
Set Up a Meeting
Because the meeting is the central unit of Zoom, as discussed in What Makes a Meeting, creating that meeting is the central job of the host. In this chapter, I review the many options you have for setting up a meeting, including planning for safety, and then discuss how to create a meeting.
Configure Meeting Options
Let it never be said that Zoom offers too few options—or that it puts them all in one place! In this section, I explain where to find settings and walk through basic meeting preferences and security options you can choose in advance.
Where To Find Zoom Meeting Settings
The company’s website and apps organize meeting options in a few different places.
Personal settings: Preferences you set via the Personal > Settings part of the website affect both the defaults for future meetings you create as well as the accessibility of certain features in all meetings, no matter whether you have scheduled the meeting before that point or not. I discuss these in this section.
Administrative settings: Every paid account, even with a single host in the account, has additional settings for people in the administrator role. If you’re a single-host Pro account, you may need to use the website section Admin > Account Management > Account Settings to enable features that can then be accessed via the host account’s Personal > Settings options. If your host account is managed by another person, you may need to consult them to turn on (or off) features in your host account.
Group settings: Administrators can create groups that have their own set of meeting-related settings reachable via Admin > User Management > Group Management. If there are features you need in a particular way that nobody else does, an administrator could conceivably create a group of one for you.
Meeting settings: When scheduling a meeting, you can make changes to defaults that are decided in your account settings. See Create a Meeting for details.
In-meeting settings: Some options chosen in advance can be modified by a host while the meeting is underway. See Manage a Meeting for a variety of options available during a meeting.
Personal Meeting Room settings: Zoom also has separate options for the Personal Meeting Room, a sort of fixed address in Zoom assigned to your account. I discuss these options particularly in Meet Instantly and Invite Participants to a Meeting.
To access personal settings that affect just your host account, start by visiting zoom.us, clicking Sign In, and then clicking My Account. In the left-hand navigation bar, click Settings under the Personal menu. Or click this link to Settings.
I’ve grouped below the settings you should understand and consider configuring. There are many others that are self-explanatory or which you will rarely have reason to change.
Set Defaults for a Meeting
You should examine and configure two groups of settings in your account before scheduling and creating meetings. The first set revolves around passcodes and how a participant is allowed to enter a meeting.
Zoom began requiring stringent meeting protections in late 2020 to avoid unwanted participants dropping in. That resulted in the peculiar setting “Require that all meetings are secured with one security option.” It’s enabled by default and cannot be turned off for free or Pro accounts or for Business accounts with fewer than 100 licenses.
With “one security option” enabled, a meeting must have set at least one of the following to schedule or start a meeting: a passcode, the option to allow in only authorized users, or a Waiting Room, a holding area in which people attempting to join have to cool their heels before a host chooses to grant them entry.
You can preset any or all of those three:
Meeting Passcode: This causes any new meeting you schedule to fill in a randomly generated placeholder passcode that you can change. If you allow dial-in callers, also enable “Require passcode for participants joining by phone.”
Waiting Room: I highly recommend using a Waiting Room unless you carefully protect your meeting details, and advise how to use it in Start the Meeting. Enabling the setting ensures the Waiting Room is active for any meeting you schedule (Figure 77).

Figure 77: The Waiting Room screen remains in place until the host starts the meeting and lets you in. Only authenticated users can join meetings: Paid tiers of service can enable this option by itself or with others and require that participants are logged in to any legitimate Zoom account (as described early in the book in Create a Zoom Account) or only a Zoom account that’s associated with the organization hosting the meeting, or that uses an email ending in particular domain names. Some meeting features require this setting to be turned on.
If you don’t enable one of the three options in your account settings, Zoom enforces a Waiting Room for all meetings created.
If the Waiting Room is disabled, you can opt to turn on “Allow participants to join anytime,” which lets participants enter a meeting if they arrive before the host. While Zoom’s settings have a note that says “Enabling the waiting room automatically disables the setting for allowing participants to join before host,” that’s not true in terms of the settings interface. The join-before-host options aren’t shown as disabled or dimmed.
The second set involves audio and video options, including screen sharing:
Start a meeting with video on: You can opt separately to have your video (“Host”) or participants’ video (“Participants”) start as soon as you or they join a meeting. Participants can override this.
Audio Type (paid accounts): You can choose to let participants connect via audio only using a Zoom app (Computer Audio, whether on a desktop computer or mobile), call in by telephone, or both options. For more details, see Configure Dial-In Access.
Mute all participants when they join a meeting: It’s an excellent idea to enable this option so that people have to choose to unmute themselves. A meeting can also be set up so that only the host can unmute one or more users. This may be useful for certain kinds of meetings.
Screen sharing: You may want to disable by default letting anyone else share their screen. Oddly, you can even prevent yourself from sharing, which may be in place to keep you from accidentally sharing your screen, since you can change that setting during a meeting.
Plan for Safety as a Host
Because of the potential for unwanted participants or even people invited to a meeting who decide to make a fuss for whatever reason, you can both plan in advance to make a meeting less likely to be disrupted, discussed here; and take steps during a meeting to clamp things down, covered in the next chapter, in Protect a Zoom Meeting.
Most of this advice is useful for public meetings in which information about joining is distributed beyond people in a business, organization, or tight-knit social group. Those structures allow all members bound by either work or mutual interest, and it’s rare you’d see egregiously bad behavior in a meeting in which there are effectively no anonymous participants, and people could be fired or removed from an organization for improper or harassing behavior.
However, this advice is also worthwhile for meetings intended to be private or limited, but which have unreliable or naïve members who distribute information accidentally or casually to folks outside the intended audience.
Zoom Protects Meetings in Several Ways
Since the explosion in usage of Zoom starting in early 2020, the company has dramatically expanded and improved requirements, options, and tools for improving meeting safety and deterring abuse.
As of mid-2022, Zoom requires the following for sessions:
Mandatory passcode: All accounts with fewer than 100 licenses require a password on all meetings. There’s no way to override this. For clarity, this includes free accounts, any Pro account (1 to 10 licenses), and Business accounts with fewer than 100 licenses.
Default Waiting Room: All accounts’ default setup includes the Waiting Room being turned on. A Waiting Room puts participants in a queue to join that a host can review. (The Waiting Room can be disabled if a password is set, as it will be for most sessions.)
Centralized security: Zoom’s apps offer a Security icon that reveals one-click settings to control access and participation.
Lock meeting: A host can close the door after everyone is in. This can be toggled on and off, but it’s a key tool in preventing zoombombing in the middle of sessions.
Easy blocking of user actions: Hosts can easily restrict participants’ ability to stream video, share a screen, share audio, or engage in other behavior as a meeting preference or during it.
Suspend participants’ activities: A single button halts all participants’ video, mutes all their audio, halts screen sharing, disables third-party Zoom apps, and locks the meeting.
Reporting abusive users: Zoom offers account-based abuse reporting for hosts and attendees.
Zoom lets you see a summary of all security-related settings for a meeting in one place. Click the security ![]() or E2EE
or E2EE ![]() icon in the upper-left corner of the screen of a desktop or web app or at the top of a mobile app to show meeting details. Then click or tap Security Settings Overview (Figure 78).
icon in the upper-left corner of the screen of a desktop or web app or at the top of a mobile app to show meeting details. Then click or tap Security Settings Overview (Figure 78).

I look into all of these below. Let’s start with passcodes.
Protect the Passcode
Zoom requires all meetings have a passcode except those created at Business or Enterprise tiers, which must have a Waiting Room enabled if the passcode isn’t.
All Zoom apps create a six-character random passcode when you click or tap to bring up the form that lets you create a scheduled meeting, but while editing the meeting’s setting, you can change that. A passcode may be from 1 to 10 characters long. Basic and single-host paid accounts aren’t required to meet complexity rules, like mixed case, or a minimum length. Organization administrators of paid tiers can layer on requirements, however.
Business users should set a passcode for all meetings unless you’re sure the ID will never hit an audience broader than you intended.
A passcode doesn’t fully protect your meeting, however, because anyone with the passcode or a link that embeds it can obviously join. You should try to prevent this from happening in several ways.
For public meetings that try to sweep in many participants, consider not distributing the passcode with the Meeting ID or as part of the URL initially. That could include a school parent-teacher-student association meeting, AA meeting, neighborhood virtual social get-together, or affinity group.
In the public announcement, include the date, time, and Meeting ID, and explain how the passcode will be provided through a back channel or private group. A potential participant might have to subscribe to a closed email list, members-only Facebook group, group text message, Slack workspace, or other non-public way that you can distribute the passcode within about half an hour of the meeting’s start time. Or you might hand out the passcode to anyone who texts, DMs, or PMs you, depending on the service.
For meetings that aren’t intended for a general group of people or for anyone, the much-maligned option of “security through obscurity” is a good solution. That phrase is used for ridicule, because you can’t fix fundamental problems in encryption or flaws in a system by hiding them.
But for a meeting only a selected set of individuals should join, you simply need to make sure only people who you want to attend get the meeting ID and passcode or the Meeting URL with the passcode embedded:
Use a private means to send the invitation.
Remind people to not distribute the passcode or URL.
Ensure that even if there’s a public mention of a meeting, no one accidentally embeds a link to it.
Create Safety with Settings
Unfortunately, Zoom doesn’t have a prefab “most private” button to click to configure all options at once. You also can’t set up account profiles that let you switch among the long list of meeting settings. If you switch between hosting private, business, public, and other meetings, you may need to monkey constantly with your meeting settings.
Instead, you can configure your account meeting settings ahead of time with a number of protections. I’ve compiled a list of settings and their states that are most useful for meetings that anyone or a large swath of people can join. For meetings that involve a small number of people or only people you know, some of these settings may be overkill.
Pick the Right Encryption
Zoom offers two kinds of meeting encryption: cloud-based encryption (“Enhanced encryption”), which isn’t immune to interception in the right circumstances, and “End-to-end encryption” (E2EE), which is designed to deter any known cracking methods.
If you need to schedule meetings that require high levels of security, enable “Allow use of end-to-end encryption.” (An administrator may also need to enable the use of E2EE in Account Settings at the website.)
Then you can set a default encryption level of Enhanced or E2EE for new meetings, but you can change that when scheduling.
Zoom’s E2EE pairs greater security than Enhanced encryption, but it has a number of limitations. With E2EE, participants can’t dial in, you can’t record the session, and you can’t use real-time captioning, among other missing features. All participants must use a native app—web apps aren’t E2EE compatible. I cover the nitty-gritty of E2EE in Appendix A: End-to-End Encryption.
Set Other Options for Safety
Here’s my recommended setup for other meeting options:
Require that all meetings are secured with one security option: Enabled. This can only be disabled by certain paid tiers. See Set Defaults for a Meeting.
Waiting room: Enabled. This is a key safety feature I mentioned earlier. I discuss these options in greater depth in Start the Meeting.
Require passcode for participants joining by phone: Enabled.
Only authenticated meeting participants and webinar attendees can join meetings and webinars, Only authenticated users can join meetings from Web client: Both enabled. Web apps have been prone to misuse by trolls. Enable these options to require people to have a Zoom account to join the meeting in a Zoom app or by browser. (Disabling the former option lets people join without an account for apps; the latter, via the web.)
Allow participants to join before host: Disabled.
Mute all participants when they join a meeting: Enabled.
Chat: By default, allow participants to chat with: Hosts and co-hosts.
Private Chat: Disabled. For public meetings and class sessions, this can prevent participants from privately harassing one another.
Send files via meeting chat: Disabled.
Screen sharing: Enable screen sharing if you’ll need it, but set “Who can share?” and “Who can start sharing when someone else is sharing?” to Host Only. You can change this preference during a meeting to allow people to present on a selected basis.
Annotation: Disabled. This prevents people from marking up shared items. You can enable in the meeting.
Whiteboard: Disabled. You can enable in the meeting.
Remote control: Disabled. Zoom can act like remote-control software, and there’s rarely a good reason for it.
Allow removed participants to rejoin: Disabled. I can’t think of a case in which you would kick someone out of a meeting and want them to be able to come back. If you have a reason, you can enable this option as long as you have the Waiting Room turned on, as you can choose whether or not to let them back in.
Allow users to change their name when joining a meeting, Allow participants to rename themselves: Enable the former, disable the latter. In some cases, people join with a perfectly fine name, which you can preview in the Waiting Room, and then change it to something obscene or offensive. I’ve heard of this happening frequently in school class sessions.
Hide participant profile pictures in a meeting: Disabled. This prevents someone from joining with an inappropriate image or changing their profile during a meeting.
Report to Zoom: Enabled. While this setting’s description says “allow users to report,” this means a host, as these are administrative settings that affect the controls hosts have access to.
Virtual background, Video filters: You may want to disable these features if you have any concerns they would be used inappropriately or for harassment. A participant could put up a horrible image or apply an inappropriate filter during a meeting after starting with a nominal one.
Local recording: On the Recording tab of Personal > Settings, you can enable the setting to allow you to record a meeting, but check a box that requires you to grant participants permission. Because of the potential for misuse of sessions, it’s better to not let people record unless you have a specific reason. (Of course, someone can use local software on a computer to record the video from the screen and audio from their audio output, but you don’t have to make it any easier for them.)
While this list of options may seem like overkill, the move to distance learning and open meetings has exposed a lot of ugliness in the world, some of which arises out of boredom and anger rather than more straightforward hatred.
Those with authority—including the host of a meeting—need to exercise some control and moderation to prevent people of any age and in any situation from perpetuating abuse or even causing trauma in these sessions.
Create a Meeting
Zoom lets you create two kinds of meetings: ones that are scheduled, via the website or via an app, and ones that start instantly via an app.
Schedule a Meeting
If you schedule a meeting, Zoom adds a number of benefits compared to instant meetings, described below. A scheduled meeting shows up in a list in your account at the website and in the Zoom apps. You can invite people in your Contacts list, and they can receive reminders or download calendar events (see Find and Manage Contacts, below). They can store the URL for later reference manually, too.
You can set a number of parameters and have the meeting repeat as needed or make a template to reuse for future meetings.
The Zoom apps offer most but not all options for scheduling a meeting. Others require scheduling via the Zoom website. Many of the website extras aren’t applicable to most meetings, so I start with scheduling via an app and then explain the additional options in website scheduling.
Schedule via an App
To schedule a meeting in an app:
Open a desktop app to the Meetings view or select the Meet & Chat view in a mobile app.
Create a meeting by clicking the plus
 (Schedule Meeting) button in a desktop app or by tapping Schedule in a mobile app (Figure 79).
Figure 79: Zoom has extensive options for creating meetings (top). Now you can fill out details as described below. When complete, click Schedule in a desktop app, or tap Done in a mobile app.
Let’s walk through important choices:
Topic: Explaining the meeting through a one-line topic and a more detailed description can be helpful when sending invitations. It may be even more useful inside organizations in which meeting invitations appear on calendars or through the Zoom client.
Recurring meeting: This option lets you schedule once and have it repeat. When you check “Recurring meeting,” Zoom lets you pick the frequency and an end time for repeats.
Meeting ID: You typically want to use Generate Automatically, which produces a unique Meeting ID. Your Personal Meeting ID allows anyone to join an in-progress meeting if they have the current passcode. That can be useful among colleagues, friends, and family, but in few other circumstances.
Security: Zoom offers three security options: Passcode, Waiting Room, and the wordy “Only authenticated users can join” (Figure 80). Zoom One free accounts cannot deselect Passcode. Pro and Business accounts with fewer than 100 licenses must select one of these three choices.
For the Passcode, you can use the six-character randomly generated code or pick something easier to type or remember. If you select Waiting Room—or it was already selected—the choices you made in Configure Meeting Options control how users are allowed entry.
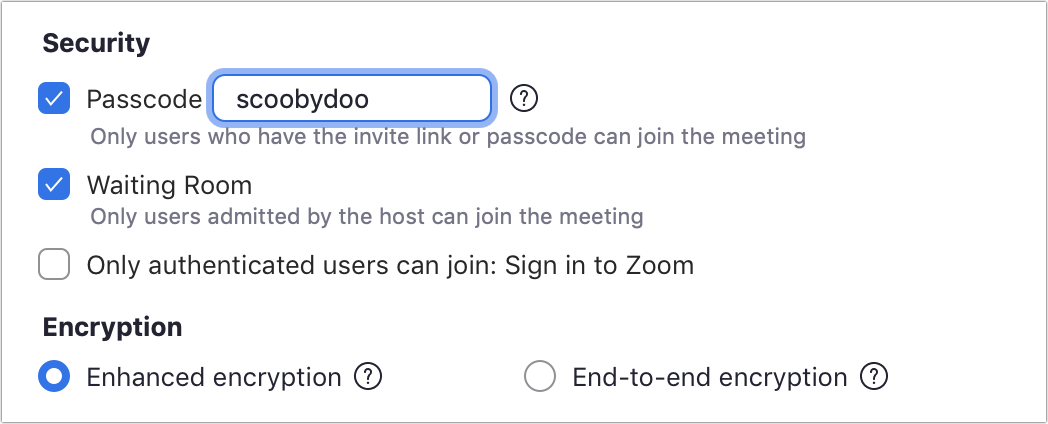
Figure 80: Security options can be set individually for each meeting, or picked up from account settings. Encryption: If you enabled the use of E2EE at the account level, you can choose between the cloud-based (and fairly secure) “Enhanced encryption” and “End-to-end encryption,” which carries a number of limitations, noted earlier.
Meeting startup options: As noted earlier in Configure Meeting Options, you can make a lot of choices in advance about how a meeting starts in your meeting settings. However, you can override them when scheduling a meeting, some of which require opening the Advanced section of the dialog (Figure 81). That includes:
You or your participants’ video stream starting on entry
Choosing audio options for participants (with paid accounts)
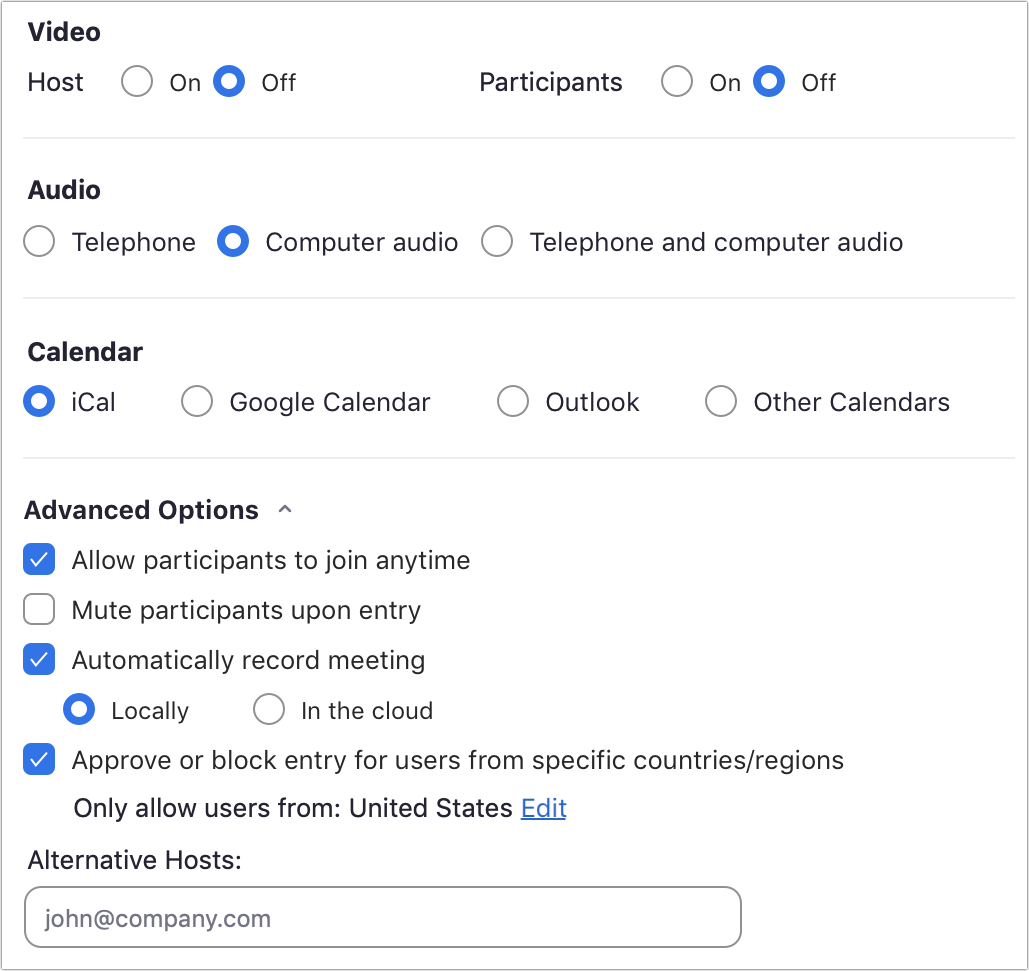
Figure 81: Additional meeting options control behavior on entry. Allowing participants to join before the host; this setting is ignored if the Waiting Room is enabled (timed entry is available only through the web app; see below)
Automatically starting a recording
Control entry by country or region: Zoom uses IP addresses to determine where someone is located, but VPNs let people transport themselves virtually to another country, so it hardly seems effective. In the example above, I restricted participants to the United States. Select the item, select whether to approve or block, and then start typing in country or region names, which are autocompleted by Zoom. Click Save when done.
Calendar: You can choose the sort of calendar entry you want created, and after you click or tap Save or Done, depending on the app, Zoom automatically creates that event in the correct form, letting you opt to add it or opening the calendar entry file in your calendar app.
Alternative hosts: You can specify other people who may start the meeting and have co-host “powers” while scheduling the session. For more on host roles, see Divvy Up Host Roles. If you add alternative hosts, you can also opt to check a box that appears for “Allow alternative hosts to add or edit polls.”
Schedule via the Website
The Zoom website offers scheduling choices not available in any app, some of which you may want to use regularly. To add to the complexity, some of these options may be set only during the meeting creation process; others may be set during creation or after the meeting has started, but editing an existing meeting doesn’t allow you to access those settings.
To schedule a meeting via the website, follow these steps:
Go to Personal > Meetings on the website.
Create a meeting by clicking Schedule a Meeting.
All of the options listed in the Schedule a Meeting, above, are available, plus the additional ones below. (The only difference? “Topic” is labeled “Description” on the website.)
When complete, click Save.
This brings up an additional configuration screen with options for polls and livestreaming, as described below.
Here are the website-specific meeting options:
Choose time before meeting to allow participants in: If the Waiting Room is off, you can let participants join at any time when scheduling via an app. Via the website, you can also restrict joining to 5, 10, or 15 minutes before the meeting’s scheduled start.
Add watermark that identifies the viewing participant: An optional privacy and security feature lets admins require all sessions display a background visible watermark on all video panels or allow a host to choose through this setting on a meeting-by-meeting basis. See Add a Watermark.
Allow host to save video order: For meetings with authenticated users required—as noted above in the Security bullet point—you can enable an account feature that causes this option to appear. Check this box to then turn on the ability to save any custom order of the Gallery view you make. It’s pretty convoluted! See Use Gallery View To Set a Fixed Grid.
Breakout Room pre-assign: For meetings that you know will use breakout rooms, you can pre-assign them to invitees when setting up the meeting. This includes uploading a CSV (comma-separate values) text file with names and rooms.
Enable focus mode when meeting starts: Meetings can start in Focus mode, a way of reducing distractions, described in Use Focus Mode To Stay on Task.
Polls (second screen): You can create or pull in polls from your account’s Polls library so they’re available immediately within your meeting (see Run a Poll).
Live Streaming (second screen): When using a custom livestreaming service, click the Live Streaming link and click Configure Custom Streaming Service. See Stream a Meeting for how to use livestreaming with Zoom.
Meet Instantly
Zoom makes it simple to create an ad hoc meeting, too. Simply click or tap New Meeting in a Zoom app, and the app uses your default meeting preferences to start a new session immediately. (See Configure Meeting Options, earlier, and Start the Meeting, later.)
This instant meeting works exactly the same as any scheduled meeting, including having a Waiting Room if you’ve enabled that feature or if your account is required to have it turned on. I describe how to start an instant meeting in Start the Meeting in the next chapter.
Zoom’s service can create a unique Meeting ID for an instant meeting or rely on your Personal Meeting ID. If you use a Meeting ID, Zoom picks up the preferences from your account settings for meetings. However, if you make the combination of an instant meeting and your Personal Meeting ID, Zoom relies on preferences you’ve set separately.
These Personal Meeting Room preferences are identical to the settings for a scheduled meeting minus the scheduling part. However, Zoom has placed the settings in widely scattered places across their website, desktop apps, and mobile apps:
On the account website, find it in the Meeting settings, where you can click Personal Meeting Room. (I can’t link to it, because the link contains one’s own Personal Meeting ID.) Click Edit This Meeting, make any changes, and then click Save.
In a desktop app, you can access in two different spots:
Click the Meetings
 icon and select the My Personal Meeting ID (PMI) item at the top. Click Edit to change settings.
Click the Home
 icon and then click the downward-pointing arrow
  to the right of the New Meeting label. Hover over the Personal Meeting ID and choose PMI Settings.
In a mobile app, tap the Meetings
icon and then tap Edit the top of the screen below the Personal Meeting ID.
As part of the ambiguity among scheduled meetings, instant meetings, and a Personal Meeting ID, you have several options to invite people to an instant meeting and to what Zoom sometimes calls your Personal Meeting Room, which aren’t quite the same thing. I describe invitations for schedule, instant, and Personal Meeting Room sessions next.
Configure Dial-In Access
When the pandemic exploded in early 2020, part of Zoom’s initial appeal included the company’s free use of local dial-in access phone numbers, so-called toll calls in Zoom’s parlance. By including online and phone-only participants, Zoom spread quickly, as similar services didn’t offer dial-in options or attached a cost, and phone-call-only services were expensive.
Zoom later restricted dial-in access to paid accounts, a reasonable limitation given the expense in operating such gateways. If you have a Pro account or higher, you can use or restrict dial-in participation in several ways.
If you enable “Telephone and computer audio” when scheduling a meeting, you can choose to allow either or both in creating a meeting; choose just Telephone in settings, and it’s the only option that appears.
When creating a meeting or starting an instant meeting, if Telephone is the only or one of the two options, you see next to “Dial in from” a country name, such as “Dial in from United States of America.” This is the default country associated with your account. Click Edit next to that message and you can add additional countries in which Zoom has local numbers. You might add Canada and Mexico or a number of European countries for U.S.-originated sessions.
The invitation for the meeting includes all the dial-in numbers, including details about the city in which the number is located countries that have toll options, which can help a caller who pays per minute for calls figure out if they will be charged a toll rate. Zoom automatically uses your location to place the numbers in geographically closest order.
If you leave the default numeric code generated by Zoom for a meeting that includes dial-in calling as an audio option, the passcode for joining by phone is identical to the meeting passcode. If you change the meeting passcode, the dial-in passcode changes to a separate, randomly generated numeric one. It’s included in the invitation, but you can’t see it in a scheduled meeting—only the meeting passcode can be revealed there.
Callers join by selecting one of the numbers and placing the call. On a mobile device, they can copy and paste the “One tap mobile” sequence into their phone app. Or they call with the phone number on any calling device or software, and then enter the Meeting ID and the passcode as prompted.
If a participant uses a Zoom app for video and opted to handle audio by phone, the Zoom app displays a participant ID they can enter, too. For more details on joining a meeting by phone, see Dial In to Zoom.
Zoom offers an add-on for paid-tier plans so the account associated with a host account can pay for toll-free and call-back service based on this table of per-minute fees:
Monthly minimum: Paid accounts can opt to pay $100 per month as a deposit against calling minutes and receive discounted per-minute rates for toll and toll-free calls. If that $100 is used up in a month, additional per-minute rates continue to accrue at the discounted rate. This is the only option for Pro tier subscribers.
Pay-as-you-go: Except for Pro, all paid tiers can opt instead into a pay-as-you-go calling plan that has no minimum. Rates are somewhat higher. For instance, calls into a meeting using a U.S. number are $.0740 per minute on pay-as-you-go and $0.0477 per minute with the monthly plan.
With this add-on active, additional toll-free numbers appear when you schedule or start an instant meeting.
Invite Participants to a Meeting
Zoom has many, many (many) ways you can invite participants to a meeting. While the core unit is the Meeting ID or URL containing it, there are a lot of paths to access that and a wordier invitation that contains more details and links, too.
The options vary a bit by precisely what kind of meeting it is, too:
Copy the meeting invitation (scheduled, website): For a meeting you schedule, you can visit your meetings list in your account on the Zoom website, click the meeting name, and then click “Copy the invitation.” The site pops up a display from which you can click or tap the Copy Meeting Invitation button (Figure 82). This grabs all the text and puts it on your clipboard.

Figure 82: A Zoom meeting invitation includes all necessary details. Copy the meeting invitation (Personal Meeting Room, website): Click the Personal Room link above the Meetings list and click Copy the Invitation. Options are then the same as the preceding item.
Copy the meeting invitation (all meetings, desktop apps): Click the Meetings tab, select the meeting or My Personal Meeting ID (PMI) at the top, and then click Copy Invitation. You can also click Show Meeting Invitation, revealing the text and allowing you to copy it.
Copy the meeting invitation (all meetings, mobile apps): Tap the Meetings
icon. For a scheduled meeting, tap the meeting name and tap Add Invitees; for a Personal Meeting Room, tap the Send Invitation link below the ID at the top. You can then choose among Send Email, Send Message, and Copy to Clipboard, all of which grab the meeting details.Automatically copy the meeting URL (all meetings, desktop and mobile apps): In a desktop app, choose Zoom > Preferences > General, check “Copy invite link when starting a meeting” (macOS) or “Automatically copy invite link after the meeting starts” (Windows) and the meeting link is dropped onto the clipboard. In iOS/iPadOS or Android, tap More
 , tap Meetings, and enable Auto-Copy Invite Link.
Invite within an active meeting (all meetings, desktop and web apps): Click the security
 or E2EE
  icon in the upper-left corner of the screen to show meeting details. Click Copy Link to just grab that (Figure 83). You can also click the Participants icon and, at the bottom of the Participants list, click Invite and then Copy Invite Link or Copy Invitation. You can select people to invite by clicking Contacts or Email (Figure 84).
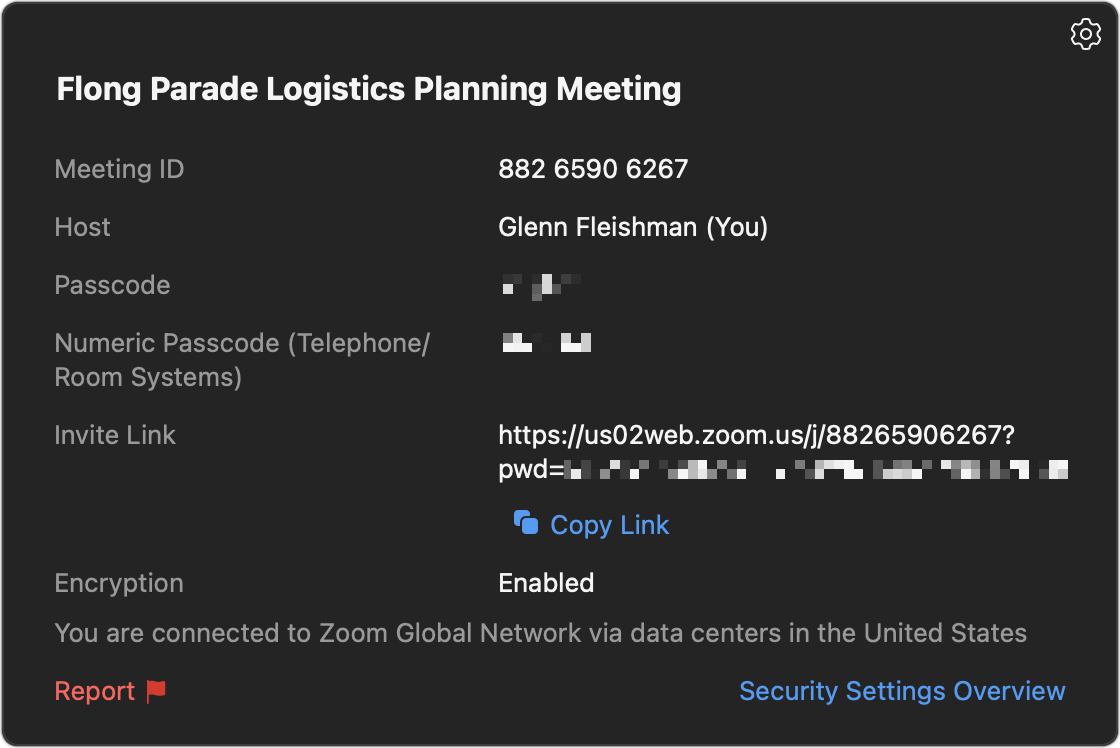
Figure 83: Click Copy Link to share the meeting and password. 
Figure 84: During a meeting, you can invite Zoom contacts, who then receive a notification. Invite in an active meeting (all meetings, mobile apps): Tap the Participants icon and tap Invite, and you see the same options as above for sharing an invite. You can also tap Invite Contacts to send an invitation within the Zoom system to people you choose.
Copy invitation (Personal Meeting Room, desktop apps): Click the Home button and then click the downward-pointing arrow
to the right of the New Meeting label. Hover over the Personal Meeting ID and choose Copy Invitation.
Send a Calendar Entry for a Meeting
Zoom can generate a calendar entry automatically when you schedule a meeting in a desktop or mobile app, but that’s only for the host. You could use that calendar entry to invite other people, but you can’t send them an entry to add to their calendar.
There’s one exception—recurring meetings. If you create a recurring meeting, the full calendar invite also includes a link to a Zoom download of the standard .ics format that can be imported into calendars in any operating system and web-app calendars.
For single-occurrence meetings, you can “fool” Zoom into generating a calendar link this way:
Create a scheduled meeting as above.
Check the “Recurring meeting” box.
Set the frequency to Weekly and set the end date to the day after the meeting.
Now, the meeting invitation includes a link to a .ics file.