
Prep for Meetings
Appearing on video and setting yourself up to be heard (and to hear) can be daunting if you don’t do it all time—even among trusted colleagues. It’s especially the case when you’re connecting with students, instructors, your boss or higher-ups, family, and friends. Consider the following as a way to put your best visual and audio feet forward.
Let’s start with the new reality that broadly emerged in 2022: having Zoom meetings when people other than family are in the vicinity.
Prepare for Hybrid Meetings
While some offices in mid-2022 remain fully virtual—and some companies will never have physical offices again—challenges emerged for anyone back in an office, preparing to return, or coping with an ever-growing number of people returning.
If you work at least a day a week in an office alongside other people, you have probably already encountered issues with working in the same shared space while using Zoom.
For starters, I hope you’ve had discussions among co-workers or as a department, company, school, etc., about noise and audio separation. (Reducing ambient noise is a business/social interaction issue beyond the scope of this book.)
The big things to consider around noise in your environment created by you or other people are:
Noise cancellation (hearing): Can you (or they) wear noise-canceling earbuds or headphones to reduce ambient sound?
Noise cancellation (speaking): Can you use a better mic, settings on your computer or mobile device, or settings in Zoom to reduce ambient noise or conversation? For instance, you can use a headset mic or an external dynamic mic, both less sensitive to far than near sounds; change the Mic mode on certain iOS/iPadOS devices (see Use iOS/iPadOS Audio Control Options); or modify the Zoom noise-reduction settings (see Manage Your Audio Input).
With that in mind, the following three scenarios will help you in a communal space in how you set up for a Zoom call.
Set Up for Video
Obtaining the best results from a stream of video can be a fickle endeavor. Built-in and add-on webcams often perform poorly in low light, adding noise, and in mixed light, such as with bright lights in frame or pointing towards a frame.
You can fix lighting, add a backdrop, and make other changes that bump up your video quality. Here are a few tips that can help you produce the best conditions (Figure 7).

Manage Your Camera
Whatever kind of camera or device you’re using, make sure the camera is positioned and angled well to show your entire face, mostly, er, head on. Nobody wants to look up your nose or see just your eyes and forehead (Figure 8).

Stabilize a Mobile Device
If you own a relatively recent smartphone or tablet, it may have a very nice front-facing camera for selfies and videos. But other people will find it distracting if you’re holding the device in your hand and it’s constantly jiggling or moving.
There are a zillion smartphone and tablet tripods in the $15 to $40 range that include an adjustable clamp to fit any size of device. Or, you can buy an adapter for about $10 to $20 for smartphones and tablets that works with a tripod you already own.
If you’re using a camera or tablet as an adjunct to Zoom on desktop, either joining from multiple devices (see Present with Multiple Devices) or using virtual camera passthrough software (as described in Virtual Cameras), you may need a mount that attaches to your laptop screen or desktop monitor, so the camera is placed in the right location relative to your face. I bought a $12.99 Shaw gooseneck mount, a long-necked flexible smartphone holder with a simple adjustable clamp.
Frame Yourself on the Desktop
Depending on the type of camera you use, you might try these tricks:
Laptop: Put a laptop on a higher surface than you would normally use to type and work on. The screen should be close to level with your head. You can use a stack of books, an adjustable riser used to convert a table into a standing desk, or a laptop stand. My wife and older kid both love the portable Roost stand ($74.95 or $89.95). It’s versatile and folds up into an absurdly small bundle (Figure 9).
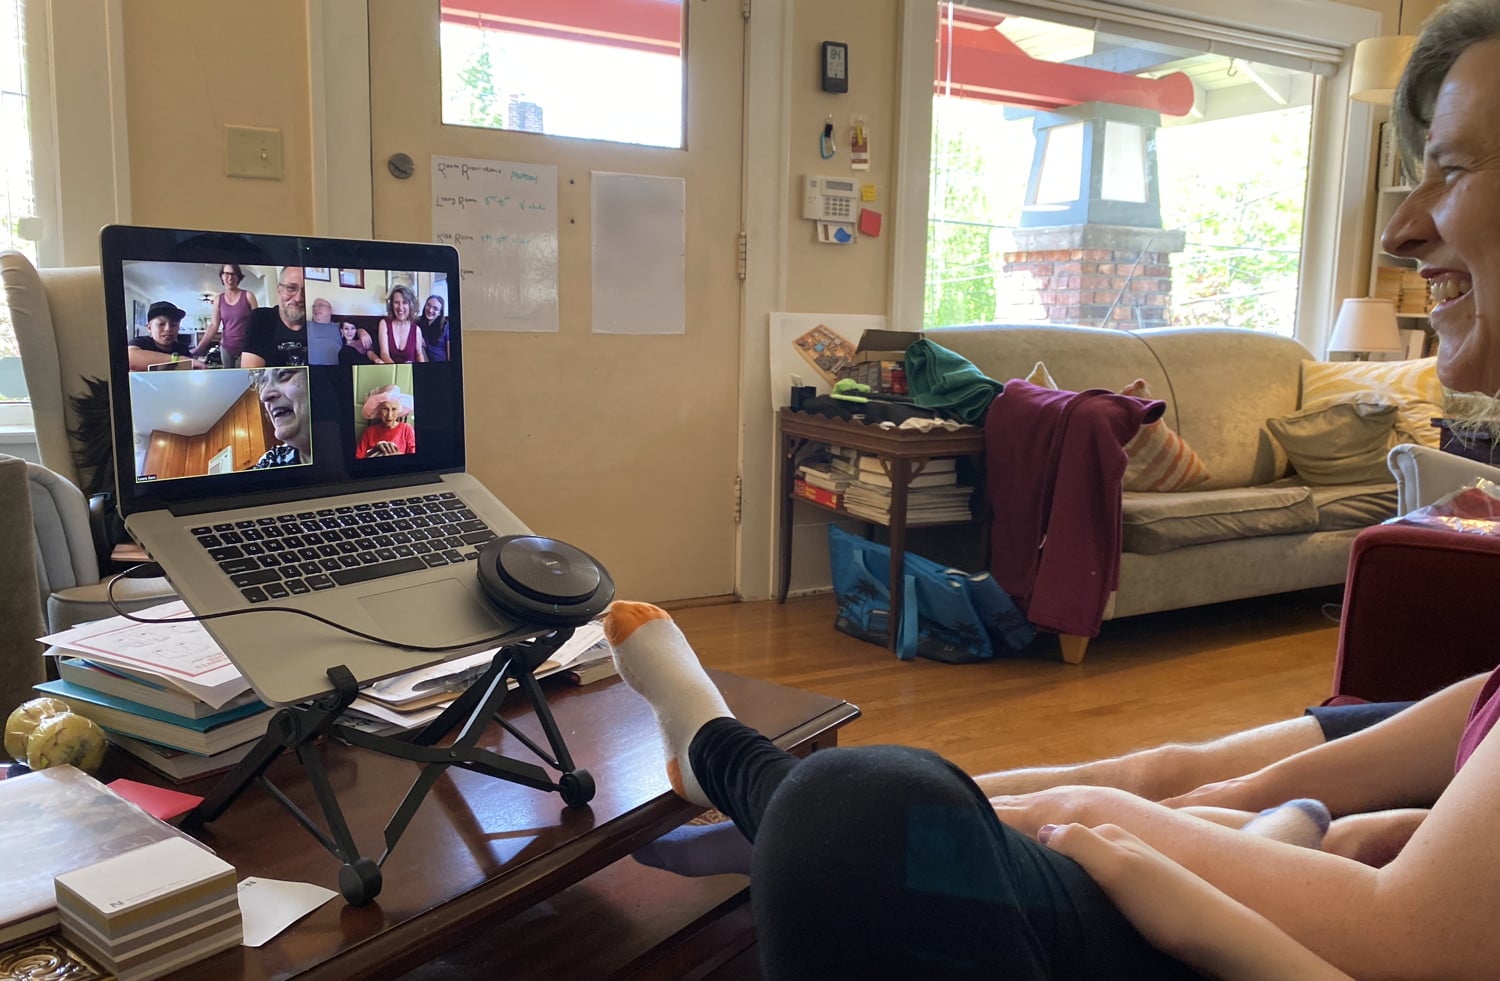
Figure 9: Using the Roost and a Jabra speakerphone for better position and sound on a family call. Integral display: For cameras built into a monitor’s top, you may need to adjust the display’s height or tilt it while in meetings to get the optimum angle.
- Add-on: Cameras designed to plug in to a computer (typically via USB) almost always come with one of following: an integral clip or folding stand, an internal mount (or boss) that fits all standard tripod screws, or an external stand. Whatever the case, place the camera lens at nearly eye height—or just a bit above—without obscuring your view of the monitor.
Frame Multiple People on Camera
It’s increasingly likely you’ll be sitting next to one or more people in an office setting trying to squeeze into view (see earlier in the chapter). You have a few options on how to make this work:
Use a laptop’s camera and mirror to an external display: If you position a laptop far enough away to fit two or more people into its field of view, the screen may now be too distant to see people on screen or reach the keyboard. Consider using a laptop stand as explained above and connect an external display to the laptop that’s mirrored from the internal display. Position the laptop so its camera peeks above the display. You’ll want an external keyboard, too, preferably wireless.
Get a wide-angle webcam: Many webcam makers offer wide-angle models designed to sweep in a field of view broad enough to capture three people side by side. Just remember to position the camera so you can look at a laptop screen or desktop display and still be looking not far off the lens.
Buy a videoconferencing appliance: Zoom and partners offer hardware optimized for multiple participants, described in Other Zoom Products. While they may cost hundreds of dollars or more, they’re still cheaper than a dedicated laptop, and may solve audio input, camera position, and video display requirements all at once.
Tweak Settings in Webcam Software
Depending on your operating system and camera, you may be able to adjust exposure, contrast, saturation, white balance, and other camera settings to improve your appearance on video.
Logitech, one of the biggest manufacturers of webcams, used to have several different apps to manage camera settings, each with different features. Fortunately, in 2021, the company transitioned everything to the free Logi Tune, supporting most of models they have made over the last few years (Figure 10).

Apple offers no controls for its built-in cameras, and doesn’t allow third-party software to change settings reliably. With Apple and any other computers that lack control, you can use virtual-camera software to pass video through and use adjustments found in that software to improve the stream. See Virtual Cameras.
Change the Lights
Your lighting may not be ideal. In fact, it almost surely isn’t. You can try a few options:
Balance lighting (solo or group): Whether solo or in a group, have some light behind you and some ambient light cast over you. Don’t set a space up so light comes entire from behind, whether with artificial or natural lighting—or you all will be hard to make out. Also, don’t point a light directly at faces: this causes a webcam to overexpose faces, removing detail.
Manage window shades (solo or group): Close or open window shades depending on the time of day and their position relative to the camera. This is a particular danger in conference rooms with exterior windows.
Get a ring light (solo): Search on retailers for “studio ring lights,” which are simple rings of LEDs designed to cast a glow on your face. Some “selfie lights” are battery powered and clip on to a laptop top or monitor; others come with a stand.
Add a diffuse light source (solo or group): While more expensive than ring lights, a light box or smaller diffuse source produces even illumination, no reflection in glasses for those who wear glasses, and can be easier on the eyes for long video sessions.
You should also make sure that you don’t have an unintentional light source. I have a two-monitor display, and I’ve found that depending on how I size my Zoom window and what I have in other parts of the screen, the emitted light from the monitors can wash out my face, too. I try to remember to bring up a dark background or hide windows that are all or mostly white.
Add a Backdrop
Is your area too messy or busy, a conference room used partly for storage and piled high with binders, or full of your personal life? A backdrop can help block it out—and remove distractions.
Let Zoom Drop In a Background
Zoom can swap in a background via the Virtual Background option, which you can use to choose a still image or a looped video with a desktop or web app or a still image in iOS or iPadOS (Figure 11).
Zoom uses an algorithm to determine the edge between you and whatever is behind you. The algorithm is smart, but doesn’t always neatly cut out a background; I discuss using a green screen later.
In desktop apps, you can add your own images and videos in Settings > Background & Effects. Click the plus ![]() icon and select an appropriate media item from your computer, knowing it will be cropped to video ratio of your camera (16:9 for HD video). Hover over backgrounds and click the X
icon and select an appropriate media item from your computer, knowing it will be cropped to video ratio of your camera (16:9 for HD video). Hover over backgrounds and click the X ![]() to remove an image or video.
to remove an image or video.
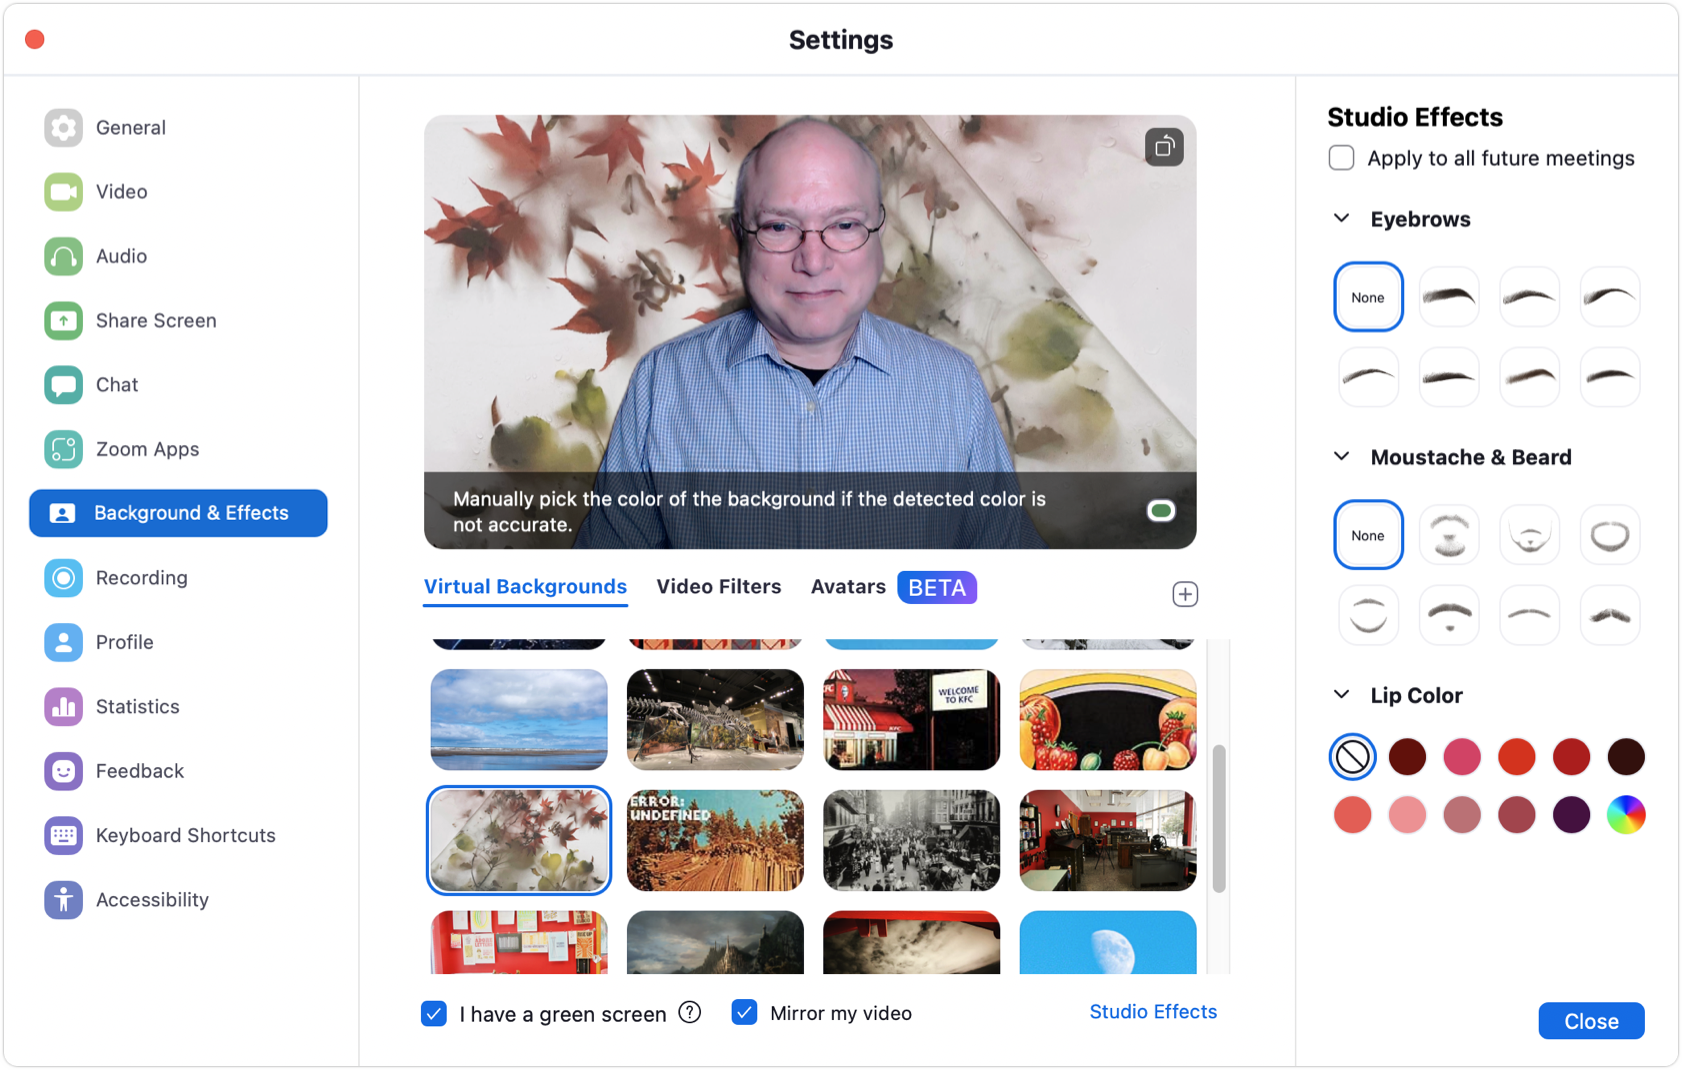
You can also apply ridiculous studio effects, as shown in Figure 12.
In iOS/iPadOS apps, you can add a background when joining or during a meeting:
When joining a meeting, Zoom displays a video preview by default, and offers a Change Virtual Background button to tap in the upper-left corner. (Tap the “Always show video preview dialog…” switch to disable seeing this dialog when joining meetings in the future.)
During a meeting, tap the More
 icon and then tap Virtual Background.

You can select an image that appears or tap the plus ![]() icon to select an image from your mobile’s photo library. Tap Remove to delete the selected image. Tap Close to confirm your current selection.
icon to select an image from your mobile’s photo library. Tap Remove to delete the selected image. Tap Close to confirm your current selection.
During a meeting on an iPhone or iPad, you can tap More ![]() > Minimize Meeting and then Settings > Meeting Settings > Keep Virtual Background For to select All Meetings. This retains it for subsequent meetings.
> Minimize Meeting and then Settings > Meeting Settings > Keep Virtual Background For to select All Meetings. This retains it for subsequent meetings.
Backgrounds should be picked wisely. For personal and social calls, you can go all out. Have some fun and use a picture behind you of Tahiti, Taika Waititi, or skiing while it’s sleeting, or place yourself or Rihanna performing on stage in a loop.
With a professional call, I suggest you exercise restraint. A neutral color could be appropriate, or even a fake background of an office! Seems a little ridiculous, even skeuomorphic, but it’s familiar. (This will work better with a green screen, described next.)
In all apps, turn off the background by clicking or tapping None in the place you select a background.
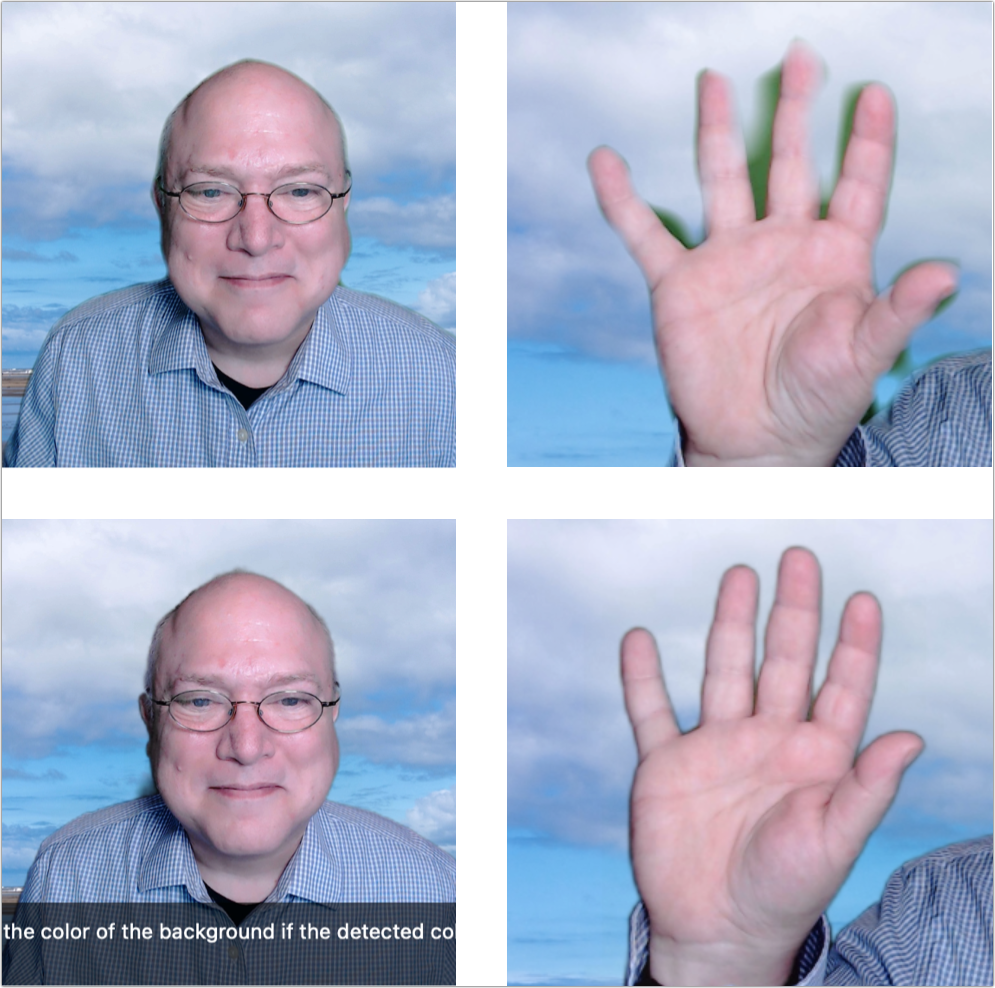
Sometimes all you want is for your environment to disappear into a light miasma. Zoom offers a blur filter that does just that (Figure 13). Using the same algorithm to paint out your background and drop in and image and video, select Blur from the Virtual Backgrounds list.

Hang a Green Screen
In desktop apps, you can also combine the physical and virtual world by hanging a solid contrasting color backdrop behind you (Figure 14). This is typically a bright green, because it’s rare we’re wearing anything in that color range and nobody’s skin tone falls into that range, either.
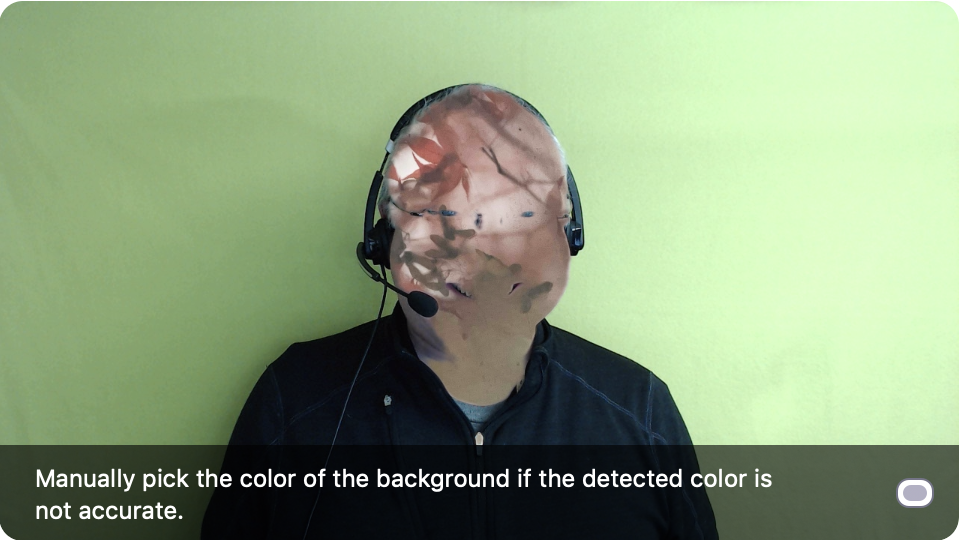
In the Zoom app, check “I have a green screen” and the app will subtract the physical background much more accurately than it otherwise could. If the color doesn’t subtract correctly, you can click the background color picker to match your backdrop. Pick wisely, though, or things might become…strange (Figure 15).
A backdrop can help with lighting, by providing a closer surface for indirect light and allowing a webcam to handle contrast better.
My journey might be instructive:
I started in 2020 with Zoom’s automatic background removal, then transitioned to using a green fleece blanket my older kid had once used for YouTube background removal.
In early 2021—I bought a Corsair Green Screen MT ($159.99), a retractable ceiling mountable or hangable screen. It upped the quality of background removal needed as I moved into more professional video work.
Then in early 2022, I finally repainted my office, so I could use a real and good-looking background for some recordings, as shown in Figure 16!

Determine Whether You Can Use HD Video
Zoom offers HD video, typically defined as 720p or higher, with a bunch of asterisks and provisos. The feature is called Group HD.
Zoom once offered up to 1080p video streams for all sessions. But it began degrading video to 480p for most meetings in mid-2020 to preserve bandwidth. The company explained in their Group HD tech note: “As our world comes together to slow the spread of COVID-19 and stays connected through Zoom globally, we are working to quickly scale our bandwidth during this unprecedented demand.” (The word “quickly” remains on that note in their last update, in June 2022.)
Free accounts used to host meetings can only use 480p (standard definition) for meetings with a total of three or more people. Paid accounts can choose to enable Group HD, which allows high-definition video at 720p, but this only upgrades video in the Active Speaker view. Business and Enterprise subscribers can use up to 1080p.
The rules by which you can obtain video quality above 480p are complicated and most settings apply to desktop apps, not mobile and web apps. Desktop apps need Settings > Video > HD selected; mobile apps, Meeting Settings > HD Video must be on.
Here are the maximum resolutions available and in what circumstances:
One-to-one sessions, any tier: 720p
Three or more participants, free tier: 480p
Three or more participants, any paid tier: 720p in full-screen Speaker View in desktop apps only for currently displayed speaker, and in views within the mobile apps; otherwise, 480p
Three or more participants, paid tiers above Pro: 1080p only in the desktop apps and only if the speaker’s device has an Intel i7 or faster processor; otherwise 480p or 720p
Virtual background, no green screen, any number of participants: from 360p to 720p, depending on the hardware Zoom runs on
There are even more provisos about enabling Group HD:
720p: Available to all paid accounts, but Pro tier accounts must contact Zoom support to enable 720p. Administrators with Business, Enterprise, and Education accounts can directly enable 720p for hosts via “In Meeting (Advanced)” settings. 720p requires 1.2 Mbps symmetrical for two-person sessions and 2.6 Mbps upstream and 1.6 Mbps downstream for group sessions.
1080p: Available to Business and Enterprise only, and an administrator must contact Zoom support to enable 1080p. To use 1080p for any size meeting, you need least 3.8 Mbps up and 3 Mbps down.
Because of Zoom’s video limits, if you spend most of your time in Zoom, you generally don’t need to use a webcam that offers better than 720p, although higher resolution cameras can produce crisper downsampled images and zoom in to better crop the area you want to show of the camera’s field of vision.
Whether you’re using Zoom or another service that supports 720p or higher, you definitely want a camera input that offers good low-noise signal capture and works well in a variety of lighting conditions. (See Upgrade Your Video.)
Consider How You Appear
There are two sides to how you look on camera. One is what you look like, some aspects of which you can control if you wish. The other is keeping track of when you’re on a video stream—and avoiding the pitfall of showing up when you didn’t mean to.
Tweak Your Appearance
You don’t need to turn yourself into a TV presenter, but you can also be confident and well received with very little effort:
Smooth your face (desktop apps, iOS/iPadOS app): Zoom offers “Touch up my appearance” in Settings > Video (desktop) and in Settings > Meetings (iOS/iPadOS). When selected, the app applies a live smoothing algorithm that removes some of the variation of texture of your skin (Figure 17). The desktop app lets you control the intensity, from mild to full-on anime-style smoothness.
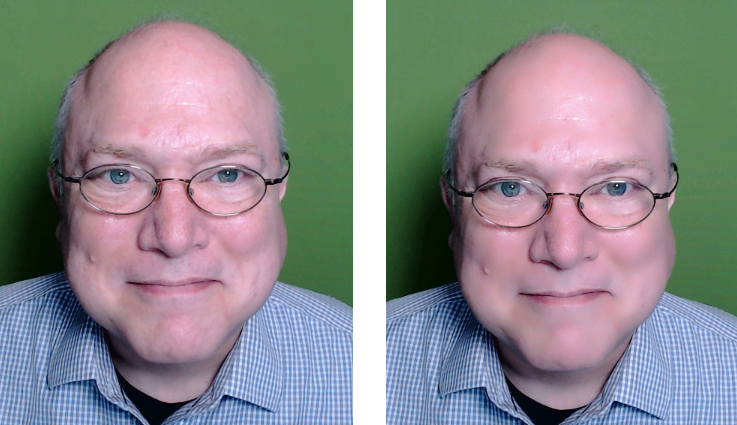
Figure 17: My smiling, slightly grizzled face (left) becomes sleeker, as my pores and uneven skin tone have been removed. Adjust low light: Desktop apps have an option to adjust the brightness of your video feed if your scene appears too dark. In Settings > Video, select “Adjust for low light.” If the automatic compensation doesn’t seem to fit or you want to set and hold the change, choose Manual from the pop-up menu that appears and use the slider to find the right level.
Consider makeup: If you have an interest in appearing in a particular way on screen, consider whether makeup might assist, no matter your gender. For people who generally avoid makeup, a little light powder applied correctly can reduce glare—especially for folks like me, challenged in the follicle department. This guide from Shutterstock’s The Beat offers some good advice and links for the “no makeup” makeup style.
Wear clothes you find appropriate: Because Zoom can be used for a variety of purposes, you may have a wide range of choices about what you wear. You may want to test tops, shirts, sweaters, or dresses using the Zoom video settings preview to see what presents well on camera.
Look Like You’re Paying Attention
Nobody has yet cracked the problem that the camera lens that captures your face isn’t centered on the screen where you’re watching video. Mobile devices are better optimized for that, because your camera lens and device input are effectively the same plane of the screen.
It’s much harder on a desktop. Zoom’s default view shows the current speaker front and center and the most recent ones in a small row at the top. With the alternative, Gallery view, the grid of videos means your eyes might dart left and right, up and down as people talk. (See Adjust the View for more how other participants appear to you.)
You can improve how people see how you’re paying attention, and also how they read your facial expression and feedback in a few ways:
Crop to your head: Keep yourself close to the screen so your head is most of the top-to-bottom space in the camera. Many people lean way back. You may need to adjust your setup to make this feasible. (See also Manage Your Camera.)
See yourself near the center: Move your Zoom selfie video panel as close to your camera as possible. There’s a psychological tendency to want to look at oneself, and if you do that while your image is close to the camera, your gaze will look more as if it were aimed at the other person.
Stay focused on the target monitor: Remember to not glance around your space, at a second or other monitor, check your cell phone in your hand, or engage in other obviously distracted activities that people can easily pick up. We’re really good at noticing differences in patterns.
Use in-person cues with the camera: When you’re talking or listening, look regularly into the camera directly. When listening, provide visual, non-verbal feedback, like nodding.
Managing all this behavior can be exhausting! Try to take video-free breaks when possible, when you don’t need to have a camera trained on you: stop the video, close your eyes, look around.
People May Be Watching You
I don’t want to make you self-conscious, but in a videoconference in which your webcam is streaming, people can in fact see you. They may not be looking at you all the time unless you’re speaking or a presenter—that would be pretty creepy, in fact—but folks watching in Gallery view or seeing you as a recent speaker with Speaker view selected will have your video on screen.
You might want to hide the video view of yourself, so you aren’t watching yourself watching yourself. However, this could lead you to forget you can be seen. Don’t floss your teeth. Don’t pick your nose. And don’t be naked—or engaged in other bodily functions, like eating.
You can disable your video feed with a click or tap of the Stop Video icon in any Zoom app. (See Interact in a Meeting for more.)
However, if you want to ensure that you never broadcast video when you don’t mean to, block the webcam lens:
Pick Default Settings for Joining
Zoom lets you make choices about what happens when you join a meeting through their apps. If you use Zoom on different platforms, like macOS and Android, you can choose different options in each app.
You can make these changes before joining any meeting, allowing you to set defaults, and change them at any time. However, most of the default choices can also be changed while a meeting is active, which I discuss in the next chapter, Participate in a Meeting.
In the following sections, I pull out the most useful settings by desktop preference category.
Because Zoom’s desktop and mobile apps have such different settings and organization, I call out which options are can also be applied in mobile apps, where they are all found in Settings > Meetings in both Android and iOS.
Name, Profile Picture, and Pronouns
Zoom relies on what participants provide as their name and (optional) profile picture to share with the group when they join. In fact, there’s no good way to prevent this as a participant, so think wisely about how you set these two items up. While Zoom allows you as an option to share your pronouns, you can decide in which contexts they’re displayed with a profile others can see.
If you have a registered Zoom account and are logged in to a Zoom app, Zoom picks up your profile settings when you join a meeting. If you’re joining without an account, Zoom asks when you join what name you want to use. That name remains in place for future meetings if you’re using a native app.
Set Your Name and Profile Picture
You can rename yourself one of three ways and add or change a photo in two places:
Zoom website: With a registered account at any time, go to your profile on the Zoom website. (You can also click your profile image in a desktop app and select My Profile and be taken to that page.) Click Change to add or change your photo, including framing and zoom an existing or new one, or Delete to remove your photo. To change your name, click Edit on the far right. Then click Save.
Desktop app: Click Participants, hover over your name in the list and click More
, and then choose Rename. You can also click More > Add Profile Picture to select, frame, and zoom one, or Edit Profile Picture to swap it out or change the frame and zoom.Mobile app: Tap Participants, your entry in the list, and Rename. You can’t modify your profile photo.
Hosts have some leeway as to how they let you use profile names and pictures:
A host can disable name changes in a meeting. (If you don’t see an option to rename yourself in a desktop or mobile app, or you see your name change, that’s why.)
A host can force-change your name as it appears to something else.
A host can also choose to not allow profile pictures if they have concerns people might pick inappropriate or actively harassing images.
Set Your Pronouns and Control Their Display
Zoom lets you set personal pronouns via your profile on the Zoom website (Figure 18). When you click Edit to the right of your name, you can type in the pronouns that you employ and select a context. Click Save when done.

Zoom enabled this feature by default for free accounts only. For others, the account owner or administrator has to enable pronouns via Admin > Account Management > Account Settings.
While anyone you have added as a contact will always see your pronouns, they appear to others in Zoom sessions (in desktop and mobile apps) initially based on your selection from “How would you like to share your pronouns?”:
Always share in meetings and webinars: If you would prefer these are always shown, select this option.
Ask me every time after joining meetings and webinars: If you have some reservations about displaying your pronouns in some contexts, select this.
Do not share in meetings and webinars: You may only want your contacts to see your pronouns and this option allows that.
You can toggle your pronoun display during a meeting, no matter what you chose from your profile’s menu:
In a desktop app: Hover your video thumbnail, click the More
icon, and choose either Share My Pronouns or Unshare My Pronouns, depending on which appears.In a mobile app: Tap Participants, tap your name, and tap Share My Pronouns or Unshare My Pronouns.
General
Zoom’s General settings in desktop apps have a few key items that will help you manage your interaction with the app (Figure 19):
Ask me to confirm when I leave a meeting: With this checked, it prevents you from exiting a meeting immediately if you accidentally click the Leave button.
Show my meeting duration/connected time (plus iOS/iPadOS): A clock appears when you join the meeting showing elapsed time. (You can also toggle this setting during a meeting.)
Stop my video and audio when my display is off or screen saver begins: If you walk away from your computer, you may not want audio and video streaming into the meeting to continue. I recommend checking this.
Remind me X minutes before my upcoming meetings: With calendar integration enabled in Zoom, the app provides an alert 5, 10, or 15 minutes ahead of scheduled meetings.
Reaction Skin Tone: If you don’t like the default “golden” hue of emojis that use skin tone in reactions (see Get Attention), you can pick any of the five tones available here.

Video
Video settings in desktop apps let you choose a camera (if you have more than one) and see a preview. Many of the Video options make sense to consider, if not change, before you first join meetings:
Original ratio: Some webcams offer multiple cropping options. Checking “Original ratio” preserves the camera’s setting, but it may not be different than how Zoom crops the frame. You can select and deselect it to see which you prefer.
HD (plus mobile): Zoom supports high-definition video (720p or 1080p) in certain circumstances described in Determine Whether You Can Use HD Video. Even if you qualify for HD, you may want to turn this off—dropping to 480p or standard video—depending on your broadband connection speed or how your ISP charges. (The setting is HD Video in mobile apps.)
Mirror my video (plus mobile): Most of us see ourselves in a mirror, and that’s the familiar version of ourselves. For video, you may want to preserve that effect, so what you see onscreen matches your internal conception. This setting applies only to what you see in your copy of Zoom, both in the preview in Settings and in the version of your feed that you see in a Zoom meeting. No matter whether you have “Mirror my video” selected, however, everyone else in a meeting always sees you on screen unmirrored, as in life.
Touch up my appearance (plus iOS/iPadOS): Zoom can employ some simple smoothing that removes blemishes, pores, and other signs that we are imperfect physical beings.
Stop my video when joining a meeting (plus mobile): I recommend this, as it avoids you having video streaming to others before you’re sure you’re ready. (In mobile, the setting is Turn Off My Video.)
Always show video preview dialog when joining a video meeting (plus mobile): It’s worthwhile to see what you look like on camera before you start. (In mobile, the setting is Show Video Preview.)
See myself as the active speaker while speaking: Zoom has a variety of options for how people are displayed in a conference. With this setting checked, whenever you speak, you appear in your own app front and center, which can be useful if you want to use that as feedback while you present.
Maximum participants displayed per screen in Gallery view (plus web apps): When you’re in a meeting with a large number of participants, you need a powerful computer processor for the desktop Zoom app to show more than 25 participants per screen. One radio button should show “25 participants,” while another will be the maximum for your computer, which goes as high as 49. Apple’s iPad with an M1 Apple silicon processor maxes out at just one fewer: 48. Less-powerful devices may have a lower limit or not display any choice at all, which I examine in Gallery View.
Audio
In desktop apps, use these settings to pick your output and input devices. You likely won’t change these settings often, but it’s good to test them, as desktop audio selection and USB-connected devices can be fickle (Figure 20). Mobile apps have a couple useful audio settings in Settings > Meetings noted below worth examining.

Manage Your Audio Input
I generally recommend turning off “Automatically adjust microphone volume” in desktop apps. Instead, test and set a volume for your mic, and use a meeting recording or ask other participants to ensure that it’s the right volume.
Unless you’re in a noisy environment or vary your speaking voice enormously without realizing you do, adjusting mic input levels constantly simply isn’t necessary. Instead, select one of the options under “Suppress background noise,” which neatly explains the level of noise-reduction offered from Low (“faint background sound”) to High (“typing, dog barks”). You can also pick Auto.
You should also enable automatic audio connection:
Automatically join computer audio when joining a meeting (desktop and web apps): Zoom lets hosts choose to allow audio from the same device as the app or via a dial-up phone number. Unless you think you will ever call in on a phone, turn this on.
Auto Connect Audio (mobile apps): Zoom offers as many as four options, depending on your device, account, meeting, and platform. You might see all four of these:
Off: No audio is selected when you join a meeting.
Wifi [sic] or Cellular Data: Zoom uses device audio and sends it from within the app.
Call My Phone Number: On meetings started by paid accounts with an add-on option and that option enabled for the meeting, you can opt to have Zoom call you via your associated phone number.
Auto-Select Based on Network: If you’re on a Wi-Fi network, device audio is used; otherwise, you’re prompted to call or your phone is called.
I recommend you enable “Mute my mic when joining a meeting” (desktop, web) or Mute My Microphone (mobile) as I think it’s a smart idea to choose when to start audio streaming only after joining and when you’re ready.
Zoom automatically enables echo cancellation. This is a reason that Zoom audio typically sounds fairly clear: you don’t hear yourself or other people repeated or, worse, wind up in a feedback situation in which echoes build on echoes.
But the Echo Cancellation pop-up menu—found by clicking the Advanced link at the very bottom of Audio Settings—doesn’t have an Off selection: it allows only Auto and Aggressive, useful when your audio environment is particularly reflective.
Control Your Audio Volume
If you’re using a device that cannot have its output level controlled by your desktop operating system—I have such a USB headset, which has hardware volume buttons—then changing the output level in Zoom will likewise have no effect.
In mobile apps, there’s a different quirk: Zoom overrides system-wide audio settings. Even if you mute audio output, setting the volume slider to zero, Zoom will still use its own setting. To truly mute audio coming out of your mobile device, tap the tiny speaker ![]() icon in the upper-left corner that’s showing a few sound waves coming out. When you tap it, wait a second: there’s a short delay before it switches to a speaker with an x
icon in the upper-left corner that’s showing a few sound waves coming out. When you tap it, wait a second: there’s a short delay before it switches to a speaker with an x ![]() icon, indicating sound output is muted.
icon, indicating sound output is muted.
Tweak Sophisticated Audio Settings
Zoom continues to add more sophisticated audio settings as its service matures. That now includes several choices you can find in desktop apps (Figure 21). These options let you tweak audio input for better results, depending on your audio source and the nature of the sound.
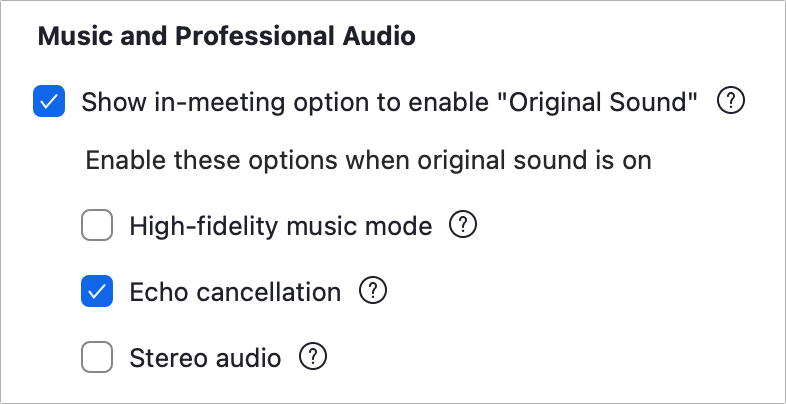
Select “Show in-meeting option to enable ‘Original Sound’,” a very wordy option, and Zoom adds a menu into the main Zoom session next to the security icon in the upper-left corner of the display and removes the Advanced link that leads to separate control of echo cancellation.
By default, the option in the Zoom session reads “Original Sound: Off”. If you click it, Zoom begins to use the original sound as modified by three checkboxes I describe next instead of its processed version, and the label now reads “Original Sound: On”.
You have three options you can use to modify Original Sound, which you can change during a meeting via Audio settings, too:
High-fidelity music mode: This mode was designed to allow music and richer vocal audio to pass through without the compromises required with voice-based meetings. Zoom notes that it increases the sample rate to 48 MHz (slightly above a CD’s sample rate), and the codec increases throughput to 96 kbps for mono and 192 kbps for stereo. This consumes more bandwidth in exchange for higher quality.
Echo cancellation: Unchecking this box is the only way to turn off echo cancellation entirely. Because some headsets and mics already manage echo cancellation, disabling it might produce better results.
Stereo audio: Most microphones are mono, so stereo sound doesn’t help. However, for musical performance, panel discussions, or any case in which mixing sound to left or right track or panning across those tracks is useful, this option enables your audio input to send stereo sound to the meeting.
Use iOS/iPadOS Audio Control Options
Users with the appropriate iPhone model or iPad model and iOS 15/iPadOS 15 and later installed may pick among three options to adjust microphone input. During a Zoom call, swipe to reveal the Control Center, tap Mic Mode, and then you can select from three options (Figure 22).

Here’s why you might select among them:
Standard provides normal mic input that relies on two mics to reduce noise and emphasizes what’s close to the mic—typically you speaking—without removing background noise. This is best when speaking in a normal audio environment.
Voice Isolation blocks ambient noise, performing something like the inverse of noise-canceling headphones: the mic input is isolated from other sounds. Use this to eliminate background noise that interferes with you being heard or is distracting to other meeting participants.
Wide Spectrum more broadly mixes your voice and ambient sound to produce a balance. Select this option so that the sound around you can be heard well by other meeting participants. If you’re at a zoo, for instance, they might want to hear the animals; at a concert, the performers.
Zoom warns you if these settings conflict with audio choices made in the Zoom app.