
Chapter 8
Importing Data into JMP
Looking for Data in All the Right Places
Importing Microsoft Excel Spreadsheets
Copying and Pasting Microsoft Excel Spreadsheets
Importing Data from the Internet: HTML Tables
Introduction
Focusing your attention on the obvious, I will make two assertions: (1) statistics is about data, and (2) the availability of data in our connected world is nothing less than astounding. “Data” are now available in many forms: images, shape files, graphs, and tables in scientific publications, and of course in the usual row and column format. Raw data are available in large quantities in spreadsheets, databases, and other traditionally statistical formats and can be easily accessed with JMP. Many Web pages present data in a text or table format that can be copied and pasted into JMP with little or no prior editing. (More on this in chapter 9.)
In this chapter I discuss and demonstrate how to import data into JMP.
Looking for Data in All the Right Places
Deep in the processor(s) of the computer, information is read in a manner not all that different from how humans read. We form words from alphabetic symbols; the computer takes “bits” of information, conceived of as 0s and 1s, and forms larger chunks of information known as bytes. We extract meaning from words and syntax; the computer reacts to sequences of bytes, some in the form of instructions, some in the form of data. Our phrases, sentences, and paragraphs are structured by a language to provide meaning. The computer’s programs and data must also be planned in advance to facilitate the construction of meaning from bits and bytes. Humans have flexibility in the arrangement and spelling of words and in the format of presentation, and in the case of spoken communication variations of accent are allowed without loss of meaning. Here the similarity between computer and human ends; computers have only the flexibility that human ingenuity can program into them. Human ingenuity has so far succeeded in programming a seemingly remarkable flexibility in the computer’s capability to “read” data, but it is built on a thin veneer of shallow capability, executed by very fast computers.
When data is entered into JMP and saved electronically, JMP stores the data in a very precisely defined format for future reading. Other computer programs, such as Microsoft Word or Excel, not having been programmed to read JMP files, may be able to read the bytes, but they are unable to properly interpret them. To get a sense of how Word, for example, interprets JMP files, ask Word to read one. I did, with results shown in figure 8.1. Other than a small amount of some accidentally readable characters in the file, Word could not quite figure out how to read the JMP file. JMP has to solve the same problem when attempting to read, or “import,” data from files that are not JMP. Over the years of software development different programs, using data but built for essentially nonstatistical purposes, have defined formats consistent with their purpose. The JMP software folks have designed into JMP the capability of reading many of these types of files stored in other formats. In addition, “industry standard” data file formats have grown to facilitate the transfer of data among different data producers and consumers. When JMP reads a file that is not a JMP file, we say that JMP is “importing” the file. Which files you will be able to import into JMP will depend to some extent on the software you have installed on your machine.
Figure 8.1 Word reading a JMP file

1. Select File ![]() Open.
Open.
You should see a drop-down menu indicating the types of files to choose from. (Note: Mac users will see the available file types highlighted by their file name. On the Mac, JMP can open any highlighted file.) In my case the present choice is All JMP Files. Click on this drop-down menu to see your import options. Mine are shown in figure 8.2.
Figure 8.2 Readable file formats

The Help capability in JMP gives excellent detailed instructions about importing files of different types, and I encourage you to browse these capabilities.
2. Select Help ![]() Index and type “importing” as shown in figure 8.3.
Index and type “importing” as shown in figure 8.3.
Figure 8.3 Help choices

In an elementary statistics class, most of the files that will be imported will probably be Excel files and text files, since these types of files are almost universally available on computers. To illustrate downloading and reading files with JMP, I will give you the actual URLs and walk you through the steps for importing the data. I will not analyze these data statistically, but of course you are very welcome to do so by practicing your new JMP skills.
Importing Microsoft Excel Spreadsheets
To illustrate the import of Excel files, I use a file downloaded from the U.S. Department of Energy website, http://www.fueleconomy.gov/feg/download.shtml. The fuel economy data from the 2011 Datafile contain information about vehicle testing done at the Environmental Protection Agency’s National Vehicle and Fuel Emissions Laboratory in Ann Arbor, Michigan, and by vehicle manufacturers with oversight by the EPA.
Importing data from an Excel file proceeds in a manner very similar to opening JMP files.
1. Click File ![]() Open, and in the drop-down menu, select Excel 97–2003 Files (*.xls).
Open, and in the drop-down menu, select Excel 97–2003 Files (*.xls).
2. Select 2011FEguide-public.xls.
An issue that must be considered when importing Excel files is whether the first row consists of column names. Notice the Always enforce Excel row 1 as labels options in figure 8.4. Some Excel files (as well as text files) will include a first row with variable names, while some will not. If JMP believes the first row has variable names, it will import the first row as column headings, not data. If in fact there are no variable names in the first row, JMP will treat the first row of data as column headings. If the Excel file does have variable names in the first row, but JMP believes otherwise, the variable names will be imported as the first row of data, also something not desirable. The best strategy is probably to view the file in Excel, take note of what is in the first row, and then select Always or Never.
Figure 8.4 Choosing the best guess

The EPA data has variable names in the first row.
3. Select the Always button and Open.
JMP will respond by reading the Excel file, part of which is shown in figure 8.5.
Figure 8.5 Imported Excel file 20011FEguide-public

Copying and Pasting Microsoft Excel Spreadsheets
Excel spreadsheets and portions of Excel spreadsheets can also be transferred via copying and pasting. To utilize copying and pasting, you must have both JMP and Excel open.
1. In Excel, select the rows and columns that you wish to copy and select Edit ![]() Copy. (Or, in Windows 7, just Copy.)
Copy. (Or, in Windows 7, just Copy.)
2. In JMP, create a new data table by selecting File ![]() New.
New.
3. In JMP, hold down the Shift key and select Edit ![]() Paste or Edit
Paste or Edit ![]() Paste with Column Names, depending on the status of the first row.
Paste with Column Names, depending on the status of the first row.
Importing Text Files
Another common format used for transfer of data is a text format. Text formats can be identified by their file extensions: .txt, .csv, .tsv, or .dat. The .csv and .tsv extensions primarily indicate comma-separated variables and tab-separated variables format; .txt and .dat generally indicate human-readable data as opposed to data that can only be read by specific computer software. The .csv and .tsv formats are available with most database programs and Excel. The .csv format consists of records of data, one line per record, with variables delimited by commas. In some cases commas may be part of the data, in which case the data would be enclosed in quotation marks. Tabs are less common in data, and for this reason .tsv is perhaps preferable to the .csv format. (If tabs do appear in data for some unanticipated reason, the data value is also surrounded by quotation marks.) The .txt and .dat formats are more generic, but if the contents are intended to be data for statistical analysis it is quite likely that a row and column format similar to .csv or .tsv is being used.
Importing data from a .txt or .dat text file can be a bit more complicated than importing an Excel file because some combination of you and JMP need to discern some characteristics of the file format. The .csv and .tsv formats are usually dependably row and column, but different computer systems (PC, Mac, Linux, or even a mainframe) will differ in how they indicate an end-of-line.
1. Select File ![]() Open, and in the drop-down menu, select Text Files (.txt;.csv;*.dat;*.tsv).
Open, and in the drop-down menu, select Text Files (.txt;.csv;*.dat;*.tsv).
There are some options to consider, as shown in figure 8.6.
Figure 8.6 Choosing text import preferences

These options represent different hints to JMP about the file format. Easiest to use is the Data, using best guess option. This is not the easiest because you or I guess the format; it is easiest because JMP guesses the format. JMP is excellent at this discernment of file formats and should be regarded as the fellow expert in the matter. The next-best option is for you or I to guess, using the Data with Preview option. Even then, JMP will be at our side, providing expert guidance. The Data, using Text Import preferences option allows you to specify more options for JMP and would generally be used if you had a more complex data structure than rows and columns, possibly with more than a single row of column headers.
To accentuate the different approaches we will step through each of these options using a single data set, downloaded from earthquake.usgs.gov, a website of the U.S. Geological Survey devoted to earthquakes and other natural hazards. The data we will use are locations and measures of earthquakes having at least a magnitude of 2.5 in United States and adjacent areas, and earthquakes anywhere in the world with at least a magnitude of 4.5. To better appreciate what JMP has to work with when making its guesses, you might open the QuakeData file with your word processor. QuakeData is a text file, so you may have to set your word processor to display “All Files *.*”. If you would like to try downloading data and starting at that step, point your browser to http://earthquake.usgs.gov/earthquakes/catalogs/ and under CSV Files pick the “5+” earthquakes for the past seven days. Be aware, however, that the last seven days on your calendar and my last seven days as I write this will differ!
Here are the first few lines of the file for my last seven days:
Src, Eqid, Version, Datetime, Lat, Lon, Magnitude, Depth, NST, Region us, c0003vmn, 7, “Tuesday, May 31, 2011 16:26:12
UTC”, 40.2975, 143.1563, 5.0,28.80, 157, “off the east coast of Honshu, Japan”
us, c0003vjh, 7, “Tuesday, May 31, 2011 12:28:36
UTC”, 39.3997, 141.9330, 5.6, 40.00, 295, “eastern Honshu, Japan”
us, c0003uav, 8, “Monday, May 30, 2011 00:06:27 UTC”, -15.1482, -173.4925,5.2,27.20,190, “Tonga”
us, c0003tx6, 8, “Sunday, May 29, 2011 18:24:01 UTC”, -7.7506,101.7467,5.9,9.50,58, “southwest of Sumatra, Indonesia”
us, c0003ttb, 8, “Sunday, May 29, 2011 13:44:20 UTC”, -6.5907,129.7977,5.2,146.90,78, “Banda Sea”
us, c0003tpw, 8, “Sunday, May 29, 2011 07:33:13 UTC”, -5.8344,149.3044,5.4,113.00,61, “New Britain region, Papua New Guinea”
As you can see, the original file contains a variety of different sorts of data: numeric, alphabetic, and mixed, with interesting interspersed punctuation for human readability. Note that in this set of data the first row contains variable names. Choose Data, using best guess, navigate to your data folder, and open the file QuakeData.
Figure 8.7 The best guess from JMP

The first few rows as JMP has guessed them appear in figure 8.7. Not surprisingly, JMP has discerned the nature of the variables and placed them correctly in rows and columns. Notice in figure 8.7 that JMP has detected some character values in the variables, “Eqid” and “version.” When downloading files this information can be an early warning sign of data or transmission errors. As an example, if one expected “version” to be a numeric variable, seeing that JMP has categorized it as a character variable may indicate some sort of problem, possibly with the data entry or with the data transfer. In these data, an “A” in the Version column indicates a particular mathematical earthquake model used to estimate the magnitude (Olsen, personal communication). When data are imported in JMP, numeric data is treated as continuous by default, and any column with non-numeric characters is deemed to be categorical. JMP will interpret the numeric values of Version as categorical. Sometimes a character value such as a “*” may be used to indicate “missing” data in a data file. JMP would flag this as indicating categorical data. Your response in that case would be twofold. First, simply delete the “*” in the table—JMP would interpret that missing value as, well, a missing value. After deleting any of these that you find, you would then have to inform JMP that the column contains numeric, not categorical, data. (I will show you how to do this later in this chapter when we consider data on the salaries of the New York Yankees.)
Now that we have an idea about the capabilities of JMP, let us consider our own capabilities. Close the QuakeData file and open it again, this time with the Data with Preview option selected.
1. Select File ![]() Open, and in the menu, select Text Files (.txt;.csv;*.dat;*.tsv).
Open, and in the menu, select Text Files (.txt;.csv;*.dat;*.tsv).
2. Select Data with Preview ![]() Open.
Open.
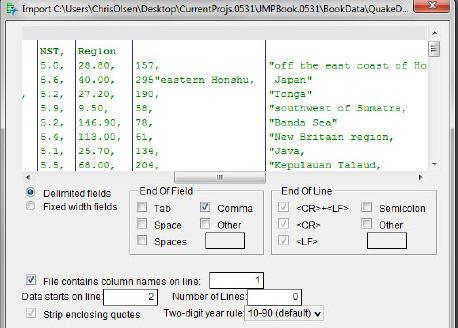
You should see the display in figure 8.8. Remember, if you are following along after downloading the current seven-day file your data will differ from mine.
Figure 8.8 JMP guesses with data with preview

An important thing to notice here is that the best guess from JMP about the appropriate data table is displayed for your consideration. Use the scroll bars, both horizontal and vertical, to check out the data. If you don’t see any problems, click Next and then Import, and you are on your way to analyzing the data. You need intervene only if you see something weird in the data table. If JMP sees a problem of some kind it will try to alert you. As an example, use your word processor and open the file QuakeDataWSrc. This file contains the earthquake data, plus the URLs for my reference. The first few lines look like this:
http://earthquake.usgs.gov/earthquakes/catalogs/
http://earthquake.usgs.gov/earthquakes/catalogs/eqs7day-M1.txt
Src, Eqid, Version, Datetime, Lat, Lon, Magnitude, Depth, NST, Region us, c0003vmn, 7, “Tuesday, May 31, 2011 16:26:12
UTC”, 40.2975, 143.1563, 5.0, 28.80, 157, “off the east coast of Honshu, Japan”
us, c0003vjh, 7, “Tuesday, May 31, 2011 12:28:36
UTC”, 39.3997, 141.9330, 5.6, 40.00, 295, “eastern Honshu, Japan”
us, c0003uav, 8, “Monday, May 30, 2011 00:06:27 UTC”, -15.1482, -173.4925, 5.2, 27.20, 190, “Tonga”
The preview in JMP for this file is shown in figure 8.9. Inspection of this preview gives you a clear indication of the problem, in this case a few lines of clutter before the actual data. When faced with this problem the easiest thing to do is to use your word processor and delete the offending early lines.
Figure 8.9 “Corrupt” data: The preview

Dealing with a corrupt file is a bit more problematic and is something of an art, but JMP will, as always, assist you in the process. The number of ways that a data file can go wrong begins with data entry and continues with any number of possible human or electronic anomalies. The key concept when “cleaning the data” is that you know what it is supposed to look like in the data table. If you aren’t seeing what you know should be there, you need to fix it! As an example, I will take the second data line of the earthquake data and delete the comma between “295” and “eastern Honshu, Japan.” The file with the data changed as indicated is a text file named CorruptQuakeData. When JMP opens the file and you scroll through the data, you will immediately see the anomaly shown in figure 8.10.
Figure 8.10 More “corrupt” data: The preview
Once problems such as these are detected, it is usually a simple matter to fix them with your word processor.
Sometimes files created by individuals for specific purposes, or data gathered from physical measuring devices for direct computer processing, will contain the moral equivalent of rows and columns of data, but are formatted in some nonstandard manner. Or possibly you may latch onto a data file created by a different computer system that uses characters other than commas to separate data values and/or characters other than a carriage-return-linefeed combination. This is less of a problem with more recently archived data files, but it can occur. If you frequently acquire data in one of these different formats you may wish to use the Data, using Text Import preferences option, shown in figure 8.11. The bookended steps to make your choices are easy.
Figure 8.11 Choosing your own format

1. Select File ![]() Preferences
Preferences ![]() Text Data Files.
Text Data Files.
2. Make appropriate choices from the panel shown in table 8.1.
3. Click OK.
Table 8.1 Options for file formatting
| Box | Explanation |
| End of Field | What character indicates the end of the data value? |
| End of line | What character indicates the end of a record, or case? |
| Table contains column headers | What line are the column names on? On what line does the data begin? |
| When determining column types | How far should JMP look for data other than numeric-looking (i.e. non-numeric symbols)? |
| Two-digit year rule | How are dates formatted in the data file? |
| Strip enclosing quotes | Should quote marks be removed in the data? (Only used with fixed-width files, to be considered shortly.) |
| Recognize apostrophe as quotation mark | Does the data source use an apostrophe for quotation marks? |
| Export settings | What format parameters do you want to use when you send files to others? |
Those steps in-between are the ones where the important decisions are made, and these decisions depend on the format of the file you are attempting to import. Generally, you would already know the correct answers because you created the file yourself or you acquired format information from the same source as the data.
Importing Data from the Internet: HTML Tables
Finally, let’s consider the capability within JMP of downloading data contained in HTML table files on the Internet. Web pages can contain data in the form of rows and columns of cells known as an HTML table. In HTML one creates these tables using the table tag, <table>. Subsequent tags define the structure of the table. HTML tables can contain all sorts of things: text, images, and data. Our interest is, of course, data.
For JMP purposes we are interested in data that is structured in a table of rows and columns that can be interpreted as observations of variables, or at least contain a subset with that structure. HTML tables can be structured with different numbers of columns in different rows, and—bottom-line—not every HTML table represents a data set as we understand them. The message here is that before you attempt to import data from an HTML table on a web page, check to be sure it contains a table of data, as opposed to just a table.
As it happens, I have a website in mind that contains lots of tables, not all of which are data tables.
1. Select File ![]() Internet Open.
Internet Open.
The web page, http://en.wikipedia.org/wiki/World_population, contains information on the population of the world and many tables of data. Enter the URL into the Internet Open dialog box as shown in figure 8.12.
Figure 8.12 Internet open

2. Select OK.
The Extract HTML Table to JMP File option searches the web page for HTML tables and presents a list, as shown in figure 8.13. Notice that the ever-helpful JMP is (a) warning you about some tables not containing data as JMP understands the term, and (b) pointing out the most likely candidates for JMP-compliant HTML tables.
Figure 8.13 Data tables

I selected the “10 countries with the largest total population” and was rewarded with the JMP file shown in figure 8.14. Well, it isn’t actually a JMP file until it is saved, but you get the idea.
Figure 8.14 The 10 countries with the largest populations

Sometimes HTML tables are only almost usable. As an example, consider the salaries of major league baseball teams at http://espn.go.com/mlb/team/salaries/_/name/nyy/new-york-yankees (see figure 8.15).
Figure 8.15 Partial web page

Partial results of choosing the Extract HTML Table to JMP File option are shown in figure 8.16. JMP pulled in the first two rows, the titles Rank and Player, naturally enough, since they were a part of the HTML table. This identifying information is of no interest to us (except for providing variable names).
Figure 8.16 The team salaries imported into JMP

Click and drag on the first two rows, and then make the following selection.
1. Select Rows ![]() Delete Rows.
Delete Rows.
There is another slight problem: JMP interpreted the contents of the first two rows as containing categorical rather than numeric data. (Recall that you can tell this by looking at the bar chart icon at the left of the panel.) The data of interest are in the salaries in Column 3. We need to inform JMP that these values are to be interpreted as numbers (see figure 8.17).
Figure 8.17 New York Yankee salaries

Double-click on “Column 3” to bring up the Column panel shown in figure 8.18. Make the changes indicated there and click OK. (If the only change needed for a variable is the modeling type, you can click on the icon to the left of “Column 3” in the Columns (3/0) panel and make the change there.)
Figure 8.18 Yankee Salaries—Column Panel

With these changes, we have successfully converted a problematic HTML table into working JMP format. After saving the data in a JMP file for safekeeping, we are ready to analyze.
What Have We Learned?
In this chapter we learned a bit about non-JMP file formats and how to convert them into a format for analysis with JMP. JMP works hand-in-glove with non-JMP files, although some human intervention is needed, on occasion, to facilitate the conversion to the correct format in JMP.
Reference
Olsen, A. (2011). Personal communication by telephone, August 30, 2011.