2Chapter 2: Photography Basics

Introduction
The Sony a7 II has scores of menu commands and options. They can discourage even the most experienced user, let alone someone who is used to a simple point-and-shoot camera. Fortunately, a lack of familiarity with these controls should not prevent you from immediately taking good pictures with the a7 II. You can start by setting the mode dial to AUTO, which will put your camera on autopilot so you can take pictures as easily as you would with your smartphone.
In fact, your camera will be easier to use than the camera in your smartphone. You will notice that the a7 II operates faster. It finds focus instantly, it records the picture immediately after you press the shutter button, and it quickly saves the picture to your SD card. Your camera will feel like an extension of your eye, and the settings do not interrupt your concentration when you are trying to compose and take a perfect picture. Plus you can shoot under lower light conditions. All this is achievable without you having to learn about things like aperture, shutter speed, or ISO. Moreover, your pictures will be superior to what your smartphone camera can produce, and you can enlarge them into huge prints.
You may be surprised to learn that even expert photographers find the automatic settings useful. When we need to quickly grab a shot, we put the camera on AUTO and shoot. Although we could probably do better by choosing our own settings, we find that we would rather capture the image than let the moment pass by.
This chapter describes how camera settings affect exposure, depth of field, shutter speed, and sensor sensitivity. Our goal is to provide an intuitive, rather than scientific, explanation of how the camera renders a sharp and detailed image so you can more thoroughly understand what the automatic settings do. You will learn what makes a picture technically good and how you can modify the camera settings to create artistic images that are imbued with your vision.
The most important thing to realize is that there are several ways to get a sharp picture, and the options you choose will depend on the subject. The best settings for portraits are not the same as for scenic or action shots.
Before you can critique your own pictures and learn how to improve them, we need to cover some basic photographic principles. Many of the topics in this chapter are discussed more thoroughly in later chapters. This chapter will also provide high-level descriptions of how the camera operates.
Basic Photographic Concepts
A photograph is a two-dimensional rendering of a three-dimensional object. The camera’s light detector, called a sensor, is flat. A lens projects light from the subject onto the sensor. If the distance between the lens and the sensor is not adjusted precisely, the image will be out of focus and blurred. This can occur even with automatic focus. To avoid out-of-focus images, you have to become an expert at controlling where the camera establishes focus.
When the main subject is in focus, you control the appearance of the background and foreground in the scene. The lens aperture controls how blurry or sharp these areas are. An understanding of how aperture relates to depth of field gives you control of the relationship between the foreground and the background. In optics, only one plane that is parallel to the sensor is rendered at maximum sharpness—in other words, the subject will be in focus only if it occupies this plane. An object in front of or behind this plane becomes progressively blurred as its distance from the in-focus subject increases. How rapidly this blurring occurs depends on the lens aperture. When you reduce the opening of the aperture, you create an image in which both nearby and distant objects appear sharp (large depth of field). When you open the aperture to its maximum, you create a shallow depth of field. You pick the plane that will be sharp, and the objects outside that plane will be blurred. This concept is illustrated in figures 2-1a and 2-1b. Figure 2-1a was photographed with an aperture of f/2.8, leaving only a couple of chess pieces in sharp focus. By closing the aperture to f/16, we increased the depth of field to sharply record a larger area in front of and behind the chess pieces, as shown in figure 2-1b. Not only is the intended subject sharp, but the background and foreground are sharp as well.


What Are Sensors and Images?
A digital camera uses a solid-state device composed of millions of photosites to convert light into an electrical signal. A photosite is the physical basis of a pixel, which is the smallest unit that senses light. In the Sony a7 II, there are 24 million pixels in a rectangular array. Signals from each photosite are collected and used to create an image for the camera display screen, or the signals can be saved in memory as a digital file. In either case, they make up a mosaic of intensities and colors that form a picture. It is important to realize that digital sensors are quantitative devices, and the value of light is a numerical unit that can be added, subtracted, divided, or multiplied. These arithmetic operations are the basis for altering the appearance of the digital image. The role of exposure is to provide the sensor with just enough light so it can measure the intensities.
The sensor can record only a limited intensity of light. If there is too little light in a region of the scene, it will be recorded as black. If there is too much light in another region of the scene, it will look like a featureless white expanse. In either case, little or no detail will be recorded because there is either no electrical data (black) or there is so much light that it oversaturates the sensor (white). The trick to a correct exposure is to ensure that data is recorded in both the darkest and the lightest regions of a scene. This differs from our visual perception of the world. We can view a much broader range of light intensities than a digital sensor.
Three factors control exposure. The first is lens aperture, which regulates how much light enters the camera body. When the aperture is open, more light enters the camera body; when the aperture is closed, less light enters. The second factor that controls exposure is shutter speed, which regulates how long the sensor receives light. A short shutter speed of 1/1000 second provides less light than a long shutter speed of 1 second. The final factor is ISO, which is essentially an electronic gain that increases or decreases the signal from the sensor. Operationally, you can think of ISO as a sensitivity control—the higher the ISO, the more sensitive the sensor is to light.
In summary, to record a technically sharp picture, you must properly focus the subject onto the sensor and ensure that the intensity of collected light lies within a prescribed range. The camera does this on its own when you set it to an automatic shooting mode, and the process is refined enough that most people are satisfied with the results. However, photography is an artistic endeavor, and there is no universal setting for recording an image for emotional impact. To create an artistically satisfying image, the controls may have to be adjusted in a different way. For example, in automatic shooting modes a running athlete will be recorded with a high shutter speed to freeze the motion. This results in a tack sharp image, but the athlete appears frozen in place. You may decide to use a longer shutter speed to blur the arms and legs to create the impression of rapid movement. In this case, you sacrifice sharpness to create the impression of speed.
There are technical and artistic advantages when you vary the aperture and shutter speed to control exposure. Technically, you have control over a much broader range of light intensities. Closing the aperture and shortening the shutter speed are additive, so doing both reduces the light intensity to a greater extent than changing just one or the other. Essentially, the range extends from using the longest shutter speed with the widest aperture opening to using the shortest shutter speed with the narrowest aperture opening. Aperture openings are expressed in numbers; smaller numerical values indicate that the lens transmits more light. Shutter speeds are typically expressed as a fraction of a second.
This means there are several combinations of aperture and shutter speed settings you can use to attain equivalent exposures. Setting the aperture to f/2 and the shutter speed to 1/60 second provides the same exposure as setting the aperture to f/16 and the shutter speed to 1 second. However—this is important for artists—images obtained with these two settings do not look the same. The depth of field is increased when you close down the aperture, and it is decreased when you open it. Photographers use this technique to direct viewers’ attention to the subject. In the case of a portrait, you can focus on the subject’s face and blur the background by opening the aperture to provide a shallow depth of field. To offset the increase in aperture, you use a faster shutter speed to reduce the amount of light falling on the sensor. Again, the dual control of shutter speed and aperture is an important concept to master to give you the most influence over the design of your image.
There are times when light levels are so low you can’t find a shutter speed or aperture to properly record the scene. You may wish to raise the shutter speed or narrow the aperture, but doing so reduces the intensity of the light that reaches the sensor to the point that the scene will be underexposed. Fortunately, you can still get the picture by raising the ISO. This comes at a cost because it reduces the range of light (the dynamic range) that the sensor can record. You may end up losing detail in either the shadows or the highlights. The image becomes granular—that is, areas that should be rendered as smooth tones become speckled with blotches of color, and the overall definition is reduced. This is referred to as image noise, and it is most easily seen in shadow regions of an image. Because of this artifact, expert photographers prefer to set the ISO manually. By judiciously raising the ISO, it is possible to obtain the best compromise between high image quality and proper light sensitivity.
In conclusion, there are three variables that control exposure: aperture, shutter speed, and ISO. These three variables allow you to impart an ambience to your pictures. Intelligent Auto and Superior Auto try to identify the subject, and they will set the three variables to produce a final image based on that identification. However, automatic modes have a limited capacity to identify the scene, so their ability to obtain the highest-quality image is limited.
What Is ISO?
ISO stands for International Organization for Standardization. Historically, this term referred to the light sensitivity of film. Today, it is associated with digital cameras and refers to the gain that can be employed to generate a brighter image. Technically, a sensor’s sensitivity to light does not vary; it generates a signal that is proportional to the amount of light that falls on it. However, a sensor has an amplifier that increases the strength of a weak signal when you increase the ISO number. When you raise the ISO, you can capture images in dim light. However, such pictures will be of lower quality than those that are captured with a lower ISO. To obtain the highest image quality with the Sony a7 II, we recommend that you use ISO 100, but we do not hesitate to raise the ISO when we work in dim light. In these situations, we prefer not to use an ISO greater than 1600. For us, the compromise in image quality at that high of an ISO is too great.
There are a number of strategies you can use to select the optimum shutter speed, aperture, and ISO to improve your pictures. A simple strategy is to take advantage of the SCN modes and select a predefined scene that matches your subject. In the SCN modes, there is a bias for certain settings. For example, when you select Sports Action mode, the camera increases the ISO and uses a fast shutter speed. In contrast, if you select Landscape mode, the camera uses a lower ISO for improved image quality and a slower shutter speed to compensate for the reduced light intensity. The Intelligent Auto, Superior Auto, and SCN modes try to find the best combination of these three controls. However, as you gain experience, you will discover that you can improve the settings. In fact, as you gain experience you may decide to use an unorthodox combination of aperture, shutter speed, and ISO to give your pictures a unique ambience. This is why photographers go beyond the automatic modes and start experimenting with the P, A, S, and M modes.
White Balance and the Appearance of Colors
We live in a world of color, where our eyes and brain work together to help us correctly identify hues under all lighting conditions. Whether we view the scene under direct sunlight, indirect sunlight, shade, or artificial light, the human eye can identify color, such as the green of grass, in all conditions. Our vision works so well that we don’t expect the appearance of an object to vary. However, with a digital camera, the recorded image reflects the appearance of the object based on the lighting conditions. If you don’t change the camera settings, photographs of an object will look different when it is shot under various lighting conditions. For example, indoor light makes a sheet of paper look orange; sunny outdoor light makes it look white; and indirect sunlight from the sky makes it look blue. To match our expectation of what an object should look like, digital cameras use automatic white balance (AWB), which adjusts the balance of colors so that when an image is saved, the colors are consistent with our expectations regardless of the lighting conditions (figure 2-2).

However, AWB is imperfect, and you must know when and why to override it. There are several ways to do this, and we will discuss the various techniques later in the book. The methods range from selecting a WB icon whose name indicates the type of ambient lighting (chapter 5) to a quantitative technique in which numerical values that describe color are used to calibrate the camera (chapter 6).
ISO
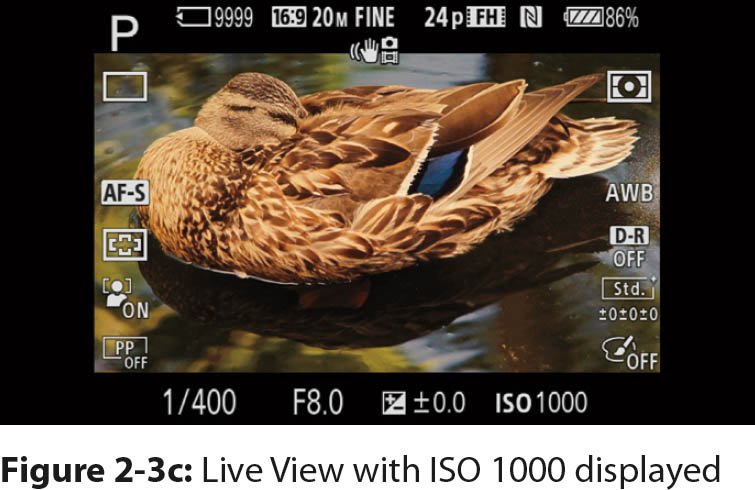
In the bottom right of the Live View screen, you can see the letters ISO in bold white characters. To the right of ISO there is either a set of numbers or the letters AUTO. The camera’s default configuration is AUTO (figure 2-3a), which means the camera sets the gain of the sensor. This setting is used in the automatic and SCN modes. You can set a specific ISO value only in P, A, S, and M modes, which are covered in chapters 5 and 6. In these modes, you can select the ISO by pressing the right button. In figure 2-3b, you can see that a scale of ISO numbers is displayed on the left side of the screen. Rotate the control wheel to navigate through the ISO values. After you select the ISO you want to use, press the center button. You can also change the ISO if you press the Fn button or if you use the Quick Navi screen or the camera menu.

In figure 2-3c, ISO 1000 is displayed at the lower right of the screen. This is a convenient reminder of your camera setting, and you can change it if needed for the shooting situation. Or you can have the camera set the ISO automatically. Press the right button, then highlight and select ISO AUTO, which will be displayed at the bottom right of the Live View screen.

Sony’s terminology can be confusing. The words ISO AUTO are used for two different functions. When the words appear with an icon over the word AUTO, it is being used for a special noise reduction function. If there is no icon, the camera will adjust the sensitivity depending on the light level (figure 2-3a).
Remember that you will capture the highest-quality images with ISO 100. This setting provides the least amount of image noise and the greatest dynamic range. However, ISO 100 may be unsuitable for handheld photography under dim lights because the shutter speed may be so long that either camera movement or subject movement will blur the photograph. How far the ISO can be increased depends on your tolerance of image noise. This, in turn, depends on the subject and how the recorded image will be displayed. If you intend to shoot images to view on a computer screen, such as email attachments or on a website, you can aggressively raise the ISO. The smaller the final picture size, the less obvious the noise, so an increased ISO value is more tolerable.
We find that ISO 8000 provides acceptable results if the subject occupies most of the sensor. When we display such a photo on our computer as a full-screen image, we do not think that image noise is a problem. However, if we plan to print an image as artwork at 24 × 36 inches or larger, we set the ISO to 100. It’s important to be able to manually set the ISO so you can control image quality. This is one of the major reasons photographers forego the automatic or SCN modes. We will discuss how to adjust the ISO in chapters 5 and 6.
Drive Mode
The Drive Mode command specifies how the camera will act when you fully depress the shutter button. You can use most of the Drive Mode settings in Intelligent Auto and Superior Auto, but in the SCN modes some of the settings will not be accessible and cannot be changed. When the camera is in Live View, press the left button (note the associated Drive Mode icon), and the Drive Mode command options will appear along the left side of the screen (figure 2-4). Rotate the control wheel to navigate through the command options. Table 2-1 contains a summary of the options. Press the center button to select the highlighted value.

The Drive Mode options can be broken down into three types: immediate nonprocessed (single or continuous) shooting; delayed shooting; and image-processed (bracket) shooting. A more detailed discussion of each Drive Mode option will be provided later in the book when we cover automatic (chapter 4), semiautomatic (chapter 5), and manual (chapter 6) shooting modes.

Single and Continuous Shooting
The Drive Mode Single Shooting option instructs the camera to fire one shot for each press of the shutter button. The continuous shooting option (Cont. Shooting) causes the camera to fire continuously as long as the shutter button is held down. Cont. Shooting can fire at a rate of either 2.5 frames per second with the [Cont. Shooting: Lo] setting or 5 frames per second with the [Cont. Shooting: Hi] setting.
In a perfect world, a continuous shooting mode would allow you to take pictures at a high shooting rate until the memory card is full. Unfortunately, this is not the case. The memory card’s response is slow and it does not have enough speed to accept new pictures as fast as the Sony a7 II can generate them. To alleviate this deficiency, Sony has engineered a fast memory buffer that rapidly accepts and stores pictures that are generated by the sensor. When the buffer becomes full during a rapid-fire sequence of shots, it can’t accept new pictures, so it slows the firing rate of the camera. The buffer must be cleared to maintain a fast continuous shooting rate.
When we use [Cont. Shooting: Hi], we can take about 13 to 19 pictures before the buffer is full, depending on the file sizes of the images. Because JPEG files are smaller than RAW files, more JPEG files can be stored in the buffer.
Delayed Shutter Release
To include yourself in a picture, you can use either of the following Drive Mode commands: [Self-timer] or [Self-timer (Cont.)].
There are two options for [Self-timer]: either a 10-second or a 2-second delay between when you press the shutter button and when the shutter is released (table 2-2). The 10-second delay gives you time to race to the front of the camera and be included in the photograph. The 2-second delay allows camera vibrations to dissipate before the shutter is released.

The [Self-timer (Cont.)] option instructs the camera to fire a burst of either three or five photographs after a 10-second delay. The rationale is that in a group shot, someone will commit a faux pas that the camera will capture. The person may look away at the wrong time, blink just as the shutter fires, or fail to smile. With the assumption that these problems occur randomly, Sony uses a statistical approach to help you get the perfect shot. The [Self-timer (Cont.)] setting allows you to take three or five shots in hopes that one of them will be perfect.
Bracketing
We will defer our in-depth discussion of this feature until chapter 6, which describes manual operation of the camera. Bracket firing is a specialized set of options for people who need precise settings for exposure, white balance, and contrast. As implied by the name, the camera records several pictures, and each picture has a slight variation in the aforementioned settings. Bracket firing is used rarely and only during highly unusual lighting conditions.
File Formats
Your digital camera records images on a memory card, and at some point you’ll transfer the image files to your computer. From there, you may want to prepare the pictures for printing, emailing, or posting to social media sites. The same is true with movies you record. You may want to download them to your computer for editing, or you may want to compress them for email attachments or to upload to the Internet. Regardless, knowing how you will work with your recordings determines the file format you should use.
File Formats for Still Photography
An advanced camera like the Sony a7 II allows you to choose whether you will save image files in RAW or JPEG format. RAW files are the equivalent of digital negatives because you cannot use them directly on your computer; first you have to process them with special software. This means you will need either third-party software, such as Photoshop, or the software that Sony supplies, called PlayMemories Home (the latest version is 4.3.01) or Image Data Converter (the latest version is 4.2.04).
The advantage of RAW format is its capacity to store information. RAW files provide the greatest flexibility during image processing for people who fine-tune their images on a computer. RAW files are stored in 14-bit format, and JPEG files are stored in 8-bit format. This means that for each of the three color channels (red, green, blue, or RGB) in a RAW image, the intensity values are recorded within a range of 1 to 16,384. In contrast, data in a JPEG file is stored in a coarser fashion; each of the three color channels store intensity information within a range of only 1 to 256. The increased precision with which RAW files record intensity information allows you to process your images to reveal subtle details in the highlights and shadows. Such details are not available when the camera saves a JPEG file. The increased precision of RAW images allows you to correct errors in white balance and adjust the contrast. Because RAW files store so much information, they are large.
In contrast, JPEG files can be thought of as prints, and it is very straightforward to work with them. Almost all computers and image-processing packages can open and work with these files. When you shoot in JPEG format, the camera processes and compresses data from the sensor before it stores the image. In essence, the files are already processed, so they are immediately available for viewing or attaching to emails. Because JPEG files are compressed, the enhancements you can do in post-processing are limited. For this reason, many people believe that JPEGs cannot capture the highest quality pictures from a camera. However, if the camera is adjusted properly, JPEG files can provide excellent images.
JPEG and RAW Defined
A JPEG image file uses a compression method developed by the Joint Photographic Experts Group. The compression causes a loss of information from the original image file, and that information cannot be restored. The file has an extension of either .jpg or .jpeg.
A RAW file is a digital camera file that is minimally processed. It retains most of the data that was originally captured by the sensor. A Sony a7 II RAW image file has the extension .arw. Unlike JPEG files, the compression in Sony RAW files minimally processes the data to maintain its fidelity.
The Sony a7 II is initially set to capture your pictures as JPEG files. This is logical because some of the most advanced camera features for capturing, processing, and manipulating images can be done only in this format. When you shoot in JPEG format, you can specify ahead of time the degree of sharpness, contrast, or color rendition you want to apply to the image. To get the best results, you need to understand how these settings affect the final picture because JPEG files can be corrected only for minor errors in exposure or color balance during post-processing on a computer. We will explain how to adjust these settings in chapter 4 when we discuss Creative Styles.
Which file type should you use? The simplest answer is to use both. The Sony a7 II allows you to record an image simultaneously in both RAW and JPEG formats, giving you the best of both worlds—the full image processing potential of a large RAW file and the convenience of a generally accessible, small JPEG file. To record an image in both RAW and JPEG formats, press the MENU button, follow the subsequent command path, and select the [RAW & JPEG] option:
MENU > Camera Settings (1) > Quality > [RAW], [RAW & JPEG], [Extra fine], [Fine], [Standard]
However, it may not be desirable to use this option because some of the most interesting and powerful capabilities of the camera will be disabled. Sony has several unique features, such as Sweep Panorama mode and Multi Frame NR, that work only when you save files as JPEGs. Because these features are valuable for shooting broad vistas or recording under low-light conditions, you will have to record only JPEG files if want to use them. They will be disabled if you shoot with either the [RAW] or [RAW & JPEG] option. As a rule of thumb, any operation that combines several exposures into a single processed image will require the file to be saved as a JPEG.
Choosing the JPEG format requires an additional decision. You need to determine how much compression will be applied to your picture. To do this, use the Quality command to choose [Extra fine], [Fine], or [Standard].
To record the finest detail, choose [Extra fine]. If you plan to save a large number of images on your memory card, you might decide to reduce the file size by compressing it more, which will retain less detail. To do this, set the Quality value to [Fine] or [Standard]; the latter applies the greatest degree of compression. We generally use [Extra fine] instead of [Standard]. Memory cards are inexpensive, and these JPEG files are small enough for our purposes, so we see little value in compressing the files further. Note that the option called [Standard] is a misnomer—it is not the default setting. The Quality default setting is [Fine]. When you use the [RAW & JPEG] option, the JPEG files are saved with [Fine] compression, even if you had previously set the Quality to [Extra fine].
You can also use the Image Size command to shrink the file size by reducing the number of pixels saved in the file:
MENU > Camera Settings (1) > Image Size > [L], [M], [S]
The image size for an a7 II RAW file is [L], which cannot be altered. For JPEGs, the default size is also [L], which is 24 megapixels (6000 × 4000 pixels); however, you can downscale the JPEG image size to either [M] or [S], as shown in table 2-3. The abbreviations from the camera display are shown in parentheses in the table. You can also change the Image Size by using the Quick Navi screen.

Reducing Noise in JPEG Files
If you want to work only with JPEG files on your camera, it’s important to understand how the camera processes them so you can get the best quality. When you shoot at ISO 1600 or greater, the a7 II uses noise reduction (NR) software to remove the appearance of punctate dots (noise) in the image. This ensures that areas like a painted wall with a smooth surface are recorded with an even tone. However, if noise reduction is employed aggressively, it can destroy fine details. You can see this in animal images when the individual hairs of their fur are indistinguishable and look smeared. This degradation is usually acceptable if you do not enlarge the picture too much. Many viewers will not see this lack of fine detail if the subject fills the entire picture and if the enlargement is smaller than 8x10 inches.
However, if you plan to make larger prints, or if you crop the image and enlarge only a small region of the image, the areas with fine details will appear blurred. To avoid this problem, navigate to the High ISO NR command and switch it from the default of [Normal] to either [Low] or [Off]. We use [Off], and if the noise is too annoying, we reduce it with third-party noise reduction software, like Noise Ninja.
The command path for controlling in-camera noise reduction is as follows:
MENU > Camera Settings (6) > High ISO NR > [Normal], [Low], [Off]
This option works only on JPEG files, not on RAW files. This is one example of the knowledge you need to control and improve the appearance of pictures that you save as JPEG files.
Before we leave the topic of JPEG files and noise reduction, there is one more setting that we will briefly mention: Multi Frame NR. This setting provides even greater noise reduction than what is available with High ISO NR. Rather than relying on one exposure, Multi Frame NR takes four exposures and uses image processing to further reduce the noise. It is available on the ISO selection only if Quality is set to a JPEG file format. This option is best used when you mount your camera on a tripod and focus the lens on a stationary subject. It can be used for handheld photography, although the results can be problematic. We will discuss this option in detail in chapter 5.
Image Magnification and Digital Zoom
With a zoom lens, you can vary the magnification of your picture or movie optically. When you reach the longest focal length of the lens, you can get even greater magnification if you save the file in JPEG format. This is a digital function that will not reveal more detail than what you can capture with your lens. In fact, the sharpness is comparable to saving the picture and digitally enlarging it with post-processing software, such as Photoshop. If you wish to increase the magnification of your picture or movie, use the following command:
MENU > Custom Settings (3) > Zoom Setting > [Optical zoom only], [On:Clear-Image Zoom], [On:Digital Zoom]
The default option for the Zoom Setting command, [Optical zoom only], serves as a place marker that makes sure the digital zooms are off. Therefore, any changes in magnification will occur only if you can vary the focal length of the lens. That is, you can zoom in only by turning the zoom ring on the lens.
The [On:ClearImage Zoom] and [On:Digital Zoom] selections are software commands that set limits on how much the image can be digitally enlarged. Functionally, they are distinct from [Optical zoom only] in that they do not reveal any more detail than what can be resolved with the lens. Because of this, the image will look degraded when you use these options.
The degradation occurs because digital zooming, in effect, increases the separation between pixels on the sensor. Rather than display the separation as empty space, the camera’s software fills in the gaps with what it assumes should be there. This process is called interpolation. As a consequence, digitally enlarged images will look increasingly fuzzy as the magnification is increased. In contrast, when you use [Optical zoom only], the image size is enlarged by optically increasing the magnification on the sensor.
The predominant difference between [On:ClearImage Zoom] and [On:Digital Zoom] is the extent of enlargement that is allowed. The two options are confusing because the limits of their zoom features are not fixed; they vary depending on the size of the JPEG file. To keep things simple, we will restrict our discussion to the JPEG [L] image size option. The [On:ClearImage Zoom] option limits the increase in image magnification from its original size (1×) to twice its original size (2×). Increasing the magnification beyond this requires [On:Digital Zoom]. Selecting [On:Digital Zoom] will also activate [On:ClearOptical Zoom] so you can seamlessly go from 1× to 2× and then from 2× to 4×. Sony’s rationale for distinguishing these two settings is that they employ a different means to interpolate the increasing separation between individual pixels. Basically, [On:ClearImage Zoom] is supposed to do a better job of rendering a sharp image than [On:Digital Zoom].
After you have set the limits on the zoom settings, activate the zoom with the following command:
MENU > Camera Settings (5) > Zoom > [Desired value]
You can set the [Desired value] by pressing the left or right button, which decreases or increases the zoom, respectively. If you are using an E-mount lens that has a power zoom lever, you can implement the zoom with this lever.
Before we close this section, we will describe the Smart Zoom feature. You can use this feature only when you set the JPEG size to either [M] or [S]. This is not a Zoom Setting command option that you activate directly. As you increase the zoom, you will see a set of changing icons. First, there will be an icon for Smart Zoom, which will be replaced by an icon for [On:ClearImage Zoom], which in turn will be replaced with an icon for [On:Digital Zoom]. Keep in mind that the camera always records the data collected by the individual pixels or photosites that make up the sensor. To keep the example simple, we will assume the Aspect Ratio is set to [3:2]. When Image Size is set to [M] or [S], the sensor pixels are grouped, or binned, so the 6000 × 4000 pixel sensor appears to generate either a 3936 × 2624 sensor (if the image size is set to [M]) or a 3008 × 2000 pixel sensor (if the image size is set to [S]). You might think of this as grouping adjacent, individual pixels to form a larger superpixel. The 3936 × 2624 or 3008 × 2000 pixel image is composed of these superpixels.
When you first zoom in on an image whose size is set to [M] or [S], you increase the separation between the superpixels. But in this case, because the image is not the largest size ([L]), the newly formed space is filled in with data collected by the original single pixels. In other words, there is no interpolation—real data is used to fill the new space. As a result, there is no breakdown in the image, and Sony claims that enlargements done this way do not show any degradation. Eventually, as the magnification increases, the camera can no longer fill in the space with real data. This occurs when [On:ClearImage Zoom] is operating, and the image quality becomes degraded.
We recommend that you stick with the camera’s default setting and use [Optical zoom only]. You will obtain the same results by enlarging the image with post-processing software. These zoom commands are not available if you use RAW or RAW & JPEG.
File Formats for Movies
There are three file formats for recording movies: AVCHD, XAVC S, and MP4. AVCHD stands for Advanced Video Coding High Definition, which has a resolution of 1920 × 1080 pixels. It can record up to 60 frames per second. There are two types of AVCHD: 60i/60p or 50i/50p. The former is the standard in North America and parts of South America; the latter is the standard in Europe, Africa, and the Asia-Pacific region. Where you buy your camera determines which of these two formats is used. Files stored in these formats can be used to project your movie directly from your camera onto your television. With Sony’s PlayMemories Home software, you can also burn your movies onto disks for playback on a DVD player.
The XAVC S option is popular among videographers who plan to post-process their videos. The contrast, brightness, and color can be adjusted most efficiently when movies are recorded in this format. In addition, XAVC S provides a superior audio track. This file format can be opened with Final Cut Pro.
The advantage of the MP4 format is that you can edit these files in readily available programs, such as QuickTime 7 Pro. The output of MP4 files has lower resolution (table 2-4), but, like JPEG files, they are easier to work with on a computer. The main disadvantage is that you cannot burn MP4 files to disks for playback on a DVD player.
You must set the movie file format type through the camera menu. It is not available in the Quick Navi screen, and you cannot customize the Fn button or other buttons to provide a gateway to this command. The menu path is as follows:
MENU > Camera Settings (2) > Movie File Format > [XAVC S], [AVCHD], [MP4]
Note: When a command pertains to taking movies, Sony uses an icon that looks like a short length of film. We use the word Movie for this icon. The default setting is AVCHD. The other settings, [XAVC S] and [MP4], are best used by experienced videographers. We will discuss these options in chapter 11.

There are a lot of options for the movie record size. While you are learning about your camera, we advise against altering the Movie Record Setting command. If you change the default option, 60i 17M(FH), you may not be able to save your movies to a DVD. The default option results in a good-quality HD movie that you can burn to DVD for playback. We will cover how to create higher-quality movies in other formats in chapter 11.
Shutter Button and Autofocus
Shutter Button
The shutter button is located on the top-right panel of the camera (figure 2-5). When you press it halfway, you will feel an increase in resistance. Even though the camera has not fired, you can stop there and hold this position. This halfway press is a control point that initiates many camera settings. It can also lock the focus and exposure.

Typically, pressing the shutter button halfway either accelerates or starts the automatic focusing process. When focus is obtained with the Focus Mode command [Single-shot AF] option, the lens is locked and a green circle lights up in the lower-left corner of the screen. As long as you keep the shutter button pressed halfway, you can aim the camera toward another area without the camera refocusing. To take the picture, press the shutter button fully. This is a useful technique to master for times when the camera does not focus on the intended subject. This can occur when the subject has no fine details or when the scene is cluttered with material in front of and behind the desired subject.
Pre-AF and Single-shot AF
Most DSLRs do not start focusing until you press the shutter button. In contrast, the Sony a7 II can start focusing when you aim it at a subject. The focusing is initially slow, and it will speed up when you press the shutter button. This is made possible by a command called Pre-AF. The factory default is [On], so you will see your camera slowly focus, even if it is set to Single-shot AF. The light level governs the speed of focusing, and it is fastest under bright lighting conditions.
We prefer to leave this feature on, but if you do not care for it, you can turn it off with the following command:
Menu > Custom Setting (3) > Pre-AF > [On], [Off]
If the Focus Mode is set to [Continuous AF], the camera’s autofocus does not lock when you press the shutter button. Instead, the focus will change if the subject moves closer to or farther from the camera. A green focus indicator surrounded by green colored brackets on the display screen tells you that the camera is maintaining focus as the position of the subject changes. If the green circle is not lit, the camera has not found focus.
As we mentioned earlier, the camera lens focuses the scene onto the sensor. When you do not use an automatic mode—that is, when you use P, A, S, or M mode—you can specify which areas of the screen are to be used for focus. This will be discussed in chapter 5.
In Intelligent Auto and Superior Auto modes, the camera uses the Focus Area command [Wide] option for focusing. There are 25 rectangular regions distributed throughout the sensor that are used to establish focus. You won’t know which focusing region will be used until you press the shutter button halfway. When the camera focuses, the areas it uses to establish focus are indicated with green brackets. In these modes, the camera tends to focus on objects in the center of the field of view. This is a logical strategy because the center is the most likely place for the subject to be. However, this setting covers a large area, and the camera may focus on the wrong zone and blur the region of interest. To get more directed focus, you can set the camera to detect faces. When the Face Detection command is active, the camera identifies a face and uses it for the focus point. In the camera’s default configuration, the center button will provide even more accurate focus by targeting and focusing on the eye. Many professional portrait photographers believe the eye should be the critical point of focus.
Autofocus
Working with autofocus requires that you understand the cues for how to judge what is in focus. For the Sony a7 II, the final determination for focus is contrast. When an object is out of focus, its edges are blurred, and the transition between light and dark is gradual. When the object is brought into focus, its edges are sharply defined and emphasize the transitions from dark to light. In essence, a sharp, in-focus object has a greater range of intensity values than a fuzzy, out-of-focus object. To achieve accurate focus, the subject must have some variation between light and dark tones. It can be impossible for autofocus to focus on a blank wall.
However, contrast is not the only thing that is used to establish focus. The a7 II also uses phase detection to initiate focus, and it finalizes focus with contrast detection. Phase detectors initiate focus more quickly, although they are less accurate at identifying the final point of focus. The mechanism for phase detection determines the direction and extent that the focus needs to be changed to ensure a sharp image. However, the focus can still be off, and in some cameras, such as the Sony SLT cameras (which use phase detectors), the focus may be imperfect. Such cameras have a menu setting that allows you to calibrate the phase detectors to compensate for a lens that consistently misses perfect focus. This adjustment is not necessary for a camera like the a7 II because the final determination of focus is contrast detection.
Although contrast detection focusing is more accurate, it is slower. With contrast detectors there is a 50 percent chance that the focusing mechanism will move in a direction that renders the image out of focus. When this occurs, the contrast drops and the sensors, having noted the error, will instruct the focusing mechanism to reverse its action. In half of the cases, the contrast increases and focus is achieved. In the other half of the cases, the focusing is delayed while the focusing mechanism realizes it has blurred the image and backtracks to achieve the sharpest focus. Cameras that are equipped with this type of focusing mechanism have greater focus accuracy, but the focus is delayed. However, the Sony a7 II has an advantage because it uses a hybrid focusing scheme that takes advantage of the speed of phase detection and the accuracy of contrast detection.
There are several Focus Mode command options to choose from. You can choose [Single-shot AF], where the camera focuses then locks the focusing ring. Or you can choose [Continuous AF], where the camera continually adjusts the focus in an attempt to keep a moving object in focus. Finally, there are modes for quickly overriding automatic focus—Direct Manual Focus [DMF] and Manual Focus [MF]—that turn off automatic focus entirely. The command for setting the focus mode is as follows:
MENU > Camera Settings (3) > Focus Mode > [Single-shot AF], [Continuous AF], [DMF], [MF]
To indicate that the camera has found focus, a green circle appears in the viewfinder or on the monitor, and you will hear a short beep. If the green circle flashes, focus was not achieved. In [Continuous AF] mode, since the camera updates the focus between shots, there are green icons on the display screen (viewfinder and monitor) to tell you how automatic focusing is doing (table 2-5). If you see green brackets, the camera is in [Continuous AF] mode. If a green circle appears within the brackets, the camera has found focus. If the green circle flashes, the camera is unable to maintain focus on the subject. In both cases, the areas that are in focus are identified by green rectangular outlines.
In Intelligent Auto, Superior Auto, and many of the SCN predefined modes, the camera chooses a Focus Mode. Most of the time it is set to [Single-shot AF] to autofocus and shoot one image. However, if you choose the predefined [Sports Action] SCN mode, the camera will use [Continuous AF]. This makes sense in situations when you expect the subject to move and you need the camera to maintain focus.
Autofocusing works well, but you may need to take over and focus manually. You switch from autofocus to manual focus by using a menu and setting the camera to [DMF] or [MF].

This command can also be executed with the Quick Navi screen. Both options involve manual operation, and we will cover them in more detail in chapter 6.
Advanced Focusing Features: Face Detection and Tracking
Although we will discuss advanced focusing features in more detail in chapter 4, this is a good place to mention focusing features so you can watch out for them as you experiment with your new camera. Face Detection identifies a human face and uses it to focus on. By default, this command is [Off]; however, if you use the Portrait-related options in SCN mode, you will see that this feature is enabled and active when you frame a person’s face. To set this command in other modes, use the following path:
MENU > Camera Settings (6) > Smile/Face Detect. > [Off], [On (Regist. Faces)], [On], [Smile Shutter]
This command has an additional level. When you select Smile Shutter, it will display three suboptions: [On: Big Smile], [On: Normal Smile], and [On: Slight Smile].
When Face Detection is set to [On (Regist. Faces)] or [On], you will see a frame around each of the detected faces. The color of the frame indicates the Face Detection status, which is in part determined by whether the camera is set to autofocus or manual focus.
For autofocus, a white square frame indicates that the face has been identified and the camera can attempt to focus on it. When you press the shutter button halfway, the frame turns from white to green when focus is achieved. When several faces are involved, they may each be surrounded by a frame.
If the frame is gray, it indicates that a face has been detected but will not be used for focusing. This occurs when the camera is set to manual focus or MF. If the face has been registered but is not being used for focus, the frame will be magenta. Regardless of whether faces are detected, in MF you will be required to determine the target and focus the camera yourself.
The [On (Regist. Faces)] command is for faces you have taught the camera to recognize. When you use this command, the camera focuses on and sets the exposure for these preferred people. We will discuss how to register faces, as well as the limitations of this command, in chapter 4.
The other advanced focusing modes are Center Lock-on AF and Focus Area Lock-on AF. These modes will target and track a specific subject as it moves throughout the scene. The command for Center Lock-on AF is as follows:
MENU > Camera Settings (6) > Center Lock-on AF > [Off], [On]
The command for Focus Area Lock-on AF is as follows:
MENU > Camera Settings (3) > Focus Area > Lock-on AF > [Wide], [Zone], [Center], [Flexible Spot]
Both of these advanced features will be discussed further in chapter 5.
Recommendations
If you want to take pictures immediately, set the mode dial to AUTO and select either Intelligent Auto or Superior Auto. With either of these options, your camera will take sharp, well-exposed pictures when you press the shutter button. The camera will record the picture and the settings that were used to take the picture, such as the time and date when the picture was saved and the shutter speed, ISO, f-stop, and white balance settings. By studying a picture and its settings, you can critique your work and ask yourself if the picture could be improved by making it darker or lighter, if the depth of field should be different, if the motion is adequately frozen, and if the color balance is correct.
As you use your camera and advance to other shooting modes, you will need to become familiar with additional tools that control the appearance of your images. This chapter provided some instruction on selecting options, but remember that you can rely on the automatic settings. As you explore the camera’s manual settings, you will find that you access some menu commands frequently. You can get to them faster if you assign them to a button. If you decide to customize the control tools, as described in chapter 7, you’ll rarely have to dive into the camera menus. Instead, you’ll be able to access the functions that are most important to you by using the external dials and buttons.