8Chapter 8: Working With the Camera’s Wireless Functions

Introduction
Your Sony a7 II has Wi-Fi capabilities, so it can communicate with your wireless server, smartphone, and tablet. You can use Wi-Fi to download apps from the Sony website to your camera or to share your photographs on the Internet. You can, for example, upload pictures from your camera to Flickr or Facebook.
We will not cover all the Sony apps because they can potentially change daily. When firmware version 1.20 was released for the Sony a7 II in March 2015, many of the apps were updated from the versions that were available for the a7 and a7R. We will discuss a few apps that we think are the most useful.
Using the Camera Wirelessly
We rarely upload pictures to social media sites directly from our camera because we think the process is inconvenient. For one thing, the camera must be near a Wi-Fi network. This isn’t an issue when we are at home, but it can be a problem in the field. You have to find a Wi-Fi hot spot and stay there while you upload images or movies. When you use a hot spot, you can load Sony apps, but we don’t like to enter passwords when we are on a public network. If we want to share a photo on social media, we transfer it to our smartphone on the Wi-Fi connection between our camera and phone. Then we share the photo from our phone when we have a cellular signal.
Another reason we don’t use our camera to upload photos to social media sites is the virtual keyboard on the camera (figure 8-1). It is not ergonomic and can be a source of frustration. You have to move a selection box with the up, down, right, and left buttons. When the key you want to type is highlighted, you press the center button. Each letter you want to type requires at least two, and usually several, presses of the camera buttons. We therefore do not use the Sony Direct Upload app to upload pictures to Flickr or Facebook because entering comments is laborious. It’s easier to use a device that has a better keyboard, such as a computer or smartphone.

Similarly, we don’t download Sony apps from their website to our camera. It’s easier to do it at home because we don’t have to enter passwords on the camera’s virtual keyboard. After we download the app to our computer, we transfer it to our camera with the USB cable that came with our camera.
We use our camera’s Wi-Fi capability and the Sony Smart Remote Control App to fire the camera shutter with our iPad and iPhone. This is an excellent feature for studio, scenic, or closeup work. We can mount our camera on a tripod and view the scene via the screen on our tablet or smartphone. This allows us to move around, stage the scene, and arrange the lighting so it creates the proper mood and enhances the subject. When we work with flash, we can take the picture, quickly review the results on our tablet’s larger screen, and adjust the scene if needed without having to go back to the camera. When we work in our laboratory, we use our tablet as a preview monitor for macro photography or photomicrography. We can judge the focus, evaluate the depth of field, and control the lighting while we study the subject on the tablet screen. Although we can do all this on the camera monitor, its small size makes it unsuitable for critically evaluating an image.
Camera Apps
The Sony Smart Remote Control App was preinstalled on our a7 II when we bought the camera, so it is probably installed on yours too. But because apps are frequently updated, check the Sony website to see if you need to upgrade. Besides, you may find an app that is worth purchasing. We purchased the Time-lapse app and the Lens Compensation app.
To get the Smart Remote Control app, go to the following website on your computer:
https://www.playmemoriescameraapps.com/portal/
You have to create an account with Sony, which requires a credit card number. As long as you download free apps, your card will not be charged. Fortunately, the Smart Remote Control app is free, and we urge you to get it because it’s exceedingly useful. After you create an account, you can start the download process. Make sure your camera battery is fully charged. If you are working on an Apple computer, navigate to the following camera menu:
MENU > Setup (4) > USB Connection > [Auto], [Mass Storage], [MTP], [PC Remote]
The default setting for this command is [Auto]. The camera is supposed to automatically shift to [Mass Storage] or [MTP]. On our Apple computer, this did not happen, and our computer would not communicate with the camera. We had to manually select [MTP].
Find the Smart Remote Control app on the Sony website. Figure 8-2a shows the app with a flag that indicates we need to update it. We used our Apple computer and the Safari browser (figure 8-2b). Then we connected our camera to our computer with the supplied USB cable. The software verified the connection and downloaded the app (figure 8-3). The process was easy, and connecting the camera to our computer worked better than attempting to download the app directly to the camera by using its WiFi transceiver to connect to the Sony website.


Working with Tablets and Smartphones
After you install the Smart Remote Control app on your camera, you need to prepare your tablet or smartphone to communicate with it. This requires you to download the free PlayMemories Mobile software to your smartphone or tablet (available from Google Play for Android and the App Store for iOS). After you install PlayMemories Mobile, use the following command to allow your camera to communicate with your smart device (figures 8-4a and 8-4b):


MENU > Application > Application List > Smart Remote Control
After the Smart Remote Control app is operational, and if this is the first time you’ve connected your smart device to your camera, you will see a screen like the one in figure 8-5. It lets you know your camera is working as a transceiver, and it shows your camera’s SSID address, its name, and its password.

Next, check the Wi-Fi settings on your smart device. Locate and select your camera’s SSID, which first appears under “Choose a Network” (figure 8-6a). When you select your camera’s SSID, you can then enter the camera’s password (figure 8-6b). When your smart device indicates that it established a link to your camera, open the PlayMemories Mobile app on your smart device (figure 8-6c).


You will not have to enter the camera password again. Your smart device will remember it so your device and your camera will automatically be connected when you use the app in the future. However, the connection may not occur automatically. When our iPad is connected to our home wireless system, it does not automatically establish a connection. We have to go to our iPad’s Settings screen and manually select the Wi-Fi signal from our camera, then the password is automatically entered and the connection is established. We can then open the PlayMemories Mobile app. We find it easier to tell our iPad to forget our home Wi-Fi signal, then it automatically connects to our camera’s Wi-Fi signal.
Smart Remote Control App
We highly recommend the Smart Remote Control app. As the title implies, you can use your smart device to remotely fire your camera. It is a worthwhile app, not least because you won’t have to buy the Sony RM-VPR1 remote control. In addition, when you use the app you can tag your pictures with the location of the shot.
The app lets you override the camera’s recommended exposure in P, A, or S modes. You can see the results of your changes on your smart device screen. As you can see in figures 8-7a and 8-7b, the shutter speed, f-stop, exposure compensation, ISO, and shooting mode are displayed on your smart device. Figure 8-7a shows the icons superimposed on the Live View screen. Because the icons are hard to see against an image, figure 8-7b shows them against a black field with the camera set to manual focus. In both figures, you can see a silver circle with a camera symbol in the middle. This is a shutter button icon. Tap it to fire the shutter. In figure 8-7b, an icon of a thumb with the word FOCUS is at the top. This is the Touch Screen Focus control. Tap the icon, then tap the smart device screen where you want the point of focus to be. When focus is achieved, a green focus confirmation bracket will appear where you touched. Press the shutter button icon on your smart device to take the picture. Notice that the word FOCUS will be replaced by an x, which indicates that you can turn the feature off.


The symbols on the smart device screen are touch sensitive. Tap them to change the ISO, aperture, shutter speed, and exposure compensation. For example, in figure 8-8a we touched the shutter speed icon on our iPad to select the shutter speed, and the shutter speed turned orange. We then touched the arrows on the right side of the screen to change the shutter speed to 1/40 second (figure 8-8b).


More options are available than those displayed on the Live View screen. Notice the crossed wrench and screwdriver icon at the lower-left corner of the screen (figures 8-7a and 8-7b). This is the tools icon. Touch it to see a screen where you can adjust the white balance, the self-timer, the quality of the Live View, and how you will review and save the captured image (figure 8-9).

If you select white balance, you will see the preset options at the bottom of the screen (figure 8-10).

The Self-timer command allows you to delay firing the camera by two seconds after you press the shutter button icon on your smart device. We leave this option [Off] because we do not notice any improvement in image quality when we use it. When the a7 II exposes the sensor to light, the electronic first curtain shutter does not impart movement to blur the image.
We leave the Review Image option [Off] when we shoot under ambient light. Live View provides a good indication of what will be captured, so we don’t see the benefit of reviewing the picture afterwards. However, we turn Review Image to [On] if we shoot with flash because we cannot preview the results. We can see the results only after we take the shot, then we can see if we need to reposition the lights for the next shot.
The Save Options allow you to save your image to your smart device. We generally don’t do this for two reasons: one, the image is already saved to the SD card in the camera, and two, it takes a few seconds to transfer the image to the smart device, which slows our workflow.
To maintain a fast workflow, we leave Size of Review Image set to 2M. Although you can change the Live View Quality from [Standard] to [Image Quality Priority], we generally leave it at the default of [Standard]. Although [Image Quality Priority] provides a slight resolution improvement, it tends to slow down commands when you execute them on the smart device.
We have started using Location Information, which is a geotagging feature. The default is [Off], but when you turn it on, GPS information will be transmitted from your smart device to your camera. In figure 8-7b you can see an icon to the right of M that looks like a satellite. If you see that icon, Location Information is enabled.
Although it looks like you can make all adjustments from your smart device, this is not the case. Some options require you to push buttons on your camera. For example, you have to press the menu button on your camera to implement commands that control the app, and when you have to exit the app from the camera screen (figure 8-11a). Plus there are additional pages (figure 8-11b) you can access to adjust settings like the file format, Image Size, Aspect Ratio, Flash, Focus Area, DRO/Auto HDR, Drive Mode, Metering Mode, Creative Style, Picture Effect, and Smile/Face Detect. It can be confusing to work with both the camera controls and the smart device. We hope that future app upgrades will place all the operational controls on the smart device.


Keep in mind that Sony updates their apps separately from camera firmware updates. We recently found that the current version of Smart Remote Control had been substantially upgraded. The original firmware version for the NEX-6 camera did not allow us to record RAW files to the SD card, but the upgraded version for the a7 II does. Upgrades are free, so visit the Sony website periodically to check for new versions (Sony does not send email notifications when updates are available).
Other PlayMemories Mobile Apps
Downloading apps to your camera can be addictive. After you set up an account, you can download apps to take time-lapse videos, make multiple-exposure images, and correct optical errors in your lenses. The most expensive apps cost $9.99, others cost $4.99, and the remaining are free. Before you download apps, you should be familiar with your camera and its controls and how they interact with the app. Fortunately, you can read the specifications of the app and the app manual before you buy it. The only problem is finding the instructions. Try visiting the following website, which lists the available apps:
https://www.playmemoriescameraapps.com

Most of the apps are shown as icons. When you see one that interests you, double click its icon. For example, in figure 8-12 we double clicked the icon for Smart Remote Control. You can see the version number, a list of compatible cameras, and a dark rectangle with the word Install. Above the rectangle you will see Specifications and Instruction Manual. Click the one you’re interested in so you can read the relevant information to help you decide if you want the app. If you do, click the Install rectangle to download the app to your camera. When you’re done, the app will be available in your camera’s Application List.
There are three benefits to downloading apps. First, the apps will always be available to you, even if they are lost from your camera. For example, the apps can become corrupt if you take the battery out of your camera before you turn it off. Also, apps will be erased if you reboot your camera with the Setting Reset [Initialize] option. Fortunately, Sony keeps a record of your downloads, and you can reload them at no additional expense.
Second, you can use your apps on different cameras. For example, if you previously downloaded apps for a Sony NEX camera, you can download them to your a7 II for free (if they are compatible). You can load the same app on 10 cameras. We originally downloaded the Time-lapse app to our NEX 6 camera, and later we downloaded it to our a7, a7R, and a7 II. With each new camera, we have noticed that the app has new features and capabilities.
Third, there is no charge for upgrades. Those new features we noticed in the Time-lapse app when we downloaded it to our new cameras have been free. Originally the app could not vary the exposure as lighting conditions changed. This was not a problem if the subject was in consistent light, such as clouds moving across the sky. However, its capabilities were limited for movies of sunrises and sunsets when our goal was to capture the transition from light to dark or vice versa. The light values changed so much that parts of the movie were severely overexposed or underexposed. The second version of the app allowed the camera to alter the exposure, which solved the problem. But there was no way to control how rapidly the camera would make exposure adjustments. Finally, the third version of the app allows us to provide this control. Considering that we can download the app to 10 cameras and get free upgrades, the original purchase price of $9.99 is very reasonable.
Touchless Shutter App
One problem we have when we use our camera on a tripod is that we sometimes misplace our cable release. Although the Smart Remote Control app can be used without one, it’s sometimes not convenient to set up a Wi-Fi connection between our smartphone and our camera.
The Touchless Shutter app comes to the rescue because you can quickly and easily trigger your camera without touching it. Just pass your hand behind the eyepiece of the viewfinder, and the camera will fire. This makes it easy to shoot long exposures when you set your camera to M mode and choose the Bulb setting. When you pass your hand behind the eyepiece, the shutter will open; pass your hand behind the eyepiece again to close the shutter. The Touchless Shutter app is free, but Sony says the Bulb feature works only on the a7S and a7 II cameras. We downloaded the beta version, and we think the app is worth getting.
There are a few things to note with this app. First, the camera must automatically switch between the monitor and the viewfinder. This should be no problem because this is the default. Just to be sure, set the following command to [Auto]:
MENU > Custom (4) > FINDER/MONITOR > [Auto]
Second, when you use Bulb, it can be disconcerting if you pass your hand behind the eyepiece and nothing seems to happen. The first curtain electronic shutter has no sound, so you don’t hear a click when it opens. You might notice that the camera monitor goes black and stays black until you end the exposure by passing your hand behind the eyepiece again. At that time you might hear a thunk, which is the sound of the second shutter closing (it’s mechanical). You might want to experiment with this app before you shoot an important image so you can get used to how it works.
Third, when you use Bulb, your camera can be busy longer than you expected because of the Long Exposure NR command. Remember that this command requires a second dark exposure that is as long as the initial exposure, which doubles the amount of time before your camera is ready for the next shot. If this delay is unacceptable, turn the command off:
MENU > Camera Settings (6) > Long Exposure NR > [On], [Off]
If you want to turn it off, do so before you activate Touchless Shutter. After you activate the app, its menu structure does not permit you to access the command.
Time-Lapse App
Time-lapse records a series of still images over an extended time period and combines them to create a video. When the video is played back, it shows an accelerated passage of time. It can be used to view events whose movements are too slow to appreciate in real time, such as a flower opening, the sun sinking beneath the horizon, or clouds moving across the sky.
Time-lapse photography is challenging because you need to anticipate how the scene will change over time. The Sony Time-lapse app is designed to fire the camera at predefined intervals. The shortest interval is one second, which means that when you view the movie, the scene will move at least 24 times faster than it does in real time. An event that transpires in four minutes will be shown in a 10-second time-lapse video. If you want to speed the playback even more, use longer intervals between shots. If you set the interval to 10 seconds for the same four-minute event, the time-lapse video will last only a second.
Although it seems that the time-lapse feature would be a movie function, the camera saves the clips in a unique way. First, if you save the files as a movie, it is stored in AVI format. This is different from the AVCHD, MP4, or XAVC S format the camera uses for real-time video clips. In addition, the camera allows you to save files as still pictures—either JPEG or RAW. You can use the files later to create high-resolution movie sequences with third-party software. The Time-lapse app takes these still pictures and allows you to pan, shift, or zoom within the time-lapse sequence.
When you open the Time-lapse app, you select a theme to use under specific conditions (figure 8-13). There are themes titled Cloudy Sky, Night Sky, Night Scene, Sunset, Sunrise, and Standard. You pick a theme to match the subject, and the theme provides the settings that are most suitable for recording the event. Each theme has a brief description to help you decide which one to use, plus the camera settings are displayed. In figure 8-13, you can see that the camera will be in operation for nearly two hours (01:59:30), it will fire 240 shots at 30-second intervals, and the video will be saved in 24p format (24 frames per second progressive). The exposure will be locked and not altered after the initial shot. If the recommended settings are acceptable, press the center button to select them. The camera will return to Live View, where you can frame and compose the subject (figure 8-14).


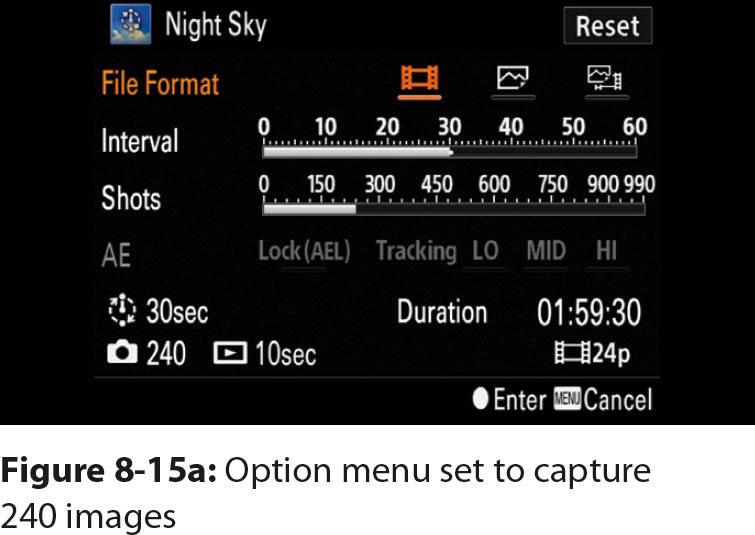
You do not have to accept the theme’s initial settings. If you want to modify the settings, do not press the center button to go to Live View. Instead, press the C4 button, which opens the Option menu that allows you to customize the file format, the total number of shots to be taken, and the interval between the shots (figure 8-15a). The app calculates the viewing time of the final video. In figure 8-15a at the bottom of the screen, you can see that if you take 240 pictures, the final video will be 10 seconds long—videos are played back at 24 frames per second (fps). Use the up and down buttons to select the file format, interval, and number of shots. After you highlight a setting, you can change it with the left and right buttons. Figure 8-15b shows that we altered the number of shots. Instead of 240 shots, we will shoot the maximum number of shots, which is 990. The camera recalculated the duration of the shoot and the length of the final video. The camera will operate for nearly 8 hours and 15 minutes (08:14:30) and produce a video that is 41 seconds long.

The AVI movie files you create with the Time-lapse app will be stored in a different directory than other image files (figure 8-16).
To play back a time-lapse sequence on your camera, open the Time-lapse app then press the playback button. If you want to see your other time-lapse clips, either let the current clip finish or press the center button to stop it. Then use the left and right buttons to see the first frame of other time-lapse sequences on the memory card. Be careful if you installed a supplemental app called Angle Shift Add-on. In most apps, if you press the MENU button the camera will return to the previous screen, but in Angle Shift Add-on the MENU button initiates a process to modify the clip by panning, shifting, or zooming during playback. To back out of the time-lapse movie and return to the menu commands, press the playback button.

To view an index of your time-lapse movies, press the Image index button (AF/MF/AEL button). Each thumbnail will display the first frame of a time-lapse movie (figure 8-17a). Highlight the movie you want to watch and press the center button. The first frame of the time-lapse movie will then appear (figure 8-17b). If you leave the Time-lapse app, you can play back only the movies you shot in real time.


To download the Time-lapse app movies to your computer, use either PlayMemories Home or iMovie. The files are not like AVCHD files. You can use a card reader and treat your SD card like an external drive. If you go to the directory shown in figure 8-16 and select the AVI files, you can copy the Time-lapse movies to your computer hard drive.
An interesting feature in Time-lapse is that you can save the files as individual JPEG still frames. These Time-lapse still images will be stored in the same directory as your other still photographs, and they are used by the Angle Shift Add-on app. You must save your Time-lapse files in JPEG or RAW format if you want to use Angle Shift Add-on.
Before we move on, we will discuss two of the newer settings in the Time-lapse app. First, keep in mind that most of the themes in this app set the exposure for the first image it takes, and it locks in those values (AE lock). The goal is to maintain a consistent brightness during playback. However, suppose you want to record the transition between sunset and night, which has different light intensities. You will have to adjust the exposure as the scene becomes darker. One approach is to use automatic exposure throughout the time-lapse sequence—a feature that Sony calls AE tracking. Three settings (low, medium, and high) allow you to control how fast the camera adjusts the exposure. This creates a smoother transition as the light level increases or fades away. The setting is finicky, and you have to play around with it for the best effect, but it’s a handy feature to help you improve your time-lapse movies.
The most recent feature for the Time-lapse app, which we touched on briefly, is an add-on app called Angle Shift Add-on. You first have to download the Time-lapse app, then after you install Angle Shift Add-on, it will appear as a new menu command in the Time-lapse app (figure 8-17b). When you press the MENU button, a screen will show the effects you can apply to your movie (figure 8-18). Press the center button to modify the effect.

There are a couple of things to note about this add-on app. First, it costs $4.99, and considering its limitations, you may not think it’s worth purchasing. For example, the shift in viewpoint is limited. You do not have the freedom to define the path of the shift in viewpoint. Zooming works in only one direction; you can only zoom out, not in. Plus you have to save your time-lapse movie frames as still pictures. Angle Shift Add-on will not work if you saved your time-lapse file as a high-definition movie. Second, the app will create a new AVI file that you can play back at either 24 fps or 30 fps.
Lens Compensation App
The Lens Compensation app seems redundant because the camera has a series of commands in the Custom Settings menu called Lens Comp. Those commands are for Sony FE lenses; they provide automatic correction for vignetting, distortion, and lateral chromatic aberration. The adjustments are built into the a7 II software; you cannot control the extent of the corrections. The lens faults are cataloged by Sony in an in-camera database. When you apply Lens Comp., the command uses that database to decide how much correction to apply. The command is normally turned on so saved image files will not exhibit lens aberrations. If you turn off the Lens Comp. command, your images can have vignetting, distortion, and lateral chromatic aberration.
The Lens Compensation app is significantly different because you control the degree of correction. Moreover, it provides correction for any manufacturers’ lenses. The app is flexible because you create a lens correction database for the lenses you own. First you mount a lens on your camera. With the Lens Compensation app, you apply corrections for vignetting and geometric distortion. The adjustments are done on the camera displays, then you store the settings in your camera’s internal memory. You can provide correction for up to 100 lenses. When you need to apply corrections, you call up the registered information and apply it to the lens you are using.
In the rest of this section, we will describe how to get started with the app, how to determine which lens corrections are needed (and to what degree), how to store those corrections in the camera’s memory, and how to apply the corrections.
First, download the Lens Compensation app from the Sony website (www.playmemoriescameraapps.com) to your camera. It costs $9.99. Then select the Lens Compensation app from your camera’s Application list (figure 8-19):

MENU > Application (1) > Application List
When you start the app, you will see a screen titled Lens Profile List. The first time you open the app, the list will be empty (figure 8-20a). Highlight the Create New selection. On the next screen, you use the camera’s virtual keyboard to input a lens name, its focal length, and its f-stop (figure 8-20b). The lens corrections apply to a single focal length, so it is best to use the app with prime lenses. The app is less suitable for zoom lenses because aberrations may change at various focal lengths. When you use a zoom lens, you likely zoom in and out, so if you decide to use the app for a zoom lens, decide which focal length you will apply the adjustment to. Although you can theoretically select different focal lengths for a zoom lens, this strategy is cumbersome.


Plan ahead before you make a correction to a lens. For example, if you plan to correct for Peripheral Shading (vignetting), find an evenly lit white surface, mount your camera on a tripod, and do a custom white balance. Then, in the app, highlight the optical characteristic you want to change. In figure 8-20c we chose Peripheral Shading.

Press the center button to activate the Peripheral Shading correction process. You will see a new screen with a live view through the lens (figure 8-21a). Notice that the peripheral areas of the scene are darker than the center. At the right of the screen you can see an orange dot that you can move with the up and down buttons. There are three rectangles at the bottom of the screen; each has a square icon in the middle. Use the right and left buttons to navigate to these squares. They represent the types of shading you might see. The square on the left represents neutral darkening of the corners with no color cast; the middle square represents shading with a magenta cast; the right square represents shading with a blue cast. In figure 8-21a, we chose the left square (no color cast). You can move the orange dot on the scale to adjust the peripheral areas of the image. In figure 8-21b we raised the dot to +11 to lighten the peripheral areas. Now the peripheral areas of the image match the center of the image and there is no shading. Press the MENU button when you are done, and the camera will return to the previous screen.


At this point, if you want to correct the lens for distortion, select the Distortion setting from the menu. When you press the center button, you will go to Live View and there will be a control for correcting distortion. Mount your camera on a tripod and find a subject with parallel lines in both the horizontal and vertical directions. Make sure the plane of the camera sensor is parallel to these lines. On the right side of the screen you will see a vertical bar with a barrel distortion icon at the top and a pincushion icon at the bottom. Use the up and down buttons to move the orange dot and correct the distortion errors. When you are done, press the center button. The camera will return to the menu, which now has a SAVE option (figure 8-22). Highlight SAVE and press the center button. You have now corrected your lens for peripheral shading and distortion, and you saved the settings.

We recommend using the Lens Compensation app to correct peripheral shading and distortion, but not chromatic aberration. The color fringes that characterize chromatic aberration are not visible on the camera monitor or in the viewfinder. To evaluate a lens for this error, you have to view a saved image on your computer screen. Unlike the peripheral shading and distortion corrections, the app does not provide real-time feedback. You have to apply a correction and hope you got it right. You apply a correction, take a photograph, load it onto your computer, and look at it to see if the problem is fixed. Most likely, you will have applied too much or too little correction, so you have to repeat the process. This is a time-consuming exercise, so you have to decide if it is worthwhile. It is easier to make the correction during post-processing. Photoshop and other software can remove color fringes caused by chromatic aberration.
You can export lens compensation settings to your camera’s SD card. If you want to use a different Sony a7 series camera with a lens you have corrected, you can insert the SD card into the other camera and import the settings to that camera’s internal memory. This is also a good way to back up your lens compensation settings. If you have to reinitialize your camera, the lens compensation settings, including those from the Lens Compensation app, will be lost from your camera’s internal memory. If you have the settings backed up on an SD card, you can simply reload them.
After you register your lenses in the Lens Compensation app, you apply the corrections for a specific lens when you mount it on your camera for a photo shoot. The app remembers the last lens you used. When you open the app, it will recall the corrections for that lens and apply them. If you want to select another lens, press the MENU button and select Application Top (figure 8-23a). Press the center button to see the list of lenses you have registered on the Lens Profile List (figure 8-23b).


Highlight the lens you want to use. At this point, you have some additional options. Press the C4 button to choose Option at the bottom of the screen, which will display an additional set of commands: Edit, Export, and Delete (figure 8-24). Edit allows you to adjust the lens corrections you previously made. This option is often necessary if you attempt to correct a lens for chromatic aberration. Export allows you to send the lens registration data to a memory card, and Delete removes the lens registration information. As previously mentioned, you can use the memory card in another a7 series camera that has the Lens Compensation app installed. You will then have the option to import the lens settings to that camera.

Recommendations
When Sony first released downloadable apps for their cameras, we debated their utility and value. But now we find that the apps are useful and they add an element of fun to our photography. There are a lot of apps to choose from, and we covered the few that we think are the most useful. We use apps that simplify our workflow, and we ignore those that process images on the camera monitor; we prefer to do image processing on our computer and large monitor.
The Smart Remote Control, Touchless Shutter, Time-lapse, and Lens Compensation apps are helpful in our workflow. Smart Remote Control facilitates our scientific photography because we can mount our camera on a tripod, a focusing rail, or a microscope and have a large preview screen to frame and compose our image. The app provides just enough photographic controls that we find it indispensable for this type of work. If you like the live preview advantage, a tablet is an ideal choice. However, it’s convenient to use a smartphone as a controller. We often need a remote triggering device, and even though we may forget our cable or infrared remote, we never forget our phones. This feature is always available, even if you don’t have a cellular signal, because communication occurs over a Wi-Fi connection between the camera and the smartphone. And if we forget to bring our cell phone, we can use the Touchless Shutter app. It is always on our camera, and it’s faster to activate than Smart Remote Control.
We are surprised how often we use the Time-lapse app. It’s fun to use, and it makes it easy to shoot a time-lapse sequence. The themes in the app give you an easy introduction to this type of photography. The one limitation is that the app limits you to a 40-second movie. However, you can capture a whole day in those 40 seconds.
We use the Lens Compensation app with our legacy lenses. We take advantage of the corrections for shading and distortion, but it is too labor intensive to use for chromatic aberration.
We strongly recommend that you try these apps and check out the others. New apps and updates can be added to the Sony website at any time, so check back frequently. We are sure you will enjoy the results.