
1Chapter 1: Getting Started

Introduction
This book is about Sony’s a7 II full-frame camera. It is a complex camera with an extensive menu structure that has more than 125 menu commands. Finding the right command and selecting it can require you to press half a dozen buttons, which can be slow and arduous and is not conducive to making quick camera adjustments for your photographic scenes. But help is on the way! We will describe how to use shortcuts to modify the camera settings so you can quickly access the most important commands. Photographs of the camera body, with its controls labeled and identified, are provided at the beginning of this book. You should learn about the buttons so you can get the most out of your new camera, but you shouldn’t feel pressured to immediately memorize all of them. You can start taking photographs if you know where the mode dial and the shutter button are.
We assume you already have a Sony a7 II camera and that you have taken it out of the box and inserted a fully charged battery into the camera body. Even though most people do this immediately after they buy a camera, we will describe how to do it and provide some tips on how to use the supplied battery and charger. Also, we provide a section that describes how to set the camera’s date and home information. Again, this is something you may have already done, but it may be useful to read our description of the process because it also introduces how to navigate the menu commands. We also describe the camera buttons and dials so you can begin to use them.
Menu Navigation Commands
Throughout the book we refer to commands and explain how to locate them within the menu. To do this, we use a shorthand command path that reflects the flow of the menu. For example, to set the camera’s date and time, specifically the Daylight Savings value, you will use the path in the following example:
MENU > Setup (4) > Date/Time Setup > Daylight Savings > [On], [Off]
The camera’s menu system has page numbers to help you locate a certain command. We indicate those page numbers next to the main menu choice in parentheses, such as Setup (4) in the previous example.
We use the greater-than symbol > to indicate levels within the command structure. In the previous example, the > symbol in Date/Time Setup > Daylight Savings means that you will navigate to the Daylight Savings submenu from Date/Time Setup.
We use square brackets to enclose values you can select. In the previous example, you can select [On] or [Off]. For most commands, the options are [On] or [Off], which means you can choose only one. However, this is not always the case. There are a few commands where you must select values for multiple options. In the following example, the submenu Date/Time has multiple settings. In these situations, the name of each setting will be shown in square brackets.
MENU > Setup (4) > Date/Time Setup > Date/Time > [month], [day], [year], [hour], [minute]
Some options are represented by icons, but the camera usually displays a name when an icon is highlighted. For clarity, we will enclose the name, rather than the icon, in the square brackets.
Learning Progression: From Automatic to Manual
The simplest way to start using the camera is to turn the mode dial to the AUTO icon, which controls both the Intelligent Auto and Superior Auto shooting modes. These modes make photography a point-and-shoot operation. One benefit of digital photography is that the image file maintains a record of all your settings. You can recall the sensitivity of the sensor, the lens type, the lens opening, and the shutter speed. This can be a powerful teaching aid. By taking the time to study a picture, analyze the results, and determine how it might be improved, you’ll take the first step toward figuring out a strategy to improve your photography. If a moving subject is too blurry, you can review your camera settings and determine if the shutter speed should be shorter. If the depth of field is too narrow and the background is out of focus, you can check your lens opening and remember to use a smaller one when you want the background and foreground to be sharp in a future picture.
Your Sony camera can be regarded as a teaching tool. It lends itself perfectly to helping you learn photography because you can start with fully automatic (AUTO), then advance to Scene Selection (SCN), then proceed to semiautomatic (P, S, and A), and finally learn to shoot in manual mode (M). The automatic modes are like training wheels that ensure you capture technically excellent pictures. Manual mode provides the most control so you can create art rather than simply record scenes. This book is assembled in a similar progression; the automated features are introduced in the beginning, then the semiautomatic modes are discussed, and the more complicated manual settings are introduced later. We hope this approach will be useful to readers at all levels of photographic experience.
The Sony camera’s display screens show a variety of camera setting and format icons when you are about to take a picture. We provide descriptions of these icons within the chapters. Many of the icons are critical for you to learn when you use the camera. They include indications for identifying focus, shutter speed, and stabilization settings.
We devote a significant portion of the book to the camera’s automatic modes. Even an expert photographer may wish to quickly grab a shot when there is not enough time to manually choose optimum camera settings. The automatic modes allow you to capture an image quickly and guarantee you’ll get the shot.
Chapter 1 discusses the camera basics so you can get started using your camera. Chapter 2 covers photographic basics and expands on the camera’s basic controls. This will give you an intuitive feel for what the camera can do and emphasizes the importance of different types of settings in pictorial compositions. Chapter 3 describes how to manage your images. It covers topics from how to customize the display screens to organizing your saved images. In later chapters we describe how to get the most out of your camera. We progress from the automatic modes in chapter 4 to the semiautomatic modes in chapter 5. Chapter 6 discusses how to take full control of the camera settings. Later chapters explore the advanced features of your camera and the accessories that are available.
The Camera
The Sony a7 II is an interchangeable lens camera that has a full-frame sensor (36 × 24mm). The image stabilization is based in the body, not in the lens. Other cameras have similar image stabilization designs, but they use a much smaller sensor.
When you hold and aim a long telephoto lens, you can appreciate how effective the built-in stabilization is as it dampens tremors and movements that result from handholding the camera. Without stabilization, you will see the image move in the frame. When you activate the stabilizer by slightly pressing the shutter button, the image becomes steady. This feature is also helpful for videographers because a video can be ruined if the subject appears to bounce around within the frame. To an extent, the image stabilizer on the a7 II helps you keep the subject centered within the frame.
A weakness in the Sony a7 II is the limited number of FE-mount lenses. To date, at least 10 lenses have been designed for this camera; the longest focal length is available in the 24–240mm zoom lens. If you want to explore longer lenses, you can purchase a third-party lens that was not designed for the a7 II. Usually, some features must be sacrificed, such as autofocus, image stabilization, or both. However, you can avoid this disadvantage if you buy Sony A-mount lenses and the appropriate lens adapter. If you use this approach, you can purchase a 500mm lens, which has automatic focus and image stabilization. We’ll discuss these options in chapter 9.
The a7 II’s 36 × 24mm sensor has theoretical and practical advantages over the smaller sensor arrays that are used in Micro Four Thirds or APS-C cameras. For a given pixel count, a larger sensor will have a greater dynamic range and lower noise levels. These advantages are most apparent when you work in low light levels. In bright daylight, these advantages are less evident, and many users are satisfied with using a smaller sensor. However, for professionals or enthusiasts who are exploring the limits of what can be captured with their cameras, a larger full-frame sensor is the best tool for the job.
Some photographers have noted the increase in weight from the Sony a7 to the a7 II. Remember that the a7 II is still the lightest full-frame interchangeable lens camera on the market. It is 4 ounces lighter than the Leica M-P rangefinder digital camera, and a half pound lighter than most Canon and Nikon digital single lens reflex (DSLR) cameras. This makes the Sony a7 II ideal for mobile photographers who want to minimize the weight of photographic hardware.

Which camera should you buy? Since you bought this book, you’ve probably already purchased the Sony a7 II, but if you haven’t, you may be reading this book to get a feel for the camera and to decide if it would be a worthwhile purchase. We recommend that if you already own a Nikon or Canon full-frame camera, you should evaluate whether it is cost-effective to replace it. Switching to a new camera system can be expensive, and we won’t claim that the quality of your photographs will improve markedly if you switch.
Having said that, there are some valid reasons for changing systems. One reason may be the weight of the camera. You can see in table 1-1 that the Sony a7 II is significantly lighter than its competitors, which is important for people who must carry their equipment. The Sony a7 II and the Sony 35mm f/2.8 lens together weigh only 24 ounces—less than the weight of a Nikon D610 without a lens. Other advantages of the Sony a7 II are its electronic viewfinder (EVF) and rear organic light-emitting diode (OLED) monitor, which provide a good indication of how an image will appear before you take a picture. Unlike with the optical viewfinders on Nikon, Canon, or Leica cameras, you will see the effects of white balance and exposure settings before you take a picture. In addition, data indicators specify the degree of overexposure and if the camera isn’t level.
With its position on the lower end of the price scale for full-frame cameras, the Sony a7 II is affordable, plus you can equip it with other manufacturers’ lenses.
If you switch camera systems, you may not have to replace all your hardware with Sony equipment. We have been gradually selling our Nikon equipment and replacing it with Sony cameras and lenses. However, we have retained many of our manual-focus Nikon lenses for use on the Sony a7 II. As shown in table 1-2, we kept our macro lenses, which we use only with manual focus. The 180mm f/2.8 and the 300mm f/4.0 lenses are not available with either the Sony A or FE mounts. Both of these lenses are very sharp.

We find that the Sony a7 II is a superior tool for scientific work. When we use it with a manual-focus lens, we have greater focusing accuracy with the camera’s electronic displays than we have when using the optical viewfinder of a typical DSLR. Also, we find that the a7 II is ergonomically superior to Canon and Nikon cameras when we take pictures through microscopes. The a7 II has an electronic first-curtain shutter, which ensures the camera is vibration free when it takes a picture. Because this camera is mirrorless, there’s no need to worry about the jarring effects of an instant-return mirror, as with a DSLR, or the release of a mechanical first-curtain shutter. The electronic display of the a7 II has a level gauge so you can make sure your camera is perpendicular to the ground, such as for architectural work. With shift lenses, you can avoid perspective distortion by using level controls to keep the sensor plane parallel to the edge of a building; that is, the sensor plane will be perpendicular to the ground. Sony does not make such lenses; however, Samyang and Schneider do and these can be used on the a7 II with the aid of simple adapters.
Description of the Camera and Its Features
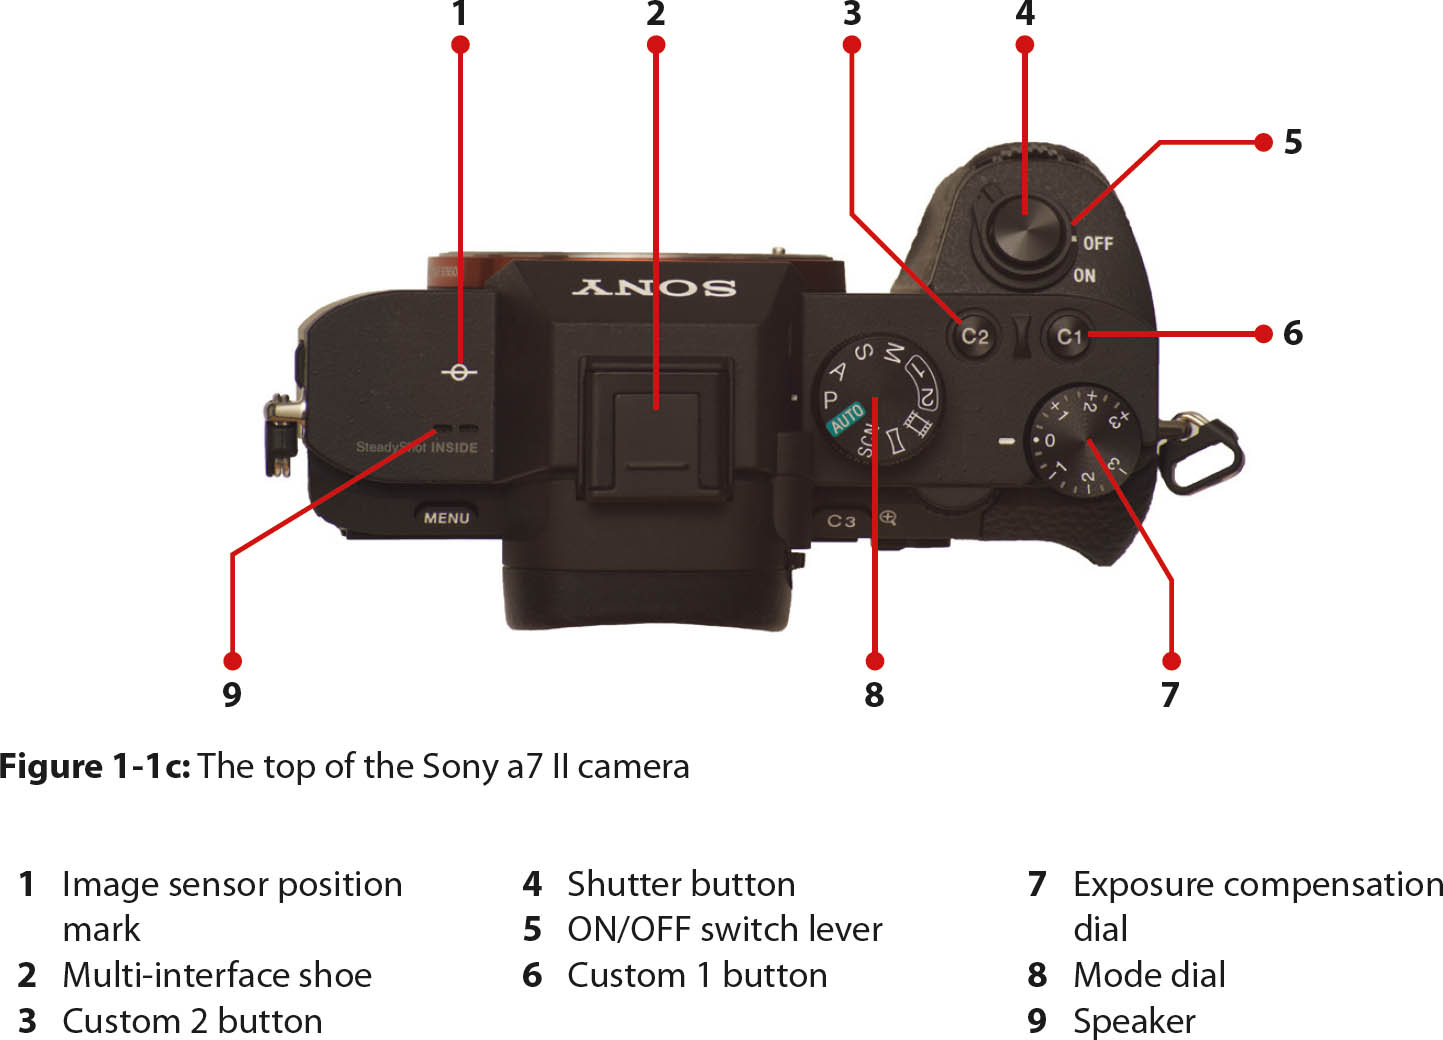
The Sony a7 II has many buttons, dials, levers, and other elements. Figures 1-1a through 1-1d show each side of the camera with each of the camera’s components identified. Unlike a DSLR, which uses a mirror to direct light to an optical viewfinder, the Sony a7 II is mirrorless. Light goes directly to the sensor, which drives one of two electronic displays: the 3-inch rear monitor or the EVF, both shown in figure 1-1b. Having two ways to view the subject enhances the camera’s versatility. You can use the viewfinder when you shoot under bright outdoor lighting that makes it difficult to see the monitor. When you use long telephoto lenses and handhold your camera, you should use the viewfinder to provide increased stability. Use the monitor when you record videos or when you mount your camera on a tripod. When we take macro pictures of subjects that are close to ground level, we use the monitor to frame and compose the picture. With the viewfinder we would have to lie on the ground, sprawled behind the camera.


Unlike an optical viewfinder, these two electronic displays provide extensive data about the scene so you can adjust the exposure. You can view a histogram of the overall light intensity, and by over- or underexposing the scene you can see if the highlights are burned out or if the shadows are deep and impenetrable black areas. Additionally, you can accurately gauge the appearance of the scene before the sensor captures it. If the exposure is set lower than the camera’s recommendation, the viewfinder displays a darkened image. As you increase the exposure, the scene in the viewfinder becomes progressively brighter in proportion to the wider aperture or slower shutter speed. This is advantageous because errors in exposure or white balance can be corrected before you take a picture, which promotes an efficient workflow during post-processing. Although the electronic displays don’t have the dynamic range of an optical viewfinder, you can, with experience and the aid of the histogram, judge if the light intensity of the entire scene will be recorded.

With the proper camera settings, the EVF can provide a real-time preview of the depth of field. When the camera is set to aperture-priority (A) mode, the image is displayed at the working aperture of the lens, so you can determine if the background or foreground will be rendered sharply or if it will be blurred. You can do this with a DSLR optical viewfinder, but you must press a button to physically close down the aperture of the lens. This is inconvenient because as the aperture closes, the optical viewfinder becomes progressively dimmer, making it difficult to see fine details. This is not the case with an EVF in A mode. The screen maintains a constant brightness level so you can clearly see how fine details will be rendered at various aperture settings.
For capturing movies, the absence of a hinged mirror in the a7 II has a singular advantage. It’s easier to record movies with a mirrorless camera than with a DSLR. To start recording, you just press a button. In contrast, with a DSLR you must raise the mirror before you can record.
The remainder of the a7 II is like a DSLR. You can use it with an external flash, and it has a built-in Wi-Fi transceiver. The latter is used to communicate with your smartphone or tablet for transferring images. With the right apps, you can use your mobile device as an external remote control for the camera. The larger display of a tablet can be used as a monitor from which you control the operation of the camera. In addition, Wi-Fi allows you to expand the camera’s versatility; for example, you can use apps for time-lapse photography or to correct lens aberrations in non-Sony lenses.
Dual Viewing System
We mentioned that the a7 II has a dual electronic viewing system: a monitor and an EVF. Each has unique advantages, and becoming proficient in selecting which preview screen to use under various shooting conditions can help you obtain results that are not available with traditional DSLRs.
The monitor is the preferred framing device for someone who shoots movies, and it’s advantageous when the camera is mounted on a tripod. Because the monitor can be tilted, it’s useful when you work on copy stands and with macro photography. When you do this type of work, the monitor replaces the viewfinder. It’s difficult, if not impossible, to place your eyes directly behind the camera, and it’s a distinct advantage to view the camera monitor from above.
Having said this, you should get accustomed to using the viewfinder. Depending on the conditions, it offers a different set of advantages when you frame, view, and focus on the subject. For one thing, you can see finer details on the viewfinder screen because it has almost double the pixel count. Also, the diopter-adjustment dial on the viewfinder is a boon for people who are nearsighted or farsighted. They can dial in a sharp image on the viewfinder even if it is difficult to hold the camera far enough away to read the icons or see details that are displayed on the monitor. The viewfinder also offers advantages when you shoot under bright daytime conditions. The ambient light can make it difficult to see the monitor, but the viewfinder offers a good view of the subject. Another advantage is that for handheld photography, the camera is more stable when you hold the camera against your face. This allows you to use longer telephoto lenses or slower shutter speeds. When you use the monitor, there is a lack of stabilization because you hold the camera away from your body with outstretched arms.
Some photographers prefer a clean view of the subject when they frame it in the viewfinder or on the monitor. If there is data on the display, you can get an uncluttered view by pressing the DISP button; conversely, if the display is free of data, you can add more data to it by pressing the DISP button.
Diopter-Adjustment Dial
To effectively use the viewfinder, you need to precisely focus it for your eyesight. To the right of the EVF there is a small wheel called the diopter-adjustment dial (figure 1-2). Rotate the dial until the objects in the viewfinder are maximally sharp. We have found that the best way to determine if the viewfinder is focused for our eyesight is to look at a number or letter that is displayed in the viewfinder and adjust the dial until it is sharp.
If you wear eyeglasses with either progressive or bifocal lenses, you must take care to always position your corrective lenses at the same point over the viewfinder. If you share your camera with others, they may need to change the diopter adjustment to work for their eyesight. If one person is nearsighted and another is farsighted, the diopter-adjustment dial will have to be fine-tuned when they exchange the camera.

Setting Up Your New Sony a7 II
When you take your camera out of the box, you will find the following items:
• Camera body
• E-mount 28–70mm zoom lens (optional)
• Front and rear lens caps (only when lens is included)
• Body cap
• Accessory shoe cap
• Rechargeable InfoLithium (NP-FW50) battery
• AC adapter
• Shoulder/neck strap
• Micro USB cable
Make sure you have everything before you put together your new camera. Attach the lens and insert the battery and a memory card. We recommend that you attach the shoulder/neck strap and use it in the field to make sure you don’t drop the camera. Before you use the camera, make sure the battery is fully charged. Connect the AC adapter to the USB port cable, and insert the cable into the camera’s USB port. Although you can use the USB cable to charge the battery with your computer, we don’t recommend this because it takes longer to charge the battery. In either case, when you plug in the camera, a yellow light should appear. You can see it in figure 1-3, which has been processed to show the location of the glowing LED bulb. When the battery is fully charged, this lamp will turn off.

Recommendation: Get a Spare Battery
The single battery included with the camera will not be sufficient for a long day of shooting, so you will want to purchase replacement batteries. We recommend getting at least one spare, and you may want to consider getting two spare batteries. Although two may seem excessive and expensive, we base our recommendation on experience when we shoot for a full day in the field or the laboratory. There is nothing more exasperating than running out of power during a photographic assignment or a daily outing. Depending on the type of shooting you do, the battery can quickly be drained. Having two spare batteries is insurance that your photography excursion won’t be cut short due to the lack of power.
We caution against buying less expensive third-party batteries, which could void the camera warranty. If the battery damages your camera, Sony will not pick up the repair tab. For us, the savings from buying less expensive batteries is not worth the risk of losing our camera warranty.
We have tried third-party batteries, and although they worked, it is our impression that they had less electrical capacity than Sony batteries. Under ideal conditions you may be happy with third-party batteries, so no harm is done. But you can also end up with a battery that doesn’t hold as much of a charge or drains too quickly. In a worst-case scenario, it damages your camera, and the money you saved by buying the inexpensive battery will be lost because you’ll have to repair or replace your camera.
Along with extra batteries, purchase a charger for them. You cannot use your camera while it is plugged in to charge a battery. Sony sells a charger that allows you to recharge batteries independent of the camera.
Memory Card
You will need a memory card for your camera. Unlike some point-and-shoot cameras, the a7 II has no internal memory for storing images. You may already have a compatible memory card from a previous camera.
The a7 II uses a secure digital (SD) memory card, which is about the size of a postage stamp. SD cards come in many varieties, with various memory capacities and data transfer speeds. They are designated as SD, SDHC, or SDXC, which refers to the card’s maximum memory capacity. Don’t be too concerned about these designations because your camera can handle all of them, but find out if your computer can handle SDXC cards. They have an improved bus, and the computer must have the correct contacts to take advantage of the card’s capabilities. Also, an SDXC card requires the computer to use an operating system that can address more than 32 gigabytes (GB) of disk space.
Before you purchase an SDXC card, which has a potential capacity of 2 terabytes (TB), make sure your computer can utilize this much memory in an external disk. Computers that use early versions of Windows may not be able to handle more than 32 GB. If in doubt, stick to SD or SDHC cards; their memory capacity is sufficient for most still photographers. SDXC cards are for videographers who need more memory capacity and a higher write speed. If you insert the card into a computer that cannot handle its speed or capacity, you may receive a prompt that asks you to format the card. Don’t format the card unless you are prepared to lose all the data stored on it.
The most important thing to look for is the card’s class rating. Memory cards are categorized into classes (2, 4, 6, 8, and 10); the higher the class, the faster the card can receive and record data. The size and class of the memory card you buy depends on how you will use the camera and how you plan to maintain the stored pictures and movies. If you plan to record a lot of movies, you will need a high-capacity memory card with a fast speed rating. Although the Sony a7 II users manual says a Class 4 rating is sufficient for recording movies, Sony technical support recommends a Class 10 card. If you want to take the highest quality videos with your camera, buy a card that is rated as Ultra High Speed (UHS). For this type of work, use the UHS Class 1 SD card.
You can use SD, SDHC, or SDXC memory cards from any manufacturer. Sony currently sells an SDHC Class 10 card that holds 64 GB of data for about $40, or you can opt for a 32 GB card (about $19) or a 16 GB card (about $13). SDXC cards are the most expensive and can have the highest memory rating. A potential problem with high-capacity memory cards is that a card failure can result in a greater loss of data. For this reason, many photographers use several smaller-capacity memory cards so that if one goes bad, the loss of pictures and movies is limited to that one card.
Instead of using an SD card, you may wish to use a Sony Memory Stick card. They aren’t as common, and they are a bit more expensive in terms of memory capacity. However, if you already own these cards, you may wish to use them in your new camera. Note that if you want to record both still pictures and movies on a Memory Stick PRO Duo, it must be the Mark 2 version. The Memory Stick PRO-HG Duo and the Memory Stick XC-HG Duo also record both still pictures and movies. If you wish to record the highest quality movies in XAVC S format, you’ll need to use Memory Stick XC-HG Duo media.
When you first use a memory card, don’t use the format command on your computer to prepare the card for receiving images. Instead, use the camera’s format command to prepare the card for your camera:
MENU > Setup (5) > Format
Recommendation: Using SD Cards
At the end of each shooting day, get in the habit of downloading the images from your camera to your computer. After the files are downloaded, erase the images on the card by using the camera’s Format command. This allows you to start fresh the next day and minimizes the risk of running out of memory. If you simply erase the files with the delete command, the SD card may become fragmented, which may cause interruptions while you record the highest quality movies.
Although you can connect your camera to your computer with a cable and transfer the stored files directly, it is a slow process. The download will go faster if your computer has a USB 3.0 port. Attach a card reader that supports USB 3.0 so you can take the memory card out of your camera, insert it into the card reader, and download your images and movies.
If you transfer your files with the camera’s USB port, its download speed is limited by the camera. The Sony a7 II uses the USB 2.0 standard, which, in theory, transmits data at 1/10 the speed of a system that is configured for USB 3.0. If you use a USB 3.0 card reader and a USB 3.0 port on your computer, the download time will be significantly reduced.
Assembling the Camera
Make sure your camera is turned off before you insert or remove the battery, memory card, and lens.
The battery and memory card occupy different locations in the camera. The door to the battery chamber is on the bottom of the camera. When you invert the camera, you will see the cover with a sliding switch that unlocks it. After you unlock the door and open it, slide the battery in the direction of the arrow. The battery can be fully seated only one way; a set of ridges surrounds the contacts and helps you orient the battery properly. You’ll hear a solid click when the battery is properly seated. You can now close the battery cover and slide the switch to lock it in place. To remove the battery, open the compartment to expose a small blue lever that blocks the battery (figure 1-4). Push the lever to the side, and the battery will pop up for easy removal. Note that the battery compartment is not always accessible when the camera is mounted on a tripod.

The memory card compartment is on the right side of the camera; it can be opened even if the camera is mounted on a tripod. You can open the hinged door by pushing your finger toward the rear of the camera to expose the slot for the memory card. Insert the memory card with the metallic bars going in first. The memory card will lock into position with a click. To remove the card, gently push it down to release the lock, and the card will pop up for easy removal.
The card can be loaded in only one direction; don’t force it. If the memory card is defective or if its contacts are dirty, a NO CARD message will be displayed on the monitor or in the viewfinder when you turn the camera on. If this occurs, remove the memory card, check it, brush off any dirt, and reinsert it. The message should go away. If it doesn’t, the card may be defective and will have to be replaced.
Next, attach the lens to the camera body. Remove the rear lens and camera body caps. Store both caps in a safe place for future use. Mounting the lens is a two-step process. There is a white bump on the barrel of the lens (figure 1-5a) and a white dot on the rim of the camera body’s lens mount (figure 1-5b). Align these two indicators, insert the lens, then rotate the lens clockwise until you feel and hear a click. The lens is now locked in position and ready to use.
Last but not least, attach the camera strap. It should always be secured to the camera and placed either around your neck or over your shoulder when you carry or use your camera.

Protecting the Lens
When we take photographs, we often forget how vulnerable the lens is. It sits at the front of the camera and is exposed to the elements, where it can be struck by an object or coated with dust.
Be proactive and protect your lens. When you remove it from the camera, attach the front and rear lens caps to protect the glass elements. This is especially important when you place the lens in your camera bag, where a hard object may scratch the glass or damage the contacts. Make sure to use the caps supplied with the lens. It is not unusual to lose one, especially the rear cap. If this happens, replace it. Avoid the inexpensive plastic caps that fit on the rear of the lens by friction and can easily be knocked off. Instead, get a rear cap with a bayonet mount to engage the rear of the lens. Periodically check the cap to make sure it fits securely. With time, the edges of a plastic cap can be worn down so the cap becomes loose.
It’s important to protect the front of the lens as well. One way to protect the front element is to always use a lens hood. Not only will it reduce flare, but it is also a physical barrier that shields the front lens element. To further protect the front of the lens, we screw in an ultraviolet (UV) filter, which serves as a clear optical lens cap. Sony sells UV filters, but if you know the thread diameter of your lens, you can buy a filter from a different manufacturer.
Some photographers claim that UV filters degrade image quality and offer minimal protection. We disagree with this viewpoint. If you use high-quality filters made by reputable manufacturers, there is minimal image degradation. Filters made by Tiffen, Hoya, and B+W are of excellent quality. You may be surprised at their cost, but they are worth it. Remember that professional filters are optically ground, made from premium glass, and multicoated to prevent flare, so the high price is warranted. We routinely mount high-quality UV filters on our lenses as soon as we get them. We have found that inexpensive, off-brand UV filters are problematic; the worst of them reduce the sharpness of the image.
An advantage of using a filter as an optical lens caps is that it can be cleaned very easily. When we work in the field, we simply wipe the dust off the filter with a quick pass of lens tissue or a microfiber cloth. Such a cavalier approach is not advisable when you clean the front element of a lens. A piece of grit can scratch the glass or damage the coatings. It’s a lot cheaper to replace a damaged filter than a damaged lens.
Recommendation: Get a Protective Screen for the Monitor
Although the surface of the Sony a7 II monitor is made of durable material, it can be scratched. This won’t affect the camera’s ability to take good pictures, but when you review or frame a new scene, it can detract from the view. We recommend that you buy a monitor protector. Sony offers them for the a7 II at a nominal cost. We purchased the semihard plastic model. It is sticky, and you apply it directly to the monitor. The adhesive is not a permanent bond, so if the protector gets scratched, you can replace it. Another nice feature of the protector is that it resists picking up oil from your fingertips.
Turning On the Camera
After you have assembled your camera, you are ready to turn it on. The ON/OFF power switch is on the top-right side of the camera, beneath the shutter button (figure 1-6). Move the lever so the indicator matches up with the ON option.

Setting the Camera Date, Time, and Area
The first time you turn on the camera, it will ask if you want to set your home location and the internal clock. Although you don’t have to set these options, it is a shame not to. When they are set properly, the clock will record the time and date of each picture, which is valuable when you organize your images. Setting the date and time allows you to learn how to navigate the menu options and see what the many prompts look like to help you execute a command.

The first screen you will see when you turn on the camera is Set Area/Date/Time (figure 1-7a). Notice the prompts at the bottom of the screen that tell you how to choose settings. The Select prompt has up and down arrows that represent the up and down buttons on the control wheel. The circle beside the Enter prompt represents the center button. The cursor is an orange rectangle that highlights the current choice. In figure 1-7a, the cursor is positioned on Enter. Press the center button to display the Area Setting screen so you can select your current time zone (figure 1-7b).

The Area Setting screen has plenty of prompts. One time zone is highlighted in white. The horizontal arrows beside the Select prompt at the bottom of the screen are reminders that if you press the left and right buttons on the control wheel, the highlighted area will move west or east so you can choose your current location. You can set the daylight saving time (Daylight Svg) indicator at the bottom of the screen by pressing the up and down buttons. After you’ve chosen your time zone and a daylight saving time setting, press the center button to accept your selections.
After you select your time zone, the Date/Time Setup menu is displayed with the Daylight Savings option highlighted (figure 1-8a), which gives you a second chance to change this value. Press the down button once to highlight the Date/Time option (figure 1-8b). Press the center button to select the option, and you’ll see a new screen where you can set the date and time (figure 1-8c). Use the right and left buttons to navigate through the fields. As the prompts suggest, use the up and down buttons to change the values of the fields. When you are done, press the center button to bring up a new screen. Navigate to the Enter option and press the center button to complete the process. A half press of the shutter button returns you to Live View, and you can start taking photographs.
If you have reinitialized the camera with the Setting Reset command, you will have to repeat this process; however, you will start the process by pressing the MENU button, highlighting Date/Time Setup in the Setup menu, and then selecting the Area Setting command. This will be described in the next section, “Introducing Menu Navigation.”


Recommendation: Be Sure to Set Daylight Saving Time
Most areas in the United States observe daylight saving time in the summer. The time is set forward one hour in the spring, and back one hour in the fall. The Daylight Savings option under the Date/Time Setup command allows you to specify if your current location is in daylight saving time. Unfortunately, as you travel in and out of daylight saving time zones, or when daylight saving time switches to standard time, you will need to reset the Daylight Savings indicator.
Introducing Menu Navigation
Although most of the important camera operations can be quickly changed using buttons and dials, you should become familiar with the menu system because it has commands that cannot be accessed any other way. An example is setting the date, time, and area.
To enter the menu system, press the MENU button on the left side of the camera back (figure 1-9a). You’ll see a screen with six icons along the top. From left to right, they indicate the following: Camera Settings menu (camera icon), Custom Settings menu (gear icon), Wireless menu (radiating radio waves icon), Application menu (matrix icon), Playback menu (video play icon), and Setup menu (tool box icon). Use the left or right buttons to position the cursor over the Setup menu icon (figure 1-9b). Note the row of numbers just below the menu icons. They indicate pages within the currently highlighted menu, and they will be different for each menu. If the numbers are grayed out, press the down button to make them active (figure 1-9c). When a number turns white, the corresponding page within the menu is active, and the cursor will be positioned on the first command. Use the right and left buttons to scroll through the pages. As you navigate through the pages, the top option on each page will be highlighted. Use the up and down buttons to navigate through the commands within a page. You may notice that some of the commands are grayed out; this is because they are not available with the current camera settings.

Press the center button to enter a command. You’ll see either a list of available command options or another screen. Use the up/down buttons to navigate through the list of options. You may see horizontal arrows indicating that you should use the right and left buttons to see and set values.

Let’s return to the task of changing the camera’s date and time information. You may want to change the date or time after you start using the camera. To do so, press the MENU button. Use the left or right buttons to position the cursor over the Setup menu icon. In the Setup menu there are six pages of screens, and at this stage they are grayed out. Press the down button to enter the page numbers bar; the page numbers will change to light gray, and the selected page will be white with an orange underline. Press the right or left button to navigate to page 4. You’ll see a screen that shows the Date/Time Setup and Area Setting commands (figure 1-10). If you highlight either of these commands and push the center button, you will access their respective setup screens.


How the Camera Maintains Date and Time Information
In addition to the replaceable main battery that supplies power, the camera has a small internal battery that maintains the date and time settings, face registration, customized button settings, stored Memory Recall information, and downloaded apps. The internal battery ensures that this information won’t be lost when you replace the main battery. Even if the main battery is depleted, the internal battery will maintain these personalized settings for up to three months. If the internal battery becomes depleted, it will lose all previously stored data. You can recharge the internal battery by inserting a charged main battery into the camera. The internal battery cannot be replaced by the user.
Error Messages
The Sony a7 II displays several messages to help guide you through setting up and using the camera. These include command descriptions and error messages that notify you when the camera receives incompatible commands. As mentioned earlier, some menu commands may be grayed out if they are unavailable with the current camera settings. If you press the center button while a grayed-out option is highlighted, you will see an error message that says the selected command is not available. The error message may also state which menu command is preventing the selected command from being enabled. For example, you cannot choose the Drive Mode command when the mode dial is set to Sweep Panorama. If you try, you will receive the error message shown in figure 1-11.

Get Out of Trouble by Reinitializing Commands
You’ll frequently set and change command values as you use the camera. Sometimes the camera may get confused. In computer jargon, it may “hang” and fail to respond to commands. Or you may find that familiar commands don’t work as expected. If this occurs, you can try several approaches to make the camera operational again. The first and easiest step is to simply turn the camera off and back on to see if the problem disappears. If this doesn’t work, turn the camera off and remove the battery for about 30 seconds, then reinsert the battery and check to see if the problem is resolved. If the camera is still not responding, you can start over with the camera’s default values by executing the following command:
MENU > Setup (6) > Setting Reset > [Camera Settings Reset], [Initialize]
Execute the [Camera Settings Reset] option first. It resets all menu items listed under the Camera Settings menu (camera icon) to their default values. This includes ISO, Quality, Image Size, and Dynamic Range Optimizer (DRO). None of the command settings in the other menus will be affected. Check to see if the camera starts operating as expected. If not, your last resort is to execute the [Initialize] option, which will restore the camera settings to their default values and delete your stored customization settings and face registered data. Although you can reenter your customized settings, reregistering faces requires the person to be present so the camera can record his or her face.
Introduction to Buttons, Dials, and Other Controls
When you use the menu system of the a7 II, you can access all the operational controls and camera features. However, navigating the sheer number of options is not practical when you are actively taking photographs. Fortunately, there are 11 buttons, one control wheel, one lever, and three dials that you can use to quickly select, initiate, and choose menu options. For active photographers who need to make fast changes to camera settings, these controls are invaluable. See table 1-3 for a list of these controls and their functions. The table lists the default settings, most of which can be customized to execute different commands.
It is important to spend time learning the standard camera settings because the default button assignments are complex. Depending on your camera settings, many of the buttons and dials perform two or more functions. For example, while you are taking a picture, the left button can change the Drive Mode; while you are using a menu, it controls the cursor as you navigate the menu selections. This maximizes the number of commands you can access by pressing buttons, and it minimizes the number of controls that are needed to operate the camera.

We don’t recommend that you customize the controls while you are learning to use your camera. Our experience is that customization should be done gradually and in stages. First, we took our time to figure out which commands we use the most and which we use the least. If we thought we would need a command that was not currently assigned to a button, we assigned it to one of the two buttons that don’t have defined values: the down button and the C4 button. This was a temporary assignment so we could determine how often we used the function. If we found the assignment helpful, we reassigned the function to a permanent location. Generally, we would find a button that has a default command we did not use, and we replaced it with the more useful command. We would then restore the down or C4 button to an unassigned status. As we worked through this process, we assigned the buttons with our most-used commands and gradually eliminated assignments that we rarely used.
This gradual process ensures that you customize the buttons with the most useful commands. If you customize more than two buttons, you will have to displace some of the default commands. Because you can replace virtually all default commands with those you prefer, it is wise to keep a written record of the changes you make. If you have to execute the Camera Settings Reset command [Initialize], you’ll lose all your customizations. We’ll cover customization in detail in chapter 7.
Fn Button
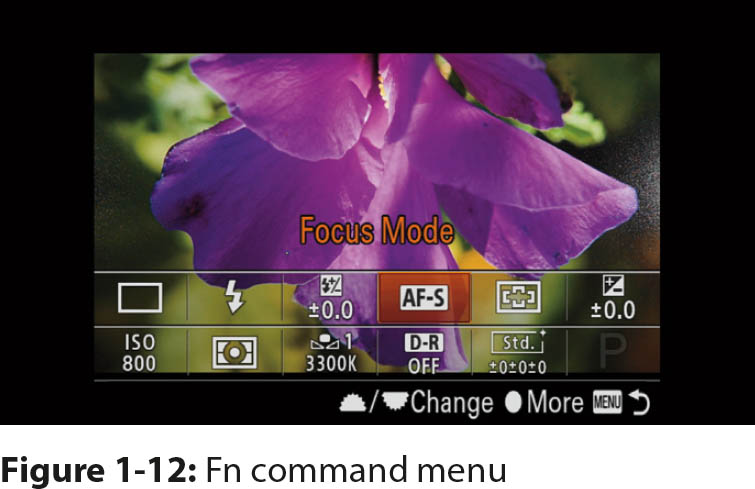
The Fn button is located on the back of the camera, on the right side. This button initiates access to a maximum of 12 commands, which are displayed in two rows of six commands on the bottom of the screen. The two rows of commands will be superimposed over the preview image (figure 1-12). Use the up, down, right, and left buttons to navigate though the command icons. In its default mode, the first row consists of Drive Mode, Flash Mode, Flash Comp., Focus Mode, Focus Area, and Exposure Comp. The second row consists of ISO, Metering Mode, White Balance, DRO/Auto HDR, Creative Style, and Shoot Mode.
The Shoot Mode icon is frequently grayed out when you shoot still photographs. To set this value, you must turn the mode dial to AUTO, SCN, or Movie. Use the Shoot Mode command when you need to switch from Intelligent Auto to Superior Auto. If you select the SCN mode, Shoot Mode allows you to assign the type of scene you are photographing. In Movie mode, the Shoot Mode icon allows you to choose P, A, S, or M mode.
When you select a command for modification, it is highlighted in orange, and the command name appears above the top row. You can change the value of the highlighted command by turning the front or rear dial or the control wheel. Generally, turning the rear dial does nothing, but there are two exceptions: when you select the ISO command, and when the DRO command is not set to [Off]. With the ISO command, it isn’t clear why the rear dial is active in this command and not in the other commands. With the DRO command, the rear dial will provide additional settings for this command. These settings will be explained in chapter 6 when we discuss how to adjust the contrast within an image.
You can also change a command by highlighting it and pressing the center button. This is convenient if you select a complex command, such as White Balance, that adjusts several parameters. When you press the center button for the White Balance command, you’ll see a list of options that allow you to fine-tune the color balance. We will discuss setting the white balance more fully in chapters 5 and 6.

Sometimes commands in the Fn menu are grayed out and disabled. The easiest way to see this is to set the mode dial to AUTO, which is where the camera automatically sets most of the command values (figure 1-13).
You can customize the Fn button so it will display the commands you want to easily access. Again, we recommend that you use the camera for a while to see which commands you most frequently use. If you want to play with different settings, you can access them with the buttons on the back of the camera. For example, Drive Mode and ISO have dedicated keys, so you may want to eliminate them from the Fn menu and customize it to display other commands. Chapter 7 will describe how to customize the Fn button.
DISP Button, Fn Button, and Quick Navi Screen
When the camera is in Live View, press the DISP button (up button) to cycle through the various data display formats for the monitor and the viewfinder. We will describe the different display formats in more detail in chapter 3; here, we’ll discuss one monitor-only display that is used to change command values. It’s called the [For viewfinder] format, which is readily recognizable because it is the only screen that does not display what the camera sensor sees (figure 1-14a). Instead, it has numbers, letters, and a graph that provide a readout of all your camera settings. When you see this screen, press the Fn button to convert the screen to the Quick Navi screen (figure 1-14b). The Quick Navi screen is interactive; it’s a quick and convenient interface where you can select commands and alter their settings. Press the up, down, right, and left buttons to navigate through the Quick Navi screen. The current position is highlighted in orange. To change a highlighted value, turn the control wheel or the front dial (figure 1-14c), or press the center button to see a screen with available options for the selected command. Select a value and press the center button to return to the [For viewfinder] display with the value you chose.


The Fn button and the Quick Navi screen provide simple and direct ways to change commands. In fact, when they are properly configured, you seldom need to access the menu to make a selection while you shoot. We recommend that you experiment with these settings, even if you use Intelligent Auto or Superior Auto.
The Fn button is particularly useful when you use the camera at eye level. You can preview the scene then press the Fn button to access commands and options without having to remove the camera from your eye. This is particularly useful when you switch between Intelligent Auto and Superior Auto. In chapter 4, when we describe how to work with SCN mode, you will learn that you can use the Fn button to select the scene presets that most closely match what you see through the viewfinder.
Although the Quick Navi screen provides a convenient way to view your camera settings and change them on the fly, it is not perfect. Neither the fully automatic modes or SCN mode will allow you to choose RAW or JPEG file formats, but if you use the menu system, you can select RAW or JPEG and use that format when you shoot in Intelligent Auto, Superior Auto, or SCN modes.
Control Wheel (ISO)
This is a warning for readers who have owned or used a Sony a7 or a7R. In those camera models, you rotate the control wheel to change the ISO value. This is not so with the a7 II. To change the ISO, you press the right rim of the control wheel, then rotate the wheel to change the ISO. We applaud Sony’s decision to modify how you change the ISO. We found that with the older models, you could mistakenly change the ISO when you put the camera in your equipment bag. Because you now have to press the rim first and then rotate the wheel, this problem has been solved.
Left Button (Drive Mode)
Press the left rim of the control wheel (left button) to display the Drive Mode command options on the left side of the screen, then rotate the control wheel to navigate through the command options. Press the center button to select the highlighted value. These options allow you to determine how the camera will fire when you press the shutter button. We will discuss Drive Mode in greater depth in chapter 6. For now, be aware that you can access the Drive Mode command by pressing the left button in Live View.
Right Button (ISO)
Press the right rim of the control wheel (right button) to adjust the gain of the sensor (ISO). The ISO values will be displayed on the left side of the screen. You can select a value by rotating the control wheel. In the Sony a7R and a7, this button adjusts the White Balance, but in the a7 II this function is controlled by the C1 button. You cannot change the ISO in Intelligent Auto or Superior Auto mode.
Front Dial, Rear Dial, and Exposure Compensation Dial
You will use these three dials most frequently when you set the mode dial to P, A, S, or M and are in Live View. In A mode, the front and rear dials adjust the aperture; in S mode they adjust the shutter speed. In M mode, when the default settings are active, the front dial adjusts the aperture and the rear dial adjusts the shutter speed. However, this can be changed. We’ll discuss how in chapter 7, where we explain in detail how to customize the camera settings. The exposure compensation dial allows the exposure to be raised or lowered by 3 exposure value (EV) units. When you use this dial, the selection in the menu command is overridden.
Cleaning the Sensor
When you change the lens, dust particles can enter the camera body and land on the sensor. They look like blurred shadows on your pictures. You can limit this problem by removing and replacing the lens quickly and in environments with no wind. When you change the lens, try to hold the camera body so the lens opening faces downward. This will help prevent dust from falling into the body.
However, it is inevitable that dust will end up on the sensor. The Sony a7 II dislodges dirt from the sensor by shaking it off at high speed. Each time you turn the camera off, it automatically cleans the sensor with ultrasonic vibrations. There may be times when you think an extra cleaning is needed. You can initiate it with the following command:
MENU > Setup (3) > Cleaning Mode > [Enter]
This command won’t work if the battery level is low. You’ll need three or more bars on the battery icon to perform the cleaning operation. If the battery is low and you still wish to execute the command, Sony recommends connecting the camera to its transformer.
Recommendation: Manual Cleaning of the Sensor
If foreign particles remain after you execute the cleaning mode, you can clean the sensor manually. First, remove the lens. Use a manual bulb blower to clean the surface of the sensor. It is best to hold the camera with the lens opening facing down so the dust particles can fall out of the camera. Don’t touch the image sensor with your fingers or the blower. Sony does not recommend wet cleaning, in which you use a solution and wipe the surface of the sensor. If the dirt persists, Sony recommends that you send your camera to a service facility.
We don’t recommend using a can of pressurized gas to blow out the camera because any dirt in the nozzle can be blown into the camera body with enough force to damage the sensor. Also, if propellant is expelled, it will be difficult to remove from the sensor. If you have any problems or concerns, take your camera to a professional service center.