
2.7. Case Study: DB2 with DPF Environment
Now that you are familiar with DPF, let's review some of the concepts discussed using a simple case study.
Your company is expanding, and it recently acquired two other firms. Since the amount of data will be increased by approximately threefold, you are wondering if your current single-partition DB2 database server will be able to handle the load, or if DB2 with DPF will be required. You are not too familiar with DB2 with DPF, so you decide to play around with it using your test machines: two SMP machines running Linux with four processors each. The previous DBA, who has left the company, had installed DB2 UDB ESE with DPF on these machines. Fortunately, he left a diagram with his design, shown in Figure 2.16.
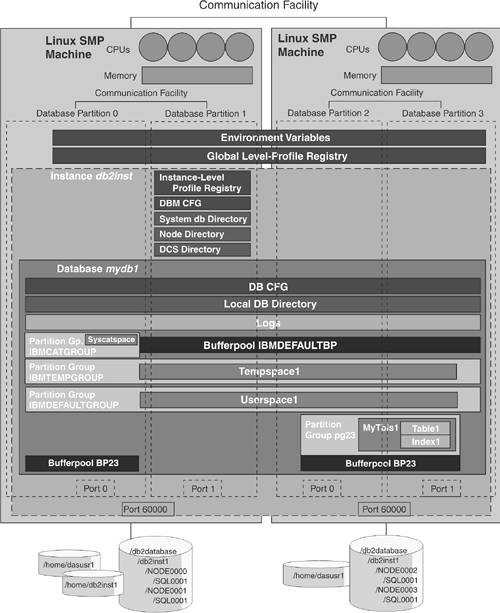
Figure 2.16 is a combined physical and logical design. When you validate the correctness of the diagram with your system, you note that database mydb1 has been dropped, so you decide to rebuild this database as practice. The instance db2inst1 is still there, as are other databases. These are the steps you follow.
1. | Open two telnet sessions, one for each server. From one of the sessions you issue the commands db2stop followed by db2start, as shown in Figure 2.17. The first thing you note is that there is no need to issue these two commands on each partition; issuing them on any partition once will affect all partitions. You also can tell that there are four partitions, since you received a message from each of them. | |||
2. | Review the db2nodes.cfg file to understand the configuration of your partitions (see Figure 2.18). Using operating system commands, you determine that the home directory for instance db2inst1 is /home/db2inst1. The db2nodes.cfg file is stored in the directory /home/db2inst1/sqllib. Figure 2.18 shows there are four partitions, two per server. The server host names are aries and saturn. | |||
3. | Create the database mydb1. Since you want partition 0 to be your catalog partition, you must issue the CREATE DATABASE command from partition 0. You issue the statement db2 "values (current dbpartitionnum)" to determine which partition is currently active and find out that partition 3 is the active partition (see Figure 2.19). Figure 2.17. Running the db2stop and db2start commands
Figure 2.18. A sample db2nodes.cfg file
Figure 2.19. Determining the active partition
| |||
4. | Next, you change the DB2NODE environment variable to zero (0) as follows (see Figure 2.20): DB2NODE=0 export DB2NODE db2 terminate Figure 2.20. Switching the active partition, then creating a database
| |||
5. | To confirm that partition 0 is indeed the catalog partition, simply issue a list db directory command and look for the Catalog database partition number field under the entry for the mydb1 database. Alternatively, issue a list tablespaces command from each partition. The SYSCATSPACE table space will be listed only on the catalog partition. | |||
6. | Create partition group pg23 on partitions 2 and 3. Figure 2.21 shows how to accomplish this and how to list your partition groups. Remember that this does not list IBMTEMPGROUP. | |||
7. | Create and manage your buffer pools. Issue this statement to create buffer pool BP23 on partition group pg23: db2 "create bufferpool BP23 database partition group pg23 size 500"
Figure 2.21. Creating partition group pg23
To list your buffer pools and associated partition groups, you can query the SYSCAT.BUFFERPOOLS catalog view, also shown in Figure 2.22. Figure 2.22. Managing buffer pools
| |||
8. | ||||
9. | Create table table1 in table space mytbls1 with a partitioning key of col1 and col2: db2 "create table table1 (col1 int, col2 int, col3 char(10)) in mytbls1 partitioning key (col1, col2)" | |||
10. | Create the index index1. Note that this doesn't have any syntax specific to a DPF environment: db2 "create index index1 on table1 (col1, col2)"
The index will be constructed on each partition for its subset of rows. | |||
11. | Test the db2_all command to update the database configuration file for all partitions with one command. Figure 2.23 shows an example of this. Figure 2.23. Using db2_all to update the db cfg file
|
And that's it! In this case study you have reviewed some basic statements and commands applicable to the DPF environment. You reviewed the db2stop and db2start commands, determined and switched the active partition, and created a database, a partition group, a buffer pool, a table space, a table with a partitioning key, and an index. You also used the db2_all command to update a database configuration file parameter.