
16. Reading from and Writing to the Web
The Internet has become pervasive and has changed our lives. From your desktop, millions of answers are available at your fingertips. In addition, publishing a report on the Web allows millions of others to instantly access your information.
This chapter discusses automated ways to pull data from the Web into spreadsheets, using web queries. You will learn how to use VBA to call a website repeatedly to gather information for many data points. It also shows how to save data from your spreadsheet directly to the Web.
Getting Data from the Web
There is an endless variety of data on the Internet. You can gather stock quotes from Quotes.com. You can download historical temperatures from weather underground. You can get fantasy football stats from NFL.com. Whatever your interest, there is probably a website somewhere with that information online.
Sometimes the websites make it difficult by putting the information on many different pages. You can use VBA to automate the process of visiting all those pages and collecting the data.
Instead of manually downloading data from a website every day and then importing it into Excel, you can use the Web Query feature in Excel to allow it to automatically retrieve the data from a web page.
Web queries can be set up to refresh the data from the Web every day or even every minute. While they were originally fairly hard to define, the Excel user interface now includes a web browser that you can use to build the web query.
As Web 2.0 evolves, there are some sites that are not suitable for web queries. You want to look for web pages where the URL tells you about the selections that you made while getting to that page.
For example, I searched for NFL stats. In the process of getting to an interesting page, I had asked for 2008 regular season data. I had asked for passing stats and then the complete list. I ended up at a page with a very long URL, as follows:
![]()
This looks like an excellent candidate for web queries because all of my choices are embedded in that URL. I can see 2008, REG, PASSING YARDS in the URL.
Go to the address bar, change 2008 to 2007, and press Enter. If the correct page comes up with 2007 passing yards, you know that you have a winner.
Another example: Suppose you wanted currency exchange rates from XE.com. On the XE.com page, you specify 100, CAD for Canadian dollars and USD for U.S. dollars. Click Go. The URL of the returned page is http://www.xe.com/ucc/convert.cgi?Amount=100&From=CAD&To=USD. You can see how you can alter this URL by changing USD to GBP to get British pounds.
In contrast, take a look at http://www.Easy-XL.com. There are several videos that you can watch there. As you navigate to each video, the URL stays exactly the same:
http://www.easy-xl.com/iaplayer.cgi?v=Query&x=play&p=ez%2Fvideos&i=ezVideos.csv
There is nothing in that URL which tells you which video you chose. The site is using some Web 2.0 magic via java to serve up the correct video. A site built like this is not ideal for web queries.
Manually Creating a Web Query and Refreshing with VBA
The easiest way to get started with web queries is to create your first one manually while the macro recorder is running.
Excel 2010 includes the PowerPivot add-in that allows you to mash-up disparate datasets. One of the favorite demo applications is to mash up daily sales data from a store with daily weather for that city. You probably already have daily sales data for your stores. The hard part is finding daily weather data.
The Weather Underground website has a historical weather query. After browsing to find the data for the Akron Canton airport (code = CAK) for June 16, 2006, you will have this URL:
http://www.wunderground.com/history/airport/KCAK/2006/6/16/DailyHistory.html
You can see all the variables in the URL; the airport code of CAK and the date from which you need the weather, albeit in a bizarre format of YYYY/M/D.
Open Excel. Go to a blank worksheet. Rather than leave the cellpointer in A1, move down to about Cell A10 to leave room for some work variables later.
Turn on the macro recorder. Record a new macro called WeatherQuery. From the Data tab of the Ribbon, select Get External Data, from Web. Excel shows the New Web Query dialog with your Internet Explorer home page displayed.
Using the browser, go to your desired website. Make the selections necessary to get the data. In the case of Weather Underground, select history, the city, the date, and click Go. In a moment, the desired web page will display in the dialog box.
Note that in addition to the web page there are a number of yellow squares with a black arrow. These squares are in the upper-left corner of various tables on the web page. Click the square that contains the data that you want to import to Excel. In this case, you want the weather information. As shown in Figure 16.1, click the square by the weather. While you are clicking, a blue border confirms the table that will be imported. After you click, the yellow arrow changes to a green check mark.
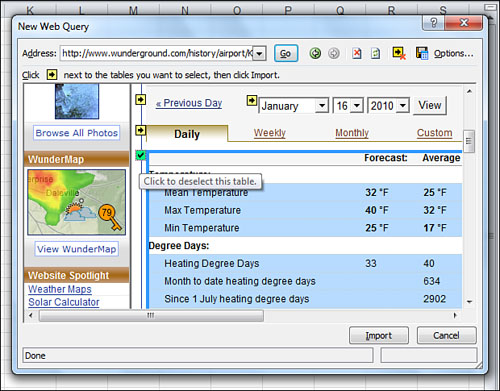
Figure 16.1. Use the New Web Query dialog to browse to a web page. Highlight the table that you want to import to Excel by clicking on a yellow arrow adjacent to the table.
Click the Import button on the New Web Query dialog. Click OK on the Import Data dialog. In a few seconds, you will see the live data imported into a range on your spreadsheet. Because you import the entire section of the web page, there will be the data that you want as well as extraneous data. In Figure 16.2, you will see that I’ve manually highlighted the statistics that I think would be relevant in northeastern Ohio. If you live in Maui or Trinidad, you might not care about snowfall. Figure 16.2 shows the returned web query.

Figure 16.2. Data from the web page is automatically copied to your worksheet. You can now use VBA to automatically refresh this data at your command or periodically.
The recorded macro:

The important parts of this macro are the connect string, the location of the data returned from the web query, the web table, and the Refresh BackgroundQuery:=False.
The connect string is the URL that you found in the address bar of Internet Explorer (preceded by URL:).
The output location for the web query is specified in the destination property.
Setting Background Query to False means that the macro will not proceed until the data comes back from the web page. This is the appropriate setting. You macro might go on to pull certain pieces of data from the results. If you allowed the query to run in the background, the macro would be pulling from a blank web page.
In the recorded code, you will see WebTables as 11. This means that when you select the check box for the weather table, it happened to be the 11th table on the web page. The best way to figure out this table number is to record a macro and have the macro recorder tell you the table number that corresponds to the check box that you selected.
Caution
If web query macros are going to break over time, it will be because of a website redesign. If the web owner decides to ad a new advertising box at the top of the website, it might move the good data from table #11 to table #12. If you are designing a web query that will be run once a day for the next five years, you should add some code to make sure that you are actually getting the correct data.
In this example, if the word Actual does not appear in Cell B10, stop the macro and alert someone:

Using VBA to Update an Existing Web Query
To update all web queries on the current sheet, use this code:

You can assign this macro to a hot key or to a macro button and refresh all queries on demand.
Building Many Web Queries with VBA
To gather weather data for 24 months, you have to repeat the web query process more than 700 times. This would be tedious to do manually.
Instead, you can use VBA to build and execute the web queries. It is fairly simple to build a web query on-the-fly. The connect string to get weather for any airport for any day can be broken down into four parts.
The first part can be hard-coded because it never changes:
"URL;http://www.wunderground.com/history/airport/K"
The next part is the 3-letter airport code. If you are retrieving data for many cities, this part will change:
CAK
The third part is a slash, the date in YYYY/M/D format and a slash:
/2006/6/16/
The final part can be hard-coded:
DailyHistory.html"
Insert a new worksheet and build an output table. In Cell A2, enter the first date for which you have sales history. Use the fill handle to drag the dates down to the current date.
The formula in B2 is ="/"&Text(A2,"YYYY/M/D")&"/".
Add friendly headings across Row 1 for the statistics that you will collect.
The data worksheet is shown in Figure 16.3.

Figure 16.3. Build a data worksheet to hold the results of the web query.
Finding Results from Retrieved Data
Next, you have a decision to make. It looks like the weather underground website is fairly static. The snow statistic even shows up if I ask for JHM airport in Maui. If you are positive that rainfall is always going to appear in Cell B28 of your results sheet, you could write the macro to get data from there.
However, to be safe, you can build some VLOOKUP formulas at the top of the worksheet to look for certain row labels and to pull that data. In Figure 16.4, 7 VLOOKUP formulas in A2:G2 grab the necessary statistics from the web query.

Figure 16.4. VLOOKUPs at the top of the web worksheet find and pull the relevant data from a web page.
Note
The variable web location of the web data happens more often than you might think. If you are pulling name and address information, some addresses have three lines and some have four lines. Anything that appears after that address might be off by a row. Some stock quote sites show a different version of the data depending on whether the market is open or closed. If you kick off a series of web queries at 3:45 p.m., the macro might work until 4 p.m. and then stop working. For these reasons, it is often safer to take the extra steps of retrieving the correct data from the web query using VLOOKUP statements.
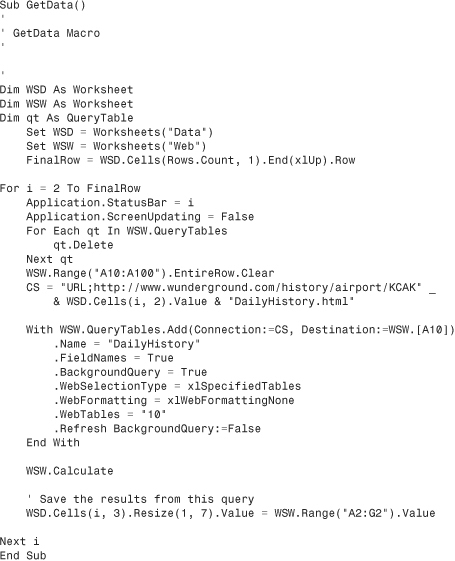
To build the macro, you will add some code before the recorded code:
Then add a loop to go through all of the dates in the data worksheet.

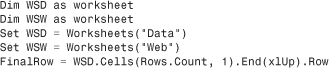
If a web query is about to overwrite existing data on the worksheet, it will move that data to the right. You want to clear the previous web query and all of the contents:
For Each qt In WSD.QueryTables
qt.Delete
Next qt
WSD.Range("A10:A100").EntireRow.Clear
You can now go into the recorded code. Change the QueryTables.Add line to the following:
With WSD.QueryTables.Add(Connection:= CS, Destination:=WSW.Range("A10"))
After the recorded code, add some lines to calculate the VLOOKUPs, copy the results, and finish the loop:
WSW.Calculate
WSD.Cells(I, 3).Resize(1, 7).Value = WSW.Range("A2:G2").Value
Next i
Step through the code as it goes through the first loop to make sure that everything is working. You should notice that the actual .Refresh line takes about 5 to 10 seconds. To gather 2 or 3 years’ worth of web pages, it will require more than an hour of processing time. Run the macro, head to lunch, and then come back to a good dataset.
Putting It All Together
In the final macro here, I turned off screen updating and showed the row number that the macro is processing in the status bar. I also deleted some unnecessary properties from the recorded code:
After an hour, you will have data retrieved from hundreds of web pages (see Figure 16.5).
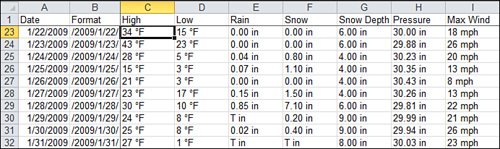
Figure 16.5. The results of running the web query hundreds of times.
Examples of Scraping Websites Using Web Queries
Over the years, I have used the web query trick many times. Examples include the following:
• Names and company address for all Fortune 1000 CFOs so that I could pitch my Power Excel seminars to them.
• The complete membership roster for a publishing association of which I am a member. (I already had the printed roster, but with an electronic database, I could filter to find publishers in certain cities).
• The complete list of Chipotle restaurants (which later ended up in my GPS, but that is a story for the (yet unwritten) Microsoft MapPoint book).
Using Application.OnTime to Periodically Analyze Data
VBA offers the OnTime method for running any VBA procedure at a specific time of day or after a specific amount of time has passed.
You can write a macro that would capture data every hour throughout the day. This macro would have times hard-coded. The following code will, theoretically, capture data from a website every hour throughout the day:
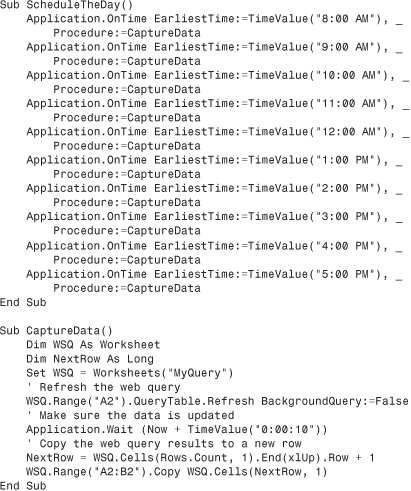
Scheduled Procedures Require Ready Mode
The OnTime method will run provided only that Excel is in Ready, Copy, Cut, or Find mode at the prescribed time. If you start to edit a cell at 7:59:55 a.m. and keep that cell in Edit mode, Excel cannot run the CaptureData macro at 8:00 a.m. as directed.
In the preceding code example, I specified only the start time for the procedure to run. Excel waits anxiously until the spreadsheet is returned to Ready mode and then runs the scheduled program as soon as it can.
The classic example is that you start to edit a cell at 7:59 a.m., and then your manager walks in and asks you to attend a surprise staff meeting down the hall. If you leave your spreadsheet in Edit mode and attend the staff meeting until 10:30 a.m., the program cannot run the first three scheduled hours of updates. As soon as you return to your desk and press Enter to exit Edit mode, the program runs all previously scheduled tasks. In the preceding code, you will find that the first three scheduled updates of the program all happen between 10:30 and 10:31 a.m.
Specifying a Window of Time for an Update
One alternative is to provide Excel with a window of time within which to make the update. The following code tells Excel to run the update at anytime between 8:00 a.m. and 8:05 a.m. If the Excel session remains in Edit mode for the entire five minutes, the scheduled task is skipped:
Application.OnTime EarliestTime:=TimeValue("8:00 AM"), Procedure:=CaptureData,
LatestTime:=TimeValue("8:05 AM")
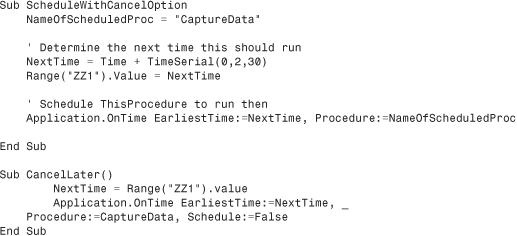
Canceling a Previously Scheduled Macro
It is fairly difficult to cancel a previously scheduled macro. You must know the exact time that the macro is scheduled to run. To cancel a pending operation, call the OnTime method again, using the Schedule:=False parameter to unschedule the event. The following code cancels the 11:00 a.m. run of CaptureData:
Sub CancelEleven()
Application.OnTime EarliestTime:=TimeValue("11:00 AM"), _
Procedure:=CaptureData, Schedule:=False
End Sub
It is interesting to note that the OnTime schedules are remembered by a running instance of Excel. If you keep Excel open but close the workbook with the scheduled procedure, it still runs. Consider this hypothetical series of events:
- Open Excel at 7:30 a.m.
- Open Schedule.XLS and run a macro to schedule a procedure at 8:00 a.m.
- Close Schedule.xls but keep Excel open.
- Open a new workbook and begin entering data.
At 8:00 a.m., Excel reopens Schedule.xls and runs the scheduled macro. Excel doesn’t close Schedule.xls. As you can imagine, this is fairly annoying and alarming if you are not expecting it. If you are going to make extensive use of Application.Ontime, you might want to have it running in one instance of Excel while you work in a second instance of Excel.
Note
If you are using a macro to schedule a macro a certain amount of time in the future from the current time, you could remember the time in an out-of-the way cell to be able to cancel the update. See an example in the “Scheduling a Macro to Run x Minutes in the Future” section of this chapter.
Closing Excel Cancels All Pending Scheduled Macros
If you close Excel with File, Exit, all future scheduled macros are automatically canceled. When you have a macro that has scheduled a bunch of macros at indeterminate times, closing Excel is the only way to prevent the macros from running.
Scheduling a Macro to Run x Minutes in the Future
You can schedule a macro to run at a time at a certain point in the future. The macro uses the TIME function to return the current time and adds 2 minutes and 30 seconds to the time. The following macro runs something 2 minutes and 30 seconds from now:
Later, if you need to cancel this scheduled event, it would be nearly impossible. You won’t know the exact time that the macro grabbed the TIME function. You might try to save this value in an out-of-the-way cell:
Scheduling a Verbal Reminder
The text to speech tools in Excel can be fun. The following macro sets up a schedule that will remind you when it is time to go to the staff meeting:

If you want to pull a prank on your manager, you can schedule Excel to automatically turn on the Speak on Enter feature. Follow this scenario:
- Tell your manager that you are taking him out to lunch to celebrate April 1.
- At some point in the morning, while your manager is getting coffee, run the ScheduleSpeech macro. Design the macro to run 15 minutes after your lunch starts.
- Take your manager to lunch.
- While the manager is away, the scheduled macro will run.
- When the manager returns and starts typing data in Excel, the computer will repeat the cells as they are entered. This is slightly reminiscent of the computer on Star Trek that repeated everything that Lieutenant Uhura would say.
After this starts happening, you can pretend to be innocent; after all, you have a firm alibi for when the prank began to happen:

Note
To turn off Speak on Enter, you can either dig out the button from the QAT Customization panel (look in the category called Commands Not on the Ribbon) or, if you can run some VBA, change the SetupSpeech macro to change the True to False.
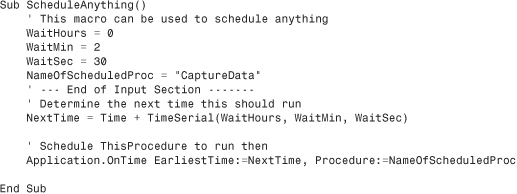
Scheduling a Macro to Run Every 2 Minutes
My favorite method is to ask Excel to run a certain macro every 2 minutes. However, I realize that if a macro gets delayed because I accidentally left the workbook in Edit mode while going to the staff meeting, I don’t want dozens of updates to happen in a matter of seconds.
The easy solution is to have the ScheduleAnything procedure recursively schedule itself to run again in 2 minutes. The following code schedules a run in 2 minutes and then performs CaptureData:
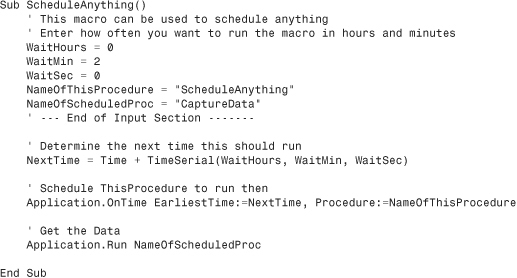
This method has some advantages. I have not scheduled a million updates in the future. I have only one future update scheduled at any given time. Therefore, if I decide that I am tired of seeing the national debt every 15 seconds, I only need to comment out the Application.OnTime line of code and wait 15 seconds for the last update to happen.
Publishing Data to a Web Page
This chapter has highlighted many ways to capture data from the Web. It is also useful for publishing Excel data back to the Web.
In Chapter 14, “Excel Power,” the RunReportForEachCustomer macro was able to produce reports for each customer in a company. Instead of printing and faxing the report, it would be cool to save the Excel file as HTML and post the results on a company intranet so that the customer service reps could instantly access the latest version of the report.
Consider a report like the one shown in Figure 16.6. With the Excel user interface, it is easy to use save the report as a web page to create an HTML view of the data.

Figure 16.6. A macro from Chapter 14 was used to automatically generate this Excel workbook. Rather than e-mail the report, we could save it as a web page and post it on the company intranet.
In Excel 2010, use File, Save As. Select Web Page (*.htm, *html) in the Save as Type drop-down (see Figure 16.7).
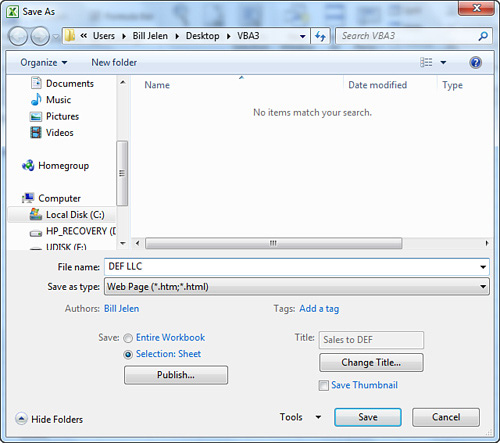
Figure 16.7. When saving as a web page, you can control the file name and a title.
Note
The Excel 2003 option to add interactivity to a web page has been deprecated and is no longer available.
After Microsoft removed the interactivity option, you only have control over the title that appears in the window title bar. Annoyingly, in Excel 2010, this title also gets written to the top center of your web page.
Click the Change Title button to change the <Title> tag for the web page. Type a name that ends in either .html or .html and click Publish.
The result is a file that can be viewed in any web browser. The web page accurately shows our number formats and font sizes (see Figure 16.8).

Figure 16.8. The formatting is close to the original worksheet.
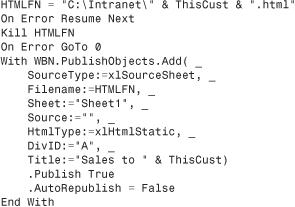
Where the macro from Chapter 14 did WBN.SaveAs, the new macro uses this code to write out each web page:
Although the data is accurately presented in Figure 16.8, it is not extremely fancy. We don’t have a company logo or navigation bar to examine other reports.
Using VBA to Create Custom Web Pages
Long before Microsoft introduced the Save as Web Page functionality, people had been using VBA to take Excel data and publish it as HTML. The advantage of this method is that you can write out specific HTML statements to display company logos and navigation bars.
Consider a typical web page template:
• There is code to display a logo and navigation bar at the top/side.
• There is content for the page.
• There is some HTML code to finish the page.
This macro will read the code behind a web page and write it to Excel:

If you import the text of a web page into Excel, even if you don’t understand the HTML involved, you can probably find the first lines that contain your page content.
Examine the HTML code in Excel. Copy the lines needed to draw the top part of the web page to a worksheet called Top. Copy the lines of code needed to close the web page to a worksheet called Bottom.
You can use VBA to write out the top, then generate content from your worksheet, and then write out the bottom.
Using Excel as a Content Management System
Five hundred million people are proficient in Excel. Companies everywhere have data in Excel, and many staffers who are comfortable in maintaining that data. Rather than force these people to learn how to create HTML pages, why not build a content management system to take their Excel data and write out custom web pages?
You probably already have data for the web page in Excel. Using the HTML to read the HTML into Excel from above, you know the top and bottom portions of the HTML needed to render the web page.
Building a content management system with these tools is simple. To the existing Excel data, I added two worksheets. In the worksheet called Top, I copied the HTML needed to generate the navigation bar of the website. To the worksheet called Bottom, I copied the HTML needed to generate the end of the HTML page. Figure 16.9 shows the simple Bottom worksheet.

Figure 16.9. Companies everywhere are maintaining all sorts of data in Excel and are comfortable updating the data in Excel. Why not marry Excel with a simple bit of VBA so that custom HTML can be produced from Excel.
The macro code opens a text file called directory.html for output. First, all the HTML code from the Top worksheet is written to the file.
Then the macro loops through each row in the membership directory, writing data to the file.
After completing this loop, the macro writes out the HTML code from the Bottom worksheet to finish the file:


Figure 16.10 shows the finished web page. This web page looks a lot better than the generic page created by Excel’s Save as Web Page option. It can maintain the look and feel of the rest of the site.

Figure 16.10. A simple content-management system in Excel was used to generate this web page. The look and feel matches the rest of the website. Excel achieved it without any expensive web database coding.
This system has many advantages. The person who maintains the schedule data is comfortable working in Excel. She has already been maintaining the data in Excel on a regular basis. Now, after updating some records, she presses a button to produce a new version of the web page.
Of course, the web designer is clueless about Excel. However, if he ever wants to change the web design, it is a simple matter to open his new sample.html file in Notepad and copy the new code to the Top and Bottom worksheet.
The resulting web page has a small file size—about one-sixth the size of the equivalent page created by Excel’s Save as Web Page.
Note
In real life, the content-management system in this example was extended to allow easy maintenance of the organization’s calendar, board members, and so on. The resulting workbook made it possible to maintain 41 web pages at the click of a button.
Bonus: FTP from Excel
After you are able to update web pages from Excel, you still have the hassle of using an FTP program to upload the pages from your hard drive to the Internet. Again, we have lots of people proficient in Excel, but not so many comfortable with using an FTP client.
Ken Anderson has written a cool command-line FTP freeware utility. Download WCL_FTP from http://www.softlookup.com/display.asp?id=20483. Save WCL_FTP.exe to the root directory of your hard drive, and then use this code to automatically upload your recently created HTML files to your web server:

Next Steps
Chapter 17 shows how to create tiny, word-sized charts in Excel 2010 VBA.