20. Text File Processing
VBA simplifies both reading and writing from text files. This chapter covers importing from a text file and writing to a text file. Being able to write to a text file proves useful when you need to write out data for another system to read, or even when you need to produce HTML files.
Importing from Text Files
There are two basic scenarios when reading from text files. If the file contains fewer than 1,048,576 records, it is not difficult to import the file using the Workbooks.OpenText method. If the file contains more than 1,048,576 records, you have to read the file one record at a time.
Importing Text Files with Fewer Than 1,048,576 Rows
Text files typically come in one of two formats. In one format, the fields in each record are separated by some delimiter such as a comma, pipe, or tab. In the second format, each field takes a particular number of character positions. This is called a fixed-width file and was very popular in the days of COBOL.
Excel can import either type of file. You can also open both types using the OpenText method. In both cases, it is best to record the process of opening the file and use the recorded snippet of code.
Opening a Fixed-Width File
Figure 20.1 shows a text file where each field takes up a certain amount of space in the record. Writing the code to open this type of file is slightly arduous because you need to specify the length of each field. In my collection of antiques, I still have the metal ruler used by COBOL programmers to measure the number of characters in a field printed on a greenbar printer. In theory, you could change the font of your file to a monospace font and use this same method. However, using the macro recorder is a slightly more up-to-date method.
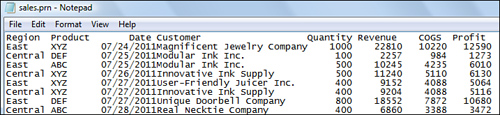
Figure 20.1. This file is fixed width. Because you must specify the exact length of each field in the file, opening this file is quite involved.
Turn on the macro recorder by selecting Record Macro from the Developer tab. From the File menu, select Open. Change the Files of Type to All Files and find your text file.
In the Text Import Wizard’s step 1, specify that the data is Fixed Width and click Next.
Excel then looks at your data and attempts to figure out where each field begins and ends. Figure 20.2 shows Excel’s guess on this particular file. Because the Date field is too close to the Customer field, Excel missed drawing that line.

Figure 20.2. Excel guesses at where each field starts. In this case, it missed two fields and probably did not leave enough room for a longer product name.
To add a new field indicator in step 2 of the wizard, click in the appropriate place in the Data Preview window. If you click in the wrong column, click the line and drag it to the right place. If Excel inadvertently put in an extra field line, double-click the line to remove it. Figure 20.3 shows the data preview after the appropriate changes have been made. Note the little ruler above the data. When you click to add a field marker, Excel is actually handling the tedious work of figuring out that the Customer field starts in position 27 for a length of 27.
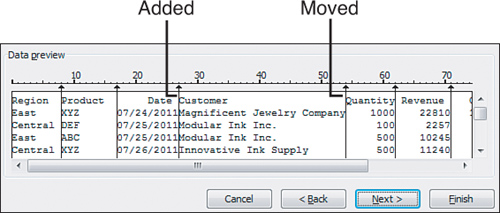
Figure 20.3. After you add a new field marker and adjust the marker between Customer and Quantity to the right place, Excel can build the code that gives you an idea of start position and length of each field.
In step 3 of the wizard, Excel always assumes that every field is in General format.
Change the format of any fields that require special handling. Click the third column and choose the appropriate format from the Column Data Format section of the dialog box. Figure 20.4 shows the selections for this file.
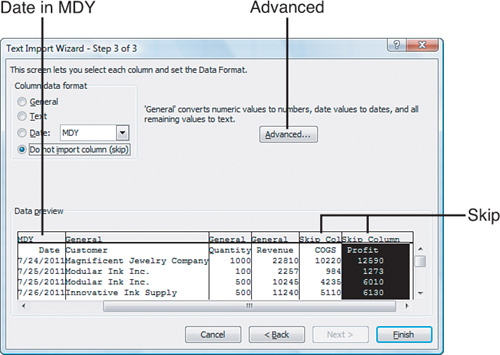
Figure 20.4. The third column is a date and you do not want to import the Cost and Profit columns.
If you have date fields, click the heading above that column, and change the column data format choice to a date. If you have a file with dates in year-month-day format or day-month-year format, select the drop-down next to date and choose the appropriate date sequence.
If you prefer to skip some fields, click that column and select Do Not Import Column (Skip) from the Column Data Format selection. There are a couple of instances when this is useful. If the file includes sensitive data that you do not want to show to the client, you can leave it out of the import. For example, perhaps this report is for a customer to whom you do not want to show the cost of goods sold or profit. In this case, you can choose to skip these fields in the import. In addition, occasionally you will encounter a text file that is both fixed width and delimited by a character such as the pipe character. Setting the 1-wide pipe columns as “do not import” is a great way to get rid of the pipe characters, as shown in Figure 20.5

Figure 20.5. This file is both fixed width and pipe delimited. Liberal use of the Do Not Import Column setting for each pipe column eliminates the pipe characters from the file.
If you have text fields that contain alphabetic characters, you can choose the General format. The only time you should choose the Text format is if you have a numeric field that you explicitly need imported as text. One example of this is an account number with leading zeros or a column of zip codes. In this case, change the field to Text format to ensure that zip code 01234 does not lose the leading zero.
Caution
After you import a text file and specify that one field is text, that field will exhibit seemingly bizarre behavior. Try inserting a new row and entering a formula in the middle of a column imported as text. Instead of getting the results of the formula, Excel enters the formula as text. The solution is to delete the formula, format the entire column as General, and then enter the formula again.
After opening the file, turn off the macro recorder and examine the recorded code:

The most confusing part of this code is the FieldInfo parameter. You are supposed to code an array of two-element arrays. Each field in the file gets a two-element array to identify both where the field starts and the field type.
The field start position is zero based. Because the Region field is in the first character position, its start position is listed as zero.
The field type is a numeric code. If you were coding this by hand, you would use the xlColumnDataType constant names; but for some reason, the macro recorder uses the harder-to-understand numeric equivalents.
With Table 20.1, you can decode the meaning of the individual arrays in the FieldInfo array. Array(0, 1) means that this field starts zero characters from the left edge of the file and is a general format. Array(8, 1) indicates that the next field starts eight characters from the left edge of the file and is General format. Array(17, 3) indicates that the next field starts 17 characters from the left edge of the file and is a date format in month-day-year sequence.
Table 20.1. xlColumnDataType Values

As you can see, the FieldInfo parameter for fixed-width files is arduous to code and confusing to look at. This is one situation where it is easier to record the macro and copy the code snippet.
Caution
The xlTrailingMinusNumbers parameter was new in Excel 2002. If you have any clients who might be using Excel 97 or Excel 2000, take the recorded parameter out. The code runs fine without the parameter in newer versions. However, if left in, it leads to a compile error on older versions. In my experience, this is the number one cause for code to crash on earlier versions of Excel.
Opening a Delimited File
Figure 20.6 shows a text file where each field is comma separated. The main task in opening such a file is to tell Excel that the delimiter in the file is a comma and then identify any special processing for each field. In this case, we definitely want to identify the third column as being a date in mm/dd/yyyy format.
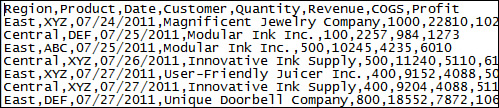
Figure 20.6. This file is comma delimited. Opening this file involves telling Excel to look for a comma as the delimiter and then identifying any special handling, such as treating the third column as a date. This is much easier than handling fixed-width files.
Caution
If you try to record the process of opening a comma-delimited file where the filename ends in .csv, Excel records the Workbooks.Open method rather than Workbooks.OpenText. If you need to control the formatting of certain columns, rename the file to have a .txt extension before recording the macro.
Turn on the macro recorder and record the process of opening the text file. In step 1 of the wizard, specify that the file is delimited.
In the Text Import Wizard—step 2 of 3, the data preview may initially look horrible. This is because Excel defaults to assuming that each field is separated by a tab character (see Figure 20.7).

Figure 20.7. Before you import a delimited text file, the initial data preview looks like a confusing mess of data because Excel is looking for tab characters between each field when a comma is actually the delimiter in this file.
After clearing the Tab check box and selecting the proper delimiter choice, which in this case is a comma, the data preview in step 2 looks perfect, as shown in Figure 20.8

Figure 20.8. After changing the delimiter field from a tab to a comma, the data preview looks perfect. This is certainly easier than the cumbersome process in step 2 for a fixed-width file.
Step 3 of the wizard is identical to step 3 for a fixed-width file. In this case, specify that the third column has a date format. Click Finish, and you will have this code in the macro recorder:

Although this code appears longer, it is actually simpler. In the FieldInfo parameter, the two element arrays consist of a sequence number, starting at 1 for the first field, and then an xlColumnDataType from Table 20.1. In this example, Array(2, 1) is saying “the second field is of general type.” Array(3, 3) is saying, “the third field is a date in M-D-Y format.” The code is longer because it explicitly specifies that each possible delimiter is set to False. Because False is the default for all delimiters, you really need only the one that you will use. The following code is equivalent:

Finally, to make the code more readable, you can use the constant names rather than the code numbers:

Excel has built-in options to read files where fields are delimited by tabs, semicolons, commas, or spaces. Excel can actually handle anything as a delimiter. If someone sends pipe-delimited text, you would set the Other parameter to True and specify an OtherChar parameter:
Workbooks.OpenText Filename:= "C:sales.txt", Origin:=437, _
DataType:=xlDelimited, Other:=True, OtherChar:= "|", FieldInfo:=...
Reading Text Files with More Than 1,048,576 Rows
If you use the Text Import Wizard to read a file with more than 1,048,576 rows of data, you will get an error saying “File not loaded completely.” The first 1,048,576 rows of the file will load correctly.
If you use Workbooks.OpenText to open a file with more than 1,048,576 rows of data, you are given no indication that the file did not load completely. Excel 2010 loads the first 1,048,576 rows and allows macro execution to continue. Your only indication there is a problem is if someone notices that the reports are not reporting all the sales. If you think that your files will ever get this large, it would be good to check to see whether cell A1048576 is nonblank after an import. If it is, the odds are that the entire file was not loaded.
Reading Text Files One Row at a Time
You might run into a text file with more than 1,048,576 rows. When this happens, the alternative is to read the text file one row at a time. The code for doing this is the same code you might remember in your first high school BASIC class.
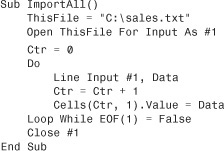
You need to open the file for INPUT as #1. You can then use the Line Input #1 statement to read a line of the file into a variable. The following code opens sales.txt, reads 10 lines of the file into the first 10 cells of the worksheet, and closes the file:

Rather than read only 10 records, you will want to read until you get to the end of the file. A variable called EOF is updated by Excel automatically. If you open a file for input as #1, checking EOF(1) will tell you whether you have read the last record.
Use a Do...While loop to keep reading records until you have reached the end of the file:
After reading records with code such as this, you will note in Figure 20.9 that the data is not parsed into columns. All the fields are in Column A of the file.

Figure 20.9. When you are reading a text file one row at a time, all the data fields end up in one long entry in Column A.
Use the TextToColumns method to parse the records into columns. The parameters for TextToColumns are nearly identical to the OpenText method:

Caution
For the remainder of your Excel session, Excel will remember the delimiter settings. There is an annoying bug (feature?) in Excel. After Excel remembers that you are using a comma or a tab as a delimiter, any time that you attempt to paste data from the Clipboard to Excel, the data is parsed automatically by the delimiters specified in the OpenText method. Therefore, if you attempted to paste some text that includes the customer ABC, Inc., the text will be parsed automatically into two columns, with text up to ABC in one column and Inc. in the next column.
Rather than hard-code that you are using the #1 designator to open the text file, it is safer to use the FreeFile function. This returns an integer representing the next file number available for use by the Open statement. The complete code to read a text file smaller than 1,048,576 rows is as follows:

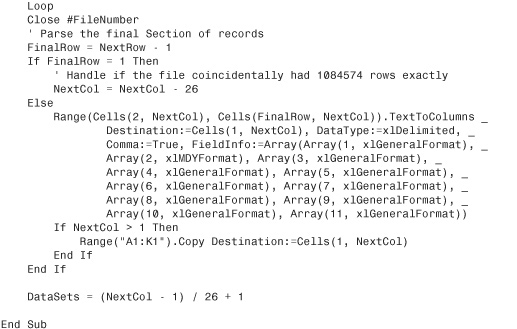
Reading Text Files with More Than 1,048,576 Rows
You can use the Line Input method for reading a large text file. A good strategy is to read rows into cells A1:A1048575, and then begin reading additional rows into cell AA2. You can start in Row 2 on the second set so that the headings can be copied from Row 1 of the first data set. If the file is large enough that it fills up Column AA, move to BA2, CA2, and so on.
Also, you should stop writing columns when you get to Row 1048574, leaving two blank rows at the bottom. This ensures that the code Cells(Rows.Count, 1)""".End(xlup).Row finds the final row. The following code reads a large text file into several sets of columns:

Usually you should write the DataSets variable to a named cell somewhere in the workbook so that you know how many datasets you have in the worksheet later.
As you can imagine, using this method it is possible to read 660,601,620 rows of data into a single worksheet. The code that you formerly used to filter and report the data now becomes more complex. You might find yourself creating pivot tables from each set of columns to create a data set summary, and then finally summarizing all the summary tables with a final pivot table. At some point, you need to consider whether the application really belongs in Access. You can also consider whether the data should be stored in Access with an Excel front end, which is discussed in Chapter 21, “Using Access as a Back End to Enhance Multi-User Access to Data.”
Writing Text Files
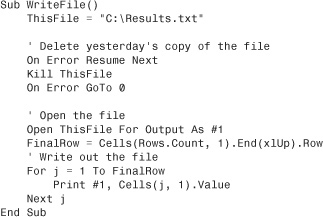
The code for writing text files is similar to reading text files. You need to open a specific file for output as #1. Then, as you loop through various records, you write them to the file using the Print #1 statement.
Before you open a file for output, make sure that any prior examples of the file have been deleted. You can use the Kill statement to delete a file. Kill returns an error if the file was not there in the first place. In this case, you will want to use On Error Resume Next to prevent an error.
The following code writes out a text file for use by another application:
This is a somewhat trivial example. You can use this method to write out any type of text-based file. The code at the end of Chapter 16, “Reading from and Writing to the Web,” uses the same concept to write out HTML files.
Next Steps
There will be times when you write to text files out of necessity—either to import data from another system or to produce data compatible with another system. Using text files is a slow method for reading and writing data. In Chapter 21 you learn about writing to Access Multidimensional Database (MDB) files. These files are faster, indexable, and allow multi-user access to data.