
4. Document Basics
The term document in the non-digital world generally refers to a written or printed paper bearing original, official, or legal information. In the realm of computers, the term document refers to a file. Typically, computer documents contain text, but not always. Documents can also include files generated by desktop publishing programs, web pages, and more. Just for the record, the files you create in Word are officially called documents.
Because the whole purpose of having a word-processing program is to make documents, you need to learn a variety of basic tasks in order to get things rolling. You need to know how to start new files, open existing documents, juggle multiple open documents, and generally manage how your documents behave. This chapter shows you how to perform such basic document tasks.
Starting a New Document
Every time you open Word, you are presented with the option of starting a new document, opening a recent document, or opening another document stored on your computer, SkyDrive, or other location. The Word Start screen, as it is called, is a launching pad for deciding what you want to do in Word. To open a blank document, choose the Blank document option from among the list of templates, as shown in Figure 4.1. Yes, strangely enough, even a blank document is built on a template. You can learn more about using templates in the next chapter.
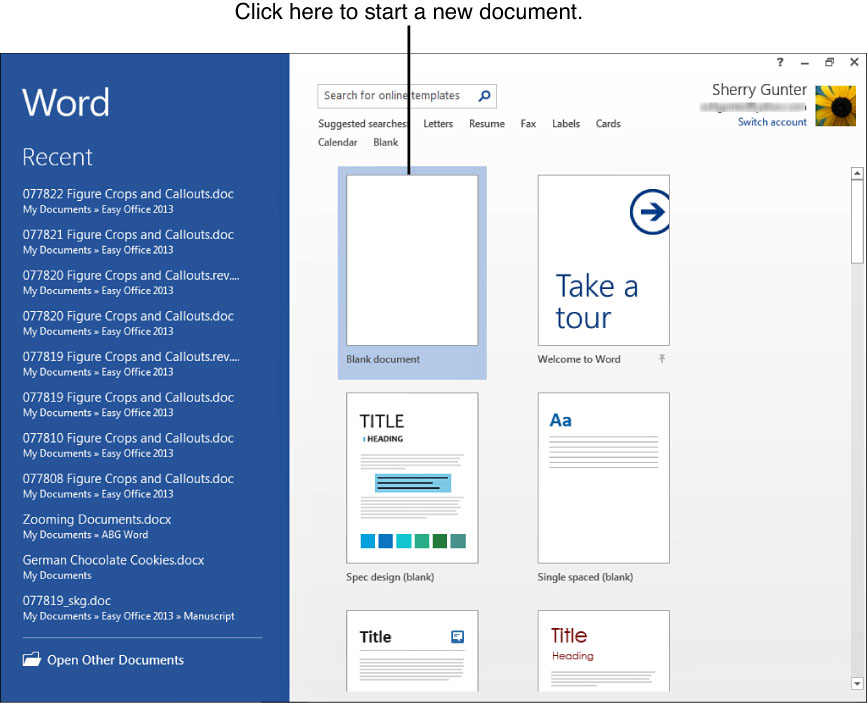
FIGURE 4.1 You can start a new document when you launch Word.
If you’re already using Word and want to create a new document, you can summon one by revisiting the launch pad:
1. Click the File tab on the Ribbon.
2. Click New.
3. Click Blank document, shown in Figure 4.2, or any other template you want to use to start a new file.

FIGURE 4.2 Use the New command to start a new document in Word.
Word opens a new, blank document onscreen and you’re ready to go.
![]() Note
Note
If you prefer a shorter method to create new documents, you can display the New command on the Quick Access toolbar—the little line of buttons that appears up at the top of the program window. (We’ll look at the Quick Access toolbar in the next section. Jump ahead to Figure 4.3 if you can’t stand to wait.) By default, the toolbar starts out with the Save, Undo, and Redo tools, but you can add other tools, such as the New command, to the bar for easy access. When you do, you can quickly start a new document without revisiting the launch screen. Follow these steps to add the button to the toolbar.
1. Click the Customize Quick Access Toolbar arrow icon at the end of the toolbar.
2. Click New.
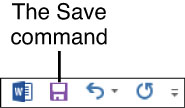
FIGURE 4.3 The Save command is conveniently located on the Quick Access toolbar.
This adds the button. Just click the New button any time you want to start a blank document.
Saving Documents
Another key function of most programs is learning to save your work by activating some sort of Save command. In Microsoft Word, that command is conveniently located in the Quick Access toolbar, pointed out in Figure 4.3. You can also find your way to it through the Ribbon’s File tab by clicking File, Save or File, Save As (see Figure 4.4).
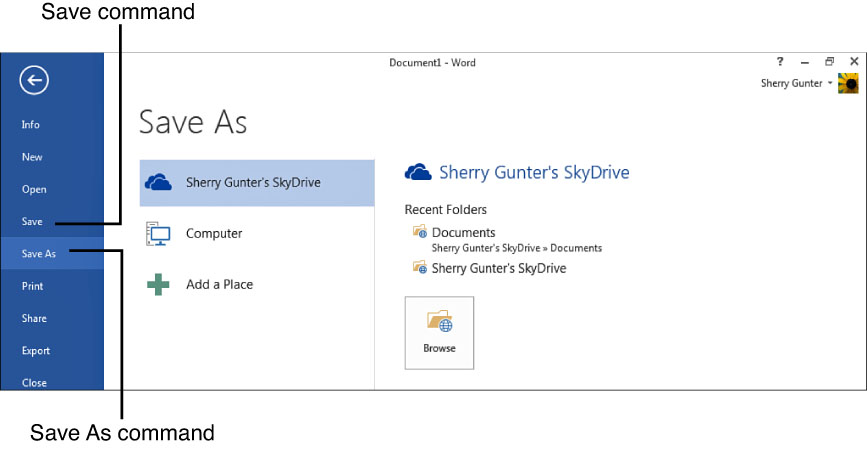
FIGURE 4.4 You can also find the Save and Save As commands through the Ribbon’s File tab.
Before going any further, let me clarify the difference between the Save command and the Save As command. Either one of these commands accomplishes the same thing the first time you save a document, which is basically saving your work, assigning a filename, and choosing where you want to save the file. After a file is saved, however, you only need to use the Save command to save any subsequent changes you make to the document.
But what if you want to save the same content as a different document, thus creating two different files? That’s where the Save As command comes into play. You can use it to save an existing document under a new filename. You might do this to create two copies of a report, for example. Perhaps you want to take last year’s report and update it to reflect this year’s changes. You can start with the original file, save it under a new filename, and then make your changes. This can be a real timesaver, as you can imagine.
Ready to go through the steps for saving a file? Here we go:
1. Click the File tab on the Ribbon and click Save or Save As, or click the Save button on the Quick Access toolbar.
2. Click a destination for the saved file.
3. Depending on the selected destination, additional recent folders might appear listed. You can choose one, if needed. If the folder you want isn’t listed, you can use the Save As dialog box in the next step to find the folder or drive to which you want to save the file; click Browse to get started.
4. Next, the Save As dialog box opens and you can type in a name for the file in the File name box, as shown in Figure 4.5. You can also use this dialog box to navigate to a certain folder or drive in which to store the file, if need be.

FIGURE 4.5 Use the Save As dialog box to specify a filename, a destination folder, or a particular file type.
5. Optionally, you can use the Save as type drop-down menu to assign another file type, such as saving the document as a PDF file or a web page.
6. Click Save, and Word saves the file per your directions.
Use the left pane in the Save As dialog box to scroll up and down to find and select the drive or library folder where you want to store your document, then use the other pane to narrow down your destination to folders within the main library folder or drive.
If you try to exit a document without saving your changes, Word prompts you to do so before closing the file. Click Save to save your work, click Don’t Save to disregard all of your changes, or click Cancel to change your mind about closing the document.
![]() Note
Note
By default, Word is set up to automatically save temporary copies of your documents as you work. In case of a system crash, you can recover any documents you were working on at the time of the crash. Word’s AutoRecover feature is set up to save a file every 10 minutes and keep the last autosave if you close the program without saving. You can adjust these settings, if needed, or turn off AutoRecover. You can find the save options by clicking the File tab, and then clicking the Options link. This opens the Word Options dialog box; click the Save category to find all the AutoRecover settings. You can also find your way to the Word Options dialog box through the Save As dialog box; click the Tools drop-down arrow next to the Save button and choose Save Options. If you ever do need to recover an autosaved file, click the File tab, click Open, click Recent Documents, and scroll down to the Recover Unsaved Documents option.
A Word About File Types
Let’s talk about file types, also called file formats. By default, the files you create in Word are saved in Word’s “document” file type, which adds a .DOCX file extension to the filename automatically. If you save a file and name it Bob, its actual full name is Bob.docx with the file extension. Most of the time you don’t see file extensions in Windows unless you want to, but they determine what sort of program can read the file. Different programs read and create different file types. For example, you normally won’t create Word document files in an illustration program, and you can’t turn a Word document file into a graphic file—software programs are designed to make certain types of files, hence the distinguishing file extensions.
However, many programs can read and work with a wider variety of file types than just the ones they are designed to create. Microsoft Word lets you open text files of other varieties, web pages, XML documents, OpenDocument Text files, PDF files, XPS files, and files created in older versions of Word. You can also save your documents as these other file types. Take a look at Figure 4.6 to see the Save as type drop-down list of available file types. Notice the file extension listed at the end of each file type (I turned my extensions on so you could see what they look like).
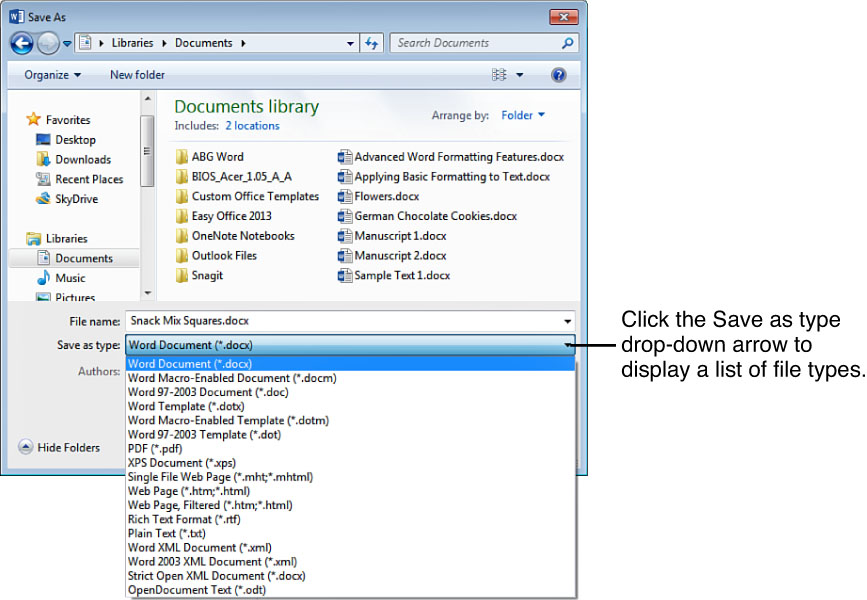
FIGURE 4.6 You can choose which file format you want to assign to a document.
The default Word document type is mostly backward compatible, which means you can open your Word 2013 files in older versions of Word.
The more you work with various types of files on your computer, the easier you can distinguish their types and which programs you can use to view the files.
![]() Note
Note
Ordinarily, you don’t see file extensions unless you turn them on. If you want to see them in Windows Explorer or File Explorer (depending on your version of Windows), open the Explorer window (click the Explorer icon in the Windows desktop taskbar), click the Tools menu and click Folder Options. In the Folder Options dialog box, click the View tab and deselect the Hide extensions for known file types check box. Click OK and you can now view file extensions, even in Word’s Save As and Open dialog boxes.
Other File-Saving Options to Consider
File properties are extra details about a document. The file properties include the behind-the-scenes data saved with a file, such as author name, file creation date, and tags—keywords that help you search for the file later. You can use the Save As dialog box to assign tags when you save a document. Just click the Add a tag link above the Save button in the dialog box and type in your tags, separated by semicolons. Tags are words or phrases that describe or identify, so a document about the declining population of penguins might use tags like “penguin,” “population,” or “school report,”—anything that might help you look up the document later.
You can also change the author name or add more names to a document’s file properties. In the Save As dialog box, click the Authors link and make your changes or additions.
![]() Tip
Tip
You can also view a document’s properties anytime by clicking the Ribbon’s File tab and clicking Info. To view all the properties, click the Properties drop-down arrow and choose Advanced Properties. This opens a dialog box with all kinds of file properties, including fields for entering additional information, such as company name, manager name, and so on.
Opening and Closing Documents
What’s the point of saving your documents if you can’t open them and work on them again? You can open documents using a similar method as saving them. Microsoft Word keeps a list of recently opened files handy for reopening, or you can use the Open dialog box, which looks hauntingly like the Save As dialog box with a different name at the top.
To open a document you have previously saved, the first thing you need to do is to click the Ribbon’s File tab and click Open. You’ll see a page similar to Figure 4.7 or Figure 4.8.
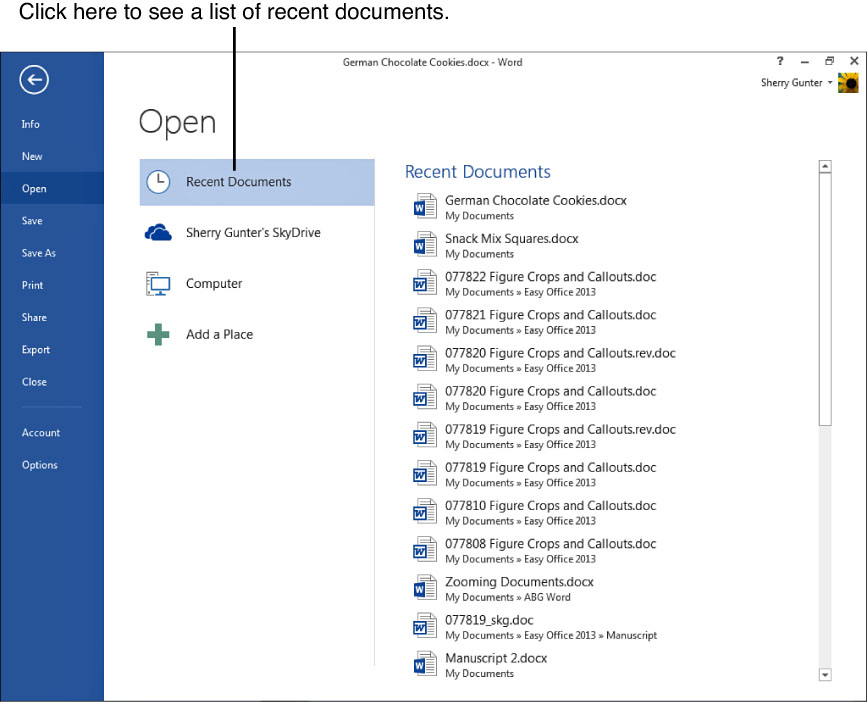
FIGURE 4.7 The Recent Documents option lists recently viewed files.

FIGURE 4.8 You can look for a document on SkyDrive, your computer, or another storage area or device.
With the Open page displayed, try one of these options:
• Click Recent Documents to view a list of recently viewed files, like the one shown earlier in Figure 4.7. You can quickly open a file you previously used simply by clicking its name.
• Click the SkyDrive option if you stored the document on the cloud. (For even more cloud storage options, you can use the Add a Place option to set up Office 365 access and retrieval.)
• Click Computer if you stored your document on the computer, as shown earlier in Figure 4.8. You can then use the Open dialog box to navigate to the file.
• If the file is stored on another device, such as a USB flash drive, plug in the device and click the Computer option, then navigate to the device.
Other than the recent files list, the other options all inevitably lead to the Open dialog box, shown in Figure 4.9, where you can navigate to the file you’re looking for. The Open dialog box is arranged just like the Save As dialog box. Use the left pane to navigate to a drive or library, then “drill down” to the exact folder containing your document file. After you’ve located the one you want to open, you can double-click it, or click it and click Open.

FIGURE 4.9 The Open dialog box is the place to go to find the document you want to open.
You can close a document without closing the entire program window. Closing a document merely closes the current file, leaving the program window open so you can work on more documents.
To close a document, click the File tab, then click Close. That’s it. (To learn more about closing the program window, revisit Chapter 1, “Getting to Know Microsoft Word).
Viewing Multiple Documents
You can open more than one document at a time and switch between them as you work. This is particularly useful when you want to move text from one to the other, which you’ll learn to do in the next section. You can use the Windows taskbar to swap between open documents. Just move the mouse pointer to the taskbar and hover over the Word icon, as shown in Figure 4.10. A list of the open files appears and you can click the one you want to view.
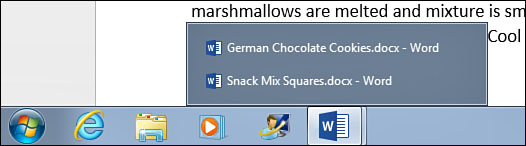
FIGURE 4.10 Use the Windows taskbar to quickly switch between open Word documents.
You can also use Word’s View tab to switch between document windows, as well as control the display of two or more windows onscreen at the same time. Click the View tab, shown in Figure 4.11, to find all the viewing options.
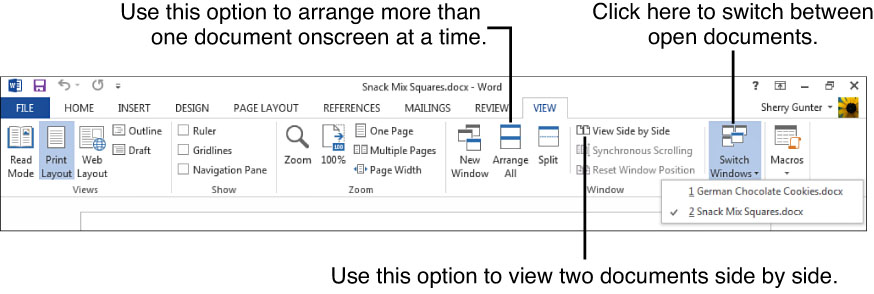
FIGURE 4.11 Find all kinds of viewing options on the View tab.
Here are a few ways to view multiple documents:
• To switch document windows, click the Switch Windows button and click the document you want to view.
• To view all open documents onscreen at once, click the Arrange All tool. Warning: This can make your screen pretty crowded, as shown in Figure 4.12.
• To view two documents side by side, click the View Side by Side tool. Click it again to return to one full document window.

FIGURE 4.12 Use the Arrange All option to view two or more documents onscreen.
Don’t forget—you can use the Minimize, Restore, and Maximize tools in the upper-right corner of the document window to control individual windows. See Chapter 1 to learn more.
Moving, Copying, and Pasting Data Between Files
Cut, Copy, and Paste are the universal go-to commands for moving data around digitally. You can cut data, such as text in Word, and move it to another area in a document, to a completely different document, or to a completely different program and paste it into place. You can use the copy command to do the same thing, but by making a copy of the original item.
The Cut, Copy, and Paste commands have been a crucial part of most software programs since the dawn of personal computing. Chances are, if you’ve worked with computers before, you most definitely have tapped into the power of cutting and copying items and pasting them where you wanted them to go. Items, whether it’s text or pictures, or something else, when cut or copied are placed on the Windows Clipboard, a seemingly magical place where data rests briefly until you paste it somewhere else. It turns out the Clipboard is not so magical, but it does work behind the scenes.
To cut text from one document to place in another, select the text and click the Cut tool on the Home tab, or press Ctrl+X (the keyboard shortcut for the Cut command). Now open the document and click where you want to insert the cut text and click the Paste button on the Home tab, or press Ctrl+V (the keyboard shortcut for Paste). If you want to control whether formatting is carried over along with the cut text, click the Paste button’s drop-down arrow and choose an option to suit your needs. If you want to copy the text instead of cut it, choose the Copy command on the Home tab instead (Ctrl+C).
Another option for cutting and copying between documents is to simply drag the selected text from one document window to the other and drop it where you want it to go. You’ll need both windows displayed onscreen at the same time (use the Arrange All button on the View tab to accomplish this). To copy selected text instead of just moving it, press and hold the Ctrl key while dragging.
You can learn more about using the Cut, Copy, and Paste commands in your Word documents in Chapter 6, “Adding Text.”
Assigning Document Protection
Microsoft Word has a variety of protection tools you can use to help keep your documents safe. Let’s say you work for a certain intelligence gathering bureau and want to keep your weekly report safe from prying eyes, or you just want to keep your coworker from reading your latest blog entry before it’s ready, or you’re just super paranoid your cat is secretly reading your computer files while you’re sleeping—you can restrict access to your files or encrypt them with passwords. Document protection tools actually aren’t just for spies or paranoid people, but they’re designed to help you keep your data safe. You can find your way to document protection options through the Info page. Click the File tab on the Ribbon, then click Info. Click the Protect Document button, shown in Figure 4.13, to view a list of options.
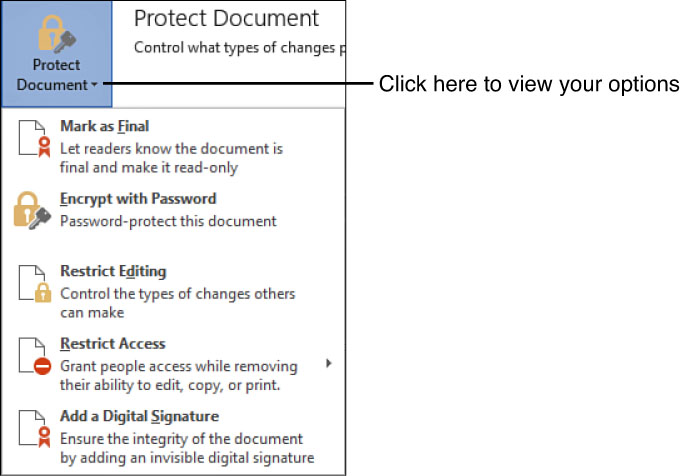
FIGURE 4.13 Find protection options through the Info page.
Here’s a rundown of ways you can protect your documents:
• Mark as Final This option turns the document into a read-only file, which means no one can make changes to it.
• Encrypt with Password Use this option to assign a password to a document. No one can open the document without the password—including you, so make sure that you’ll remember that password or you’ve recorded it somewhere safe.
• Restrict Editing Use this option to control what sort of changes can be made to a document and who exactly in your network can work with the file.
• Restrict Access If you set up your computer with Information Rights Management (IRM) software, you can restrict access to the file. This is handy for networked computers in an office situation with Windows Rights Management Services Client Service Pack installed. (Did your eyes just glaze over?) Anyway, if this applies to you, go have a chat with your administrator to find out how this works in your scenario.
• Add a Digital Signature If your documents require the added security of authentication, which confirms the information originates from you and has not been altered, you can add a digital signature. Like the restricted access option, digital signatures require some extra setup typically involving a signing certificate to prove identity through a certificate authority. Fees are involved. You can learn more about this feature through Word’s Help content.