
16. Fine-Tuning Your Graphics
Now that you have some amazing graphics placed in your document—or at least you do if you read Chapters 14, “Adding Simple Graphic Elements,” and 15, “Inserting Pictures and Videos”—it’s time to fiddle with them a bit and make them even more amazing. Word has a plethora of formatting attributes you can assign to any of your visual elements. Whether it’s a simple graphic or WordArt object, a clip art picture or photograph, you can add formatting such as borders, styles, and effects to give some added pizzazz. Not only that, but you can perform a variety of other techniques to change your artwork and give it a completely new look.
In this chapter, I show you a variety of techniques and attributes that might, in fact, knock your socks off—assuming you are wearing socks. For example, did you know you can layer graphic objects or crop and recolor a picture, or even remove its background? Ha—I didn’t think so, but by the end of this chapter, you will know for sure. Get your graphics ready and follow along.
The term graphic object refers to any type of artwork you place in a document, including any shapes you draw (circles, lines, triangles, arrows, and so on), or WordArt object you insert, or text box you add. The term also covers picture files, photos, clip art, screenshots, and even the image of an embedded video clip. Graphic is an overarching term for all the visual, artsy-oriented things you add to a file. So when we talk about formatting graphic objects, now you know what it means.
Resizing, Positioning, and Wrapping Text Around Graphics
I realize you probably remember this from the previous two chapters, but in case you’ve slept since then, let’s briefly go over how to position and resize your artwork again. Besides, you’re going to need this information at your fingertips to do other things with the graphics coming up.
Anytime you click on a graphic object, it’s selected and you can start performing edits on it. A few more things happen automatically when you click a graphic element:
• A new tab or set of tabs appears on the Ribbon, offering formatting controls and tools.
• A Layout Options icon appears next to the selected graphic.
• Selection handles surround the graphic.
Take a gander at Figure 16.1 to see all of these things in play.
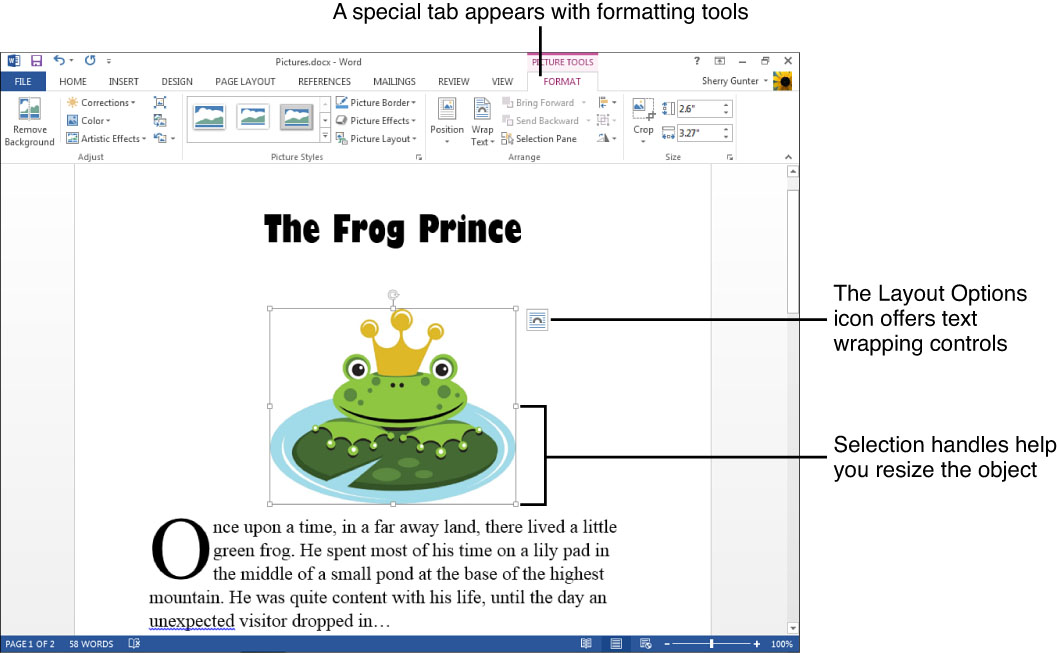
FIGURE 16.1 You can count on several things to happen onscreen every time you select a graphic, regardless of what type of graphic object it is.
Out of all of these things that happen when you select an object, you can use each of them to do something with positioning and resizing. Let’s start with the most obvious one—the selection handles. Here’s what you can do with them:
• Drag a corner handle—any corner—to resize the graphic in any direction you drag.
• Drag a top or bottom middle handle to increase or decrease the object’s height, up or down.
• Drag a side middle handle to increase or decrease the object’s width, left or right.
• The circular icon that sits at the top of a graphic is the rotation handle, and you can use it to rotate the graphic—more about this technique coming up later.
Figure 16.2 maps out what each of these handles can do for you.
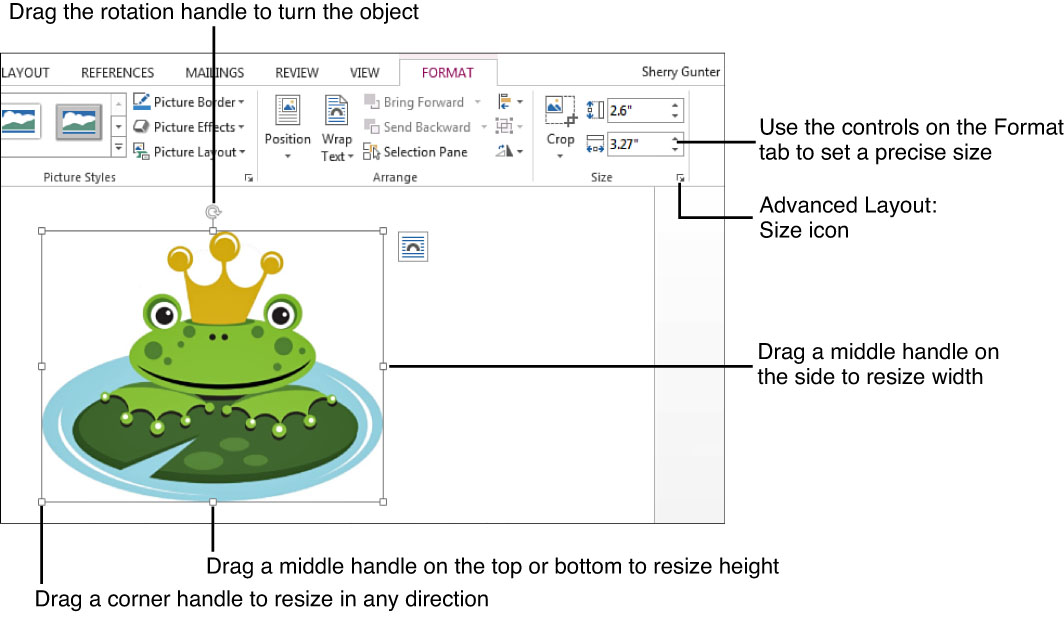
FIGURE 16.2 The easiest way to resize a graphic is to use the selection handles and drag it to a new size.
Word offers other sizing controls you can apply. If you click the Ribbon’s Format tab (which appears only when you select a graphic object), you can find some exact sizing commands. Under the group of tools labeled Size sits a control for adjusting height and another for adjusting width (see Figure 16.2). You can click the spinner arrows to reset a value, or you can type a value directly into the appropriate box. The size settings are measured in inches, by the way.
If you would like to access some additional sizing controls, open the Layout dialog box to its Size tab, as shown in Figure 16.3. To find your way to this dialog box, click the Advanced Layout: Size icon in the bottom-right corner of the Size group of tools on the Format tab. You can also right-click the object and choose Size and Position from the pop-up menu, or click the Layout Options icon and choose See more command. All of these routes lead to the Layout dialog box.
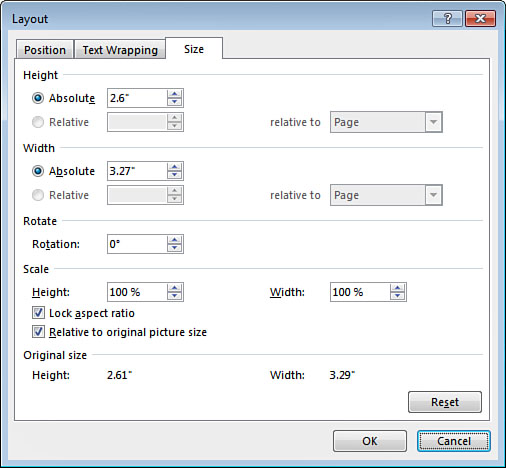
FIGURE 16.3 The Layout dialog box has controls for positioning, text wrapping, and size.
The Layout dialog box has some extra controls for resizing, such as unlocking the aspect ratio or scaling the size by a certain percentage. You can utilize this dialog box any time you need some precision in your sizing tasks.
Let’s move on to positioning. Most of the time when you insert an object, it appears where the cursor was last located in the document. Often you’ll need to adjust the position, especially to make the object work well with the document layout. The natural thing to do is just drag the object where you want it. When you move the mouse pointer over a selected graphic, a four-sided arrow pointer appears. When you see this icon, you know it’s safe to start dragging (see Figure 16.4).
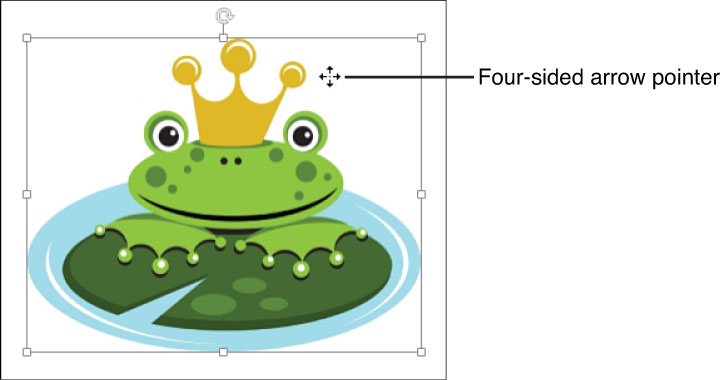
FIGURE 16.4 One way to move a graphic is to just drag it and drop it.
Word’s new alignment guides can help you position objects on a page. As you drag, the green horizontal or vertical lines show you how the object lines up with other page elements, as shown in Figure 16.5, as well as margins. The alignment guides can really help you line up elements fast, so keep an eye out for them as you drag things around your page.

FIGURE 16.5 Use the alignment guides to help you position objects on a page.
When you reposition a graphic, the next thing you have to contend with is the way in which text flows around the object. Called text wrapping, you can choose between several options:
• In Line with Text The graphic sits on the same baseline as the adjacent text. This is typically the default setting.
• Square Text flows around the object and treats it as a square, with a little breathing room between the text and the object on all four sides.
• Tight The text flow with this option hugs the object on all sides, nice and tight, with little space between the text and the object.
• Through This option flows the text directly “through” the object, from one side to the next. The lines of text only break the flow to accommodate the object, then pick up again on the other side of the object as if nothing had impeded it.
• Top and Bottom Text flows at the top and bottom of the object, but not left or right of the object. (Note that text might appear beside the object if you’re using a multi-column layout.)
• Behind Text Flows text directly behind the object; looks like you just plopped the graphic right on top of the text.
• In Front of Text Flows text directly on top of the object, thus making the object more of a background behind the text.
![]() Tip
Tip
If you ever run into trouble trying to move a graphic object around on a page, try changing its text wrapping setting. Swapping to Tight text wrapping, for example, allows the object to move around more freely.
Figure 16.6 shows an example of wrapping that flows behind the text. Notice how legibility is going to be a big issue with this setting. But if my graphic was nearly transparent or faded out, it might work. You can click the Layout Options icon (upper-right corner of the selected object) to access a quick menu of text wrapping options, as shown in Figure 16.6. Just click the wrapping option you want to assign. To close the options menu, click its Close button. Changing text color can also make it more readable; white text on a faded print can sometimes look better than black, for example.

FIGURE 16.6 The Layout Options icon is a quick way to assign a text wrapping option.
You can also find a drop-down menu of text wrapping options on the Picture Tools Format tab, shown in Figure 16.7. Click the Format tab and click the Wrap Text button to display the menu. Figure 16.7 shows text wrapping at the top and bottom of the graphic object.

FIGURE 16.7 Or you can use the Format tab to set a wrap option.
![]() Tip
Tip
Thankfully, the icons associated with each wrap text command give a visual clue about the effect they assign to the text flow, so look carefully at the icon graphic to see what the effect on your text will be when applied.
If you’re looking for some additional controls for text wrapping, then look no further than the Layout dialog box’s Text Wrapping tab, shown in Figure 16.8. You can use the settings in this box to control the exact distance of text from the graphic object (measured in inches). You can also find a few more wrapping options, such as flowing text only on certain sides of the selected object.
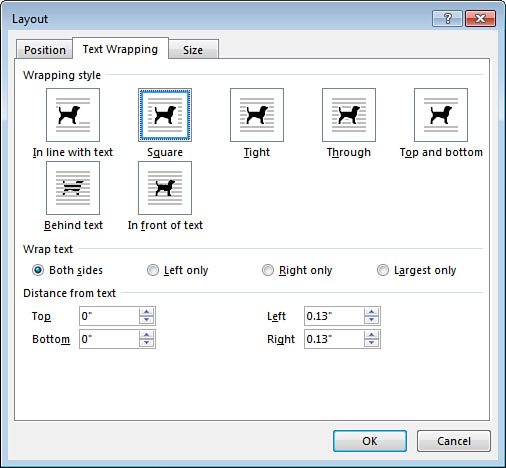
FIGURE 16.8 Open the Layout dialog box for more text wrapping controls.
To display the dialog box, click the More Layout Options command at the bottom of the Wrap Text drop-down menu (refer to Figure 16.7), or click the See more command at the bottom of the Layout Options menu (refer to Figure 16.6).
Oh, and one more method to use, you can always count on a shortcut menu to offer a route to common commands; right-click the object and click Wrap Text and choose a text wrap option to apply.
![]() Tip
Tip
As long as we’re talking about positioning, don’t forget about the alignment commands. You can align objects on the page just like you align text. You can actually use the text alignment controls (found on the Home tab), to assign an alignment setting to an object or you can click the Align Objects drop-down arrow on the Format tab. The Align Objects menu offers all the alignment options in one convenient spot.
Rotating and Flipping Objects
Sometimes you just need to make a different kind of positioning adjustment to a graphic—like flipping it to face the other direction or rotating it slightly to fit your document layout better. You can both flip and rotate graphic elements, and doing either takes little effort.
To flip a selected object, click the Format tab and click the Rotate Objects drop-down arrow, shown in Figure 16.9. Click either Flip Vertical or Flip Horizontal.

FIGURE 16.9 Flip an object with a click of a Flip command.
![]() Tip
Tip
You don’t have enough energy to display the Rotate Objects menu? Then just drag a middle side selection handle to the opposite edge of the object to flip the graphic. To flip it the other direction, drag the middle top or bottom selection handle and drag it to the opposite edge.
If you thought flipping was cool, you might even flip out over the rotation tool, or maybe turn head over heels? Never mind the puns, just keep reading. You can rotate a graphic in either direction and control how much it rotates. For a quick rotation, use the selected graphic’s rotation handle, pointed out in Figure 16.10. Simply drag the handle in either direction to start rotating the object.

FIGURE 16.10 Drag the rotation handle to rotate an object.
You can also summon the Rotate Objects menu on the Format tab and choose a rotation setting, as shown in Figure 16.11. Click the Rotate Objects drop-down arrow and choose to rotate the object left or right.
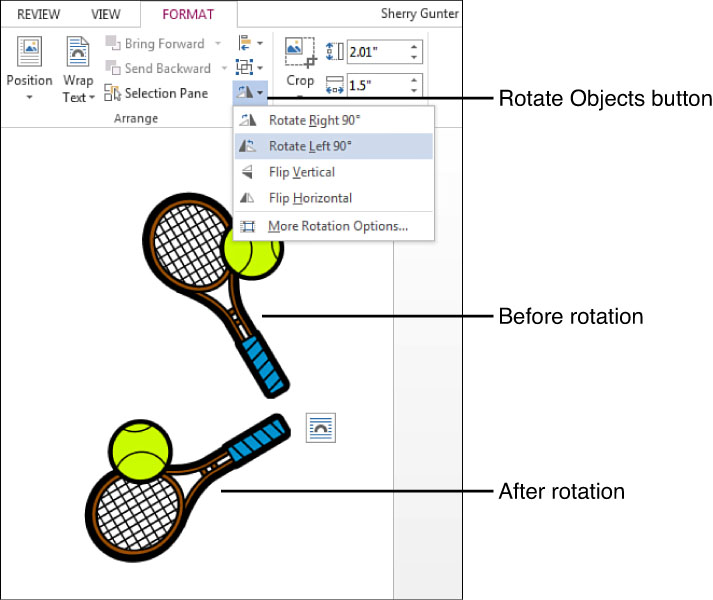
FIGURE 16.11 You can also use the Format tab to assign a quick left or right rotation.
For even more rotation controls, you can open the Layout dialog box, shown in Figure 16.12. To open the dialog box, click the More Rotation Options command on the Rotate Object menu (see Figure 16.11) or right-click the object and click Size and Position. Using the Rotation setting in the dialog box, you can click the spinner arrows to set an exact value, or type it directly into the box. Negative values rotate to the left, positive values rotate to the right. When you’ve set the rotation the way you want, click OK to apply it.

FIGURE 16.12 The Layout dialog box also has a rotation setting.
![]() Tip
Tip
If you don’t like all the formatting you’ve applied to a graphic, you can reset it to its original state. Click the Reset Picture drop-down arrow on the Format tab and click Reset Picture & Size.
Layering and Grouping Objects
You can create different arrangements of graphic elements in a document, and you can group different objects together to move them or apply formatting to all of them at once. Using these techniques, you can create new objects out of existing graphics. For example, you might layer a WordArt object over a shape object to create a logo, then group the two elements together as one. You might place a text box on top of a photo to use as a special caption, or layer one picture over another to start building a collage. There’s all kinds of ways you can stack objects on top of each other in a layering effect. Figure 16.13 shows an example of a WordArt object stacked on top of a shape.
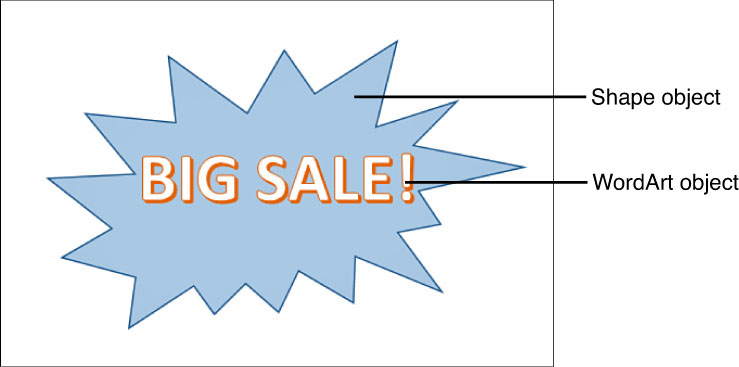
FIGURE 16.13 Stacking shapes, text boxes, and pictures can create some interesting artwork in your documents.
I can easily turn the two layered objects shown in Figure 16.13 into a single graphic using Word’s grouping feature. Rather than move each object independently, I can group them and move them about the document as one object. This technique can really come in handy when you work with multiple objects in a document. First things first, though—let’s start with layering.
Layering Objects
Layering involves changing an object’s position backward or forward in a stack. Depending on how many objects you use, several positions can be in the stack: back of the layer, middle of the layer, top of the layer, and so on. To layer an object, drag it on top of another object. To see what I mean by stacking, take a look at Figure 16.14—I’ve drawn three shapes and stacked them on top of each other. The hexagon is on the top of the stack, which is called the front in layering lingo, and the triangle is on the bottom of the stack, which is called the back in layering lingo. The circle is between the two.

FIGURE 16.14 Here’s an example of three layered shapes.
Now take a look at Figure 16.15 to see what happened when I changed the layering order. The triangle is now at the front, the circle is in the back, and the hexagon is in the middle. This should give you some idea how you can control positioning of objects to make them interact with each other in your document.

FIGURE 16.15 Here’s how the shapes look when I change the order of layers.
One of the easiest ways to change an object’s layer order is to use the right-click shortcut menu, shown in Figure 16.16. To change an object’s placement in a stack, try one of these methods:
• To move the object to the front layer, right-click the object and choose Bring to Front, Bring to Front. (This command’s so nice, they used it twice.)
• To move the object to the back layer, right-click the object and choose Send to Back, Send to Back.
• To bring the object forward one level, right-click the object, click the Bring to Front arrow, and then click Bring Forward.
• To send the object back a level, right-click the object, click the Send to Back arrow, and then click Send Backward.

FIGURE 16.16 For quick reordering, use the right-click method and choose layering commands from the shortcut menu.
You can also find the layering commands on the Ribbon’s Format tab. Click the Bring Forward drop-down arrow to specify a forward action. Click the Send Backward drop-down arrow to specify a backward action (see Figure 16.17).

FIGURE 16.17 Look for layering controls in the Arrange group of tools on the Format tab.
If you ever run into trouble selecting items in the stack, you can display the Selection Pane to help you. Click the Selection Pane button on the Format tab, then click the object you want to select (see Figure 16.18). Word immediately surrounds it with selection handles and you can specify another layer for the object or apply any other formatting attributes.

FIGURE 16.18 When working with several different objects in a layer, the Selection pane can help you select items in a stack.
You can close the Selection pane when you no longer need it. Click its Close button or click the Selection Pane button on the Format tab again.
Grouping Objects
You can use Word’s grouping feature to gather multiple objects into one moveable, formattable unit. You might, for example, group several shapes together to apply the same formatting attributes to all of them at once to save yourself some steps. Or you might want to group two pictures together to move them to the end of a document in one fell swoop. Grouping is a real timesaver for working with multiple elements in Word.
You can choose to group objects for just one task and then ungroup them again, or you can keep them grouped together, such as components you combine to make a logo. To group objects, you first have to select them. After you’ve selected what you want, you can apply the Group command. Follow these steps:
1. Click the first object you want to select, then press and hold the Ctrl key while clicking the remaining objects you want to group (notice each selected object has its own selection border and handles, as shown in Figure 16.19).
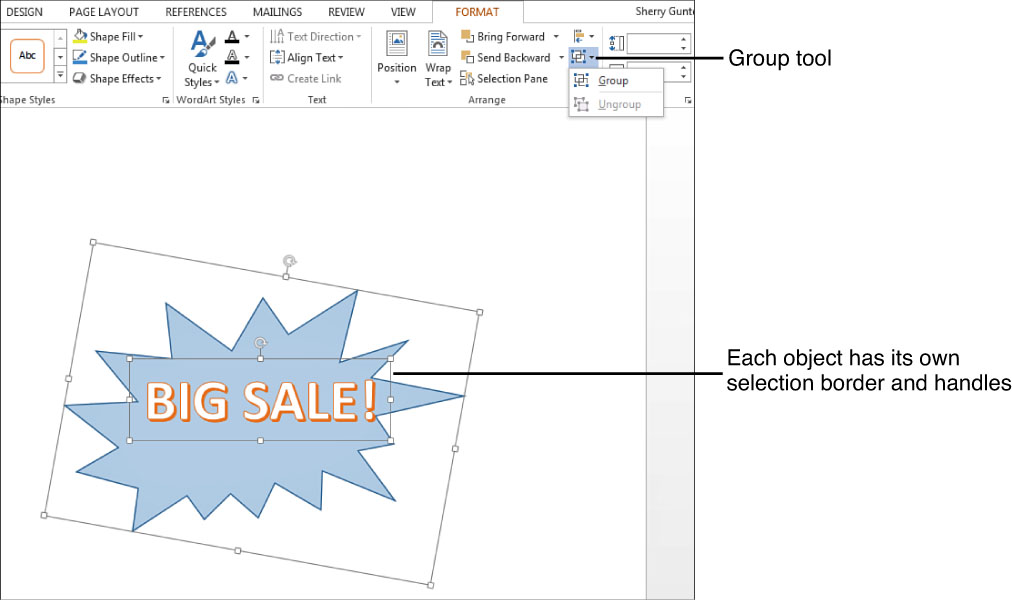
FIGURE 16.19 To group objects, start by selecting which ones you want to include in the group.
2. Click the Format tab.
3. Click Group Objects.
4. Click Group.
Word groups your objects and surrounds them with a selection border and handles, as shown in Figure 16.20.

FIGURE 16.20 After assigning the Group command, all the objects are grouped as a unit.
To ungroup the group, select it and click the Group Objects button and choose Ungroup.
![]() Tip
Tip
You can also right-click the selected objects and click Group and Group or Ungroup.
Adding Picture Styles and Borders
Microsoft Word has a surprising amount of graphic-editing tools for a word-processing program, but that’s a good thing. Visuals are often a crucial part of conveying your text’s message, so being able to alter them to suit your message is an important aspect of making your document look its best. One such modifying feature well worth checking out is Word’s Picture Styles gallery.
The gallery, shown in Figure 16.21, displays preset styles you can apply to clip art illustrations and photographs. Picture styles, much like Word’s built-in styles for shapes and WordArt objects, offer a variety of looks, such as borders, shading, shadows, and an assortment of combinations. You’ll want to sample each one to see what it looks like applied to your selected image.

FIGURE 16.21 Dress up your pictures by applying picture styles.
To assign a picture style, follow these steps:
1. Select the picture you want to edit.
2. Click the Format tab.
3. Click a picture style from the Picture Styles gallery (see Figure 16.22).
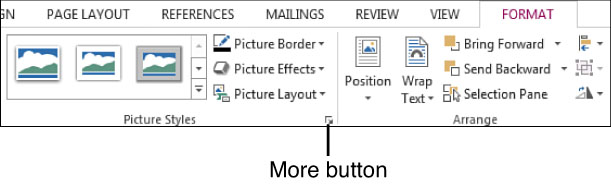
FIGURE 16.22 Find the Picture Styles gallery on the Format tab.
Word immediately assigns the style. To view all the styles at a glance, click the More button in the corner of the gallery. To preview a style, move the mouse pointer over the style and check it out as it temporarily transforms your selected image (it helps to move the document page so you can see the full gallery as well as the picture).
The Picture Styles and Picture Border tools only work with pictures—clip art illustrations or photos. If you want to add a style to a shape, text box, or WordArt object, they have their own styles to apply. For example, when you select a shape, the Shape Styles gallery appears on the Format toolbar and you can use it to change the shape’s style.
Although the Picture Styles gallery has quite a few borders to choose from, you might prefer to add a straight-up, simple border to your picture. You can use the Picture Border tool to do this. From the Format tab, click the Picture Border drop-down arrow and choose a color for the border. If you want to assign a different line thickness or dash style, you can do that, too. Just click the submenu and make your choice. Word immediately applies it to the picture, as shown in Figure 16.23.

FIGURE 16.23 Add a simple border using the Picture Border tool.
To remove a border, select the picture, reopen the Picture Border palette, and choose No Outline.
Adding Flourishes with Effects
If you’re in an especially artistic mood, consider perusing the two effects groups of formatting attributes in Word. You’ll find them geared toward making more of your basic shapes, illustrations, and photos by way of preset design flourishes. One group, called Artistic Effects, works only with illustrations and photos. The other group, plain old Effects, work with all the graphic elements, including shapes and WordArt. Each different effect you apply changes the appearance of the selected object in one way or another. You’ll definitely need to experiment with these to see what kind of transformations you can make to your own graphics.
Assigning Effects
All the shapes, WordArt, photos, and clip art can dip into a group of settings called Effects to change the appearance of the object. If you’re working with a shape, for example, they’re labeled Shape Effects. If you’re working with WordArt, they’re called Text Effects. If you’re working with other image types, such as illustrations or photographs you inserted, they’re called Picture Effects. Despite the slight differences in naming, the effects are all the same and they break down into the following categories:
• Shadow Adds a shadow to the graphic, including outer and inner shadows as well as perspectives.
• Reflection Creates a reflection of the graphic.
• Glow Adds a glowing color of your choice around the graphic.
• Soft Edges Creates fuzzy edges around the graphic.
• Bevel Adds beveled angles or edges to a graphic.
• 3-D Rotation Assigns a 3-D rotation effect to a graphic, giving it the appearance of depth.
Figure 16.24 shows an example of a glow effect added to a clip art illustration. Within each category are subcategories and variations to choose from. As you can see in Figure 16.24, you can access the effects through the Picture Effects button on the Format tab for pictures. If you’re formatting a shape, look for the Shape Effects button, and if you’re formatting WordArt, use the Text Effects button. All of these tools lead to the same controls.
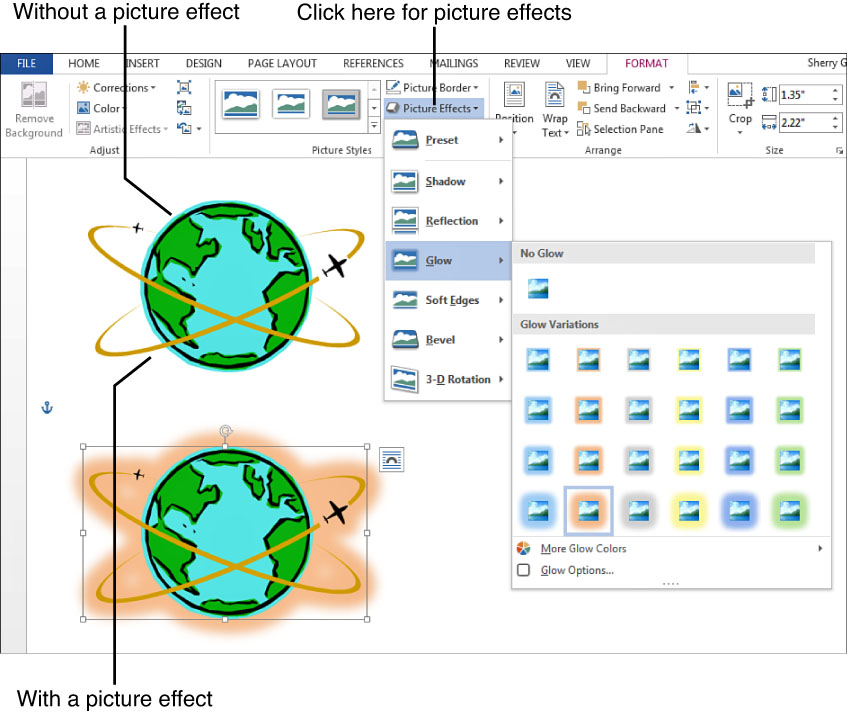
FIGURE 16.24 Look for the effects button on the Format tab for the type of graphic you’re editing.
You also have the option of tweaking the effect further using the Format pane, shown in Figure 16.25. Again, there’s a slight naming difference for this pane depending on what type of graphic you’re editing. If it’s a picture, it’s called the Format Picture pane; if it’s a shape, it’s the Format Shape pane. To open the pane, click the Format icon in the corner of the Picture Styles, Shape Styles, or WordArt Styles groups of tools. You can also get there via the shortcut menu; right-click over the object and choose Format Shape or Format Picture. After the pane is open, click the Effects icon at the top of the pane (if it’s not already selected by default).

FIGURE 16.25 Use the Format pane to further modify an effect.
Using the Format pane, you can make adjustments to individual elements that make up the effect. For example, in Figure 16.25, the glow effect color is changed and the size of the glow increased. Different effects offer different settings, so tweak them to your heart’s delight.
Applying Artistic Effects to Pictures
If you liked the regular special effects, wait till you see the artistic ones. You can turn a photo into a mosaic painting, a black and white pencil sketch, or a photocopy. Using the Artistic Effects gallery, shown in Figure 16.26, you can pretend you’re your own Monet. The only caveat is that they’re applicable to pictures, not shapes or WordArt. On the plus side, pictures include any artwork you insert from other sources, such as illustrations, photo files, clip art, and so forth.

FIGURE 16.26 You can apply some really creative touches using Word’s Artistic Effects.
Select your intended artwork and click the Format tab’s Artistic Effects button, then choose an effect from the gallery. Remember, you can preview the effect on the intended graphic simply by moving your mouse over each one in the gallery. When you find the right one, click it and Word assigns it to the picture.
Cropping Pictures
Say you have the perfect picture to illustrate your Word document, but you need to edit out the telephone pole off to the side, or the picture is great but too big for the spot you want to place it. You can employ the cropping tool to trim the picture, removing the distracting telephone pole. Figure 16.27 shows a before and after crop effect, just to give you an idea of how it works.

FIGURE 16.27 You can crop pictures using Word’s cropping tool.
Ready to try your own cropping? Follow these steps:
1. Select the picture you want to crop.
2. Click the Format tab.
3. Click the Crop drop-down arrow (see Figure 16.28).

FIGURE 16.28 Find the Crop button on the Format tab.
4. Click Crop.
5. Drag a crop handle to the desired cropping edge (see Figure 16.29). To crop equally from both sides, press the Ctrl key while dragging a center crop handle. To crop all four sides, press Ctrl while dragging a corner cropping handle.

FIGURE 16.29 Drag a cropping handle to crop a side of the picture.
6. Continue cropping as many edges as needed.
7. Click the Crop button again or press Esc, and Word applies the new settings.
You can also access the cropping tool by right-clicking the picture and clicking the Crop button from the pop-up toolbar.
Here’s a cool trick—you can crop out a picture to a shape. Click the Crop drop-down arrow and click Crop to Shape, then choose the shape from the Shapes gallery. Word immediately crops out the picture, and the remainder takes the shape of the shape you picked.
![]() Tip
Tip
If your cropping needs to comply with a certain picture frame dimension, you can apply a common aspect ratio. Click the Crop drop-down arrow, click Aspect Ratio, and choose a setting. If your picture needs to fill a shape’s height or width, apply the Fill or Fit commands from the same drop-down menu.
Adjusting Pictures
You can find a few more picture editing tools under the Adjust group of tools on the Format tab. These editing tools work on any type of picture, including photographs. For example, you can make color corrections (helpful for digital photographs), tweak brightness and contrast, compress pictures, and even remove a background.
Correcting Picture Problems
Granted, we’re not all professional photographers, but even they need to fix photos from time to time. Word has a few picture correcting tricks you can apply in a pinch. You can sharpen up a not-so-focused photo or make adjustments to the overall brightness and contrast.
With the Format tab displayed, click the Corrections drop-down arrow to view the gallery (see Figure 16.30). To sharpen a picture, choose from among the Sharpen/Soften settings. To adjust the contrast or brightness, try a selection from the Brightness/Contrast picks. As always, you can hover over a gallery setting and see what effect it has before actually applying it to the photo. When you find an adjustment you want to apply, click it.
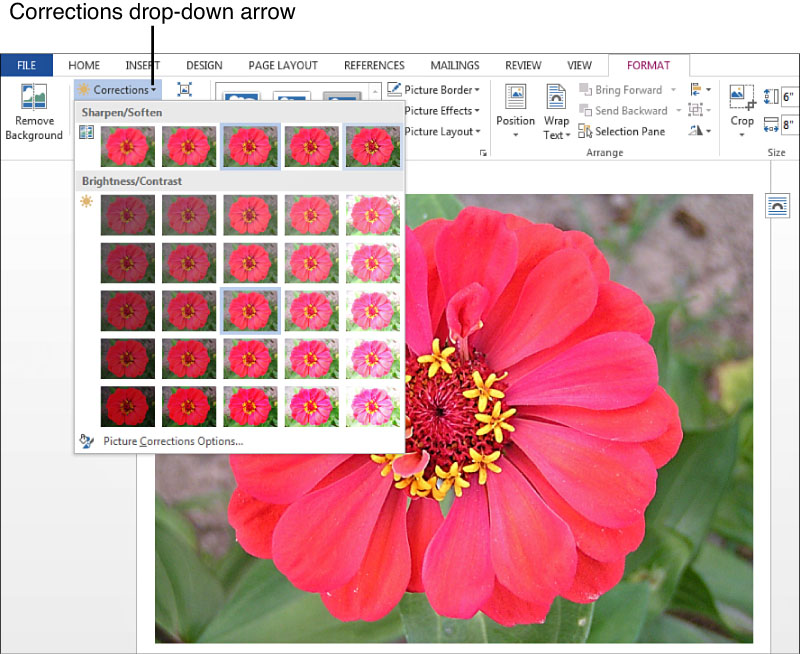
FIGURE 16.30 You can apply a few photo corrections to a picture with a little help from the Corrections gallery.
You can make further adjustments to a correction using the Format Picture pane. Using slider bars and spinner arrows, you can make more adjustments as needed. To display the pane, click the Artistic Effects Options command at the bottom of the Corrections gallery.
Tweaking Colors
Does your photo suffer from dullness, or do you need to turn it into a black-and-white image for your particular publication? You can make adjustments to the color using the Color gallery, shown in Figure 16.31. From the Format tab, click the Color drop-down arrow to open the gallery. You can choose from among the saturation (intensifies or de-intensifies color), color tone (adjusts color temperature), or recolor (changes the image’s color scale) settings.

FIGURE 16.31 Tweak picture color with the Color gallery.
As with picture corrections (see the previous section), you can make further adjustments to whatever color setting you applied with the options found in the Format Picture pane (click the Picture Color Options command at the bottom of the Color gallery to open the pane). Using slider bars and spinner arrows, you can make more adjustments as needed.
![]() Tip
Tip
You can activate the Compress Pictures tool to compress a picture and specify the type of output required for the picture quality.
Removing Backgrounds
Okay, I’ve saved the best for last. I love the tool I’m about to show you. It’s the Remove Background tool and you can use it to take away the background of a picture. You have to see it to believe it. Figure 16.32 shows a regular picture of a flower, and right next to it is the same picture with the background removed. Cool, right?
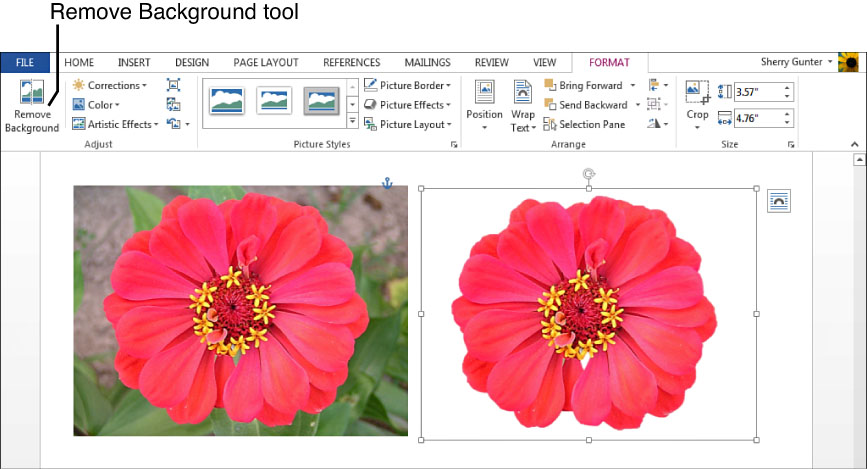
FIGURE 16.32 You can remove a picture’s background and end up with just the subject.
This works best on photos in which it’s pretty easy to see the main subject. Want to try it yourself? Select your picture, click the Format tab, and click the Remove Background button (see Figure 16.33). The picture turns purple around the edges, and Word tries to guess what the subject is, leaving it clear. You can help it out by dragging the handles to include any parts of the subject that might appear cut off, yet you want to include in the picture.

FIGURE 16.33 You can control exactly what parts of the picture are removed.
Next, click the Mark Areas to Remove button on the Background Removal tab. Depending on your picture, you might prefer to mark the areas to keep instead of the parts to remove, and if so, click the Mark Areas to Keep button.
The mouse pointer becomes a pencil icon. Click the areas on the picture you want to remove. You might need to click in several spots, such as corners. When you finish, click the Keep Changes button to return to the document and see your results.
It might take a little practice to get it right, but the Background Removal tool might prove useful in helping you create artwork to flow with and around the document text.