
18. Citing Sources and References
Even if you haven’t written a research paper lately, you probably have some vivid memories of your last experience in doing so. Citing sources in the proper format (that is, the format your school teaches, or the format customary in your profession) has always been one of those “tear your hair out” tasks because there are so many rules—and exceptions to the rules—regarding the proper capitalization, spacing, and indentation of listings. Entire reference manuals have been published (and have sold very well!) that do nothing but demonstrate how to format various types of entries. And with the rise of Internet research, the potential for confusion over bibliography formatting has only gotten worse because there are even more types of sources from which to draw.
In this chapter, you find out how to use Word’s tools for referencing sources. No matter what format your sources need to be in for the assignment or research project you are working on, Word has you covered.
Understanding Sources and Citations
A bibliography is a list of works cited in a report. Students in most high school and college classes routinely have to write research papers that contain bibliographies, and so do professional researchers and scholars.
One of the most valuable features in Word 2013, at least from the perspective of students and researchers, is its ability to automatically generate bibliographies or lists of works cited in any of a variety of well-known formats, including MLA and APA (the big two for academia). I sure could have used this when I was in school!
Citing sources in Word involves four steps:
1. Select a citation style—You can change your mind later about this, but selecting the style you think you are most likely to use will help Word present the applicable fields in which to enter information about your sources.
2. Enter sources—You enter each source into an internal database of sources stored in the document. You can do these all upfront, or you can enter them individually as you write the document. Even if a source is referenced multiple times in the document, it needs to be entered only once.
3. Insert in-text references—Each time you want to refer to one of the sources in the document, you insert a code that places either a parenthetical reference to the source or a footnote or endnote, depending on the dictates of the citation style you are using.
4. Generate a bibliography—When you are finished with the document, you generate a Bibliography page that presents all the sources from the internal database in a specified format. (In some citation styles, this is called a Works Cited page.)
In the following sections, you learn how to accomplish each of these steps.
Selecting a Citation Style
A citation style is a set of rules for formatting various types of sources. The most significant difference between them is their handling of citations. Some styles use inline citations, wherein a source is referenced in parentheses after its first usage. The complete information about the source is then presented either in a Bibliography or a Works Cited page. Other styles use numbered footnotes or endnotes. There are also formatting and alphabetization differences between styles.
![]() Tip
Tip
The Citations and Bibliography tools in Word work best if you set the citation style before you begin entering sources. This is because some citation styles require more information about the source than others, and Word needs to make sure that it prompts you appropriately. However, if you change your mind later and choose a different citation style, you do not have to reenter all your source information. In most cases, Word can make the transition seamlessly without prompting you again for additional source information.
Select the citation style from the Style drop-down list on the References tab (see Figure 18.1).

Figure 18.1. Select a citation style.
Table 18.1 provides a list of the citation styles that Word 2013 supports. It is not critical for you to understand the differences and subtleties of each format; the main thing is to know which style is required for your school or business. The dates shown with each citation format in Figure 18.1 refer to the year of the last update to the standard; this is not important unless you have been instructed to use a certain version of the citation format.
Table 18.1. Citation Styles in Word 2013


As mentioned in Table 18.1, some citation styles use footnotes or endnotes instead of in-text citations. However, Word does not enforce that particular convention; if you use Insert Citation, Word always inserts an inline citation, even if your chosen citation style does not use inline citations. Therefore, be aware of the rules regarding inline or footnote citations in your chosen style at least at a basic level.
Entering Sources
Word 2013 stores the sources you enter in a database inside the document, so the source list is always available whenever that document is open. Sources can also be saved to a master database called Sources.xml, located in C:UsersusernameAppDataRoamingMicrosoftBibliography, so you can reuse sources in multiple documents.
As you enter the data for a source, Word displays the field text boxes to fill in based upon the type of source being used. For example, if you are entering information about a book, it prompts you for fields including Author, Title, and Publisher, whereas for a piece of artwork, it prompts for fields such as Artist, Title, and Institution.
To add a source, follow these steps:
1. Check to make sure that you have chosen the appropriate style from the Style list. See the preceding section for details.
2. On the References tab, in the Citations & Bibliography group, choose Manage Sources. The Source Manager dialog box opens.
3. Click the New button. The Create Source dialog box opens.
4. Open the Type of Source list and choose the type (for example, Book, Journal Article, or Web site). The fields change to reflect what’s needed for that type of source. For example, Figure 18.2 shows the fields for a book.
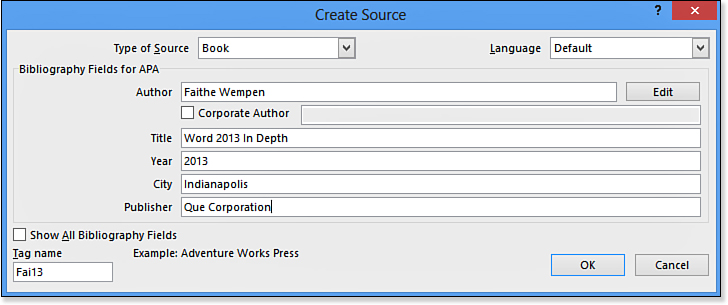
Figure 18.2. Fill in the fields provided for the selected source type.
5. Enter the author or artist’s name in one of these ways:
• Type the author’s full name directly into the Author or Artist box. You can type it either as First Middle Last or as Last, First Middle. (Word can figure it out based on your usage of a comma or not.) If there is more than one author, separate the names with semicolons.
• If the author is an organization, mark the Corporate Author check box and then enter the organization’s name.
![]() Tip
Tip
Multiple authors are usually ordered alphabetically by last name. If one author is more significant than the others, use the Up and Down buttons in the Edit Name dialog box to reorder them.
• Click the Edit button and enter each part of the name in the boxes provided in the Edit Name dialog box (see Figure 18.3). If there is only one author, click OK; if there are multiple authors, click Add after each one, and click OK when finished.
6. Fill in the other fields for the selected source type.
7. Click OK to return to the Source Manager dialog box.
8. Create more sources, or click Close when you are finished.
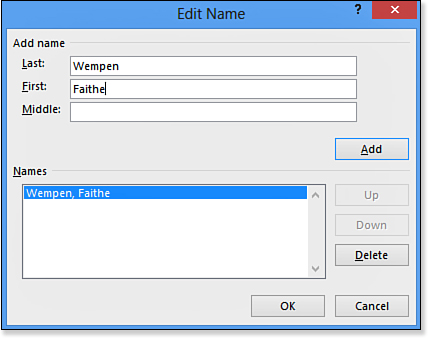
Figure 18.3. Specify the parts of the name explicitly in the Last, First, and Middle boxes.
Editing a Source
It is uncommon to need to edit a source (unless you make a mistake when initially entering it), because a source represents a fixed point in time. A book is published, and its author, date, and title never change. However, online sources are changing this rule a bit because their content can change on a daily basis; the information you retrieve depends on the date on which you accessed it.
To edit the information for a source, follow these steps:
1. On the References tab, click Manage Sources. The Source Manager dialog box opens.
2. Click the desired source, either from the Master List or the Current List, depending on which location you want to change (see Figure 18.4). If you want to change both the copy in the document and the master copy, it does not matter which you select.
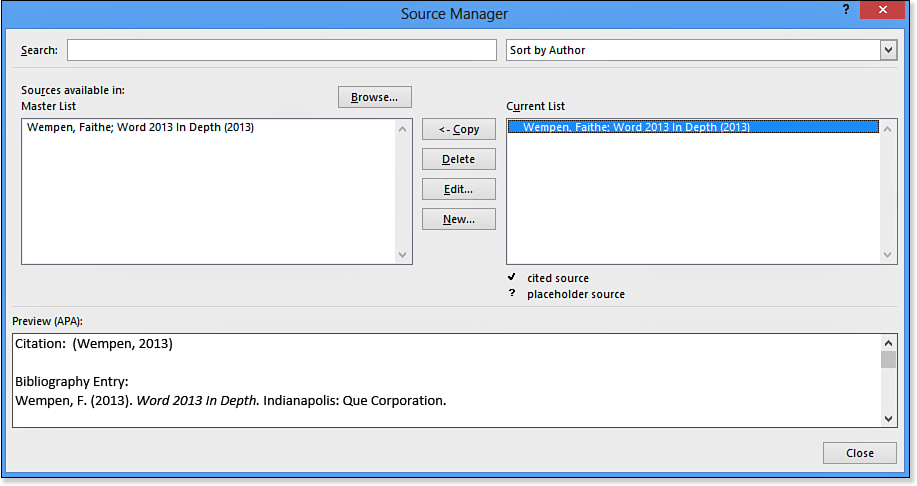
Figure 18.4. Select the source to be changed.
If you want access to the other fields in the database that Word does not consider applicable to this source type, mark the Show All Bibliography Fields check box.
3. Click Edit. The Edit Source dialog box opens. It’s the same as the Create Source dialog box from Figure 18.2.
4. Make any changes needed to the source information.
5. Click OK.
6. Change another source, or click Close.
Deleting a Source
You can delete a source from the Master List, from the Current List, or from both places. However, if the source is cited in the current document, you must delete the citation from the Current List before you can delete the source to which it refers. (You can still remove it from the Master List without deleting the citation.)
To delete a citation, follow these steps:
1. On the References tab, click Manage Sources. The Source Manager dialog box opens (refer to Figure 18.4).
2. Click the desired source, either from the Master List or the Current List, depending on which location you want to delete the source from.
3. Click Delete. The source is removed from the list.
4. Delete other sources, or click Close.
Transferring Sources to and from the Master List
The Master List is a source database maintained separately from the current document. You can use it to quickly retrieve previously used sources for use in other documents. By default, every source you create is entered into the Master List.
To transfer sources between the Current List and the Master List, follow these steps:
1. On the References tab, click Manage Sources. The Source Manager dialog box opens.
2. Click the desired source, either from the Master List or the Current List.
3. Click the Copy button to copy that source from its current list to the other one. The button face changes to show a ← or →, depending on which side is selected (refer to Figure 18.4).
![]() Tip
Tip
The most common copy direction is from the Master List to the Current List. Because the Master List’s entries are automatically created, there is usually not much reason to copy a source to the Master List. However, if you accidentally delete a source from the Master List, you might want to copy that source back to it from the Current List.
Inserting Inline References to Sources
An inline reference to a source is inserted in parentheses in the text. Depending on the citation style you have chosen and the type of source you are citing, the parenthetical citation includes one or more of these items:
• Author’s name (always included)
• Year
• Title
• Page number
The most common usage is the author name and date, like this:
A recent study has found that students who abstain from illegal drug use are 25 percent more likely to finish high school than students who do not (Smith, 2013).
Even if the citation style requires these elements, they may be omitted if the text includes them. For example:
A recent study by Sally Smith (2013) found that students who abstain from illegal drug use are 25 percent more likely to finish high school than students who do not.
![]() To omit part of a citation, see “Editing a Citation,” p. 708.
To omit part of a citation, see “Editing a Citation,” p. 708.
To insert a citation, follow these steps:
1. Position the insertion point where you want the citation.
Depending on the context, the citation can go at the end of the sentence (as in the first of the preceding examples) or within the sentence (as in the second example).
2. On the References tab, click Insert Citation. A menu appears listing all the sources in the current document. In Figure 18.5 there is only one.

Figure 18.5. Select the source to cite.
3. Click the desired source. A reference to it is inserted as a field.
![]() If the desired source does not appear on the list but you have all the information you need to enter it now, see the next section, “Creating a New Source When Entering a Citation.”
If the desired source does not appear on the list but you have all the information you need to enter it now, see the next section, “Creating a New Source When Entering a Citation.”
![]() If the desired source does not appear on the list and you do not have the needed information to enter it now, see “Inserting Temporary Placeholders for Later Entry of Sources,” p. 711.
If the desired source does not appear on the list and you do not have the needed information to enter it now, see “Inserting Temporary Placeholders for Later Entry of Sources,” p. 711.
Creating a New Source When Entering a Citation
Sometimes it’s hard to know what sources to enter until you get to the point in the document where you need to cite them. If you did not already enter the source you want to use, follow these steps to insert the citation and create its source entry at the same time:
1. Position the insertion point where you want the citation.
2. On the References tab, click Insert Citation. A menu appears (refer to Figure 18.5).
3. Click Add New Source. The Create Source dialog box appears.
4. Enter the information for the new source, as you did in the section “Entering Sources” earlier in this chapter.
5. Click OK in the Create Source dialog box. The source is created, and a citation for it is inserted into the document.
Inserting Temporary Placeholders for Later Entry of Sources
As you are writing the document, perhaps you realize there is a source you need to cite but you don’t have all the details handy to formally enter it as a source. In situations like that, you can create a temporary placeholder for the source, so you can go ahead and insert its citations. Then later, when you have all the facts you need, you can update the source listing in the Source Manager.
To insert a citation and create a temporary placeholder for the source, follow these steps:
1. Position the insertion point where you want the citation.
2. On the References tab, click Insert Citation. A menu appears (refer to Figure 18.5).
3. Click Add New Placeholder. The Placeholder Name dialog box appears.
4. Type a name for the placeholder. A good name would be something that will help you remember the source you plan to cite, such as the author’s last name or an abbreviated version of the article title.
5. Click OK. A citation is inserted into the document with the placeholder in parentheses.
To complete the information for a placeholder when you have the information available, follow these steps:
1. On the References tab, click Manage Sources.
2. On the Current List, click the placeholder. Placeholders are identified by question mark icons, as in Figure 18.6.
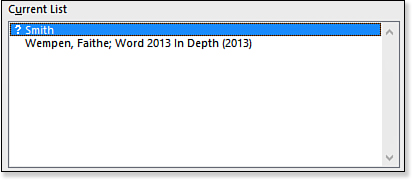
Figure 18.6. Select and edit the placeholder.
3. Click Edit. The Edit Source dialog box opens.
4. Enter the information needed for the source and click OK.
5. Complete other placeholders, or click Close.
Editing a Citation
A citation is a field that pulls its information from the source on which it is based, so you cannot edit its text directly. You can, however, show or suppress certain pieces of information. For example, you can make a citation show a page range (useful when citing two or more articles in the same journal, for example), and you can suppress the usage of the author, date, or title.
To edit a citation, follow these steps:
1. Click the citation in the document. It appears in a blue box, indicating that it is a field.
2. Click the down arrow to the right of the field, opening a menu (see Figure 18.7).
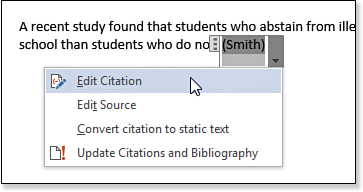
Figure 18.7. Open the menu for the citation field.
3. Click Edit Citation. The Edit Citation dialog box opens (see Figure 18.8).
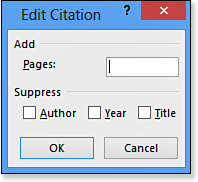
Figure 18.8. Include a page range or suppress one or more of the standard items.
4. (Optional) To add page numbers, type a range in the Pages box. Use a hyphen (but no spaces) to separate a range, like this: 12-24.
5. (Optional) In the Suppress area, click the check box for any elements to suppress.
Even if a certain element does not appear in the current citation style, you can still suppress it, so that if you change to a different citation style that does include that element, it will be suppressed at that point.
Converting a Citation to Plain Text
To edit a citation directly (that is, by changing its text) and not just add or suppress elements, you must convert it to plain (static) text so that it is no longer a field linked to a source.
As you can imagine, converting a citation to plain text is not a good idea in most cases because it no longer updates when you change the source information or the citation style. However, sometimes it’s the only way to achieve the desired effect.
To convert a citation to text, follow these steps:
1. Click the citation in the document. It appears in a box, indicating that it is a field.
2. Click the down arrow to the right of the field, opening a menu (refer to Figure 18.7).
3. Click Convert Citation to Static Text. The citation remains in place but is no longer a field.
Generating a Bibliography
A bibliography appears at the end of the document and lists all the sources cited. Usually sources are arranged alphabetically by the author’s last name.
The formatting of the bibliography, and the facts that appear about each source, depend heavily on the citation style in use. For example, Table 18.2 shows the same entry in several different styles. As you can see, some styles use bold or italic; some use the complete name of the author; some begin with the title rather than the author’s name; and so on. Some separate items with commas, some use ellipses, and some use colons.
Table 18.2. Comparison of Bibliography Formatting Among Common Citation Styles
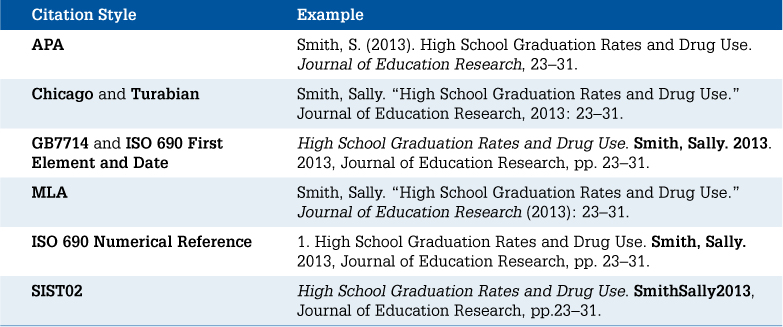
I’ve shown you the examples in Table 18.2 not to try to teach you the syntax of each style, but to illustrate how changing the citation style affects the bibliography. You can change to a different citation style either before or after the bibliography is generated; Word automatically keeps the entire document’s citations and bibliography consistent with the selected style.
![]() Note
Note
A couple of citation styles arrange bibliography entries differently. For example, GOST–Title Sort sorts by title, and ISO–690 Numerical Reference sorts chronologically by position in the document. (That style also numbers inline references rather than using author and date.)
Word comes with three built-in bibliography layouts in its Bibliography Gallery: Bibliography, References, and Works Cited. These are all more or less the same except for the heading at the top.
Inserting a Bibliography from the Bibliography Gallery
The Bibliography Gallery is the list of bibliography layouts that appears when you open the Bibliography button’s list on the References tab. Word calls the layouts bibliographies, although of course they are not real bibliographies but codes that generate bibliographies using the sources in the current document. That’s important because you can save and reuse bibliographies between documents.
![]() Tip
Tip
These layouts are actually building blocks that can be renamed, deleted, and so on from the Building Blocks Organizer. See “Working with Building Blocks” in Chapter 2, “Typing and Editing Text,” for details.
To create a bibliography using one of the layouts in the Gallery, follow these steps:
1. Position the insertion point where you want the bibliography to appear.
2. On the References tab, click Bibliography.
3. Click the gallery entry that best represents the bibliography you want to create. It is inserted into the document at the current position.
If you want to insert the bibliography at the beginning or the end of the document or the current section, you do not have to move the insertion point to the desired spot beforehand (step 1). Instead, you can right-click a gallery entry and select a location from the shortcut menu, as in Figure 18.9.
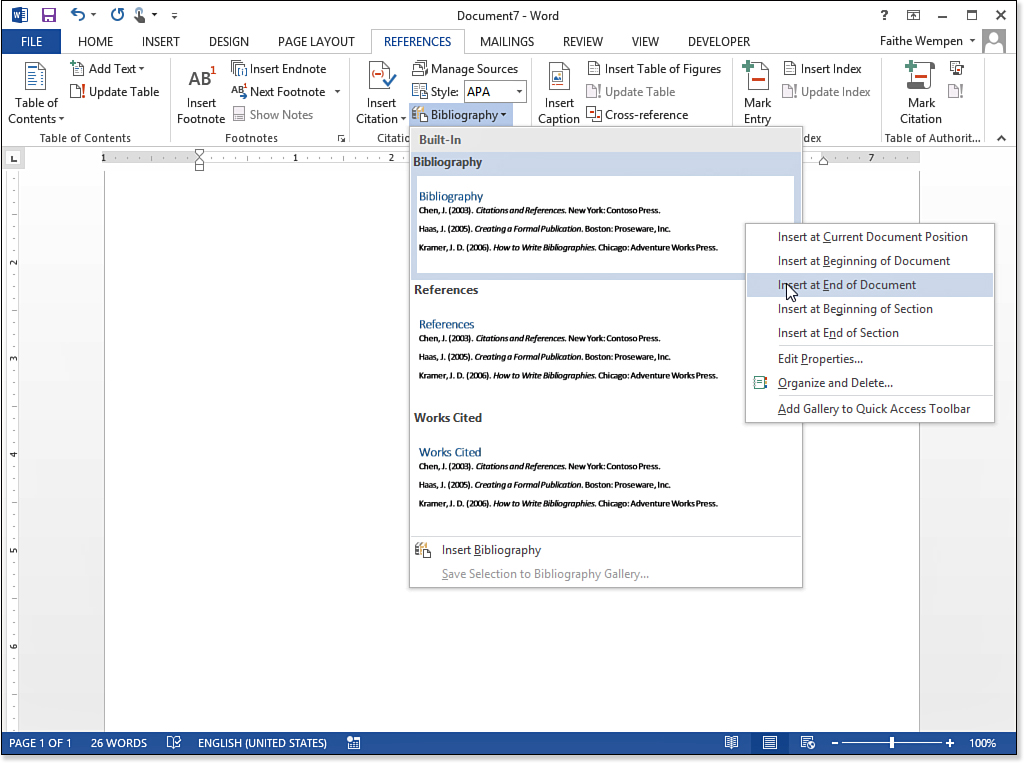
Figure 18.9. If desired, select a position for the bibliography from its shortcut menu in the gallery.
Working with a Bibliography Field
The inserted bibliography appears in a field, with a box around it like any other field.
You can click the Bibliographies button at the top to open a menu, as shown in Figure 18.10. From here you can choose a different style (Bibliography versus Works Cited), or you can convert the bibliography to static text, so that it no longer updates and can be freely edited like any other text.
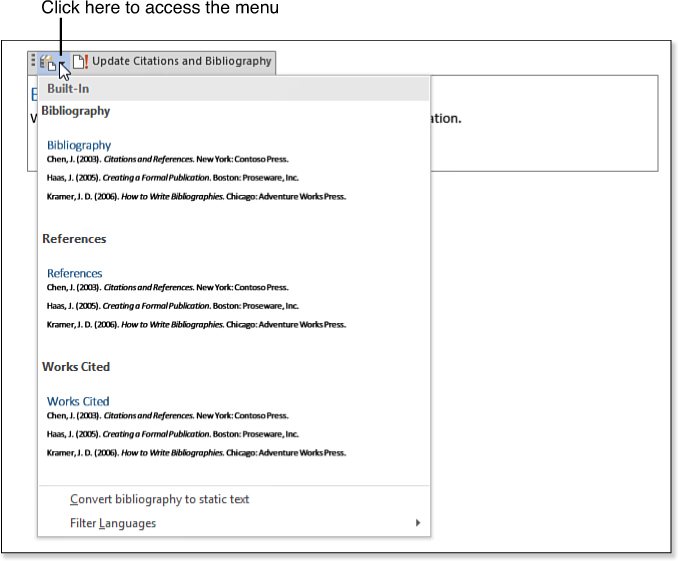
Figure 18.10. The button at the top of the bibliography provides commands for managing the field.
Saving a Bibliography as a New Gallery Entry
After inserting a bibliography, you can format its text. For example, you can apply a different heading style to its heading, apply a different body style to its body, or add indentation or other special formatting.
Then you can save your changed version of the bibliography as a new Bibliography Gallery entry for later reuse. To create a new entry, follow these steps:
1. Format the bibliography as you want it.
![]() Caution
Caution
The default name might be the text from the first entry in the bibliography at present, or it might be blank. Neither of those is a good name, though, because you will potentially apply this bibliography format in other documents that do not have these same sources.
2. Select the bibliography.
3. On the References tab, click Bibliography and select Save Selection to Bibliography Gallery. The Create New Building Block dialog box opens.
4. Change the name in the Name box to something descriptive of the format you’re creating.
5. (Optional) Enter a brief description in the Description box (see Figure 18.11).
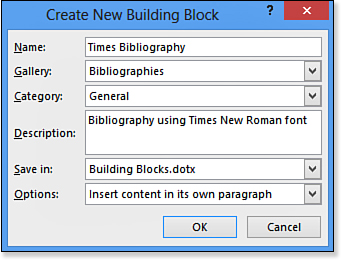
Figure 18.11. Create a new building block entry for the bibliography.
6. Click OK to create the new bibliography gallery entry.
Your gallery entries appear at the bottom of the Bibliography button’s menu. (Scroll down the menu if you don’t see them at first.) To access its building block properties later, right-click it and choose Edit Properties.
Removing a Bibliography from the Gallery
To remove one of your custom bibliographies from the gallery, follow these steps:
1. On the References tab, click Bibliography, and scroll down the list to locate your custom entry.
2. Right-click the entry and choose Organize and Delete. The Building Blocks Organizer dialog box opens with the chosen entry already selected.
3. Click the Delete button.
4. Click Yes to confirm.
5. Click Close.
Working with Footnotes and Endnotes
Another way of citing a source is to create a footnote or endnote for it. Footnotes and endnotes are the same except for their position: Footnotes appear at the bottom of the page on which the reference occurs, whereas endnotes appear at the end of the document or section.
![]() Note
Note
In this section, I refer to footnotes and endnotes generically as notes for simplicity whenever no difference in functionality exists between them.
Figure 18.12 shows a footnote and points out some of the key features involved in footnote usage:
• Reference mark—Appears within the body text. This is usually a number but can also be a symbol.
• Separator line—The line that separates the body text from the footnote area.
• Footnote reference—The corresponding number or symbol to the reference mark, appearing at the beginning of the footnote.
• Footnote text—The footnote itself. It is different from the footnote reference and is formatted using a different style.
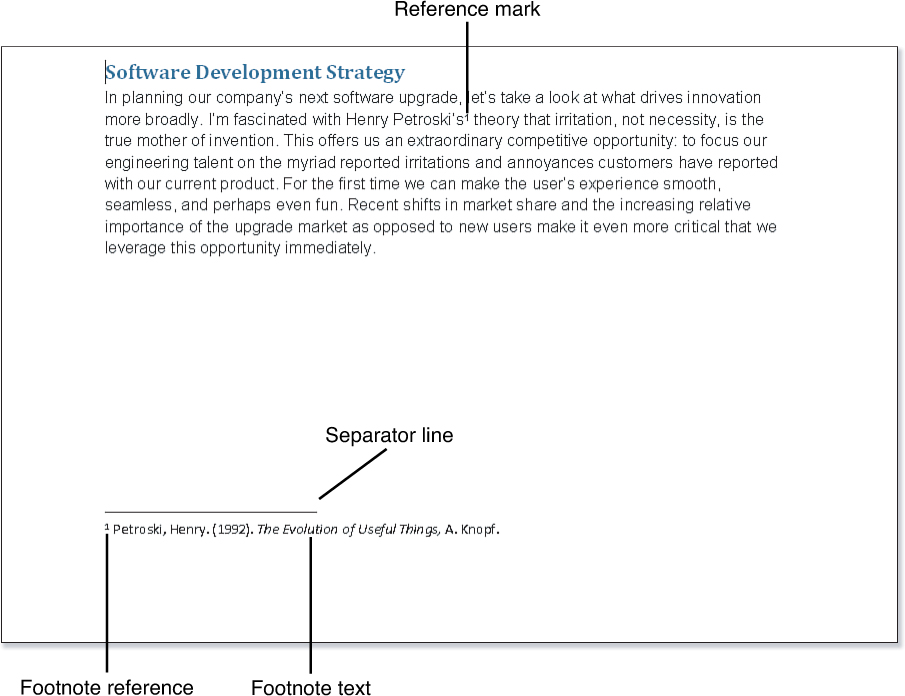
Figure 18.12. A footnote and its reference mark.
An endnote has all those same pieces: reference mark, separator line, endnote reference, and endnote text. However, with an endnote, the separator line and the notes that follow it appear on the last page of the document, immediately after the last body text paragraph (not at the bottom of the page).
Inserting a Footnote
To insert a standard footnote, do either of the following:
• Press Ctrl+Alt+F.
• On the References tab, click Insert Footnote.
Word inserts a reference mark at the insertion point and then jumps to the bottom of the page and places a footnote reference. It then leaves the insertion point flashing there next to the footnote reference, so you can type the footnote text.
If you’re working in Draft view, footnotes do not appear on the document page. Instead, a separate Notes pane appears at the bottom of the Word window, as in Figure 18.13. If the pane does not appear, click the Show Notes button on the References tab. You can drag the divider between the panes up or down to see more or less of the note area at once.

Figure 18.13. A footnote in Draft view.
Inserting an Endnote
To insert an endnote, do either of the following:
• Press Ctrl+Alt+D.
• On the References tab, click Insert Endnote.
Word inserts a reference mark at the insertion point and then jumps to the end of the document and places a new endnote reference. It leaves the insertion point flashing there so you can type the endnote text.
In Draft view, endnotes appear just like footnotes, in the separate Notes pane at the bottom of the screen (refer to Figure 18.13).
Moving a Reference Mark
To move the reference mark for a note, select it and then cut and paste it or drag it to a new location. If the new location puts it out of sequence, Word automatically renumbers the notes.
Deleting a Note
To delete a note, delete its reference mark in the body text. The footnote or endnote goes away automatically.
You can delete all the text for a footnote or endnote, but its number or symbol remains in the Notes pane (or at the bottom of the page or end of the document) until you delete the reference mark from the body of the document.
Jumping to the Note That Corresponds to a Reference Mark
When working with footnotes, it’s easy enough to find the note that corresponds to the number or symbol—just scroll down to the bottom of the page. However, with endnotes, it is not always so easy because the note might be on a page far removed from its reference.
To jump to the footnote or endnote, double-click the reference mark in the body text.
Moving Between Notes
There are several ways to jump from one footnote or endnote reference mark to another within the body text.
Perhaps the easiest method is to use the Next Footnote button on the References tab. Click it to go to the next footnote, or open its menu to go to the previous footnote or the next or previous endnote.
Another way to move between notes is with the Go To command. This method lets you specify a certain footnote or endnote number to find:
1. On the Home tab, click the arrow beside the Find button and click Go To. The Find and Replace dialog box opens with the Go To tab displayed.
2. On the Go To What list, click Footnote or Endnote.
3. Enter the footnote or endnote number you want to find.
You can either enter an exact number or enter a plus or minus sign and a number to move relative to the current position (–2, for example).
4. Click Go To.
5. Click Close.
Switching Between Footnotes and Endnotes
Perhaps you started out using footnotes and later decide you want endnotes instead—or vice versa. No matter; it’s easy to change between them.
One way is to change each note individually:
• To change a footnote to an endnote, right-click it and choose Convert to Endnote.
• To change an endnote to a footnote, right-click the endnote text and choose Convert to Footnote.
Another way is to change all the notes in the document at once:
1. Right-click any note and choose Note Options, or click the dialog box launcher in the Footnotes group of the References tab. The Footnote and Endnote dialog box opens.
2. Click the Convert button. The Convert Notes dialog box appears. The options available depend on what type of notes you already have in the document. For example, in Figure 18.14, the only option is to convert footnotes to endnotes because the document does not currently contain endnotes.

Figure 18.14. Convert all notes at once.
3. Click OK and then click Close.
Changing the Positioning of the Notes
Notes can appear either at the bottom of the page or immediately below the text on the page. By default, footnotes appear at the bottom and endnotes appear at the end of the document or the end of the section, but you can change this positioning.
To modify the text positioning, follow these steps:
1. Right-click any note and choose Note Options, or click the dialog box launcher in the Footnotes group of the References tab. The Footnote and Endnote dialog box opens.
2. In the Location section, open the drop-down list for Footnotes or Endnotes and choose the desired position (refer to Figure 18.14).
3. Click Apply.
Changing the Note Numbering or Symbols
By default, footnotes use Arabic numbering (1, 2, 3) and endnotes use lowercase Roman numbering (i, ii, iii).
To change to a different style of numbering or to a set of symbols, follow these steps:
1. Right-click any note and choose Note Options, or click the dialog box launcher in the Footnotes group of the References tab. The Footnote and Endnote dialog box opens.
2. Select a format from the Number Format list.
Choosing a format this way applies the format to all the notes in the document or section.
Alternatively, you can enter a custom symbol to use, or you can browse for a symbol.
Choosing a custom symbol applies to only the current footnote or endnote; it enables you to enter your own symbols to use for each note on an individual basis. Your own symbols override the default ones.
3. (Optional) Set a different Start At value than 1 if desired.
4. (Optional) To restart numbering with each section or page, choose how you want restarts to occur from the Numbering list. The default is Continuous, which means no restarting of numbering.
5. In the Apply Changes To list, choose the scope for your changes. Unless you have multiple sections in your document, the only choice here is Whole Document.
6. Click Apply.
Modifying Note Styles
You can format footnotes or endnotes manually, as you can any text, but it is much more efficient to modify their styles instead and let those changes populate automatically through the document.
Four styles are used for notes:
• Footnote Reference—For the reference mark that appears in the footnote area.
• Footnote Text—For the text of the footnote.
• Endnote Reference—For the reference mark that appears in the endnote area.
• Endnote Text—For the text of the endnote.
Here’s a way to modify a style used in a footnote or endnote:
1. Display the Styles task pane by clicking the dialog box launcher in the Styles group of the Home tab.
2. Format the footnote or endnote reference or text the way you want the style to be.
![]() Tip
Tip
If the footnote or endnote styles are not listed in the Styles task pane, access them via the Style Inspector.
3. Select the footnote or endnote reference or text.
4. On the Styles task pane, right-click the style and choose Update to Match Selection.
And here’s another way:
1. Right-click the footnote or endnote reference mark or text and choose Style. The Style dialog box appears.
2. Select the style you want to modify.
3. Click Modify. The Modify Style dialog box appears.
4. Make any changes to the style as needed.
5. Click OK, and then click Apply.
![]() To learn more about modifying styles, see “Modifying Styles,” p. 235.
To learn more about modifying styles, see “Modifying Styles,” p. 235.
Changing the Note Separator Line
The note separator line is the line between the body text and the footnotes or endnotes. By default, it is a plain 1-point black line that runs one-third of the way across the page.
Word treats this separator line as a single character of text. As such, you can format it only by doing the things you can do to text: You can increase its width and thickness slightly by increasing its “font size,” and you can change its color and make it bold.
Here’s how to access that line for the limited formatting just described:
1. View the document in Draft view.
2. If the Notes pane is not already displayed, click Show Notes on the References tab.
![]() Tip
Tip
For a double separator line, apply Underline formatting to the separator line.
3. In the Footnotes (or Endnotes) drop-down list on the Notes pane, select Footnote Separator (or Endnote Separator). The line appears (see Figure 18.15).
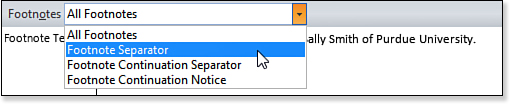
Figure 18.15. To view the line, switch to Draft mode, display the Notes pane, and then choose Footnote Separator from the drop-down list.
4. Select the line.
5. Use the Font tools on the Home tab or on the Mini Toolbar to change the line’s color and thickness as desired.
![]() Note
Note
If you want a real Word-drawn line shape as the separator, complete with all the formatting that’s inherent in a shape, you won’t be able to have it appear automatically on each page that has footnotes. Instead, you need to delete the line from the Footnote Separator in the Notes pane (refer to Figure 18.15) and then draw a line manually on each page on which a footnote occurs. A manually drawn line does not move automatically with the footnote if it moves to another page due to edits.
Managing Footnote Continuations
When a footnote is too long to fit on one page and still be on the same page as its reference mark, Word splits the footnote and continues it on the next page. When that happens, a continuation separator and continuation notice appear. The continuation separator line is just like the regular separator line except it’s longer. The continuation notice is blank by default; you can enter it in yourself—perhaps something like (continues on next page).
To format the continuation separator and continuation notice:
1. Switch to Draft view.
2. On the References tab, click Show Notes to display the Notes pane if needed.
3. Open the Footnotes drop-down list and choose Footnote Continuation Separator. The separator line appears.
4. Format the separator line as desired. See the preceding section for help with that.
![]() Note
Note
Continuation is an issue only for footnotes, not endnotes.
5. Open the Footnotes drop-down list and choose Footnote Continuation Notice. By default, nothing appears.
6. Type the text you want to use as the separation notice into the Notes pane.
7. Close the Notes pane when finished. (Click Show Notes again on the References tab.)
Creating Cross-References
Perhaps you’ve noticed that this book has a lot of cross-references. Whenever I’m talking about a topic that’s covered in another section, a cross-reference note appears telling you which page to turn to for more information.
Unfortunately, due to the page layout process that this book has to go through, those cross-references are not automatically generated. Yes, believe it or not, there is a person with a four-year college degree whose job is to go through and manually insert the correct page numbers for each of those cross-references.
If this book were laid out in Microsoft Word 2013, the cross-referencing process could be completely automated. (Of course, someone might be out of a job....) In Word, you can create cross-references to bookmarks, headings, sections, captions, or just about any other marker in a document. These cross-references update dynamically, so if the page on which a particular heading changes, all cross-references to that heading change, too.
You got a taste of cross-referencing in Chapter 15, “Copying, Linking, and Embedding Data,” in the section “Inserting a Cross-Reference to a Bookmark,” but now let’s take a look at the full gamut of cross-referencing that’s available.
First, here’s how to insert a basic cross-reference:
1. On the References tab, click Cross-Reference. The Cross-Reference dialog box opens.
2. Select the type of item being referenced from the Reference Type list.
3. On the For Which list, select the instance of the reference type to be referenced. For example, if you chose Heading in step 2, select from a list of all the headings in the document (see Figure 18.16).
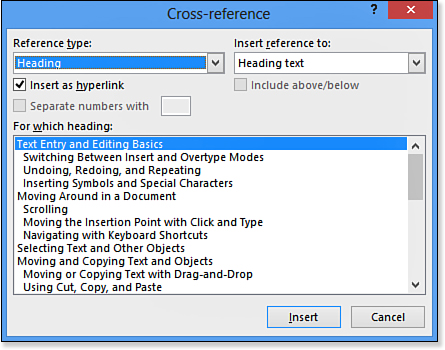
Figure 18.16. Create a cross-reference.
4. Select the way you want to refer to it from the Insert Reference To list.
![]() Caution
Caution
Cross-references apply only within the current document; you cannot create a cross-reference from one document to another. If you are working with a master document, and there are cross-references between subdocuments, make sure that you expand all the subdocuments before printing; otherwise, the cross-references will not work.
5. (Optional) To make the cross-reference a live hyperlink, make sure that the Insert as Hyperlink check box is marked.
6. (Optional) To include the word “above” or “below” with the cross-reference, mark the Include Above/Below check box. (This option is not available if you chose Heading text or Above/Below in step 4.)
7. Click Insert to insert the cross-reference.
8. Click Close to close the dialog box.
The resulting cross-reference is a field such as {REF}. You can check this out for yourself by right-clicking it and choosing Toggle Field Codes. You can work with it the same as any other field; see Chapter 16, “Working with Fields and Forms.” (See, another cross-reference! They’re everywhere once you start noticing them.)
![]() Tip
Tip
You can create building blocks for cross-references you want to reuse. Just select the entire block of text, including the cross-reference within it, and on the Insert tab, click Quick Parts, Save Selection to Quick Part Gallery.
Cross-Referencing Options
Now that you know the basics, let’s delve a little further into the types of cross-references you can create. A cross-reference can refer to any of these elements:

The cross-reference itself can consist of any of these:
• The actual text of the item being referenced.
• The page number on which the referenced item lies.
• The number of the referenced item in the chronology of the document (for example, 3 for the third paragraph).
• The caption of the item (if it has one), either with or without its numbering (for example, Figure 3: Sales Revenue).
• The word Above or the word Below, depending on whether the cross-reference comes before or after the item being referenced in the document.
![]() Caution
Caution
Some editing purists object to the use of above or below to refer to material that is actually on a previous or subsequent page. I’m not allowed to use those terms that way in this book, for example! Word does not enforce this rule, though; it allows you to use above/below even when the cross-reference is separated from the item it is referring to by many pages.
Cross-Reference Context
Some of the cross-reference types give you a choice of various contexts. The context determines how much information will appear depending on where the cross-reference lies in relation to the referenced location.
For example, suppose you want to refer to heading 3(a)(iii). The full context for that reference would appear as 3(a)(iii). But if the cross-reference were also in section 3, you might not need to include the 3; you could simply use (a)(iii). Further, if the cross-reference were in section 3(a), you could simply use (iii).
Word provides three settings for cross-reference types that might have a context. The names are different depending on the type, but here are the ones for headings:
• Heading Number—Provides contextual numbering
• Heading Number (No Context)—Provides only the lowest level of numbering
• Heading Number (Full Context)—Provides the complete numbering regardless of position
For numbered items and bookmarks, context is set by paragraph number. (Replace the word “heading” with “paragraph” in the preceding list.)
The other types of cross-references do not support contextual referencing.
Footnote and Endnote Cross-References
For footnotes and endnotes, you can choose to insert the note number (formatted or unformatted), the page number on which it appears, or the word above or below. Often it is useful to combine more than one cross-reference in the body of the text, like this:
For more information on shellfish allergies, see note 1 on page 47.
In that example, both the numbers 1 and 47 are separate cross-references. They both refer to the same footnote, but they are set up to provide different information.
So what’s the difference between a formatted and unformatted note number? An unformatted one takes on the formatting of the paragraph into which you place it; a formatted one retains the formatting applied to footnote reference numbers by the Footnote Reference style.
Caption Cross-References
Equations, figures, and tables can all have captions, and these captions can be cross-referenced. When you choose any of these three types of content, you get the following options for what to insert:
• Entire caption (Example: Table 2: Quantities in Stock)
• Only label and number (Example: Table 2)
• Only caption text (Example: Quantities in Stock)
• Page number
• Above/Below
 My Headings Aren’t Showing Up as Headings for Creating a Cross-Reference
1. Display the Styles task pane by clicking the dialog box launcher in the Styles group of the Home tab.
2. Right-click the style in the Styles task pane and choose Modify.
3. In the Modify Style dialog box, click Format and then click Paragraph.
4. In the Paragraph dialog box, set the Outline Level setting to a heading level (such as Heading 1).
5. Click OK twice.