
21. Protecting and Securing Documents
As you create, edit, and manage documents, you might not always want everyone who has access to the drive to be able to open and modify all documents. Word 2013 offers a variety of ways of protecting documents. They break down into these areas:
• Restricting access to the document entirely—This includes using Windows file encryption, setting network access permissions, and placing a password on the file in Word.
• Restricting what users can do to a file—This includes restricting style usage and editing and preventing users from turning off revision marks, as well as setting a document to be read-only.
• Marking a document as finalized—You can mark a document as Final and add a digital signature to it to confirm that it has not been changed since being marked as such.
• Preventing macro-based attacks—To avoid macro viruses, you can choose to use macro-enabled file formats only when necessary, and you can set up trusted locations in which to store macro-enabled files. Files not in those trusted locations can then have higher macro security levels.
• Protecting your privacy—This includes removing personally identifying information from the file, such as the author name and keywords; controlling when Word does or does not go online to retrieve extra content; and participating (or not) in the Customer Experience Improvement program.
This chapter looks at each of these types of protection.
Restricting Access to a Document
The most basic type of protection for a document is to prevent others from accessing it entirely. You can do this in several ways. You can put a password on the file within Word itself, you can locally encrypt the location in which it is stored, or you can remove network access to the location.
Password-Protecting a Document in Word
You can put two separate passwords on a file: one to open it and one to modify it. That way you can give one password to certain people and the other password to others, depending on what you want them to be able to do with it. (You can also set more complex editing permissions, as you learn later in this chapter.)
When you password-protect a document against being opened in Word, Word encrypts it internally, and the encryption can only be decrypted by entering the correct password. This is important because then someone using a text editor outside of Word cannot browse the protected file. Password protection does not simply prevent the file from opening in Word; it actually changes the file.
When you password-protect the file against changes being saved to it, the file is not encrypted. That password simply prevents it from being saved; someone can still go into the file with a text editor and look at it (or with Word itself for that matter).
Saving with a Password
To password-protect a file, follow these steps:
1. Choose File, Save As. Then, navigate to the desired save location.
2. In the Save As dialog box, click Tools and choose General Options. The General Options dialog box opens (see Figure 21.1).
3. (Optional) In the Password to Open box, type a password. Passwords can be up to 15 characters long.
![]() Tip
Tip
For best security, use passwords that combine lowercase and uppercase letters, numbers, and symbols.
4. (Optional) In the Password to Modify box, type a different password. You can use one or both passwords, but if you use both, they should be different. Word does not force them to be different.
5. Click OK. A Confirm Password dialog box opens.
6. Retype the password and click OK.
If you set passwords for both opening and modifying in steps 3 and 4, you will receive a second Confirm Password dialog box; repeat steps 5 and 6 to respond to it if needed.
7. In the Save As dialog box, click Save to save the file with the password.
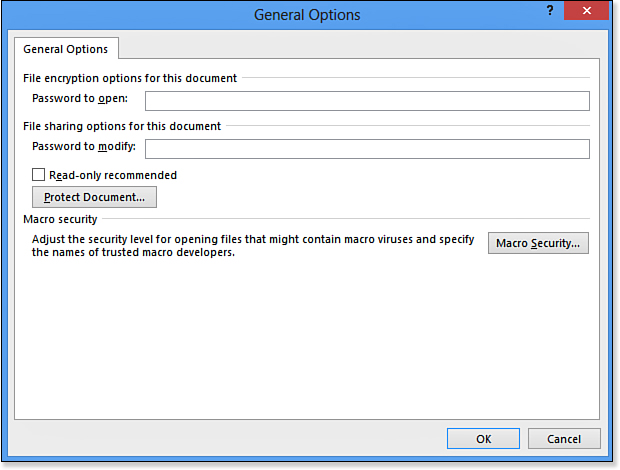
Figure 21.1. While saving, set a password for the file in its General Options dialog box.
![]() Note
Note
The Read-Only Recommended check box does not enforce anything; it simply opens the document by giving the user a choice of read-only or not. It is not related to password protection, even though it is in the same dialog box as the passwords.
Here’s an alternative way of assigning a password to open a document:
1. Choose File, Info and click the Protect Document button. A menu appears.
2. Click Encrypt with Password. The Encrypt Document dialog box opens.
3. Type a password in the Password box.
4. Click OK. A prompt appears to reenter the password.
5. Type the same password again and click OK.
Note that this type of password is for opening the document; you don’t have the option of setting a password for editing the document with this method.
Removing a Password from a File
To remove a password from a file, you must open the file, so you have to know the password. Assuming you do, here’s how to remove it:
1. Choose File, Save As and navigate to the location where the file is stored.
2. In the Save As dialog box, click Tools and choose General Options. The General Options dialog box opens (refer to Figure 21.1).
3. Clear the password boxes. (Select the current password and press Delete.)
4. Click OK.
5. Click Save to save the file without the password.
Or, if you used the Protect Document button’s method of applying the password (described at the end of the previous section), here’s how to remove it:
1. Choose File, Info and click the Protect Document button. A menu appears.
2. Click Encrypt with Password. The Encrypt Document dialog box opens.
3. Clear the password from the Password text box.
4. Click OK.
Using Windows Encryption
If you have a drive that uses the NTFS file system (and almost all Windows drives do), you can encrypt folders so that anything you put in those folders is accessible only to the currently logged-in user.
Windows NTFS encryption is designed to prevent multiple people who share the same physical PC from accessing each other’s private files. It does not prevent people accessing your PC via the network from accessing the files, as long as you are logged in as you and are sharing them.
You can encrypt individual files, but it is better to encrypt an entire folder and then place the files into it that you want to protect. Any files in an encrypted folder are automatically encrypted; when you move or copy them outside that encrypted location, they become decrypted. As long as you are logged in as the user who encrypted the folder, the encryption is invisible and unobtrusive. Encrypted folders can hold any files, not just Word documents, of course.
Encrypting a Folder
Some companies have very robust encryption systems for their files, including Windows BitLocker (included in some versions of Windows) and USB hardware keys. For the average user, however, Windows encryption is more than adequate for preventing unauthorized access to files and folders.
To encrypt a folder, follow these steps:
1. In File Explorer (Windows 8) or Windows Explorer (Windows 7), right-click the folder and choose Properties. The Properties dialog box opens.
2. On the General tab, click Advanced. The Advanced Attributes dialog box opens (see Figure 21.2).

Figure 21.2. Encrypt a folder on your hard disk in which to store private files.
3. Mark the Encrypt Contents to Secure Data check box.
4. Click OK.
5. Click OK again. A Confirm Attribute Changes dialog box opens.
6. Click the way you want the encryption to apply:
• Apply Changes to This Folder Only
• Apply Changes to This Folder, Subfolders, and Files
7. Click OK. The folder’s name turns green in the file listing.

Decrypting a Folder
To decrypt a folder, follow these steps:
1. In any file management window (such as File Explorer or Windows Explorer), right-click the folder and choose Properties. The Properties dialog box opens.
You can tell an encrypted folder because its name appears in green.
2. On the General tab, click Advanced. The Advanced Attributes dialog box opens (refer to Figure 21.2).
3. Clear the Encrypt Contents to Secure Data check box.
4. Click OK.
5. Click OK again. A Confirm Attribute Changes dialog box opens.
6. Click the way you want the decryption to apply:
• Apply Changes to This Folder Only
• Apply Changes to This Folder, Subfolders, and Files
7. Click OK. The folder’s name turns from green back to black in the file listing.
Removing Network Share Permission for a Location
If your PC is connected to a network, you can share certain folders with others on the network. One way to prevent someone from accessing a file is to remove the share permission for that folder so that people can no longer browse that location.
To check to see if a location is shared, and to remove sharing from it if needed, follow these steps:
1. From Windows Explorer (Windows 7) or File Explorer (Windows 8), right-click the folder and point to Share With.
2. Click Nobody (Windows 7) or Stop Sharing (Windows 8).
Restricting What Users Can Do to a Document
In addition to preventing access completely to a document, you can restrict what a user can do to it. As you saw earlier in the chapter, you can assign a password to modify the document, effectively making it read-only if the person does not know the password. There are other ways to restrict the document as well.
Recommending Read-Only
You can make the document read-only in general, unrelated to a password for modification, and you can make this restriction optional or required.
Look back at Figure 21.1; notice the Read-Only Recommended check box. When this is marked, each time the document is opened, a message appears asking if you want to open it as read-only. This gives the user the option of read-only, which prevents accidental changes from being saved to the original. If the users choose to allow the read-only attribute to be enabled, they can still modify the document onscreen, but they cannot save their changes to overwrite the original file.
Making the Document File Read-Only
You can also make a document read-only from outside of Word by setting the file’s properties to read-only. There’s no way to lock this on, so someone who is determined to make changes to the file can go into the properties and turn off the read-only attribute, but it does provide a layer of annoyance that slows people down from making changes and might prevent an inexperienced user from making them.
To make a document read-only from Windows, follow these steps:
1. From Windows Explorer (Windows 7) or File Explorer (Windows 8), right-click the file and choose Properties. The Properties dialog box opens for that file.
2. On the General tab, mark the Read-Only check box (see Figure 21.3).
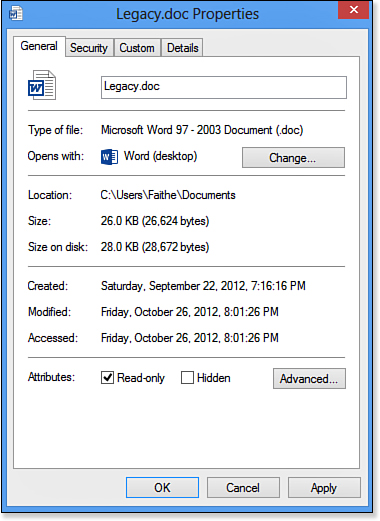
Figure 21.3. Set a file’s properties to read-only from Windows.
3. Click OK.
Setting a Read-Only Editing Restriction
In addition to protecting the document at a file level, you can protect it from inside Word by applying editing restrictions.
When you set a document to be read-only via editing restrictions, not only can people not save changes to the document, but they can’t make changes to it. You can put a password on that protection if desired, or you can leave it open so that people who know how to manage document protection settings can override it.
Follow these steps to prevent document editing:
1. On the Review tab, click Restrict Editing. The Restrict Editing task pane appears.
2. In the Editing Restrictions section, mark the Allow Only This Type of Editing in the Document check box.
3. Open the drop-down list and choose No Changes (Read Only), as shown in Figure 21.4, if it is not already selected.
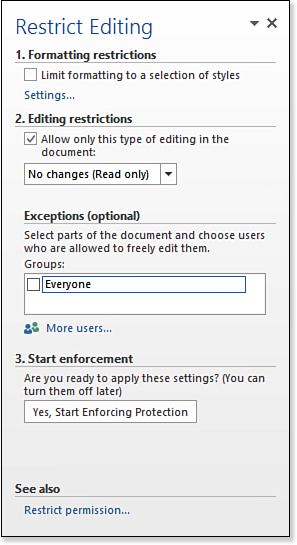
Figure 21.4. Set the document to be read-only.
4. Click Yes, Start Enforcing Protection. The Start Enforcing Protection dialog box opens (see Figure 21.5).

Figure 21.5. If you want, enforce the read-only status with a password.
5. (Optional) If you don’t want users to be able to disable the read-only status, enter a password in the Enter New Password (Optional) box, and then repeat it in the Reenter Password to Confirm box.
If you omit the password, anyone can override the document’s read-only status from the Restrict Editing task pane.
6. Click OK.
When you open a read-only document, a message appears letting you know it is read only. You must save the document under a different name or to a different location if you want to make changes and save it.
Restricting a Document to Comments Only
You can set a document’s editing restrictions so that users can enter comments (with the New Comment button on the Review tab) but otherwise cannot edit the document. To do this, follow the steps in “Setting a Read-Only Editing Restriction,” but instead of choosing No Changes in step 3, choose Comments.
![]() To learn more about comments, see “Working with Comments,” p. 776.
To learn more about comments, see “Working with Comments,” p. 776.
Restricting a Document to Form Fill-In Only
You can set a document’s editing restrictions so that form fields can be filled in, but otherwise no changes can be made. Follow the steps in “Setting a Read-Only Editing Restriction,” but in step 3, choose Filling In Forms.
![]() To learn how to create forms to fill out onscreen, see Chapter 16, “Working with Fields and Forms,” p. 623.
To learn how to create forms to fill out onscreen, see Chapter 16, “Working with Fields and Forms,” p. 623.
Forcing Revision Marks to Stay On
When you use revision marks to track changes, anyone editing the document can turn them off and thereby hide the changes they are making. To prevent this, you can set the editing restriction so that changes are permanently tracked on and can’t be turned off without knowing the password.
To force revisions to stay on, follow the steps in “Setting a Read-Only Editing Restriction,” but in step 3, choose Tracked Changes.
![]() To learn how to track changes and accept/reject revisions, see “Using Revision Tracking,” p. 773.
To learn how to track changes and accept/reject revisions, see “Using Revision Tracking,” p. 773.
Restricting Style Usage
If you are collaborating with others on a document, it might be important that only certain styles be used for formatting. For example, as I was writing this book, I used a template in which the editor had assigned certain styles for certain types of paragraphs, and I was not supposed to create any new styles. If you trust people not to create new styles, great, but if you don’t, you might want to lock down the document so that styles are limited to a certain set you define.
To restrict style usage, follow these steps:
1. On the Review tab, click Restrict Editing. The Restrict Editing task pane displays.
2. Mark the Limit Formatting to a Selection of Styles check box.
3. Click the Settings hyperlink. The Formatting Restrictions dialog box opens (see Figure 21.6).
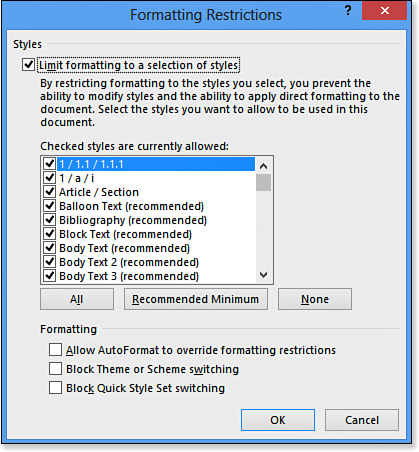
Figure 21.6. Restrict style usage to the styles you specify.
4. Ensure that the check boxes are marked for the styles you want to allow and cleared for the styles you do not.
You can get a head start by clicking All or None, or Recommended Minimum to get a whittled-down list that Microsoft recommends.
5. (Optional) Mark any of these check boxes:
• Allow AutoFormat to Override Formatting Restrictions—When this is enabled, AutoFormat can apply styles even if you have not selected them in the list in step 4.
• Block Theme or Scheme Switching—When this is enabled, users cannot apply different document themes (for example, from the Page Layout tab).
• Block Quick Style Set Switching—When this is enabled, users cannot use the Change Styles feature on the Home tab to switch style sets.
6. Click OK to accept the settings. A warning appears asking whether you want to remove unallowed style usage from the document. Click Yes or No.
7. Click Yes, Start Enforcing Protection in the Restrict Editing task pane to turn protection on.
Setting Up Per-User Exceptions to Restrictions
You can set up the restrictions on a document so that they do not apply to certain users. To do this for groups (if groups are defined), mark the check box next to the desired group in the Exceptions section of the Restrict Editing task pane.
If there is not a group set up that represents the users to be excluded from restrictions, you can manually set up the individual usernames. To do this, click the More Users hyperlink in the Restrict Editing task pane, opening the Add Users dialog box.
Then enter the users, separating the names with semicolons, as shown in Figure 21.7. You can use any of the following nomenclatures:
• Username—For local users on this PC, enter the names by which they log in.
• Email addresses—For email recipients, enter their email addresses.
• Domain usernames—For network domains, enter the domain name, a slash (), and the username, like this: Domainuser.

Figure 21.7. Specify users to whom the restrictions should not apply.
After you enter the names and click OK, Word attempts to verify the names and addresses. (It does not really verify email addresses; it just checks them for correct form.) Names that are verified appear in an Individuals section in the task pane; you can then mark their check boxes there to select them (see Figure 21.8). (They are not selected simply because you entered them in the Add Names dialog box; selecting their check box is a necessary separate step.)

Figure 21.8. Users you add appear in the Individuals section.
Marking a Document as Final
A finalized document is read-only, and when it is being viewed, some features in Word are not available. When users try to edit it, they see a message in the status bar that the document is final.
To mark a document as final, follow these steps:
1. Choose File, Info.
2. Click the Protect Document button. A menu opens.
3. Click Mark as Final.
4. Click OK.
5. A confirmation appears; click OK.
This is not a security feature; anyone who receives an electronic copy of it can simply turn off the Mark as Final attribute by repeating steps 1–3. It is merely a way to designate a document so that no inadvertent changes are made to it.
Preventing Macro-Based Attacks
Macro viruses were prevalent a decade or so ago. A macro virus would travel along with a document and infect the Normal.dot template, causing various mischief in the program. One common result of macro virus infection, for example, was that any time you tried to save a file, it would save as a template (.dot) rather than a document (.doc). Macro viruses are no longer common, due mostly to the fact that Microsoft aggressively implemented macro virus protection in later versions of Word. (Excel was also vulnerable to some macro viruses.)
Word 2013 has good protection against macro viruses, taking a multipronged approach to preventing them from doing damage.
Choosing Nonmacro File Formats
The most basic way to protect against macro viruses is to use a file format that does not support macros. Word 2013 offers two document formats: The regular .dotx and .docx formats do not support macros, and the macro-enabled .dotm and .docm formats do. When you do not need macro capability, use .dotx or .docx.
Specifying Trusted Locations
In Word 2013, macros are allowed to run in a macro-enabled document or template—or not—based on the location of the file. You can set up certain locations to be trusted; then whatever files you put in that location automatically have full macro-running privileges.
The following folders are trusted by default:
Program FilesMicrosoft OfficeTemplates
UsersusernameAppDataRoamingMicrosoftWordStartup
UsersusernameAppDataRoamingMicrosoftTemplates
To set up additional trusted locations, follow these steps:
1. Choose File, Options. The Word Options dialog box appears.
2. Click Trust Center.
3. Click the Trust Center Settings button. A separate Trust Center dialog box appears.
4. Click Trusted Locations (see Figure 21.9).

Figure 21.9. View and add trusted locations.
6. Click the Browse button and browse to the desired location; then click OK.
7. If desired, mark the Subfolders of This Location Are Also Trusted check box (see Figure 21.10).
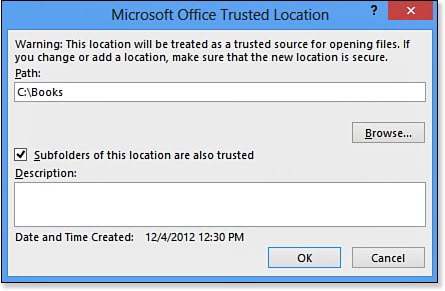
Figure 21.10. Create a new trusted location.
8. Click OK.
Other settings that you can optionally use for trusted locations (refer to Figure 21.9) are as follows:
• Allow Trusted Locations on My Network—Enables you to add trusted locations that exist other than on your local PC.
• Disable All Trusted Locations—Just what the name says. Only files signed by trusted publishers are trusted. (You learn about trusted publishers in the next section.)
• Remove—Removes a trusted location from the list.
• Modify—Opens the Microsoft Office Trusted Location dialog box.
Working with Trusted Publishers
Another way to trust a macro is to verify that it comes from a trusted publisher. Macro settings enable you to specify what should happen when a macro from a trusted publisher wants to run outside of a trusted location.
When you open a document that includes one or more signed macros, Word prompts you as to whether you want to trust macros from that signer. Information about the signer’s certificate appears, including the name, the issuing authority, and the valid dates. If you choose Yes, that signer is added to your Trusted Publishers list. If this hasn’t occurred yet, your Trusted Publishers list is blank in the Trust Center dialog box.
To view the Trusted Publishers list, follow these steps:
1. Choose File, Options.
2. Click Trust Center.
3. Click the Trust Center Settings button.
4. Click Trusted Publishers.
If you have a trusted publisher on your list, you can select it and then click View to view its information or Remove to untrust it.
Adjusting Macro Settings
Macro settings apply only to macros that are stored in documents that are not in trusted locations. They determine whether the macro should run and whether you should receive notification.
Follow these steps to get to the macro settings and to change them if desired:
1. Choose File, Options.
2. Click Trust Center.
3. Click Trust Center Settings. The Trust Center dialog box opens.
4. Click Macro Settings (see Figure 21.11).

Figure 21.11. Adjust macro settings for locations other than trusted locations.
5. Select the macro setting that best describes what should happen when a macro tries to run outside of a trusted location.
6. Click OK on both open dialog boxes.
Configuring Protected View and File Blocking
Protected View is a security feature in Word 2013 that automatically blocks certain types of files from being opened or edited, in case they contain content that might harm your computer. This includes not only macro content, but other types of active content, too. Protected View offers even more comprehensive protection than macro blocking.
Perhaps you have noticed that when you open a Word document that originated from the Internet (such as from an email attachment), Word opens the document in Protected View by default. The Ribbon does not appear, and you cannot edit the document until you turn Protected View off by clicking the Enable Editing button, as shown in Figure 21.12.
Figure 21.12. Protected View prevents the document from being edited and prevents the Ribbon from appearing.
To control Protected View’s settings, follow these steps:
1. Choose File, Options.
2. Click Trust Center.
3. Click Trust Center Settings. The Trust Center dialog box opens.
4. Click Protected View.
5. Mark or clear check boxes to control what types of documents open in Protected View by default (see Figure 21.13).
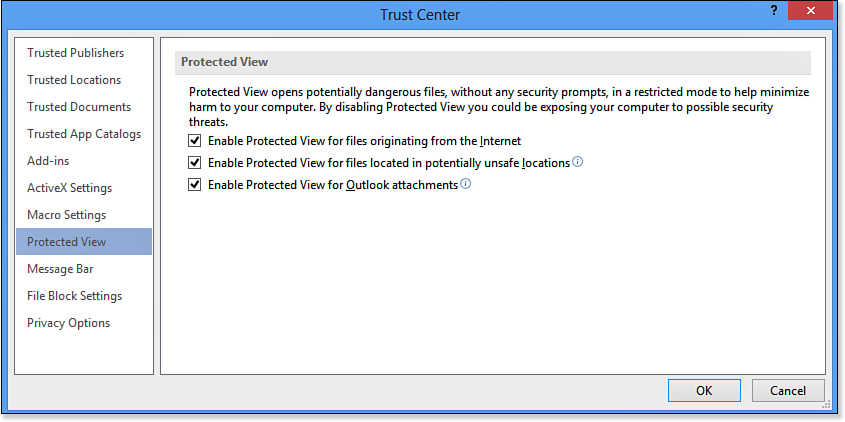
Figure 21.13. You can clear certain check boxes to allow Word to open documents normally instead of in Protected View.
6. Click OK.
You can also block certain files from opening, or open them in Protected View, based on their file type. This enables you to specify that certain file types, such as those that were generated in older versions of Word, be opened in Protected View regardless of whether they originated from a trusted location. Files from Word 6.0 and Word 95, for example, are commonly set to be blocked by default because they were generated in versions of Word that lacked macro virus protection.
To block certain file types, follow these steps:
1. Choose File, Options.
2. Click Trust Center.
3. Click Trust Center Settings. The Trust Center dialog box opens.
4. Click File Block Settings.
5. Mark or clear check boxes for file types you want to block (see Figure 21.14).
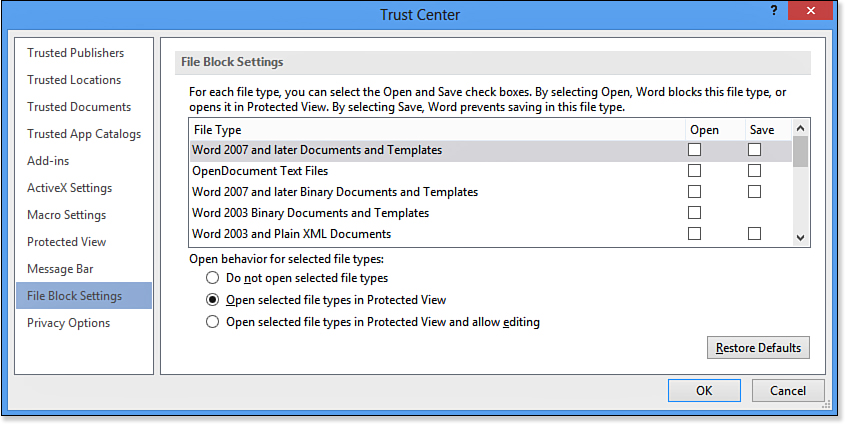
Figure 21.14. Configure file blocking to prevent certain file types from opening without protection.
6. At the bottom of the dialog box, specify what you want Word to do with files that match the specifications you chose in step 5.
7. Click OK.
Protecting Your Privacy
When you distribute a Word document or make it available to others, a certain amount of personal information about its author travels along with it. This can include properties, headers and footers that you might have neglected to remove, comments, revisions, and other items. You can see that information, and remove it, in Word 2013.
Finding and Removing Personal Information
Inspecting a document shows you all the hidden and less-obvious pieces of personal information that might potentially travel along with a document so that you can remove them if desired.
To inspect a document, follow these steps:
1. Choose File, Info, Check for Issues, Inspect Document. If prompted to save your document, click Yes. The Document Inspector dialog box opens (see Figure 21.15).
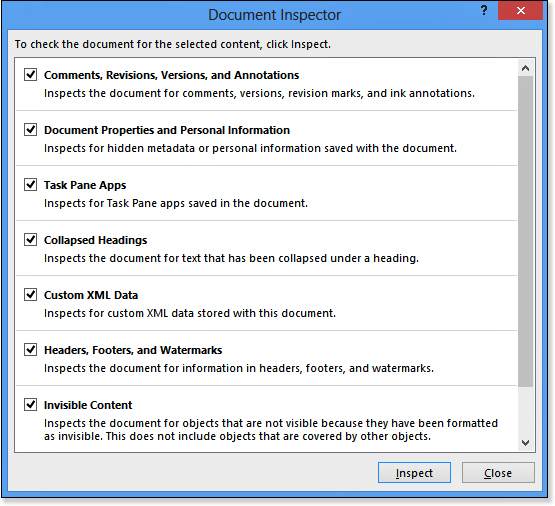
Figure 21.15. Select the items you want to inspect.
2. Clear the check boxes for any content you do not want to check for.
3. Click Inspect. Results appear, as shown in Figure 21.16. For each type of content found, a Remove All button appears.
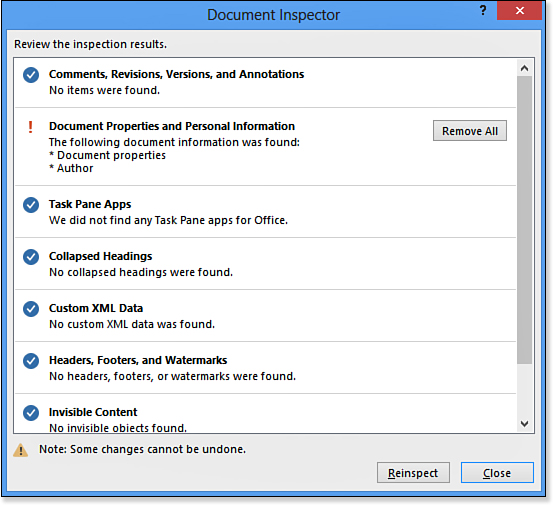
Figure 21.16. View the results of the inspection.
4. Click Remove All to remove a type of content.
5. When finished, click Reinspect or click Close.
Setting Privacy Options
In the Trust Center’s Privacy Options section are a number of settings that control how much (or little) information is sent over the Internet and with documents. You can also access the Document Inspector from there, which you used in the preceding section.
To access the privacy options, follow these steps:
1. Choose File, Options.
2. Click Trust Center.
3. Click the Trust Center Settings button. The Trust Center dialog box opens.
![]() Tip
Tip
Some of the options have i symbols next to them, indicating that more information is available. Point to one of those symbols to get help on that option.
4. Click Privacy Options.
5. Mark or clear the check boxes for the desired options (see Figure 21.17).
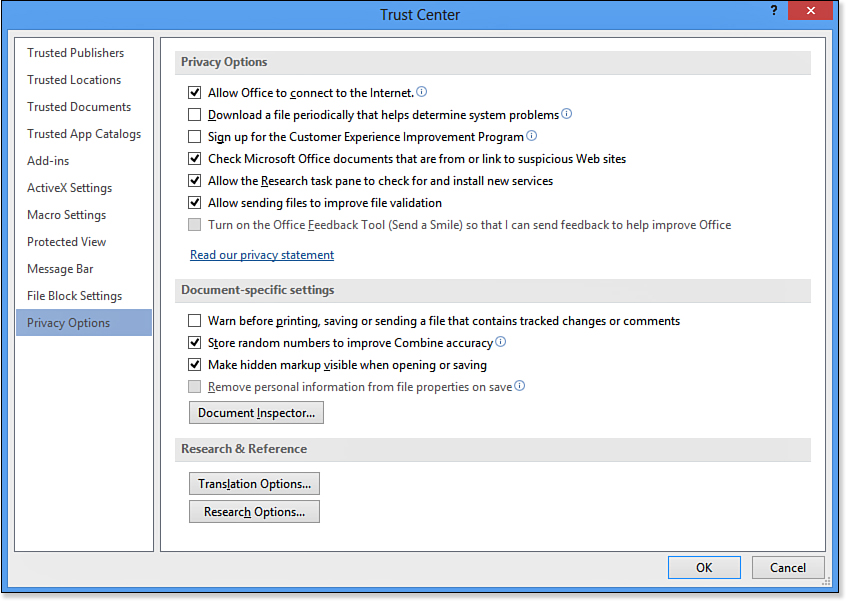
Figure 21.17. Set privacy options.
6. Click OK on both open dialog boxes.
Adding a Digital Signature
Digital signatures are certifications of a document’s authenticity. When sending legal or other important documents online, a digital signature can provide some measure of certainty that a document has actually come from its purported source and has not been altered since it was sent.
You can get a certificate from a certificate authority, a third-party service online, but this is not free. (It costs around $370 for secure2trust, for example.)
To find out about third-party certificates, choose File, Info, Protect Document, Add a Digital Signature, and then click Signature Services from the Office Marketplace.
You can also self-certify a document, but this is not all that secure and carries no legal authority. If you want to practice using digital signatures, though, a self-certificate does work.
To add a digital signature to a document, follow these steps:
1. Choose File, Info, Protect Document, Add a Digital Signature.
If you do not have a third-party signature file installed, a dialog box appears warning of that and offering to either take you to the Office Marketplace or continue. Click OK to continue. After you get a digital signature, repeat step 1 to get to the Sign dialog box.
2. In the Sign dialog box, type a description of why you are signing the document. For example, if you are approving it, you might write that.
3. If your correct name does not appear in the Signing As box, click Change and change the name; then click OK.
4. Click Sign. A message appears that your signature has been added.
5. Click OK.
6. Press Esc to return to the document. An information bar appears across the top, indicating that the document has been marked as final. (Signed documents are also marked as final.)
If you need to edit the document, click the Edit Anyway button on the information bar. This removes the signature and makes the document editable again.
To review the signatures, choose File, Info, View Signatures. A Signatures pane appears to the right of the document. In it, you can see the signatures that have been added to the document. (Multiple people may have signed it.)