
Chapter 14. Monitoring events and actions
|
|
In the previous chapter you learned how to create the basic view controllers that fulfill the controller role of an MVC architectural model. You’re now ready to start accepting user input, since you can now send users off to the correct object. Users can interact with your program in two ways: by using the low-level event model or by using event-driven actions. In this chapter, you’ll learn the difference between the two types of interactions. Then we’ll look at notifications, a third way that your program can learn about user actions.
Of these three models, it’s the events that provide the lowest-level detail (and which ultimately underlie everything else), and so we’ll begin with events.
14.1. An introduction to events
We briefly touched on the basics of event management in chapter 10, but as we said at the time, we wanted to put off a complete discussion until we could cover them in depth; we’re now ready to tackle that job.
Part 1 of this book, dealing with web design, outlined how events tend to work on the iPhone. The fundamental unit of user input is the touch: a user puts his finger on the screen. This could be built into a multi-touch or a gesture, but the touch remains the building block on which everything else is constructed. It’s thus the basic unit that we’re going to be examining in this chapter.
14.1.1. The responder chain
When a touch occurs in an SDK program, you have to worry about something you didn’t have to think about on the web: who responds to the event. That’s because SDK programs are built of tens—perhaps hundreds—of different objects. Almost all of these objects are subclasses of the UIResponder class, which means they contain all the functionality required to respond to an event. So who gets to respond?
The answer is embedded in the concept of the responder chain. This is a hierarchy of different objects that are each given the opportunity, in turn, to answer an event message.
Figure 14.1 shows an example of how an event moves up the responder chain. It starts out at the first responder of the key window, which is typically the view where the event occurred—in other words, where the user touched the screen. As we’ve already noted, this first responder is probably a subclass of UIResponder—which is the class reference you’ll want to look to for a lot of responder functionality.
Figure 14.1. Events on the iPhone are initially sent to the first responder, but then travel up the responder chain until someone accepts them.
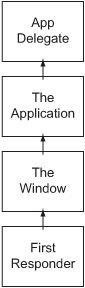
Any object in the chain may accept an event and resolve it, but whenever that doesn’t occur the event moves further up the list of responders. From a view, an event will go to its superview, then its superview, until it eventually reaches the UIWindow object, which is the superview of everything in your application. It’s useful to note that from the UIWindow downward, the responder chain is the view hierarchy turned on its head, so when you’re building your hierarchies, they’ll be doing double duty.
Although figure 14.1 shows a direct connection from the first responder to the window, there could be any number of objects in this gap in a real-world program.
Often the normal flow of the responder chain will be interrupted by delegation. A specific object (usually a view) delegates another object (usually a view controller) to act for it. We already saw this put to use in our table view in chapter 13, but we now understand that a delegation occurs as part of the normal movement up the responder chain.
If an event gets all the way up through the responder chain to the window and it can’t deal with an event, then it moves up to the UIApplication itself, which most frequently punts the event to its own delegate: the application delegate, an object that we’ve been using in every program to date.
First responders and keyboards
Before we leave this topic of responders behind, we’d like to mention that the first responder is a very important concept. Because this first responder is the object that can accept input, it’ll sometimes take a special action to show its readiness for input. This is particularly true for text objects like UITextField and UITextView, which (if editable) will pop up a keyboard when they become the first responder. This has two immediate consequences.
If you want to pop up a keyboard for the text object, you can do so by turning it into the first responder:
[myText becomeFirstResponder];Similarly, if you want to get rid of a keyboard, you must tell your text object to stop being the first responder:
[myText resignFirstResponder];We’ll discuss these ideas more when we encounter our first editable text object toward the end of this chapter.
Ultimately you, the programmer, will be the person who decides what in the responder chain will respond to events in your program. You should keep two factors in mind when you make this decision: how classes of events can be abstracted together at higher levels in your chain, and how you can build your event management using the concepts of MVC.
At the end of this section we’ll address how you can subvert this responder chain by further regulating events, but for now let’s build on its standard setup.
14.1.2. Touches and events
Now that you know a bit about how events find their way to the appropriate object, we can dig into how they’re encoded by the SDK. First we want to offer a caveat: usually you won’t need to worry about this level of detail because the standard UIKit objects will generally convert low-level events into higher-level actions for you, as we discuss in the second half of this chapter. With that said, let’s look at the nuts and bolts of event encoding.
The SDK abstracts events by combining a number of touches (which are represented by UITouch objects) into an event (which is represented by a UIEvent object). An event typically begins when the first finger touches the screen and ends when the last finger leaves the screen. In addition, it should generally only include those touches that happened in the same view.
In this chapter we’ll work mainly with UITouches (which make it easy to parse single-touch events) and not with UIEvents (which are more important for parsing multi-touch events). Let’s lead off with a more in-depth look at each.
Uitouch Reference
A UITouch object is created when a finger is placed on the screen, moves on the screen, or is removed from the screen. A handful of properties and instance methods can give you additional information on the touch, as detailed in table 14.1.
Table 14.1. Additional properties and methods can tell you precisely what happened during a touch event.
|
Method or property |
Type |
Summary |
|---|---|---|
|
phase |
Property |
Returns a touch phase constant, which indicates whether touch began, moved, ended, or was canceled |
|
tapCount |
Property |
The number of times the screen was tapped |
|
timestamp |
Property |
When the touch occurred or changed |
|
view |
Property |
The view where the touch began |
|
window |
Property |
The window where the touch began |
|
locationInView: |
Method |
Gives the current location of the touch in the specified view |
|
previousLocationInView: |
Method |
Gives the previous location of the touch in the specified view |
Together the methods and properties shown in table 14.1 offer considerable information on a touch, including when and how it occurred.
Only the phase property requires additional explanation. It returns a constant that can be set to one of five values: UITouchPhaseBegan, UITouchPhaseMoved, UITouchPhaseStationary, UITouchedPhaseEnded, or UITouchPhaseCancelled. You’ll often want to have different event responses based on exactly which phase a touch occurred in, as you’ll see in our event example.
Uievent Reference
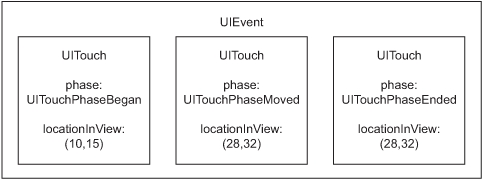
To make it easy to see how individual touches occur as part of more complex gestures, the iPhone SDK organizes UITouches into UIEvents. Figure 14.2 shows how these two sorts of objects interrelate.
Figure 14.2. UIEvent objects contain a set of related UITouch objects.
Just as with the UITouch object, the UIEvent object contains a number of properties and methods that you can use to figure out more information about your event, as described in table 14.2.
Table 14.2. The encapsulating event object has a number of methods and properties that let you access its data.
|
Type |
Summary |
|
|---|---|---|
|
timestamp |
Property |
The time of the event |
|
allTouches |
Method |
All event touches associated with the receiver |
|
touchesForView: |
Method |
All event touches associated with a view |
|
touchesForWindow: |
Method |
All event touches associated with a window |
The main use of a UIEvent method is to give you a list of related touches that you can break down by several means. If you want to get a list of every touch in an event, or if you want to specify just gestures on a certain part of the screen, then you can do that with UIEvent methods. This ends our discussion of event containers in this chapter.
Note that all of these methods compact their touches into an NSSet, which is an object defined in the Foundation framework. You can find a good reference for the NSSet at Apple’s developer resources site.
The Responder Methods
So, how do you actually access these touches and/or events? You do so through a series of four different UIResponder methods, which are summarized in table 14.3.
Table 14.3. The UIResponder methods are the heart of capturing events.
|
Method |
Summary |
|---|---|
|
touchesBegan:withEvent: |
Reports UITouchPhaseBegan events, for when fingers touch the screen |
|
touchesMoved:withEvent: |
Reports UITouchPhaseMoved events, for when fingers move across the screen |
|
touchesEnded:withEvent: |
Reports UITouchPhaseEnded events, for when fingers leave the screen |
|
touchesCancelled:withEvent: |
Reports UITouchPhaseCancelled events, for when the phone is put up to your head, or other events that might cause an external cancellation |
Each of these methods has two arguments: an NSSet of touches that occurred during the phase in question and a UIEvent that provides a link to the entire event’s worth of touches. You can choose to access either one, as you prefer; as we’ve said, we’re going to be playing with the bare touches. With that said, we’re now ready to dive into an actual example that demonstrates how to capture touches in a real-life program.
14.2. A touching example: the event reporter
Our sample application for events is something we call the event reporter, which will offer a variety of responses depending on how and when the iPhone screen is touched. We have two goals with our sample program.
First, we want to show you a cool and simple application that you can write using events, one that should get you thinking about everything you can do.
Second, we want to show some of the low-level details of how events work in a visual form. Therefore, if you actually take the trouble to code and compile this program, you’ll gain a better understanding of how the various phases work as well as how tapping works.
You’ll kick off this development process by creating a project named eventreporter that uses the View-Based Application template. That means you’ll start with a view controller already in place. We’ll also use this example to show how an MVC program can be structured.
14.2.1. Setting things up in Interface Builder
By now you should be comfortable enough with Interface Builder that you can set up all of your basic objects using it. For this program we’ve decided that we want to create three new objects: two button-shaped objects that will float around the screen to mark the beginning and end of touches, plus a status bar to go at the bottom of the screen and describe a few other events when they occur.
Because you want all of our new objects to lie beneath the view controller in the view hierarchy, you call up the view controller’s own .xib file, eventreporterViewController.xib. As usual, you’ll add your new objects to the Main Display window that represents the view controller’s view.
All of your work in Interface Builder is, of course, graphical, so we can’t show the code of this programming process. However, we have included a quick summary of the actions you should take. The results are shown in figure 14.3.
- Set the background color of the UIView to an attractive aluminum color. You do this on the Attributes tab of the Inspector window, as you would with most of your work in this project.
- Create a UILabel, stretch it across the bottom of the screen, and set the color to be steel. Also, clear out its text so that it doesn’t display anything at startup.
- Create two UITextFields. This class of objects is generally used to accept input, but we opted to use the objects for our pure display purposes because we liked their look. (Don’t worry; we’ll show how to use the full functionality of a UIText-Field toward the end of this chapter.)
- Center each UITextField at the center of the screen using Interface Builder’s handy positioning icons. This location’s coordinates will be 159, 230.
- For each UITextField, input text that lists its starting position; this will later be updated by the program as the text field moves. Deselect the user interaction–enabled option for each UITextField so that users can’t manipulate them.
Figure 14.3. Two UITextFields (one of them hidden) and one UILabel, all set against an aluminum-colored background, complete the object creation we’ll need for our eventreporter project.

The process takes longer to explain than it takes to accomplish. You’ll have a working interface in just a couple of minutes.
Creating Iboutlets
Because you’ll modify all three of these objects during the course of your program’s runtime, you need to link them to variables inside Xcode. You’ll want to link everything to your controller, since it’ll be taking care of updates, as is appropriate under the MVC model.
The tricky thing here is that the view controller doesn’t seem to appear in our eventreporterViewController.xib file—at least not by that name. Fortunately, there’s a proxy for it. Since the view controller is what loads up the .xib, it appears as the file’s owner in the nib document window. You can therefore connect objects to the view controller by linking them to the file’s owner proxy. This is a common situation, since view controllers frequently load additional .xib files for you.
Listing 14.1 shows your view controller’s header file, eventreportViewController.h, following the addition of these IBOutlets. The listing also contains a declaration of a method that you’ll use later in this project.
Listing 14.1. An IB-linked header
@interface eventreporterViewController : UIViewController {

    IBOutlet UITextField *startField;
    IBOutlet UITextField *endField;
    IBOutlet UILabel *bottomLabel;
}

- (void)manageTouches:(NSSet *)touches;

@end
To finish up this process, you connect your Interface Builder objects to the IBOutlets, using the procedures described in chapter 12.
14.2.2. Preparing a view for touches
Touch events can only be captured by UIView objects. Unfortunately, as of this writing, there’s no way to automatically delegate those touches to a view controller. Therefore, in order to manage touch events using the MVC model, you’ll typically need to subclass a UIView, capture the events there, and then send messages to the view controller.
In your project you’ll create a new object class, reportView, which is a subclass of UIView. You then link that new class into the view controller’s existing view through Interface Builder. You open up eventreporterViewController.xib, go to the Identity tab for the view object that you’ve been using, and change its name from UIView to reportView, just as you did in chapter 13 when you created a table view controller subview.
Any new methods that you write into reportView, including methods that capture touch events, will be now reflected in your view. To clarify this setup, figure 14.4 shows the view hierarchy that you’ve built for your even-treporter project.
Figure 14.4. Working primarily in Interface Builder, we’ve connected up six objects that we’ll be using to report iPhone events.

With a brand-new UIView subclass in hand, you can now write methods into it to capture touch events and forward them on to its controller. This code, which appears in reportView.m, is shown in listing 14.2.
Listing 14.2. A collection of methods report touches in UIViews
- (void) touchesBegan:(NSSet *)touches withEvent:(UIEvent *)event {
     [self.nextResponder manageTouches:touches];
}

- (void) touchesEnded:(NSSet *)touches withEvent:(UIEvent *)event {
     [self.nextResponder manageTouches:touches];
}

- (void) touchesMoved:(NSSet *)touches withEvent:(UIEvent *)event {
     [self.nextResponder manageTouches:touches];
}
The code in listing 14.2 is pretty simple. You’re just filling in standard methods so that your program will have the responses you want when those messages are sent. The overall structure of these methods reminds us of several important facts about events.
First, as promised, there are a variety of responder methods. Each of them reports only the events for their specific phase. So, for example, the touchesBegan:withEvent: method would only have UITouchPhaseBegan touches in it. In forwarding on these touches we could have kept the different phases distinct, but we’ve instead decided to throw everything together and sort it out on our own on the other side.
Second, we’ll comment one final time that these methods send us two pieces of information: a set of touches and an event. They are partially redundant, and which one you work with will probably depend on the work you’re doing. If you’re not doing complex multi-touch events, then the NSSet of touches will probably be sufficient.
Third, note that you’re sending the touches to the view controller by way of the nextResponder method. As you’ll recall, the responder chain is the opposite of the view hierarchy at its lower levels, which means in this case the nextResponder of reportView is the UIViewController. We would have preferred to have the UIView-Controller just naturally respond to the touches messages, but we made use of our responder chain in the next best way. As of this writing, the compiler warns that next-Responder may not know about the manageTouches method, but it will; this warning can be ignored.
We’ll see some other ways to use the nextResponder method toward the end of our discussion of events.
An Aside on the Text Fields and Label
If you were to actually code in this example, you’d discover that this program correctly responds to touch events even when the touches occurred atop one of the text fields or the label at the bottom of the page. How does your program manage that when you only built event response into the reportView?
The answer is this: it uses the responder chain. The text fields and the label don’t respond to the event methods themselves. As a result, the events get passed up the responder chain to the reportView, which does leap on those events, using the code we’ve just seen.
14.2.3. Controlling your events
Intercepting touches and forwarding them up to the view controller may be the toughest part of this code. Once the events get to the view controller, they run through a simple method called manageTouches:, as shown in listing 14.3.
Listing 14.3. manageTouches, which accepts inputs and changes views

Touches are sent as an NSSet, which can be broken apart in a number of ways, as described in the NSSet class reference. Here, you’ll use a simple for ... in construction ![]() that lets you look at each touch in turn.
that lets you look at each touch in turn.
Once you get a touch, the first thing you do is determine what phase it arrived in. Originally you could have determined this
information based on which method a touch arrived through, but since we combined everything you have to fall back on the phase property. Fortunately, it’s easy to use. You just match it up to one of three constants ![]() , and that determines which individual actions your program undertakes.
, and that determines which individual actions your program undertakes.
Having different responses based on the phase in which a touch arrive is common—which is in fact why the event methods are split up in the first place. Our example demonstrates this with some distinct responses: you move your start field when touches begin, you move your end field when touches end, and you update the bottom label in both the moved and ended phases.
In your UITouchPhaseBegan response, you delve further into your touch’s data by using the locationInView: method to figure out the precise coordinates where a touch occurred ![]() . You’re then able to use that data to reposition your text field and to report the coordinates in the text field
. You’re then able to use that data to reposition your text field and to report the coordinates in the text field ![]() . You later do the same thing in the UITouchPhaseEnded response.
. You later do the same thing in the UITouchPhaseEnded response.
Finally, you take a look at the tapCount in the UITouchPhaseEnded response ![]() . This is generally the best place to look at taps since the iPhone now knows that the user’s finger has actually come off
the screen. As you can see, it’s easy to both run a command based on the number of taps and to report that information.
. This is generally the best place to look at taps since the iPhone now knows that the user’s finger has actually come off
the screen. As you can see, it’s easy to both run a command based on the number of taps and to report that information.
Figure 14.5 shows what your event responder looks like in action. You should imagine a finger that set down on the space where the begin text field is sitting and that is currently moving across the screen.
Figure 14.5. Your event responder uses a few graphical elements to report events as they occur.

And with that, your event reporter is complete. Besides illustrating how a program can respond to touches, we have highlighted how the MVC model can be used in a real application.
Your project contained four views: a reportView, a UILabel, and two UITextFields. It was tempting to process events in the reportView itself, especially since you had to create a subclass anyway, but instead you pushed the events up to the view controller, and in doing so revealed why you’d want to do MVC modeling.
Since it takes on the controller role, you gave the view controller access to all of its individual objects, and therefore you didn’t have to try to remember what object knew about what other object. Tying things into the view controller, rather than scattering them randomly across your code, made your project that much more readable and reusable, which is what most architectural and design patterns are about.
14.3. Other event functionality
Before we complete our discussion of events entirely, we’d like to cover a few more topics of interest. We’re going to explore how to regulate the report of events in a variety of ways and then describe some deficiencies in the event model.
14.3.1. Regulating events
As we mentioned earlier, there are some ways that you can modify how events are reported (and whether they are at all). As you’ll see, three different objects give you access to this sort of regulation: UIResponder, UIView, and UIApplication. We’ve listed all the notable options we’re going to discuss in table 14.4.
Table 14.4. Properties in various objects allow for additional control of when events are monitored.
|
Method or property |
Type |
Summary |
|---|---|---|
|
nextResponder |
UIResponder method |
Returns the next responder in the chain by default but can be modified |
|
hitTest:withEvent: |
UIView method |
Returns the deepest subview containing a point by default but can be modified |
|
exclusiveTouch |
UIView property |
A Boolean set to NO by default; controls whether other views in the same window are blocked from receiving events |
|
multipleTouchEnabled |
UIView property |
A Boolean set to NO by default; controls whether multi-touches after the first are thrown out |
|
beginIgnoringInteractionEvents |
UIApplication method |
Turns off touch event handling |
|
endIgnoringInteractionEvents |
UIApplication method |
Turns on touch event handling |
|
isIgnoringInteractionEvents |
UIApplication method |
Tells whether the application is ignoring touch events |
Since UIView is a subclass of UIResponder, you’ll generally have access to the methods from both classes in most UIKit objects. You’ll need to do some additional work to access the UIApplication methods.
Uiresponder Regulation
You’ve already seen that UIResponder is the source of the methods that let you capture events; as shown here, it’s also the home of the methods that control how the responder chain works.
Most of the responder chain–related methods won’t be directly used by your code, instead typically appearing deep in frameworks. becomeFirstResponder and resignFirstResponder (which control who the first responder is) and canBecomeFirstResponder, canResignFirstResponder, and isFirstResponder (which return Booleans related to the information in question) all typically fall into this category.
It’s the last UIResponder method, nextResponder, which may be of use in your programs. As defined by UIResponder, nextResponder just returns the next responder, per the normal responder chain. We used it in our example to pass our touches up.
If you want to change the normal order of the responder chain, you can do so by creating your own nextResponder function in a subclass. This new function will override its parent method, and thus will allow your program to take a different path up your own responder chain.
Uiview Regulation
When you move into the UIView class methods, you can take the opposite approach by overriding hitTest:withEvent:. This method is passed a CGPoint and an event, and by default it returns the deepest subview that contains the point. By writing a new method, you can cause your responder chain to start at a different point.
The two UIView properties that we noted both work as you’d expect. exclusive-Touch declares that the view in question is the only one that can receive events (which is an alternative way that we could have managed our eventreporter example, where we didn’t want anything but the reportView to accept events). Meanwhile, multiple-TouchEnabled starts reporting of multi-touch events, which are otherwise ignored.
Uiapplication Regulation
Finally we come to the UIApplication methods. These lie outside of our normal hierarchy of objects, and thus we can’t get to them from our view objects. Instead we need to call them directly from the UIApplication object as shown here:
[[UIApplication sharedApplication] beginIgnoringInteractionEvents];
As you may recall from chapter 11, sharedApplication is a UIApplication class method that provides us with a reference to the application object. Typically, we’ve used its return as the receiver for the beginIgnoringInteractionEvents message.
Each of the three methods listed under UIApplication works as you’d expect once you know the secret to accessing them.
14.3.2. Other event methods and properties
We’ve spent a lot of time on events, but at the same time we’ve only scratched the surface. We have mixed feelings on the subject.
On the one hand, events give you low-level access to the unique user input allowed by the iPhone. Since much of this book is about how the iPhone is unique, we’d like to delve into it much further.
On the other hand, you won’t be using events that much. That’s because you usually won’t need this sort of low-level control over your user input. Instead, you’ll use the iPhone’s many control objects (and thus actions) in order to accept almost all user input.
As a result, this chapter has offered you a compromise: a solid look at how events work that should suffice for those times when you do need to descend to touch management, but not all of the intricacies. The thing that we’ve most clearly left out is how to work with multi-touch events. For that, we point you, as usual, to the Apple iPhone developer website. There’s a good tutorial on multi-touch events available as part of the iPhone OS Programming Guide that you should read if you’re one of that smaller percentage of developers—such as programmers creating games and novelties—who might need access to multi-touches and more complex gestures.
14.4. An introduction to actions
So if you’re not usually going to be programming directly with events, how will you access user input? The answer is by using actions. You’ll typically depend on preexisting text views, buttons, and other widgets to run your programs. When using these objects, you don’t have to worry about raw events at all. Instead, you can build your programs around control events and actions that are generated by UIControls.
14.4.1. The UIControl object
When we were working with events, we found that the UIResponder class held many of the methods critical for event control. Similarly, we can access a lot of the methods important to SDK controls through the UIControl class.
UIControl is a child of UIView (and thus UIResponder). It is the parent of important user interface controls such as UIButton, UISwitch, UIPageControl, UISegmented-Control, UISlider, and UITextField. It is not used for some other control-looking objects such as UISearchBar, so you should check the Apple class references before trying to use its functionality. Also note that the higher-level UIControl class can’t be used on its own; it just defines the common methods used by its children.
The UIControl class contains several properties that control its basic setup, such as enabled (which determines whether it’s on), highlighted (which determines its visual state), and selected (which sets Boolean state for appropriate sorts of controls, such as switches). You can also directly access a control’s touch events with beginTrackingWithTouch:withEvent:, continueTrackingWithTouch:withEvent:, and endTrackingWithTouch:withEvent:, methods that work in a similar way to the event response functions that we played with in UIResponder. But we won’t be using these methods at all, because they don’t represent the simple advantages that you’ll see when using control objects. For that, we turn to UIControl’s action-target mechanism.
14.4.2. Control events and actions
The UIControl object introduces a whole new event-handling infrastructure that takes touch events of the sort that we might have directly handled in the previous section and (eventually) converts them into simple actions, without you having to worry about the specifics of how a user accessed your control. The complete sequence of events is outlined in figure 14.6.
Figure 14.6. UIControl objects take standard touch events and turn them into actions that are dispatched by UIApplication.

When a touch event arrives at a UIControl object (via normal dispatching along the responder chain), the control does something unique. Inside the standard UIResponder methods that we used in the previous section (such as touches-Began:withEvent:), a UIControl object turns standard touch events into special control events.
These control events broadly describe how the user has interacted with the controls rather than just recording gestures. For example, they might report that a button has been pushed or a slider moved. They’re divided into three categories: touch events, editing events, and a slider event. The touch events describe how a user’s finger interacted with the control; the editing events describe changes to a UITextField; and the ValueChanged event describes changes to a UISlider.
These control events are all enumerated in a bitmask that’s defined in the UIControl object. An almost complete listing of them—including some composite control events—can be found in table 14.5. We’ve left out only a few Reserved values.
Table 14.5. UIControl objects recognize a number of special events.
|
Value |
Summary |
|---|---|
|
UIControlEventTouchDown |
A finger touch. |
|
UIControlEventTouchDownRepeat |
A repeated finger touch (with tapCount > 1). |
|
UIControlEventTouchDragInside |
A finger movement ending inside the control. |
|
UIControlEventTouchDragOutside |
A finger movement ending just outside the control. |
|
UIControlEventTouchDragEnter |
A finger movement that enters the control. |
|
UIControlEventTouchDragExit |
A finger movement that exits the control. |
|
UIControlEventTouchUpInside |
A finger removed from the screen inside the control. |
|
UIControlEventTouchUpOutside |
A finger removed from the screen outside the control. |
|
UIControlEventTouchCancel |
A system event canceled a touch. |
|
UIControlEventValueChanged |
A slider (or other similar) object changed its value. |
|
UIControlEventEditingDidBegin |
Editing began in a UITextField. |
|
UIControlEventEditingChanged |
Editing changed in a UITextField. |
|
Editing ended in a UITextField due to a touch outside the object. |
|
|
UIControlEventEditingDidEndOnExit |
Editing ended in a UITextField due to a touch. |
|
UIControlEventAllTouchEvents |
Composite for all the touch-related events. |
|
UIControlEventAllEditingEvents |
Composite for the editing-related events. |
|
UIControlEventAllEvents |
Composite for all events. |
Once a standard event has been turned into a control event, a sequence of additional methods is called, as shown in figure 14.6. First, the UIControl object calls send-ActionsForControlEvents:. That in turn breaks down the events it’s been sent and calls sendAction:to:forEvent:, once per event. Here the control event is turned into an action, which is a specific method that’s going to be run in a specific target object. Finally the UIApplication method sendAction:to:fromSender:forEvent: is called by the control, again once per event.
This is another situation where the application object does big-picture controlling of messaging. It’s the application that sends the action to the target object. But there’s one catch: if the target that the action is being sent to has been listed as nil, the action is sent to the first responder instead, and from there moves up the responder chain.
That whole process can be slightly exhausting, and fortunately you shouldn’t normally need to know its details. For your purposes, you should be aware that a UIControl object turns a touch event first into a control event and then into an action with a specific recipient. Even better, it’s only the last part of that conversion, from control event into targeted action, that you need to code.
14.4.3. The addTarget:action:forControlEvents: method
A UIControl object maintains an internal dispatch table that correlates control events with target-action pairs. In other words, this table says which method should be run by which object when a specified event occurs. You can add entries to this table with the UIControl object’s addTarget:action:forControlEvents: method. The following example shows how it works:
[controlObject addTarget:recipientObject action:@selector(method)
   forControlEvents:UIControlEvents];
The first argument, addTarget:, says who the message will be sent to. It’s frequently set to self, which usually refers to a view controller that instantiated the control object.
The second argument, action:, is the trickiest. First, note that it uses the @selector syntax that we mentioned in chapter 10. The selector should identify the name of the method that’s going to be run in the target object. Second, be aware that you can either send the action argument without a colon (method) or with a colon (method:). In the latter case, the ID of the controlObject will be sent as an argument. Be sure that your receiving method is correctly defined to accept an argument if you include that colon in your selector.
The third argument, forControlEvents:, is a bitmasked list of possible control events, taken from table 14.5.
With all these puzzle pieces in place, you’re now ready to write some code that will make actual use of actions (and this method). As a simple example, you’re going to expand the functionality to your event reporter by adding a “reset” button.
14.5. Adding a button to an application
The simplest use of an action is probably just adding a button to an application and then responding to the press of that button. As we’ll see, this turns out to be a lot easier than digging through individual touches.
We’ve opted to show you how to work with a button in two ways: first by using the addTarget:action:forControlEvents: method that we were just introduced to and then by using Interface Builder’s IBAction declaration.
Both of these examples begin with your existing eventreporter program. You’ll add a simple UIButton to it using Interface Builder. Place the button down atop the label at the bottom of our page and use the attributes tag to label it “Reset.” With it in place and defined, it’s now ready to be linked into your program by one of two different ways.
Both examples will call a method you’ve written called resetPage:, which just restores the three changeable objects in your eventreporter to their default states. It’s shown in listing 14.4 of eventreporterViewController.m, and as you can see is entirely elementary.
Listing 14.4. A simple button action
- (void)resetPage:(id)sender {

    startField.text = @"Begin: 159,230";
    startField.center = CGPointMake(159,230);

    endField.text = @"Begin: 159,230";
    endField.center = CGPointMake(159,230);

    bottomLabel.text = [NSString string];
}
We can now take a look at the two ways you can call this method.
14.5.1. Using addTarget:action:forControlEvents:
On the one hand, you might wish to add actions to your button programmatically. This could be the case if you created your button from within Xcode or if you created your button within Interface Builder but want to change its behavior during runtime.
Your first step, then, is bringing your button into Xcode. If you created your button in Interface Builder, as we suggested earlier, you just need to create an IBOutlet for your button, which should be old hat by now. If for some reason you didn’t create your button in Interface Builder, you could do so in Xcode. This probably means using the factory class method buttonWithType:, which lets you create either a rounded rectangle button or one of a few special buttons, like the info button. By either means, you should now have a button object available in Xcode.
Your second step is to send the addTarget:action:forControlEvents: message as part of your application’s startup. Assuming that you’re having your view controller manage the button’s action, this message should be sent from the view controller’s loadView method (if your controller was created in Xcode) or in its viewDidLoad method (if you created the controller in Interface Builder).
Listing 14.5 shows what the viewDidLoad method of your view controller looks like when applied to a button called myButton.
Listing 14.5. Adding an action to a control
- (void)viewDidLoad {

    [myButton addTarget:self action:@selector(resetPage:)
        forControlEvents:UIControlEventTouchUpInside];
    [super viewDidLoad];
}
This real-life example of addTarget:action:forControlEvents: looks much like the sample we showed in the previous section. You’re sending a message to your button that tells it to send the view controller a resetPage: message when a user takes his or her finger off the screen while touching the button.
That single line of code is all that’s required; from there on out, your button will connect to your resetPage: method whenever it’s pushed (and released).
14.5.2. Using an IBAction
The other way that you can link up actions to methods is to do everything inside of Interface Builder. This is the preferred choice if you’ve already created your object in Interface Builder (as we’ve suggested) and you’re not planning to change its behavior in runtime.
When you’re using this procedure, you won’t need to make your button into an IBOutlet. It’ll be effectively invisible from Xcode, which is fine, because all you care about is what happens when the button is pushed. You also won’t use the somewhat complex addTarget:action:forControlEvents: method that we just ran through; instead, you’ll connect things up via intuitive Interface Builder means.
For the purposes of this example, you should start with a clean slate: with a button freshly crafted inside Interface Builder and no connections yet built.
To link an object in Interface Builder to an action in Xcode, you must declare the method you’re using as having a return of IBAction. This means adding the following declaration to the header file of your view controller:
- (IBAction)resetPage:(id)sender;
The implementation of the method should share the same return.
Afterward you can go into Interface Builder and create a connection, as shown in figure 14.7.
Figure 14.7. With an IBAction, there’s no code, just a link.

As shown, when you’re connecting a control, Interface Builder gives you access to the whole palette of possible control events. You select the one (or ones) that you want to connect up to IBActions, and then you drag over to the top-level object containing your IBAction. In this case, that’s once again the file’s owner object, which represents your view controller. As usual, a menu will pop up, this time showing you possible IBActions to which you could link your control event.
To our eyes, the results are almost magical. With that single graphical link, you’ve replaced the addTarget:action:forControlEvents: call and in fact any code of any type. The button now links to the targeted action “automagically.”
What we’ve described so far covers the broad strokes of actions; everything else lies in the details. If we spent less time on actions than events, it’s not because actions are less important than events, but because they’re a lot simpler.
From here on, your challenge in using controls will simply be in figuring out how individual controls work. See appendix A for an overview of classes and the Apple Class References for specifics. However, there are a few controls that we’d like to give more attention to because they vary a bit from the norm.
14.6. Other action functionality
In this section we’ll look at two controls that report back different signals than the simple button-up or button-down control events. The first is the UITextField, the prime control for entering text, and the second is the relatively simple (but unique) UISlider. In the process we’ll also explore the other text-based entry formats, since they share some unique issues with UITextField.
14.6.1. The UITextField
There are four ways to display pure text in the SDK: the UILabel, the UISearchBar, the UITextView, and the UITextField. Each has a slightly different purpose. The UILabel and the UISearchBar are intended for short snippets of text; the UITextView is intended for multiple lines. Each of those text objects except the UILabel is editable, but only the UITextField is a UIControl subclass, with its own control events already defined.
If the UITextField sounds familiar, that’s because you used it in your even-treporter example. If you go back and look at the screenshots, you’ll see that the begin and end buttons were displayed in ovals that looked a lot like input boxes. As we mentioned at the time, we liked the way they looked, but they also gave us a good excuse to familiarize you with the object without getting into its details.
Usually, a UITextField would accept user input. It’s intended to be used mainly for accepting short user input. The trickiest thing about using a UITextField is getting it to relinquish control of your iPhone after you call up a keyboard. Listing 14.6 shows the two steps needed to resolve this problem. We’re assuming that you’re working with a myText UITextField object created inside Interface Builder and instantiated inside a view controller.
Listing 14.6. A few commands required to get a UITextField working

Your setup of an Interface Builder object begins, pretty typically, inside its controller’s viewDidLoad method. Here you turn the text field’s keyboard’s Return key into a bright blue “Done” key ![]() , to make it clear that’s how you get out. You accomplish this by using part of the UITextInputTraits protocol, which defines a couple of common features for objects that use keyboards.
, to make it clear that’s how you get out. You accomplish this by using part of the UITextInputTraits protocol, which defines a couple of common features for objects that use keyboards.
To do anything else, you need to declare a delegate for the UITextField that will follow the UITextFieldDelegate protocol. This can be done either by setting the text field’s delegate property in Xcode or by drawing a delegate link in Interface Builder. (This sample code presumes you’ve taken the easier
solution of doing so in Interface Builder.) Once you’ve done that, you can modify the textFieldShouldReturn: delegate method. We’re assuming that the view controller has been set as the delegate, which would be typical, and which
allows you to do this work ![]() in the same view controller class file.
in the same view controller class file.
Finally, you just enter two standard lines of code into this delegate method. They tell the text field to let go of first-responder
status (which, as we’ve previously noted, is what’s necessary to make a keyboard go away) and return a YES Boolean ![]() .
.
With this code in place, a user will actually be able to get in and out of a UIText-Field. To use the text field afterward you just need to monitor the text field’s special control events (especially UIControlEventEditingDidEnd) and also look at its text property.
In a moment we’re going to provide a sample of how that works, but first let’s examine a few other text objects that aren’t controls but that you might use to accept text entry.
Uilabel
The UILabel is not user-editable.
Uisearchbar
The UISearchBar looks an awful lot like a UITextField with some nuances, such as a button to clear the field and a bookmark button. Despite the similarities in style, the UISearchBar is not a UIControl object, but instead follows an entirely different methodology.
To use a UISearchBar, set its delegate to be the object of your choice, likely your view controller. Then respond to the half-dozen messages that are described in UISearchBarDelegate. The most important of these is likely the searchBarSearchButtonClicked: method. Be sure to include resignFirstResponder in order to clear the keyboard, and then you can take actions based on the results. There’s an example of a UISearchBar in chapter 16, section 16.5.3.
Uitextview
A UITextView works like a UITextField, except that it allows users to enter many lines of text. The biggest gotcha here is that you can’t use the Return key as your Done button, because users will likely want to hit returns in their text. Instead, you must have a Done button somewhere near the top of your screen, where it can be seen when the keyboard is up. When that button is clicked, you can tell the text view to resignFirst-Responder. Beyond that, you must set the UITextView’s delegate property; then you can watch for delegate messages, most importantly textViewDidEndEditing:. There’s an example of a text view in usage in chapter 16, section 16.3.4.
With our quick digression into this variety of text objects out of the way, we can now return to the other UIControl object that we wanted to discuss: UISlider.
14.6.2. The UISlider
The slider is a simple object, but we’ve singled it out because it’s the one other class that has its own control event, UIControlEventValueChanged. If you target this event, you’ll find that it gets called whenever the slider moves, but the control event won’t tell you what the new value is. To get that information, your action method must query the slider’s properties.
There are three properties of particular note: value shows a slider’s current value, minimumValue shows the bottom of its scale, and maximumValue shows the top of its scale. You can use the value without modification if you’ve set your slider to return a reasonable number (as described in the class reference), or if you prefer you can use all three properties together to determine the percentage that the slider is moved over—which is exactly what you’re going to do in one final control example.
14.6.3. A TextField/Slider mashup
Since we’ve got two UIControl objects that we want to examine more closely, it makes sense to quickly mash up an example that takes advantage of both of them. You’ll do this in the View-Based RGB Application, which sets the background color of a view based on the word you type into a UITextField and the selected position of a UISlider.
As usual, you’ll create all of these objects in Interface Builder. Then you’ll need to go hogwild linking objects to your view controller. In all you should create five links: an outlet each for your text field and slider; an action link for the important text field and the slider events; and a delegate link for the text field. Figure 14.8 shows what the view controller’s Connections tab looks like after these have all been done.
Figure 14.8. A heavily connected view controller will be a pretty normal sight as you gain experience in creating objects in Interface Builder.

As shown, the actions from both of the controls link into a single method, called changeColor:. Whenever either control is changed, this method adjusts the color of the screen accordingly. Listing 14.7 shows how.
Listing 14.7. Accessing a text field and a slider

The hardest part of working with a UITextField is setting it up, which you did in listing 14.6. Now that you’ve got input coming back, all you need to do is access the text property and do with it as you will ![]() .
.
Meanwhile, by working with your three slider values you’re able to easily generate a value from 0 to 1 ![]() . Putting that together with the color you generated from your text field input results in a background color that you can
change in two ways. Figure 14.9 takes a final look at this new program.
. Putting that together with the color you generated from your text field input results in a background color that you can
change in two ways. Figure 14.9 takes a final look at this new program.
Figure 14.9. A text field and a slider conspire to set the color of the iPhone’s background.

Would this be better to do with a UISegmentedControl and a UISlider? Probably. But as is, it also offered a quick example of how a text field works. Furthermore, it showed how you can combine action management by letting multiple controls point to a single method, a technique that will be useful in more complex programs.
As usual, there’s more information on both of these controls in the Apple class references, including lots of methods and properties that we didn’t talk about.
14.6.4. Actions made easy
Throughout the latter half of this chapter we’ve seen controls that were tied to the fully fledged target-action mechanism. In the next chapter, that’s going to change a bit when we see the same idea in a somewhat simplified form.
Sometimes buttons or other controls are built into other classes of objects (such as the button that can be built into the navigation bar). These controls will have special methods that allow them to automatically create a target-action pair. As a result, you don’t have to go through the nuisance of calling the addTarget:action:forControl-Events: method separately.
We’ll point this technique out when we encounter it as part of the navigation controller.
14.6.5. Actions in use
There are numerous control objects that we’ve opted not to cover here, mainly because they use the same general principles as those we’ve already talked about. Nonetheless, they’ll remain an important factor throughout the rest of this book.
In particular, controls represent one of the main ways that users can offer input to your programs, and we’ll discuss them when we talk about data in chapter 16. We’ll also be offering more complex programs that use a variety of controls from chapter 16 on. Through those examples, the majority of the UI controls will receive some coverage in this book.
14.7. Introducing notifications
As we mentioned in chapter 10, there’s one other way that a program can learn about events: through notifications. When directly manipulating events or actions, as we have throughout this chapter, individual objects receive events because the events occurred in their view, because the events occurred in a subview, or because the events occurred in a view that has delegated to them.
Notifications step outside this paradigm. Now, an object registers to receive notice when certain events occur. These are often events that lie beyond the standard view hierarchy, such as information when a network connection closes or when the iPhone’s orientation changes. Notably, these notifications are also broadcast messages: many different objects can be notified when the event occurs.
All notifications occur through the NSNotificationCenter. You must create a copy of this shared object to use it:
[NSNotificationCenter defaultCenter]
Afterward, you may use the addObserver:selector:name:object: method to request a certain notification. The Observer: is the object that will receive the notification method (usually, self), the selector: is the method that will be called in the observer, the name: is the name of the notification (which will be in the class reference), and the object: can be used if you want to restrict which objects you receive notification from (but it is usually set to nil).
For example, to receive the UIDeviceOrientationDidChangeNotification notification that we’re going to talk about in chapter 17, you might use the following code:
[[NSNotificationCenter defaultCenter] addObserver:self
 selector:@selector(deviceDidRotate:)
 name:@"UIDeviceOrientationDidChangeNotification" object:nil];
Overall, notification programming tends to have four steps. First, you learn that there’s a notification by reading the appropriate class reference (UIDevice in this case). Second, you may need to explicitly turn on the notification (as is indeed the case for UIDeviceOrientationDidChangeNotification). Third, you write a method that will respond to the notification (in this case, deviceDidRotate:). Fourth, you connect up the notification to the method with the NSNotificationCenter.
There is considerably more power in the notification system. Not only can you set up multiple observers, but you can also post your own notifications. If you want more information on these advanced features, you should read the class references on NSNotificationCenter, NSNotification, and NSNotificationQueue.
14.8. Summary
The iPhone OS includes an extensive set of frameworks that takes care of lots of the details for you, making your iPhone programming as painless as possible. We’ve seen this to date in everything we’ve done, as sophisticated objects appear on our screens with almost no work.
The same applies to the iPhone’s event system. There is a complex underlying methodology. It centers on a responder chain and granular reporting of touches and allows us to follow precise user gestures. You may occasionally have to manipulate events via these more complex means.
However, the iPhone also supports a higher-level action system that lets your program respond to specific actions applied to controls rather than more freeform gestures. We’ve explained how to use both, but it’s the target-action mechanism that you’re more likely to rely on when programming.
With actions and events now out of the way, we’re ready to look at the final fundamental building block of the SDK. We’ve already encountered views, controls, and basic view controllers, but there’s another category of object that’s critical for most SDK programming: the advanced view controller that allows for navigation over multiple screens of content.
That’s going to be the basis of our next chapter.