
In this recipe, we are going to take a look at how we can override the form submission process. Sometimes you may want to enable the user to POST a form without refreshing the whole page. I usually do it because I either want to preserve some other piece of information on the page, or because I want to preserve the page's state within the browser. Examples I can think of might be scroll position, or the form exists within a modal created with JavaScript. You might be tempted to achieve a similar result with an IFRAME, hopefully this recipe will show you that a ASP.NET MVC/jQuery solution is a lot more elegant.
In addition to jQuery 1.4.1, we're going to be using one of the official jQuery plug-ins called jQuery Form. It's in the source code, but it's also available for the following URL— http://jquery.malsup.com/form/.
- As before, we'll start off with any one of the recipes that we've already created in this chapter. If you've not already done so, create a second action in the home controller called
Article. The action should look like the following example. The second parameter (btnSubmit) is entirely optional; this recipe does not use it.[HttpPost] public ActionResult Article(Article article, string btnSubmit) { return View(article); } - We're going to alter that second action in a moment, but first we need to create a new action/view. Upon a successful submission, we'll redirect the user to a page called
ArticleSaved. So, create a new action in theHomeControllercalledArticleSaved.Controllers/HomeController.cs: public ActionResult ArticleSaved() { return View(); } - Then create a new view (right-click and select Add View) and add a message saying something along the lines of The article was successfully saved!.
- With this message view in place, you can now go back to the
Articleaction that accepts posts and redirects that action to render the newArticleSavedaction.[HttpPost] public ActionResult Article(Article article, string btnSubmit) { return RedirectToAction("ArticleSaved"); }
- With all this in place, you can now run the application. Browsing to Home/Article should render your form. When you click on Submit, the form should post its data to your
Articleaction and then redirect to theArticleSavedview.Note
We've just implemented a design pattern called Post/Redirect/Get or PRG. Rather than returning the success message in the initial response to the POST, we redirect to another action first. This technique was introduced to prevent the accidental resubmission of HTML forms. If we didn't redirect first and the user tried to refresh the page, the browser will attempt to resubmit the form. Bad, if you’ve just bought a car! http://en.wikipedia.org/wiki/Post/Redirect/Get.
- With this working normally without JavaScript, we can now start to wire in some jQuery to make this form more user-friendly. Start by opening up the
Site.Masterin theViews/Shareddirectory. Make some whitespace after thecsslink. Then drag thejquery-1.4.1.js&jquery.form.jsscripts into the head. You may already have a reference to jQuery.Views/Shared/Site.Master: <head runat="server"> <title><asp:ContentPlaceHolder ID="TitleContent" runat="server"/> </title> <link href="/Content/Site.css" rel="stylesheet" type="text/css"/> <script src="/Scripts/jquery-1.4.1.js" type="text/javascript"></script> <script src="/Scripts/jquery.form.js" type="text/javascript"></script> </head>
- Then, towards the top of your article page add a script block to hold your jQuery. This jQuery script will override the form submission, serialize the form data, and then
POSTthe data to the action of the form.Views/Home/Article.aspx: <script language="javascript" type="text/javascript"> $(function () { $("form").ajaxForm({ target: "#result" }); }); </script> - Next we need to add a
divtag to capture the result of our form submission. This tag can go just above theformtag.Views/Home/Article.aspx: <div id="result"></div> - Feel free to run the
Articlepage as it currently sits. It should technically work as currently configured. However, the result will be a bit unexpected. The response for the post is currently fed into thedivtag that we just added. The problem is that the current response is an entire page! Let's remedy this by allowing our controller to render a different result depending on the type of request. - JavaScript libraries such as jQuery and MS Ajax add a header to server requests; the header identifies the request as an Ajax request. ASP.NET MVC provides a method called
IsAjaxRequestthat checks for this header in incoming requests. We'll useIsAjaxRequestto decide which response to send back to the client.Controllers/HomeControllers.cs: [HttpPost] public ActionResult Article(Article article) { if (Request.IsAjaxRequest()) return Content("Article Saved!"); return RedirectToAction("ArticleSaved"); }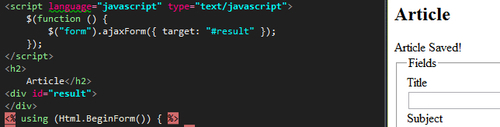
- That last step isn't really keeping it DRY, it would be better if we could reuse the Article Saved view that we created earlier. Start by adding a new partial view called
_ArticleSaved. Then take the message that we put in theArticleSavedview, and put it into the partial view. Finally, set theArticleSavedview to render the_ArticleSavedpartial view. At the end, you should have a view calledArticleSavedthat references a partial view called_ArticleSaved.Views/Home/ArticleSaved.aspx: <% Html.RenderPartial("_ArticleSaved"); %>
- Add a new action to the Home controller called
_ArticleSaved—this action will return our_ArticleSavedpartial.public ActionResult _ArticleSaved () { return PartialView(); } - Now update the Home controller to redirect to the
_ArticleSavedaction whenIsAjaxRequest()returnstrue.Controllers/HomeController.cs: if (Request.IsAjaxRequest()) return RedirectToAction("_articleSaved"); return RedirectToAction("ArticleSaved"); - Now run the application again. Disabling JavaScript should render the
ArticleSavedview after submitting the form. But with JavaScript enabled, you should just see the message rendered at the top of the form itself after it is submitted.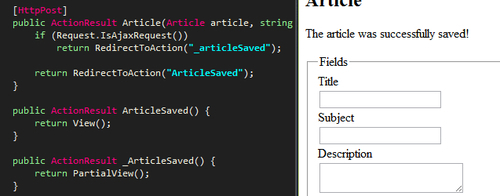
In this recipe, we have created a form that posts to an action as expected. When the form is submitted, it is then redirected to a successful submission page. With the basic form submission working as expected, we then turn our attention to wiring in some JavaScript to handle posting our form behind the scenes in an Ajax fashion. We then make our controller intelligent enough to respond to the form submission differently, based on whether we used JavaScript or not. This is called progressive enhancement or graceful degradation, depending on whether you are a glass half-full or half-empty sort of developer.