
In the previous chapter, we saw how you can use HTML helpers for different input types. Additionally, ASP.NET MVC provides intuitive helpers such as EditiorForModel, which try to figure out which input types you actually want to use. Helpers such as EditorForModel make these assumptions primarily based on data type, but what if there were a data type that was unaccounted for? In this recipe, we will take a look at how we can override these decisions to centralize the formatting of common types. We will do this by using the built-in templated helpers. Templated helpers allow you to specify how you want to display common types, such as dates and numbers, as well as more complex models.
In this recipe, we will take a look at the DateTime type. Instead of asking a person to simply enter a date into a textbox, we will instead provide them with a jQuery date picker. Because we will do this with templated helpers, all dates that are displayed on an input form will use the same date picker.
For this recipe, I'm using jQuery 1.4.1 and jQuery UI 1.8.5, both of which are provided in the dependencies folder. The latest versions of each library can be downloaded from jquery.com and jqueryui.com respectively.
- Create a new MVC application.
- Create a new class called
Personto hold our test type. We will give thePersonclass aDateTimeproperty calledBirthDate.Models/TestClass.cs: public class Person { public DateTime BirthDate { get; set; } } - We need to create a view to display our
BirthDateproperty. To do this, open up theHomeControllerand add a new action calledEdit. Configure this action to return an instance of our newPerson.Controllers/HomeController.cs:
public ActionResult Edit() { return View(new Person()); } - Now build your application (otherwise the
Personwon't show in the list when we try to create a new strongly typed view!). Then right-click anywhere in the newactionmethod and add a new strongly typed view based on thePerson. Specify that the view content will use theEdittemplate. - Hit F5 and navigate to the Edit action (Home/Edit). You should see a simple textbox that you can type a date into. Close that window and we will start building a new
EditTemplate. - First, change the
TextBoxForto anEditorFormethod call in the Edit view.
- Then add an
EditorTemplatesfolder to theViews/Sharedfolder (Views/Shared/EditorTemplates). - Now create a new partial view called
DateTime.ascxin theEditorTemplatesdirectory.
- In the
DateTimeview we are going to output a textbox. We will also format any date that is passed in to us or provide an empty value in the case that a date is not passed in. Also, we will append a class value to the input box that is created, so that we can access it later.<%: Html.TextBoxFor(model => Model, new { @class = "date" } ) %> - Now we need to write a bit of jQuery to attach a date picker to our textbox. Start by opening up the
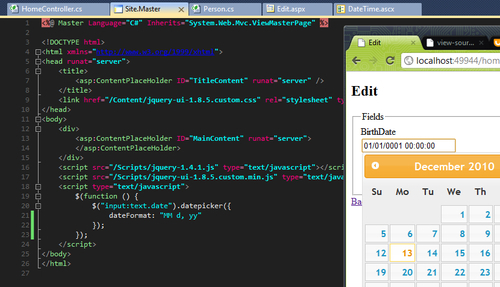
Site.Masterfile in theViews/Shareddirectory. Then drag thejquery-1.4.1.jsfile from yourScriptsdirectory into the head of your master file. Also drag in thejquery-ui{version}.jsand theui.all.cssfile into the head to support a date picker popup (this is included in the source code for this recipe or you can get it on the jQuery site). - With jQuery included in the master page, we can now add a bit of script underneath the external references. This script will locate all the textboxes that have a class of date and attach a date picker.
Views/Shared/Site.Master:
<script type="text/javascript"> $(function () { $("input:text.date").datepicker({ dateFormat: "MM d, yy" }); }); </script> - Now build your project and navigate to Home/Edit. Clicking into the date field should show the jQuery date picker!
The EditorFor method will first look in the directory of the view that is executing for an EditorTemplates directory for the type it is trying to display. If it doesn't find any templates there, it will move up to the shared directory. If there are no templates in the shared directory, it will move on and display the typed-in question with a default template.
You can test this by renaming the EditorTemplates directory that we created! If you rename the directory to _EditorTemplates, you will see that the DateTime is rendered with a simple textbox as usual.