
In this recipe, we will see how we can create self-contained easily distributable widgets called portable areas. A portable area is very similar to a regular MVC area in an external project with a few added bits to make it portable. Thanks to the makers of MvcContrib, a portable area is very easy to create and considerably more portable, or distributable, than a regular area. A regular area project is just a collection of files contained in an external project. A portable area's project outputs a single assembly that can be consumed by any other application—ASP.NET or ASP.NET MVC. A portable area therefore allows you to create widgets, which can easily be shared across many websites reducing code duplication and allowing you to publish updates on a per widget basis.
- We'll need two applications for this recipe: one application will act as the portable area, which we will name the
CommentsWidget, and the other application will act as the host for our comments widget. Both will work from the empty ASP.NET MVC 2 project template; for the host I've used a copy of the last recipe. - Now delete the
Global.asaxfile from theCommentsWidgetproject.
- Next, we need to add a reference to
MvcContriband NBuilder to ourWidgetproject.MvcContribhas all the bits to make our portable area work. NBuilder will help us to mock up some data, so that we can have a list of comments. Both of these can be found in the dependencies folder. - Add a
CommentsRegistration.csfile to the root of ourCommentsWidgetproject to take care of registering our portable areas routes. This class will need to inherit fromPortableAreaRegistrationin theMvcContrib.PorableAreasnamespace. Inheriting fromPortableAreaRegistrationrequires that we create a method,RegisterArea, and a property,AreaName. RegisterAreawill hold the routes we want to configure for this widget.AreaNametells the framework what our area is called. Also, and probably the most important, it is the area of code that is highlighted. The call toRegisterAreaEmbeddedResourcestells MVC how to find our views and resources (which we will eventually embed into our portable area).CommentsRegistration.cs:
public class CommentsRegistration : PortableAreaRegistration { public override void RegisterArea( AreaRegistrationContext context, IApplicationBus bus) { context.MapRoute("commentsRoute", "CommentsWidget/{controller}/{action}/{id}", new { controller = "links", action = "index", id = UrlParameter.Optional }); this.RegisterAreaEmbeddedResources(); } public override string AreaName { get { return "CommentsWidget"; } } } - In order for us to provide any functionality, we will need to create some objects to work with. A comments widget would naturally need a
Commentclass to render. Let's create that in theCommentsWidgetproject.public class Comment { public string Name { get; set; } public string Email { get; set; } public string Subject { get; set; } public string Body { get; set; } } - Next, we will create a new
CommentsControllerin ourCommentsWidgetproject. This controller will have one action calledShowComments. TheShowCommentsaction will work off of anHTTP GETrequest and shall take in an ID attribute (to simulate getting comments for a blog post or something similar).Controllers/CommentsController.cs:
public class CommentsController : Controller { public ActionResult GetComments(int id) { List<Comment> comments = Builder<Comment>.CreateListOfSize(5).Build().ToList(); return View(comments); } } - With our new action created, we are ready to create a new view that corresponds to it. Do this by right-clicking on the action and selecting Add a new view. Make this a partial view that is strongly typed to our
Commentclass. Also, set this view to be a details view. When the new view comes up, edit the type of class we inherit from and change it toViewUserControl<List<CommentsWidget.Models.Comment>>. - Then we need to wrap the HTML that was generated for us with a
foreachiteration block, so that we can show all of the items that were passed to the view.Views/Comments/GetComments.ascx:
<%@ Control Language="C#" Inherits="System.Web.Mvc.ViewUserControl< List<CommentsWidget.Models.Comment>>" %> <%@ Import Namespace="CommentsWidget.Models" %> <fieldset> <legend>Comments</legend> <% foreach (Comment comment in Model) { %> <div class="display-label">Name</div> <div class="display-field"><%: comment.Name%></div> <div class="display-label">Email</div> <div class="display-field"><%: comment.Email%></div> <div class="display-label">Subject</div> <div class="display-field"><%: comment.Subject%></div> <div class="display-label">Body</div> <div class="display-field"><%: comment.Body%></div> <hr /> <% } %> </fieldset> - Now we can add an
Extensionsclass to ourCommentsWidgetproject. This class will be responsible for extending the HTML class that we often use in an MVC application. In there, we will create aGetCommentsmethod that takes in apostId. This will allow our consuming application to work very easily with the functionality exposed by theCommentsWidget.Extensions.cs:
public static class Extensions
{
public static void GetComments(this HtmlHelper htmlHelper, int postId)
{
htmlHelper.RenderAction("GetComments", "Comments", new { area = "CommentsWidget", id = postId });
}
}
Note
The previous method relies on an extension method called
RenderAction, which can be found in theSystem.Web.Mvc.Htmlnamespace. I, for one, have let Visual Studio make me very lazy. I let the IDE work which namespaces are needed (and which aren't), VS even orders them for me. To my knowledge though, VS still can't resolve the namespaces of extension methods. I'm starting to sound like a man whose batteries in his TV remote, have just run out. I'm sure there is a solution in the works, if not already completed. - The last, and probably most important piece to our
CommentsWidgetproject, is that we need to alter the project's configuration in theCommentsWidget.csprojfile. Do this by opening the file in a text editor such as Programmer's Notepad or just plain old Notepad. Then scroll down to the Build section and add the following snippet to insure that all of our views and other resources are compiled into the widget assembly. This step allows us to not have to distribute a bunch of files to the consuming application but instead allows us to just distribute one DLL.<Target Name="BeforeBuild"> <ItemGroup> <EmbeddedResource Include="***.aspx; ***.ascx; ***.gif; ***.jpg; ***.png; ***.css; ***.js" /> </ItemGroup> </Target>
- With all of this work completed in the
CommentsWidgetproject, we are now ready to turn our attention to the host project. In the host project, we need to add a reference toMvcContrib(in the dependencies folder) and we need to add a reference to ourCommentsWidgetproject (though if you don't, that is ok too, just make sure that theCommentsWidget dllgets into thebinfolder of your host application). - Now we need to tell our host application how to get to our
CommentsWidget. We do this in theGlobal.asaxfile by calling the into theMvcContriblibrary. You'll need to add a reference to theMvcContrib.UI.InputBuildernamespace, in order to access a method calledBootStrap(). BootStrapworks a bit likeRegisterAllAreas, gathering up our portable areas.protected void Application_Start() { AreaRegistration.RegisterAllAreas(); RegisterRoutes(RouteTable.Routes); InputBuilder.BootStrap(); } - Then we can open up any view (I've created a home/index controller/view combo) in the application and type Html.GetComments(3); we should see a list of ten randomly generated comments displayed on the page.
Views/Home/Index.aspx:
<asp:Content ID="Content2" ContentPlaceHolderID="MainContent" runat="server"> ... <p> <% Html.GetComments(3);%> </p> </asp:Content> - We need to do two final things in the host application for all of this to work.
- In order for the
GetCommentsextension method to work as described, we will need to add a namespace reference to theWeb.configfile.<add namespace="System.Web.Routing" /> <add namespace="CommentsWidget.Helpers" /> </namespaces> </pages> - Copy the
Web.configfrom yourViewsfolder to a new folder calledAreas.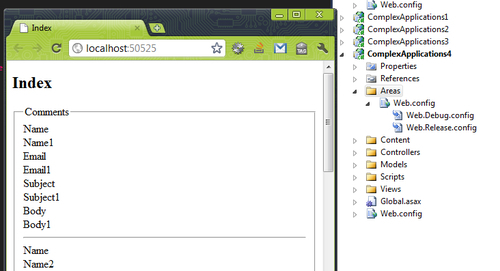
- In order for the
- Now build and run your application and you should see a list of comments displayed on the home page.
The portable area builds on the concept of the ASP.NET MVC external project areas. A couple of things are different between a portable area and a regular area. One is that a portable area embeds its resources into an assembly rather than leaving them scattered about on the disk, meaning that a portable area only needs to be referenced as a DLL. And lastly, regular areas interact with our MVC applications in the normal way, whereas portable areas can use the MvcContrib service bus concepts (which we didn't directly cover in this recipe).
The next important bit is that we have to be able to register our areas routes. Because our portable area project may or may not be directly referenced by a host application, it is important that we expose a way for the routes in our portable area to be consumed and added to the routing table. Regular areas are referenced and brought into the bin directory of a host application. The assemblies of other areas are automatically scanned and configured into the host application with very little fuss. In order for us to achieve the same magic, we have to use some MvcContrib classes and calls to get this done for us.
Lastly, though not specific to the concept of the portable area, is the service bus that comes with MvcContrib. A suggested practice to use with portable areas is to communicate with the host application using messages. This is sort of a publish-subscribe type pattern where the portable area puts a message on the bus when it does something, such as registering the portable area, creating a comment, sending an email, and so on. Then the host application can use a message handler to subscribe to specific messages that it cares about. In this way, the host application is loosely coupled to the portable area and vice versa.
The topic of portable areas hasn't gotten too much coverage, as cool as they are. The best way to see some different examples of these is to go download the MvcContrib examples here: http://mvccontrib.codeplex.com/.
Also, the ability to work in a regular MVC web application to build portable areas instead of working in a class library (you don't want to know what a pain it is to work without IntelliSense!) is thanks to Steve Michelotti. You can read about his portable areas' tinkering at geekswithblogs.net/michelotti. Things of interest are how to interact with compiled resources, such as CSS and images, and also how to go about using a master page inside your portable area!