
This recipe is all about keeping track of a user's information while on your site. Generally, once you have identified a user on your site, there will be bits of information that you will need with almost every request that the user makes. This type of information is usually best stored in a session (either on the server they are on, or in some external state server). In this recipe, we will take a look at how we can create a wrapper for the session and get strongly typed objects out of it easily. This will allow us to interact with the objects stored in our session in a very easy fashion.
- Start by creating a new default ASP.NET MVC 2 application.
- We will create an
Accountclass (in theModelsfolder) that will keep track of things such as the account's ID, e-mail address, username, and so on.Models/Account.cs:
public class Account { public Guid AccountId { get; set; } public string Username { get; set; } public string Email { get; set; } public List<string> Roles { get; set; } } - Next, we will create an
AccountServiceto get some mock data out of. This class will have aGetAccountByUsernameand return anAccountfor us to work with. For the sake of simplicity, I've put this class in theModelsfolder, as well.Models/AccountService.cs:
public class AccountService { public Account GetAccountByUsername(string username) { Account result = new Account(); result.AccountId = Guid.NewGuid(); result.Email = username + "@hotmail.com"; result.Username = username; result.Roles = new List<string>() { "Administrator", "Publisher", "Dude"}; return result; } } - Now we are ready to create our
SessionWrapperclass, which we will use to put data into and get out of ourSessionfor a given user. This class will have several private methods, such asGetStringFromSession, GetIntFromSession, GetObjectFromSession, andSetItemInSession, for accessing the session. But most importantly, it will have strongly typed properties and methods for use by our application, so that we never have to worry about casting data out of our session outside of this one class. And we will also manage session cleanliness in our session by removing keys when a property is set to null.public static class SessionWrapper { private const string c_account = "Account"; public static Account Account { get { return GetObjectFromSession(c_account) as Account; } set { if (value == null) ClearItemFromSession(c_account); else SetItemInSession(value, c_account); } } private static string GetStringFromSession(string key) { return GetObjectFromSession(key).ToString(); } private static int GetIntFromSession(string key) { return (int)GetObjectFromSession(key); } private static object GetObjectFromSession(string key) { return HttpContext.Current.Session[key]; } private static void SetItemInSession(object item, string key) { HttpContext.Current.Session.Add(key, item); } private static void ClearItemFromSession(string key) { HttpContext.Current.Session.Remove(key); } } - Having come this far, we are now ready to wire things up. We will do this by going into the
ModelsAccountModels.csfile, where we will find theSignInandSignOutmethods on theFormsAuthenicationServiceclass. When a user signs in, we want to get their account from the database (mocked up in this case) and set the user'sAccountinto the session for future use. Also, we want to clean up after ourselves when a user logs out.Models/AccountModels.cs:
public void SignIn(string userName, bool createPersistentCookie) { if (String.IsNullOrEmpty(userName)) throw new ArgumentException("Value cannot be null or empty.", "userName"); FormsAuthentication.SetAuthCookie(userName, createPersistentCookie); SessionWrapper.Account = new AccountService() .GetAccountByUsername(userName); } public void SignOut() { FormsAuthentication.SignOut(); SessionWrapper.Account = null; } - With our
Accountinstance being spun up for us and stuffed into the user's session when he/she logs in, we are now ready to interact with the session in other areas of our application. Let's open up theSite.Masterfile and add some recognition of the user to our display. Right under theLogOnUserControlrendering, we will place our own little welcome message.Views/Shared/Site.Master:
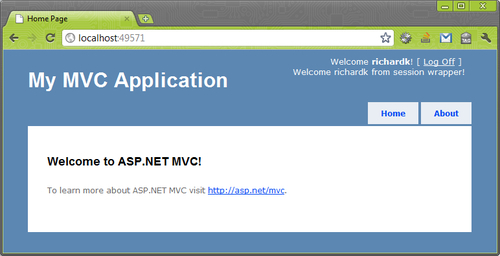
<div id="logindisplay"> <% Html.RenderPartial("LogOnUserControl"); %><br /> <%= StateExamples.Models.SessionWrapper.Account != null ? "Welcome " + StateExamples.Models.SessionWrapper.Account.Username + " from session wrapper!" : "" %> </div> - Now you can run the application. Prior to creating a new account and logging in, notice that there is no welcome message. Now create an account and you should see a welcome message.
This recipe is more of an example on how to create a simple wrapper for your session than anything else. Wrapping any framework dependency is important, as you may want to swap out the framework's way of handling sessions at some point in time for another technology, storage mechanism, or for testing purposes. With just the basic wrapper in place, it is pretty easy to plug in inversion of control (IoC) to allow for quick swapping of implementation on the fly. To best enable IoC though, you will probably want to inject your SessionWrapper class into your controllers, rather than accessing the wrapper directly! The method discussed here is perfect for a non-IoC project.