Chapter 8
Image retouching

Photoshop has become so successful that it’s very name is synonymous with digital image retouching. Photoshop retouching tools such as the humble clone stamp have been around since the very early versions of the program and have been used and abused in equal measure. The new retouching tools that have been added since then mean that you can now transform images almost any way you want. As my colleague Jeff Schewe likes to say: ‘You know why Photoshop is so successful? Because reality sucks!’ Well, that’s Jeff’s viewpoint, but then he does come from a background in advertising photography where heavy retouching is par for the course. The techniques described in this chapter will teach you some of the basic techniques, such as how to remove dust spots and repair sections of an image. We’ll then go on to explore some of the more advanced techniques that can be used to clean up and enhance your photographs.
Basic cloning methods
The clone stamp tool and healing brush are the most useful tools to use at the beginning of any retouching session. You can use these to carry out most basic retouching tasks before you proceed to carry out the more advanced retouching steps.
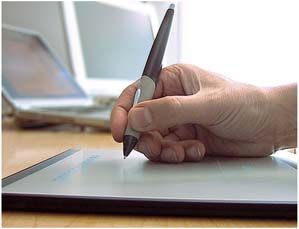
Figure 8.1
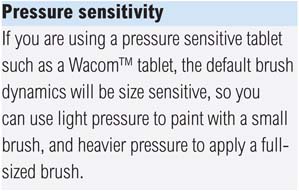
If you are carrying out any type of retouching work which relies on the use of the paint tools, a pressure sensitive graphics tablet and pen, such as the Wacom™ device shown here, is absolutely invaluable.
Clone stamp tool
To use the clone stamp tool, hold down ![]() and click to select a source point to clone from. Release the
and click to select a source point to clone from. Release the ![]() key and move the cursor over to the point that you wish to clone to, and click or drag with the mouse. If you have the tool set to aligned mode, this establishes a fixed relationship between the source and destination points. If the clone stamp is set to the non-aligned mode, the source point starts from the same location after each time you lift the pen or mouse until you
key and move the cursor over to the point that you wish to clone to, and click or drag with the mouse. If you have the tool set to aligned mode, this establishes a fixed relationship between the source and destination points. If the clone stamp is set to the non-aligned mode, the source point starts from the same location after each time you lift the pen or mouse until you ![]() -click again to establish a new source point. When working with the clone stamp or healing brush I do find it helps to use a graphics tablet (like the Wacom™ device shown in Figure 8.1), as this can help you work more quickly and efficiently.
-click again to establish a new source point. When working with the clone stamp or healing brush I do find it helps to use a graphics tablet (like the Wacom™ device shown in Figure 8.1), as this can help you work more quickly and efficiently.
Clone stamp brush settings
As with all the other painting tools, you can change the brush size, shape and opacity to suit your needs. When working with the clone stamp I mostly leave the opacity set to 100%, since cloning at less than full opacity can lead to tell-tale evidence of clone stamp retouching. However, when smoothing out skin tone shadows or blemishes, you might find it helpful to switch to an opacity of 50% or less and you can also use lower opacities when retouching areas of soft texture. Otherwise I suggest you stick to using 100% opacity. For similar reasons, you don’t want the clone stamp to have too soft an edge. For general retouching work, the clone stamp brush shape should have a slightly harder edge than you might use normally with the paint brush tools. When retouching detailed subjects such as fine textures, you might want to use an even harder edge so as to avoid creating halos. Also, if film grain is visible in a photograph, anything other than a harder edge setting will lead to soft halos, which can make the retouched area look slightly blurred or misregistered. If you need extra subtle control, lower the Flow rate; this allows you to build an effect more slowly, without the drawbacks of lowering the opacity.

1 The best way to disguise clone stamp retouching is to use a full opacity brush with a medium hard edge at 100% opacity. It is also a good idea to add a new empty layer above the Background layer, which you can do by clicking on the Add New Layer button (circled in blue). This lets you keep all the clone retouching on a separate layer, and it was for this reason I chose to have the ‘All Layers’ Sample option selected in the Options bar (circled in red) so that all visible pixels were copied to this new layer.
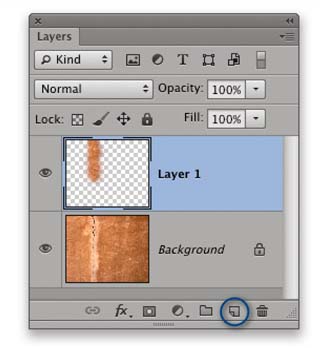
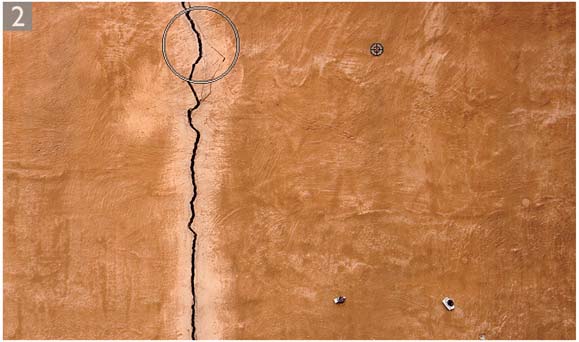
2 The Aligned box is normally checked by default in the Options bar. Here, I used the ![]() key to set the sample point on an undamaged part of the wall and was then able to click on the crack to set the destination point.
key to set the sample point on an undamaged part of the wall and was then able to click on the crack to set the destination point.

3 I then dragged to paint with the clone stamp. Photoshop retains the clone source/destination relationship for all subsequent brush strokes until a new source and destination are established. In situations like this you may find the Clone Source panel ‘Show Overlay’ option proves useful (see page 496).
Healing brush
The healing brush can be used in more or less the same way as the clone stamp tool to retouch small blemishes, although it is important to stress here that the healing brush is more than just a magic clone stamp and has its own unique characteristics. These differences need to be taken into account so that you can learn when it is best to use the healing brush and when it is more appropriate to use the clone stamp.
To use the healing brush, you again need to establish a sample point by ![]() -clicking on the portion of the image you wish to sample from. You then release the
-clicking on the portion of the image you wish to sample from. You then release the ![]() key and move the cursor over to the point where you want to clone to and click or drag with the mouse to carry out the healing brush retouching. The healing brush works by sampling the texture from the source point and blends the sampled texture with the color and luminosity of the pixels that surround the destination point. The healing brush reads the pixels within a feathered radius that is up to 10% outside the perimeter of the healing brush cursor area. By reading the pixels that are outside the cursor area at the destination point, the healing brush is (in most cases) able to calculate a smooth transition of color and luminosity within the area that is being painted (always referencing the pixels within a feathered radius that is up to 10% outside the perimeter of the healing brush cursor area). It is for these reasons that there is no need to use a soft edged brush and you will always obtain more controlled results through using the healing brush with a 100% hard edge.
key and move the cursor over to the point where you want to clone to and click or drag with the mouse to carry out the healing brush retouching. The healing brush works by sampling the texture from the source point and blends the sampled texture with the color and luminosity of the pixels that surround the destination point. The healing brush reads the pixels within a feathered radius that is up to 10% outside the perimeter of the healing brush cursor area. By reading the pixels that are outside the cursor area at the destination point, the healing brush is (in most cases) able to calculate a smooth transition of color and luminosity within the area that is being painted (always referencing the pixels within a feathered radius that is up to 10% outside the perimeter of the healing brush cursor area). It is for these reasons that there is no need to use a soft edged brush and you will always obtain more controlled results through using the healing brush with a 100% hard edge.
Once you understand the fundamental principles that lie behind the workings of the healing brush, you will come to understand why it is that the healing brush may sometimes fail to work as expected. You see, if the healing brush is applied too close to an edge where there is a sudden shift in tonal lightness, it will attempt to create a blend with the pixels immediately outside the healing brush area. So when you retouch with the healing brush you need to be mindful of this intentional behavior. However, there are things you can do to address this. For example, you can create a selection that defines the area you are about to start retouching (maybe with some minimal feathering) and constrain the healing brush work so that it is carried out inside the selection area only.

1 I selected the healing brush from the Tools panel and selected a hard edged brush from the Options bar. The brush blending mode was set to Normal, the Source button set to ‘Sampled’ and the Aligned box left unchecked.
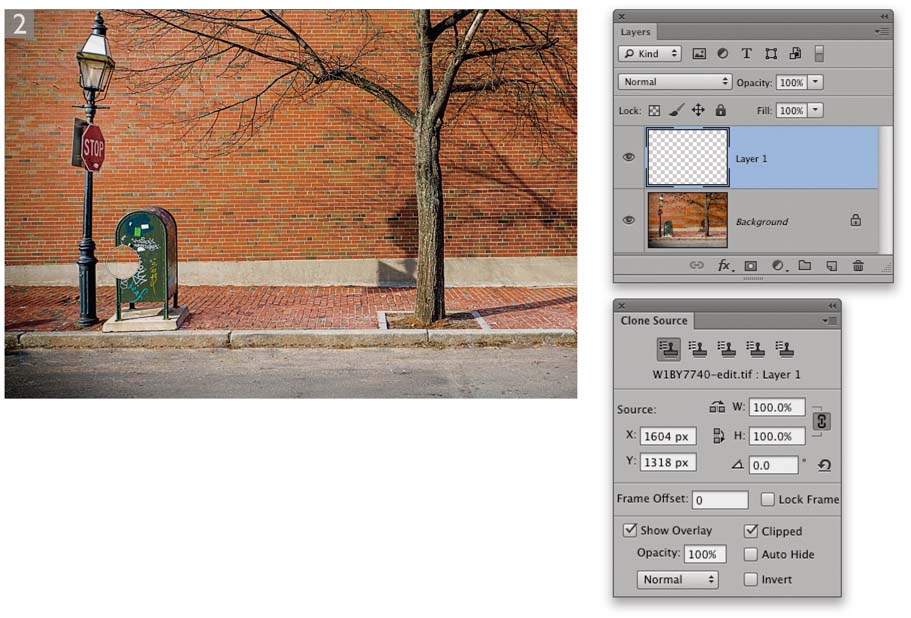
2 Before using the healing brush, I again added a new empty layer and made sure the Sample options were set to ‘All Layers’ or ‘Current & Below’. I ![]() -clicked to define the source point, which in this example was an area just to the right of the trash bin. I then released the
-clicked to define the source point, which in this example was an area just to the right of the trash bin. I then released the ![]() key, moved the cursor over to where the bin was and clicked to remove it using the healing brush. Here is an example where having the Clone Source Show Overlay visible (see page 512) ensured the bricks were carefully aligned.
key, moved the cursor over to where the bin was and clicked to remove it using the healing brush. Here is an example where having the Clone Source Show Overlay visible (see page 512) ensured the bricks were carefully aligned.

3 This shows the final image with the trash bin remove from the scene.
Choosing an appropriate alignment mode
I usually find it is more convenient to use the clone stamp tool in aligned mode (Figure 8.4) and the healing brush in non-aligned mode. This is because when you use the clone stamp you can preserve the relationship between the source and destination points, apply a few clones, then sample a new source point as you continue cloning over other parts of the photograph. You can even clone data from a separate document (as shown in Figure 8.5).
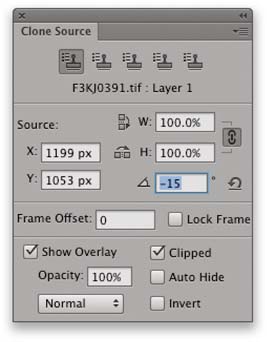
Figure 8.2
The Clone Source panel, shown here with the Show Overlay and Clipped options checked.
If you try to use the clone stamp over an area where there is a gentle change in tonal gradation, it will be almost impossible to disguise the retouching work, unless the point you are sampling from and destination point match exactly in tone and color. It is in these situations that you are usually better off using the healing brush. For most healing brush work I suggest you use the non-aligned mode (which happens to be the default setting for this tool). This allows you to choose a source point that contains the optimum texture information with which to repair a particular section of a photograph. You can then keep referencing the same source point as you work with the healing brush.
Figure 8.3
This shows how the clone stamp (or healing brush) cursor looks when using the Clone Source panel options shown in Figure 8.2, with the ‘Show Overlay’ and ‘Clipped’ options checked.
Clone Source panel and clone overlays
The Clone Source panel was mainly implemented with video editors in mind. This is because it can sometimes be desirable to store multiple clone sources when cloning in exact registration from one frame to another across several frame images in a sequence. The current version offers an improved overlay cursor view where if the ‘Show Overlay’ and ‘Clipped’ options are both checked, a preview of the clone source can be seen inside the cursor area. Earlier, on page 493, I made a reference to the Clone Source panel, saying this was just the kind of retouching task that would benefit from having an overlay inside the cursor to help guide where to click when setting the destination point for the clone stamp. Figure 8.3 shows a detail view of the clone stamp being applied using the settings shown in Figure 8.2, where the ‘Show Overlay’ and ‘Clipped’ options were both enabled. You could choose to have the ‘Show Overlay’ option switched on all of the time, but there is usually a slight time delay while the cursor updates its new position and this can at times become distracting. I therefore suggest you only enable it when you really need to.
Figure 8.4
When you have the clone stamp tool selected and the Aligned box in the tool Options bar is unchecked, the source point remains static and each application of the clone stamp makes a copy of the image data from the same original source point.


Figure 8.5
In this example you can see how I was able to sample the sky image data from one image window and copy it to another separate image using the clone stamp. I just ![]() -clicked with the clone stamp in the source (sky) image, then selected the other image window and clicked to establish a cloning relationship between the source and destination image windows.
-clicked with the clone stamp in the source (sky) image, then selected the other image window and clicked to establish a cloning relationship between the source and destination image windows.
Clone and healing sample options
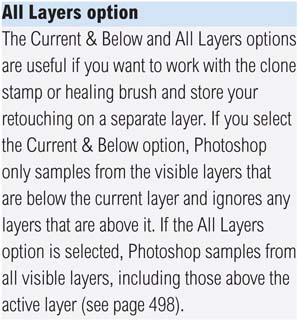
The layer sample options (Figure 8.6) allow you to choose how the pixels are sampled when you use the clone stamp or healing brush tools. ‘Current Layer’ samples the contents of the current layer only and ignores all other layers. The ‘Current & Below’ option samples the current layer and visible layers below (ignoring the layers above it), while the ‘All Layers’ option samples all visible layers in the layer stack, including those above the current layer. If the Ignore Adjustment Layers button (circled) is turned on, Photoshop ignores the effect any adjustment layers above the selected layer are having on the image (see sidebar). Meanwhile, the spot healing brush only has the ‘Sample All Layers’ option in the tool Options bar to check or uncheck.

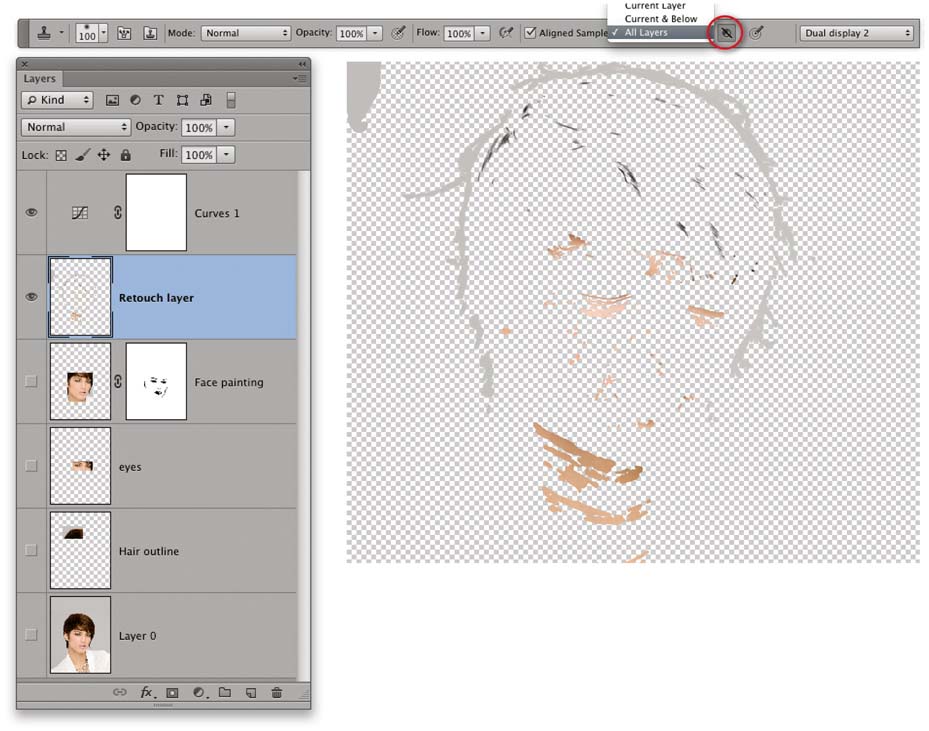
Figure 8.6
The layer sample options allow you to carry out all your clone stamp and healing brush work to an empty new layer. The advantage of this approach is that you can keep all your retouching work separate and leave the original Background layer untouched. In this example, the All Layers option allowed me to sample from layers above and below and carry out the retouching to a separate layer (which for the sake of clarity is shown here in isolation). Because the Ignore Adjustment Layers option was checked (circled above), Photoshop ignored the effect the Curves adjustment layer would have on the sampled pixels.
Better healing edges
Since the healing brush blends the cloned source data with the edges that surround the destination point, you can improve the efficiency of the healing brush by increasing the outer circumference size for the healing brush cursor. The following technique came via Russell Brown, who informs me that he was shown how to do this by an attendee at one of his seminars.
If you change the healing brush to an elliptical shape, you will tend to produce a more broken-up edge to your healing work and this can sometimes produce an improved healing blend (Figure 8.7). There are two explanations for why this works. Firstly, a narrow elliptical brush cursor has a longer perimeter. This means that more pixels are likely to be sampled when calculating the healing blend. The second thing you will notice is that when the healing brush is more elliptical, a randomness is introduced into the angle of the brush. Try changing the shape of the brush in the way I describe below and as you paint, you will see what I mean.
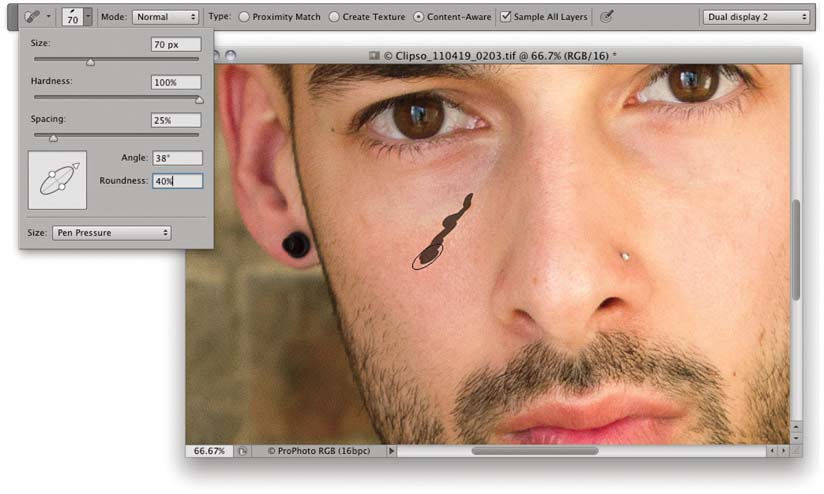
Figure 8.7
To adjust the shape and hardness of the healing brush or spot healing brush, select the healing/spot healing brush tool and mouse down on the brush options in the tool Options bar. Set the hardness to 100% and drag the elliptical handles to make the brush shape more elliptical. Notice also that if you are using a Wacom™ tablet or other pressure sensitive input device, the brush size is linked by default to the amount of pen pressure applied.
Spot healing brush
As you will have noticed, the default healing tool in Photoshop is the spot healing brush. If the spot healing brush is selected in the Tools panel and you try to use the ![]() key to establish a source point to sample from (thinking you have just selected the ordinary healing brush), you will be shown a warning dialog explaining there is no need to create a sample source when using this tool (Figure 8.8). To use the spot healing brush you just click on the marks or blemishes you wish to remove. It then automatically samples the replacement pixel data from around the area you are trying to heal.
key to establish a source point to sample from (thinking you have just selected the ordinary healing brush), you will be shown a warning dialog explaining there is no need to create a sample source when using this tool (Figure 8.8). To use the spot healing brush you just click on the marks or blemishes you wish to remove. It then automatically samples the replacement pixel data from around the area you are trying to heal.
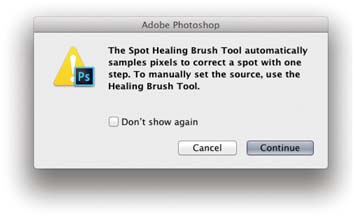
Figure 8.8
The spot healing brush warning dialog. You’ll see this if you accidentally try to sample a source point using the ![]() key.
key.
The spot healing brush tool has three basic modes of operation: Proximity Match, Create Texture and Content-Aware. These modes can be selected via the spot healing brush Options bar (Figure 8.9). In ‘Proximity Match’ mode it analyzes the data around the area where you are painting to identify the best area to sample the pixel information from. It then uses the pixel data that has been sampled in this way to replace the defective pixels beneath where you are painting. With the Proximity Match mode selected you can use the spot healing brush to click away and zap small blemishes. When you are repairing larger areas in a picture you will usually obtain better results if the brush size is slightly smaller than the area you are trying to retouch and you then click and drag to define the area you wish to repair. As you work with the spot healing brush you’ll notice how it is mostly quite smart at estimating which are the best pixels to sample from. Sometimes though, the spot healing brush will choose badly, so it pays to be vigilant and understand how to correct for this. If you are removing marks close to an edge, it is usually best to apply brush strokes that drag inwards from the side where the best source data exists (see Figure 8.10). This is because in Proximity Match mode the spot healing brush intelligently looks around for the most suitable pixel data to sample from, but if you drag with the brush it looks first in the direction from where you dragged.

Figure 8.9
This shows the spot healing brush Options bar with the mode options menu made visible.
If the Proximity Match mode fails to work you may in some instances want to try using the Create Texture mode. Rather than sampling an area of pixels from outside the cursor it generates a texture pattern within the cursor area based on the surrounding area. It may just occasionally offer a better result than the Proximity Match mode, but you’ll find that the Content-Aware mode does the same kind of thing only more successfully.
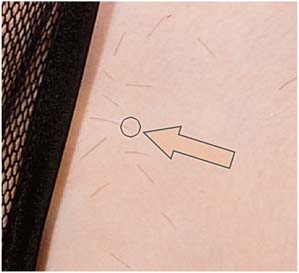
Figure 8.10
In Proximity Match mode, the spot healing brush works by searching automatically to find the best pixels to sample from to carry out a repair, but if you drag with the spot healing brush it uses the direction of the drag as the source for the most suitable texture to sample from. By dragging with the tool you can give the spot healing brush a better clue as to where to sample from. In this instance one can prompt it to sample from the area of clear skin that doesn’t have loose hairs.
Healing blend modes
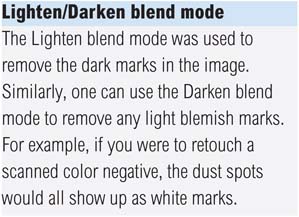
You’ll notice in Figure 8.9 that there are a number of different blend modes available for when working with the spot healing brush (as well as the main healing brush). Most the time you will find that the Normal blend mode works fine and you will get good results, but when retouching some areas you’ll find the Replace blend mode may work more successfully, especially when using the Content-Aware mode (which is discussed next). The edge hardness can also be a factor here, but I find that by adjusting the softness of the brush when using the Replace blend you can get improved results. The Replace blend preserves more of the texture in the boundary edges and the difference is therefore more pronounced as you soften the edge hardness. When using the Content-Aware mode this can make a difference when painting up close to sharp edges. In the Normal blend mode you may still see some edge bleeding, whereas in Replace mode the edges are less likely to bleed. I generally find that for detailed areas, such as when retouching out the wires that covered the rocks in the Figure 8.12 example, the Replace mode worked more effectively. The other blend modes include items such as Darken, Lighten and Color. Now, if you refer to the later section on beauty retouching you can see how these might be useful where you wish to apply healing to an image so that, say, only the darker pixels or lighter pixels get replaced. This can be useful where you wish to minimize the amount of change that takes place in an image. For example, the Lighten blend mode would be an appropriate choice for getting rid of dark marks against a light color. By selecting the Lighten mode you should be able to target the retouching more effectively on removing the dark marks. Similarly, you could use the Darken mode to remove light marks against a dark background.
Spot healing in Content-Aware mode
When working with the spot healing brush in the default Proximity Match mode you have to be careful not to work too close alongside sharply contrasting areas in case this causes the edges to bleed. The Content-Aware mode was added to the spot healing brush options in Photoshop CS5 and it intelligently works out how best to fill the areas you retouch when you use the spot healing brush. Note that the content-aware healing does make use of the image cache levels set in the Photoshop performance preferences to help speed up the healing computations. If you have the Cache limit set to 4 or fewer levels, this can compromise the performance of the spot healing brush in Content-Aware mode when carrying out big heals. It is therefore recommended that you raise the cache limit to 6 or higher.

Let’s now look at what the spot healing brush is capable of when used in Content-Aware mode. In the Figure 8.12 example there were a number of cables and wires in this photograph that spoiled the view. By using the spot healing brush in Content-Aware mode I was able to carefully remove all of these to produce the finished photo shown below. Although the end result was quite effective I should point out that you do still have to apply a certain amount of skill in your brush work and choice of settings in order to use this tool effectively. To start with I found that the Normal blend mode worked best for retouching the cables that overlapped the sky, since this blend mode uses diffuse edges to blend seamlessly with the surroundings. I also mostly used long, continuous brush strokes to remove these from the photograph and achieve a smooth blended result with the rest of the sky. When retouching the rocks I applied much shorter brush strokes using the Replace blend mode to gradually remove the cables bit by bit. I find that you need to be quite patient and note carefully the result of each brush stroke before applying the next. You’ll discover that dragging the brush from different directions can also influence the outcome of the heal blend retouching and you may sometimes need to carry out an undo and reapply the brush stroke differently and keep doing this until you get the best result. I also find that you can disguise the retouching better by adding extra, thin light strokes 90° to the angle of the first, main brush stroke and this too can help disguise your retouching work with the spot healing brush used in this mode.
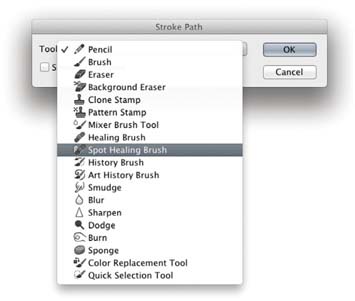
Figure 8.11
This shows the Stroke Path dialog, which can be accessed via the Paths panel when a pen path is active.


Figure 8.12
This shows a before version (top) and after version (bottom), where I had used the spot healing brush in Content-Aware mode to retouch the image.
Patch tool
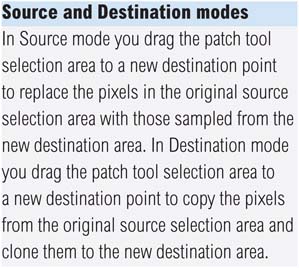
The patch tool uses the same algorithm as the healing brush to carry out its blend calculations, except the patch tool uses selection-defined areas instead of a brush. When the patch tool is selected, it initially operates in a lasso selection mode (for example, you can hold down the ![]() key to temporarily convert the tool to become a polygonal lasso tool with which to draw straight line selection edges). The selection can be used to define the area to ‘patch from’ or ‘patch to’. It so happens you don’t actually need the patch tool to define the selection; any selection tool or selection method can be used when preparing a patch selection. Once you have made the selection, select the patch tool to proceed to the next stage. Unlike the healing brushes, the patch tool has to work with either the Background layer or a copied pixel layer. What is useful though is that the patch tool provides an image preview inside the destination selection area as you drag to define the patch selection.
key to temporarily convert the tool to become a polygonal lasso tool with which to draw straight line selection edges). The selection can be used to define the area to ‘patch from’ or ‘patch to’. It so happens you don’t actually need the patch tool to define the selection; any selection tool or selection method can be used when preparing a patch selection. Once you have made the selection, select the patch tool to proceed to the next stage. Unlike the healing brushes, the patch tool has to work with either the Background layer or a copied pixel layer. What is useful though is that the patch tool provides an image preview inside the destination selection area as you drag to define the patch selection.


1 The patch tool works in a way that is similar to the healing brush. In this example I want to demonstrate how to use the patch tool to quickly repair a large area of an image in one go. When you select the patch tool you can use it just like the lasso tool to draw around the outline of the area you wish to ‘patch’, and loosely define a selection area. However, as was mentioned in the main text you can use any selection tool method you like to define the selection as you prepare an image for patching.

2 Having defined the area I wanted to patch, I made sure that the patch tool was selected (and was in Source mode) and dragged inside the selection to locate an area of the image that could be used to ‘patch over’ the original area (i.e. remove the matted hair). As I dragged the patch selection this created a second selection area which I could use to define the area to clone from. Meanwhile, I was able to see a live preview in the original patch selection, indicating which pixels would be cloned to this selection area.


Figure 8.13
This shows an example of the patch tool applied in Transparent mode to copy an ice cube in a glass and have it blend transparently.
3 As I released the mouse, Photoshop began calculating a healing blend, analyzing the pixels from the source area (that I had just defined) and used these to merge them seamlessly with the pixels in the original selection area. The patch tool repair will usually work effectively first time. If it doesn’t look quite right, I suggest deselecting the selection and use either of the healing brushes (or the clone stamp) to fine-tune the result. In this final version I repeated using the patch tool to remove more of the matted clumps of hair.
The patch tool and content-aware filling
Photoshop CS5 saw the introduction of content-aware filling. This is where you can make a selection, choose Edit ![]() Fill and fill using the Content-Aware fill mode (as shown below). You will find there is also a Content-Aware mode when working with the patch tool. The following steps show a comparison between the use of the Edit
Fill and fill using the Content-Aware fill mode (as shown below). You will find there is also a Content-Aware mode when working with the patch tool. The following steps show a comparison between the use of the Edit ![]() Fill command and the patch tool in Content-Aware mode. Note that when the Sample All layers option is checked, you can apply a patch tool content-aware fill to an empty new layer.
Fill command and the patch tool in Content-Aware mode. Note that when the Sample All layers option is checked, you can apply a patch tool content-aware fill to an empty new layer.

1 This photograph was taken at sunset and you can see the shadow of the tripod and camera. To remove this from the photo, I first made a rough lasso selection to define the outline of the shadow.

2 I then went to the Edit menu and chose Fill… (or, you may find it easier to use the ![]()
![]() shortcut). This opened the Fill dialog shown here where I selected ‘Content-Aware’ from the pop-up menu in the Contents section. When I clicked OK, this filled the selected area. You can see the result of this fill at the top in Figure 8.14.
shortcut). This opened the Fill dialog shown here where I selected ‘Content-Aware’ from the pop-up menu in the Contents section. When I clicked OK, this filled the selected area. You can see the result of this fill at the top in Figure 8.14.

3 I undid the content-aware fill, selected the patch tool and in the patch tool Options bar chose the Content-Aware option. I added an empty new layer and with the ‘Sample All Layers’ option checked, dragged the selection to the left and released the mouse. With the selection still active, I was able to go through all the different options from the Adaptation menu, finally settling on the Very Loose option. You can see the results of all the different adaptation methods in Figure 8.14 on the left.

4 Here is the final version with the shadow successfully removed.
When you use the Content-Aware Fill feature you have no control over the adaptation mode that’s used. Even so, the Content-Aware Fill feature has been found to work well in a lot of cases. All you have to do is to make a rough selection around the outline of whatever it is that you wish to remove from a scene and let the content-aware fill do the rest. Photoshop can usually work out how best to fill in the gaps in the selection and construct a convincing fill by sampling pixel information from the surrounding area. If you don’t get a satisfactory result straight off, there are a couple of things you can try doing to make it work better. For example, it is recommend that you expand the selection slightly before applying a content-aware fill. You can do this by using the Refine Edge command or go to the Select menu and choose Modify ![]() Expand. It can also help sometimes if you apply a content-aware fill more than once. As you apply subsequent fills you may see the filled area improve in appearance each time you do this. You might also like to try the layer mask trick described in the sidebar.
Expand. It can also help sometimes if you apply a content-aware fill more than once. As you apply subsequent fills you may see the filled area improve in appearance each time you do this. You might also like to try the layer mask trick described in the sidebar.


Adaptation methods
If you choose the patch tool method you have more control over the content-aware fill calculations. The main advantage you have here is that when you drag a patch selection you manually define which areas you would wish the content-aware fill to sample from. This can make a big difference to the final outcome.
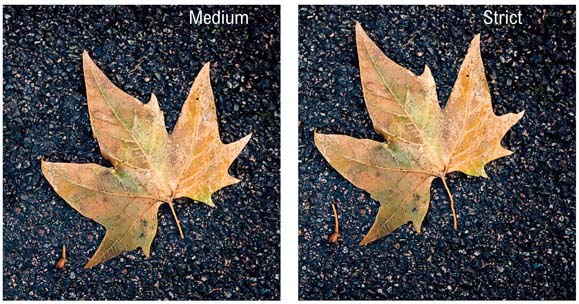
The other thing you have control over is the adaptation method that you would prefer to use. In Step 3 on the previous page I dragged the patch tool selection to the left to indicate the area I would like the tool to sample from. After letting go with the mouse, Photoshop carried out a content-aware fill. I was then able to select different adaptation methods to see which worked best here. Note that while you can set the adaptation method first before you use the patch tool, you can also edit this after dragging the patch tool selection and review the effect this has on a content-aware fill. With the Strict method, Photoshop uses a rigid sampling from the surrounding area, while with the Loose method it tends to jumble things up more. The default setting is ‘Medium’, which is probably a good starting-point to work with. In the previous example though, I found that the Very Loose setting happened to produce the best-looking result.
Content-aware move tool
The content-aware move tool works in a similar way to the patch tool in Destination mode, except it allows you to either extend a selected area or move it and fill the initial selected area (see the Options bar in Figure 8.15). In doing this it offers you the same adaptation methods as provided for the patch tool in the content-aware fill mode. You can cleverly adjust selected areas to make objects appear taller, shorter, wider, thinner or cleverly move selected items. Basically, the content-aware move tool allows you (in the right circumstances) to manually resculpt a photograph. We’ll begin by looking at a move example using the content-aware move tool.

Figure 8.15
The content-aware move tool Options bar.

1 In this example I selected the content-aware move tool and drew a rough outline around the outside of the leaf. Note that the ‘Sample All Layers’ option was selected and that I had created a new empty layer to carry out the content-aware move tool editing.

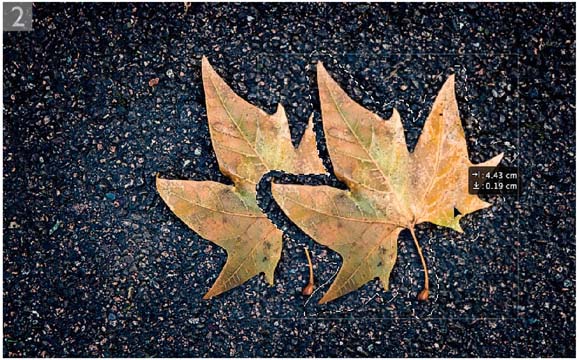
2 With the content-aware move tool in ‘Move’ mode I clicked inside the selection area and dragged a copy of the leaf to the right.
3 When I released the mouse this caused the original selection area to fill using a content-aware type fill and left a copy of the leaf just to the right of the original.

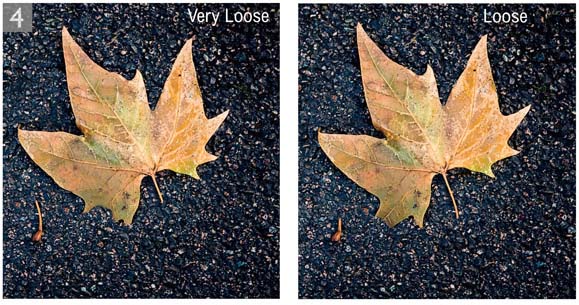
4 As with the patch tool, the content-aware move tool provides options for controlling the adaptation method. You can access these from the Adaptation menu shown above. To achieve the result shown in Step 3, I used the Very Strict adaptation method, but on the right I have shown the outcomes had I selected one of the other four options instead. As you can see, the ‘Very Strict’ adaptation method was the only suitable choice in this instance. All the other methods would have resulted in the leaf appearing broken up.
Content-aware move tool in Extend mode
When the content-aware move tool is used in the Extend mode you can use it to move selected areas and have these blend with the original image, rather than fill the original selected area. For example, you can use this to make buildings taller or stretch someone’s neck. The content-aware move tool also performs a content-aware type fill with its surroundings as you create a new blend. However, be aware though that whenever you use this tool to make things more compact you usually need to ensure the selected area on the side opposite to the direction you intend dragging is big enough to create a suitable overlap. This is because as you move the selection you need to be able to cover up whatever it is you are shortening. In the example shown below I used the content-aware move tool to extend the puffs of cloud in the sky.

Figure 8.16
This shows the cloud photo used in the steps below before applying the extend edit using the content-aware move tool.
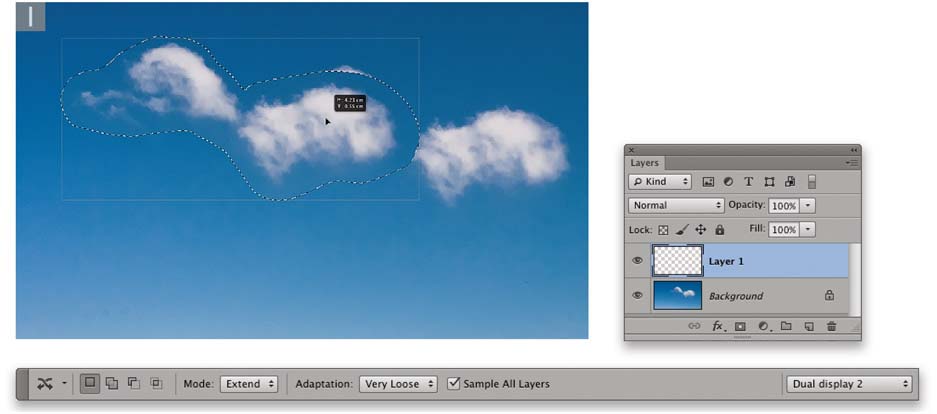
1 Here is a close-up view of a sky with a couple of wisps of cloud. I used the content-aware move tool in Extend mode to select the outline of the clouds and then clicked inside the selection and dragged to the left.

2 As I released the mouse this dropped the copy selected area and blended it with the clouds below. In this instance I decided I liked the effect produced using the ‘Very Loose’ adaptation method.
Working with the Clone Source panel
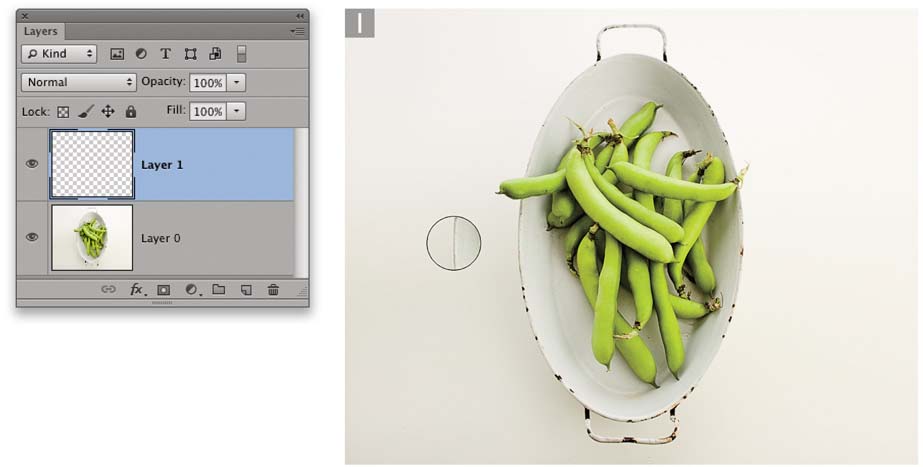
1 Here I wanted to show how you can work with the healing brush or clone stamp tools to clone at an angle. I added a new layer and sampled a side of the bowl with the healing brush.

2 I then went to the Clone Source panel and adjusted the angle. The best way to do this is double-click to highlight the angle field, place the cursor over the area to be cloned and use the keyboard arrow keys to adjust the angle value up or down. Also, hold down the ![]() key to magnify the arrow key adjustment.
key to magnify the arrow key adjustment.

3 After making a first successful clone it was necessary to double-click the angle field again to make it active, position the cursor and once more adjust the angle.

4 Here you can see the finished result. Getting the angle just right each time can be quite tricky, so patience is required. Finally, I added a layer mask and painted on this with black to mask the outer bottom left edge of the bowl.
Perspective retouching
The Vanishing Point filter can be accessed from the Filter menu and allows you to retouch photographs in a matched perspective. I have provided a brief example of how one might use the Vanishing Point filter to retouch out some road markings. For more details about working with this filter, there is a PDF you can download from the book website.
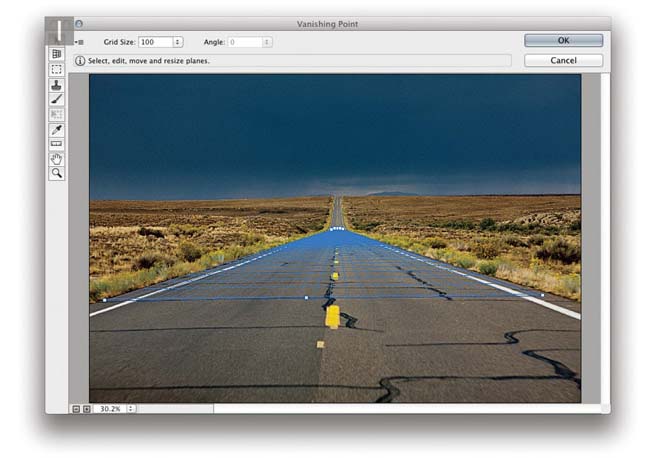

1 To begin with I selected a Background copy layer and chose Filter ![]() Vanishing point and used the create plane tool (
Vanishing point and used the create plane tool (![]() ) to define the road perspective. I selected the stamp tool (
) to define the road perspective. I selected the stamp tool (![]() ), and with the Heal mode switched on, removed the unwanted road markings.
), and with the Heal mode switched on, removed the unwanted road markings.

2 This shows how the road looked after retouching it using the Vanishing Point filter.
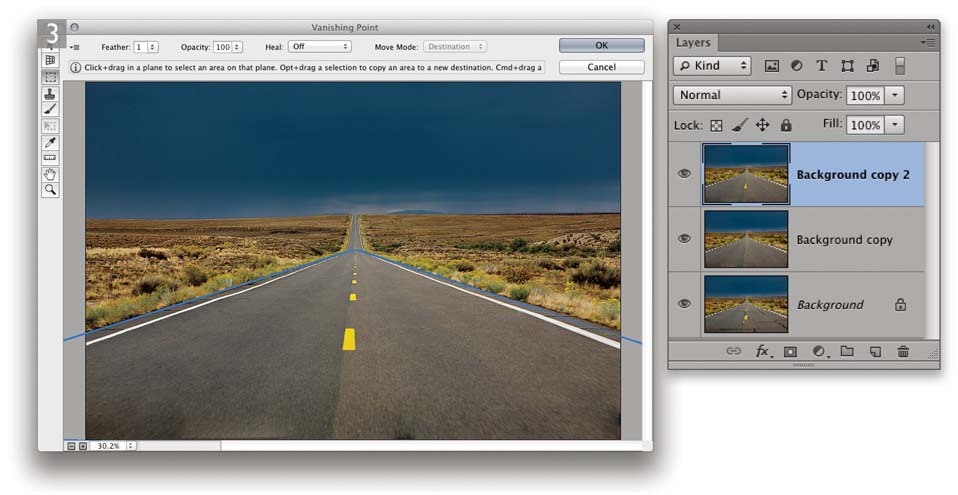
3 I applied the filter at the Step 2 stage and copied the Background Copy layer to make a new copy layer. To this I added a single yellow dash line in the middle of the road (which I had sampled from the original Background layer). I then opened the Vanishing Point filter a second time (note that the previously created perspective plane was still saved) and used the stamp tool in Heal mode again to clone the yellow dash down the middle of the road.
Alternative history brush spotting technique
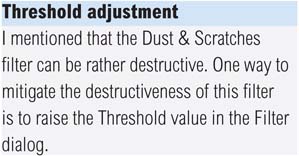
This spotting method has evolved from a technique that was first described by Russell Brown, Senior Creative Director of the Adobe Photoshop team. It revolves around using the Remove Dust & Scratches filter, which can be found in the Filter ![]() Noise submenu. If this filter is applied globally to the entire image, you end up with a very soft-looking result. So ideally, this filter should be applied selectively to the damaged portions of the image only. The technique shown here has the advantage of applying the filtered information via the history brush such that only the pixels which are considered too dark or too light are painted out. This modified approach to working with the Dust & Scratches filter avoids doing any more harm to the image than is absolutely necessary. As you can see, the technique works well when you have a picture that is very badly damaged and where using the clone stamp would be a very tedious process. What is really clever is the way that the Lighten (and Darken) blend modes can be used to precisely target which pixels are repaired from the stored Dust & Scratches history state.
Noise submenu. If this filter is applied globally to the entire image, you end up with a very soft-looking result. So ideally, this filter should be applied selectively to the damaged portions of the image only. The technique shown here has the advantage of applying the filtered information via the history brush such that only the pixels which are considered too dark or too light are painted out. This modified approach to working with the Dust & Scratches filter avoids doing any more harm to the image than is absolutely necessary. As you can see, the technique works well when you have a picture that is very badly damaged and where using the clone stamp would be a very tedious process. What is really clever is the way that the Lighten (and Darken) blend modes can be used to precisely target which pixels are repaired from the stored Dust & Scratches history state.


1 This scanned photograph serves as a good example with which to demonstrate the history brush spotting technique. A lot of dust marks are clearly visible in this picture.
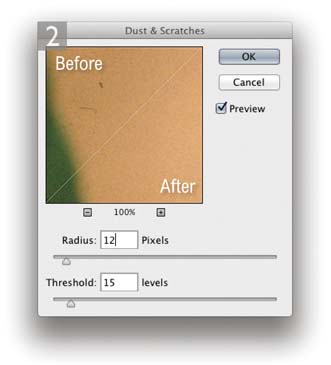
2 I went to the Filter menu and chose Noise ![]() Dust & Scratches. I checked the Filter dialog preview and adjusted the Radius and Threshold settings so that most of the dust marks would be removed. I clicked OK to apply this filter to the image.
Dust & Scratches. I checked the Filter dialog preview and adjusted the Radius and Threshold settings so that most of the dust marks would be removed. I clicked OK to apply this filter to the image.

3 I then went to the History panel and clicked on the previous unfiltered image history state, but set the Dust & Scratches filtered version as the history source to paint from. I then selected the history brush and in the tool Options bar changed the history brush blend mode to Lighten. As I painted over the dark spots, the history brush lightened only those pixels that were darker than the sampled history state. All the other pixels remained unchanged. I continued using the history brush in this way until I had removed all the dust spots in the photograph.
Portrait retouching
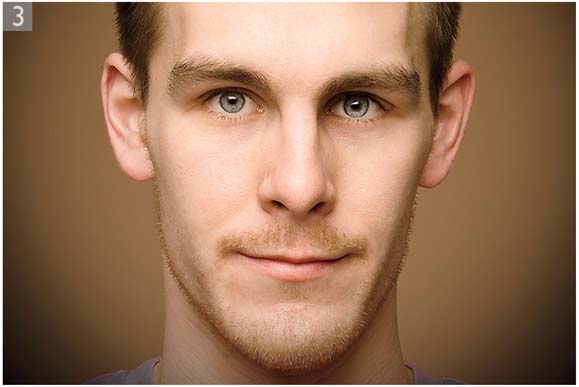
Here is an example of a restrained approach to retouching, where only a minimal amount of Photoshop editing was used. Of course you can retouch portraits as if they were fashion shots and some publications may demand this, but I thought I would start off by showing a more subtle approach to portrait retouching.
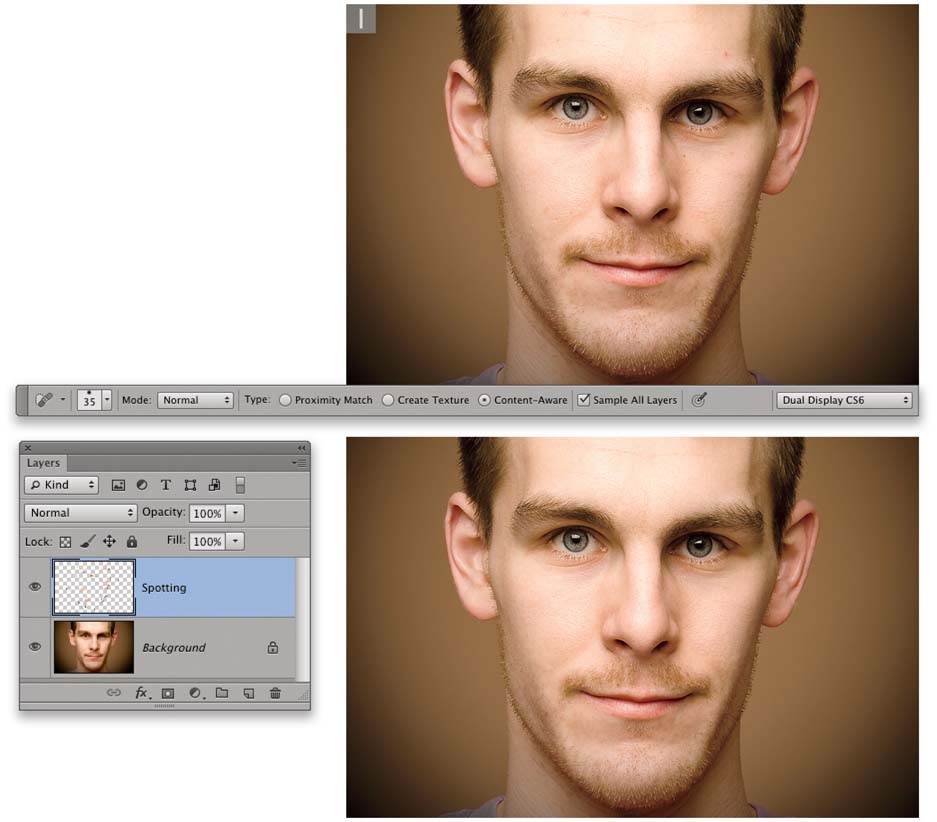
1 The top photograph shows the unretouched ‘before’ version and below this you can see the results of the initial retouching in which I mainly used the healing brush to remove some of the skin blemishes. The key thing here was not to overdo the retouching. What I did here was more like ‘tidying and grooming’ rather than ‘digital surgery’.
2 For this next step I wanted to lighten the eyes. To do this, I used the lasso tool to define the outline of the pupils. In the Adjustments panel I clicked to add a Curves adjustment and in the Properties panel adjusted the curve shape to lighten the selected area. I then selected the whites of the eyes and applied a separate Curves adjustment. The aim here was to add more contrast to the pupils and make the eyes slightly lighter.
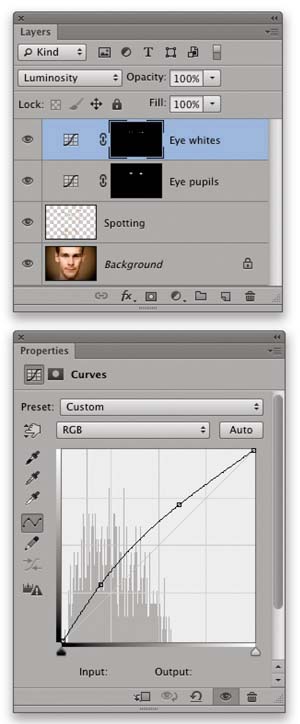
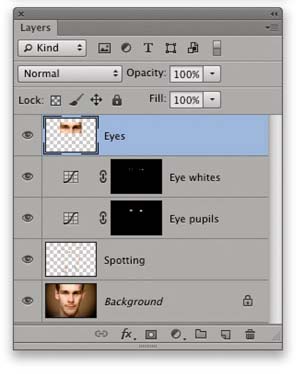
3 You don’t want the eyes to be too light, so for this step I reduced the eye adjustment layer opacity slightly. Lastly, I wanted to adjust the shapes of the eyes. To do this, I used the ![]()
![]()
![]()
![]() (Mac),
(Mac), ![]()
![]()
![]()
![]() (PC) command to create a merged copy layer at the top of the layer stack. I made a marquee selection to include the eyes, inverted the selection and hit
(PC) command to create a merged copy layer at the top of the layer stack. I made a marquee selection to include the eyes, inverted the selection and hit ![]() (this was done to keep the file size down). I then went to the Filter menu, and chose Liquify (described later in this chapter), where I made the left eye smaller, opened up the eye on the right and raised the eyebrow slightly. I then clicked OK to complete the retouching shown here.
(this was done to keep the file size down). I then went to the Filter menu, and chose Liquify (described later in this chapter), where I made the left eye smaller, opened up the eye on the right and raised the eyebrow slightly. I then clicked OK to complete the retouching shown here.
Beauty retouching
Beauty photographs usually require more intense retouching, where the objective is to produce an image in which the model’s features and skin appear flawless. This can be done through a combination of healing and painting brush work.

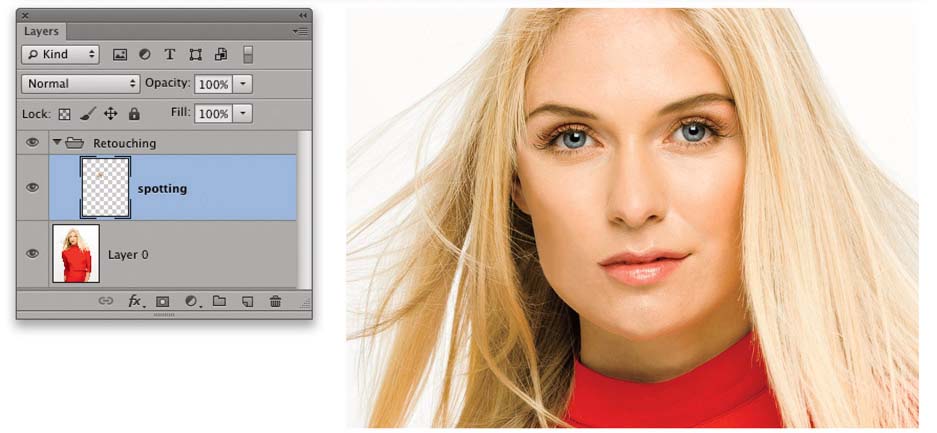
1 The top photograph here shows the before version and below that, how the same image looked after I had added a new empty layer and carried out some basic spotting work with the healing brush, where I cleaned up the spots and got rid of unwanted stray hairs.
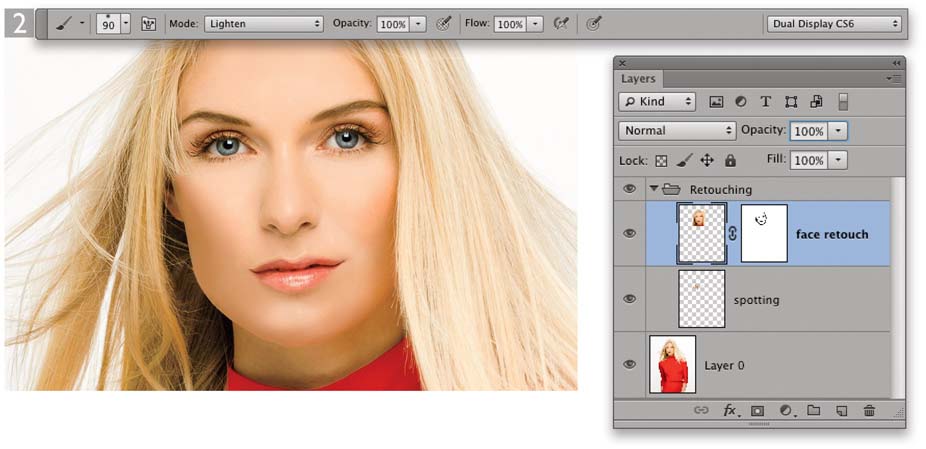
2 After that I used the ![]()
![]()
![]()
![]() (Mac),
(Mac), ![]()
![]()
![]()
![]() (PC) command to create a merged copy layer at the top of the layer stack (based on a marquee selection) and worked with the paint brush on the merged layer. The trick here was to hold down the
(PC) command to create a merged copy layer at the top of the layer stack (based on a marquee selection) and worked with the paint brush on the merged layer. The trick here was to hold down the ![]() key to sample a skin tone color and gently paint using low opacity brush strokes with the blend mode set to ‘Lighten’. This meant the paint strokes only affected those colors that were darker than the sample color. Similarly, I switched to ‘Darken’ mode when I wished to darken only those pixels lighter than the paint sample color. This selective method of painting can produce more controlled results compared with using a Normal blend mode.
key to sample a skin tone color and gently paint using low opacity brush strokes with the blend mode set to ‘Lighten’. This meant the paint strokes only affected those colors that were darker than the sample color. Similarly, I switched to ‘Darken’ mode when I wished to darken only those pixels lighter than the paint sample color. This selective method of painting can produce more controlled results compared with using a Normal blend mode.
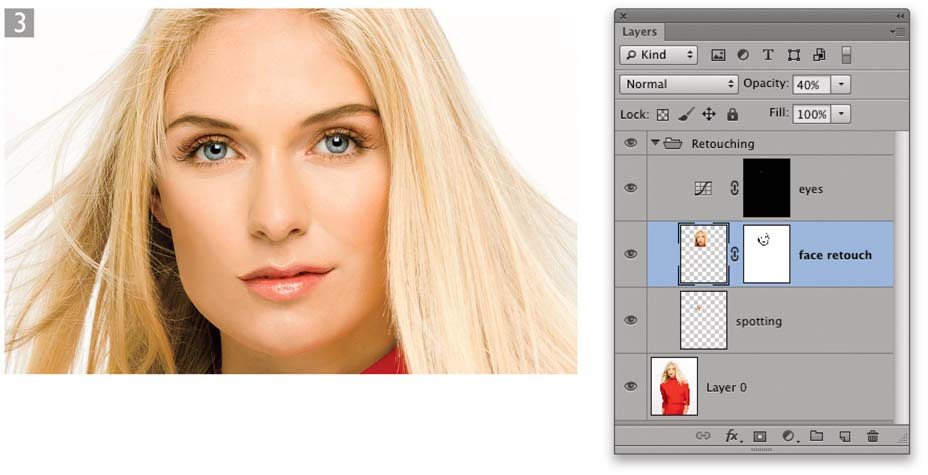
3 This shows the finished retouched version in which I faded the opacity of the painted layer to 40% and added a layer mask so that I could carefully mask the areas where the paint retouching had spilled over. Lastly, I made a lasso selection of the eyes and clicked on the Add Adjustment Layer button in the Layers panel to add a Curves adjustment based on the eyes selection. I then applied a lightening adjustment to lighten the eyes slightly.
Liquify
The Liquify filter is designed to let you carry out freeform pixel distortions. When you choose Filter ![]() Liquify (or use the
Liquify (or use the ![]()
![]()
![]() [Mac],
[Mac], ![]()
![]()
![]() [PC] keyboard shortcut), you are presented with what is known as a modal dialog, which basically means you are working in a self-contained dialog with its own set of tools and keyboard shortcuts, etc. The Liquify filter therefore operates like a separate program within Photoshop. To use Liquify efficiently, I suggest you first make a marquee selection of the area you wish to manipulate before you select the filter, and once the dialog has opened use the
[PC] keyboard shortcut), you are presented with what is known as a modal dialog, which basically means you are working in a self-contained dialog with its own set of tools and keyboard shortcuts, etc. The Liquify filter therefore operates like a separate program within Photoshop. To use Liquify efficiently, I suggest you first make a marquee selection of the area you wish to manipulate before you select the filter, and once the dialog has opened use the ![]()
![]() (Mac),
(Mac), ![]()
![]() (PC) keyboard shortcut to enlarge the Liquify filter dialog to fit the screen.
(PC) keyboard shortcut to enlarge the Liquify filter dialog to fit the screen.

Basically, you can use the Liquify tools to manipulate the image and when you are happy with your liquify work, click the OK button or hit ![]() or
or ![]() . Photoshop then calculates and applies the liquify adjustment to the selected image area. The Liquify tools are all explained in the column on the left and Figure 8.17 provides a visual guide to what they can do. One of the main things to point out here is that Liquify is optimized to make use of the GPU and provide good overall responsiveness. As a consequence of this the turbulence and mirror tools were removed when Photoshop CS6 came out. This is because they couldn’t be enabled to work with the GPU, but it’s not such a great loss as people weren’t using these particular tools a lot anyway.
. Photoshop then calculates and applies the liquify adjustment to the selected image area. The Liquify tools are all explained in the column on the left and Figure 8.17 provides a visual guide to what they can do. One of the main things to point out here is that Liquify is optimized to make use of the GPU and provide good overall responsiveness. As a consequence of this the turbulence and mirror tools were removed when Photoshop CS6 came out. This is because they couldn’t be enabled to work with the GPU, but it’s not such a great loss as people weren’t using these particular tools a lot anyway.
The Liquify filter opens in a basic mode of operation (Figure 8.18), where initially only the forward warp, reconstruct, pucker, bloat, push left, hand and zoom tools appear in the tools section. You also have just a simplified set of tool options and you’ll need to check the Advanced mode box if you want to access the full list of tools and other Liquify options (Figure 8.19).
The easiest tool to get to grips with is the forward warp tool, which allows you to simply click and drag to push the pixels in the direction you want them to go in. However, I also like working with the push left tool, because it lets you carry out some quite bold warp adjustments. Note that when you drag with the push left tool it shifts the pixels 90° to the left of the direction you are dragging in and when you ![]() drag with the tool, it shifts the pixels 90° to the right. The key to working successfully with the Liquify filter is to use gradual brush movements and build up the distortion in stages.
drag with the tool, it shifts the pixels 90° to the right. The key to working successfully with the Liquify filter is to use gradual brush movements and build up the distortion in stages.
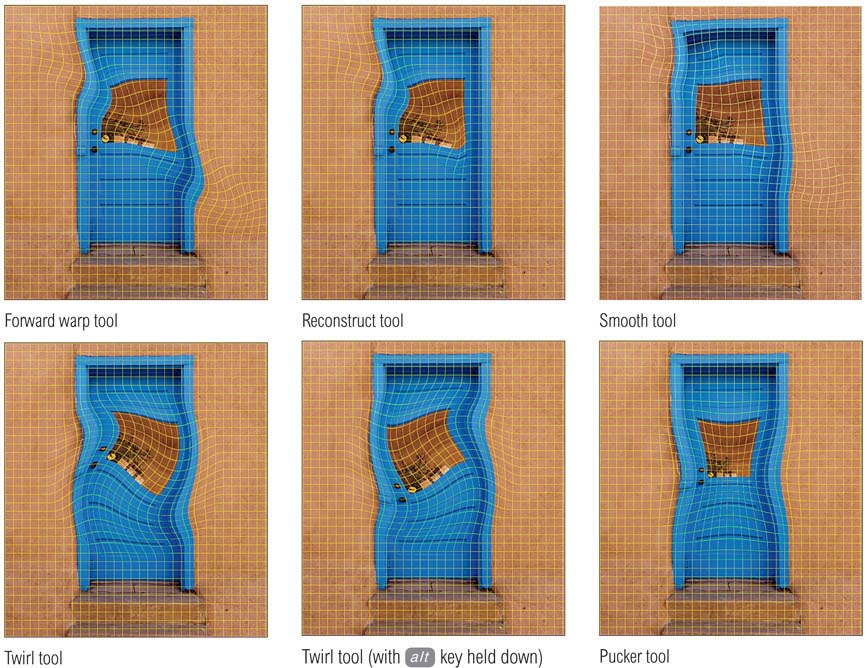
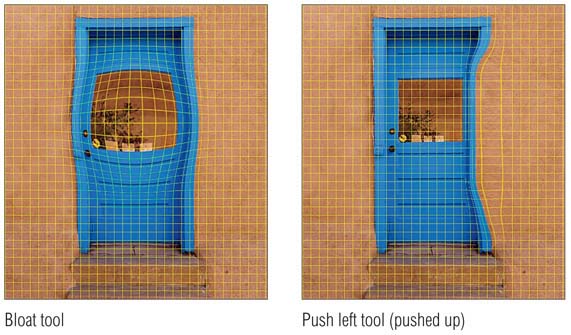
Figure 8.17
These illustrations give you an idea of the range of distortion effects that can be achieved using the Liquify tools listed on page 522.
Advanced Liquify tool controls
Once you have selected a tool to work with you will want to check out the associated tool options which are shown in the Advanced mode dialog in Figure 8.19. These tool options are applied universally to all the tools and include: Brush Size, Brush Density, Brush Pressure and Brush Rate. All tools (apart from the hand and zoom tool) are displayed as a circular cursor with a crosshair in the middle. If you mouse down on the double-arrow icon to the right of each field entry box, this pops a dynamic slider which can be used to adjust the settings. You can use the square bracket keys ![]()
![]() to alter the tool cursor size and the rate of increase/decrease can be accelerated by holding down the
to alter the tool cursor size and the rate of increase/decrease can be accelerated by holding down the ![]() key. You can also right mouse drag with the
key. You can also right mouse drag with the ![]() key in the Preview area, or use the scrubby sliders to adjust the cursor size. In Photoshop CS6 the brush size limit was increased to 15,000 pixels and you will also notice that Liquify now has a much improved brush slider response. I highly recommend here that you use a pressure sensitive pen and pad such as the Wacom™ system and if you do so, make sure that the Stylus Pressure option is checked and that the Brush Pressure setting is reduced to around 10–20%.
key in the Preview area, or use the scrubby sliders to adjust the cursor size. In Photoshop CS6 the brush size limit was increased to 15,000 pixels and you will also notice that Liquify now has a much improved brush slider response. I highly recommend here that you use a pressure sensitive pen and pad such as the Wacom™ system and if you do so, make sure that the Stylus Pressure option is checked and that the Brush Pressure setting is reduced to around 10–20%.

Figure 8.18
The basic Liquify settings.

Figure 8.19
The advanced Liquify dialog options.
Reconstructions
Next we have the Reconstruct Options. If you apply a Liquify distortion and click on the Reconstruct button, this opens the Revert Reconstruction dialog shown in Figure 8.20. By setting the Amount to anything less that 100, you can decide by how much to reduce the current overall image liquify distortion – the reconstruction is applied evenly to the whole image and allows you to unwarp by however much you like. Note that as you do this the distortion will be preserved for any areas that have been frozen using the freeze tool. If you click on the ‘Restore All’ button the entire image is restored in one step (ignoring any frozen areas). There is also a reconstruct tool (![]() ), which can be used to selectively paint over any areas where you wish to selectively undo a warp, plus a new smooth tool (
), which can be used to selectively paint over any areas where you wish to selectively undo a warp, plus a new smooth tool (![]() ) that can be used to smooth out ripples in the mesh caused by multiple, small warp tool applications.
) that can be used to smooth out ripples in the mesh caused by multiple, small warp tool applications.
Don’t forget that while inside the Liquify dialog, you also have multiple undos at your disposal. Use ![]()
![]() (Mac),
(Mac), ![]()
![]() (PC) to undo or redo the last step,
(PC) to undo or redo the last step, ![]()
![]()
![]() (Mac),
(Mac), ![]()
![]()
![]() (PC) to go back in history and
(PC) to go back in history and ![]()
![]()
![]() (Mac),
(Mac), ![]()
![]()
![]() (PC) to go forward in history.
(PC) to go forward in history.
Mask options
The mask options can utilize an existing selection, layer transparency or a layer mask as the basis of a mask to freeze and constrain the effects of any Liquify adjustments (Figure 8.21). The first option is ‘Replace Selection’(![]() ). This replaces any existing freeze selection that has been made. The other four options allow you to modify an existing freeze selection by ‘adding to’ (
). This replaces any existing freeze selection that has been made. The other four options allow you to modify an existing freeze selection by ‘adding to’ (![]() ), ‘subtracting from’ (
), ‘subtracting from’ (![]() ), ‘intersecting’ (
), ‘intersecting’ (![]() ) or creating an ‘inverted’ selection (
) or creating an ‘inverted’ selection (![]() ). You can then click on the buttons below. Clicking on ‘None’ clears all freeze selections, clicking ‘Mask All’ freezes the entire area, and clicking ‘Invert All’ inverts the current frozen selection.
). You can then click on the buttons below. Clicking on ‘None’ clears all freeze selections, clicking ‘Mask All’ freezes the entire area, and clicking ‘Invert All’ inverts the current frozen selection.
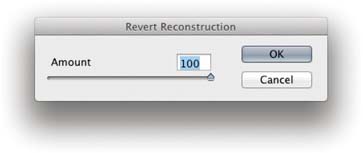
Figure 8.20
The Revert Reconstruction dialog.

Figure 8.21
If you mouse down on the arrow next to the mask options you can also load a mask from the pop-up menu. This can include saved alpha channels and this was how, for example, I was able to load the precision mask shown in Figure 8.22.
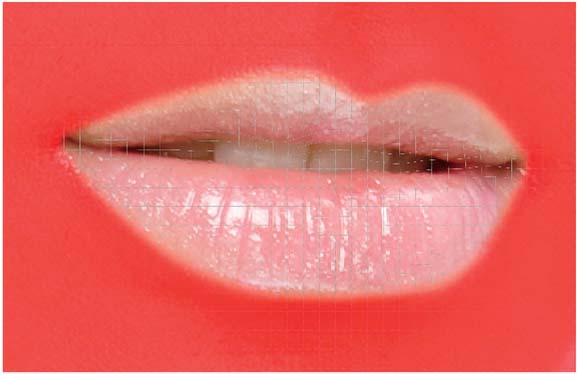
Figure 8.22
Freeze masks can be used to protect areas of a picture before you commence doing any liquify work. In the example shown here a freeze mask was loaded from a layer mask (see Figure 8.21). When you freeze an area in this way it is protected from subsequent distortions so you can concentrate on applying the Liquify tools to just those areas you wish to distort. Frozen mask areas can be unfrozen by using the thaw mask tool.
View options
The View options can be seen in Figure 8.23. The ‘Show Mesh’ option lets you see a mesh overlay revealing the underlying liquify distortion and the mesh grid can be displayed at different sizes using different colors. This can readily help you pinpoint the areas where a distortion has been applied. You can use the check boxes in this section to view the mesh on its own or have it displayed overlaying the Liquify preview image (as shown in the Figure 8.17 examples).
The freeze mask overlay can be made visible or hidden by using the ‘Show Mask’ checkbox in the View options. This section also allows you to choose a mask color.
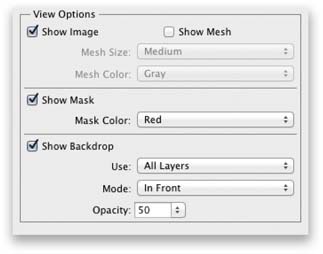
Figure 8.23
The Liquify View options.
The Show Backdrop option is normally left unchecked. If the Liquify image contents are contained on a layer, then it is possible to check the Show Backdrop option and preview the liquified layer against the Background layer, all layers, or specific layers in the image. Here is how this option might be used. Let’s imagine for example that you wished to apply a liquify distortion to a portion of an image and you started out with just a flattened image. You then make a selection of the area you wish to work on and make a copy layer via the selection contents using ![]()
![]() (Mac),
(Mac), ![]()
![]() (PC). Once you have done this, as you apply the Liquify filter you can check the Show Backdrop checkbox and set the mode to Behind. At 100% opacity the Liquify layer covers the Background layer completely, but as you reduce the opacity you can preview the effect of a Liquify distortion at different opacity percentages. This technique can prove useful if you wish to compare the effect of a distortion against the original image or a target distortion guide (as shown in the step by step example that’s just coming up).
(PC). Once you have done this, as you apply the Liquify filter you can check the Show Backdrop checkbox and set the mode to Behind. At 100% opacity the Liquify layer covers the Background layer completely, but as you reduce the opacity you can preview the effect of a Liquify distortion at different opacity percentages. This technique can prove useful if you wish to compare the effect of a distortion against the original image or a target distortion guide (as shown in the step by step example that’s just coming up).
Saving the mesh
The Liquify dialog includes ‘Save Mesh…’ and ‘Load Mesh…’ buttons. These allow you to save your Liquify work as a mesh setting and reload this later. Plus there is also a ‘Load Last Mesh’ button.
When you save a mesh you have the option to work on the image again at a later date and reload the previous mesh settings. So, for example, if you have a saved mesh, this gives you the option to copy the original layer contents again, reapply the previously used mesh and re-edit the image contents in Liquify. Another thing you can do is to edit a low resolution version first, save the mesh and then reload and apply this mesh to the full resolution version later.
To reapply a Liquify filter using the last applied settings, go to the Filter menu and choose ‘Last Filter’, or use the ![]()
![]() (Mac),
(Mac), ![]()
![]() (PC) shortcut.
(PC) shortcut.
Photoshop CC performance and interface
A number of improvements have been made to the user interface in Photoshop CC as well as steps made to improve performance. Liquify now runs faster, maybe as much as 16 times faster, when working on large documents. Also, zooming in on large documents is much faster now and aliasing has been removed when zooming levels at in-between full magnification views (i.e. at 33% and 66%).
Previously, the cursor ring and cross hairs were showing different thicknesses in CS6 and this was due to differences in GPU cards. This problem has now been ironed out so that cursor rings and cross hairs are smoother and thinner, plus the cross hairs are now made smaller on the Macintosh interface. You will also notice that the Photoshop preferences for cursors now determine the cursor appearance in Liquify as well. The brush slider responsiveness is now non-linear in behavior. In other words, the slider control feels more natural and this is especially noticeable when you use the bracket keys (![]()
![]() ) to adjust the cursor size.
) to adjust the cursor size.
Also, each tool in Liquify now remembers its own settings for size, density, pressure and rate. When you switch tools, the new tool will remember its last-used settings.
Lastly, the new smooth tool (![]() ), which was covered earlier in the section on Reconstructions (see page 524).
), which was covered earlier in the section on Reconstructions (see page 524).
Smart Object support
Photoshop CC now notably provides Smart Object support for the Liquify filter. The reason why Liquify was not supported previously as a Smart Object was because this filter relied on the creation of a mesh, which would be automatically deleted once you clicked OK to apply a mesh edit. Now, when a document or layer is converted to a Smart Object, Liquify saves a compressed mesh within the document. This means that when you choose to re-edit a Liquify (smart object) filter setting the mesh can be reloaded. Note that while the mesh is compressed, this will still cause an image document to increase in size.
On-screen cursor adjustments
Providing you have the OpenGL option enabled in the Photoshop Performance preferences, you can now apply on-screen cursor adjustments in the Liquify dialog preview. This means that if you hold down the ![]()
![]() keys (Mac), or the
keys (Mac), or the ![]() key and right-click (PC), dragging to the left makes the brush cursor size smaller and dragging to the right, larger (and keeps the cursor position centered as you do so). If you drag upwards with these same keys held down you can decrease the brush pressure settings and dragging downwards will increase the brush pressure (see Figure 8.24).
key and right-click (PC), dragging to the left makes the brush cursor size smaller and dragging to the right, larger (and keeps the cursor position centered as you do so). If you drag upwards with these same keys held down you can decrease the brush pressure settings and dragging downwards will increase the brush pressure (see Figure 8.24).
If you hold down the ![]() key the Cancel button changes to ‘Reset’. But in addition now, if you hold down the
key the Cancel button changes to ‘Reset’. But in addition now, if you hold down the ![]() (Mac),
(Mac), ![]() (PC) key, the Cancel button changes to ‘Default’, which returns the controls to the ‘factory original settings’.
(PC) key, the Cancel button changes to ‘Default’, which returns the controls to the ‘factory original settings’.

Figure 8.24
In the Liquify dialog, if you hold down the ![]()
![]() keys (Mac), or the
keys (Mac), or the ![]() key and right-click (PC), this reveals the on screen cursor display. Drag left/right to make the cursor smaller or larger and drag up/down to decrease or increase the brush pressure setting.
key and right-click (PC), this reveals the on screen cursor display. Drag left/right to make the cursor smaller or larger and drag up/down to decrease or increase the brush pressure setting.
Targeted distortions using Liquify
With the recent introduction of the Puppet warp tool you may be wondering if we still need to use Liquify? After all, Puppet Warp does allow you to work on an image layer directly rather than via a modal dialog. Although I am a fan of the Puppet Warp feature, I do still see a clear distinction between the types of jobs where it is most appropriate to use Puppet Warp and those where it is better to use Liquify. In the example shown here, the Liquify filter was still the best tool to use because you can use the paint-like controls to carefully manipulate the mesh that controls the distortion. Plus you can also use the freeze tool, which is unique to Liquify, to control those parts of the image that you don’t want to see become distorted. Every job is different and you’ll need to decide for yourself which is the most appropriate distortion tool to use and which can best help you achieve the result you are after.

1 The objective here was to enlarge the rosette on the shoulder using the Liquify filter. This first step was to create a guide for subsequent Liquify work. I created an empty new layer (Layer 1) and used the pen tool to draw a path outline and stroked this path using the brush tool (see Chapter 9). I then made a selection of the area of interest and used ![]()
![]() (Mac),
(Mac), ![]()
![]() (PC) to copy the Layer 0 selected area. I then
(PC) to copy the Layer 0 selected area. I then ![]() (Mac),
(Mac), ![]() (PC)-clicked the copied layer to reactivate the selection. This is important as having a selection active forces Liquify to load the selected area only.
(PC)-clicked the copied layer to reactivate the selection. This is important as having a selection active forces Liquify to load the selected area only.

2 I chose Filter ![]() Liquify, checked the ‘Show Backdrop’ option and made Layer 1 appear in front of the target layer to be retouched here. I then used the freeze mask tool to protect the model’s face from being edited. You can also see here that I had the mesh visible.
Liquify, checked the ‘Show Backdrop’ option and made Layer 1 appear in front of the target layer to be retouched here. I then used the freeze mask tool to protect the model’s face from being edited. You can also see here that I had the mesh visible.
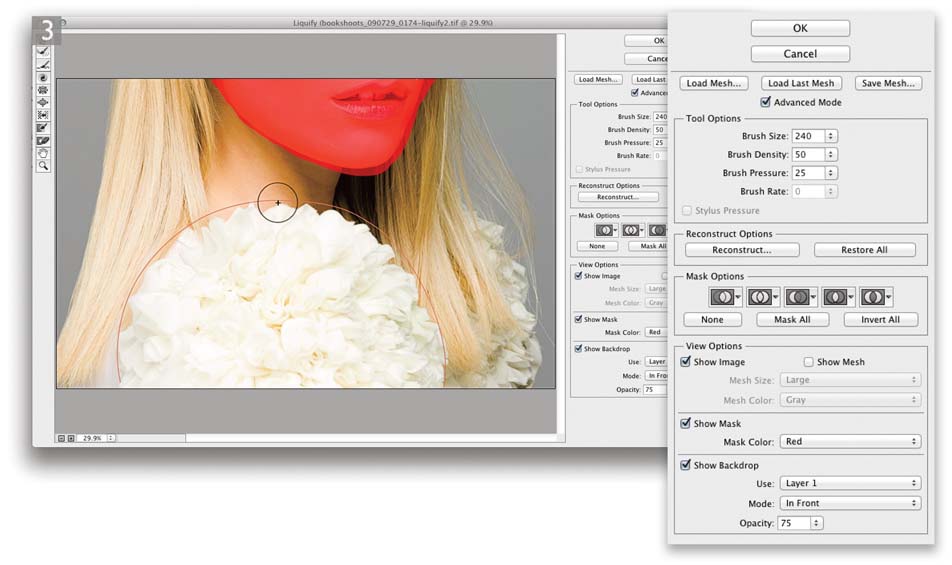
3 I then selected the forward warp tool and with a succession of low pressure strokes, gradually warped the rosette so that it matched the outline of the Layer 1 guide. When I was happy with the way the image looked, I clicked OK to apply the Liquify distortion.