
]>
26 RETOUCHING MARKS AND BLEMISHES

The Clone Stamp tool works by sampling a selected area and pasting the characteristics of this area over the blemish, so the fi rst step in the process is to identify the areas in your picture that need repair. Make sure that the image layer you want to copy is selected.
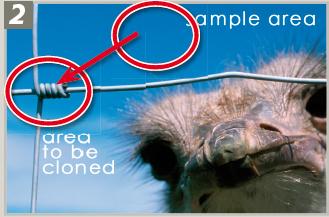
Next, locate areas in the photograph that are a similar tone, texture and color as the areas needing to be fi xed. It is these areas that the Clone Stamp tool will copy and then use to paint over fence wires.

Select the area to be sampled, or the ‘Sample Point’. Do this by holding down the Alt key (Win) or the Option key (Mac) and clicking the left mouse button when the cursor (now changed to cross hairs) is over a part of the image that suits the area to be repaired

With the sample point selected you can now move the cursor to the area to be fi xed. Click on the blemish and a copy of the sample point area is pasted over the mark. Depending on how well you chose the sample area, the blemish will now be blended into the background seamlessly. Continue to click and drag to repair more areas

You may need to reselect your sample point if you fi nd that the color, texture or tone doesn’t match the surrounds of the blemish. You can also change the brush size and hardness to alter the characteristics of both the sample and stamp areas. A softer edge helps blend the edge areas of the newly painted parts of the picture with the original image.
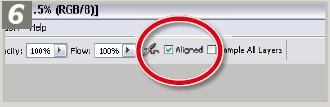
Switching between aligned and nonaligned (when the Aligned option is not selected) can really help when you are rebuilding missing parts of your restoration project. ‘Aligned’ sets the sample point so that it remains the same distance from the stamped area no matter where on the picture you start to click, and ‘Non-aligned’ repositions the sample point back to the original sample spot each time the mouse is moved and then clicked.

The Spot version of the Healing brush removes the sampling step from the process. To use the brush you simply select the feature, adjust the brush tip size and harness and then click onto the blemish. Almost magically the brush will analyse the surrounding texture, color and tones and use this as a basis for painting over the problem area.

for removing marks, hairs, streaks or cracks by click-dragging the tool across the offending blemish.
Pro tip: If unwanted detail is used to cover the repaired area, undo the changes and then draw around the area to be healed with the Lasso tool and apply the brush again. This restricts the area around the blemish that the tool uses to heal.
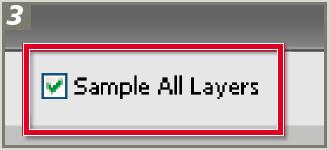
Like the Clone Stamp tool, the Spot Healing brush also contains a Sample All Layers option enabling photographers to perform non-destructive editing of their photos by painting the retouched areas onto a separate layer. Using a retouching layer also means that you can interactively adjust the strength of the changes via the layer’s opacity settings.