
]>


Photoshop bases many of its drawing, painting and filter effects on two colors - the foreground and background colors. The currently selected foreground and background colors are shown at the bottom of the toolbox as two colored swatches. The topmost swatch (1) represents the foreground color, the one beneath (2) the hue for the background.
The default for these colors is black and white but it is possible to customize the selections at any time. Click the swatch and then select a new color from the Color Picker window (5).
To switch foreground and background colors click the double-headed curved arrow at the top right (3) and to restore the default (black and white) click the mini swatches bottom left (4).


The Background Eraser is used to delete pixels around the edge of an object. This tool is very useful for extracting objects from their surrounds. The tool pointer is made of two parts - a circle and a cross hair. The circle size is based on the brush size.
To use the tool, the cross hair is positioned and dragged across the area to be erased, whilst at the same time the circle’s edge overlaps the edge of the object to be kept. The success of this tool is largely based on the contrast between the edge of the object and the background. The greater the contrast, the more effective the tool.
The Tolerance slider is used to control how different pixels need to be in order to be erased. The Limits options set the tool to erase only those pixels that are linked, or sitting side by side (contiguous), or all the pixels within the circle that are a similar color.
In addition to these controls the options bar also houses buttons for three different sampling modes:
Continuous (1) – The sampled area changes according to where the cross hair pointer is positioned.
Once (2) – The sampled area changes according to where the cross hair pointer is positioned.
Background Swatch (3) – Uses the current background color as the sample.


An image can only have one background layer. It is the bottom-most layer in the stack. No other layers can be moved or dragged beneath this layer. You cannot adjust this layer’s opacity or its blending mode. The background layer is locked (1) from these changes.
You can convert background layers to standard image layers by double-clicking the layer in the Layers palette, setting your desired layer options in the dialog provided and then clicking OK.
If the document that you are working on doesn’t contain a background layer, it is possible to change any layer into a background layer by selecting the layer in the Layers palette and then choosing Layer > New > Layer From Background.
If the selected layer is not the bottom-most layer, changing it to a background layer will force it to the bottom of the stack and this could dramatically alter the look of the image.


Most photos that are optimized for use on the internet are saved in the JPEG format. As part of the construction process of a web page, the pictures are then placed on top of a colored background. The JPEG format does not contain a Transparency option and so when an irregularly shaped graphic is saved as a JPEG and placed onto a web page it is surrounded by a plain colored box, usually white (1).
Background matting is a technique for adding the web page color to the background of the object at the time of web optimization. When the matted object is then used to create the web page, it appears to be sitting on the background as if it was surrounded by transparency (2). The transparent pixels surrounding the object are replaced with the matte color and the semi-transparent pixels are blended.
The Matte option is located in the settings area of the File > Save for Web feature (3).


The Bas Relief fi lter, as one of the group of Sketch fi lters, simulates the surface texture of the picture using the current foreground and background colors. Changing the colors will result in dramatically different results.
The edges in the picture are used as the basis for the effect, with the three settings in the dialog providing control over how the colors are applied.
The Detail slider (1) alters the amount of the original photo detail used to create the end result. Higher numbers create more detailed results. The Smoothness slider (2) alters the sharpness of the detail and the Light menu (3) contains a series of options for the direction of the light that is used to create the textured look of highlights and shadows.


If you’ve ever had to deal with enhancing a group of pictures using the same settings, or converting a pile of images from one format or color mode to another, you’ll welcome this feature.
Sketch filters, simulates the surface texture of the picture using the current foreground and background colors. Changing the colors will result in dramatically different results.
The edges in the picture are used as the basis for the effect, with the three settings in the dialog providing control over how the colors are applied.
The Detail slider (1) alters the amount of the original photo detail used to create the end result. Higher numbers create more detailed results. The Smoothness slider (2) alters the sharpness of the detail and the Light menu (3) contains a series of options for the direction of the light that is used to create the textured look of highlights and shadows.
The Batch command takes a selection of images from a folder (2) and performs action sequences (1) that you’ve prerecorded in the Actions palette.
You can specify whether you want the processed files to replace the existing ones or create new versions in a different destination folder (3). There are also options for renaming (4) the processed files and a series of checkbox settings that help manage the automation process (5).
The Batch command can be accessed from the File > Automate menu in Photoshop and the Tools > Photoshop menu in Bridge. Choosing the feature in Bridge means that you can apply the editing changes to multiselected files in the browser workspace rather than complete folders, which is the case when selecting the option in Photoshop.

The Batch feature automatically applies actions that have been previously recorded. So essentially the first step in using the Batch command is recording an editing action.


Batch processing is a term use for applying the same editing or enhancement sequence to a folder or a series of selected images.
There are several places where batch processing occurs within Photoshop. The most obvious examples are:
Batch (File > Automate > Batch) – This feature takes a folder (or a group of selected images if used in Bridge) and applies a prerecorded action to them.
Batch Rename (Bridge: Tools > Batch Rename) – Using this utility several pictures can be renamed via a single dialog (1).
Image Processor (Bridge: Tools > Photoshop > Image Processor) – This feature converts fi les from one format to another. If the pictures are Raw fi les then the photos are converted using the Adobe Camera Raw feature fi rst and then saved in different fi le formats (2).
Batch processing is a terrific way to speed up the process of applying the same edits or enhancements to a bunch of photos.


Several files can be renamed in a single action using the Tools > Rename option in Bridge.
After multi-selecting the files in the browser workspace choose Tools > Batch Rename, add in the name (2), destination settings (1), select the output options (3) and check the preview section (4) in the Batch Rename dialog and click Rename.
The New Filenames section contains three drop-down menus that provide a variety of options for creating useful filenames. The menu items cover the name, extension and case of the filename (5).


Along with the standard blend modes that are available for most painting and drawing tools and layers, Photoshop also contains two other options - Behind and Clear.
The Behind blend mode is used for drawing or painting on the transparent areas of selected layers. The result looks like the picture has been painted from behind and in the process the layer content has been preserved.
To use the mode select a layer, ensure that the Lock Transparency option is off and then select a drawing or painting tool. Now choose Behind from the mode list in the tool’s options bar. Finally, paint onto the selected layer.


A layer style that you can use to produce stylish type that will leap off your page. It can also be used on colored shapes to create 3D panels and buttons
Using the Bevel and Emboss section of the Layer Style dialog you can adjust the highlight and shadow of the bevel to create shallow or deep 3D effects.
Results vary depending on the resolution of your image so experiment with the settings to find a suitable effect. Turn Preview on so you can see the changes as you play.
Here are several examples I made using a 7x3 cm canvas with a resolution of 300 ppi and 50 point text.


Curves created using Photoshop’s Pen tool are called Bezier (bay-zee-ay) curves, named after French mathematician Pierre Bezier.
The shape of a curve is created by the position of anchor points and direction lines that can be moved to change its shape and direction. They’re used to make perfect selections around smooth or curved objects.


Digital photos are made up of pixels. These are discrete blocks of color and tone arranged in a grid fashion. The number of pixels in a picture is determined when the photo is taken or the print scanned. Occasionally it is necessary to change the number of pixels in the picture to make it either bigger or smaller. This task is usually handled by the Image Size feature where there are controls to increase or decrease the pixel dimensions (1), resample the pixels (2) and choose the method of resampling (3).
The process is often called resampling or interpolating the picture, and makes use of a mathematical algorithm to generate the newly sized picture.
Bicubic is one of the algorithms you can select to resize your picture. It takes the longest to process the file, but provides smooth graduations in the final photo.
The default interpolation setting used by Photoshop can be selected via the Edit > Preferences > General dilaog (2).


As well as standard Bicubic interpolation Adobe includes two other options: Bicubic - Sharper and Bicubic - Smoother. Bicubic - Sharper is specifically designed for occasions when you are reducing the size of a picture. It retains the detail of the original image and sharpens the picture as it resizes. If the sharpening results are too harsh then Edit > Undo the process and try the standard Bicubic approach.

As well as standard Bicubic Photoshop has two other approaches for increasing and decreasing the size of your pictures. Both options are based on the Bicubic algorithm but they have been optimized for different picture resizing operations. The Bicubic - Smoother option should be used for increasing the size of photographs, whereas the Bicubic - Sharper option is for making pictures smaller.
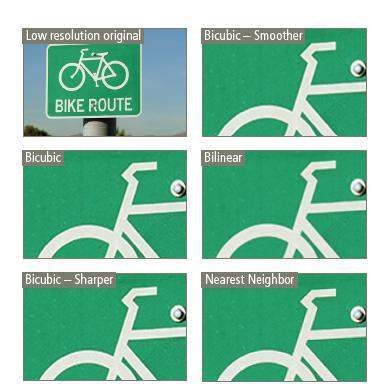


Apart from the Bicubic options examined here Photoshop can also resize pictures using two other interpolation options -Bilinear and Nearest Neighbor.
Nearest Neighbor is the fastest to apply but produces the coarsest results. Bilinear is a compromise in speed and quality between Bicubic and Nearest Neighbor. You can select the option in the Image Size dialog when the Resample Image is selected (1).
The default interpolation setting used by Photoshop can be selected via the Edit > Preferences > General dilaog (2).


It is possible to change the color mode of your picture by selecting a different mode from the Image > Mode menu. When converting a color photograph to Bitmap mode in Photoshop the file must be flattened and changed to a grayscale first and from there to pure black and white. In the process you can choose the approach used for this conversion via the Method pop-up menu.
50% Threshold -Creates broad areas of flat black and white with a 50% tone used as the separation point.
Pattern Dither -Uses a black and white dot pattern to simulate tones.
Diffusion Dither -Examines each pixel in the picture before converting it to black or white resulting in a grain-fi lled photo.
Halftone Screen -This option recreates the look of the halftone dots used in traditional lithographic printing process.
Custom Pattern -Use this option to select a specific pattern to simulate the tone in the picture. You can select from the patterns preinstalled in Photoshop or even create and use your own pattern with the Edit > Define Pattern feature.


Confusingly, the term bitmap images does not refer to the pure black and white pictures that result from converting your photos to Bitmap mode. Instead a bitmap picture is one that is made up of rectangular pixel blocks which could just as easily be in color or grayscale. In this way all digital photographs are bitmap images as their color, brightness and detail are created from a grid ofpixels. In most applications the pixel structure of the photograph is not apparent as the individual blocks are so small that they become invisible to the viewer’s gaze. To see the underlying bitmap structure of your pictures magnify the image on screen using the View > Zoom In command until the photo is at 1600% magnification.


The new Black and White feature provides a powerful new way to convert color pictures to grayscale photos. The way that different colors are mapped to gray can be adjusted with the channel sliders in the feature and a color added to the result using the tint options.
The new tool provides all the power of the Channel Mixer without the drawbacks. Overall density of the conversion is handled automatically with reference to image content and so there is no need to watch the channel settings numbers to ensure that they add up to 100, as was the case with Channel Mixer. Add to this the ability to tint the final result and you will quickly find yourself falling in love with monochromes again.
The feature’s dialog contains six slider controls for each of the color channels (1). Moving a slider to the right increases the dominance of the color in the conversion result. By changing several sliders at once you can very quickly alter the look and feel of the resultant monochrome. Towards the bottom of the screen there is a separate section that controls the tinting of the picture (2). To add a color to the grayscale, click on the Tint checkbox and then use the Hue slider to adjust the color and the Saturation slider to adjust the strength or vibrancy of this color.
Favorite conversion values can be saved using the options in the settings menu next to the Presets area (3) of the dialog. Here you can Save current settings, Load previously stored settings or Delete any settings displayed in the Presets list.


Conversion examples: 1) Original color photo. 2) Conversion using the Auto button. 3) Conversion using 300, 189, 168, 63, 35, 63 settings. 4) Conversion using the Auto button and 42, 20 Tint settings.


The Black and White feature is also available as an adjustment layer for nondestructive conversions.


The way that layers interact with other layers in the stack is determined by the blending mode of the upper layer. By default the layer’s mode is set to Normal, which causes the picture content on the upper layer to obscure the picture parts beneath, but Photoshop has many other ways to control how these pixels interact. Called blend modes, the different options provide a variety of ways to control the mixing, blending and general interaction of the layer content.
The modes are grouped into several different categories based on the type of changes that they make (1).
The layer blend modes are located in the drop-down menu at the top left of the Layers palette (2). Blend modes can also be applied to the painting and drawing tools via a drop-down menu in the tool’s options bar (3) and to Smart Filters via the blending options displayed when double-clicking the Settings icon on the right-hand end of the filter’s Layers palette entry.


In the following blend mode examples the picture has two layers – ‘Top’ (1) and ‘Bottom’ (2). In each example the blend mode of the top layer has been changed to illustrate how the two layers blend together.

Multiplies the color of the bottom layer with the top layer producing an overall darker result. There is no image change when the top layer is white.

The opposite to the Multiply mode as it multiplies the inverse of the top layer with the bottom layer producing a much lighter image.

The pixels in the top layer are opaque and therefore block the view of the bottom layer. Adjusting the opacity of the top layer will make it semi-transparent causing it to blend with the top layer.

Darkens or ‘burns’ the image using the contents of the top layer. There is no image change if the top layer is white.

Makes the picture lighter using the top layer to dodge the bottom layer. There is no effect if the top layer is black.

Combines the top layer with the bottom using a pattern of pixels. There is no effect if the top layer is at 100% opacity. Reduce the opacity to see the effect. Example set to 80% opacity.

Uses the same approach as the Color Burn mode but produces a stronger darkening effect. There is no image change when the top layer is white.

Similar to the Screen mode but produces a much stronger lightening effect. There is no effect if the top layer is black.

Compares the color of the top and bottom layers and blends the pixels where the top layer is darker than the bottom.

Compares the color in the top and bottom layers and blends the pixels if the top layer is lighter than the bottom.

Combines the effect of both the Multiply and Screen modes whilst blending the top layer with the bottom. There is no effect if the top layer is 50% gray.

Similar to the Overlay mode but produces a more subtle effect. There is no change if the top layer is 50% gray.

Blends the light colors in the top layer using the Lighten mode and blends the dark colors using the Darken mode. There is no effect if the top layer is 50% gray.

Combines the Hue (color) of the top layer with the Saturation (color vibrancy) and Luminance (tones) of the bottom layer.

Uses the same approach as the Overlay mode but the change is more dramatic. Here the top layer is either Screened or Multiplied depending on its color. There is no effect if the top layer is 50% gray.

Creates a flat toned picture with limited colors and lots of posterization. The luminosity of the top layer is blended with the color of the bottom.

Combines the Saturation (color vibrancy) of the top layer with the Hue (color) and Luminance (tones) of the bottom layer.

Combines the effects of both Color Burn and Color Dodge modes and applies the blend based on the color of the top layer. There is no effect if the top layer is 50% gray.

Displays the tonal difference between the contents of the two layers by subtracting the lighter pixels from either of the layers. This results in a dark and sometimes reversed image.

Combines the Hue (color) and Saturation (color vibrancy) of the top layer with the Luminance (tones) of the bottom layer.

Similar to the Vivid Light mode but produces a more dramatic result. There is no effect if the top layer is 50% gray.

Similar to the Difference mode but produces less dramatic effects.

Combines the Luminance (tones) of the top layer with the Saturation (color vibrancy) and Hue (color) of the bottom layer.


The Bloat tool is one of several tools in the Liquify fi lter that allows you to stretch, twist, push and pull your pictures. It spreads the pixels apart in the center of a circle equal to the size of the current brush tip. The result is like the picture part has been blown up or ‘bloated’.
To bloat your pictures, select the tool, then adjust the brush size so that it is the same dimensions as the area to be changed. Then hold down the mouse button until the picture has changed the required amount. You can drag the mouse across the canvas bloating the pixels as you go.
To reverse the tool’s effect either select the Revert button (top right) or paint over the surface with the Reconstruct tool.


Photoshop CS3 contains a extensive array of blur fi lters including the Box, Shape and Surface Blur options. It might seem strange for image makers to actually want to destroy the sharpness of their photos but many interesting enhancement effects make use of these filter options.
Box Blur – Fast blur option that is great for large pictures and special effects work.
Surface Blur – The Surface Blur fi lter is an edge preserving filter that produces results faster than Smart Blur.
Shape Blur – A blur fi lter that creates its effect based on a user selected shape. The amount of blur is determined by the size of the shape, which is adjusted via the slider control.

Box, Shape and Surface Blur options all work in 16 bits and 32 bits per channel (HDR) modes.


Average – Averages all the color in the picture and then fi lls the canvas with this color.
Blur and Blur More –Smooths transitions and softens details. Blur More is stronger.
Gaussian Blur –Slider-controlled blurring based on the Gaussian distribution of pixel changes.
Motion Blur –Blurs the image in a specific direction. Great for speed enhancing effects.
Radial Blur –Creates either spinning or zooming blur effects.
Smart Blur –Provides more control over the type and placement of blur using Radius, Threshold, Quality and Mode adjustments.
Lens Blur –This fi lter is used to simulate realistic depth of fi eld blur effects that traditionally are created via camera and lens techniques. The Lens Blur also works in the 16 bits per channel mode.

Before applying a blur fi lter to a layer with transparency, make sure that the Lock Transparency option is turned off.


Along with the extensive range of blur fi lters available in Photoshop, the program also includes a Blur tool.
The tool is used like a paintbrush but instead of laying down color on the canvas the image is blurred.
The Size (brush tip), Mode (blend mode) and Strength settings for the tool are all controlled in the options bar.


It’s easy to add a border to your whole image or a selection. With an area selected choose the Select > Modify > Border command and enter a width in pixels. The mode will be grayed out from the menu if you haven’t made a selection.
The thickness of border is relative to the original image size – a 3 pixel border on a 300 pixel wide image will look much smaller when applied to a picture with a 600 pixel width.
When applied you’ll have a second set of marching ants, which you can fi ll using the Bucket tool or Edit >Fill command. Choose the color border you want and set this as the foreground color before applying the fill.


You can add a border on the fly when making prints with Photoshop.
The Border option is part of the extended print features found in the Print Preview dialog that is displayed when the Output option is selected (1). Click on the Border button in the right of the dialog (2). The size of the border is set in the Border dialog (3) that is displayed and the color for the stroked edge is always black.


For versions prior to CS2 the Show Bounding Box setting is located on the options bar for the Move tool.
Selecting this setting displays a bounding box complete with edge and side handles (small boxes) around the currently selected layer.
The handles can be used to scale, distort, skew, rotate and apply perspective changes interactively. See the Free Transform tool entry for the keystroke combinations for these changes.
From CS2 the Bounding Box option is replaced with the Show Transformation Controls (1).


The Box Blur filter (1) is one of the range of blur filters contained in Photoshop. Like all the blur filters the box blur adds a degree of unsharpness to the picture. The filter contains a slider control (2) that is used to adjust the level of blur it produces. Higher values create less distinct results.
The Box Blur filter tends to work very quickly, especially when used with large pictures and is often recommended for the creation of blur in special effects techniques.


For those users who have the Adobe Creative suite installed, Bridge contains another mode for the feature called Bridge Center. This is the pivot point for information, file management and integration of the various components in the Creative Suite.
In Bridge Center mode you can view news group posting and other web content (1), catch up on the latest tips (2) and tricks, create a new Version Cue project (3), synchronize color management settings across a range of Adobe applications (4), save files in groups (5) and access recently used files and folders (6).
If Bridge Center is not displayed in the Favorites panel then open the Edit > Preferences > General dialog and select the option from the Favorite Items section.


Bridge Home in CS3 replaces Bridge Centre in the CS2 version of the programs. The feature still remains a pivot point for information but rather than this panel being the place to find previously opened files, saved collections and centralized color settings, as it was in the last release, Bridge Home now houses online tutorials and product information.
You can display the Bridge Home panel by clicking on the entry in the Favorites panel or by selecting Bridge Home from the Window menu.
The Bridge feature, which was first introduced in CS2 as Adobe super browser, replaces the standard file browser option found in previous versions of Photoshop. In CS3 the program gets a revamp, sporting a new interface and some great new features. Bridge 2.0 now has a three panel interface which makes the most of the wide screen arrangements that many image makers are now using. Panels can be opened, resized and pushed and pulled around so that you create a workspace that really suits your needs and specific screen arrangements. You can even stretch Bridge over two screens, choosing to use one screen for previewing and the other for metadata, favorites or content (thumbnail representation of your asset collection).
Using Bridge- Selecting File > Browse displays Bridge and the fastest way to open a fi le from your picture library is to search for, and select, the fi le from within Bridge and then press Ctrl/Cmd O. If Photoshop is not the default program used for opening the fi le, select File > Open With > Photoshop. Multi-selected fi les in the browser can also be opened in this way.
Bridge is a separate application to Photoshop (stand alone), has its own memory management system and can be opened and used to organize and manage your photo files without needing to have Photoshop running at the same time.
To locate files - Files can be located by selecting the folder in which they are contained using either the Favorites or Folders panel or the Look In menu.
Alternatively, the Edit > Find command can be used to search for pictures based on filename, file size, keywords, date, rating, label, metadata or comment.

To manage files - Bridge is more than just a file browser, it is also a utility that can be used for sorting and categorizing your photos. Using the options listed under the Label menu, individual or groups ofphotos can be rated (with a star rating) or labeled (with a colored label) and these tags can be used as a way to sort and display the best images from those taken at a large photoshoot or grouped together in a folder. Labels and ratings are applied by selecting (or multi-selecting) the thumbnail in the Bridge workspace and then choosing the tag from the Label menu. Shortcut keys can also be used to quickly attach tags to selected files
Bridge 2.0 introduces a new approach to locating images - Filters. Housed in a panel of its own, this new feature displays a list of file attributes such as file type, orientation, date of creation or capture, rating, labels, keywords and even aspect ratio. Clicking on a heading alters the content display to show only those files which possess the selected attribute. Selecting a second Filter entry reduces the displayed content further. Using this approach, it is possible to reduce thousands of photos to a select few with several well-placed clicks in the
- 1) Look In menu
- 2) Favorites panel.
- 3) Preview panel.
- 4) Metadata and Keywords panel.
- 5) Content area - thumbnails.
- 6) Display modes and thumbnail size slider.
- 7) Loupe view
- 8) Delete, rotate, new folder, compact mode and show options.
- 9) Filter panel.

Filter panel. If you like the look of the photos that you have accumulated in the set then right-click on a thumbnail and choose the Group as Stack option from the pop-up menu. Bridge now supports image stacks or groups as a useful way ofkeeping images with similar content or taken in a single session together.
Viewing thumbnails - One of the real bonuses of Bridge is the multitude of ways that the thumbnails can be viewed in the workspace. Two different controls alter the way that Bridge appears - Workspace and View.
Workspace controls the overall look of the Bridge window and is centered around the Window > Workspace menu. Panels can be opened, resized, swap positions, be grouped together and pushed and pulled around so that you create a work environment that really suits your needs and specific screen arrangements. Once you are happy with the layout of the workspace use the Window
> Workspace > Save Workspace option to store your design. Most View options are grouped under the View menu and essentially alter the way that thumbnails are presented. Here you can choose to show the thumbnails by themselves with no other data (View > Show Thumbnail only) or with metadata details included (View > As Details).


There is also an option to display the content as a impromptu slideshow. In addition, Bridge 2.0 also contains the ability to display multiple pictures in the Preview panel in a side by side or compare manner, and a new Loupe tool, which acts like an interactive magnifi er, previewing a portion of the image at 1:1.
Tools used in Bridge – Although no real editing or enhancement options are available in the Bridge feature it is possible to use the browser as a starting point for many of the operations normally carried out in Photoshop. For instance, photos selected in the workspace can be batch renamed, printed online, used to create a Photomerge panorama, compiled into a contact sheet or combined into a PDF-based presentation all via options under the Tools menu. Some of these choices will open Photoshop before completing the requested task whereas others are completed without leaving the browser workspace.

Processing Raw inside Bridge – One of the real bonuses of Bridge is the ability to open, apply conversion settings and save Raw files from inside the Bridge workspace. Now there is no need to open the files to process via Photoshop. Instead Adobe Camera Raw can be accessed directly from inside Bridge – just multi-select the files and then choose File > Open in Camera Raw.


Bridge contains a range of ways that your images can be displayed and browsed. Listed under the View menu are options for viewing your pictures as thumbnails (1), in a filmstrip (2), with details (3) and with saved versions or alternates (4). To switch between view modes you can select the desired option from the View menu or press one of the view buttons at the bottom right of the Bridge screen. Also included in the View menu are options for displaying selected photos in a slide show, sorting images according to a variety of criteria and switching Bridge to its Compact Mode. Another way to organize the look of the Bridge work area is with the options found under Window > Workspace.


The Brightness/Contrast command helps you make basic adjustments to the spread of tones within the image.
When opened you are presented with a dialog containing two slider controls. Click and drag the slider to the left to decrease brightness or contrast, to the right to increase the value.
Keep in mind that you are trying to adjust the image so that the tones are more evenly distributed between the extremes of pure white and black. Too much correction using either control can result in pictures where highlight and/or shadow details are lost.
As you are making your changes, watch these two areas in particular to ensure that details are retained.


The Brightness and Contrast feature has been overhauled in this new version of Photoshop. In CS3 the feature has become much more usable. When moving either slider the black and white points of the picture remain fi xed, and only the middle values are adjusted.
Adding Brightness using the original feature (1) pushed all values towards the highlight end of the histogram, whereas the same action in the new version (2) moves the midtones but maintains the existing black and white points.
This doesn’t mean that substantial changes will not result in detail loss but it does make for a feature that will be more attractive for the mainstream photographer.
Selecting the Use Legacy option (3) reverts the feature back to the old way of working.


To change the order of layers in the layer stack you can either click on the layer in the palette and drag it to the new position or make use of the commands in the Layer > Arrange menu.
Layers can be moved up and down the stack using these options. Here we selected the ‘Bottom’ layer and then chose Bring Forward. The layer then moves up one place in the stack, positioning the layer in between the ‘Top’ and ‘Middle’ layers.


As well as options for moving layers up or down one position at a time, the Layer > Arrange menu also contains items for placing the selected layer at the very top (or bottom) of the stack.
Here the Bring to Front option was used to move the ‘Bottom’ layer to the top of the stack, effectively making it above both the ‘Middle’ and ‘Top’ layers.


In CS2 and CS3 this option takes the user directly to the Bridge workspace. In previous versions of the program it was this command that opened the Photoshop File Browser. Bridge now replaces this feature and in doing so provides much more power and control than a simple thumbnail browser utility.
If it is simple, no-frills fi le browsing that you are after then CS2 provides the option of a customized Adobe file open (and save) dialog (1).


Photoshop is shipped with a wide range of pre-made brushes which are stored in several groups in the Brush Presets palette.
To access a specifi c brush from the library fi rst display the pop-up palette by clicking the down-arrow next to the brush stroke preview in the options bar. Select a group of brushes from the menu accessed via the side-arrow (top right). Now scroll through the brush types and click to select the brush you want to use.
Ready-made Photoshop brush libraries can be downloaded from sites on the internet that specialize in providing free imaging resources. After downloading the fi le, click on the sidearrow in the top right of the Brush Presetdialog and select the Load Brushes itemfrom the menu. Locate the library fi le and click OK to incorporate the new brushes into the palette.


The Photoshop Brush tool lays down color in a similar fashion to a traditional paint brush.
The color of the paint is set to the current foreground color. The size and shape of the brush can be selected from the list in the Brush Presets list (1) in the options bar. Changes to the brush characteristics can be made by altering the settings in the options bar and the More Options palette.
In addition to changes to the size, blend mode (2), opacity of the brush (3) and the fl ow rate (4), which are made via the options bar, you can also alter how the brush behaves via the Brushes palette (5).
To draw a straight line, click to start the line and hold down the Shift key then click the mouse button a second time to mark the end of the line.


The palette is displayed by selecting Window > Brushes or pressing the Brushes Palette button located at the right end of the Brush tool’s options bar. The palette is used to creatively control the following brush characteristics or dynamics:
Brush Tip Shape – Design and change the shape of the painting tip of your brush.
Shape Dynamics – Control the size, angle and roundness jitters (automatic variation).
Scattering – Control the size, angle and roundness jitters (automatic variation).
Texture – Select specifi c textures to paint with and control their scale and depth.
Dual Brush – Creates a second brush tip that is combined with the fi rst to produce a single stroke.
Color Dynamics – Set hue, saturation, brightness and foreground/background jitters.
Other Dynamics – Adjust opacity and flow jitte rs.
Noise – Add noise characteristics to the painted areas.
Wet Edges – Create water color type effects where the paint builds up around the edges of the stroke.
Airbrush – Applies gradual buildup of color.
Smoothing – Produces strokes with smoother curves and edges.
Protect Texture – Maintains the same texture across all brushes.


The Burn tool darkens specifi c areas of a photograph when the tool tip is clicked and dragged across the picture surface.
The tool’s attributes are based on the settings in the options bar and the is governed by the exposure setting. Most professionals choose to keep this value low and build up the tool’s effect with repeated strokes over the same area.
You can also adjust the precise grouping of tones, highlights, midtones or shadows that you are working on at any one time by setting the option in the Range menu.


This is a pretty looking interface that’s an alternative to the normal Actions palette and is selected from the black triangle drop-down menu. Each action is assigned a color, making it easy to group similar actions.
This mode is useful for less experienced users of the Actions feature, but scripts can’t be edited so more advanced users should stay clear.