Your Images on the Web
Web compression formats side by side
Sending images as email attachments

Figure 12.1 In the web age it is critical that users are able to output their images in a format that is suitable for Net use quickly and easily. Photoshop Elements has always been great at getting user’s photos to the web quickly and easily, but in version 7.0, the level of interaction with the web is nothing short of revolutionary.
Since the first edition of this book, the World Wide Web has become an even greater part of our daily lives and, as I mentioned then, it is no longer sufficient to concentrate solely on the process of making great prints from digital files, as knowing how to output your pictures so that they are suitable for the web is not just a nice idea, it is now an essential part of the image-making process. In fact, there is a growing band of professional photographers whose work never becomes a print and only ever exists on our screens. See Figure 12.1.
Along with this change to display images online there is also a big move towards community sharing of ideas, techniques and photos. I’m not suggesting that this hasn’t always been the case, just look at the level of commitment in your local camera club, but as we have all become more web literate many of the activities that used to occur at such clubs are now being conducted online. People from all over the world not only share their photos with each other, but they also provide feedback on the images and suggest different techniques that could be used to improve the pictures. All via the internet.

Figure 12.2 The new web and community features in version 7.0 are a mix of the abilities of Photoshop Elements (1) and those found in Photoshop Express (2), Adobe’s web based image management and enhancement offering.
In recognition of this situation, Adobe has been gradually introducing internet services and links to their software. Photoshop Elements 7.0 leads this change with the inclusion of a full community program with the new release. Elements users now have the opportunity to join a dedicated group of image makers and in doing so reap the benefits of the support that such involvement brings. All this is achieved by bringing together the abilities of Photoshop Elements and Photoshop Express, Adobe’s free web based image management and editing program, which was released in Beta form early in 2008. See Figure 12.2.
This is a big change to how Photoshop Elements is used, but for many of you the degree of change may initially go unnoticed. Sure, the key features of the community are there, plain to see, at the Welcome Screen (community membership, photo backup, inspirational tutorials, web galleries and your own dedicated webspace) but once in Elements proper the differences are a little more subtle. See Figure 12.3.
Therefore, over the next few pages we will look at the skills you need to become a web-savvy image maker, and in the process we’ll investigate some of the new web features that have been introduced in Photoshop Elements 7.0.

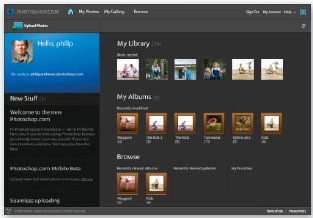
Figure 12.3 The key web based features in version 7.0 are displayed on the Welcome Screen, but you must become a member of Photoshop.com before seeing these and gaining access to them.

Figure 12.4 In version 7.0 it is possible to not only share your images on the web but also to share your ideas with fellow Element users. In this release Adobe provides a platform for the building of a energetic Photoshop Elements’ community and it all happens via your Photoshop.com membership. If you don’t have a membership, you can sign up for a free one at the Photoshop Elements Welcome Screen (1). Existing members can also sign in here (2).
The Photoshop Elements’ community
The majority of the changes that we will cover over the next few pages are based around a membership system that is associated with both Elements and Photoshop.com. Joining one gives you access to the other and vice versa. There is two levels of membership – Free, which provides access to all the main features and 2Gb of storage space for your photos, and Plus, where for the price of a small annual membership fee, members receive extra storage space and regular deliveries of inspirational tutorials and creative content (templates, clip art, etc.) that they can use with their projects.
It is an easy process to get started. Just click the Join Now button located on the Welcome Screen of Photoshop Elements 7.0. A Photoshop.com membership screen will appear where you can fill in your details. Pressing the Create Account key will process you application allowing you to Sign In the next time you open Photoshop Elements or display the Welcome Screen. See Figure 12.4.
Note: Keep in mind that for your membership application to be processed or for you to be able to sign in and use the new web features, your computer must be connected to the internet.
What is Photoshop Express and Photoshop.com?
The last couple of years has seen some big changes in the world of imaging. Apart from the release of new cameras with more and more megapixels and the increasing power of the software used to manipulate our photos, there has also been a shift in the way that people work with these images.
Remember the days when photographers spent long hours by themselves in the darkroom carefully crafting prints? Well in the first years of digital such was the life of the digital photographer as well. Although with the new technology they weren’t working in a darkroom, but rather they manipulated their photos in solitude at the desktop. Notice I said the first few years? That is because the lot of the image maker is changing. Now the process of working and presenting images is much more communal thanks to the connectivity of the internet. This change didn’t go unnoticed by Adobe and early in 2008 they released of Photoshop Express (PSX) in a public beta form.

Photoshop Express was Adobe’s initial answer to the growing need for an online image management, manipulation and storage solution.
Express was a free online image management, editing and presentation application. Employing a workflow that will be familiar to Elements users as well as photographers who have worked with other online photo applications such as Google’s Picasso, shooters upload their images to Albums before making adjustments using simple, but effective, tools, and then presenting the photos to the world in the form of animated slideshows or web galleries. New users needed to sign up for an account before being able to upload images and access PSX features, but they did receive 2Gb of storage space and one of the slickest user interfaces around for their trouble. With direct output to social networking sites such as FaceBook, the new application was loved by bloggers and those photographers who wanted a quick and easy way to get their images online.
With the release of Elements 7.0, Photoshop Express is now part of Photoshop.com. More features have been added to the site and stronger links have been created with the program itself. Now instead of a separate entity, Photoshop.com can be used as an online extension of Photoshop Elements. Cool!

With the release of Elements 7.0, Photoshop Express has become Photoshop.com.
Images and the Net
Even though fewer people are accessing the web through a modem and telephone line, the size of the images used for web work is still critical in the age of broadband. It is still true to say that the larger the picture file, the slower it will download to your machine. So preparing your files for Net use is about balancing picture quality and file size. See Figure 12.5. To help with this, several different file formats have been developed to include a compression system that shrinks file sizes to a point where they can be used on a website or attached to e-mails. The most popular of these is GIF and JPEG with the SWF, or Flash format, gaining more and more popularity in the last few years (especially with Photoshop Elements including several Flash output options for its Web Gallery, now called Online Album, feature). The problem with all these file formats is that small file size comes at a cost of image quality.

Figure 12.5 Preparing any content for web use is concerned with balancing quality and file size. This is especially true when placing your pictures on the Internet. Too much quality will mean that your photos will take a long time to display, too little and they will download quickly but be of poor quality.
GIF
With the GIF or Graphics Interchange Format, it is only possible to save a picture with a maximum of 256 colors. As most photographic pictures are captured and manipulated in 24-bit color (16.7 million colors), this limitation means that GIF images appear posterized and coarse compared with their full color originals. This isn’t always the case, but because of the color restrictions this format is mainly used for logos and headings on web pages and not for photographic imagery. GIF is also used for simple animations, as it has the ability to flick through a series of images stored in the one file. See Figure 12.6.
JPEG
In contrast, the JPEG format was developed specifically for still images. It is capable of producing very small files in full 24-bit color. When saving in this format it is possible to select the level of quality, or the amount of compression, that will be used with a particular image. See Figure 12.7. In more recent years, two new formats – PNG (Portable Network Graphics) and JPEG 2000 – have been developed that build upon the file format technology of JPEG and GIF. At present, these file types are not used widely but as time passes they are gaining more popularity.
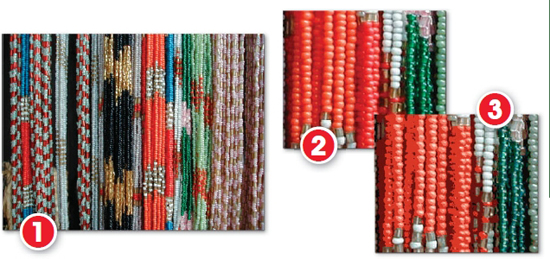
Figure 12.6 The compression technology built into the GIF format makes files smaller by reducing the number of colors in your pictures to a maximum of 256 (8-bit color). This means that GIF images are small and fast to display but the lack of colors makes them unsuitable for use with photographs. (1) Original 3.53 Mb picture containing 16.7 million colors. (2) Detail of original. (3) Detail of the same file converted to GIF format so that it is 0.43 Mb in size and contains 32 colors only.

Figure 12.7 The compression level in the JPEG format is selectable via the Quality slider in the JPEG dialog. Moving the slider to the left (1) creates a small, low quality file; moving it to the right (2) produces a better quality image but with a bigger file size.
JPEG 2000
JPEG 2000 (JPX or JP2) uses wavelet compression technology to produce smaller and sharper files than traditional JPEG. The downside to the new technology is that to make use of the files created in the JPEG 2000 file format online users need to install a plug-in into their web viewers. Native (i.e. built-in) browser support for the new standard will undoubtedly happen, but until then Elements users can freely exchange JP2 files with each other as support for the format is built right into the software. From version 2.0 Elements has supported the saving of pictures to the newest version of the JPEG format – JPEG 2000. The controls for this format are accessed in the format’s own preview dialog via the Save As option in the File menu.
PNG24 is a format that contains a lossless compression algorithm, the ability to save in 24-bit color mode and a feature that allows variable transparency (as opposed to GIF’s on and off transparency choice). File sizes are typically reduced by 5–25% when saved in the PNG format. Greater space savings can be made by selecting the PNG8 version of the format, which allows the user to select the number of colors (up to 256) to include in the picture. Reducing the size of the color set results in smaller files and works in a similar way to the GIF. Most browsers and image-editing programs support the PNG format natively, so no extra viewer plug-in is necessary.
Flash
Elements 5.0 was the first version of the program released after Adobe’s purchase of Macromedia. Since then Elements has embraced the Flash or SWF format that Macromedia developed for web sites. The galleries produced via the Elements’ Online Album feature, as well as those displayed at the Photoshop.com website, all use the Flash file format rather than the more traditional HTML pages and JPEG or Png files. Like JPEG, the Flash format is designed to quickly display high quality photos on the Internet using small file sizes.

Figure 12.8 Too much JPEG compression introduces artifacts or visual errors into your pictures. (1) Original uncompressed picture. (2) Overcompressed version of the photo showing extensive artifacts.
Editor: File > Save for Web and Editor: File > Save As > JPEG 2000
Both JPEG formats, as well as GIF and PNG8, make small files by using ‘lossy’ compression algorithms. This means that image quality and information are lost as part of the compression process. In simple terms, you are degrading the picture to produce a smaller file. Too much JPEG compression, in particular, and the errors or ‘artifacts’ that result from the quality loss become obvious. See Figure 12.8.
So how much compression is too much? Well, Elements includes a special Save for Web feature that previews how the image will appear before and after the compression has been applied. See Figure 12.9. Start the feature by selecting the Save for Web option from the File menu of either the Standard or Quick Fix editor workspaces. You are presented with a dialog that shows ‘before’ and ‘after’ versions of your picture side by side. The settings used to compress the image can be changed in the top right-hand corner of the screen. Each time a value is altered, the image is recompressed using the new settings and the results redisplayed.
JPEG, GIF and PNG can all be selected and previewed in the Save for Web feature. To preview JPEG 2000 compressed images use the Save As option in the File menu and select JPEG 2000 as the file type. This step will open the preview dialog specifically designed for this format. See Figure 12.10.

Figure 12.9 The Elements Save for Web feature produces a side-by-side comparison of your image before and after compression. The Save for Web option is available from both the Standard and Quick Fix editor workspaces.
By carefully checking the preview of the compressed image (at 100% magnification) and the file size readout at the bottom of the screen, it is possible to find a point where both the file size and image quality are acceptable.
By clicking OK it is then possible to save a copy of the compressed file to your hard drive ready for attachment to an e-mail or use in a web page.
FEATURE SUMMARY
1 With an image already open in Elements, pick the Save for Web (Editor: File > Save for Web) or Save As (Editor: File > Save As > JPEG 2000) option.
2 Adjust the magnification of the images in the preview windows to at least 100% by using the Zoom tool or the Zoom drop-down menu.
3 Select the file format from the Settings area of the dialog.
4 Alter the image quality for JPEG and JPEG 2000 or the number of colors for GIF and PNG8.
5 Assess the compressed preview for artifacts and check the file size and estimated download times at the bottom of the dialog.
6 If the results are not satisfactory, then change the settings and recheck file size and image quality.
7 Click OK to save the compressed, web-ready file.
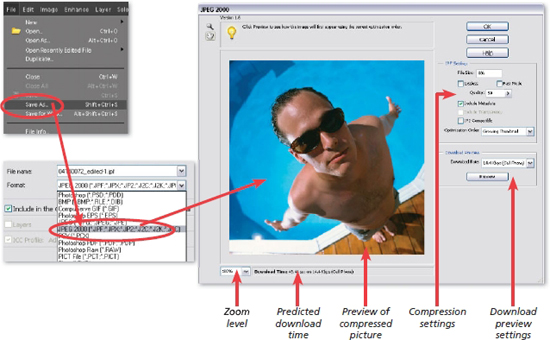
Figure 12.10 To start the JPEG 2000 preview dialog, select the Save As option from the File menu and pick the JPEG 2000 format.
Figure 12.11 Details of compression comparisons. (1) JPEG maximum compression. (2) JPEG 2000 minimum compression. (3) PNG8, 16 colors.
Web compression formats side by side
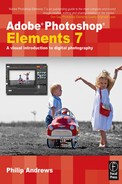
To give an indication of the abilities of each particular format, I optimized the same image and saved it in five different web formats. The differences in image quality and file sizes, as well as the best uses and features of each format, can be viewed in Table 12.1 and Figures 12.11 and 12.12.
Table 12.1 Comparison of file formats suitable for web use. * See detail of the compression type and setting applied to the same photograph in Figure 12.12.

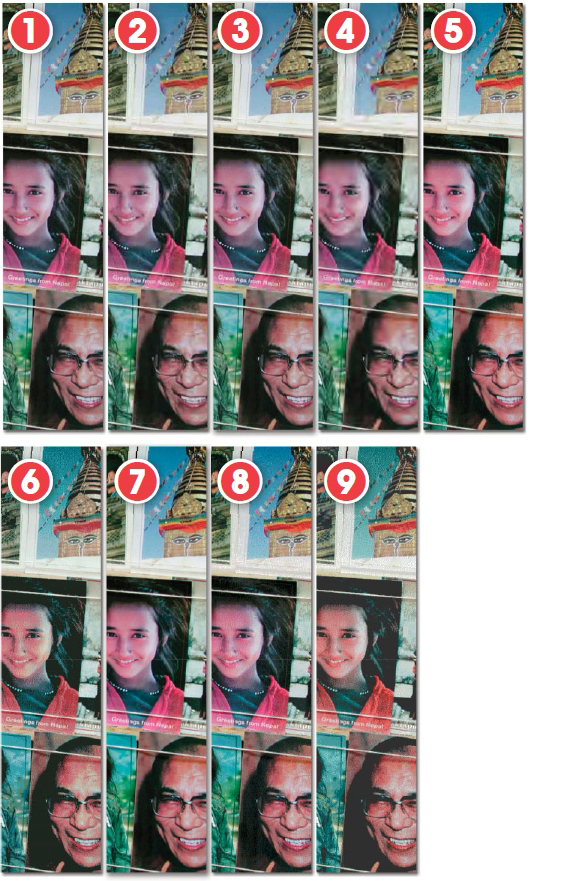
Figure 12.12 Side-by-side comparisons of the image quality of a variety of web optimized file formats at different compression settings. (1) JPEG, minimum compression. (2) JPEG, maximum compression. (3) JPEG 2000, minimum compression. (4) JPEG 2000, maximum compression. (5) PNG8, 256 colors. (6) PNG8, 16 colors. (7) PNG24. (8) GIF, 256 colors. (9) GIF, 16 colors.

Figure 12.13 The Online Album feature is one of the photo projects that can be found in the Share pane of both the Organizer (1) and Editor (2) workspaces.
Making your own web gallery
Organizer: Share task pane > Online Album or Editor: Share task pane > Online Album
Never before in the history of the world has it been possible to exhibit your work so easily to so many people for such little cost. The web is providing artists, photographers and business people with a wonderful opportunity to be seen, but many consider making your own website a prospect too daunting to contemplate. For the last few versions of Elements, Adobe has included a feature that takes several images and transforms them into a fully functioning website in a matter of a few minutes. In version 7.0 this feature has been overhauled so that now it links directly with your Photoshop.com account and the photos which are stored there.
The Online Album feature (previously called the Online Galleries or Web Photo Galleries) can be found under the Share pane in both the Editor and Organizer workspaces. See Figure 12.13. Clicking the Online Album button displays the first window in a multi-step wizard. The steps allow you to choose your images, set the template and style of the website, input the heading and adjust the colors used on the pages, and choose where you want the project saved and more importantly how the website is to be shared. The feature even provides the option for free hosting via the Photoshop.com website. In the previous version, the sharing website was called Photoshop Showcase.
Online Gallery versus Online Album
In version 7.0 the Online Album option replaces the Online Gallery feature that was available in the previous release. Both features are designed to help you quickly and easily create a presentation that displays your photos on the internet, but Online Albums uses a workflow that duplicates the Albums found in the Organizer space of Photoshop Elements and places the copy online at Photoshop.com. This means that not only are your Online Albums a means of displaying your photos but they also become way to archive your photos. For more details about Album synchronization go to Chapter 4.

An Online Album provides both a way to view your images on the web and also an automatic backup of your photos.
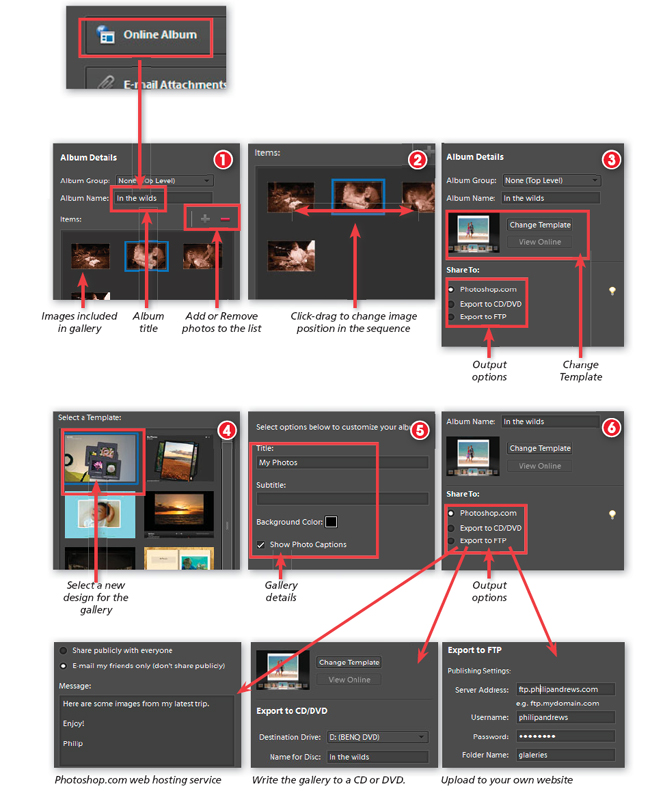
Figure 12.14 The Online Album wizard is accessed by clicking the Online Album button in the Share task pane on the right of the workspace. (1) The first step is to title the new Album and use the Add and Remove buttons to alter the pictures included. (2) Click drag the photos to change their position in the album sequence. (3) The next pane contains displays a preview of the gallery, a Change Template button and three share options. (4) Clicking the change template option will display other designs for the gallery. Select one and click apply to change the design. (5) The next dialog provides a range of settings where the user can customize the album. (6) The same Share options found in step 3 are listed in the next pane. Select one of these to publish your album.
Multi-select pictures to include
The photos that you use for the gallery can be multi-selected from the Photo Browser first, before entering the feature. This is different from earlier versions of Elements where you had to use all the pictures located in a single folder or directory. In the same vein, the revised Online Album wizard dialog contains a very useful Add/Remove pictures section (+ and – buttons on the top right) which displays a thumbnail list of those photos currently selected for inclusion in the website. In addition, the order that pictures appear in the web gallery can be changed by clicking and dragging thumbnails to new spots in the list. See Figure 12.14.
Gallery templates
For the first time version 5.0 included animated and interactive gallery types as well as the more traditional static thumbnail and display image templates. In version 6 the gallery choice was increased to now include a range of categories of design. In version 7.0 the template galleries have been arranged thematically and include the following groups: Classic, Family, Fun, Occasions, Seasons and Travel. See examples of some of the templates available on the next page in Figure 12.17. When creating an Online Album the gallery design is selected by default after clicking the Share button in the first pane. To select a different design the user needs to click on the Change Template button. They are then presented with the Template drop down menu and a list of representative thumbnails. See Figure 12.15.

Figure 12.15 The Template pane is accessed via the Change Template button and allows the user to select and apply a different design to their Online Album.
The template menu also includes a Show All entry to display all available templates as well as a Photoshop.com option for listing the templates available from the website. In the top right of the pane is a double-sideways arrow button that allows you to set the content for the template pane. See Figure 12.16. The choices are:
• Only Show Photoshop.com Content
• Only Show Local Content
• Show All Content

Figure 12.16 The settings options for the pane adjust which templates are listed – local ones from Elements or those from Photoshop.com.

Figure 12.17 The websites created with the Online Album wizard move way beyond simple static pages and now include the following example designs: (1) Reflection, (2) 35mm Slides, (3) Sliding Photos, (4) Old Map, (5) Comic Book, and (6) Photo Book.
Going live
With the site design completed, the next step is to transfer all the files to some server space on the Net. Companies called ISPs, or Internet Service Providers, host the space. See Figure 12.18. The company that you are currently using for ‘dial-up’ or broadband connection to the Net will probably provide you space as part of your access contract. As an alternative, there is a range of hosting businesses worldwide that will store and display your gallery for free, as long as you allow them to place a small banner advertisement at the top of each of your pages. By far the best solution though is to make use of the space provided with your Photoshop.com membership.

Figure 12.18 The completed website has to be transferred from your computer to a space on the Net hosted by an Internet Service Provider. This space can be provided by the company that supplies your Internet or e-mail account or alternatively you can make use of the Photoshop.com hosting service which links directly to the Photoshop Elements Online Album wizard.
This takes a lot of the hassle out of uploading your website as Adobe provides the ability to transfer your web pages to its own hosting service, Photoshop.com, from inside the Online Album’s wizard.

Figure 12.19 The easiest way to get your completed album online is to make use of the the webspace that is provided with your Photoshop.com membership. That way when you choose the Share To > Photoshop.com option from the Online Album pane, the transfer process is handled automatically.
Whichever route you take, you will need to transfer your site’s files from your home machine to the ISP’s machine. When using previous versions of Elements, this process was handled by an extra piece of software called an FTP or File Transfer Protocol program. Thankfully the Online Album feature contains an integrated FTP utility within the Share To section of the dialog. See Figure 12.19. You can choose between the following Share options:
Photoshop.com – Upload to a free online sharing area provided at Photoshop.com.
Export to FTP – Transfer to your own ISP or Net space provider.
Export to CD/DVD – An option for burning the gallery to a CD or DVD.
Step-by-step Online Album creation
Use these steps to guide you through creating your first photo website
FEATURE SUMMARY
1 Select the pictures you want to include in the site from those thumbnails displayed in the Organizer workspace. Hold down the Ctrl key to multi-select individual files and the Shift key to select all the files in a list. Alternatively, you can also drag a selection marquee around thumbnails in the Photo Browser.
2 Make sure the Task pane is displayed (Window > Show Task Pane). Click on the Create tab and then select the Online Album button.
3 Add in a title for the Album name. You can also select an Album group to include the new Album in. Remember that creating an online gallery is now a process of creating a Photoshop Elements’ Album and then publishing the new Album online. So this part of the wizard is about setting up the Album structure (Album and the Album group it belongs to). See Figure 12.20

Figure 12.20
4 If you want to add the Album to a new Album Group then you will need to exit the wizard by clicking the Cancel button at the bottom of the pane and then create a new Album Group using the settings in the Albums pane of the Organize tab in the Organizer workspace. See Figure 12.21
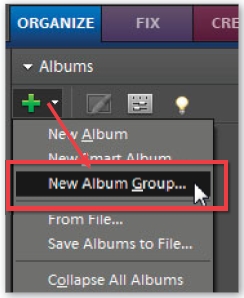
Figure 12.21
5 Add or remove photos from the list of those to be included in the album (thumbnails listed in the panel) by clicking the ‘+’ button to add more image or the ‘–’ button to remove ones already listed.
6 Adjust the position of the images in the presentation sequence by click-dragging the thumbnail within the group. Click the Share button to move to the following step.
7 A preview of the images in the last template used is now displayed in the workspace. The pane contains a summary of the Album details as well as a Change Template button. If you are happy with the design, select a share option from the list in the Share To section of the pane. Click the Next button to proceed. See Figure 12.12.

Figure 12.22
8 If you want to alter the look of your online gallery then select the Change Template button. The pane’s content changes to display a drop down menu of Template choices. Selecting one of these entries will display a list of thumbnails of the designs for each group. Clicking a thumbnail will display a description of the template features and its intended use. One entry on the Template list is titled Photoshop.com. Selecting this option will display templates from Photoshop.com rather than those stored with Elements on your computer. Click the Apply button to change the template to the new one selected from the list of press the Next button to proceed.
9 Automatically Photoshop Elements provides a preview of the web design complete with the images you selected in the main workspace to the left of the window. The content of the right side panel will be determined by the template selected in the previous step. Some web gallery designs have many settings and controls that can be used to adjust the look and feel of the gallery as well as the text included in it; others, particularly the highly automated ones, have few user-controlled settings to play with. You will need to click the Refresh button at the bottom of the panel to see the changes displayed in the preview section of the workspace. See Figure 12.23.
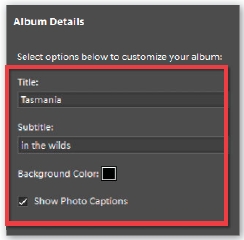
Figure 12.23
10 Many designs, however, do use photo details, like the caption entry, to provide titling for the individual photos. So if you want to, or need to, include these details in the design; exit the wizard by clicking the Cancel button. Add in caption details for your photos by adding text in the Properties palette (Window > Properties) and then restart the Online Album process. See Figure 12.24.

Figure 12.24
11 If available, adjust the color, opacity and text that will be used for the site and then choose whether you want to include any captions or file names under the display pictures.
12 With all the options set you can preview the way that the website looks and works in the workspace on the left of the panel. To update the preview to reflect your new settings click on the Refresh button at the bottom of the panel. Click Next to continue. See Figure 12.25.
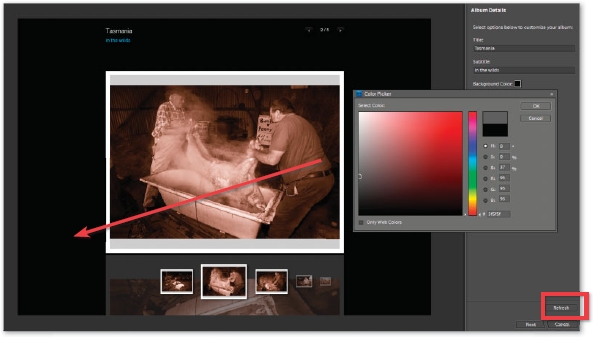
Figure 12.25 There is no longer the need to preview the website in a separate browser window (as was the case in previous versions of the feature) as now the functioning website is previewed directly in the workspace. To be sure that the preview is updated with your latest settings click the Refresh button in the bottom right of the panel.
13 There is no longer a formal Save step in the wizard as clicking the Share button in the final pane of the wizard automatically adds the new Album to list in the Organizer workspace as well as publishing it online.
14 Now select the way that you want to share your website from the three options listed in this panel. In this example the Export to FTP option was selected. Add in the details for your FTP site, which can be obtained from your service provider, and then click Upload to transfer the website to the web server. See Figure 12.26.
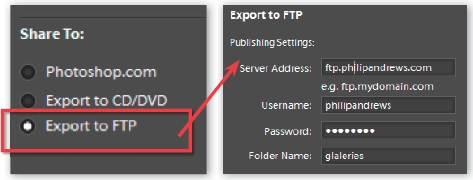
Figure 12.26 After selecting Export to FTP, the FTP dialog will be displayed. Here you can input the settings provided by your ISP (Internet Service Provider). Next, click the Upload button to transfer your website files to the space on the web server.
Sharing alternatives for your Online Album
As well as transferring your completed website to a space provided by your ISP, the Online Gallery feature provides two alternatives for sharing your pages – via CD/DVD or with the Photoshop.com. Both options are listed along with Export to FTP in the last panel of the Online Album wizard. See Figure 12.27.
CD/DVD distribution
FEATURE SUMMARY
1 After selecting the Export to CD/DVD option Elements will look for the CD/DVD drives installed in your computer and list these devices in a new Make a CD or DVD dialog.
2 Choose the drive to use for the writing and input a name for the disk in the area at the bottom of the dialog before clicking OK to start the writing process.
Uploading to Photoshop.com
FEATURE SUMMARY
1 Selecting the Photoshop.com option and clicking Next will re-display the details pane where you can adjust the settings for the Template. Click Next to continue.
2 Next, a new pane containing share settings is shown. Here you can choose to provide public access to the gallery via the Share publicly with everyone option, or share with friends via email invitations. If you select the second choice then you need to type in a message that will be sent with the invitation and select the contacts for the email.
3 Finally the choose the type of access that viewers will have from the entries at the bottom of the pane. The options are Download Photos and Order Photo Prints. Click Share to upload the files and send the invitations.

Figure 12.27 The Photoshop Showcase option allows you to upload and share websites and collections of photos with your friends over the Internet. The CD/DVD option provides the ability to save the completed website to disk for distribution separately.
Another approach to publishing to the web
As we have already seen, the Online Albums feature is linked to the general Album options found in the Photoshop Elements’ Organizer workspace. Given this link then it will come as no surprise that it is also possible for you to publish your pictures online via the settings in the Albums Pane. There are a couple of ways that you can create a gallery of images using this approach so let’s look at each in turn.
Share a new Album
The first starts with the creation of a new Album. You might not have noticed that Share is one of the options that is available when creating a new Album. The Share button sits between the Done and Cancel buttons at the bottom of the Album Details pane that is used to create a new Album entry. See Figure 12.28. Selecting this option at the time of Album creation, transfers the album images straight to the Online Album wizard. With a couple more clicks of your mouse (to move through the wizard steps) the photos are published. In one easy sequence you have created an Album and published the contents online. Good job!

Figure 12.28 Clicking the Share button in the New Album pane takes you directly to the Online Album wizard, fast tracking the web publishing process.
Now if you are an experienced Elements user then you probably have developed a workflow for publishing web galleries that involves:
1. creating an album,
2. adding selected images to the album,
3. adjusting the sequence of the pictures,
4. selecting the photos from the album that you want to use,
5. create the web gallery, and then
6. publish the gallery on line.
As you can see, in Photoshop Elements 7.0 this process is much simplified. Now you can fast track your gallery production right from the Album pane. It may take a little time to get used to this way of working, but it is certainly faster than the old method. It also has the added bonus that if you select the Backup/Synchronize settings, located in the same pane, you will instruct Elements to automatically back up the contents of this album.
For more details about creating and using Albums go to Chapter 4.
Okay, so you say to me, ‘This is great Phil. I can really speed up my organization and web publishing using this new way of working, but what of the Albums that I have already created?’ Good question!. Thankfully these too can be easy uploaded to Photoshop.com in a template based web gallery of your own choosing. Here’s how.
Display the Album pane first. Notice that there are different icons used for different Albums. These indicate the state of the Album. A double headed arrow shows the Album is marked for Backup/Synchronization and a small person indicates that the Album has been published online. See Figure 12.29.

Figure 12.29 The entries in the Albums pane are marked with different icons to signify their status. (1) A two way arrow is used for Backup/Synchronized albums. (2) A small person is used for Albums that have been Shared or published online.
To publish an existing Album, select its entry and then choose the Share icon (two people and a green arrow) on the left of the entry. This action will transfer the contents of the Album to the Online Album wizard. From here it is a simple matter of following the wizard steps to select the design of the gallery and published the photos to Photoshop.com. See Figure 12.30.

Figure 12.30 To publish an existing Album just select the Album entry and then click on the Share icon (two people and a small green arrow). This will transfer the images in the current album directly to the Online Album wizard.
The photos in Synchronized Albums can be viewed online but only via the Photoshop.com file browser and only by you when you are signed in to the site. For your images to be seen publicly in a template based or themed Album then you must publish them from Photoshop Elements and select the ‘Share publicly with everyone’ setting in the Online Album wizard.
Alternatively, you can make a synchronized album visible to the public or viewable by a group of invited friends by clicking on the Lock icon to the right of the Album entry in the My Files or My Gallery sections of Photoshop.com. You don’t get the choice of using a themed web gallery template when making images public in this way but it does provide another method of allowing others to see your photos. There are also options in the pop-up menu for allowing printing or downloading of the photos. See Figure 12.31.

Figure 12.31 Synchronized but not published Albums can be made viewable by friends or the public by clicking on the Lock icon and choosing the required action from the pop-up menu.
Photoshop.com is your new partner
The partnership between Photoshop Elements and Photoshop.com goes way beyond merely providing a space on the web to view the pictures that you process in Elements. Because Photoshop.com grew out of Photoshop Express the site also contains simple editing features such as the ability to crop, resize, auto correct, alter white balance, adjust highlights, boost color, tint and distort photos. See Figure 12.32.
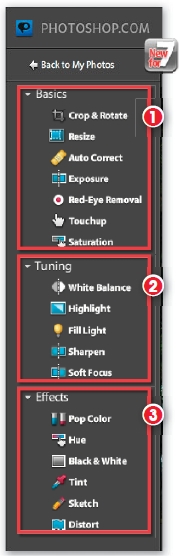
Figure 12.32 Image enhancement options in Photoshop.com are broken into three broad groups. (1) Basics, (2) Tuning and (3) Effects. Each group contains a series of adjustment entries.
Enhancing online
To adjust an image online, click onto the My Photos heading first and then navigate to the photo. You can look for the photos visually by selecting an Album entry or Library heading on the left of the screen and then scrolling through the thumbnails in the main workspace. Alternatively, you can locate the photo by typing a search term into the Search box at the top right of the workspace and then hitting the Enter key. Photoshop.com tries to match the search term with album and file names, tags associated with the photos and picture captions.
Once you have located the photo, clicking on the picture’s thumbnail switches the workspace to the edit mode and displays the photo as large as possible within the window. All the adjustments that can be applied to the photo, are grouped under three headings Basics, Tuning and Effects on the left. See Figure 12.33.

Figure 12.33 All image adjustments performed in Photoshop.com are undertaken in the Editing mode pictured to the left.
For most options, when an adjustment is selected from the list, a series of thumbnails displaying varying degrees of application for the adjustment are displayed above the image. Clicking a thumbnail will preview a change to the photo. With some adjustments a slider control is also provided below the thumbnails for finer control. One thumbnail of the group will be displayed with a curved yellow arrow. Click this entry to reset the photo to the way it was before selecting the current adjustment. Click the green tick (top right) to save the current adjustment changes and click the red cross to cancel the alterations.
Despite the preview being updated to reflect the changes that you have made, the adjustments are not actually applied to the image until they are saved upon exiting the Editing mode. This way of working allows you to revert the photo to its original state by clicking the Reset All button at the bottom of the window. Also contained at the bottom of the editing window is the View Original image which allows you to see how the photo looked before your adjustments.
Hold down the button to see the before image, let go of the button to return the picture to its current state.
Some enhancement options, such as Red-Eye Removal and Touchup, require the user to interact directly with the image. With these tools you will need to click on or paint over the parts of the photo that you want to change. The touchup tool in particular is very useful as it provides a way to remove small dust marks and spots from your photo. Once selected, you simply click and drag the a circle around the dust mark and then let the mouse button go. Automatically the dust spot is removed. If the result didn’t work as you expected, just click the circular orange arrow icon at the top right of the window. This is the Reset button and pressing it will remove all your retouching changes, allowing you to start again.
Once you are satisfied with your changes, you can saved the altered photo by clicking the blue Save button at the bottom of the editing window. This action will update the photo in the Photoshop.com library and will also update the picture in your Photoshop Elements Catalog if the picture belongs to an Album that is set for Backup/Synchronisation. See Figure 12.34.
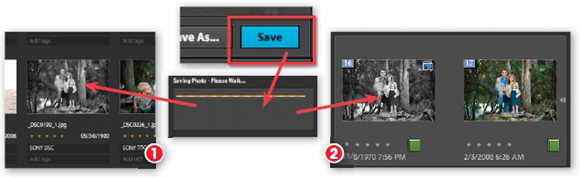
Figure 12.34 For photos that you have edited, and are part of a synchronized album, clicking the Save button updates the image at Photoshop.com (1) and in your Photoshop Elements catalog (2).
One great feature of the way that photos are saved is that it is always possible to return the photo back to its original state, that is, how it looked when you first imported it into Photoshop Elements or uploaded it to Photoshop.com. To do this when working at Photoshop.com, hover the mouse cursor over the thumbnail of the photo and a Photo Options menu heading will appear at the bottom of the thumbnail. Clicking on the downwards facing arrow, beside the heading, displays a pop up menu of choices. To remove the editing changes select the Revert entry. See Figure 12.35.

Figure 12.35 To remove the adjustments that you have made to a photo at Photoshop.com choose the Revert option from the Photo Options menu. Display this menu by hovering over the mouse cursor over the thumbnail and then clicking the menu heading when it appears.
The changed versions of the photo are saved in the Photoshop Elements catalog in a version set. The user can choose which version to display as the main thumbnail by using the selections found on the menu that is displayed when right-clicking the thumbnail.
Photoshop.com workspaces
As well as the editing mode we have been looking at here, Photoshop.com has four other key workspaces that can be used to manage and view your photos. To access any of these spaces select one of the options from the website’s menu bar. See Figure 12.36.
The Home (house icon), My Photos and My Gallery areas are available only when you are signed in as a registered member of the site. These workspaces are private and viewable only by you. You can decided to invite specific friends and family to view the Online Albums stored here and marked as private, but apart from these selected viewers, no-one else can access the photos stored in this area. Even then, they only have access to the Albums that you choose. A special version of My Gallery complete with your details and any public albums is viewable when the public navigates their way to your Photoshop.com webspace. The Browse area is the public part of the Photoshop.com website. Here you can not only view any of your Albums that you have chosen to mark as public, but also the public albums of all other Photoshop.com users. See Figure 12.37.

Figure 12.36 When signed in as a registered member, Photoshop.com has four main work areas that you can navigate between by clicking the headings at the top left of the window. They are broken into two groups. The first group has three options that can be accessed by the member (1) Home, (2) My Photos and (3) My Gallery and are used to manage, manipulate and control the sharing of your photos. The second group contains (4) Browse plus a special version of My Gallery set up for public viewing. The Browse space is a dedicated public area of the website displaying the images that can be viewed by all.
Home – The Home area is access by clicking the small house icon on the left of the menu bar. It contains messages from Adobe on the left, a greeting to the user at the top left and clickable thumbnail previews of your library, albums and those places you have recently browsed. At the top left is a button for uploading files to Photoshop.com.

My Gallery – This workspace displays any online albums that you have created in Photoshop.com or uploaded from Photoshop Elements. There is also space for displaying member details and buttons for linking your albums. Albums marked public can also bee seen here by anyone.

My Photos – This area also contains an Upload Photos button. Just below this is a file manager view of your library and albums plus links to other photo sharing sites. The main workspace displays image thumbnails and their associated information. This is the starting point for most image actions including rating, editing, printing and emailing.

Browse – Switch to the Browse space for viewing all the online albums created and shared by Elements users worldwide. Only albums that you mark as Available to All will appear here.
Figure 12.37 Photoshop.com has four key work and viewing spaces. Home, My Photos and My Gallery areas are available to the signed-in user and the Browse area and a cut down version of My Gallery is what the public sees. ![]()
The My Gallery area is unique among the workspaces in Photoshop.com as it can be viewed both by the public and also by the user. When signed in, you see a list of Albums, both public and locked, on the left of the screen, some details about the member that can be edited and thumbnails for the public albums in the main display area. Public Albums are marked with a brown album icon and those that are private are indicated with a small lock symbol. The state of any album can be changed by clicking onto the icon (lock or brown album) associated with the Album and selecting a new state from the menu that pops-up.
A different view of this My Gallery is displayed when a user navigates to your Photoshop.com website. The public will see a list of albums that you have marked as being able to viewed by everyone on the left of the screen and thumbnail versions of the same entries in the main workspace. The member details are displayed in the same spot but when viewed by the public this information is not editable. See Figure 12.37.

Figure 12.37 The view of My Gallery that you see when you are signed in (1) and the view the public sees when displaying your Photoshop.com web page (2). Albums can be shared or made private by clicking on their icon in the list and selecting a different option from the list (3).
Private and Public Albums
Using the idea of private and public albums provides the Elements user with security over the content that they produce, but the choice doesn’t have to be one or the other. You also have the option to invite a set of individuals to view your otherwise private album. The invitations are sent out via email and each message contains a special link that the viewer can follow to see your photos.
Setting up and sending the viewing invitations can be be accomplished in several ways. The first is at the time of creating the Online Album in Photoshop Elements. As we saw earlier in this chapter, one of the options available to the user when working their way through the Online Album wizard is to Email my friends only (don’t share publicly). Here you can add a message and select the recipients before hitting the Share button to send out the email invitations.
As an alternative for Online Galleries that have already been published, you can select the Private, but available to friends, option from the Pop-up menu that is displayed when clicking the lock icon of an album entry. Albums that are marked private or public can be made semi-private, or is that semi-public, in this way. See Figure 12.38.

Figure 12.38 You can change the state of a published online album to Private, but available to friends by selection the option from the pop-up menu.
Order Prints
As you will see in the next chapter, Photoshop Elements has a very powerful print engine built into the program. It is just as easy to print individual photos, groups of images and order photos to be printed by a third-part printing laboratory, from the Organizer as it is the Editor workspaces. With the linking of Elements to Photoshop.com we now have a couple of extra printing options.
The same Order Print option found in Photoshop Elements is also available to use with images that are stored online. To use the feature, select one (or a few) of the images in the My Photos workspace and click the Prints button at the bottom of the window. This will transfer the file to Adobe’s printing partner Shutterfly.com. By following the steps in the Shutterfly.com wizard you will then be able to choose the size and quantity of photos, pay for the order and have them printed and delivered.

Figure 12.39 When clicking the Prints button in Photoshop.com, the selected images from the My Photo workspace are transferred to Shutterfly.com for printing.
If you prefer to print your own then is is also possible to right-click a photo and choose the Print option from the pop-up menu.

Pro’s Tip: The right-click > Print approach certainly provides a quick and easy way to output your online photos but given the higher level of control that is possible with the Photoshop Elements print engine, it worth the extra to print the image from there. This may mean having to locate the photo in your Element’s catalog, or if it is an online-only picture, downloading it first before printing.
Extra Photoshop.com features
If you look to the bottom of the My Photos window you will see a range of other Photoshop.com features that we have yet to cover. See Figure 12.40. These include an Edit Photo button that can be used instead of double-clicking the thumbnail to open the picture in the editing workspace and a Remove Photo option for clearing the images from the Photoshop.com image collection.

Figure 12.40 There are several different buttons for extra features at the bottom of the My Photos screen.
Download to desktop
Pressing the Download button will display the Download Photo dialog. See Figure 12.41. Here you can select the size of the file (the image dimensions) that you want to transfer, before pressing the Download to complete the process. This sizing option is very handy if you are wanting to add the photo to a website as the dialog presents you with options for downloading a thumbnail size as well as an image that is suitable for full screen viewing.

Figure 12.41 The Download Photo dialog is used to size the photo before downloading the image.
Two extra buttons are also included at the bottom of the dialog – Link and Embed. Both features copy a piece of html code that describes the image, its size and where it is stored on the internet, to the clipboard. HTML or Hyper Text Markup Language is the coding used to build web pages. This piece of code can then be pasted (Ctrl V) into a webpage to either provide a link to the photo, or as a means of embedding the picture in the webpage.
A similar option, Embed Album, exists as an individual button in the bottom bar. Rather than embedding an individual image, this version of the feature embeds the whole album. Providing you with the ability to place Photoshop Elements Online Albums in websites other than Photoshop.com. Cool! See Figure 12.42.

Figure 12.42 By copying and pasting the code needed to display your album into new or existing web page, you can successfully display your photos in a range of websites other than Photoshop.com. .
These features may seem a little obscure to many of you, but they do provide a way of featuring your photos on other websites around the world quickly and easily. In the example above, the copied text was pasted into a new text document that was saved as the ‘test-embed-album.html’ file. The file was then opened into a web browser and the animated album appeared.
Slideshows at Photoshop.com
Alongside managing and editing your pictures Photoshop.com is also great at displaying images. As we saw earlier in the chapter, the Themed Online Albums, or slideshows as they are called in Photoshop.com, that you create in Elements can be uploaded to the website and viewed either by the general public or by a select group of fiends or family members. Using the Online Album feature in Elements to create these slideshows provides the user with the most control over the look of the final web gallery. Apart from being able to select from a range of designs or templates for the website, you also have the chance to adjust colors and titles for most designs.
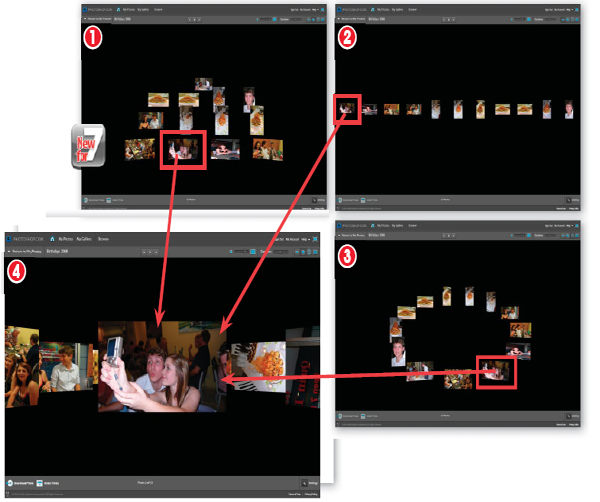
Figure 12.43 Photoshop.com has three different default slideshow styles – (1) Grid, (2) Filmstrip and (3) Ring. Selecting a thumbnail in any of these styles will display a larger view of the photo (4).
However, this is not the only way to view your images on Photoshop.com. The website has several built-in slideshow styles that can be automatically applied to albums that are stored on the site. There are three main styles to choose from: Filmstrip, Grid and Ring. Each presents the Album’s photos in a different animated style, allowing the user to select specific images which then snap into enlarged view. See Figure 12.43.
Figure 12.44 Users can switch between slideshow styles by pressing the display buttons located in the top right of the slideshow screen. Buttons for the three default styles are always available (1) but the themed button (2) is only present for albums which have been created with the Elements’ Online Album wizard.
To view an Album as a slideshow, select its entry in the My Photos workspace and then click onto the Album Slideshow option at the bottom of the screen. To switch between slideshow styles click on one of the Display buttons at the top right of the slideshow window. If a Themed slideshow has been created for the Album then this will be the default slideshow view for the Album. You can still switch to the other styles using the display buttons, returning to the themed presentation if you wish, by clicking on the fourth, themed button. This extra display button is only available when a themed slideshow has been created for an online album. See Figure 12.44.
Photoshop.com has a variety of controls that can be used to adjust how your slideshows look and work. You can alter both the length of time that each slide is displayed, and the size of thumbnails and featured images using the Duration and Zoom In/Out sliders at the top of the slideshow screen. More specific controls for each slideshow style can be displayed by clicking the Settings button (wrench or spanner icon) at the bottom of the screen. See Figure 12.45. In the Settings panel you will find controls for Layout, Viewing Settings and Audio (Photoshop.com provides several different tracks that can accompany your presentation).

Figure 12.45 You can display the slideshow settings panel on the right of the workspace by clicking on the Wrench icon (1) at the bottom of the screen.
Emailing from Photoshop.com
In the next section of this chapter we’ll look at different ways to email your photos to your friends and relatives from Photoshop Elements, but while we are discussing features found at Photoshop.com, we should examine the site’s email potential as well.
Let’s start with the simple task of how to email individual photos. After selecting the photo that you want to send from the My Photos workspace, click onto the E-mail Photo button at the bottom of the screen. This will display a small E-mail Photo window where you can add an address and a short message before clicking the Send button.
If you want to send the same image to multiple recipients then you can add several addresses as long as they are separated by a comma. See Figure 12.46.

Figure 12.46 To send a photo via email just select the image in the My Photos area of Photoshop.com and then click onto the E-mail Photo button. Add an email address and a message in the window that is displayed and then hit the Send button.
Photoshop.com also lets you make use of the email contacts that you already have stored on your computer. Most users will already have a collection of addresses stored in their email program. Photoshop.com can import and use these contacts with its email features. To use existing contacts you first need to add them to your Photoshop Elements’ Contact Book. Do this by displaying the book (Organizer: Edit > Contact Book) and then using the Import feature to add email addresses that you have stored in another program. Once this is completed, Elements will synchronize these new contacts with those used online at Photoshop.com as long as the Backup/Synchronization settings are active.
Now when emailing a photo from Photoshop.com you have the option of clicking onto the person icon in the top right of the E-mail Photo window and selecting the recipients for the message from the contacts listed. See Figure 12.47.

Figure 12.47 After importing the addresses saved with your email program to Photoshop Elements you can use the entries with the mailing options at Photoshop.com.
Emailing an Album
Photoshop.com also has the ability to email an album of photos. At the moment this is the only way to email a group of images. So if you are wanting to send several pictures to your friends add them to an album first and then select the album entry from those listed on the left of the My Photos workspace. Next, select the Share Album button at the bottom of the screen. Insert the email addresses of the recipients and add a short message. Using the settings at the bottom of the Share Album window you can also decide if you want to let those you are sharing with to be able to download and/or print the Album photos. This option doesn’t actually email all the photos in a message to your recipients. Instead, the feature sends a message containing a link that recipients can use to view the photos at your Photoshop.com webspace. See Figure 12.48.

Figure 12.48 When Sharing an Album from Photoshop.com you have the option to allow the viewer to download and/or print the photos (1). The feature sends an email message containing a link to the Online Album stored at your Photoshop.com website.

Figure 12.49 The E-mail Attachments wizard (1) provides the ability to adjust the size and compression (2) used with the photos you attach to your emails. Using the feature you can also add and remove contacts, via the Contacts Book, and type your message directly into the window (3). Pressing Next opens your email program (4), adds in your message and recipient details and attaches an optimized version of your picture to the new email document.
Sending images as email attachments
Organizer: Share task pane > Photo Mail or Editor: Share task pane > Photo Mail or E-mail Attachments
For many people, sharing images by sending them as email attachments has become a commonplace activity. Whether you are showing grandparents in another country just how cute their new granddaughter is, or providing a preview look at some holiday property, using email technology to send pictures is both fast and convenient.
Starting with Elements version 2.0 Adobe included a special Attach to E-mail function designed just for this purpose. Things have progressed with the new releases and now Elements users can email their images in two different ways – as Photo Mail or as E-mail Attachments. There is also a Contacts Book dialog in place of the old Add a Recipient option found in previous releases. Here you can add individual contacts, make groups from several e-mail addresses, and import and export to and from common e-mail contact formats such as vCards or Microsoft Outlook.
E-mail Attachments
The E-mail Attachment button starts the emailing process. Images are dragged from the content area in the Organizer workspace onto the Items section of the panel. The size and compression settings for the images are selected with the controls directly under the Items area. After clicking the Next button you can add a message and choose who to send the email to from the listed recipients. New recipients can be added with the Edit Contacts button (small person icon) in the top right of the panel. After all the participants have been selected, clicking the Next button will open your email program, create a new message and add in your pictures and recipients. See Figure 12.49 on the previous page.
FEATURE SUMMARY
1 You can select to use a photo that is currently open in the Editor workspace or multi- select images from inside the Organizer workspace.
2 Select the E-mail Attachments option in the Share task pane to start the feature.
3 Add or delete photos from the thumbnail list of those to include with the buttons at the top right of the dialog. Adjust size and compression of the photos and click Next.
4 Choose an existing recipient from the contacts list or add a new contact; add in a message and click Next to open your email program and create the new message.
Photo Mail
The second way to send your image by email is to use the Photo Mail option located in both the Share task pane of both the Organizer and Editor spaces. The first couple of screens are the same as the E-mail Attachment feature but, once you have selected the images and recipients to include in the message, clicking the Next button opens a new window where you can adjust the stationery, framing and layout of the images. See Figure 12.50.
FEATURE SUMMARY
1 After selecting the Photo Mail option from the Share task pane use the same steps as above (steps 1–3) to add images, choose recipients and include a message. Click Next.
2 In the new dialog that is displayed select the stationery (frames and background) style for the Photo Mail. Click the Next Step button.
3 Customize the look of the stationery by adjusting the background color, layout, photo size, font, borders and the inclusion of drop shadows.
4 Click Next to open your email program and create the new Photo Mail message.
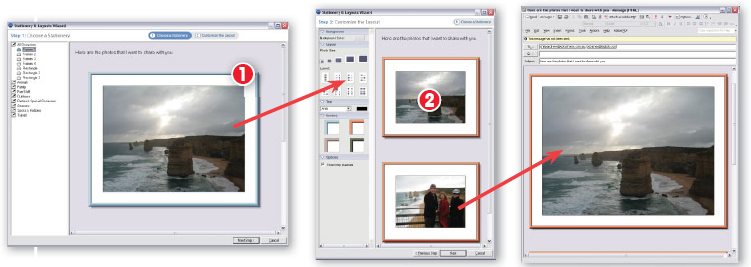
Figure 12.50 If, instead of using the E-mail Attachments option, you choose the Photo Mail format button then you will be prompted to choose the stationery (1) and decide on the layout (2) of the message in addition to the first couple of steps. The compression and size settings for this option are adjusted automatically.
Making simple web animations with Elements
In Chapter 7, we looked at how layers can be used to separate different image parts so that they are easier to enhance and manipulate. Here we will use layers to create simple animations for your website.
Traditional animation
Whether it is the production of a Disney classic or the construction of a small moving cursor for your web page, the basics of making animations remain the same. A series of images, or frames, is created with slight changes recorded from one picture to the next. The sequence is then compiled and each frame is shown in quick succession. As your eye sees a new image, your brain remembers the last, with the result that the still images appear to move.
Historically, the frame images were drawn and painted on a series of acetate cells. Large productions could use thousands of cells, each representing a small slice of movement, to produce just a few seconds of animation on screen. These days, many animation companies use digital versions of this old way of working but, despite all the technological changes, all animation is based on a sequence of still images.

Figure 12.51 Each layer of a multi-layer Elements’ file becomes a different frame in a GIF animation. (1) GIF animation. (2) Elements’ image layers. (3) Layers as animation frames.
Animation – the Elements’ method
Adobe has merged traditional techniques with the multi-layer abilities of its PSD file structure to give Elements users the chance to produce their own animations. Essentially, the idea is to make an image file with several layers, the content of each being a little different from the one before. See Figure 12.51 on the previous page. The file is then saved in the GIF format. In the process, each layer is made into a separate frame in an animated sequence. As GIF is a format that is used for small animations on the Net, the moving masterpiece can be viewed with any web browser, or placed on the website to add some action to otherwise static pages.
The easiest way to save the GIF file is via the Save for Web feature. See Figure 12.52. The Save for Web dialog contains the original image and a GIF compressed version of the picture. By ticking the Animate check box you will be able to change the Frame Delay setting and indicate whether you want the animation to repeat (loop) or play a single time only. This dialog also provides you with the opportunity to preview your file in your default browser. The final step in the process is to click OK to save the file. See Figure 12.53.
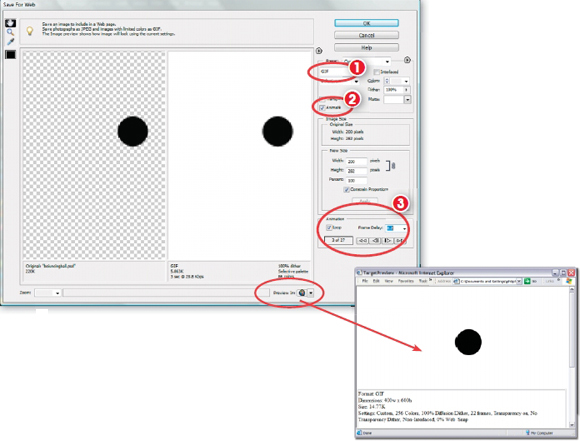
Figure 12.52 The Save for Web feature provides a series of settings that control the production of GIF animation files.
(1) The GIF file format is used for animation.
(2) The Animation option must be checked.
(3) Use the Animation controls to set Frame Delay and Loop settings and to preview the individual frames.
Figure 12.53 Your animation can be previewed in your default web browser directly from the Save for Web window.
Keep in mind when you are making your own animation files that GIF formatted images can only contain a maximum of 256 colors. This situation tends to suit graphic, bold and flat areas of color rather than the gradual changes of tone that are usually found in photographic images. So, rather than being disappointed with your results, start the creation process with a limited palette; this way you can be sure that the hues you choose will remain true in the final animation. It is also worth remembering that the Elements Animation feature is designed for short, non-complex compositions. If you are planning a major epic made up of large, high-resolution files that when compiled will play for an extended period of time, or even if you just want to add sound to your moving images, it would be best for you to use a dedicated animation package.
FEATURE SUMMARY
1 Create an Elements file with several layers of differing content.
2 Select File > Save for Web.
3 Ensure that the GIF setting is selected in the Settings section of the dialog.
4 Tick the Animate check box.
5 Adjust the Frame Delay option to control the length of time each individual image is displayed.
6 Tick the Loop check box if you want the animation to repeat.
7 Preview the animation by clicking the browser preview button. Close the browser to return to the Save for Web dialog.
8 Select OK to save the file.
Flipbooks – a new way to animate
Organizer: Share task pane > More Options > Flipbook
Flipbooks are a new way of creating small animations from a series of individual photographs. The results simulate the ‘old school’ animation technique where slightly different drawings were created on corners of successive pages of a small notebook. Flipping the pages between thumb and forefinger created a sense of motion.
The process for creating an Elements Flipbook is simple. Select the pictures to include from those displayed in the Organizer workspace and then choose the Flipbook entry in the More Options section of the Create task pane. See Figure 12.54. Set the Speed in frames per second, Order and Output options in the Flipbook dialog and then click Output to create. The resultant WMV (Windows Media Video) file can be played with any Windows machine with the latest version of Windows Media Player installed. See Figure 12.55.

Figure 12.54 After selecting the images to be included in the Flipbook choose the option from the More Options section of the Create task pane.

Figure 12.55 Use the settings in the Flipbook dialog to adjust the frames per second that the photos are flipped, along with the size of the final video. Flipbooks are output in WMV format, which is compatible with most Windows machines.
Creating your own slide shows
Organizer: Share task pane > Slideshow
Elements contains a Slide Show editor which can produce a variety of different types of presentations. The feature contains an easy-to-use interface and options that allow users to create true multimedia slide shows complete with music, narration, pan and zoom effects, transitions, extra graphics, and backgrounds and titles. The finished presentations can be output as a file, burnt to CD or DVD, e-mailed as a slide show, sent directly to your television (Windows XP Media Center Edition users only) or sent to Premiere Elements for further editing (for users who have this program installed). See Figure 12.56.

Figure 12.56 The fully featured Slide Show editor in Elements provides more output options than ever before.
Creating slide shows
Creating presentations in version 6 uses an approach that centers all production activities around a single editor interface and it is only at the time of outputting that you choose the type of slide show that you want to create. In this way you can create (and save) a single slide show project and then repurpose the presentation in many different forms (online, DVD, PDF slide show or direct to TV) by simply selecting different output options. See Figure 12.57.

Figure 12.57 When selecting the Slide Show option from the Share task pane in the Organizer workspace the Slide Show Preferences dialog is displayed first, allowing you to set the default options that will apply to the whole presentation. After clicking OK the full Slide Show editor is displayed.
Slide shows in action
Though the Slide Show editor may at first seem a little complex, having all the controls in one place certainly means that you can create great multimedia presentations easily and efficiently. See Figure 12.58.
The following key features are included in the Editor:
• Automatic editing: Rotate, size, change to sepia, black and white or back to color and apply Smart Fix and Red Eye Fix to your photos without leaving the Slide Show editor. Click the Preview image to display the edit options in the Properties palette. See Figure 12.59.
• Styled text: Select from a range of text styles with click, drag and drop convenience (‘1’ in Figure 12.58).
• Add graphics: The Slide Show editor now includes a variety of clip art that can be added to your presentations. Double-click or click-drag to place a selected graphic onto the current slide (‘2’ in Figure 12.58).
• Transitions: Add individual transitions between slides by clicking the area in the middle of the slides in the storyboard and then selecting the transition type from those listed in the Properties pane (‘3’ in Figure 12.58).
• Pan and Zoom: Add movement to your still pictures by panning across or zooming into your photos. Simply select the slide in the storyboard and then check the Enable Pan & Zoom option in the Properties pane. Click on the left thumbnail (Start) and set the starting marquee’s (green) size and position, then switch to the right thumbnail and adjust the ending marquee’s (red) size and position (‘4’ in Figure 12.58).

Figure 12.58 The Slide Show editor provides a single workspace for the creation and editing of your presentation creations.
• Quick Reorder: This new sequencing screen enables you to quickly and easily adjust the position of any one photo in the presentation sequence using click and drag (‘5’ in Figure 12.58).
• Music and narration: Add music and extra audio to the show using the Add Media button and incorporate narration using the built-in slide show recorder (‘6’ in Figure 12.58).
FEATURE SUMMARY
Step-by-step Slideshow creation
1 Preselect the photos to include in the show from within the Photo Browser and then select Organizer: Create task pane > Slide Show.
2 Set the defaults for the presentation in the Slide Show Preferences dialog.
3 Adjust the slide sequence by click-dragging thumbnails within the storyboard or Quick Recorder workspaces.
4 Insert transitions by clicking the space in between slides and selecting a type from the menu in the Properties pane.
5 Add graphics and text by click-dragging from the Extras pane.
6 Record voice-over by selecting a slide and then using the Narration option in the Extras pane.
7 Add existing audio by clicking the soundtrack bar at the bottom of the storyboard.
8 Produce the slide show by selecting File > Output Slide Show and picking the type of presentation to produce from the Slide Show output dialog.
Editing the slide photos
The Properties palette displays several simple editing controls when you click a photo in the preview area of the Slide Show editor. Although the best approach is to ensure that all editing and enhancement changes are applied to the photos before their inclusion in a presentation project, these controls can be used for making quick simple changes to the images used in individual slides. The options include:
Rotate – Pivots the photo 90° left or right.
Scale – Makes the photo bigger or smaller.
Crop to Fit – Enlarges the photo to fill the whole slide frame even if this action crops the edges of the picture.
Crop to Slide –Fits the photo within the boundaries of the slide without cropping any image details.
Auto Smart Fix – Applies automatic adjustment of colour, contrast, brightness and sharpness to the picture.
Convert to Black and White – One-click conversion to black and white.
Convert to Sepia – One-click conversion to sepia toned monochrome.
Auto Red Eye Fix – Removes red eye from portraits taken with a flash.
More Editing – Opens the slide in Elements’ Editor workspace where the edited file is saved as a Version Set and added to a catalog once complete. See Figure 12.59.

Figure 12.59 Clicking the photo in the preview area of the Editor switches the contents of the Properties palette to contain simple editing tools. These include Rotate left and right, Scale and Crop options, Auto Smart Fix, Convert to black and white or sepia buttons and Auto Red Eye Fix. For more advanced editing tasks click the More Editing button to transfer the photo to the Full Edit workspace.