Introducing Photoshop Elements 7
Adobe Photoshop Elements 7 – new tools and features
Photoshop Elements is the type of software tool that photographers, designers and illustrators use daily to enhance and change their photos. There are many companies who make programs designed for this purpose and in this field Adobe has a substantial advantage over most of its competitors because it also produces the flagship for the industry – Photoshop. Now in its eleventh version, this product, more than any other, has forged the direction for image-editing and enhancement software worldwide. In fact, the tools, functions and interface that are now standard to graphics packages everywhere owe a lot to earlier versions of Photoshop.
With the release of Elements, Adobe recognized that not all digital imaging consumers are the same. Professionals do require a vast array of tools and functions to facilitate almost any type of image manipulation, but there is a significant and growing number of users that want the robustness of Photoshop but don’t require all the ‘bells and whistles’. This makes Elements sound like a cut-down version of Photoshop, and to some extent it is, but there is a lot more to this package than a mere subset of Photoshop’s features. Adobe has taken the time to listen to its customers, and has designed and included in Elements a host of extra tools and features that are not available in Photoshop. It’s this combination of proven strength and new functions that makes Elements the perfect imaging tool for digital camera and scanner owners who need to produce professional-level graphics economically.
Adobe Photoshop Elements 7 – new tools and features
The release of version 7 of the program builds upon the firm foundation and user following that the previous editions secured. The revision contains a variety of new tools and features that I predict will fast become regularly used favorites. At the time of going to press this release is a Windows-only version and builds extensively on the extra organization and management features that were added in 3.0 and were originally part of the Photoshop Album package. One of the biggest changes is the extending of this management function to now include the features found at www.photoshop.com. This expansion to include a dedicated webspace designed to work seamlessly with Photoshop Elements is a change that shouldn’t be overlooked as many believe that it flags the future of the program. The web is such an all-pervading presence in most people’s lives now that it seems natural that Elements should spread its imaging wings online.
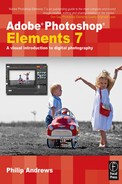
Table 2.1 details some of the changes that are ‘New for 7’ and compares them with features found in previous versions of Photoshop and Elements. The new or revised features are also highlighted throughout the book with the ‘New for 7’ symbol ![]() . Video tutorials detailing how to use these new features are also located on this book’s website, www.photoshopelements.net, and indicated in the text with an on the web symbol
. Video tutorials detailing how to use these new features are also located on this book’s website, www.photoshopelements.net, and indicated in the text with an on the web symbol ![]() . Unlike some of the previous versions of the program, version 7 is a Windows-only release and so this text contains no Macintosh equivalents.
. Unlike some of the previous versions of the program, version 7 is a Windows-only release and so this text contains no Macintosh equivalents.
Apart from the inclusion of a host of new and revamped features like the Smart Brush tool, quick fixes for common problems (such as whitening teeth, creating bluer skies and improving skin color) and the new Scene Cleaner feature the program now includes a variety of web linked options available directly in the Organizer workspace. The big push with this release is certainly centred around the building of a thriving Photoshop Elements community. This is plain to see right from the start with membership options available on the Welcome Screen and the ability to share via, publish to, and backup your pictures to www.photoshop.com distributed throughout the program. With membership to this new Elements’ community comes rewards. Adobe promises regular delivery of new and inspiration content, great tutorials from leading Elements’ experts (yes even yours truly) and masses of online storage space for your photos. In addition Elements members can share their images and movies with their friends and relatives privately or choose the public option and show the world the images they have created. This level of connectivity is powered by the links to www.photoshop.com and the features that are available in Photoshop Express. See Figure 2.1. The one downside to the community concept is that in initial release these options will only be made available to Elements’ users based in the United States.

Figure 2.1 Photoshop Elements 7 combines many of the advanced editing features contained in Photoshop CS4 (1) along with management tools that started life with Photoshop Album (2) and now includes the powerful online features of www.photoshop.com (3).
The Photoshop Elements 7 workflow
Elements 7 provides a workflow solution from the moment you download your files from camera, scanner or the Net, through organization and manipulation phases and then onto printing (photos, books) or sharing the pictures electronically (online gallery, slide shows, e-mail attachments). Understanding how the various components in the system fit together will help you make the most of the software and its powerful new features. See Figure 2.2.
Table 2.1 Summary of features of different versions of Adobe Photoshop Elements and Adobe Photoshop.
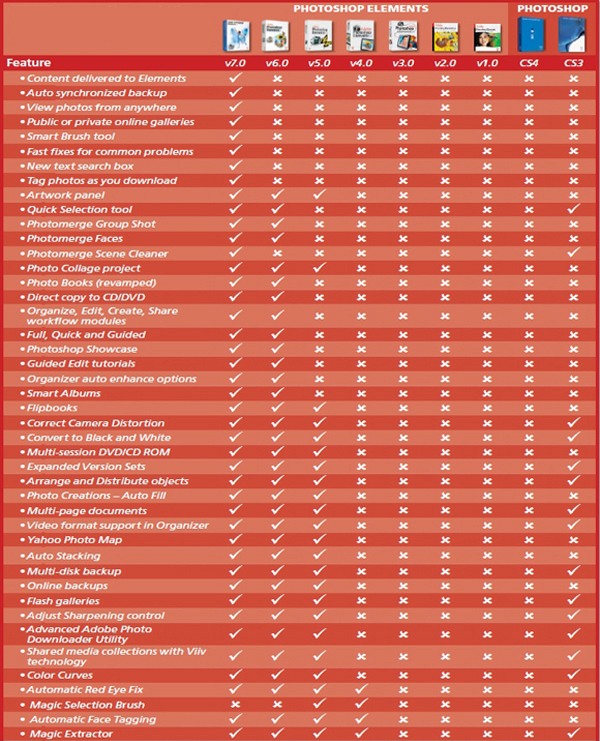
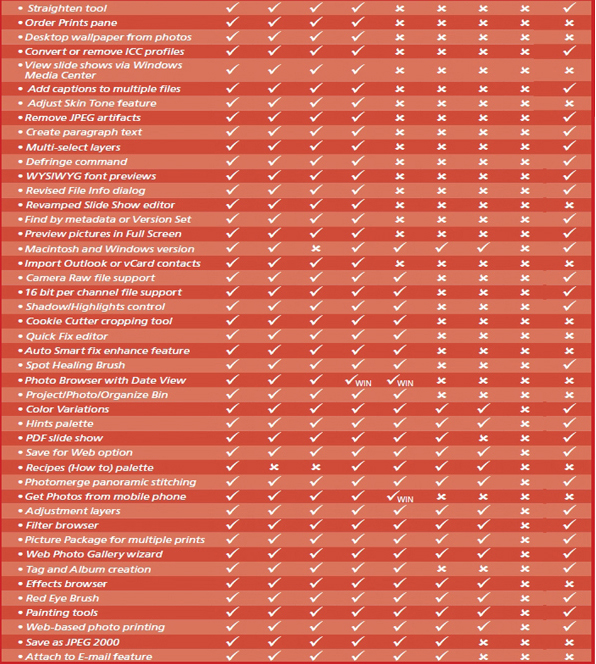
Figure 2.2 The Photoshop Elements workflow moves from download through editing and enhancing to output.

The interface
The program interface is the link between the user and the software. Most graphics packages work with a system that includes a series of menus, tools, palettes and dialog boxes. These devices give the user access to the features of the program. The images themselves are contained in windows that can be sized and zoomed. In this regard Elements is no different. Version 7 carries on the same look and feel that we saw in version 6 with a dark gray surround to most windows and a special Task pane that sits on the right of both Organizer and Editor workspaces. Clicking any of these ‘task’ headings will set up the workspace for the desired action (creating, sharing, editing, etc.) and listing a range of options in the pane itself. See Figure 2.3.

Figure 2.3 The interface for the Windows-only release of Elements 7 Full edit workspace.
Photoshop Elements 7 contains three different editing workspaces – Full, Quick, and Guided. For many editing and enhancement tasks you will be using the Full editor, so over the next few pages we will look at the various parts of this screen and how they are used to allow you to interact with and change your pictures. Later on in the chapter we will also examine the interface of other parts of the Elements system such as the Organizer, Quick, Guided editor and Create, Share options. At the time of publication Photoshop Elements 7 is supplied as a Windows-only package, whereas previous editions of the program have been released in two forms to suit both the Macintosh and Windows platforms.
You control the look of Photoshop Elements 7
One of the most striking and immediately obvious changes for Elements 6 was the look of the interface. Not all users liked the change and in version 7 the Adobe engineers have provided a Interface Brightness control that lets the user decide how dark or light the interface is. Located along with other system settings in the Preferences (Editor: Edit > Preferences > General) a simple slider controls the look of the interface. The Reset Brightness button returns the control to the default setting. See Figure 2.4.

Figure 2.4 In response to user requests the brightness of the interface for the Elements Editor workspace can be lightened or darkened using the new Appearance Options located in the General section of the editor preferences ( Edit > Preferences > General).
New tools and features
As with every new version of Photoshop Elements Adobe has added new features an updated existing tools for this release. These changes include great new productivity tools such as:
• The new Smart Brush Tool allows users to paint on changes to their photos. By combining the selection abilities of the Quick Selection tool and the enhancement powers of Adjustment layers, the new tool automatically seeks out picture parts as you paint and then applies the changes non-destructively to the photo. The new feature is available in two different variations: the Smart Brush Tool, for changes to larger parts of the photo, and the Detail Smart Brush Tool, for making changes to smaller, specific image parts such as teeth and eyes in a portrait. The user selects the type of enhancements to apply from a range of over 65 that ship with Elements before proceeding to paint on the changes to the picture. See Figure 2.5.
• Carrying on the Elements’ tradtion of pushing the abilities of the switching powerof the Photomerge feature, Elements 7 sees the introduction of a new option – the Photomerge Scene Cleaner. Using the feature you can build a composite image from selected parts of several photos. The typical application of this is the removal of tourists from front of landmark buildings. Simply shoot a variety of source photos of the landmark and then pick the best bits from each.
• New tools have been added to the Quick Fix editing space. Now sitting alongside the Red Eye Removal tool, there is the Toothbrush (whiten teeth) and Bluer Skies brushes as well as the very cool Black and White Paintbrush. The inclusion of these tools in the Quick Fix workspace borrows some of the power editing ease of the new Smart Brush Tool from the Full Edit workspace.
• The Guided Edit workspace gets new step by step enhancement options that include Effects such as Pencil Sketch and Old Fashioned and Adjustments like using Levels and fixing distortion, but the big news is the addition of the new Action Player. This new feature has been created to allow Elements users to play Photoshop Actions. Actions are a series of saved editing steps that can be applied to an image by replaying via the Action Player. The program ships with a set of premade actions but it is also possible to create your own actions in Photoshop and then install them into Elements. Expect to see Elements users the world over creating and swapping their favorite enhancement actions. See Figure 2.6.
• The Surface Blur filter has been added to the list of Blur filters available in Photoshop Elements. When used carefully, this filter is particularly good for softening surface texture in areas such as mottled skin. See Figure 2.7.
• Elements now integrates more tightly with Adobe’s online presence, Photoshop.com. It is true that in previous versions of the package it has been possible to upload completed Web Galleries to free webspace provided by Adobe but in this release the web integration goes way beyond simple site hosting. Now registered Elements users get extra features such as being able to synchronize their favorite Organizer Albums with a version online providing automatic backup of their best pictures. Just as before, your Elements-created web galleries can be published online, but now these images can not only be viewed from almost any computer but also with specific mobile phones via Photoshop.com Mobile. See Figure 2.8.

Figure 2.5 The Smart Brush Tool selects and changes image parts in the one action. Using one of a range of preset enhancement options you can paint on the changes with the new tool.

Figure 2.6 The Action PLayer in the Guided Edit workspace is designed for playing recorded Photoshop actions and can be used for applying sophisticated changes to a photo.

Figure 2.7 Adding a single new blur filter may seem like a strange inclusion except that the Surface Blur filter is good for softening textured areas.
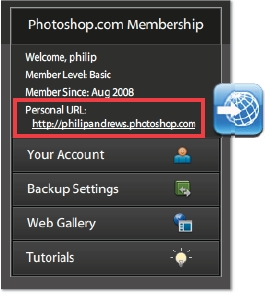
Figure 2.8 Becoming a member to the new Photoshop Elements community has many benefits including your own web address at Photoshop.com.
• There are two levels of membership availble for Elements users, a free option that provides the new features above and a paid ‘Plus’ level which provides extra benefits for the Elements enthusiast. These include regular deliveries of extra templates for the creative projects you undertake in Elements or online, access to special inspirational tutorials and videos designed to build your skills, and more backup space for safely archiving your images.
• Finding thew images you want quickly and easily is a constant challenge for any photographer. Photoshop Elements 7 adds to its already impressive array of ‘Find’; options with a new Text Search which can locate pictures using keywords, dates and file information. See Figure 2.9.
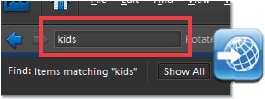
Figure 2.9 Emulating the search features found in both Mac and Windows, Elements now has its own Text Search feature located at the top of the Organizer workspace. With this feature you can quickly locate pictures based on keywords, file information and dates.
Revamped favorites
In addition to these new features version 7 also showcases improved versions of many of the program’s existing tools and functions that have proven to be firm favorites with image makers worldwide. Revamped features include:
• In the previous version of Elements the Artwork palette became a pivot point for a lot of users when looking to create a different look for their projects. In this release even more background, themes, clip art and effects have been included.
• Users were interduced to some stunning animated web gallery templates in the last release. In version 7 you have more choice of online album styles.
• The Adobe Photo downloader (APD) now includes a new Import into Album option that creates a new Elements’ Album entry and then adds the photos that you are downloading to it; all in one action. See Figure 2.10.

Figure 2.10 Adobe Photo Downloader now includes a special setting that adds transferred images to a new Elements Album.

Figure 2.11 The menu bar provides access to the major features and commands in the program. (1) Main menu bar. (2) Menu. (3) Sub-menu.
Menus
Most image-editing programs contain a menu bar with a range of choices for program activities. In addition to the standard File, Edit, View, Window and Help menus, Elements contains five other specialist headings designed specifically for working with digital pictures. See Figure 2.11.
The Image menu contains features that change the shape, size, mode and orientation of the picture. Grouped under the Enhance heading is a range of options for altering the color, contrast and brightness of images, as well as the new Auto Sharpen, Adjust Sharpness and Convert to Black and White features. All functions concerning image layers and selections are contained under the Layer and Select menus. The special effects that can be applied to images and layers are listed under the Filter menu and in this latest release the Unsharp Mask filter has been moved to the Enhance menu.
Selecting a menu item is as simple as moving your mouse over the menu, clicking to show the list of items, and then moving the mouse pointer over the heading you wish to use. With some selections a second menu (sub-menu) appears, from which you can make further selections. See Figure 2.11.
Some menu items can also be selected using a combination of keyboard strokes called shortcuts. The key combinations for these features are also listed next to the item in the menu list. For example, the Free Transform can be selected using the menu selections Image > Transform > Free Transform or with the key combination of Ctrl + T (the Control key and the letter ‘T’).

Because Photoshop Elements 7 has several different workspaces or modes that you can work within, I will indicate the workspace first before the menu sequence required to select a feature. For instance, to select the Free Transform feature (as pictured in Figure 2.11) from inside the Standard Editor space the notation would be Editor: Image > Transform > Free Transform.

Figure 2.12 The toolbox in the Elements Full Editor contains a set of tools that are used directly on the picture surface. Keystrokes for selecting tools are indicated in brackets. When dragged away from the side of the workspace the tool bar switches to two-column mode (1).
Tools
Unlike menu items, tools interact directly with the image and require the user to manipulate the mouse to define the area or extent of the tool’s effect. Over the years the number and types of tools found in digital photography packages have been distilled to a common few that find their way into the toolbox of most programs. Amongst these familiar items are the Magnifying Glass or Zoom tool, the Brush, the Magic Wand, the Lasso and the Cropping tool. See Figure 2.12 on page 23. In addition to these few, each company produces a specialized set of customized tools that are designed to make particular jobs easier. Of these, Elements users will find the Red Eye Removal tool, Custom Shape, the Selection Brush, Cookie Cutter, Straighten, Healing Brush and the Quick Selection tool particularly useful.
Some tools contain extra or hidden options which can be viewed by clicking and holding the mouse key over the small triangle in the bottom right-hand corner of the Tool button. Alternatively the sub-menu may list a variety of tools related to the one currently selected. Selecting a new option from those listed will replace the current icon in the toolbox with your new choice. To switch back simply reselect the original tool or repeatedly press the tool’s hotkey. See Figure 2.13.

Figure 2.13 Click and hold the triangle in the bottom right of the tool icon to reveal the tool’s other options or related tool choices.
Tool types
The many tools available in Photoshop Elements can be broken into several different groups based on their function or the task that they perform.

Figure 2.14 Selection tools are used to isolate a specific area in a picture. This can be achieved by drawing around the picture part or you can create the selection based on color.
Selection tools
Selection tools are designed to highlight or isolate parts of an image for editing. This can be achieved by drawing around a section of the picture using either the Marquee or Lasso tools or by using the Magic Wand tool to define an area by its color. The Selection Brush tool allows the user to select an area by painting the selection with a special brush tool. Careful selection is one of the key skills of the digital imaging worker. Often, the difference between good quality enhancement and a job that is coarse and obvious is based on the skill taken at the selection stage. Also included in this group is the new Quick Selection tool that selects picture parts interactively as you drag the brush over the image surface. See Figure 2.14.
Painting/drawing tools
Although many photographers and designers will employ Elements to enhance images captured using a digital camera or scanner, some users make pictures from scratch using the program’s drawing tools. Illustrators, in particular, generate their images with the aid of tools such as the Paint Bucket, Airbrush and Pencil. However. it is possible to use drawing or painting tools on digital photographs. In fact, the judicious use of tools like the Brush can enhance detail and provide a sense of drama in your images. Also included in this grouping are the Eraser tool, which comes in handy for cleaning up drawn illustrations and photographs alike, the Gradient tool used for filling areas with a blend from one color to another, and the Custom Shape tool. Unlike the other tools in this group the Custom Shape tool creates vector-based or sharp-edged graphics. This tool is especially good for producing regularly shaped areas of color that can be used as backgrounds for text. It is interesting to see that Adobe has included the new Smart Brush Tool in this grouping. Certainly its ‘paint on’ workflow is similar to other options found here, but the fact that most users will apply the tool to photographic images is different to the strengths of the other tools. See Figure 2.15.
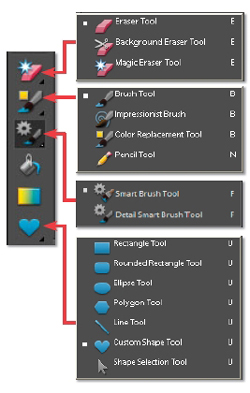
Figure 2.15 Painting and drawing tools are used to add details to existing images or even create whole pictures from scratch. Also included in this section of the toolbar is the new Smart Brush Tool.
Enhancement tools
These tools are designed specifically for use on existing pictures. Areas of the image can be sharpened or blurred, darkened or lightened and smudged using features like the Burn or Dodge tool. The Red Eye Brush is great for removing the ‘devil’-like eyes from flash photographs and the Clone Stamp tool is essential for removing dust marks, as well as any other unwanted picture details. The Spot Healing tool works like an advanced version of the Clone Stamp. See Figure 2.16.

Figure 2.16 Enhancement tools are used to alter existing images to improve their overall appearance.
Move and view tools
The Hand tool helps users navigate their way around images. This is especially helpful when the image has been ‘zoomed’ beyond the confines of the screen. When a picture is enlarged to this extent it is not possible to view the whole image at one time; using the Hand tool the user can drag the photograph around within the window frame. The Zoom tool allows you to get closer to, or further away from, the picture you are working on and the Move tool is used to select, and move, individual picture parts within the picture itself. See Figure 2.17.
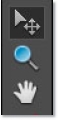
Figure 2.17 The Hand tool is used to navigate around enlarged pictures, whereas the Zoom tool alters the magnification of the image on screen.
Text tools
Combining text with images is an activity that is used a lot in business applications. Elements provides the option to apply text horizontally across the page, or vertically down the page. It is also possible to drag the cursor on the image to create Paragraph text. In addition, since version 2.0, two special text masking options have been included that can be used in conjunction with images to produce spectacular effects. See Figure 2.18.

Figure 2.18 The Text tool is used to add type and type masks to images.
Cropping and straightening tools
The final group of tools is designed for removing unwanted sections of the image and straightening crooked pictures. Using the standard and familiar Crop tool we can drag a marquee around the part of the picture that we wish to keep and then double-click inside the frame to remove the image areas outside the selection. The Cookie Cutter tool, first introduced in version 3.0, takes the idea further by providing the ability to crop your picture to a specific shape on the rectangular canvas. See Figure 2.19.
Figure 2.19 The Crop and Cookie Cutter tools are used for changing the shape of your pictures and removing unwanted edge sections.
The Straighten tool is used to correct pictures that are slightly crooked by click-dragging a line along the edge of objects that are meant to be horizontal. After letting the mouse go, Elements rotates the photo so that the marked line becomes horizontal. Using the Control (Ctrl) key while drawing also allows you to straighten vertically.
Options bar
Each tool and its use can be customized by changing the values in the options bar. See Figure 2.20. It is located below the shortcuts bar at the top of the screen. The default settings are displayed automatically when you select the tool. Changing these values will alter the way that the tool interacts with your image. For complex tools, like the Brush, more settings can be found by selecting the More button located to the extreme right of the bar.

Figure 2.20 The options bar contains all the settings for the currently selected tool. The way that a tool behaves is based on the values found here.
Palettes, panels and panes
Palettes are small windows that help users enhance their pictures by providing extra information about images or by listing a variety of modification options. See Figure 2.21. Palettes can be docked in the Palette Bin (Palette Well for versions 1.0 and 2.0) or dragged and dropped onto the main editing area. Commonly used functions can be grouped by dragging each palette by their tab onto a single palette window. To save space only have open those palettes that you need for the editing or enhancing job at hand. Close the remaining palettes by clicking the Close button in the top of the palette window or drag them to the retractable Palette Bin so that they are out of the way.

Figure 2.21 Palettes (1) and Panel (2) listings provide a visual summary of image enhancement tools and features. Panel contents remain fixed in the pane area of the workspace whereas palettes are able to be dragged from here to the main workspace where they become stand-alone entities (3).
In addition to palettes Photoshop Elements 6 and 7 also contain panels. These are essentially the same as palettes in that they list settings or controls, but they differ because they can’t be dragged onto the main workspace. Most panels are associated with the new Task Modes (Create, Share, etc.), whereas palettes are used in the Full edit workspace and owe their heritage to Photoshop.
Guided edits
The Guided edit workspace was introduced in Elements 6. It combines the step-by-step instructions that used to be found in the How To feature with the direct enhancement control of the Quick edit space. Selecting the Guided tab from the Edit task pane displays a list of the tutorials that ship with Elements. See Figure 2.22. Clicking a tutorial heading will reveal subheadings for specific topics. Selecting a heading topic will display a set of instructions together with associated buttons and controls. For instance, in the example here, two Rotate buttons (rotate left and rotate right) are displayed in the panel. Clicking either of these buttons will perform the same action as selecting the same options from the Image > Rotate menu.

Figure 2.22 The Guided edit workspace combines step-by-step instruction with embedded enhancement or edit controls.
Guided edit is best used for learning how to use new tools and techniques or, as is the case with the Photomerge Faces, Photomerge Scene Cleaner and Group Shot options, as a way to step through complex techniques. The Guided Activities > Guide for Editing a Photo entry contains a collection of guided edits that are useful when correcting images. These include crop, lighten, darken, touch up and sharpen.
The Quick editor (previously Quick Fix editor)
The Quick editor (Enhance > Quick Fix), which was introduced in version 2.0 of Elements, cleverly combined a variety of commonly used enhancement and correction tools into a single image control center. With this feature the user no longer needed to access each individual tool or menu item in turn – rather all the options are available in one place. The feature proved so popular that in Elements 3.0 a completely new editing option, called the Quick editor, was introduced. The component is accessed via the Quick Fix entry in the Edit menu at the top right of the Organizer workspace or via the Quick button under the Edit task mode in the Editor workspace. The Quick edit workspace has the same before and after layout as the original Elements 2.0 dialog and contains a reduced tool and feature set designed to facilitate the fast application of the most frequent of all enhancement activities undertaken by the digital photographer. New for version 7 is the inclusion of extra touch up tools at the bottom of the pane on the right. See Figure 2.23.

Figure 2.23 The Quick editor brings together all your most commonly used tools and adjustment features into one easy- and quick-to-use workspace.
The Zoom, Hand, Crop, and Quick Selection tool (and the nested Selection Brush), located in a small tool bar to the left of the screen, are available for standard image-editing changes and the fixed Palette Bin, to the right, contains the necessary features to alter and correct the lighting, color, orientation (Rotate), red eye (automatically) and the sharpness of your pictures. At the base of these controls is a new Touch Up section containing the Red Eye Removal tool and three new options - Toothbrush (for whitening teeth), Bluer Skies (for changing dull skies to blue) and the Black and White Brush (for altering parts of the photo to monochrome).
One of the best aspects of the Quick editing option is the fact that the user can choose to apply each image change automatically, via the Auto button, or manually using the supplied sliders. This approach provides both convenience and speed when needed, with the option of a manual override for those difficult editing tasks. The adjustment features are arranged in a fashion that provides a model enhancement workflow to follow – simply move from the top to the bottom of the tools starting with picture rotation, working through lighting and color alterations and, lastly, applying sharpening.
The Organizer workspace ( Photo Browser or Date View)
Along with the Quick editor, Elements 3.0 also introduced a new sophisticated file browsing and management workspace called the Organizer. Previous to this Elements incorporated an older style File Browser feature which provided a quick way to visually locate your images but didn’t contain the range of search, tag and display options that the Organizer workspace boasts. See Figures 2.24 and 2.25.
Once the picture files have been imported (Organizer: File > Get Photos and Videos) into Elements they can be viewed by date taken, their associated tags and even their folder location. Pairs of pictures can be viewed side by side with the Organizer: Display > Compare Photos Side by Side feature to help choose the best shot from a series of images taken of the same subject. Instant slide shows of whole albums, or just those pictures selected from the browser, can be created and displayed using the Organizer: Display > View Photos in Full Screen feature.

Figure 2.24 The Photo Browser or Organizer shortcuts and options bar provide controls and button-based access to a range of organizing, editing and sharing options for selected thumbnail images.

Figure 2.25 The Organizer or Photo Browser workspace adds extra search, management and viewing options to your collections of images. Simple auto enhancement options can be applied directly from the thumbnail display using the entries in the new Fix task pane without having to enter the main editing application window.
Different icons in the top right corner of the Photo Browser thumbnail represent different file types.
(1) Multi-page .PSE.
(2) Online gallery.
(3) Slide Show.
(4) Video.
Simple editing tasks, such as the automatic adjustment of levels, contrast and/or sharpness along with simple orientation and crop changes can be performed directly from inside the browser with the auto enhance features in the Fix pane. Finding your favorite pictures has never been easier as you can search by date, caption, filename, history, media type, tag and color similarity (to already selected photos).
Photo Creations become Create and Share options
In version 3.0 Adobe added a separate Photo Creations workspace to Elements. The feature used a wizard approach to create great projects with your pictures. It is these sets of guided projects that have helped set Elements apart from other image-editing programs. Much of the program’s popularity is based on the ease with which users can convert a group of their photos into a finished project.
Carrying on the tradition, version 7 sees these photo projects broken into two separate groups and listed in the Create and Share Task panes. The step-by-step wizard approach remains but the separate workspace of earlier days is gone. Now you can commence the creation process from either the Organizer or Edit workspaces by selecting the desired project from the appropriate Task pane. See Figure 2.26.

Figure 2.26 The Create and Share task panes in the Organizer and Editor workspaces provide button-based access to a range of organizing, editing and sharing options for selected thumbnail images.
The Create and Share panes are the starting point for the production of slide shows, greeting and postcards, online galleries, photo books and collages and Video CD (VCD) presentations. Whole albums, several individually selected files from the Organizer or images open in the Editor, can be used as a basis for the projects. The steps involved in creating the project are clear and precise, with sophisticated and professional results being available in minutes rather than hours, which would be the case if manually produced.
Project Bin (previously the Photo Bin)
In versions 6 and 7 of Elements, substantial changes have been made to what used to be called the Photo bin, now titled the Project Bin. Now when working with Projects (photo books, photo collages, etc.) selecting auto-fill will use the contents of the bin to populate the frames. Also photos can be dragged from the bin into frames, or onto other framed photos. If you have several files open in the editor workspace, you can quickly create an album with them by choosing Save Bin as an Album from the Bin Actions menu. If you use Save Bin as an Album with an existing album’s name, the bin’s files will be added to that album.
Project Bin behaviors:
• To show a photo in the bin, double-click its thumbnail.
• Ctrl-click or Shift-click on thumbs to select multiple thumbs, then use context menu to Open, Close, Rotate, Duplicate, etc.
• Photos in albums or in Show Files from Organizer are not open in the Editor until you double-click them.

Figure 2.27 The Create options provide step-by-step guides to producing projects such as photo books, collages, slideshows, album pages, greeting cards, and online galleries. (1) You can access the project options via the entries in the new Create task pane. (2) Most Create options now use a common wizard to select the size, layout and style for the project. (3) After clicking OK the projects are created as a multi-page document in the Editor workspace. The pages are stored in a special stack in the Project Bin. Extra frames, photos, shapes, text and graphics can be added at this point. (4) The finished creation can then be printed on a desktop printer or via the online options. The multi-page document is saved in the new .PSE or Photoshop Project format (5).
• Bin Actions works on all photos in the bin, whether they are selected or not.
• You don’t have to open the photos in an album to use them in a project or in Group Shot/Faces.
• For Group Shot/Faces, you should select at least two thumbs in the bin that you want to use, otherwise all thumbs will be used.
Options in the Bin Actions menu:
• Show Open Files: Shows files currently open in the Editor.
• Show Files from Organizer: Shows any files currently selected in the Organizer. If the selection changes (e.g. files are added to or removed from selection), the bin updates dynamically.
• Albums: Shows the files in a given album.
• Album Group: Shows all the files of all albums in the group.
• Create/Share: Opens the Create or Share workspace.
• Print Bin Photos: If a single photo or PSE document in the bin, opens the Editor’s Print dialog. If several photos in the bin, opens the Organizer’s Print dialog.
Version 7 Creations
As well as changing the way that you access creations, versions 6 and 7 contain a modified mix of creation offerings. The major change is the revision of the Photo Layout project so that now we have a Photo Book option, for the production of multi-page documents to be printed and bound online, and the Photo Collage option, which provides the same theme-based layout but for printing at the desktop. Like Photo Layout in version 5.0, these are based around free form, multi-page projects that are produced using a simple step-by-step wizard.
This way of working flows through to other project options (CD/DVD Jacket, Greeting Card, CD/DVD Label). The wizard contains three basic steps – choose project page size, select the theme (matched frame design and background) and then nominate the layout, or number of images per page. Next you click OK and Photoshop Elements creates multiple pages and automatically inserts the photos in the layouts on these pages. At this stage, the project becomes a standard multi-page document– a format which was introduced in version 5.0 and really finds its legs here. See Figure 2.27. Whilst the project is in the Edit space you can adjust the style settings (drop shadows, etc.), add extra pictures, surround them with frames, add text and other graphics or shapes, or even change each page’s theme. When complete, you save projects in the .PSE, or new Photo Project format.
Multi-page documents can be printed directly on your desktop printer or, if the Photo Book option was selected, sent to an online print or book service, such as the one offered by Kodak’s EasyShare gallery, for professional printing and binding. The completed book is then returned in the mail.
For more details on creating photo projects using the PSE format and the Create/Share options found in Photoshop Elements 7, go to Chapters 10 and 14.