Using Elements’ Painting and Drawing Tools
At some point during your imaging life you will need, or want, to create an image from scratch. Until now, we have concentrated on editing, adjusting and enhancing images that have been generated using either a camera or scanner; now we will look at how to use Elements’ painting and drawing tools to create something entirely new.
Although the names are the same, the tools used by the traditional artists to paint and draw are quite different from their digital namesakes. The painting tools (the Paint Brush, Pencil, Eraser, Paint Bucket and Airbrush) in Elements are pixel based. That is, when they are dragged across the image they change the pixels to the color and texture selected for the tool. These tools are highly customizable and, in particular, the painting qualities of the Brush tool can be radically changed via the brush More Options palette.
The drawing tools (the Shape tool), in contrast, are vector or line based. The objects drawn with these tools are defined mathematically as a specific shape, color and size. They exist independently of the pixel grid that makes up your image. They produce sharp-edged graphics and are particularly good for creating logos and other flat colored artwork. See Figure 9.1.

Figure 9.1 Drawing and painting tools are used to add non-photographed information to your images. (1) Drawing tools. (2) Painting tools.
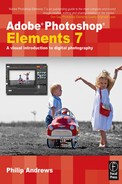
Also included in this vector type (hard-edged) Drawing tools group is the Cookie Cutter tool. Though not strictly a drawing tool, the feature works in a very similar way to the Custom Shape tool as it too allows users to select and draw a range of predesigned shapes in the workspace. It is after the drawing step that the two tools differ. The shape drawn with the Cookie Cutter is used to define the edges of the current image. In this way the feature functions as a fancy Crop tool, providing a range of graphic designs that can be used to stamp out the edges of your pictures. See Figure 9.2.
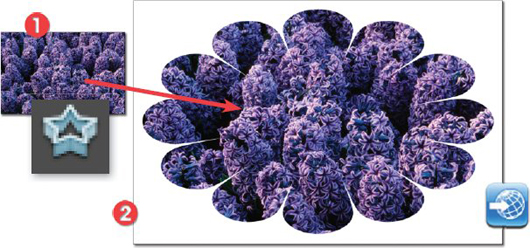
Figure 9.2 The Cookie Cutter tool that was first introduced in Elements 3.0 functions much like a fancy cropping feature, allowing users to remove the edges of their pictures in a range of graphic hard-edged shapes. Adding a feather value via the options bar softens the edge of the crop, producing smoother transitions between the filled shape and the background. (1) Original photo. (2) Photo cropped with the Cookie Cutter tool.
Painting tools
Paint Brush
The four main painting tools all apply color to an image in slightly different ways.
The Paint Brush lays down color in a similar fashion to a traditional brush. The size and shape of the brush can be selected from the list in the Brush Presets list (versions 2.0 – 6) or Brush palette (version 1.0) in the options bar. Changes to the brush characteristics can be made by altering the settings in the options bar and the More Options palette. See Figure 9.3.
In addition to changes to the size, painting mode and opacity of the brush, which are made via the options bar, you can also alter how the Paint Brush behaves. The Brush Dynamics palette (displayed by pressing the brush icon on the right end of the options bar) is used to creatively control your brush’s characteristics, or brush dynamics as it is sometimes called.
• Spacing determines the distance between paint dabs measured in brush diameters, with high values producing dotty effects.
• Fade setting controls how quickly the paint color will fade to nothing. Low values fade more quickly than high ones.
• Hue Jitter controls the rate at which the brushes’ color switches between foreground and background hues. High values cause quicker switches between the two colors.
• Hardness sets the size of the hard-edged center of the brush. Lower values produce soft brushes.
• Scatter setting is used to control the way that strokes are bunched around the drawn line. A high value will cause the brush strokes to be more distant and less closely packed.
• Angle controls the inclination of an elliptical brush.
• The Roundness setting is used to determine the shape of the brush tip. A value of 100% will produce a circular brush, whereas a 0% setting results in a linear brush tip. See Figure 9.4.

Figure 9.3 The Paint Brush size and type can be changed via the settings in the options bar.
(1) Brush type.
(2) Wet Edges.
(3) 100% opacity.
(4) 50% opacity.
(5) Brush Presets palette.
(6) Brush More Options palette.
(7) Brush Tablet options.
(8) Airbrush feature.
(9) Opacity.
(10) Blend mode.
In previous versions users had a more limited set of brush controls that were accessed by clicking the thumbnail of the currently selected brush or pressing the More Options button. Thankfully Elements 6 and 7 have a wide range of brush options and completely new brushes can be added to the palette by selecting the side-arrow in the Brush palette and choosing the New Brush option. For the truly creative among us, extra custom-built brush sets are available for download and installation from websites specializing in Photoshop Elements resources.
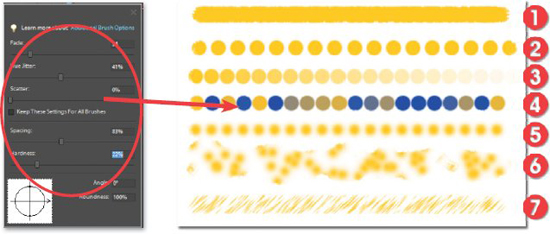
Figure 9.4 The Elements brush engine provides a range of Brush Dynamics settings that allow users to completely control the behavior and characteristics of their brushes. (1) Normal. (2) Spacing increased. (3) Fade introduced. (4) Hue Jitter increased. (5) Hardness decreased. (6) Scatter increased. (7) Angle = 45°, Roundness = 0%.
Airbrush
The Airbrush tool, located in the options bar of the Brush tool, sprays the paint color over the surface of the image. Although the size and style of the spray are determined by the selected brush (in the options bar), the edge of the area painted with this tool is a lot softer than the equivalent paint brush. Holding the mouse button down in one spot will build up the color in much the same way as paint from a spray can. See Figure 9.5.

Figure 9.5 The Airbrush sprays the color onto the canvas. The paint continues to build up as long as you keep the mouse button pressed.
The Pencil differs from the other tools we have looked at so far in that it paints freehand lines. The thickness of these lines is dependent on the selected brush size and the lines drawn with the pencil have hard edges with no anti-aliasing. By clicking and dragging the mouse, the user can create free form lines just as if you were using a pencil and a piece of paper. Using the tool in conjunction with the Shift key means that you can draw straight lines by clicking at the beginning and end points.
Don’t confuse the Pencil with the line version of the Shape tool. The Pencil draws with pixels; the Line tool defines a beginning and end point to a mathematical pixel-free line that is drawn only at the time that it is printed. See Figure 9.6.

Figure 9.6 The Pencil tool draws hard-edged lines.
(1) 70 pixel pencil.
(2) 30 pixel pencil.
(3) 8 pixel pencil.
(4) To draw a straight line click to start the line and hold down the Shift key and click the mouse button a second time to mark the end of the line.
(5) The shift + click technique is used to draw a rectangle.
Paint Bucket
The Paint Bucket, though not usually considered a painting tool, is included here because its main role is to apply color to areas of the image. The best way to describe how it functions is to imagine a Magic Wand tool that selected areas based on their color and then filled these selections with the foreground tint. In this way, the Paint Bucket selects and fills in a one-step action. See Figure 9.7.
Just like the Magic Wand, the Paint Bucket makes its selection based on the Tolerance value in the options bar. Higher Tolerance values mean pixels with greater difference in tone and color will be marked for color changes by the tool. The Anti-aliased, Contiguous and Use All Layers settings also work in the same was as they do for the Magic Wand.

Figure 9.7 The Paint Bucket tool selects and fills an area in the image based on pixel colors.
In addition to applying color to selected areas, the Paint Bucket can also fill the area with a pattern. See Figure 9.8. After selecting the Pattern option you can choose from the included patterns displayed in the drop-down menu. Alternatively you can create your own using the following steps.
FEATURE SUMMARY
1 Select an area of an image using the Rectangular Marquee.
2 With the selection still active, select Define Pattern from Selection in the Edit menu.
3 Enter a name in the New Pattern dialog.
4 The new pattern is now available for use from the Pattern palette of the Paint Bucket tool.

Figure 9.8 The Paint Bucket feature can also fill areas using a predefined pattern or one that you have defined yourself.
The color of the paint for all tools is based on the foreground color selected in the toolbox. To change this hue you can double-click the swatch and select another color from the palette or you can use the Eyedropper tool to sample a color already existing in your image. See Figure 9.9.

Figure 9.9 All brushes paint with the color that is selected in the foreground/background swatches. (1) Foreground color. (2) Switch colors. (3) Default colors. (4) Background color. (5) Changing color using the Color Picker. (6) Changing color using the Eyedropper tool to sample a new hue from a picture. With the Color Picker selected, if you move the cursor over the image, it will turn into the Eyedropper tool, allowing you to sample color directly from the image.
Painting tools summary
FEATURE SUMMARY
1 Pick foreground color (painting color).
2 Select the Painting tool from the toolbox.
3 Click the down arrow next to the sample brush in the options bar to select brush type.
4 Adjust brush opacity.
5 Adjust other options for a particular tool.
6 Drag brush over image surface to paint.
The Impressionist Brush tool
In addition to these standard painting options, Elements has a specialist Impressionist Brush tool that allows you to repaint existing images with a series of stylized strokes. By adjusting the special paint style, Area, Size and Tolerance options, you can create a variety of painterly effects on your images. See Figure 9.10.
FEATURE SUMMARY
1 Pick Impressionist Brush from the toolbox (hidden under the Brush tool in Versions 6, 5.0, 4.0, and 3.0).
2 Select brush size, mode and opacity from the options bar.
3 Set the style, area and Tolerance values from the More Options palette.
4 Drag the brush over the image surface to paint.

Figure 9.10 The Impressionist Brush applies a painterly effect to the picture as you brush over the surface.
Color Replacement tool
The Color Replacement tool locates and replaces a specific color in an image with one of your choosing. In this way it works a little like a more sophisticated version of the Red Eye Removal tool in that you can choose both the color to be replaced as well as its substitute hue. See Figure 9.11.
FEATURE SUMMARY
1 Pick the Color Replacement tool from the toolbox (hidden under the Brush tool).
2 Select brush size and set mode to Hue, sampling to Background Swatch and limits to Discontiguous in the options bar.
3 Using the Eyedropper tool select the color from the picture that you want to replace as the foreground color swatch.
4 Switch foreground and background swatches.
5 Double-click on the foreground swatch and select a replacement color.
6 Click and drag the Color Replacement brush over the image surface to substitute the colors.
Figure 9.11 The Color Replacement tool is used to substitute one color for another in your pictures.
Erasing
The Eraser tool changes image pixels as it is dragged over them. If you are working on a background layer then the pixels are erased or changed to the background color. In contrast, erasing a normal layer will convert the pixels to transparent, which will let the image show through from beneath. See Figure 9.12.
As with the other painting tools, the size and style of the eraser is based on the selected brush. But unlike the others the eraser can take the form of a paint brush, pencil or block. Setting the opacity will govern the strength of the erasing action. Apart from the straight Eraser tool, two other versions of this tool are available – the Background Eraser and the Magic Eraser. These extra options are found hidden under the eraser icon in the toolbox.
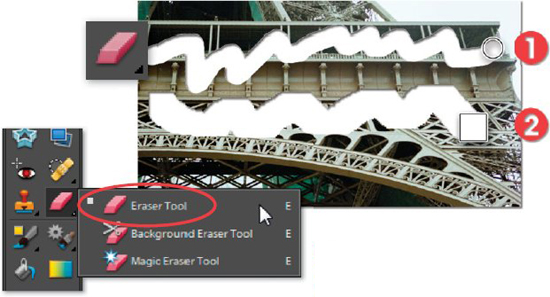
Figure 9.12 The Eraser tool is used to take away portions of an image.
(1) Brush Eraser tip.
(2) Block Eraser tip.
The Background Eraser is used to delete pixels around the edge of an object. This tool is very useful for extracting objects from their back grounds. The tool pointer is made of two parts – a circle and a cross hair. The circle size is based on the brush diameter. To use the tool, the cross hair is positioned and dragged across the area to be erased, whilst at the same time the circle’s edge overlaps the edge of the object to be kept. The success of this tool is largely based on the contrast between the edge of the object and the background. The greater the contrast, the more effective the tool. Again, a Tolerance slider is used to control how different pixels need to be in order to be erased. See Figure 9.13.
The Magic Eraser uses the selection features of the Magic Wand to select similarly colored pixels to erase. This tool works well if the area of the image you want to erase is all the same color and contrasts in tone or color with the rest of the image. See Figure 9.14.
Both tools replace the background color with transparency and in the process create a new image layer if the tool was applied to a background layer.
FEATURE SUMMARY
1 Pick the Eraser tool type from the toolbox.
2 For the Eraser tool – select a brush size and style and choose the form that the tool will take.
3 For Magic Eraser and Background Eraser – set Tolerance and Contiguous values.
4 Drag over or click on the image to erase.
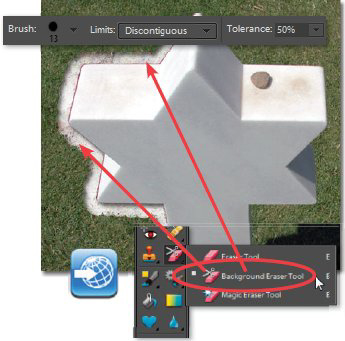
Figure 9.13 The Background Eraser is used to delete the pixels surrounding an object.

Figure 9.14 The Magic Eraser selects and erases pixels of similar color and tone.
As we have seen in Chapter 6, one of the great technologies included in more recent versions of Elements is the Magic Extractor feature (Image > Magic Extractor). In this release the feature’s selecting powers have been boosted so that your results will be more accurate than ever. The tool automatically erases some picture parts whilst retaining others. The user marks the areas in the photo that are to be retained or erased by painting over these sections with dots or scribbles of different colors. Elements then goes to work intelligently erasing and retaining parts throughout the photo. It is this intelligent erasing power that warrants the feature’s inclusion in this part of the text. See Figure 9.15.
Used carefully, the Magic Extractor has both the power and fine-tuning abilities to make it a regular part of your erasing toolset. For more details on how to use the feature turn to the selection section in Chapter 6.
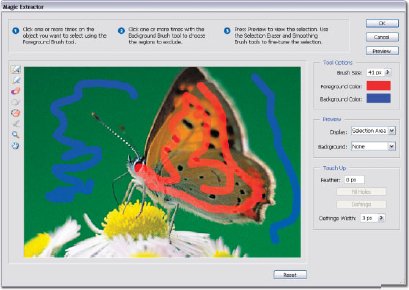
Figure 9.15 The Magic Extractor feature acts as an intelligent Eraser tool by allowing the user to mark (scribble or dot) picture parts to be retained (foreground) and areas to be erased (background).
Better with a tablet
Many professionals prefer to work with a stylus and tablet when working with complex drawing tasks. The extra options provided by the pressure sensitivity of the stylus, along with the familiar ‘pencil and paper’ feeling, make using this approach more intuitive and often faster than using a mouse. When a stylus and tablet are installed on your machine you will be able to access the extra pen or stylus options available through the program. See Figure 9.16.

Figure 9.16 Elements contains support for pressure-sensitive devices such as Wacom Stylus and Tablets. Elements enables the user to link specific settings to the Pressure setting of the stylus.
Hand coloring black and white photos
In this technique, we will use the Elements Brush tool to apply a color tint to a photograph. But to ensure that the detail from the image shows through the coloring we must modify the way the hue is added. By switching the Brush mode (this is similar to the Layers blend mode options) from its Normal setting to a specialized Color setting the paint starts to act more like traditional watercolor paint. When the hue is applied the detail is changed in proportion to the tone beneath. Dark areas are changed to a deep version of the selected color and lighter areas are delicately tinted. See Figure 9.17.
STEPS SUMMARY
1 With your image open in Elements check to see what Color mode the picture is stored in. Do this by selecting Image > Mode and then locate which setting the tick is next to. For most black and white photographs the picture will be in Grayscale mode. If this is the case change it to RGB Color (Image > Mode > RGB Color).
2 You will not notice any difference in the picture as a result of its mode change but now the image is capable of holding colors (not just grays). Now double-click on the foreground swatch in the toolbox and select a color appropriate for your picture. Here I chose a dark green for the leaves.
3 Now select the Paint Brush tool from the toolbox and adjust its size and edge softness using the settings in the options bar. Start to paint onto the surface of the picture. You will notice straight away that the paint is covering the detail of the picture beneath. This is because the brush is still in Normal mode. Use Ctrl + Z to undo your painting.
4 In order for the brush to just color the picture (keeping the details from beneath) the tool must be in the Color mode. To make the change click on the Mode drop-down menu in the options bar and select the Color option towards the bottom of the list.

Figure 9.17 Use the Brush tool in Color mode to add realistic tints to your black and white photographs.
5 With the Color mode now selected start to apply the color again. Immediately you will notice the difference. The brush is now substituting the color for the gray tones in the picture and it is doing so proportionately: dark gray = dark green, light gray = light green.
6 Once the leaves and stems have been colored, select new colors for the flowers and finally the bucket. The amount and areas of the picture that you choose to color is up to you. Some photographs look great with only one colored section and the rest black and white.

Figure 9.18 Only one Shape tool is shown in the toolbox, but others can be viewed by clicking and holding the mouse over the small triangle in the bottom right corner of the button or by repeatedly pressing the tool’s hotkey (U).
Drawing tools
With the Shape tool it is possible to draw lines, rectangles, polygons and ellipses, as well as creating your own custom shapes. After selecting the tool and picking the fill color, you can draw the shape by clicking and dragging the mouse. Although only one Shape tool is visible in the toolbox at any time, you can select a different option by clicking and holding the mouse button down over the tool icon and then selecting the new tool from the list as it appears. See Figures 9.18 and 9.19.

Figure 9.19 The Shape tool is used to draw a range of different vector shapes.
(1) Custom shapes.
(2) Drawing mode (new, add to, subtract from, intersect with)
(3) Fill color palette.
(4) Style palette.
(5) Convert to pixels Simplify button.
(6) Shape selection tool.
A new shape layer is opened automatically when you select a tool and draw a new shape. Double-clicking the shape thumbnail in the Layers palette allows you to change the color. See Figure 9.20.
When you create multiple shapes on a single layer you have the opportunity to decide how overlapping areas interact. Two or more different shapes can be added to form a third and the intersection of shapes can be added or subtracted from the image. At first the Shape tool can seem a little confusing, but with practice you will be able to build up complex images by gradually adding and subtracting shapes. See Figure 9.21.

Figure 9.20 The fill color of a shape can be changed by double-clicking the shape in the shape’s layer or the color icon (earlier versions of Elements).
STEPS SUMMARY
1 Pick the Shape tool you require from the toolbox. Click and hold down the mouse button to reveal hidden options.
2 For a new shape pick the Create New Shape Layer option. For adding to an existing shape layer, select the layer and select the Shape Area option that suits your needs. You can pick from Add, Subtract, Intersect and Exclude.
3 Click on the color swatch to specify the fill color for the shape.
4 Click and drag on the image surface to draw the shape.
Even more shapes
Elements comes supplied with a vast range of shapes. New shape sets can be added to those already visible as thumbnails by clicking the side-arrow button in the Custom Shape Picker palette. If you can’t find a favorite here then why not try some of the extra shape sets that can be downloaded from specialist Elements resources websites?

Figure 9.21 The way that successively drawn custom shapes interact can be customized via buttons on the options bar. (1) Single new shape. (2) Add shape to existing shape. (3) Subtract shape from existing shapes. (4) Subtract overlapping areas of existing shapes. (5) Use the intersection of the areas as a new shape.
Cookie Cutter tool
The Cookie Cutter tool is a two-step feature that crops your pictures in the shape of one of many ‘cookie’ designs that Elements is shipped with. The feature is a great way to add interesting edge effects to your pictures. See Figure 9.22.
FEATURE SUMMARY
1 Open an image to crop and select the Cookie Cutter tool from the toolbox.
2 Click the Shape button in the options bar to reveal the pop-up menu of cookie shapes. Select the shape to use.
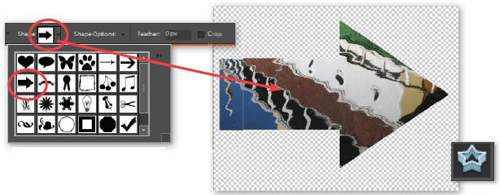
Figure 9.22 The Cookie Cutter creates fancy crops based on custom shapes.
3 To soften the edge of the cookie cutter crop, add a Feather value in the options bar before you drag the shape.
4 Optional – Select the Crop option if you want the image cropped to the edge of the shape.
5 Click and drag the tool over the surface of the picture. Let the mouse button go and click and drag the edge handles to adjust the size of the cookie shape to suit the picture.
6 Double-click inside the cookie shape or click the tick icon in the options bar to crop.
Shapes and graphics in the new Effects palette
Photoshop Elements 5.0 first introduced the concept of grouping together visual content in the Artwork and Effects palette. In versions 6 and 7 this grouping has been fine-tuned slightly with the Artwork content now available in the Artwork > Content palette located under the Create module in the editing workspace. This is a central location for storing frames, backgrounds, and themes options and is a key place to look for small picture elements to add to compositions when you are creating Photo Layouts. In versions 6 and 7, Layer Styles and Filters are stored in the Effect palette.
In addition, you will also find a variety of shapes and graphics stored in the palette. Both groups of picture elements are vector based (resolution independent) and so can be scaled, rotated, twisted and distorted to fit your compositions with no loss in quality. Unlike the Custom Shape tool though, you do not need to draw the shape onto the canvas surface: simply click on the thumbnail of your choice and then press Apply at the bottom of the palette. See Figure 9.23.

Figure 9.23 You can also draw shapes and add graphics to your Photo Layouts by dragging them from the Artwork tab of the Create section.
Elements automatically creates a new layer and places the picture element on the canvas. From this point you can rotate, size and distort the shape/graphic using the handles situated on its edges. Apply the changes by clicking the green tick or Commit button that appears at the bottom edge.
To scale proportionately – Click and drag a corner handle.
To squish or stretch non-proportionately – Click and drag a side handle.
To scale or squish from the center – Hold down the Alt key whilst dragging a handle.
To rotate – Click and drag the rotate handle located in the middle of the bottom edge of the graphic/shape. Alternatively, move the mouse cursor outside the edges of the graphic and then click-drag to rotate.
To distort or twist – Ctrl-click side or corner handles to distort or change perspective.
Shapes added to the document from the Content palette (Window > Content) are stored in a standard shape layer whereas graphics are stored in a new Smart Object layer. The Smart Object layer is similar to a Frame layer in that it is resolution independent and must be simplified before you can edit it directly. Simplifying the layer loses its ability to be scaled and distorted non-destructively.

Figure 9.24 Click-drag graphics and shapes from the Effects palette to an open document before repositioning, sizing, and adding layer styles.
Adding shapes or graphics from the new Effects palette is an easy task. Follow the steps below to place, size and position one of these picture elements. See Figure 9.24.
STEPS SUMMARY
1 Display the Content palette by selecting Window > Content or choosing the Create module heading and then the Artwork tab.
2 Select the By Type entry from the drop-down menu on the left and then the Graphics or Shapes option menu on the right.
3 With the thumbnails displayed, either click and drag the shape/graphic from the palette onto the open document or select the thumbnail and press the Apply button at the bottom of the palette or double-click the thumbnail.
4 To move the shape/graphic around the canvas, move the mouse cursor onto the picture element and click and drag to a new position.
5 To resize, click and drag a corner or side handle. To pivot, click and drag the rotate handle.