
Hands on Techniques
Processing with Photoshop Elements and Adobe Camera Raw (ACR)
Photoshop Elements has always been a sofware program that could produce professional results that go way beyond what you would expect given its modest price. I guess one of the main reasons for this is the fact that so many of the tools and features in the package are built on the same professional-level editing technology that gives Photoshop its strength. So it should come as no surprise when we come across tools and features that are very similar, and in some cases exactly the same, as those found in Photoshop. It is these very features, when coupled with a professional approach to their use, that will get you producing high quality digital photographs just like the pros (but at a fraction of the price!).
Elements 7 carries on this tradition by including plenty of great ‘high-end’ tools for us to play with. One of the most dramatic of these is the built-in Raw conversion utility (yes, just like Photoshop) as well as the ability to support 16 bits per channel color pictures. These features might not mean much to you now but this chapter will introduce these and other quality editing tools, techniques and ideas that will ensure that you produce the absolute best quality pictures possible.
Better digital capture
More and more medium- to high-end cameras are being released with the added feature of being able to capture and save your pictures in the raw format. Selecting Raw, instead of the usual JPEG, stops the camera from processing the color information from the sensor and reducing the image’s bit depth, and saves the picture in this unprocessed file type. This means that the full description of what the camera ‘saw’ is saved in the image file and is available to you for use in the production of quality pictures. Many photographers call this type of file a ‘digital negative’ as it has a broader dynamic range, extra colors and the ability to correct slightly inaccurate exposures.
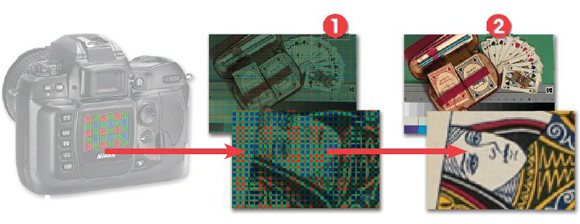
Figure 6.1 Unlike TIFF and JPEG formats, raw files contain the unprocessed image and shooting data. In many cameras this visual information is laid out in the pattern (1) of the original sensor. The raw data needs to be interpolated to create the full color digital file we normally associate with camera output (2).
Sounds great, doesn’t it? All the quality of an information-rich image file to play with, but what is the catch? Well, raw files have to be processed before they can be used in a standard image-editing application. To access the full power of these digital negatives you will need to employ a special dedicated Raw editor. Photoshop Elements includes just such an editor built into the program. Called Adobe Camera Raw, this feature is designed specifically to allow you to take the unprocessed raw data directly from your camera’s sensor and convert it into a usable image file format. The Elements Raw editor also provides access to several image characteristics that would otherwise be locked into the file format. Variables such as color depth, White Balance mode, image sharpness and tonal compensation (contrast and brightness) can all be accessed, edited and enhanced as part of the conversion process. Performing this type of editing on the raw data provides a better and higher quality result than attempting these changes after the file has been processed and saved in a non-raw format such as TIFF or JPEG. See Figure 6.1.
So what is in a raw file?
To help consolidate these ideas in your mind try thinking of a raw file as having three distinct parts:
Camera Data, usually called the EXIF or metadata, including things such as camera model, shutter speed and aperture details, most of which cannot be changed.
Image Data which, though recorded by the camera, can be changed in the Elements Raw editor and the settings chosen here directly affect how the picture will be processed. Changeable options include color depth, white balance, saturation, distribution of image tones and application of sharpness.
The Image itself. This is the data drawn directly from the sensor in your camera in a non-interpolated form. For most raw-enabled cameras, this data is supplied with a 16 bits per channel color depth, providing substantially more colors and tones to play with when editing and enhancing than found in a standard 8 bits per channel camera file. See Figure 6.2.
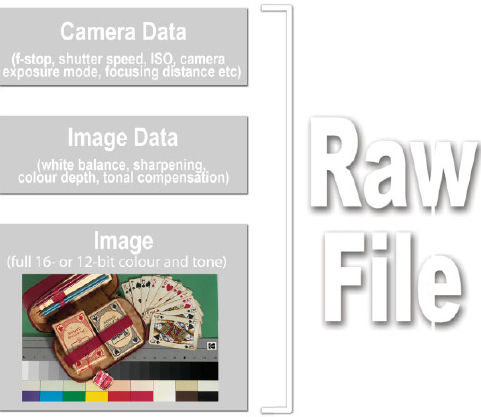
Figure 6.2 The raw file is composed of three separate sections: Camera Data, Image Data and the Image itself. By keeping these components separate it is possible to edit variables like white balance and color depth, which are usually a fixed part of the file format, in the Raw file editor.
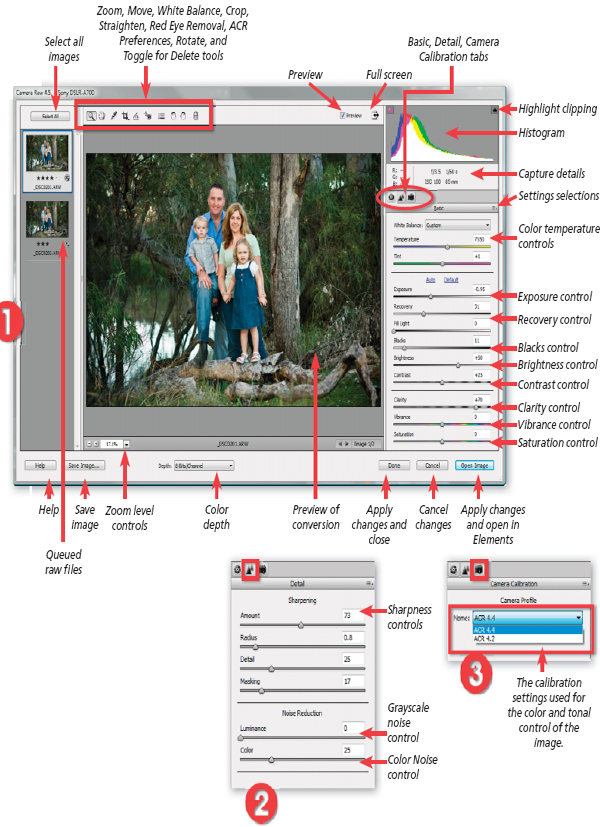
Figure 6.3 When you open a raw file in Elements the Camera Raw editor is activated, providing you with a range of sophisticated controls for the enhancement and conversion of your raw files.
After making your changes, click Open – the plug-in closes and the converted file is placed into the Elements workspace.
(1) Adjust tab options.
(2) Detail tab options.
(3) Camera Calibration options.
Raw in action
When you open a raw file in Elements 7 you are presented with the Adobe Camera Raw editing dialog containing a full color interpolated preview of the sensor data. Using a variety of menu options, dialogs and image tools you will be able to interactively adjust image data factors such as tonal distribution and color saturation. Many of these changes can be made with familiar slider-controlled editing tools normally found in features like Levels and the Shadows/Highlights control. The results of your editing can be reviewed immediately via the live preview image and associated histogram graphs.
After these general image-editing steps have taken place you can apply some enhancement changes such as filtering for red-eye removal, straightening, cropping, sharpness, removing color noise and applying some smoothing. The final phase of the process involves selecting the color depth and image orientation. Clicking the Open Image button sets the program into action applying your changes to the raw file, whilst at the same time interpolating the Bayer data to create a full color image, and then opening the processed file into the full Elements workspace.
The raw advantage
The real advantages of editing and enhancing at the raw stage are that these changes are made to the file at the same time as the primary image data is being converted (interpolated) to the full color picture. Editing after the file is processed (saved by the camera in 8 bits per channel versions of the JPEG and TIFF format) means that you will be applying the changes to a picture with fewer tones and colors.
A second bonus for the dedicated raw shooter is that actions like switching from the White Balance option selected when shooting to another choice when processing are performed without any image loss. This is not the case once the file has been processed with the incorrect White Balance setting, as anyone who has inadvertently left the tungsten setting switched on whilst shooting in daylight can tell you.
Newly introduced ACR features
The Adobe Camera Raw utility that ships with Elements is in constant review. In fact the team that develops ACR are always making changes to keep up with photographer demand and new camera releases. For this reason the version of ACR that appears in versions 6 and 7 has some improvements over what was offered in previous releases.
The key differences are:
• The ability to work on more than one raw file at a time with the raw files queued as thumbnails on the left of the dialog.
• The inclusion of the Red Eye Removal, Straighten and Cropping tools.
• The option to increase the dialog to Full Screen mode with the new Full Screen toggle switch.
• A speciality saturation slider called Vibrance that concentrates on boosting the pastel colors in your photo.
• Moving the shadow and highlight clipping warning buttons to the top corners of the histogram.
• The addition of a new Clarity slider to help make the detail in photos stand out especially those taken under hazy conditions. In version 7.0 the slider is positioned in the middle at a 0 value providing the option to soften local contrast with a negative value.
• Substantially improved sharpening control growing the number of sliders in this area from one to four.
• The inclusion of the Camera Calibration tab to allow the user to select the latest calibration settings.
Processing with Photoshop Elements and Adobe Camera Raw (ACR)
Now that you have some basic understanding about raw files let’s look at the process that you will use when bringing your raw images into the editing workspace in Photoshop Elements.
Opening
This seems like a simple step but just as there are many roads that lead to Rome so too are there a variety of ways to open a raw file in Adobe Camera Raw.
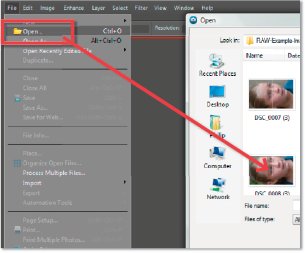
1. Opening the raw file in the Editor workspace
Once you have downloaded your raw files from camera to computer you can start the task of processing. Keep in mind that in its present state the raw file is not in the full color RGB format that we are used to, so the first part of all processing is to open the picture into Adobe Camera Raw. Selecting File > Open from inside Elements will automatically display the photo in this.
2. Starting with the PhotoBrowser
Starting in the PhotoBrowser or Organizer workspace simply right-click on the thumbnail of the raw file and select the any of the editing workspace options (Full Edit, Quick, Guided) from the pop-up menu to transfer the file to the Elements version of ACR in the Editor workspace.

3. Rotate Right (90° CW) or Left (90° CCW)
Once the raw photo is open in ACR you can rotate the image using either of the two Rotate buttons at the top of the dialog. If you are the lucky owner of a recent camera model then chances are the picture will automatically rotate to its correct orientation. This is thanks to a small piece of metadata supplied by the camera and stored in the picture file that indicates which way is up.

4. Straighten and Crop
The Straighten tool can automatically rotate a picture taken with the horizon slightly crooked. Simply drag the tool along the line in the image that is meant to be level and ACR will automatically rotate and crop the photo to realign the horizon.
Use the Crop tool to remove unwanted areas around your photo or to reshape the format of the image to fit a specific paper type. The tool can be click-dragged around the area you want to keep or a specific cropping format can be selected from the drop-down menu accessed via the small downward facing arrow in the bottom right of the Tool button.
Adjusting white balance
Unlike other capture formats (TIFF, JPEG) the White Balance settings are not fixed in a raw file. ACR contains three different ways to balance the hues in your photo.
5. Preset changes
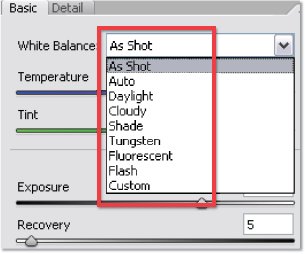
You can opt to stay with the settings used at the time of shooting (‘As Shot’) or select from a range of light source specific settings in the White Balance drop-down menu of ACR. For best results try to match the setting used with the type of lighting that was present in the scene at the time of capture. Or choose the Auto option from the drop-down White Balance menu to get ACR to determine a setting based on the individual image currently displayed.
If none of the preset white balance options perfectly matches the lighting in your photo then you will need to fine tune your results with the Temperature and Tint sliders (located just below the Presets drop-down menu). The Temperature slider settings equate to the color of light in degrees Kelvin – so daylight will be 5500 and tungsten light 2800. It is a blue to yellow scale, so moving the slider to the left will make the image cooler (more blue) and to the right warmer (more yellow). In contrast the Tint slider is a green to magenta scale. Moving the slider left will add more green to the image and to the right more magenta.


6. The White Balance tool
Another quick way to balance the light in your picture is to choose the White Balance tool and then click on a part of the picture that is meant to be neutral gray or white. ACR will automatically set the Temperature and Tint sliders so that this picture part becomes a neutral gray and in the process the rest of the image will be balanced. For best results when selecting lighter tones with the tool ensure that the area contains detail and is not a blown or specular highlight.

Tonal control
The next group of image enhancements alters the tones within the photo. There are nine different slider controls each dealing with a specific group of image tones. Each of the controls can be controlled automatically based on individual image content by clicking the Auto option just below the White Balance options. Use the following steps if you want a little more control.
7. Setting the white areas
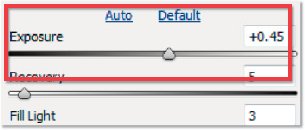
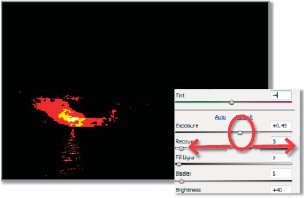
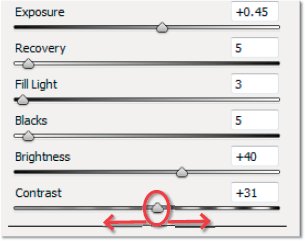
To start, adjust the brightness with the Exposure slider. Moving the slider to the right lightens the photo and to the left darkens it. The settings for the slider are in f-stop increments with a +1.00 setting being equivalent to increasing exposure by 1 f-stop. Use this slider to peg or set the white tones. Your aim is to lighten the highlights in the photo without clipping them (converting the pixels to pure white). To do this hold down the Alt/Option whilst moving the slider. This action previews the photo with the pixels being clipped against a black background. Move the slider back and forth until no clipped pixels appear but the highlights are as white as possible. The one exception to this advice is when your photo contains specular highlights (reflections from chrome, bright lights, etc.) which contain no detail. It is natural for these areas to be clipped when setting the white areas of your photo.
8. Adjusting the shadows (blacks)
The Blacks or Shadows slider performs a similar function with the shadow areas of the image. Again, the aim is to darken these tones but not to convert (or clip) delicate details to pure black. Just as with the Exposure slider, the Alt/Option key can be pressed whilst making Shadows adjustments to preview the pixels being clipped. Alternatively, the Shadow and Highlights Clipping Warning features (top left and right corners of the histogram) can be used to provide instant clipping feedback on the preview image. Shadow pixels that are being clipped are displayed in blue and clipped highlight tones in red.

9. Brightness changes
The next control, moving from top to bottom of the ACR dialog, is the Brightness slider. At first the changes you make with this feature may appear to be very similar to those produced with the Exposure slider but there is an important difference. Yes, it is true that moving the slider to the right lightens the whole image, but rather than adjusting all pixels the same amount the feature makes major changes in the midtone areas and smaller jumps in the highlights. In so doing, the Brightness slider is less likely to clip the highlights (or shadows) as the feature compresses the highlights as it lightens the photo. This is why it is important to set white and black points first with the Exposure and Shadows sliders before fine-tuning the image with the Brightness control.
10. Recovering Highlights and Shadow detail
If the highlights are still being clipped then use the Recovery slider to recreate detail in the problem area. Likewise, if the shadows areas are too dark then drag the Fill Light slider to the right to lighten these tones in the photo. Be careful with overapplication of either of these controls as it can make the image look low in contrast.
11. Increasing/Decreasing contrast
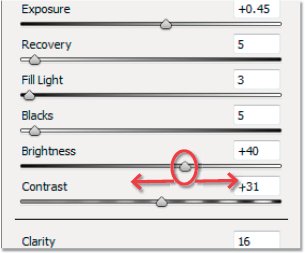
The last tonal control in the dialog, and the last to be applied to the photo, is the Contrast slider. The feature concentrates on the midtones in the photo with movements of the slider to the right increasing the midtone contrast and to the left producing a lower contrast image. Like the Brightness slider, Contrast changes are best applied after setting the white and black points of the image with the Exposure and Blacks sliders.
12. Local Contrast control
The Clarity slider is used to alter the local contrast or the contrast of details within the photo. It works well with photos that have been photographed with diffused light or on a cloudy day. Use Clarity and Contrast sliders together. In version 7.0 we have the option to use negative values for this control. This produces a lower contrast result around details in the photo and is good for softening the texture of skin tones.
Color strength adjustments
As one of the primary roles of the Adobe Camera Raw utility is to interpolate the captured colors from their Bayer mosaic form to the more usable RGB format, it is logical to include a couple of color strength controls in the process.
13. Vibrance adjustment
Unlike the Saturation slider which increases the strength of all colors in the photo irrespective of their strength in the first place, Vibrance targets its changes to just those colors that are desaturated. Use this control to boost the strength of colors in the photo with less risk of posterized results.

14. Saturation control
The strength or vibrancy of the colors in the photo can be adjusted using the Saturation slider. Moving the slider to the right increases saturation with a value of +100 being a doubling of the color strength found at a setting of 0. Saturation can be reduced by moving the slider to the left, with a value of -100 producing a monochrome image. Some photographers use this option as a quick way to convert their photos to black and white but most prefer to make this change in Elements proper where more control can be gained over the conversion process with features such as the Convert to Black and White.
Sharpness/Smoothness and Noise Reduction
With the tones and colors now sorted let’s turn our attention to sharpening and noise reduction. Both these image enhancements can be handled in-camera using one of a variety of auto settings found in the camera setup menu, but for those image makers in pursuit of imaging perfection these changes are best left until processing the file back at the desktop.

15. To sharpen or not to sharpen
The latest version of ACR contains four separate sharpening controls. Use the Amount slider to determine the overall strength of the sharpening effect. The Radius is used to control the number of pixels from an edge that will be changed in the sharpening process. The Detail and Masking sliders are both designed to help target the sharpening at the parts of the image that most need it (edges) and restrict the sharpening effects from being applied to areas that don’t (skin tone and smooth graded areas). Moving the Detail slider to the right increases the local contrast surrounding edge areas and therefore enhances the appearance of details. Moving the slider to the left decreases the effect and also reduces the appearance of halos. The Masking control interactively applies a edge locating mask to the sharpening process. A setting of 0 applies no mask and therefore all detail in the photo is sharpened. Moving the slider to the right gradually isolates the edges within the photo until at a setting of 100 sharpening is only being applied to the most contrasty or dominant edges in the picture.

16. Reducing noise
ACR contains two different Noise Reduction controls. The Luminance Smoothing slider is designed to reduce the appearance of grayscale noise in a photo. This is particularly useful for improving the look of images that appear grainy. The second type of noise is the random colored pixels that typically appear in photos taken with a high ISO setting or a long shutter speed. This is generally referred to as chroma noise and is reduced using the Color Noise Reduction slider in ACR. The noise reduction effect of both features is increased as the sliders are moved to the right.
Output options
Now to the business end of the conversion task – outputting the file. The Photoshop Elements version of ACR contains only the Color Depth output option.

17. Controlling color depth/space and
image size/resolution
The section below the main preview window in ACR contains the output options settings. Here, you can adjust the color depth (8 or 16 bits per channel) of the processed file. Earlier versions of Photoshop Elements were unable to handle 16 bits per channel images but the last two releases have contained the ability to read, open, save and make a few changes to these high color files.

Save, Open or Done
The last step in the process is to apply the enhancement changes to the photo. This can be done in a variety of ways.
18. Opening the processed file in
Photoshop Elements
The most basic option is to process the raw file according to the settings selected in the ACR dialog and then open the picture into the Editor workspace of Photoshop Elements. To do this simply select the Open Image button. Select this route if you intend to edit or enhance the image beyond the changes made during the conversion.
19. Saving the processed raw file
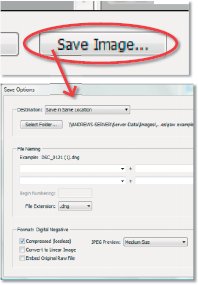
Users also have the ability to save converted raw files from inside the ACR dialog via the Save Image button. This action opens the Save Options dialog which contains settings for inputting the file name as well as file type specific characteristics such as compression. Use the Save option over the Open command if you want to process photos quickly without bringing them into the editing space.

Pro’s tip: Holding down the Alt/Option key whilst clicking the Save button allows you to store the file (with the raw processing settings applied) without actually going through the Save Options dialog.
20. Applying the raw conversion settings
There is also an option for applying the current settings to the raw photo without opening the picture. By Clicking the Done button (or Alt-clicking the OK button – holding down Alt/Option key changes the button to the Update button in previous versions of the dialog) you can apply the changes to the original file and close the ACR dialog in one step.

The great thing about working this way is that the settings are applied to the file losslessly. No changes are made to the underlying pixels, only to the instructions that are used to process the raw file.
When next the file is opened, the applied settings will show up in the ACR dialog ready for fine-tuning, or even changing completely.
The thumbnail section of the Photoshop Elements ACR dialog appears when you select multiple raw files inside the Organizer workspace and then choose the Full Edit option from the right-click menu. The selected files are opened into the ACR dialog and listed on the left-hand side of the main workspace. This function first appeared in Photoshop Elements 6.
In general, only one image can be selected from the grouping, and displayed in the preview area, at a time. All changes made to the image settings are applied to the selected photo only. Users can move from image to image making the necessary enhancements before clicking the Done key to apply the changes without transferring the files, or the Open key to display the converted pictures in the Full edit workspace. But this is not the only way to work with the files. The Select All button at the top of the queued files can be employed for a more efficient workflow. Queued images can also be multi-selected by Shift-clicking or Ctrl-clicking the thumbnails. With this feature, enhancement changes made to a single photo can be applied across the whole range of images queued in the dialog.
Applying changes across rated raw files
1. In addition to being able to apply image changes across all the queued files by choosing the Select All button, it is also possible to adjust just a subset of the files listed. Start by reviewing each of the queued files in turn by clicking onto the thumbnail on the left of the dialog.
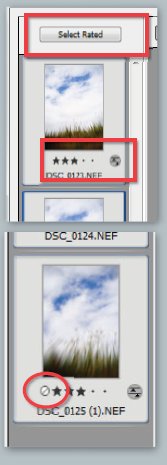
2. During the review process rate those files that you want to adjust as a group. Do this by clicking the star rating section located under each thumbnail.
3. Once the review process is completed and all files to be enhanced as a group are rated hold down the Alt key and choose the Select Rated button at the top of the queued list. Notice that this action selects only those files with a star rating attached.
4. Now you can set about applying the changes to those selected as before.
5. If you want to remove an image from the Rated grouping simply click on the No Rating option under the thumbnail.
Applying changes across multiple raw files

1. For best results, start by multi-selecting files from the Organizer space that have similar characteristics or were shot under the same lighting conditions.
2. Next, open the pictures in ACR by selecting one of the editing options from the right-click menu.
3. Now select a single photo from the queue that is indicative in tone and color of the whole group. With this photo displayed in the preview area, choose the Select All option from the top of the dialog.
4. Proceed to make enhancement changes to the previewed files as you would normally. Notice that these changes are also applied to the other photos in the queue.
5. The changes made to all the photos can then be fine-tuned to suit the characteristics of individual images (if needed) by selecting each picture in turn and adjusting the controls.
6. If no changes for individual files are necessary, then the selected photos can be saved, using the Save Images button, transferred to the Edit workspace with the Open Images option, or the enhancement settings applied by clicking the Done button.

Figure 6.4 If you want the best quality pictures always make sure that your scanner or camera captures in 16 bit per channel or 48-bit mode. On most cameras this is referred to as the ‘TIFF’ or ‘Raw’ setting.
Color depth or ‘What do you mean 8 bits per channel?’
Each digital file you create (capture or scan) is capable of representing a specific number of colors. This capability, usually referred to as the ‘mode’ or ‘color depth’ of the picture, is expressed in terms of the number of ‘bits’. Most photos these days are created in 24-bit mode. This means that each of the three color channels (Red, Green and Blue) is capable of displaying 256 levels of color (or 8 bits per channel). When the three channels are combined, a 24-bit image can contain a staggering 16.7 million separate tones/hues.
This is a vast amount of colors and would be seemingly more than we could ever need, see or print, but many modern cameras and scanners are now capable of capturing up to 16 bits per channel or ‘high-bit’ capture in either raw or TIFF file formats. This means that each of the three colors can have as many as 65,536 different levels and the image itself, with all three channels combined, a whopping 281,474,976 million colors (last time I counted!). But why would we need to capture so many colors? See Figures 6.5 and 6.6.
More colors equals better quality
Most readers would already have a vague feeling that a high-bit file (16 bits per channel) is ‘better’ than a low-bit (8 bits per channel) alternative, but understanding why is critical for ensuring the best quality in your own work.

Figure 6.5 The higher the bit depth of an image the more levels of tone and numbers of colors it can display.
Here are the main advantages in a nutshell:
16-BIT OR HIGH-BIT ADVANTAGES
1 Capturing images in high-bit mode provides a larger number of colors for your camera or scanner to construct your image with. This in turn leads to better color and tone in the digital version of the continuous tone original or scene.
2 Global editing and enhancement changes made to a high-bit file will always yield a better quality result than when the same changes are applied to a low-bit image.
3 Major enhancement of the shadow and highlight areas in a high-bit image is less likely to produce posterized tones than if the same actions were applied to a low-bit version.
4 More gradual changes and subtle variations are possible when adjusting the tones of a high-bit photograph, using tools like Levels, than is possible with low-bit images.
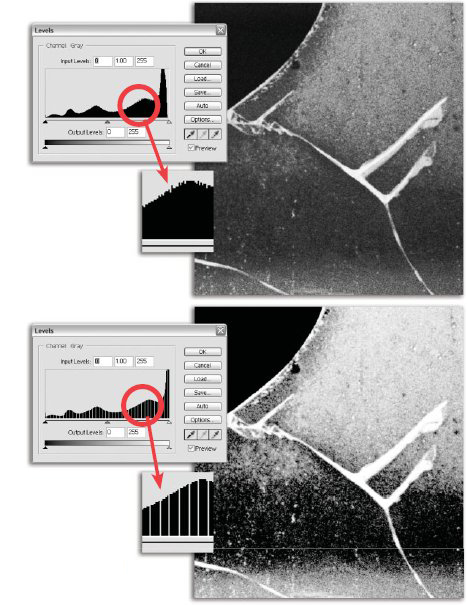
Figure 6.6 Redistributing the tones on an 8 bits per channel file can lead to loss of levels of gray (white spikes) and noticeable ‘banding’ in the image. 16 bits per channel files, by contrast, maintain their appearance of continuous tone even after quite drastic editing and enhancement actions.
Photoshop Elements is 16-bit enabled
But why all this talk about 16 bits per channel files (48-bit color in total)? Well, since the version 3.0 release of Elements the program has been 16-bit enabled. This means that if you have a camera or scanner that is capable of capturing in this mode you can now take advantage of the extra color and tone it provides. ‘Fantastic!’ you say. ‘No more 8 bits per channel (24-bit image) tweaking for me, I’m a 16 bits per channel fanatic from here on in.’ But there is a catch (you knew there had to be).
Despite the power and sophistication of Elements, only a subset of its features is available for working on 16-bit files. Of the tools, the Rectangular and Elliptical Marquee and Lasso, Eyedropper, Move, Crop and Zoom tools all function in this mode. In addition, you can rotate, resize, apply auto levels, auto contrast or auto color correct or use more manual controls such as Levels, Shadows/Highlights and Brightness/Contrast features. The Sharpen, Noise, Blur and Adjustment filter groups also work here. Does this mean that making enhancement changes in 16-bit mode is unworkable? No, you just need to use a different approach. Read on.
Global versus local enhancement
Because of the limitations when working with a 16 bits per channel file in Elements, some digital photographers break their enhancement tasks into two different sections – global and local.
Global, or those changes that are applied at the beginning of the process to the whole picture. These include general brightness and contrast changes, some color correction and the application of a little sharpening.
Local changes are those that are more specific and are sometimes applied to just sections of the picture. They may include dodging and burning in, removal of unwanted dust and scratches, the addition of some text and the application of special effects filters.
This separation of enhancement tasks fits neatly with the way that the 16-bit support works in Photoshop Elements. Global changes can be applied to the photograph whilst it is still in 16-bit mode; the file can then be converted to 8 bits per channel (Image > Mode > 8 Bits/channel) and the local alterations applied. This is the process that the professionals have been using for years and now Elements gives you the power to follow suit.
Common high-bit misconceptions
1 Elements can’t handle high-bit images. Not true. Previous versions of the program couldn’t handle high-bit pictures but since Elements 3.0 the program has contained a reduced feature set that can be used with 16 bits per channel images. And even with this limitation there are enough features available to ensure quality enhancement of your images.
2 High-bit images are too big for me to handle and store. Yes, high-bit images are twice the file size of 8-bit pictures and this does slow down machines with limited resources but, if this is a concern, put up with the inconvenience of a slow machine whilst you make tonal and color changes then convert to a speedier 8-bit file for local changes.
3 I can’t use my favorite tools and features in high-bit mode so I don’t use high-bit images at all. You are losing quality in your images needlessly. Perform your global edits in 16-bit mode and then convert to 8-bit mode for the application of your favorite low-bit techniques. See Figure 6.7.

Figure 6.7 Try to perform as many of your standard editing tasks on the 16-bit file as this will give you the best overall editing results. Once these changes have been made it is then time to convert the file to 8-bits per channel to finish your enhancement techniques. (1) Create 16-bit files from raw format pictures. (2) Perform all possible enhancement steps whilst the image is in 16-bit mode. (3) Convert to 8-bit mode and complete editing and enhancing the photo with tools and techniques that are only possible with 8-bit files.
Ensure quality capture and enhancement with 16-bit and raw files
1 Capture all images in the highest color depth possible. This will help to ensure the best possible detail, tone and color in your pictures.
2 If you have a camera that can capture raw files then ensure that this feature is activated as well, as it provides the best quality files to work with.
Manual tonal control
The Brightness/Contrast feature that we looked at in the last chapter is a great way to start to change the tones in your images, but as your skill and confidence increase you might find that you want a little more control. Adobe included the Histogram feature and the Levels function from Photoshop in Elements for precisely this reason.

Figure 6.8 The Histogram provides graph-based information about the spread of pixel tones within your image so that you can see the number of pixels grouped in the shadows (1), midtones (2) and highlights (3) areas.
In version 6.0: Window > Histogram
The first step in taking charge of your pixels is to become aware of where they are situated in your image and how they are distributed between black and white points. The Histogram palette displays a graph of all the pixels in your image. The left-hand side represents the black values, the right the white end of the spectrum. As we already know, in a 24-bit image there are a total of 256 levels of tone possible from black to white – each of these values is represented on the graph. The number of pixels in the image with a particular brightness or tone value is displayed on the graph by height. See Figure 6.8.

Figure 6.9 You can diagnose the problems with your photos and predict the way that your picture looks by the shape of the graph in the Histogram palette and the Levels feature. (1) The pixels are bunched to the left end of the graph for underexposed images and (2) to the right end for overexposed ones. (3) Pixels are bunched together in the middle of the graph for flat images. (4) The pixels are spread right out to the left and right edges for contrasty pictures.
After a little time viewing the histograms of your images, you will begin to see a pattern in the way that certain styles of photographs are represented. Overexposed pictures will display a large grouping of pixels to the right end of the graph, whereas underexposure will be represented by most pixels bunched to the left. Flat images or those taken on an overcast day will show all pixels grouped around the middle tones and contrasty pictures will display many pixels at the pure white and black ends of the spectrum. See Figure 6.9.
Previously in this book we have fixed these tonal problems by applying one of the automatic correction features, such as Auto Contrast or Auto Levels, found in Elements, or by using a simple slider control such as Brightness/Contrast. All of these tools remap the pixels so that they sit more evenly across the whole of the tonal range of the picture. Viewing the Histogram of a corrected picture will show you how the pixels have been redistributed. See Figure 6.10.

Figure 6.10 The Auto Levels or Auto Contrast feature redistributes pixels in the graph between the black and white points. (1) Before Auto Levels. (2) After Auto Levels.
Editor: Enhance > Adjust Lighting > Levels
In version 6.0: Enhance > Adjust Lighting > Levels
If you want to take more control of the process than is possible with the auto solutions, open the Levels dialog. Looking very similar to the Histogram, this feature allows you to interact directly with the pixels in your image. As well as a graph, the dialog contains two slider bars. The one directly beneath the graph has three triangular controls for black, midtones and white, and represents the input values of the picture. The slider at the bottom of the box shows output settings, and contains black and white controls only. See Figure 6.11.
To adjust the pixels, drag the Input Shadow (left end) and Highlight (right end) controls until they meet the first set of pixels at either end of the graph. When you click OK, the pixels in the original image are redistributed using the new white and black points. Altering the Midtone control will change the brightness of the middle values of the image, and moving the output black and white points will flatten, or decrease, the contrast. Clicking the Auto button is like selecting Enhance > Auto Levels from the menu bar.
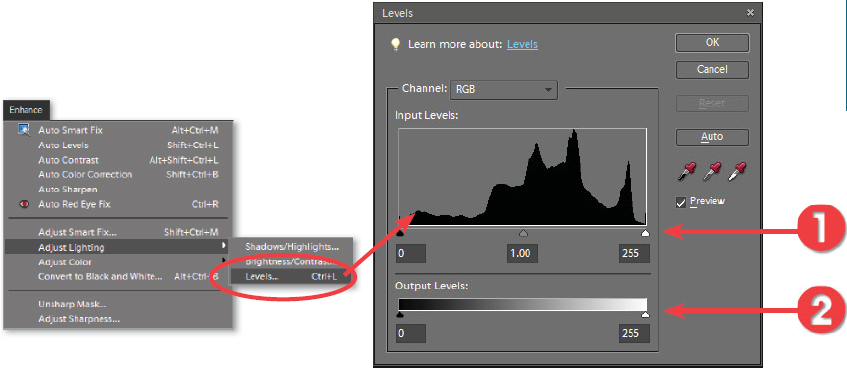
Figure 6.11 The Levels control allows you to interactively control the spread of pixels within your image. (1) Input values. (2) Output values.
Pegging black and white points
On the right-hand side of the Levels dialog is a set of three Eyedropper buttons used for sampling the black, gray and white pixels in your image. Designed to give you ultimate control over the tones in your image, these tools are best used in conjunction with the Info palette (Window > Info). See Figure 6.12.

Figure 6.12 The Info dialog displays a readout of the precise values of a group of pixels. (1) First readout. (2) Second readout. (3) Sample position. (4) Marquee size. (5) Document information. (6) Info palette options. (7) If you create a shape then Transform it you will see readouts for width (W), height (H), angle of rotation (A), and angle of skew (H). If you click and drag the shape, you also get readouts for Delta X (X), Delta Y (Y), angle (A) , and distance (D).
To use this technique, start by making sure that the Info palette is visible (Window > Info) and then select the black point eyedropper from the Levels dialog. Locate the darkest point in the picture by moving the dropper cursor over your image and watching the values in the Info palette. Your aim is to find the pixels with RGB values as close to 0 as possible. By clicking on the darkest area you will automatically set this point as black in your graph (and your picture). Next, select the white point eyedropper, locate the highest value and again click to set. With Highlight and Shadow values both pegged, all the values in the picture will be adjusted to suit. Note that the Info palette will show before and after values when making changes, for example 42/48 (before/after). When sampling white areas, you should avoid specular highlights such as the shine from the surface of a metallic object as these parts of the picture contain no printable details. See Figure 6.13.

Figure 6.13 With the aid of the details in the Info dialog locate the darkest and lightest points in your picture and peg these with the black and white point eyedroppers from the Levels feature.
Color correction with the gray point eyedropper
The gray point eyedropper performs in a similar manner to the Color Cast command. With the tool selected, the user clicks on an area in the picture that should be a neutral gray. The color of the area is changed to neutral gray or equal amounts of red, green and blue, changing with it all the other pixels in the image. This tool is particularly useful for neutralizing color casts.
FEATURE SUMMARY
1 Select Window > Info.
2 Select Enhance > Adjust Lighting > Levels.
3 Peg highlights and shadow areas using the Levels’ eyedropper tools and values in the Info palette.
4 Select OK to finish.

Make Levels changes in 16-bit mode
Levels changes can be performed and indeed should be performed when your photographs are in 16-bit mode. Adjusting your contrast and brightness here will give you much smoother gradation of tones and preserve more detail in your final picture.
Adjusting tones with Levels summary
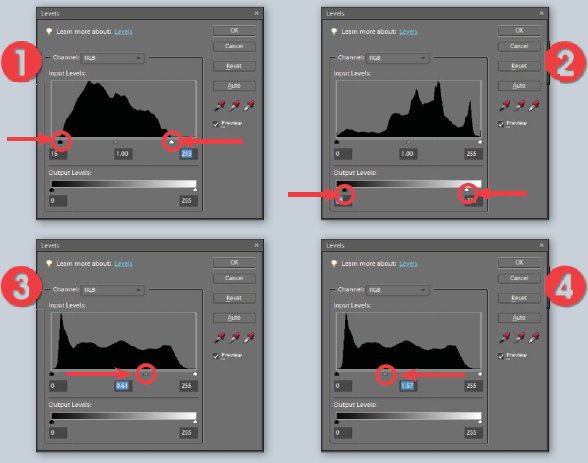
Use the following guide to help you make tonal adjustments for your images using Levels:
1 To increase contrast – Move the Input black and white controls to meet the first group of pixels.
2 To decrease contrast – Move the Output black and white controls towards the center of the slider.
3 To make middle values darker – Move the Input midtone control to the right.
4 To make middle values lighter – Move the Input midtone control to the left.
FEATURE SUMMARY
1 Select Enhance > Adjust Lighting > Levels.
2 Change contrast and midtone values by adjusting Input and Output sliders.
3 Select OK to finish.
Specialized color control
In traditional imaging it is very difficult to manipulate the hues in an image. Thankfully, this is not the case in digital picture making. Fine control over color intensity and location is an integral part of the new technology. Apart from the Variations and Color Cast features that we looked at in the last chapter, Elements also contains the Hue/Saturation command and the Auto Color feature.
Editor: Enhance > Auto Color Correction
In version 6.0: Enhance > Auto Color Correction
This feature works in a similar way to Auto Levels and Auto Contrast in that it identifies the shadows, midtones and highlights in an image and uses these as a basis for image changes. The feature adjusts the contrast of the image by remapping the shadows and highlights to black and white, and neutralizes any color casts by balancing the red, green and blue values in the picture’s midtones. As with most Auto functions, this tool works well for the majority of images. For most users this is a good place to start to enhance and correct images, but for those occasions where Auto Color Correction produces poor results then my suggestion is to undo the automatic changes and rework the picture using either the Variations or Color Cast features. This option is also available in the Organizer’s Fix panel. See Figure 6.14.

Figure 6.14 The Auto Color Correction feature provides a one-click solution to most color cast problems.
Editor: Enhance > Adjust Color > Adjust Hue/Saturation
In version 6.0: Enhance > Adjust Color > Hue/Saturation
To understand how this feature works you will need to think of the colors in your image in a slightly different way. Rather than using the three-color model (Red, Green, Blue) that we are familiar with, the Hue/Saturation control breaks the image into different components – Hue or color, Saturation or color strength, and Lightness (HSL). See Figure 6.15.

Figure 6.15 The Hue/Saturation control provides control over the color within your image. (1) Target tones selected for adjustment. (2) Color slider. (3) Strength slider. (4) Lightness slider. (5) Colorize option.
The dialog itself displays slider controls for each component, allowing the user to change each factor independently of the others. Moving the Hue control along the slider changes the dominant color of the image. From left to right, the hue’s changes are represented in much the same way as colors in a rainbow. Alterations here will provide a variety of dramatic results, most of which are not realistic and should be used carefully. Moving the Saturation slider to the left gradually decreases the strength of the color until the image is reduced to just gray tones. In contrast, adjusting the control to the right increases the purity of the hue and produces images that are vibrant and dramatic. The Lightness slider changes the density of the image and works the same way as the Brightness slider in the Brightness/Contrast feature. You can use this feature to make slight adjustments when a color change darkens or lightens the midtones of the image, but more critical brightness changes should be made with the Levels feature.
By selecting the Colorize option and then moving the Hue control, it is possible to simulate sepia-or blue-toned prints. The option converts a colored image to a monochrome made up of a single dominant color and black and white. See Figure 6.16.
FEATURE SUMMARY
1 Select Enhance > Adjust Color > Hue/Saturation.
2 Select the Colorize option to make toned prints.
3 Change Hue, Saturation and Lightness by adjusting sliders.
4 Select OK to finish.

Figure 6.16 The Hue/Saturation feature provides you with the ability to change the color in your pictures in a variety of ways. (1) Original picture. (2) Moving the Hue slider changes the dominant colors in the image. (3) The Saturation slider controls the strength or purity of colors in the picture. (4) Movements of the Lightness slider control the brightness of the picture. (5) Selecting the Colorize option changes the image to a monochrome, containing tones made up of one main color, white and black. Moving the Hue slider with this option checked produces ‘toned’ photographs.

Figure 6.17 The Variations control can also be used to tint your monochrome pictures. (1) Start by changing the color photo to grayscale (Enhance > Convert to Black and White). (2) Now open the Color Variations control (Enhance >
Adjust Color > Color Variations) and click on the thumbnails to tint your picture.
Editor: Enhance > Adjust Color > Color Variations
In version 6.0: Enhance > Adjust Color > Color Variations
The Variations command that we looked at in the last chapter can also be used to convert full color images to tinted monochromes. First, change your color image to grayscale using the brand new Enhance > Convert to Black and White feature. Your image will now appear to be a grayscale but the file is still in RGB mode so color can be added at any time. Open the Variations command (Enhance > Adjust Color > Color Variations) and tone your picture by clicking on the appropriate thumbnails. For some users this method might be a little easier to use than the Hue/Saturation command, as the results and color alternatives are previewed and laid out clearly. See Figure 6.17.
FEATURE SUMMARY
1 Open color image.
2 Select Enhance > Convert to Black and White using any of the Preset options.
3 Select Enhance > Adjust Color > Color Variations.
4 Adjust strength of the color changes using the Color Intensity slider.
5 Pick the thumbnails to change image color and check progress by viewing the Before and After thumbnails. Click OK to finish.
Editor: Enhance > Adjust Color > Adjust Color Curves
The Adjust Color Curves option provides another way that you can alter the brightness and contrast in your photo. Unlike the very basic Brightness/Contrast control, Adjust Color Curves provides separate controls for altering the brightness of highlights, shadows and midtones as well as a separate slider for changing midtone contrast. The feature has been revamped since its introduction in version 6.0 and now contains two separate sections – Style and Adjust Sliders. The features dialog contains both Before and After previews so that the effect of curve changes can be seen as you make them.
The Style area contains a series of preset curves settings for the most widely used enhancements, which include: Backlight, Darken Highlights, Default, Increase Contrast, Increase Midtone, Lighten Shadows, and Solarize.
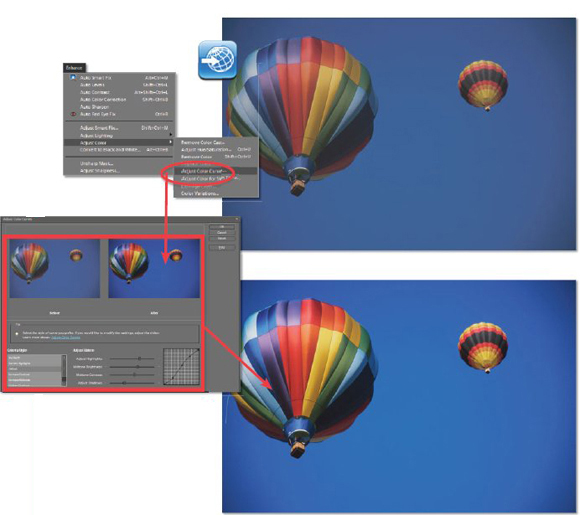
Figure 6.18 The Adjust Color Curves feature provides the Elements user with another way to fine-tune the tones in their pictures.
The Adjust Sliders section contains four slider controls plus a curves graph that plots the tonal relationships in the picture. Whereas the Samples thumbnails provided a one-click adjustment, the controls here allow multiple, additive, fine-tuning changes.
The best approach is to select a style of curve adjustment first, e.g. Lighten Shadows, and then fine-tune the results with the sliders. To reset the Curves feature back to its original position click the Default style entry or the Reset button in the top right of the dialog. See Figures 6.18 and 6.19.
FEATURE SUMMARY
1 Open color image and Select Enhance > Adjust Color > Adjust Color Curves.
2 Select the base curves adjustment style from the options on the left of the dialog.
3 Use the slider controls to fine-tune the results and then click OK to apply the changes or Reset to start again.
4 To reset the feature and remove any current adjustments click the Reset button.
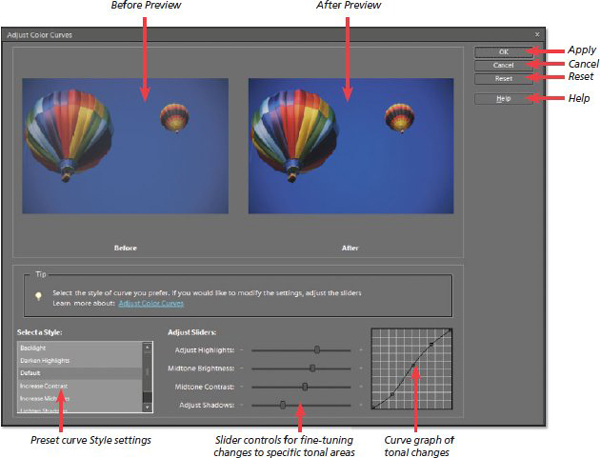
Figure 6.19 The feature contains two different type of controls – thumbnail buttons for applying quick changes and sliders for fine-tuning the results.
It is possible to draw a viewer’s attention to a particular part of an image by increasing its saturation. The difference in color (contrast) makes the saturated part of the picture a new focal point. The effect can be increased greatly by desaturating (reducing the color strength) the areas around the focal point. The Sponge tool is designed to make such saturation changes to the color within your photos. It can be used to saturate or desaturate and, in grayscale mode, it will even decrease or increase contrast. As with most other tools, size and mode can be changed in the options bar. Changing the Flow settings in the bar alters the rate at which the image saturates or desaturates. See Figure 6.20.
FEATURE SUMMARY
1 Pick the Sponge tool from the toolbox.
2 Select brush size, type and flow rate from the options bar.
3 Select the mode to use – Saturate or Desaturate.
4 Drag over the image part to change.

Figure 6.20 The Sponge tool can be used to selectively increase or decrease the saturation of parts of the image. (1) Desaturate. (2) Saturate.
Editor: Filter > Adjustments > Posterize
In version 6.0: Filter > Adjustments > Posterize
The Posterize feature reduces the number of color levels within an image. This produces a graphic design type illustration with areas of flat color from photographic originals. This type of image has very little graduation of tone; instead, it relies on the strength of the colors and shapes that make up the image for effect. The user inputs the number of tones for the images and Elements proceeds to reduce the total palette to the selected few. See Figure 6.21.

Figure 6.21 The Posterize feature is used to reduce the total number of color levels in an image.
FEATURE SUMMARY
1 Select Filter > Adjustments > Posterize.
2 Input the number of levels required.
3 Select OK to finish.
Editor: Filter > Adjustments > Invert
In version 6.0: Filter > Adjustments > Invert
The Invert command produces a negative version of your image. The feature literally swaps the values of each of the image tones. When used on a grayscale image the results are similar to a black and white negative. However, this is not true for a color picture as the inverted picture will not contain the typical orange ‘mask’ found in color negatives. See Figure 6.22.

Figure 6.22 The Invert command reverses all image colors and tones.
Editor: Filter > Adjustments > Photo Filter
In version 6.0: Filter > Adjustments > Photo Filter
The Photo Filter was added to the feature line-up in Elements in version 3.0 after first appearing in the CS version of Photoshop. The tool applies a colored filter to your picture and simulates the effects that traditional photographers could achieve by screwing a colored piece of glass, or gel, to the front of their camera lenses. The change in color that this technique produces can be used for visual effect, such as making a cloudy day appear more sunny (by applying a warm-up filter) or to help correct color cast problems like those displayed in Figure 6.23. Here a Cooling Filter(82) is applied to the warm image to help eliminate the yellow cast.
Also included in the feature’s dialog are areas for you to select the exact color of the filter applied, a Density slider that controls the strength of the filter, and the Preserve Luminosity check box which ensures that the overall tone of your picture doesn’t darken or lighten with your filter changes.
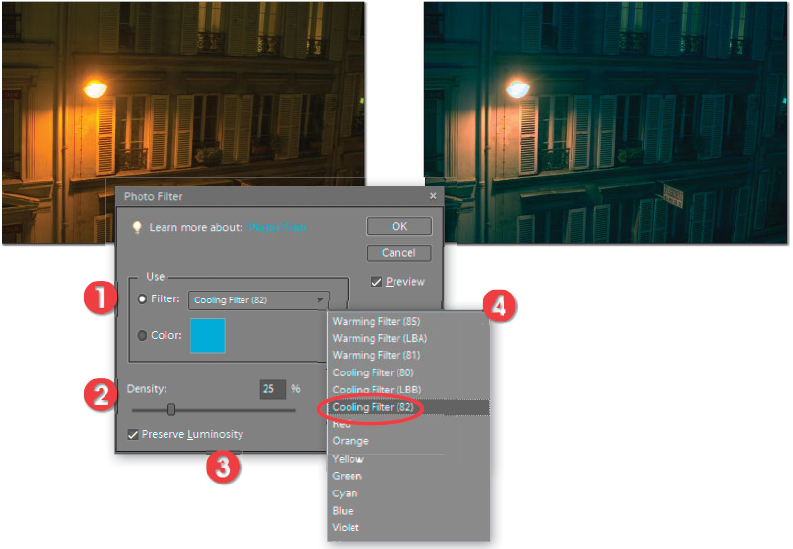
Figure 6.23 The Photo Filter changes the colors in your picture by applying a colored filter to the image. (1) Filters to select from or use the color swatch to make your own. (2) Adjust the strength of the filter with the Density slider. (3) Click the Preserve Luminosity option to ensure that the overall brightness of the picture doesn’t change. (4) Preset filter list.
FEATURE SUMMARY
1 Select the Filter > Adjustments > Photo Filter.
2 Ensure that the Preview and Preserve Luminosity options are selected.
3 Pick the filter from the drop-down list or double-click the color swatch to pick the color more precisely.
4 Adjust the density of the filter to suit the image. Click OK to apply.
High quality sharpening techniques
Sometimes, during the image capture process, the picture loses some of the subject’s original clarity. This can be especially true if you are scanning small prints or negatives at high resolutions. To help restore some of this lost clarity, it is a good idea to get into the habit of applying sharpening to images straight after capture (although ensure that your digital camera has not already done this as an automatic feature). I should say from the outset that although the specialist features in Elements will improve the appearance of sharpness in an image, it is not possible to use these tools to ‘focus’ a picture that is blurry. In short, sharpening won’t fix problems that arise from poor camera technique; the only solution for this is ensuring that images are focused to start with. That said, let’s get sharpening.
Adobe revamped the sharpening options offered in Elements 5.0. Whereas in previous releases all sharpening activity was based around the Filter menu, from version 5.0 the three sharpening options are grouped under the Enhance menu. The Unsharp Mask filter from previous releases is now joined with the Auto Sharpen and Adjust Sharpness features. These together with the specialized Sharpening tool provide a variety of methods for adding extra clarity to your pictures.
Editor: Enhance > Auto Sharpen
Version 4.0: Filter > Sharpen > Sharpen
Most digital sharpening techniques are based on increasing the contrast between adjacent pixels in the image. When viewed from a distance, this change makes the picture appear sharper. The new Auto Sharpen feature applies basic sharpening to the whole of the image. See Figure 6.24.

Figure 6.24 The two basic sharpening filters provide automatic sharpening of all the pixels in your photographs. (1) No sharpening. (2) With Auto Sharpen applied.
Editor: Enhance > Unsharp Mask
Version 4.0: Filter > Sharpen > Unsharp Mask
This feature is based on an old photographic technique for sharpening images that used a slightly blurry mask to increase edge clarity. The digital version offers the user control over the sharpening process via three sliders – Amount, Radius and Threshold. By careful manipulation of the settings of each control the sharpness of images destined for print or screen can be improved. Beware though – too much sharpening is very noticeable and produces problems in the image, such as edge haloes, that are very difficult to correct later. See Figure 6.25.
Before using the Unsharp Mask filter, make sure that you are viewing your image at 100%. If you intend to print the sharpened image, make test prints at different settings before deciding on the final values for each control. Repeat this exercise for any pictures where you want the best quality, as the settings for one file might not give the optimum results for another picture that has a slightly higher or lower resolution.
The Unsharp Mask controls
The Amount slider controls the strength of the sharpening effect. Values of 50–100% are suitable for low-resolution pictures, whereas settings between 150% and 200% can be used on images with a higher resolution. See Figure 6.26.
The Radius slider value determines the number of pixels around the edge that is affected by the sharpening. A low value only sharpens edge pixels. Typically, values between 1 and 2 are used for high-resolution images, and settings of 1 or less for screen images. See Figure 6.27.

Figure 6.25 Overuse of the Unsharp Mask filter can lead to irreversible
problems.
(1) Too much contrast.
(2) Coarse skin tones.
(3) Haloes.
The Threshold slider is used to determine how different the pixels must be before they are considered an edge and therefore sharpened. A value of 0 will sharpen all the pixels in an image, whereas a setting of 10 will only apply the effect to those areas that are different by at least 10 levels or more from their surrounding pixels. To ensure that no sharpening occurs in sky or skin tone areas, set this value to 8 or more. See Figure 6.28.
FEATURE SUMMARY
1 Select Filter > Sharpen > Unsharp Mask.
2 Adjust Amount slider to control strength of filter.
3 Adjust Radius slider to control the number of pixels surrounding an edge that is included in the effect.
4 Adjust Threshold slider to control what pixels are considered edge and therefore sharpened.

Figure 6.26 The Amount slider
controls the strength
of the sharpening
effect.
(1) Amount = 50%.
(2) Amount = 150%.
(3) Amount = 500%.

Figure 6.27 The Radius slider
determines the number
of edge pixels that are
sharpened.
(1) Radius = 1.0 pixels.
(2) Radius = 20 pixels.
(3) Radius = 250 pixels.
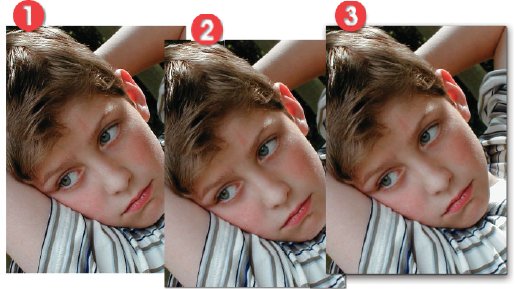
Figure 6.28 The Threshold slider
controls the point at
which the effect is
applied.
(1) Threshold = 0 levels.
(2) Threshold = 8 levels.
(3) Threshold = 100 levels.

Figure 6.29 The Adjust Sharpness feature contains Amount and Radius sliders as well as a variety of sharpening approaches in the Remove menu.
Editor: Enhance > Adjust Sharpness
The Adjust Sharpen feature provides all the control that we are familiar with in the Unsharp Mask dialog plus better edge detection abilities, which leads to better results and in particular less apparent sharpening haloes. The feature’s dialog contains a zoomable preview, two slider controls, a drop-down menu to choose the sharpening approach used and a More Refined option. See Figure 6.29.
The user can control the sharpening effect with the following settings:
Amount – Strength of sharpening effect.
Radius – Determines the extent of sharpening. Higher values equal more obvious edge effects.
Remove – Determines sharpening algorithm used. Gaussian Blur uses the same approach as the Unsharp Mask filter. Lens Blur concentrates on sharpening details and produces results with fewer haloes. Motion Blur reduces the effects of blur caused by camera shake or subject movement.
Angle – Sets Motion Blur direction.
More Refined – Longer processing for better results.
For best results, choose the Remove setting first. The Lens Blur option provides a good balance between sharpening effects and minimal sharpening artifacts. Enlarge the preview to at least 100%. Next, select a low Radius value – 1 or 2 for high-resolution images and 1 or less for low-resolution photos. Now gradually move the Amount slider from left to right, stopping occasionally to check the results of the sharpening. When you reach a setting that provides good sharpening, but doesn’t create halo artifacts, click OK to apply.
To see the results of your sharpening being reflected in the Elements document itself, make sure that the Preview option is selected.
Applying sharpening makes permanent and irreversible changes to your photos so it is always a good idea to keep an unsharpened copy of your image as an original.
Elements’ sharpening tools
In addition to using a filter to sharpen your image, it is also possible to make changes to specific areas of the picture using one of the two sharpening tools available. The Blur and Sharpen tools are located in the Elements toolbox. See Figure 6.30.
The size of the area they change is based on the current brush size. The intensity of the effect is controlled by the Strength value found in the options bar.
As with the Airbrush tool, the longer you keep the mouse button down the more pronounced the effect will be. These features are particularly useful when you want to change only small parts of an image rather than the whole picture. See Figure 6.31.
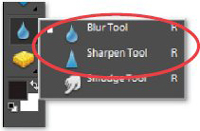
Figure 6.30 The Blur and Sharpen tools can be used to apply sharpening to specific areas within an image.
FEATURE SUMMARY
1 Select the Blur or Sharpen tool from the toolbox.
2 Adjust the size and style of the tool with the Brush palette in the options bar.
3 Change the intensity of the effect by altering the Strength setting.
4 Blur or sharpen areas of the image by clicking and dragging the tool over the picture surface.
5 Increase the change in any one area by holding the mouse button down.
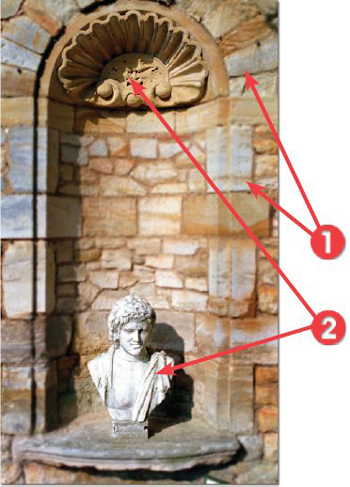
Figure 6.31 The Sharpen/Blur tools can be used to direct the eye of the viewer by making some areas of an image more prominent than others. (1) Blurred area. (2) Sharpened area.
Retouching techniques
Used for more than just enhancing existing details, these techniques are designed to rid images of visual information, like dust and scratches, which can distract from the main picture.
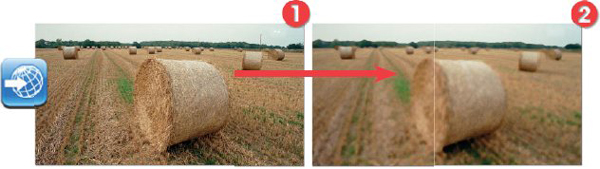
Figure 6.32 Too much Dust & Scratches filtering can destroy image detail and make the picture fuzzy. (1) Original picture. (2) Photo after too much Dust & Scratches filtration.
Editor: Filter > Noise > Dust & Scratches
In version 6.0: Filter > Noise > Dust & Scratches
It seems that no matter how careful I am, my scanned images always contain a few dust marks. The Dust & Scratches filter in Elements helps to eliminate these annoying spots by blending or blurring the surrounding pixels to cover the defect. The settings you choose for this filter are critical if you are to maintain image sharpness whilst removing small marks. Too much filtering and your image will appear blurred, too little and the marks will remain. See Figure 6.32.
To find settings that provide a good balance, first try adjusting the Threshold setting to zero. Next, use the Preview box in the Filter dialog to highlight a mark that you want to remove. Use the zoom controls to enlarge the view of the defect. Now drag the Radius slider to the right. Find, and set, the lowest Radius value where the mark is removed. Next, increase the Threshold value gradually until the texture of the image is restored and the defect is still removed. See Figure 6.33.
FEATURE SUMMARY
1 Select Filter > Noise > Dust & Scratches.
2 Move preview area to highlight a mark to be removed.
3 Zoom the preview to enlarge the view of the mark.
4 Ensure that the Threshold value is set to zero.
5 Adjust the Radius slider until the mark disappears.
6 Adjust Threshold until texture returns and the mark is still not visible.
7 Click OK to finish.

Figure 6.33 Follow the three-step process to ensure that you choose the optimal settings for the Dust & Scratches filter.
(1) Set both sliders to minimum (all the way to the left). Preview the Dust Mark area.
(2) Adjust the Radius slider until the mark disappears.
(3) Raise the Threshold slider to regain texture in the non-marked area of the image.
In some instances the values needed for the Dust & Scratches filter to erase or disguise picture faults are so high that it makes the whole image too blurry for use. In these cases it is better to use a tool that works with the problem area specifically rather than the whole picture surface.
The Clone Stamp tool samples an area of the image and then paints with the texture, color and tone of this copy onto another part of the picture. This process makes it a great tool to use for removing scratches or repairing tears or creases in a photograph. Backgrounds can be sampled and then painted over dust or scratch marks, and whole areas of a picture, can be rebuilt or reconstructed using the information contained in other parts of the image. See Figure 6.34.
Using the Clone Stamp tool is a two-part process. The first step is to select the area that you are going to use as a sample by Alt-clicking the area. See Figure 6.35. Now move the cursor to where you want to paint, and click and drag to start the process. See Figure 6.36.
The size and style of the sampled area are based on the current brush and the Opacity setting controls the transparency of the painted section.
FEATURE SUMMARY
1 Pick the Clone Stamp tool from the toolbox.
2 Adjust the brush size via the Brush palette in the options bar.
3 Set the opacity for the painted area.
4 Position the mouse cursor on a part of the image you want to sample and Alt-click.
5 Move the tool to the area of the image you want to use the sample to cover and click and drag to paint.
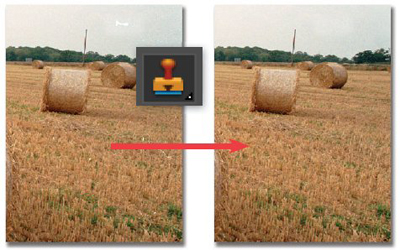
Figure 6.34 The Clone Stamp tool is perfect for retouching the marks that the Dust & Scratches filter cannot erase.
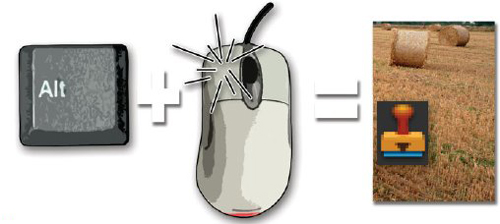
Figure 6.35 Alt-click to mark the area to be sampled.

Figure 6.36 Move the cursor over the mark and click to paint over with the sampled texture. (1) Sample point. (2) Retouching area.
Spot Healing Brush
In recognition of just how tricky it can be to get seamless dust removal with the Clone Stamp tool, Adobe decided to include the Spot Healing Brush in Elements. After selecting the tool you adjust the size of the brush tip using the options in the tool’s option bar and then click on the dust spots and small marks in your pictures. The Spot Healing Brush uses the texture that surrounds the mark as a guide to how the program should ‘paint over’ the area. In this way, Elements tries to match color, texture and tone whilst eliminating the dust mark. The results are terrific and this tool should be the one that you reach for first when there is a piece of dust or a hair mark to remove from your photographs. See Figure 6.37.
FEATURE SUMMARY
1 Locate the areas to be repaired.
2 Adjust the brush size to suit the size of the mark.
3 Click on the spot to repair.

Figure 6.37 The Spot Healing Brush tool is designed for quick, accurate repair of dust and hair marks. To use simply select the tool, adjust the size of the brush tip to suit the dust mark and then paint it out.
Healing Brush tool
The Clone Stamp tool is good, but the best way to remove unwanted detail from your pictures is with the amazing Healing Brush tool. Designed to work in a similar way to the Clone Stamp tool, the user selects the area (Alt-click) to be sampled before painting and then proceeds to drag the brush tip over the area to be repaired. The tool achieves such great results by merging background and source area details as you paint. Just as with the Clone Stamp tool the size and edge hardness of the current brush determine the characteristics of the Healing Brush tool tip.
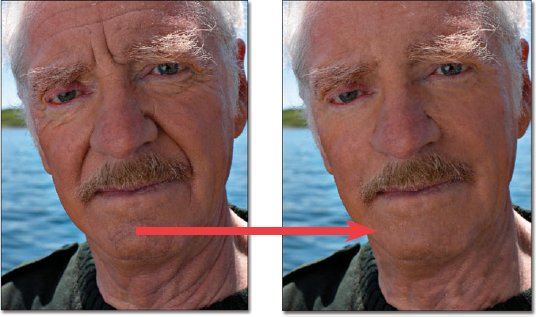
Figure 6.38 The new Healing Brush tool works wonders for removing unwanted details. It can even provide a little digital plastic surgery when required.
One of the best ways to demonstrate the sheer power of the Healing Brush is to remove the wrinkles from an aged face. Though I’m not sure of the ethics of such an action it is a request that is often put to me. In Figure 6.38, the deep crevices of the fisherman’s face have been easily removed with the tool. The texture, color and tone of the face remain even after the ‘healing’ work is completed because the tool merges the new areas with the detail of the picture beneath.
FEATURE SUMMARY
1 The first step is to locate the areas of the image that need to be retouched.
2 Hold down the Alt key and click on the area that will be used as a sample for the brush. Notice that the cursor changes to cross hairs to indicate the sample area.
3 Move the cursor to the area to heal and click and drag the mouse to ‘paint’ over the problem picture part. After you release the mouse button Elements merges the newly painted section with the image beneath. See Figure 6.39.
You can remove wrinkles on a duplicate layer and then fade the opacity of this layer to create a more natural appearance, where wrinkles are softened and not completely removed.

Figure 6.39 (1) Locate the areas to be healed. (2) Alt-click the source that you will use in the repairs. (3) Drag the brush tip over the area to be repaired.
Editor: Filter > Noise > Reduce Noise
In version 6.0: Filter > Noise > Reduce Noise
Many new digital cameras have a variety of ISO settings to choose from. When shooting in sunny or bright conditions you generally use values of 100 or 200, giving sharp and noise-free results, but when you select a higher value such as 1600 for use at night, or in low light, the resultant pictures can become very noisy. Camera manufacturers often include Noise Reduction features as part of the camera functions but sometimes the length of time the camera takes to process the file means that it is almost impossible to take a series of night-time pictures rapidly. If this is your requirement then you are stuck with grainy photographs because you have had to shoot with the Noise Reduction feature turned off.
With just this sort of problem in mind, the Adobe engineers included a new Noise Reduction filter (Filter > Noise > Reduce Noise) in version 3.0 of Elements. The feature includes a preview window, a Strength slider, a Preserve Details control and a Reduce Color Noise slider. As with the Dust & Scratches filter you need to be careful when using this filter to ensure that you balance removing noise whilst also retaining detail.
The best way to guarantee this is to set your Strength setting first, ensuring that you check the results in highlights, midtone and shadow areas. Next, gradually increase the Preserve Details value until you reach the point where the level of noise that is being reintroduced into the picture is noticeable and then back off the control slightly (make the setting a lower number). For photographs with a high level of color noise (random speckles of color in an area that should be a smooth flat tone) you will need to adjust this slider at the same time as you are playing with the Strength control. See Figure 6.40.
FEATURE SUMMARY
1 Open the noisy image and select the Filter > Noise > Reduce Noise filter.
2 Drag the Preserve Details slider to the left and then gradually move the Strength slider to the right until the noise is at an acceptable level.
3 Now slowly move the Preserve Details slider to the right until there is an acceptable balance between detail and noise in your picture.
4 To reduce the appearance of JPEG compression select the Remove JPEG Artifact check box in the feature’s dialog.
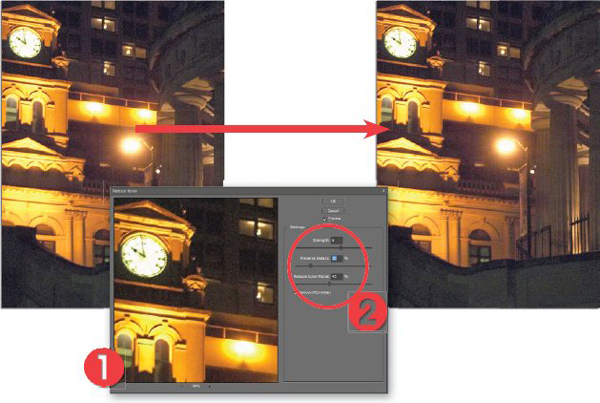
Figure 6.40 The Reduce Noise filter is great for making pictures taken when your camera is set on a high ISO value less noisy. (1) Preview. (2) Noise Reduction controls.
At first, the idea of making a smooth, evenly graduated image more textured seems to be at odds with the general direction that digital technology has been heading over the last few years. Research scientists and technicians have spent much time and money ensuring that the current crop of cameras, scanners and printers is able to capture and produce images so that they are in effect textureless or grainless. The aim has been to disguise the origins of the final print so that the pixels cannot be seen.
For me to introduce to you at this stage a few techniques that intentionally add noticeable texture to your image may seem a little strange but, despite the intentions of the manufacturers, many digital image makers do like the atmosphere and mood that a ‘grainy’ picture conveys. See Figure 6.41. All the techniques use filters to alter the look of the image. Filter changes are permanent, so it is always a good idea to keep a copy of the unaltered original file on your hard drive, just in case.
Editor: Filter > Noise > Add Noise
In version 6.0: Filter > Noise > Add Noise
The Add Noise filter is one of four options contained under the Noise heading in the Filter menu. Using this feature adds extra contrasting pixels to your image to simulate the effect of high-speed film. See Figure 6.42. When the filter is selected, you are presented with a dialog that contains several choices. A small zoomable thumbnail window is provided so that you can check the appearance of the filter settings on your image. There is also the option to preview the results on the greater image by ticking the Preview box. The strength of the effect is controlled by the Amount slider and the type of noise can be switched from Uniform, a more even effect, to Gaussian, for a speckled appearance. The Monochromatic option adds pixels that contrast in tone only and not color to the image. See Figure 6.43.

Figure 6.41 Despite all the techniques in the previous section, which were designed to reduce the marks in our pictures, there are many photographers who like texture and who regularly use other techniques to intentionally put back desirable textures into their photographs.

Figure 6.42 Use the Add Noise filter for basic texture additions. (1) Preview thumbnail. (2) Filter strength. (3) Noise type. (4) Monochromatic check box.
FEATURE SUMMARY
1 Select the Add Noise filter from the Noise section of the Filter menu.
2 Adjust thumbnail preview to a view of 100% and tick the Preview option.
3 Select Uniform for an even distribution of new pixels across the image, or pick Gaussian for a more speckled effect.
4 Tick the Monochromatic option to restrict the effect to changes in the tone of pixels rather than color.
5 Adjust the Amount slider to control the strength of the filter, checking the results in both the thumbnail and full image previews.
6 Click OK to finish.

Figure 6.43 The Add Noise filter settings control the look of the final texture. (1) Original non-filtered picture. (2) Uniform Distribution selected. (3) Gaussian Distribution selected. (4) Uniform Distribution and Monochrome
setting selected.
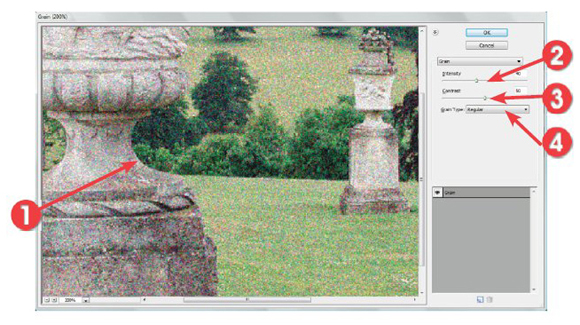
Figure 6.44 The Grain filter provides a little more control over the type of texture that is added to your images. (1) Preview thumbnail. (2) Filter strength. (3) Effect contrast. (4) Grain style.
Editor: Filter > Texture > Grain
In version 6.0: Filter > Texture > Grain
Found under the Texture option in the Filter menu, the Grain filter, at first glance, appears to offer the same style of texture changes as the Add Noise feature, but the extra controls in the dialog give users the chance to add a range of different texture types to their images. See Figure 6.44.
The dialog provides a thumbnail preview of filter changes. The Intensity slider controls the strength of the effect and the Contrast control alters the overall appearance of the filtered image. The Grain Type menu provides 10 different choices of the style of texture that will be added to the image. By manipulating these three settings, it is possible to create some quite different and stunning texture effects. See Figure 6.45.
FEATURE SUMMARY
1 Select the Grain filter from the Texture section of the Filter menu.
2 Adjust thumbnail preview to a view of 100%.
3 Select Grain Type from the menu.
4 Adjust the Intensity slider to control the strength of the filter, checking the results in the thumbnail preview.
5 Alter the Contrast slider to change the overall appearance of the image.
6 Click OK to finish.

Figure 6.45 The Grain filter with a range of
options selected.
(1) Horizontal option set.
(2) Speckle option set.
(3) Stippled option set.
Editor: Filter > Texture > Texturizer
In version 6.0: Filter > Texture > Texturizer
The Texturizer filter provides a slightly different approach to the process of adding textures to images. With this feature much more of the original image detail is maintained. The picture is changed to give the appearance that the photo has been printed onto the surface of the texture. The Scaling and Relief sliders control the strength and visual dominance of the texture, whilst the Light direction menu alters the highlight and shadow areas. See Figure 6.46. Different surface types are available from the Texture drop-down menu. See Figure 6.47. The feature also contains the option to add your own files and have these used as the texture that is applied by the filter to the image.
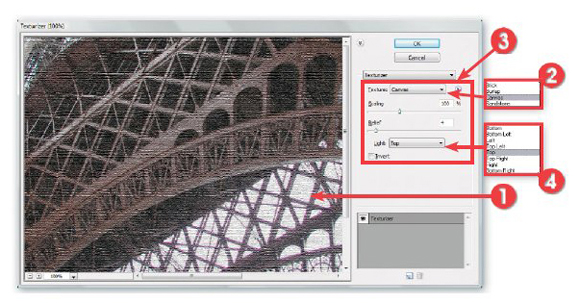
Figure 6.46 The Texturizer filter changes the image so that it appears to have been printed onto a textured surface. (1) Preview thumbnail. (2) Texture type. (3) Texture settings. (4) Light direction.

Figure 6.47 The example is textured using the Texturizer filter with (1) Brick surface selected and (2) Burlap surface selected.
1 Texturizer filter from the Texture section of the Filter menu.
2 Adjust thumbnail preview to a view of 100%.
3 Select texture type from the drop-down menu.
4 Move the Scaling slider to change the size of the texture.
5 Adjust the Relief slider to control the dominance of the filter.
6 Select a Light direction to adjust the highlights and shadow areas of the texture.
7 Tick the Invert box to switch the texture position from ‘hills’ to ‘valleys’ or reverse the texture’s light and dark tones.
8 Click OK to finish.
Making your own textures
Being able to make your own texture files is the real bonus of the Texturizer filter. This ability gives the user the chance to extend the available surface options by adding customized Elements files that have been designed, or captured, especially for the purpose. Any Elements or Photoshop file (.PSD) can be loaded as a new texture via the Load Texture option in the side-arrow menu, in the top right of the Texturizer dialog. Simply locate the file using the browsing window and then adjust the Scaling, Relief and Lighting controls as you would for any of the built-in surface options.
FEATURE SUMMARY
1 Shoot, scan or design a texture image and save as an Elements or Photoshop file (.PSD). See Figure 6.48.
2 Select the Texturizer filter from the Texture options of the Filter menu.
3 Pick the Load Texture item from the drop-down list in the Texture menu. See Figure 6.49.
4 Browse folders and files to locate texture file.
5 Click File name and then Open to select.
6 Once back at the Texturizer dialog, treat like any other surface option. See Figure 6.50.

Figure 6.48 Shoot your own texture photos and save the images as an
Elements or PSD file.

Figure 6.49 Click the side-arrow menu in the Filter Gallery dialog before searching for the PSD texture file and then loading it into the Texturizer filter.
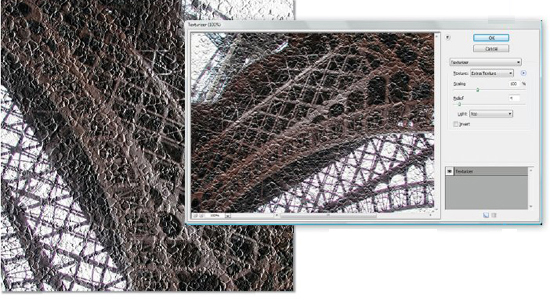
Figure 6.50 Apply the new texture to your image.
Changing the size of your images
As we have seen in earlier chapters, the size of a digital image is measured in pixel dimensions. These dimensions are determined at the time of capture or creation. Occasionally, it is necessary to alter the size of your digital photograph to suit different output requirements. For instance, if you want to display an image on a website that was captured in high resolution, you will need to reduce the pixel dimensions of the file to suit.
Grouped under the Resize option of the Image menu, Elements provides a couple of sizing features which can be used to alter the dimensions of your picture. PROCEED WITH CAUTION. Increasing or decreasing the dimensions of your images directly affects the quality of your files, so my suggestion is that until you are completely at home with these controls always make a backup file of your original picture before starting to resize.

Figure 6.51 The Image Size dialog controls the
dimensions and resolution
of your pictures.
(1) Pixel Dimensions section.
(2) Document Size section.
(3) Constrain Proportions
check box.
(4) Resample Image check
box and drop-down menu.
Editor: Image > Resize > Image Size
In version 6.0: Image > Resize > Image Size
The Image Size dialog provides several options for manipulating the pixels in your photograph. At first glance the settings displayed here may seem a little confusing, but if you can make the distinction between the Pixel Dimensions of the image (shown in the topmost section of the dialog) and the Document Size (shown in the middle), it will be easier to understand. See Figure 6.51.
Pixel Dimensions represent the true digital size of the file.
Document Size is the physical dimensions of the file represented in inches (or centimeters) based on using a specific number of pixels per inch (resolution or ppi).
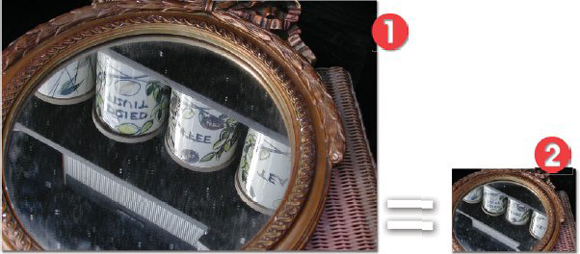
Figure 6.52 The example image contains 1800 × 1200 pixels and can be output to a print that is 6 inches × 4 inches or 1.8 inches × 1.2 inches, depending on how the pixels are spread (resolution).
(1) 6 × 4 inches @ 300 dpl = 1800 × 1200 pixels. (2) 1.8 × 1.2 inches @ 1000 dpl = 1800 × 1200 pixels.
Non-detrimental size changes
A file with the same pixel dimensions can have several different document sizes based on altering the spread of the pixels when the picture is printed (or displayed on screen). In this way you can adjust a high-resolution file to print the size of a postage stamp, postcard or a poster by only changing the dpi or resolution. This type of resizing has no detrimental quality effects on your pictures as the original pixel dimensions remain unchanged. See Figure 6.52.
To change resolution, open the Image Size dialog and uncheck the Resample Image option. Next, change either the resolution, width or height settings to suit your output. See Figure 6.53.

Figure 6.53 Non-detrimental size changes, or the changes that don’t lose picture quality, can be made to your image if the Resample Image option is always left unchecked.
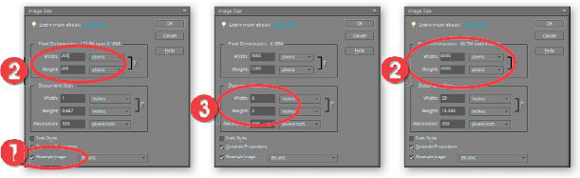
Figure 6.54 With the Resample Image option selected, it is possible to increase and decrease the total number of pixels in your image. (1) Resample Image option ticked. (2) New pixel dimensions. (3) New document size.
Upsizing and downsizing
This said, in some circumstances it is necessary to increase or decrease the number of pixels in an image. Both these actions will produce results that have less quality than if the pictures were scanned or photographed at precisely the desired size at the time of capture. If you are confronted with a situation where you are unable to recapture your pictures, then Elements can increase or decrease the image’s pixel dimensions. Each of these steps requires the program to interpolate, or ‘make up’, the pixels that form the resized image. See Figure 6.54. To increase the pixels or upsize the image, tick the Resample Image check box and then increase the value of any of the dimension settings in the dialog. To decrease the pixels or downsize the image, decrease the value of the dimension settings.
Image Size dialog settings
To keep the ratio of width and height of the new image the same as the original, tick the Constrain Proportions check box.
Interpolation quality and speed are determined by the options in the drop-down menu next to the Resample Image check box. Bicubic is the best setting for photographic images.
FEATURE SUMMARY
1 Select Image Size from the Resize option under the Image menu.
2 Tick the Resample Image check box for changes to the pixel dimensions of your image.
3 Uncheck the Resample Image option for changing image resolution.
4 Adjust the dimension settings to suit your output requirements.
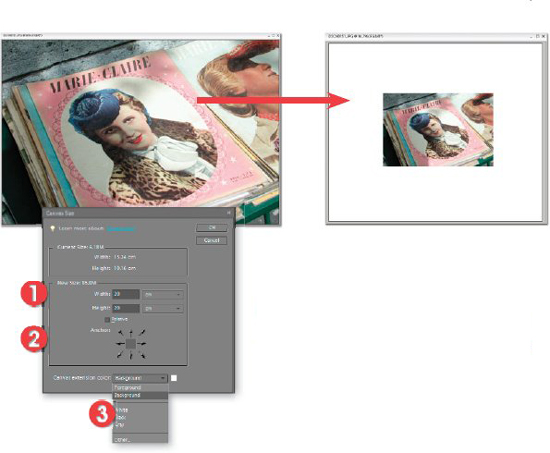
Figure 6.55 Altering the settings in the Canvas Size dialog changes the dimensions of the background the image is sitting upon. Larger dimensions than the picture result in more space around the image. Smaller dimensions crop the image.
(1) New Size settings.
(2) Anchor settings that determine where the new canvas area is placed.
(3) Drop-down menu for selecting the color for the new canvas area surrounding the picture.
Editor: Image > Resize > Canvas Size
In version 6.0: Image > Resize > Canvas Size
Just to add a little more complexity to the picture size discussion, Elements also provides the ability to change the size of the canvas that your photograph is sitting upon. Alterations here result in no change to the size of the image itself, but the overall canvas size does change, which means that the total dimensions of the document change as well.
This feature is particularly useful if you want to add several images together. Increasing the canvas size will mean that each of the extra pictures can be added to the newly created space around the original image.
To change the canvas size, select Canvas Size from the Resize option of the Image menu and alter the settings in the New Size section of the dialog. You can control the location of the new space in relation to the original image by clicking one of the sections in the Anchor diagram. Leaving the default setting here will mean that the canvas change will be spread evenly around the image. See Figure 6.55.
1 Select Canvas Size from the Resize option under the Image menu.
2 Alter the values in the New Size section of the dialog.
3 Set the anchor point in the Anchor diagram.
4 Click OK to complete.
Increasing the canvas size with the Crop tool
Pros use the Crop tool to quickly increase the size of the canvas that the picture sits in. First, zoom out from the picture so that it sits smaller in the workspace, then select the Crop tool and drag a marquee around the whole image. After releasing the mouse button, click on one of the side or corner handles and drag the crop marquee outwards until it is the size and shape of the new canvas. Double-click to complete the canvas resize. The new canvas will be the color of the current background color. See Figure 6.56.
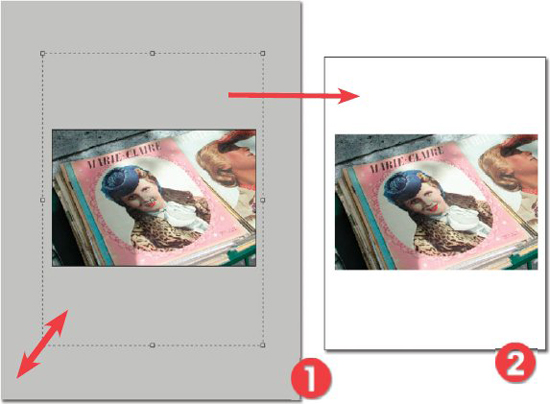
Figure 6.56 The Crop tool can be used to increase the size of the canvas by dragging the crop marquee outside the dimensions of the picture. (1) Make the crop marquee larger than the picture. (2) Double-click
inside the crop marquee to increase the canvas size.