
Chapter 5. Workflow Applications
We learned about action types, the basic building blocks of an Oozie workflow, in the last chapter. In this chapter, we will get into the various aspects of authoring a complete workflow application comprised of those actions. We will learn all the tricks and techniques, like parameterization and variable substitution, that come in handy when assembling actions into a functional workflow. We will also see how to manage and drive the control flow among those actions.
Outline of a Basic Workflow
As we have already seen, workflows are defined in an XML file that is typically named workflow.xml. Example 5-1 shows an outline of a typical Oozie workflow XML, which captures some of the relevant components and the most common sections.
Example 5-1. Outline of a basic workflow
<workflow-app xmlns="uri:oozie:workflow:0.5" name="simpleWF">
  <global>
      ...
  </global>
  <start to="echoA"/>
  <action name="echoA">
    <shell xmlns="uri:oozie:shell-action:0.2">
      ...
    </shell>
    <ok to="echoB"/>
    <error to="done"/>
  </action>
  <action name="echoB">
    <shell xmlns="uri:oozie:shell-action:0.2">
      ...
    </shell>
    <ok to="done"/>
    <error to="done"/>
</action>
  <end name="done"/>
</workflow-app>
At the very beginning of the XML is the <workflow-app>
root element with an xmlns and a
name attribute specifying the name of
the workflow application.
Tip
Oozie performs XML schema validation on all XML files used to
define workflows, coordinators, and bundles. So you must specify a
schema URI (the xmlns attribute in
the root element). Oozie schemas have evolved and newer versions have been introduced. While Oozie supports older schemas, it is recommended
to always use the latest schema, as it supports the latest Oozie
features. Older schemas will eventually be deprecated in newer versions
of Oozie.
The workflow name must be a word consisting of any combination of
letters, numbers, underscores (_), and dashes (-). Within this <workflow-app> element, the complete
workflow application is defined. As you can see, the following sections
are captured in Example 5-1:
Global configurationControl nodesAction nodes
Tip
The action nodes in the example shown here are represented as
simple <shell> actions meant
only to echo something on the screen.
Real workflows will have real actions, mostly Hadoop actions that we
covered in the last chapter. We will go with <shell> actions here for simplicity.
When users start writing their first Oozie workflows, it’s a good idea
to start small with something like a one-line <shell> action and expand from
there.
First, we cover the control nodes in the next section. We look at configuration details later in this chapter.
Control Nodes
Workflow control nodes define the start and end of a workflow and they define
any control changes in the execution flow. All nodes except for the
<start> node have a name attribute. Node names must be a valid Java
identifier with a maximum length of 40 characters. Node names can also use
dashes.
<start> and <end>
The <start> node
is the starting point of a workflow. When Oozie starts a
workflow, it looks for the <start> node and transitions to the node
specified in the to attribute.
The <end> node is the
completion point of the workflow. When a workflow transitions to an
<end> node, it completes its
execution with a SUCCEEDED
status.
The preceding workflow example has a <start> node that transitions to a
<shell> action echoA, then transitions to the <shell> action echoB, and then transitions to the done <end> node, which ends the workflow
successfully. This simple workflow is captured in Figure 5-1.

Figure 5-1. Simple workflow example
<fork> and <join>
Simple workflows execute one action at a time. In the previous section, we
saw that the echoA action is executed
first and the echoB action is not
executed until after echoA completes successfully.
When actions don’t depend on the result of each other, it is
possible to execute actions in parallel using the <fork> and <join> control nodes to speed up the
execution of the workflow.
When Oozie encounters a <fork> node in a workflow, it starts
running all the paths defined by the fork in parallel. These parallel
execution paths run independent of each other. All the paths of a
<fork> node must converge into
a <join> node. A workflow does
not proceed its execution beyond the <join> node until all execution paths
from the <fork> node reach the
<join> node. Example 5-2 captures the
<fork>-<join>
syntax.
Example 5-2. Workflow with <fork> and <join> control nodes
<workflow-app xmlns="uri:oozie:workflow:0.5" name="forkJoinNodeWF">
  <global>
    ...
  </global>
  <start to="forkActions"/>
  <fork name="forkActions">
    <path name="echoA"/>
    <path name="echoB"/>
  </fork>
  <action name="echoA">
    <shell xmlns="uri:oozie:shell-action:0.2">
        ...
    </shell>
    <ok to="joinActions"/>
    <error to="joinActions"/>
  </action>
  <action name="echoB">
    <shell xmlns="uri:oozie:shell-action:0.2">
        ...
    </shell>
    <ok to="joinActions"/>
    <error to="joinActions"/>
  </action>
  <join name="joinActions" to="done"/>
  <end name="done"/>
</workflow-app>
The <path> elements
within the <fork>
node define the parallel execution paths of the <fork> node. Each <path> element indicates the first node
in the parallel execution path being created. In the example above, each
parallel path happens to have only one action node. But in reality, it
could be a sequence of nodes. The last node of each such execution path
should transition to the <join>
node.
It is possible to have nested <fork> and <join> nodes. The only constraint is
that <fork> and <join> nodes always go in pairs and all
execution paths starting from a given <fork> must end in the same <join> node. Figures 5-2 and 5-3 depict both invalid and valid nesting of <fork> and <join> nodes.

Figure 5-2. Workflow with invalid nesting of <fork> and <join> nodes
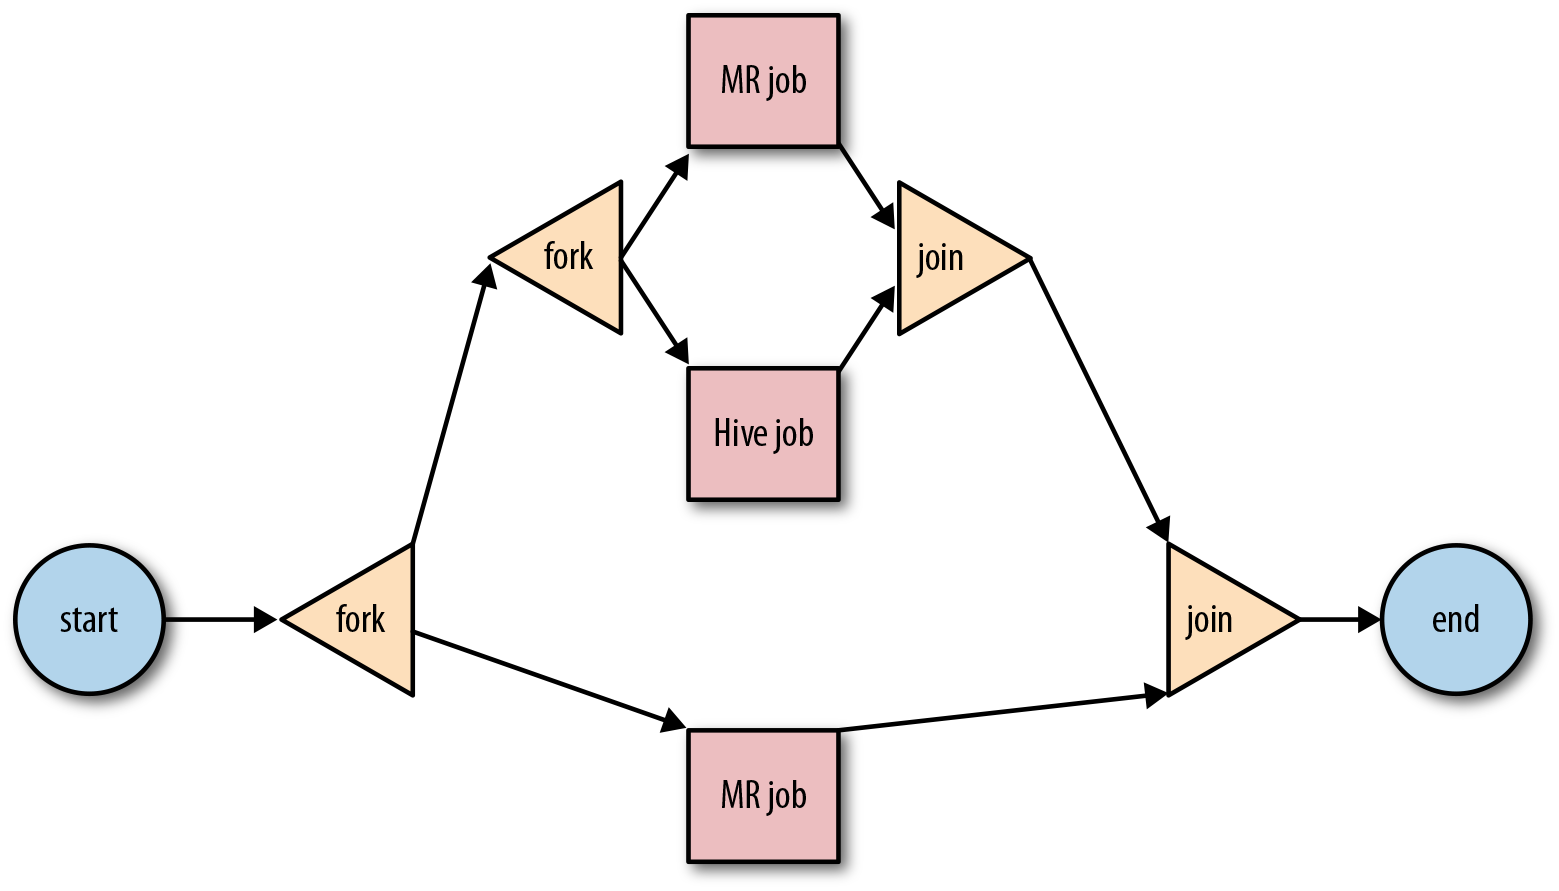
Figure 5-3. Workflow with valid nesting of <fork> and <join> nodes
<decision>
In programming languages, if-then-else and switch-case statements are usually used to
control the flow of execution depending on certain conditions being met
or not. Similarly, Oozie workflows use <decision> nodes to determine the actual
execution path of a workflow.
A <decision> node
behavior is best described as an if-then-else-if-then-else... sequence, where
the first predicate that resolves to true will determine the execution path. Unlike
a <fork> node where all
execution paths are followed, only one execution path will be followed
in a <decision> node.
Figure 5-4 is a pictorial representation of a workflow that executes a MapReduce, Hive, or Pig job (depending on the value of a workflow parameter).

Figure 5-4. Workflow with a <decision> node
The corresponding workflow XML definition is shown in Example 5-3.
Example 5-3. Workflow with a <decision> node
<workflow-app xmlns="uri:oozie:workflow:0.5" name="decisionNodeWF">
  <start to="decision"/>
  <decision name="decision">
    <switch>
      <case to="mapReduce">${jobType eq "mapReduce"}</case>
      <case to="hive">${jobType eq "hive"}</case>
      <case to="pig">${jobType eq "pig"}</case>
      <default to="mapReduce"/>
    </switch>
  </decision>
  <action name="mapReduce">
    ...
    <ok to="done"/>
    <error to="done"/>
  </action>
  <action name="hive">
    ...
    <ok to="done"/>
    <error to="done"/>
  </action>
  <action name="pig">
    ...
    <ok to="done"/>
    <error to="done"/>
  </action>
  <end name="done"/>
</workflow-app>
Each <case> element
has a to attribute
indicating the execution path to follow if the content of the
<case> element (${jobType eq
"mapReduce"} in the example) evaluates to true. If none of the <case> contents evaluates to true, the execution path specified by the
<default to> attribute will be
followed.
Note
Expressions like ${jobType eq
"mapReduce"} are explained in detail in “EL Functions”.
<kill>
The <kill> node allows a
workflow to kill itself. If any execution path of a
workflow reaches a <kill> node,
Oozie will terminate the workflow immediately, failing all running
actions (it could be multiple running actions if the workflow execution
is currently within a <fork>-<join> block) and setting
the completion status of the workflow to KILLED. It is worth
noting that Oozie will not explicitly kill the currently running
MapReduce jobs on the Hadoop cluster that corresponds to those actions.
They will be allowed to complete, though the action will be set to
FAILED and no downstream actions of those jobs in their respective
<fork>-<join> block will
be run. Example 5-4 illustrates the use of
a <kill> node.
Example 5-4. Workflow with a <kill> node
<workflow-app xmlns="uri:oozie:workflow:0.4" name="killNodeWF">
  <start to="mapReduce"/>
  <action name="mapReduce">
    ...
    <ok to="done"/>
    <error to="error"/>
  </action>
  <kill name="error">
    <message>The 'mapReduce' action failed!</message>
  <end name="done"/>
</workflow-app>
Using a <kill> node in a
workflow is similar to doing a System.exit(1)
(any non-zero exit code) in Java. We have already seen in previous
examples that action nodes have two possible transitions: <ok> and <error>. Typically, <error> transitions to a <kill> node indicating that something
went wrong.
<OK> and <ERROR>
When an action completes, its status is typically in either OK or ERROR
status depending on whether or not the execution was successful. If an
action ends in OK status, the
workflow execution path transitions to the node specified in the <ok> element.
If the action ends in ERROR status,
the workflow execution path transitions to the node specified in
the <error>
element. Even when the action exit status is ERROR, the workflow still continues to
execute. Typically, the node specified for transition in case of an
ERROR is the <kill> node, but it’s not required to
be. In that case, the workflow will stop running and it will end up in
the KILLED.
If desired, you have the option to continue the workflow execution
even in case of an ERROR state for an
action. There are legitimate reasons to continue running the workflow
even after an action ends with an error. For example, you might want to
transition to an <email> action
on an error and send mails to a group of people before actually failing
the workflow. In some use cases, there might be expected errors that can
be handled and you may chose to transition to an action that cleans up
or recovers some state and retries the failed action again. In short,
just because an action ended up in the ERROR state doesn’t mean the containing
workflow also exits with an error right away.
Figure 5-5 captures the typical flow of control from an action node.
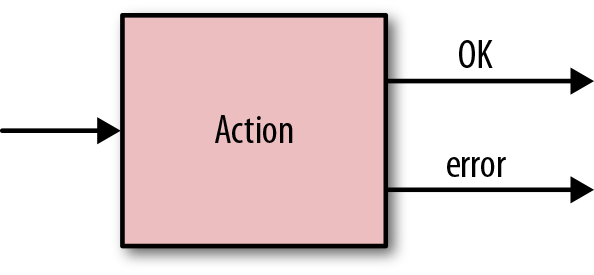
Figure 5-5. Workflow action node
Note
<OK> and <ERROR> nodes in a workflow are
considered action nodes, though they are funtionally different from
the action worker nodes we saw in the previous chapter. Also, there
are several other action states and we will see them in detail later
in the chapter. But for simplicity here, we will assume actions either
end up in <OK> or <ERROR>.
Job Configuration
As we have seen in the last chapter, there are several configuration settings that are required for defining workflow actions, especially Hadoop actions. Oozie provides multiple ways to specify them. It’s important to understand Oozie’s approach to configuration and parameterization if you want to become efficient at writing workflows.
Oozie’s workflow XML supports several elements for each action type
and we looked at these elements in detail in the previous chapter. For
instance, every Hadoop job needs a JobTracker and NameNode and Oozie supports the <name-node> and
<job-tracker> as top-level XML
elements for all Hadoop action types. Most actions, especially Hadoop
actions, also support a <configuration> section where job
configurations can be defined. This can include system settings like mapred.job.queue.name or can also be user-defined keys that they want to send to the
job.
Oozie provides multiple ways—some users may say too many ways—to pass in all of these configuration settings to the workflow. Here are three ways in which configuration can be passed to the workflow actions, listed in order of increasing priority:
Global configuration
Job XML file(s) specified in
<job-xml>Inline
<configuration>section in workflow.xml
Tip
There is actually a fourth, rarely used way to predefine most of the job configuration per action type, but it requires changing the Oozie server settings. The following setting in oozie-site.xml can be used to specify a set of configuration files:
oozie.service.HadoopAccessorService.
  action.configurations
Refer to the Oozie documentation for more details.
Global Configuration
Most actions in a workflow need several of the same settings
(e.g., the JobTracker URI, NameNode URI, Hadoop scheduler queue, etc.).
Users can avoid repeating all these settings and job configuration
values in every action of the workflow by defining them once in the
workflow’s <global> section.
The properties defined in the <global>
section are available to all actions of the workflow. The sample
workflow we saw in Example 5-1
introduced this <global>
section, but Example 5-5 provides a more
detailed example. As you can see, this makes the individual action
definitions short and sweet.
Example 5-5. Global configuration for workflow applications
<workflow-app name="globalConfigurationWF" xmlns="uri:oozie:workflow:0.5">
  <global>
    <job-tracker>localhost:8032</job-tracker>
    <name-node>hdfs://localhost:8020</name-node>
    <configuration>
        <property>
            <name>mapred.job.queue.name</name>
            <value>development</value>
        </property>
    </configuration>
  </global>

  <action>
    <java>
        <main-class>org.apache.oozie.MyJavaMainClass</main-class>
        <arg>argument1</arg>
        <capture-output/>
    </java>
  </action>
  ...
</workflow-app>
Caution
Make sure you are using the right schema version for both the
workflow and the specific action types when using the <global> section. Workflow schema
version 0.4 and above supports the <global> section. In fact, schema
version is always something to check and verify when certain workflow
features and syntax throw errors.
Readers are strongly encouraged to use the <global> section liberally in their
workflows to reduce clutter and confusion.
Job XML
Most actions supports a <job-xml> element, which is specifically
meant for passing in Hadoop job configuration in XML format. This file
has to be packaged with the workflow app and deployed on HDFS. Different
action nodes in the workflow can include different job-xml file(s). With the later
versions of the Oozie schema (version 0.4 and above), multiple <job-xml> elements are supported, which
means that an action can have multiple files packaged and made available
with the job configuration information split across them. Example 5-6 shows multiple job XMLs listed for a
single action.
Example 5-6. Multiple job XML files
<map-reduce>
    <job-tracker>${jobTracker}</job-tracker>
    <name-node>${nameNode}</name-node>
    <job-xml>/conf_A_job.xml</job-xml>
    <job-xml>/conf_B_job.xml</job-xml>
    <job-xml>/conf_C_job.xml</job-xml>
...
Note
What happens if the same configuration property is defined in
multiple <job-xml> files?
Settings from the later files in the list of files override the
earlier ones. In this example, if the property mapred.queue.name is defined in all three job XML
files, the value in conf_C_job.xml will take precedence over
the value in the first two files.
Inline Configuration
Inline configuration in the body of the workflow action holds higher priority
than the <global> section and
the <job-xml> files. Example 5-7 shows a <configuration> section. The format and
syntax are the same regardless of whether these properties are defined
in the body of the action in the workflow XML or in a separate job XML
file. It’s only the priority and precedence that will be
different.
Example 5-7. Configuration properties
    <configuration>
        <property>
            <name>hive.metastore.local</name>
            <value>true</value>
            <description>controls whether to connect to a remote metastore
                                       server</description>
        </property>
        <property>
            <name>javax.jdo.option.ConnectionURL</name>
            <value>jdbc:postgresql://localhost/hive</value>
            <description>JDBC connect string for a JDBC metastore</description>
        </property>
    </configuration>
Launcher Configuration
We saw in “Action Execution Model” how the Oozie
launcher job itself is a MapReduce job. You can specify
the configuration settings for this launcher job in the action by
prefixing oozie.launcher to any
Hadoop configuration property. This way, you can override the default
settings Oozie uses for the launcher job. Hadoop configuration
properties like the job queue specified for the action are
applied as defaults to the launcher job as well. These defaults help
keep the action definition short and clean by avoiding specifying
several redundant properties, but they can be explicitly overridden
using the oozie.launcher.*
properties.
Tip
One of the common settings users change for the launcher is
oozie.launcher.mapred.job.queue.name to run it in
a different Hadoop queue from the actual action itself. This will help
avoid the deadlock situation explained in “Action Execution Model”.
Parameterization
Oozie applications are often parameterized at all levels: workflow, coordinator, and bundle. Typically, the same workflow is often required to run in different contexts and it’s too inefficient to modify the workflow and action definition for each of those runs. For example, you might want to run the same workflow every day on a different date partition of the same input dataset. You might do this through a coordinator application or by using cron or may be even run it manually every day. In all of these scenarios, you don’t want to have to modify the workflow.xml and update the HDFS directory every day to run this job. It’s much more efficient to parameterize the workflow using variables or functions than to hardcode everything.
Tip
This section explains configuration, parameterization, and EL functions in the context of an Oozie workflow. But the concepts, patterns, and techniques are exactly the same when it comes to parameterization of Oozie coordinator and bundle applications that we will come across in later chapters. Specific functions and variables will be different, but the concept and methodology are the same.
Oozie supports the JSP Expression Language syntax from the JSP 2.0 Specification for parameterization. This allows Oozie to support variables, functions, and complex expressions as parameters. We will see each one of them in detail below. Oozie’s parameterization framework is extensible and we will cover how to add user-defined EL functions in “Developing Custom EL Functions”. Do note that you can’t just submit code for user-defined functions dynamically as part of a workflow at runtime. It needs to be preconfigured and added to the Oozie system and requires a server restart.
EL Variables
The most common technique for parameterization in Oozie is through EL
variables. Various settings like NameNode, JobTracker, Hadoop queue, application path,
and the date for the datasets can all be defined and parameterized using
EL variables. We have seen user-defined variables in a workflow as early
as Example 1-1; this is reproduced
here:
<job-tracker>${jobTracker}</job-tracker>
<name-node>${nameNode}</name-node>
The values for these user-defined variables ${jobTracker} and ${nameNode}) need to be specified before the
job submission. These variables are valid throughout the entire life of
the workflow.
EL constants and system-defined variables
In addition to user-defined variables, Oozie also provides a set of
system-defined variables and EL constants for your convenience. For
example, KB, MB, GB,
TB, and PB are all predefined long integers
representing KiloBytes, MegaBytes, GigaBytes, TeraBytes, and
PetaBytes, respectively. These are EL constants. Oozie also supports
variables like ${YEAR},
${MONTH}, and ${DAY} that you will use often in Oozie coordinators.
Think of them as system-defined variables. Unlike the user-defined
variables, system variables are evaluated during job execution. In
some cases, the system variables have a predefined scope. In other
words, those variables are valid only in certain parts of the Oozie
job specification. We will run across system-defined variables in
various contexts throughout the book.
Hadoop counters
It’s also very common to use Hadoop counters as parameters in a
workflow. If myMRNode is a
MapReduce node in a workflow, the subsequent actions could refer to
its counters using the following syntax. It could use it as an action
argument or make some decisions based on it:
${hadoop:counters("myMRNode")["FileSystemCounters"]["FILE_BYTES_READ"]}${hadoop:counters("myPigNode")["RECORD_WRITTEN"]}There are system variables representing some of the common
Hadoop counters: RECORDS,
MAP_IN, MAP_OUT, REDUCE_IN, and REDUCE_OUT. RECORDS is the Hadoop counter group name and those other variables
refer to the record’s in-and-out counters for mappers and reducers.
These variables refer to the counters from the particular action and
can come in handy when making decisions after the action’s processing
completes.
EL Functions
Applications also have a need for handling dynamic values during
runtime that cannot be statically defined through variables. For
example, you may want to print the workflow ID as part of some <shell> action. This ID is available
only at runtime and the developer had no way to specify the value when
she was writing the workflow or even when she was submitting it. This is
where Oozie’s EL functions come in handy. They are convenience functions
that are available for a lot of common use cases. For instance, Oozie
has a wf:id() function that
returns the ID of the current workflow execution. The workflow can be
parameterized using the ${FUNC}
syntax ${wf:id()} for this use case.
While Oozie verifies the syntax of any function during job submission,
it eventually evaluates the functions during the workflow
execution.
Note
EL expressions can be used in all XML element values, all
configuration values (for both action and decision nodes), and
attribute values. They cannot be used in a XML element name, attribute
name, node name, and within the transition elements of a node
(“ok to”, “error to”, etc.).
There are several built-in EL functions that Oozie supports and they are all listed in the Oozie documentation. They are roughly classified as basic, Hadoop, HDFS, and HCatalog functions and constants. We will now look at a few common and useful ones.
String wf:errorCode(String node)
Given a node name, this EL function returns the error code or an empty string if the action node did not exit with an error. Each type of action node must define its complete error code list, which the standard actions do anyways. It’s something to keep in mind if you are writing your own custom action. This function is very useful in error reporting as well as in transition nodes and decision nodes where you may want to take different courses of action in the workflow depending on errors and error types.
boolean fs:fileSize(String path)
This is an HDFS EL function that returns the size in bytes of the specified file. If the path is not a file, or if it does not exist, it returns -1.
Tip
The preferred syntax for Oozie variables is ${VAR}. But this only works for variable
names that follow Java naming conventions. There is another way to
specify these variables and that’s by using the {wf:conf('VAR')} function. If a variable
name has spaces or dots, wf:conf() is
the way to go. Some users prefer this because it’s consistent with
the syntax for EL functions while most users like the ${VAR} syntax because it’s simpler
and also helps differentiate between variables and functions.
EL Expressions
In addition to the EL variables and functions, EL expressions are supported as well. A common use case for this is the decision nodes in a workflow. It’s not uncommon to check the output of the previous action against some condition and branch the workflow based on that. But that’s not the only use for EL expressions and they can be used wherever the EL variables and functions are supported. Example 5-3 illustrates the use of EL expressions in the context of a decision node.
As you can see, EL variable, function, and expression substitution are a very powerful and fundamental feature of Oozie and users are encouraged to make good use of it. This will make their workflows more flexible and dynamic.
The job.properties File
When and how do we set the values for the EL variables? As we saw in Chapter 1, Oozie workflows are typically invoked with the following command (the command is similar for coordinator and bundle jobs, but let’s restrict the scope of this discussion to workflows):
oozie job -oozie http://localhost:4080/oozie/ -config ~/job.properties –run
The job.properties file is on
the local filesystem and not on HDFS. The filename job.properties conforms to Oozie conventions, but a
different name can be used if you wish (because this file is explicitly
passed to the Oozie command line). The file contains the job configuration
that you send to Oozie for this invocation of the workflow application.
Think of the job.properties as the
set of arguments for the workflow.xml, which is the application. This
file can be used to pass in all the variables required to parameterize the
workflow.xml. For example, - ${nameNode}. This var can be defined in the
job.properties file used for a
particular run.
The workflow.xml can define the
NameNode as follows:
<name-node>${nameNode}</name-node>And the job.properties file can pass in an actual value to the workflow as follows:
nameNode=hdfs://abc.xyz.com:8020
If the Hadoop NameNode crashes
and is replaced by another node (efg.qrs.com), we don’t have to modify the
workflow.xml on HDFS for making this
update. We can just replace the variable in job.properties for the next run of the
workflow. It’s good practice to handle the application XMLs like code
rather than configuration and the less often we modify “code,” the
better.
Note
Oozie accepts both the XML syntax and the properties file syntax
(key=value) as shown above. But do
note the file extension matters. If you’re using the XML syntax, you
should name the filefile_name.xml;
if you’re using the properties file syntax, you should name the file file_name.properties. The properties (key=value) file syntax is simpler and much more popular among users.
Example 5-8 contains a simple example of a typical job.properties file.
Example 5-8. Sample job.properties file
nameNode= hdfs://localhost:8020
jobTracker=localhost:8032

queueName=research
oozie.use.system.libpath=true

oozie.wf.application.path=${nameNode}/user/joe/oozie/mrJob/firstWorkflow.xml
Example 5-9 shows the same file using the XML syntax.
Example 5-9. Sample job.xml file
<configuration>
    <property>
        <name>nameNode</name>
        <value>hdfs://localhost:8020</value>
    </property>
    <property>
        <name>jobTracker</name>
        <value>localhost:8032</value>
    </property>
    <property>
        <name>queueName</name>
        <value>research</value>
    </property>
    <property>
        <name>oozie.use.system.libpath</name>
        <value>true</value>
    </property>
    <property>
        <name>oozie.wf.application.path</name>
        <value>${nameNode}/user/joe/oozie/mrJob/firstWorkflow.xml</value>
    </property>
</configuration>
There are three variables defined in this file: jobTracker, nameNode, and queueName; and they will be substituted during
the workflow submission. Oozie will throw an error if the variables cannot
be substituted due to missing values. The most important property in the
job.properties file is the
application root pointing to the HDFS directory where the workflow files
reside. It must be specified as oozie.wf.application.path. This tells Oozie where to find the workflow XML file on HDFS and
everything follows from there. If you choose to go with the default
workflow.xml filename for the
workflow XML, the oozie.wf.application.path can just be a
directory.
The other interesting setting in the job.properties file is the oozie.use.system.libpath=true. This tells Oozie
to look for JARs and libraries in the sharelib path, and many actions like <distcp> and <hive> require this setting. Oozie
sharelib is an important topic and is
explained in detail in “Managing Libraries in Oozie”.
Command-Line Option
Passing parameter values using the -D
command-line option is pretty much the same as defining them through the
job.properties, except the -D overrides the properties file and is of the
highest priority. Example 5-10 contains an
example of using -D on the command
line to pass in a variable.
Example 5-10. Calling the Oozie CLI with the -D option
oozie job -oozie http://localhost:4080/oozie/ -DqueueName=research
  -config job.properties –run
The config-default.xml File
The optional config-default.xml file can be packaged with the workflow and deployed in the workflow
app directory on HDFS. This file has default values for variables that
are not defined via the job.properties file or the -D option. You can use the same job.properties file for all invocations of
the workflow or use a different properties file for different runs. But
the config-default.xml file is
valid for all invocations of the workflow and serves as the default for
all missing variables in other places. A sample is shown here:
<configuration>
    <property>
        <name>queueName</name>
        <value>default</value>
    </property>
</configuration>
Note
Note that a config-default.xml file in a directory can
act as the default for all workflow XMLs in that directory, though the
normal convention is to have one workflow per directory. This file has
the least priority and is often overridden by the job.properties file and/or the -D option.
The <parameters> Section
Another convenient feature for parameterization is the <parameters> section at the top of the
workflow. This optional section allows users to declare the EL variables
in the workflow XML. This lets Oozie validate the XML and the parameters
before submission to the server rather than after. This is similar to a
compile time check versus a runtime check in programming languages.
Users can declare just a <name> or also
specify a <value>. If there is
just a name, Oozie will check for the value defined either in the
job.properties file or through
-D . It will throw an error if the
variable is not defined. If the <parameters> section also includes a
<value> element, that value
will be used as the default value
if the variable is not defined elsewhere. It is similar to the config-default.xml and can be used for
handling defaults, though the <parameters> section is confined to
only that workflow file.
Note
Oozie’s validation of the <parameters> section ignores the
entries in the config-default.xml
file. So use the config-default.xml file approach or the
<parameters> section for
providing the defaults, but don’t try to mix both for a given
workflow.
Example 5-11 contains an example of
a <parameters> usage in a
workflow.
Example 5-11. Parameters section in a workflow
...
<workflow-app name="parametersWF" xmlns="uri:oozie:workflow:0.5">
<parameters>
    <property>
        <name>queueName</name>
        <value>production</value>
    </property>
    <property>
        <name>outputDir</name>
    </property>
</parameters>
...
Configuration and Parameterization Examples
Let’s take a look at a couple of concrete examples to understand all the configuration and
parameterization concepts we have seen so far. In Example 5-12, the value for the Hadoop configuration
property mapred.job.queue.name will be evaluated as
“integration”.
Example 5-12. Configuration example
workflow.xml file:
...
<job-xml>my-job.xml</job-xml>
...
<configuration>
    <property>
        <name>mapred.job.queue.name</name>
        <value>integration</value>
    </property>
</configuration>
...

my-job.xml file:

...
<property>
    <name>mapred.job.queue.name</name>
    <value>staging</value>
</property>
...
Basically, the inline definition in the body of the workflow overrides the definition in the my-job.xml file.
Example 5-13 is a little more complicated and
pulls in parameterization concepts. The value for the Hadoop property
mapred.job.queue.name will be evaluated
as “production” in this
case.
Example 5-13. Parameterization example
config-default.xml:
<property>
    <name>queue_var</name>
    <value>default</value>
</property>

job.properties:
queue_var=research

workflow.xml:
<job-xml>my-job.xml</job-xml>
...
<property>
    <name>queue_var</name>
    <value>production</value>
</property>

my-job.xml

<property>
    <name>mapred.job.queue.name</name>
    <value>${queue_var}</value>
</property>
...
The variable queue_var is defined
in three places and that variable is used in my-job.xml to define the mapred.job.queue.name property. The inline
definition in workflow.xml overrides
the config-default.xml and job.properties. So the value for the mapred.job.queue.name property will be
evaluated as “production”.
Lifecycle of a Workflow
Now that we have looked at all aspects of a workflow specification, it’s good to understand the lifecycle of a workflow. As you know, once a workflow application is deployed and copied to HDFS, we can run the jobs. A workflow job has a well-defined set of state transitions from submission until completion.
Workflow statuses are: PREP, RUNNING, SUCCEEDED, KILLED, FAILED, and SUSPENDED.
When a workflow is submitted, its initial status is PREP. When the workflow is started, it
transitions from PREP to RUNNING.
Tip
The transition from PREP to
RUNNING is not automatic. If you want
the workflow to start running immediately on submission without having
to perform an additional step to start it, use the -run option instead of the -submit option when submitting the job with
the Oozie command-line tool. If the
-submit option is used, the workflow
will be in PREP status until it is
explicitly started using the -start
option of the Oozie command-line
tool.
On completion, a workflow transitions to SUCEEDED, KILLED, or FAILED status depending on the end result of its
execution. If the execution completed successfully, the end status of the
workflow is SUCCEEDED. If the execution
failed due to an error in the workflow, the end status of the workflow is
KILLED. If the execution failed due to
an error in Oozie itself, the end status of the workflow is FAILED.
Tip
It is a common practice to write a workflow to kill itself if it encounters an application error; for example, if the input directory for a Hadoop job does not exist.
A workflow in RUNNING status can
be suspended. In that case, the workflow status changes to SUSPENDED. When a workflow has been suspended,
it does not make any further progress. A workflow in SUSPENDED status can be resumed or killed. If
the workflow is resumed, its status changes back to RUNNING. If the workflow is killed, its status
changes to KILLED.
Caution
When a workflow is SUSPENDED,
if the workflow was executing a Hadoop job, the Hadoop job will continue
running until completion. Hadoop jobs cannot be paused. When the Hadoop
job completes, Oozie will update the workflow with the completion
information of the Hadoop job, but the workflow job itself will still
not make any further progress until resumed.
When a workflow reaches SUCCEEDED, KILLED, or FAILED status, there is no further processing
performed by Oozie for the workflow. Any of these three statuses indicates
the completion status of the workflow. Figure 5-6
captures workflow state transitions.
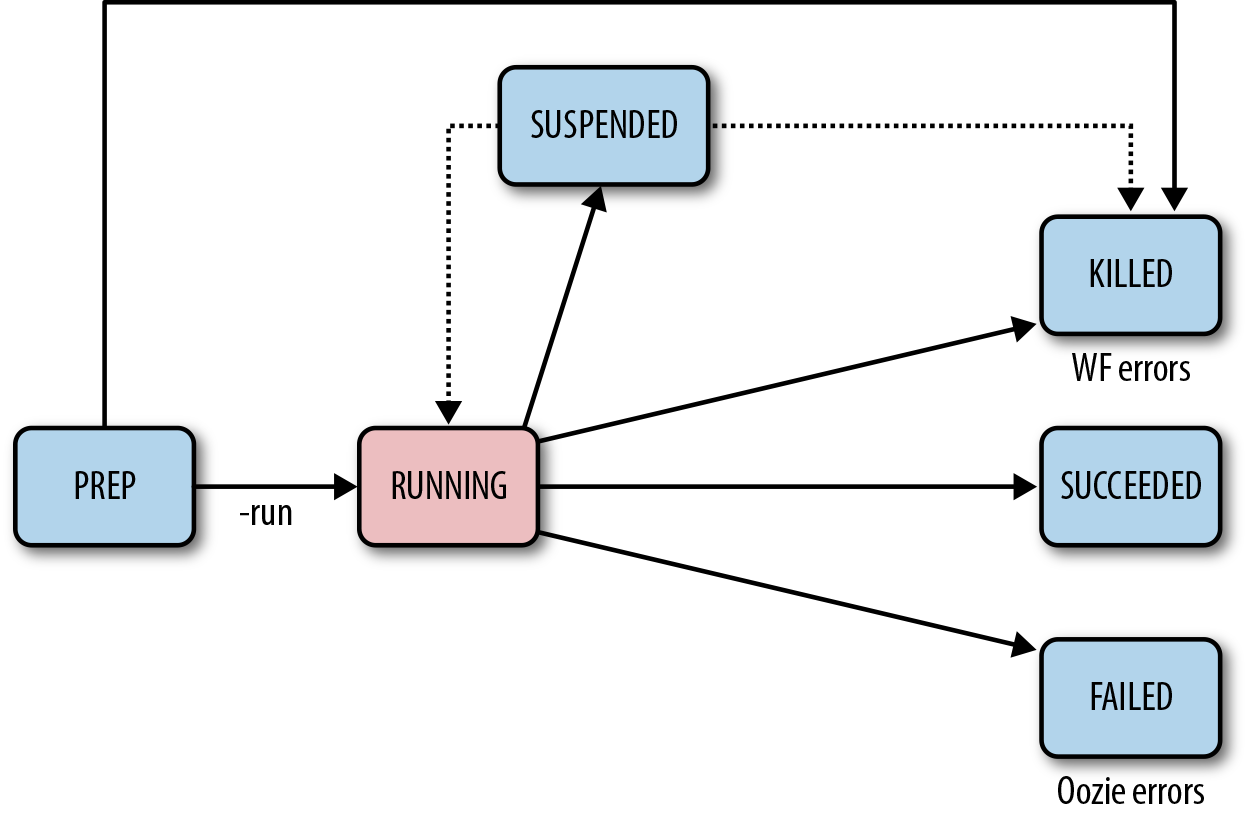
Figure 5-6. Workflow state transitions
Action States
Much like the workflow, individual actions go through their own state transitions, too. We won’t cover the action states in detail because users don’t usually manage the action states at that level of granularity. It’s more practical to manage complete workflows or even coordinators or bundles. The list of action states is captured here just for your reference:
DONEEND_MANUALEND_RETRYERRORFAILEDKILLEDOKPREPRUNNINGSTART_MANUALSTART_RETRYUSER_RETRY
In this chapter, we saw the various practical aspects of writing an Oozie workflow application. This chapter, combined with the coverage of various action types in Chapter 4, should give you enough ammunition for writing efficient, production-quality workflow applications. We will now move on to the Oozie coordinator in the next chapter.