
Ken Goldman is a popular instructor at the Athenaeum School of the Arts in La Jolla, California, where he teaches portraiture, artistic anatomy, and landscape painting classes. Ken also is the author of six Walter Foster books, including Pastel 1; Pastel: Landscapes; Acrylic 1; and Basic Anatomy and Figure Drawing in the How to Draw and Paint series; as well as Charcoal Drawing in the Artist’s Library series and Understanding Values in the Drawing Made Easy series. Ken received his training in New York at the Art Students League of New York, National Academy, and New York Studio School. A recipient of numerous awards, Ken has exhibited widely in group shows and in more than 30 one-man shows in the United States, Mexico, and Europe. His artwork is featured in the permanent collections of several major museums. Ken lives in San Diego, California, with his artist-wife Stephanie Goldman.

EXPLORING THE TORSO: FRONT VIEW

Skeleton Some parts of the skeletal system are important to the artist because they are prominent and so serve as visual landmarks. Several bones of the torso’s frontal skeleton are obvious even beneath the skin, including the clavicles, acromion processes, sternum, thoracic arch, 10th rib, anterior superior iliac spines, and great trochanters. The spinal column comprises 24 vertebrae, divided into 3 sections: The cervical (or neck) region has 7 vertebrae, the thoracic (or chest) region has 12, and the lumbar (or lower back) region has 5.
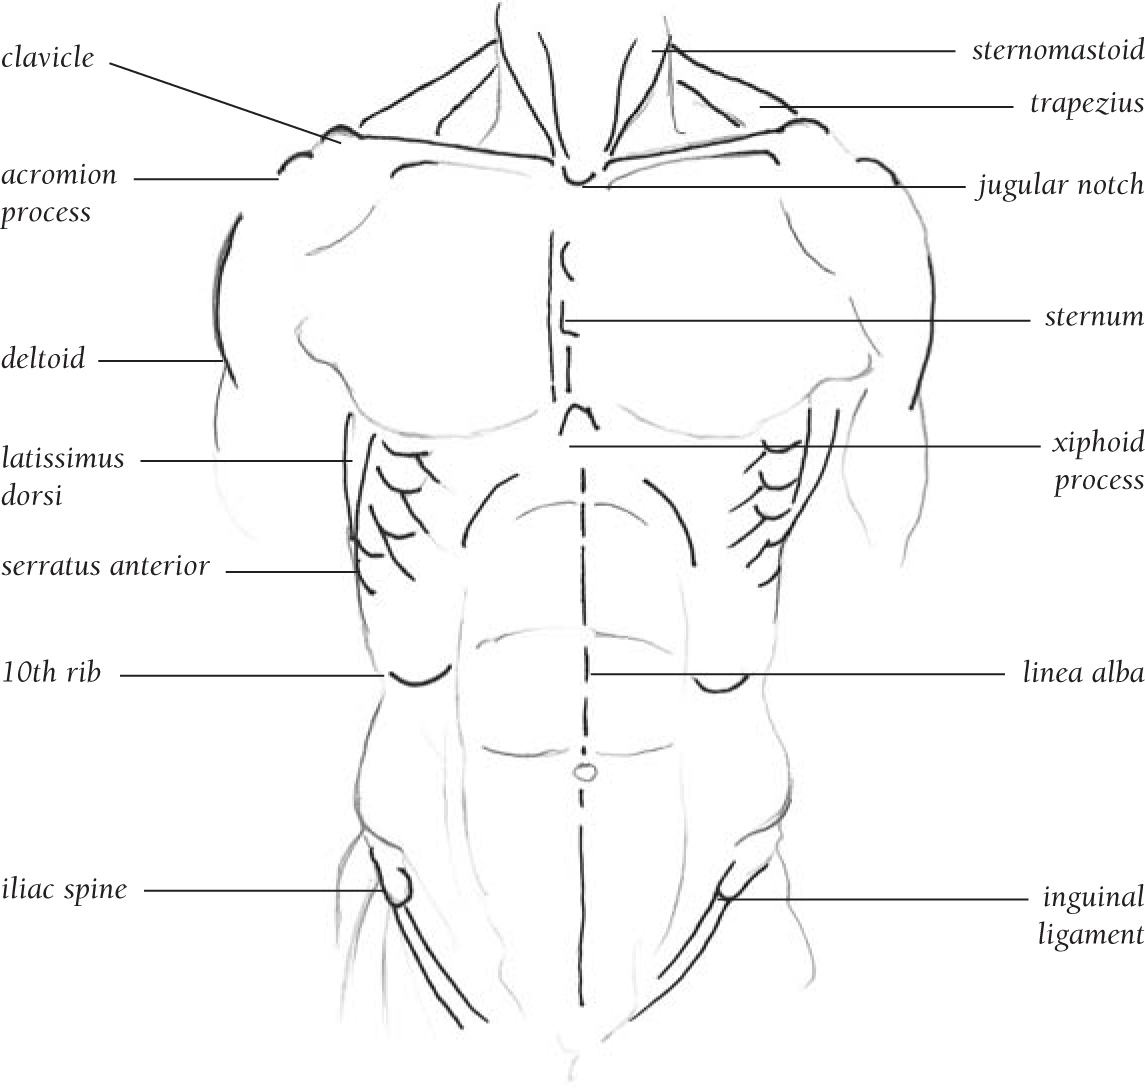
Diagram of Landmarks The observable muscles and bony landmarks labeled on the illustration above are the most important for artists who want to draw the torso’s surface anatomy from the front view. Focus on accurately portraying these anatomical features to achieve a lifelike drawing, such as the example at right.

Trunk Muscles The torso’s movement is dependent on and restricted by the spine—both the chest and the pelvis twist and turn on this fixed, yet flexible, column. And the relationship between the rib cage, the shoulders, and the pelvis creates the shape of the trunk muscles. The pectoral (breast) muscles are divided by the sternum, the rectus abdominus is divided by the linea alba, and the external obliques—which are interwoven with the serratus anterior—bind the eight lowest ribs to the pelvic girdle.

Drawing Tips Use the bony skeletal landmarks, which are apparent despite the layers of muscles, to guide the placement of the features. For example, the nipples align vertically with the anterior spines of the iliac crest. Note also that the pectoralis major sweeps across the chest and over to the arm, ending nearly horizontal to the nipples.
EXPLORING THE TORSO: BACK VIEW
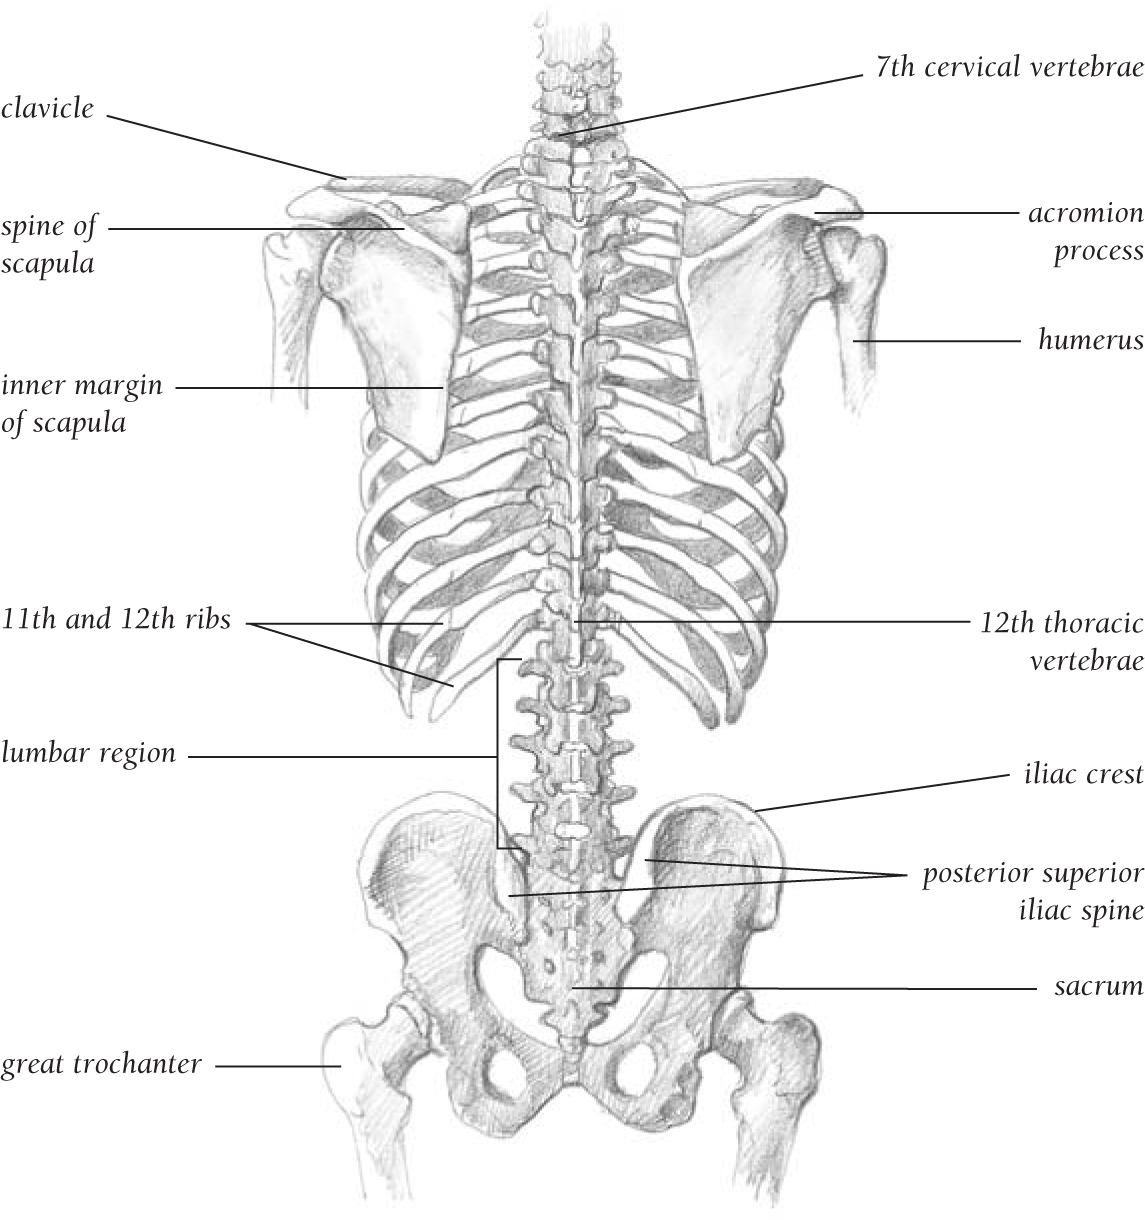
Skeleton The back is one of the most challenging parts of the body to draw because of its skeletal and muscular complexity. From the artist’s point of view, the most important bones visible from the rear skeletal view are the 7th cervical vertebrae, the posterior superior iliac spines (dimples on the pelvic girdle), and the sacrum, which together form the sacral triangle—a major anatomical landmark at the base of the spine.
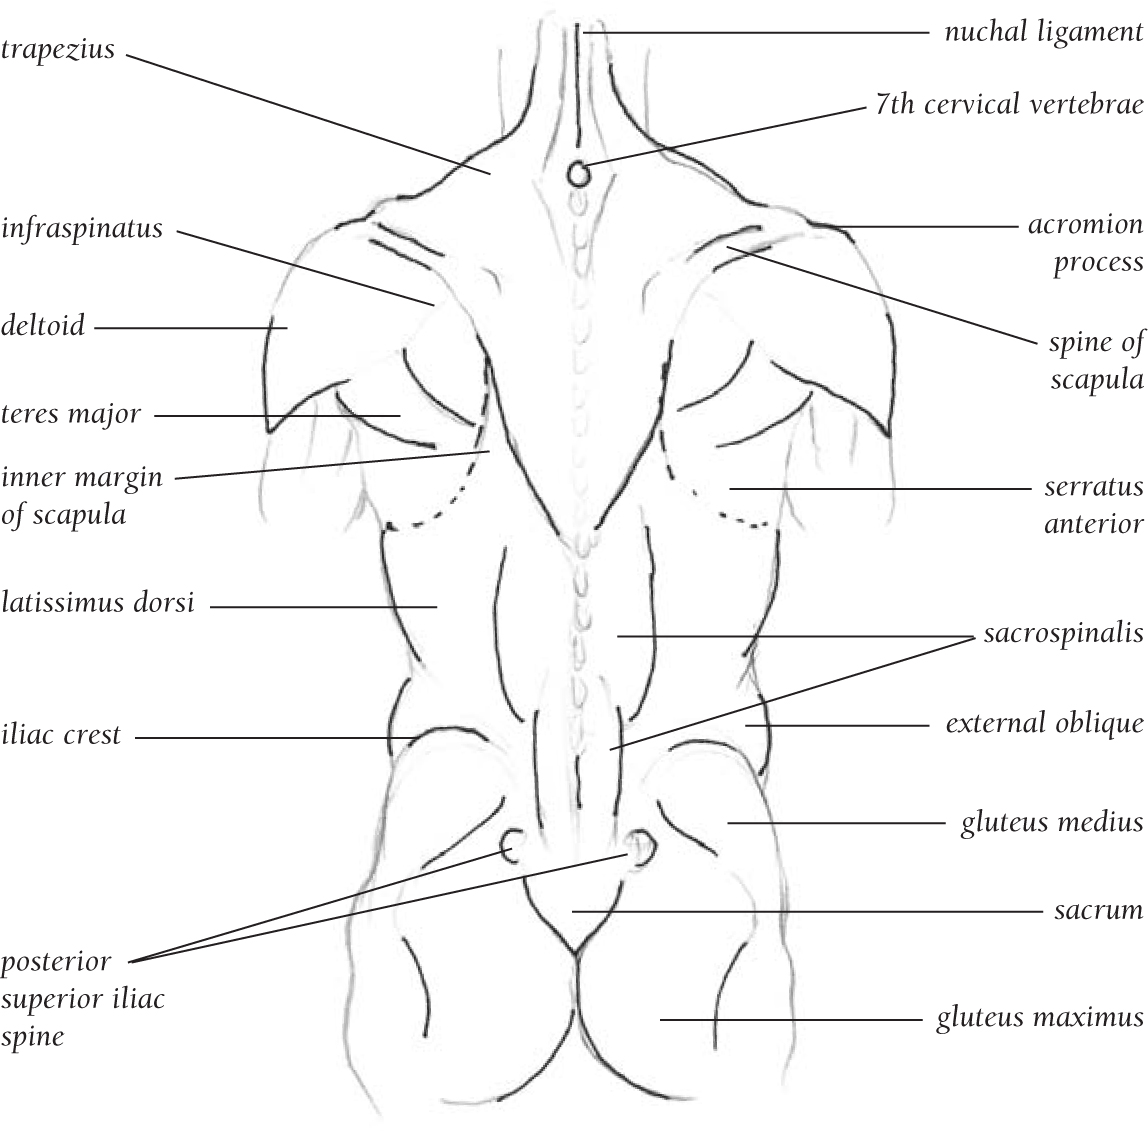
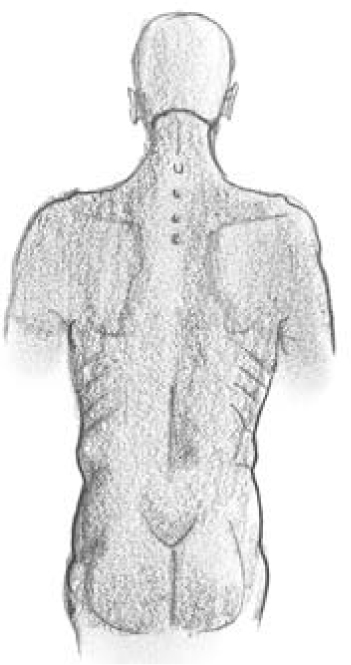
Diagram of Landmarks The observable muscles and bony landmarks labeled on the illustration above are the most important for artists who want to draw the torso’s surface anatomy from the rear view. Focus on accurately rendering these anatomical markers to achieve a lifelike drawing, such as the example at right.

Trunk Muscles The back has many overlapping muscles; our focus will be on the upper layer, which is more immediately apparent to the eye. The trapezius connects the skull to the scapula (shoulder blade) muscles—deltoid, infraspinatus, teres minor, and teres major—which connect to the arm. The latissimus dorsi attaches under the arm, extending to the pelvis. And the gluteus medius bulges at the hip before meeting with the gluteus maximus.

Drawing Tips Under the skin, back muscles are not easy to discern. However, the trapezius, 7th cervical vertebrae, spine of scapula, inner margin of scapula, deltoid, infraspinatus, and teres major are all fairly evident. To depict the nuchal ligament, 7th cervical vertebrae, spinal column, and sacral triangle, draw a long line and an upside-down triangle.
EXPLORING THE TORSO: SIDE VIEW

Skeleton The visual landmarks of the skeleton in profile are the 7th cervical vertebrae, acromion process, inner margin of scapula, and backbone. The backbone’s four curves—cervical (forward), thoracic (backward), lumbar (forward), and sacral (backward)—arrange the head, chest, and pelvic girdle over the legs for balance.

Diagram of Landmarks It is lack of fat in addition to degree of muscularity that determines surface definition. To render the female form, it’s important to become familiar with fat deposit areas, including the flank (iliac crest); buttocks (gluteus); and stomach (abdomin), especially below the navel. Mammary fat accounts for the smoothness of the breast.

Trunk Muscles The upper torso muscles—as well as the scapula, which is anchored by muscle to the spine, ribs, and arms—follow and influence all arm movement. Mid-torso muscles, such as external oblique, rectus abdominus, and latissimus dorsi, bend, twist, and stabilize the rib cage and pelvis. Muscles below the pelvic girdle activate the legs.
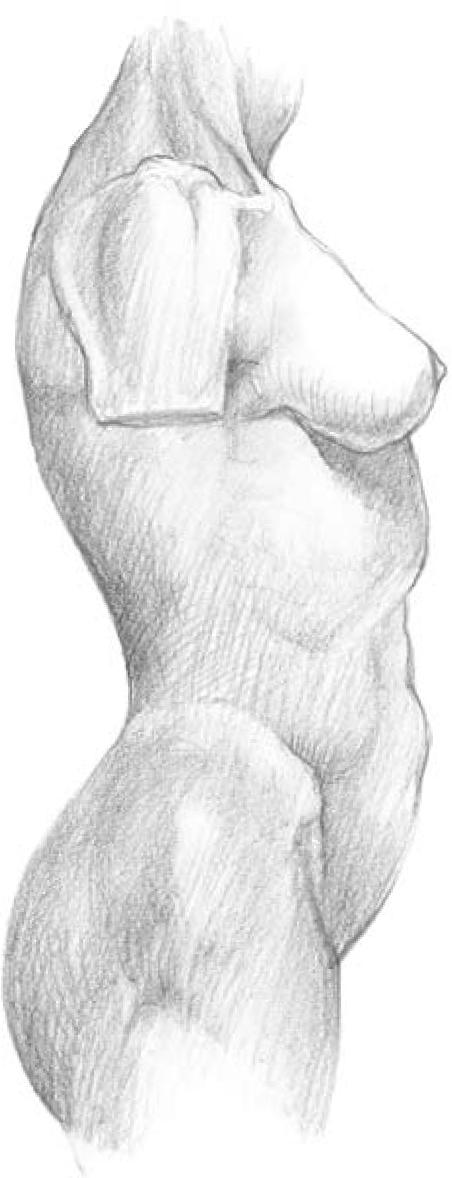
Drawing Tips Female figures display a more fluid contour than do male figures, largely because of the female’s extra fatty layer, which serves a reproductive purpose but also obscures muscular form. Muscular structure is basically the same for both sexes, but the width and angle of the pelvis makes the skeleton more recognizably male or female.
EXPLORING THE TORSO: TIPS
FRONT VIEW

Proportion The pelvic girdle is about 1 head high, and the torso—from trochanters to 7th cervical vertebrae—is about 3 heads high.

Simplified Figurette Sketching with simple lines and basic shapes is a good way to establish the base of a figure drawing.

Tips The nipples, 1 head-width apart, are vertically aligned with pelvic landmarks and diagonally aligned with the acromion processes.

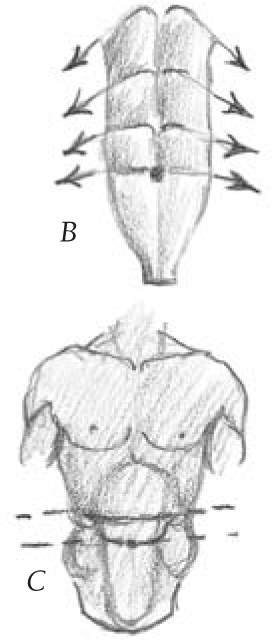
Detail Note the relationship between the skeletal and muscular structures (A). The linea alba (interrupting tendons) of the rectus abdominis create a “six pack” appearance as they arch progressively higher toward the sternum (B). Two of the interrupting tendons line up with the 10th rib and the navel (C).
BACK VIEW

Trapezoids represent the overall bone structure of the torso from both front and rear views. Here you can see the same three-part division.

This simplified sketch from the back view includes an important feature: a line from the 7th cervical vertebrae to the sacral triangle.
On an erect figure, the bones of both the lower ribs and the upper spine are apparent, whereas the lumbar region looks like a furrow.

The shape of the trapezius is similar to that of a kite (A) or a four-pointed star (C). The simplified shape of the latissimus dorsi suggests the appearance of an upside-down triangle (B), with a diamond-shaped sheath removed from its upside-down apex (D).
SIDE VIEW

The simplified torso from the side view has a bean-shaped appearance, but the same proportional divisions of the torso apply.

The simplified figurette in profile makes use of the bean and oval shapes that appear in the proportional drawing at left.

Each spinal segment curves more as the column descends toward the sacrum. The thoracic region has the longest curve.

The serratus anterior muscle starts alongside the first eight ribs, then ends at the inner margin of the scapula (A). Its main mass appears as a bulge underneath the latissimus dorsi (B). At the muscle’s origin (on the ribs), it looks a little like the fingers of a hand (C).
DEPICTING THE ARM: FRONT VIEW

Bones The underlying skeletal structure determines much of the overall shape of the arm (figure 1). Several elements of this substructure, such as the inner epicondyle (E), act as visual landmarks that are identifiable even under layers of muscle (figure 2) and skin (figure 3).

Muscles The upper and lower portions of the arm each consist of three major muscle masses. The bicep and brachialis of the upper arm bend the lower arm, the tricep (see page 31) straightens it, and the deltoid raises the entire arm. In the lower arm, the flexors (flexor carpi radiales, palmerus longus, and flexor carpi ulnaris) bend the palm and clench the fingers; the extensors on the back of the arm (see page 31) straighten the palm and open the fingers; and the supinators (brachioradialis, see page 31), attached to the outer epicondyle (D, figure 1) on the outside arm, rotate the hand outward. A fourth, smaller muscle, the pronator teres, rotates the palm inward.
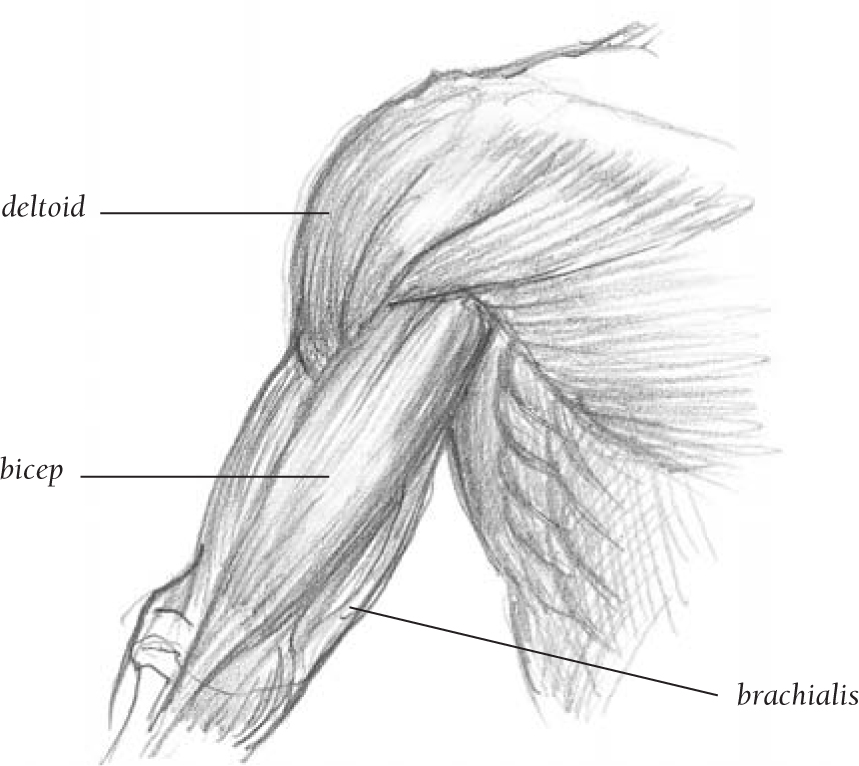
Drawing Tips The bicep does not extend across the full width of the upper arm. The deltoid inserts in between the brachialis and the bicep.
DEPICTING THE ARM: BACK VIEW

Figure 1
Bones Much of the overall shape of the arm in the back view is determined by the underlying skeletal structure, just as with the front view. The inner and outer epicondyle (D and (E), are again identifiable, even under layers of muscle. And from this view, the olecranon, or elbow (F), also is evident.
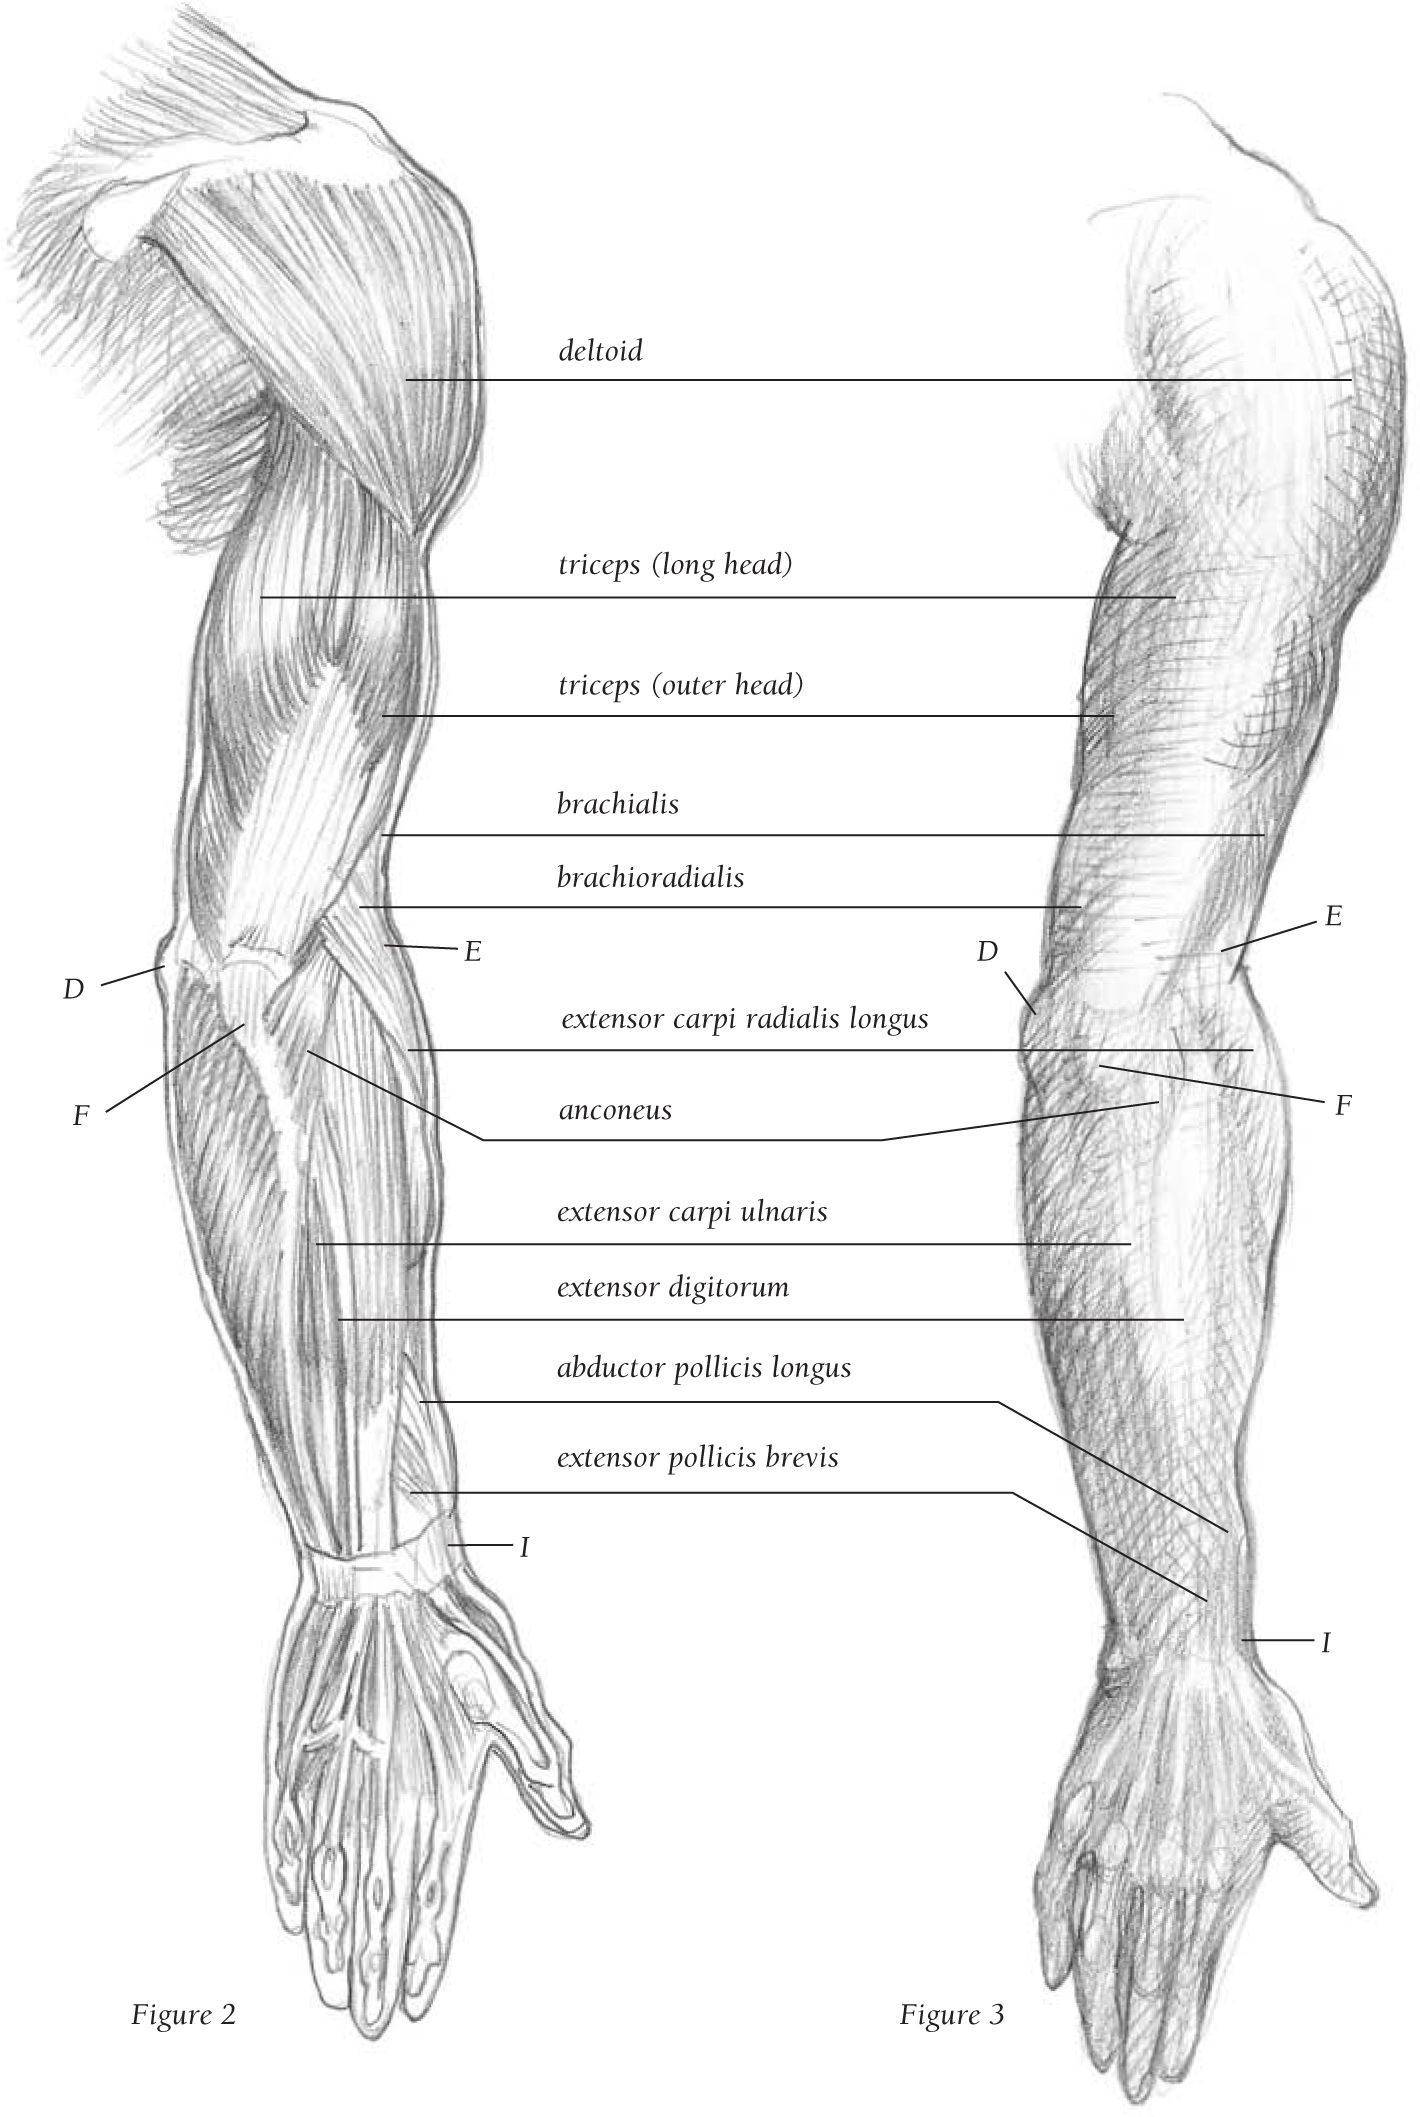
Figure 2
Figure 3
Muscles Muscles work in opposing pairs: Flexors (see page 30, figures 2 and 3) pull and extensors extend, moving in the opposite direction. When a flexor or extensor muscle becomes active, its opposite becomes passive. From the back view, when the hand is pronate (illustrated in figures 2 and 3 above), extensor groups are the most prominent muscles. On the upper arm, the tricep is the most visible extensor. On the lower arm, extensor carpi radialis longus, extensor carpi ulnaris, and extensor digitorum, which all originate on the outer epicondyle, are evident.
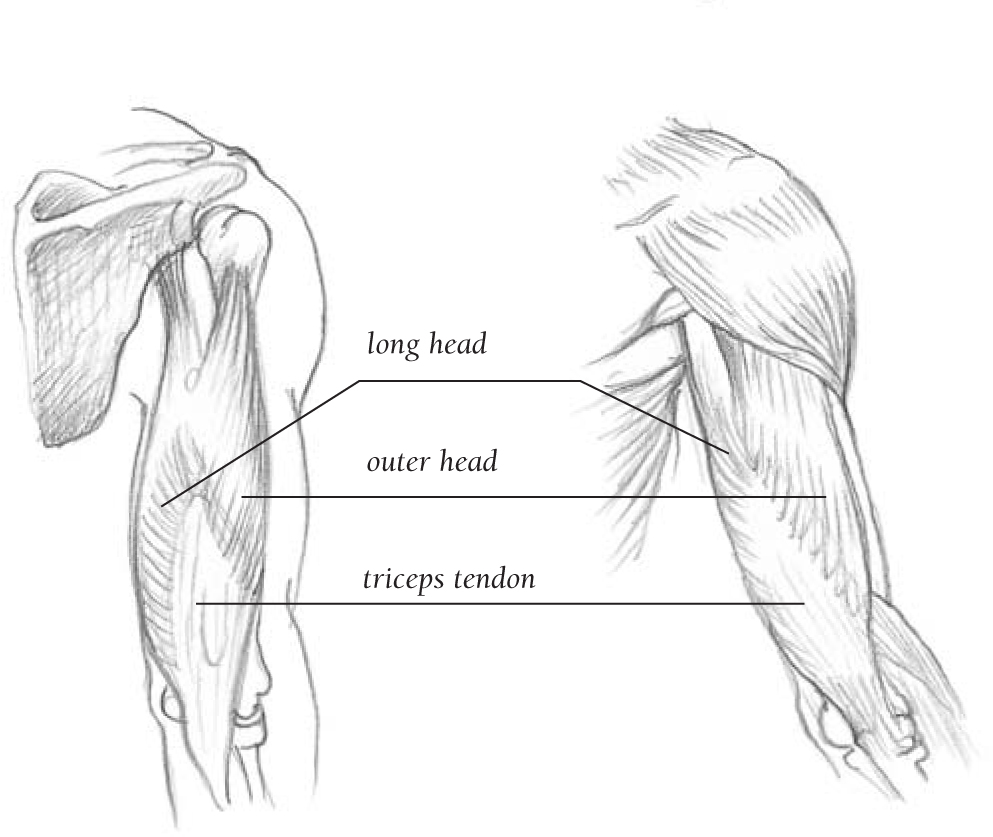
Drawing Tips The tricep has three heads (the long and outer heads are shown here; the medial head lies beneath). All share a common tendon: a flattened form on the back of the upper arm.
DEPICTING THE ARM: SIDE VIEW
CLENCHED FIST

Bones Here the arm is not viewed in full profile; rather it is seen from an angle that is a combination of a side view and a back view. Because of the angle, the bony landmarks most apparent under the muscle are the olecranon, outer epicondyle, and head of ulna.
Muscles The side view provides a good angle for observing the extensors and flexors of the upper and lower arm. The brachioradialis, located where the upper and lower arms meet, is particularly important. It originates on the lateral side of the humerus (C), above the outer epicondyle (E), and then attaches to the lateral side of the wrist above the head of radius (I).
DRAWING TIPS

The brachioradialis is responsible for turning the palm up (supinate), and the pronator teres (see page 30) for turning the palm down (pronate). The radius (shaded) rotates around the fixed ulna, permitting pronation and supination of the palm.

The span between the inside bend of the elbow and the wrist is usually about one hand length. The arrows show the inward and outward curvature of the muscles, and the dashed line shows the line of the ulna, called the “ulnar furrow.”
PORTRAYING THE HAND
OPEN PALM

Bones The hand contains 8 wrist (carpal) bones: minor multangular (1), major multangular (2), navicular (3), lunate (4), triquetrum (5), pisiform (6), hamate (7), and capitate (8). The hand also features 5 metacarpals (9) and 14 phalanges (10).

Muscles The flexor tendons (A, B, C) from the forearm muscles (see page 30) extend into the hand. The teardrop-shaped muscle masses, the thenar eminence abductors of the thumb (I, J) and the hypothenar eminence abductor (D) and flexor (E) of the little finger, are known as the “palmer hand muscles.” The adductor of the thumb (G) lies under the flexor tendons (F). The visible creases of the palm result from the way the skin folds over the fat and muscles of the hand.
BACK
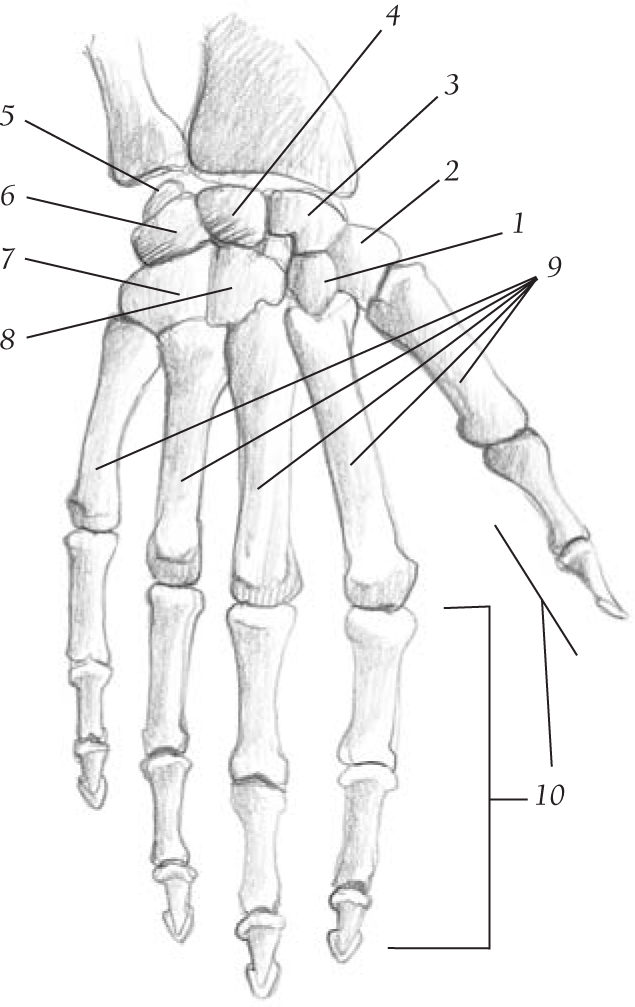
Bones From this view of the hand, all the same bones are visible, but the carpal bones appear convex rather than concave. From this angle, the bones have more influence on the shape of the fleshed-out hand.
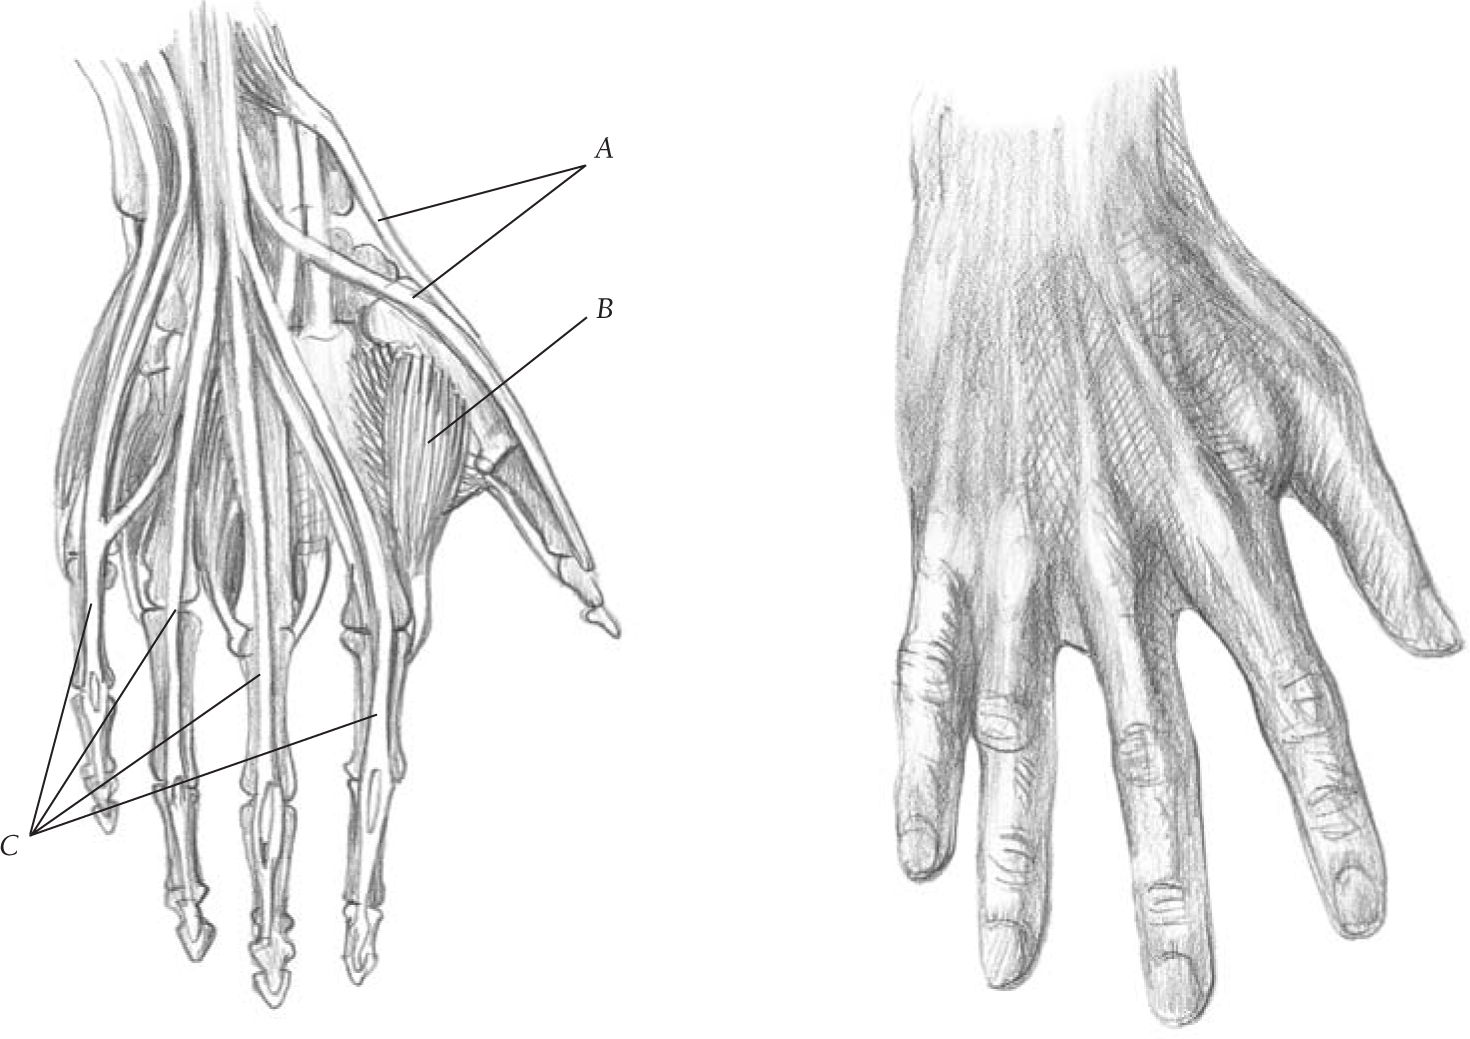
Muscles Whereas the palm side of the hand is muscular and fatty, the back of the hand is bony and full of tendons. The extensor tendons of the thumb (A) are visible when contracted, as are the other four extensor tendons (C). The first dorsal interosseous (B) is the largest of the four dorsal interosseous muscles, and it is the only one that shows its form through the skin’s surface; when the thumb is flexed, this muscle appears as a bulging teardrop shape.
SKETCHING THE LEG: FRONT VIEW

Bones The femur (B), with its great trochanter at the top (A) and outer epicondyles (C) and inner epicondyles (D) at the base, is the heaviest and longest bone of the skeletal system. The knee cap (patella) sits in between the outer epicondyles and inner epicondyles on the patellar surface. The lower leg consists of the thick tibia (I) and the slender fibula (H). The tibial tuberosity (F) and head of the fibula (G) are important landmarks at the top, as are the ankle bones (the inner malleolus and outer malleolus).
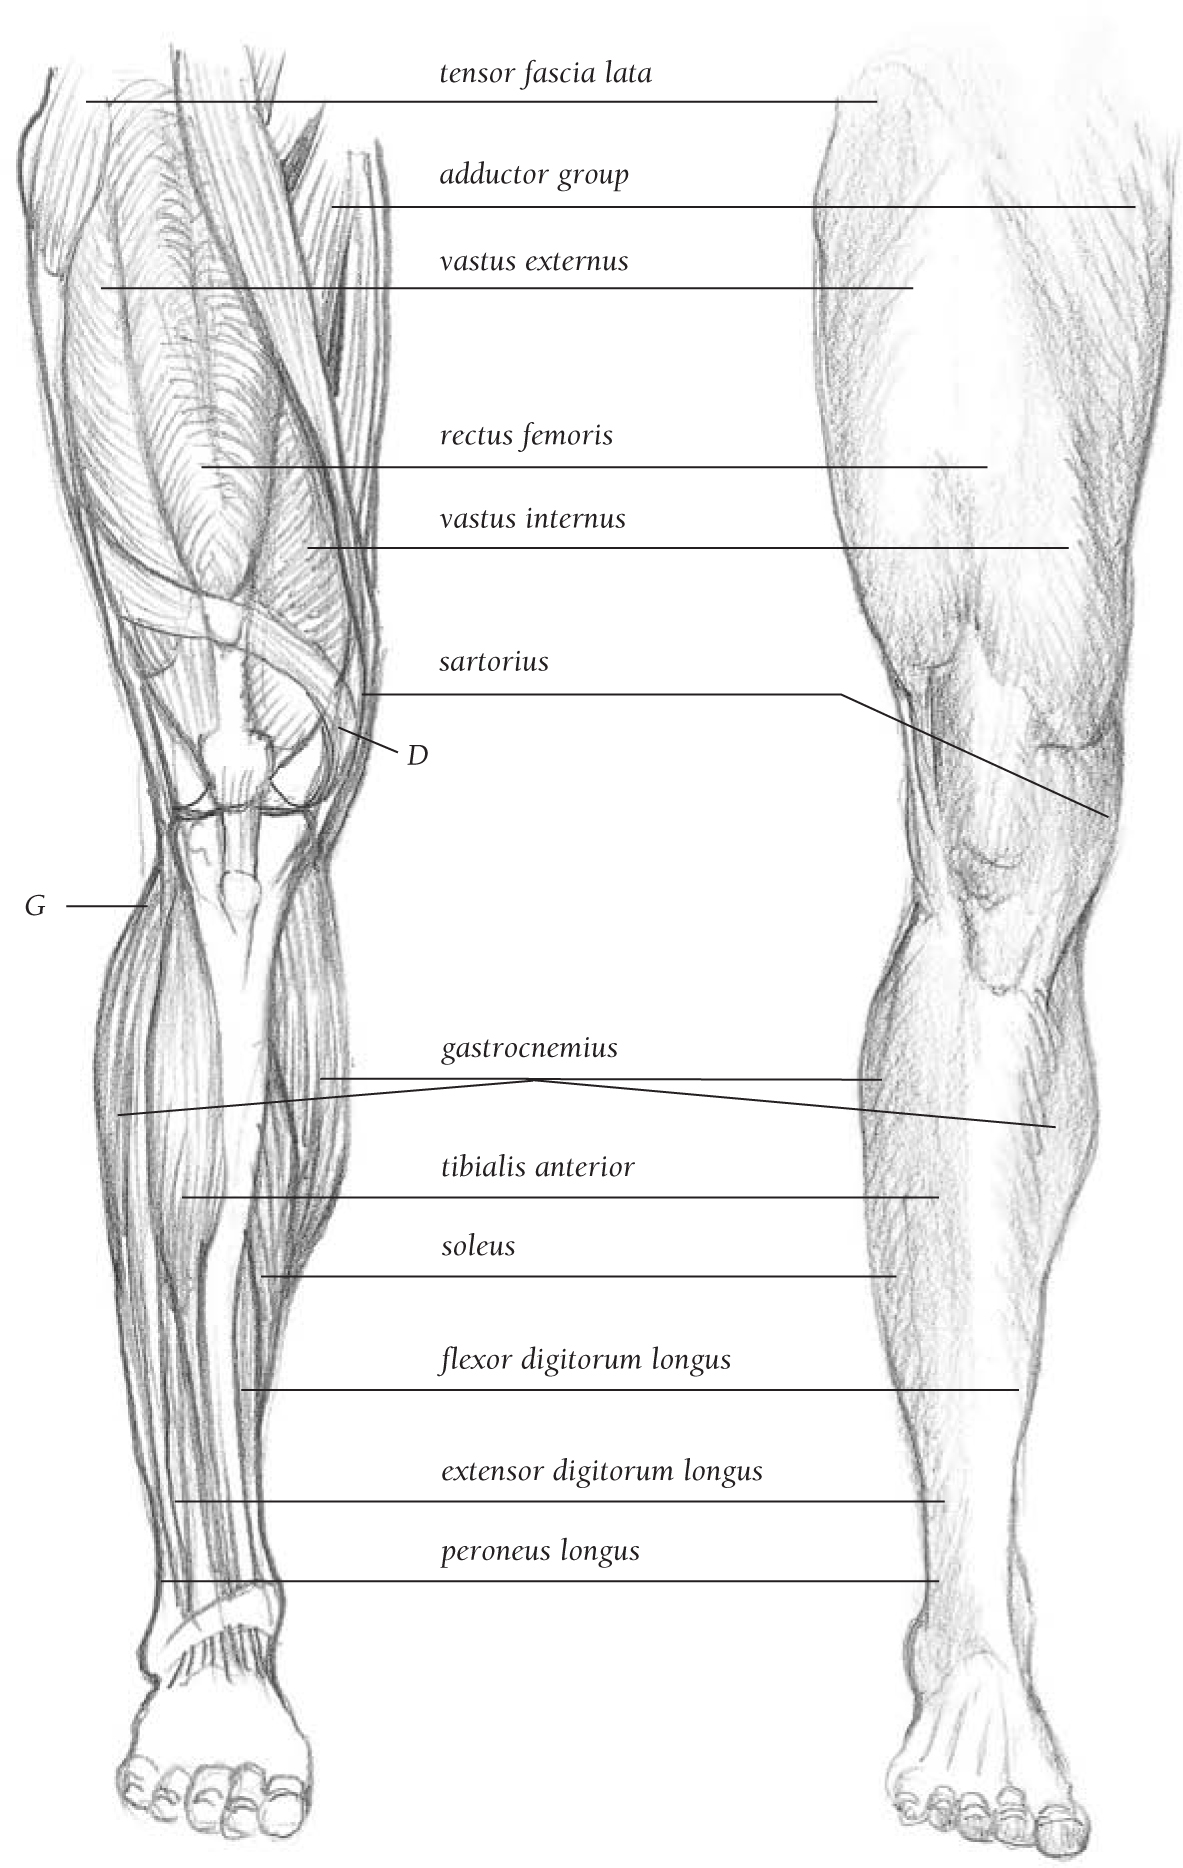
Muscles The upper leg has four major muscle masses: vastus externus, which attaches to the knee cap (E); rectus femoris, which engulfs the patella (E) and continues toward the tibial tuberosity (F); vastus internus, a medial bulge; and the adductor group on the inside of the leg. There also are two other masses: the tensor fascia lata and the sartorius. The sartorius is the longest muscle in the body. The lower leg has six long muscles visible: gastrocnemius, protruding on both sides; tibialis anterior, running along the shin toward the big toe; soleus; flexor digitorum longus; extensor digitorum longus; and peroneus longus.
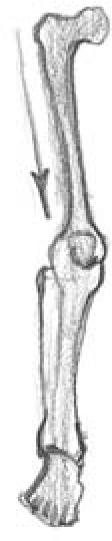
Figure 1

Figure 2

Figure 3
Drawing Tips The legs angle in toward the middle, positioning the body’s weight over the gravitational center. (See figures 1 and 2.) The muscle masses on the outside of the leg are higher than those on the inside. (See figure 3.) The ankles are just the reverse—high inside, low outside.
SKETCHING THE LEG: BACK VIEW

Bones From the back view, the same leg bones that appear in the front view are visible. Their appearance is slightly altered, however, because the bone attachments in the front are designed to allow muscles to extend, and the back attachment is designed for muscles to flex.
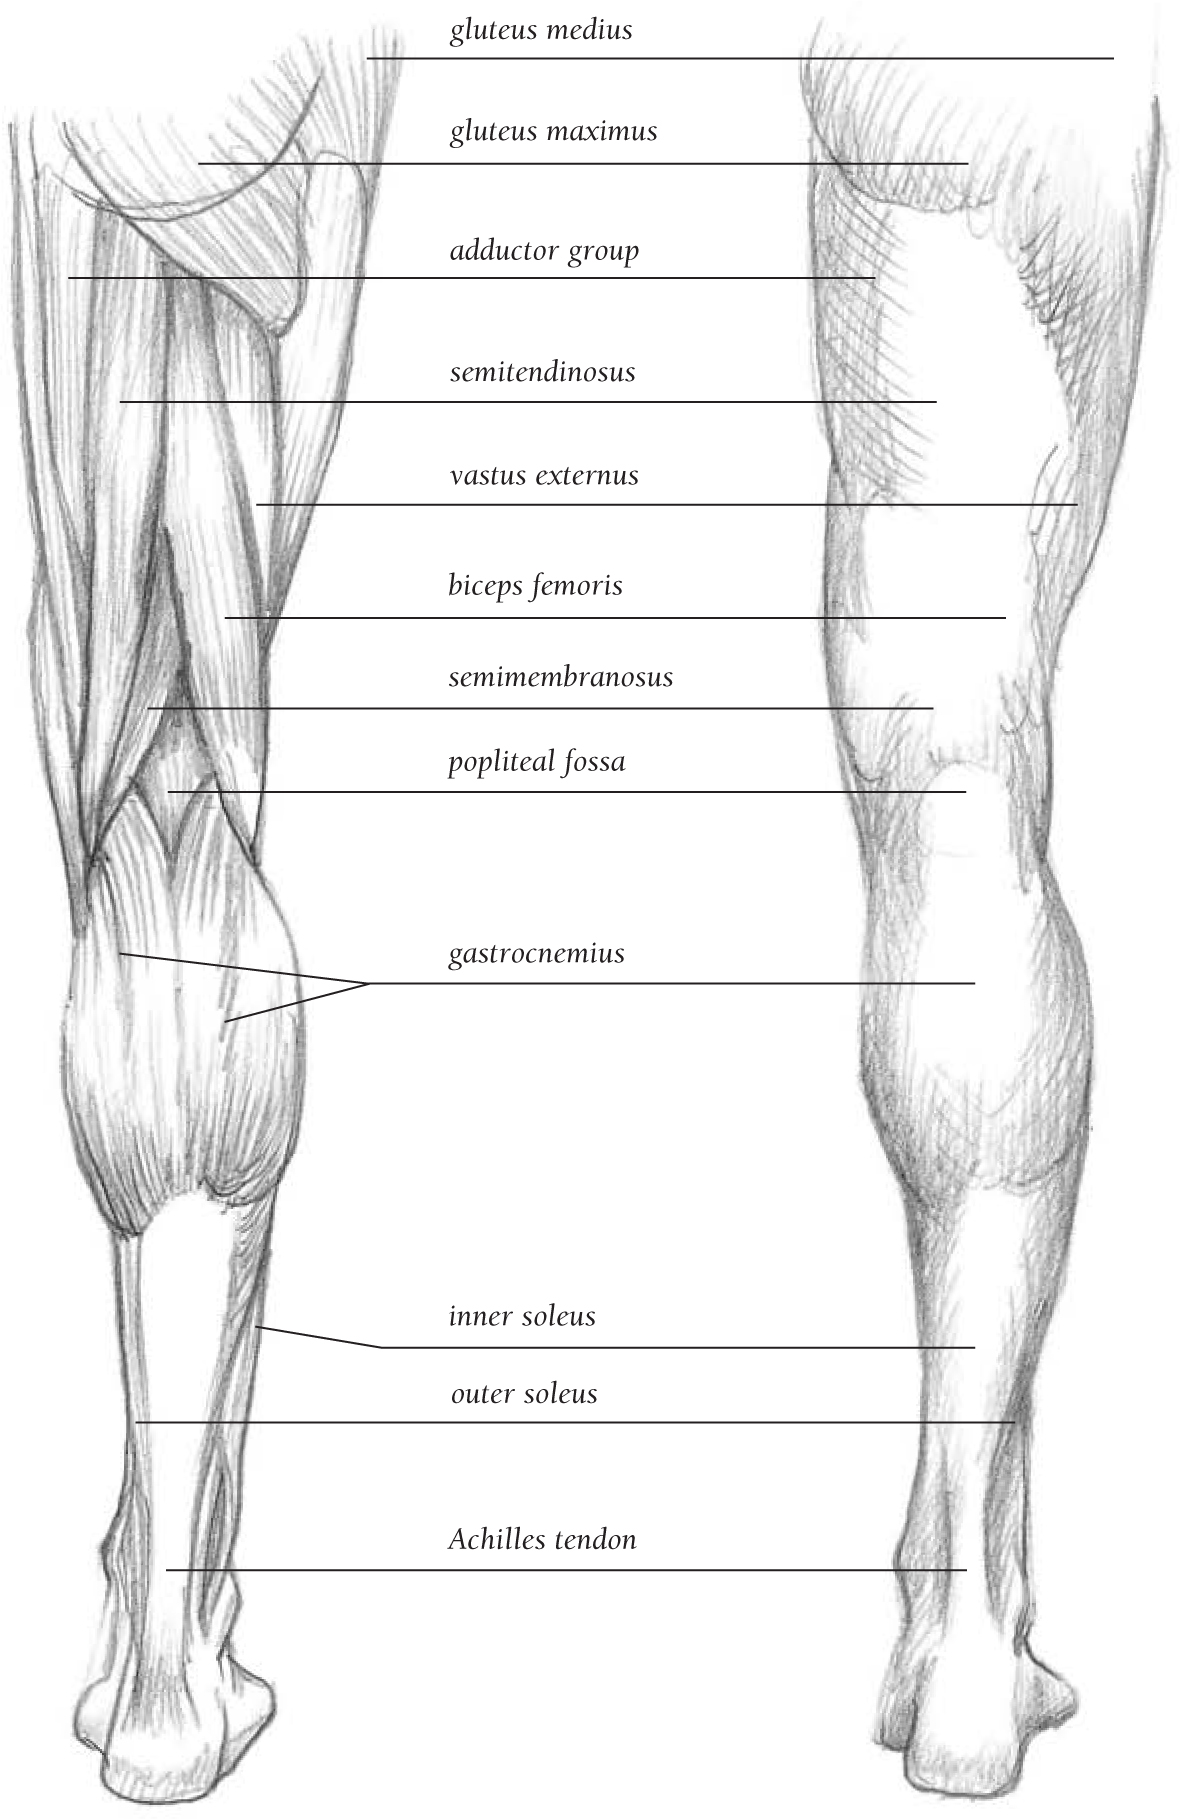
Muscles The upper leg consists of five large muscle masses: gluteus maximus; gluteus medius; the hamstring group (biceps femoris, semitendinosus, and semimembranosus); the adductor group; and the vastus externus, which can be seen peeking out from behind the biceps femoris.
The lower leg also features five masses: three larger ones and two smaller. The larger masses are the two heads of the calf: the gastrocnemius and the Achilles tendon, which connects to the heel bone. The two smaller masses are the inner soleus and outer soleus. Also notice the hollow area behind the knee where the calf tendons attach, called the “popliteal fossa”; this fatty hollow makes deep knee bends possible.

Figure 1

Figure 2
Drawing Tips The calf is lower and rounder on the inside than it is on the outside. (See figure 1.)
The hamstring tendons grip below the knee on both sides, almost like a pair of tongs. (See figure 2.)
SKETCHING THE LEG: SIDE VIEW

Bones and Muscles Because the long femur (B), and large tibia (H) carry the weight of the body, they sit directly on top of each other. But in a side-view drawing, the upper and lower leg appear staggered; the front of the shin lines up directly below the illio-tibial band muscles and behind the upper-leg masses of the rectus femoris and vastus externus.

In the lower leg, the forms to look for are the gastrocnemius; the long, straight form of the Achilles tendon; the peroneus longus tendon, which passes behind the outer malleolus (I) and the bulk of the extensor digitorum longus; and the tibialis anterior, toward the front of the leg.
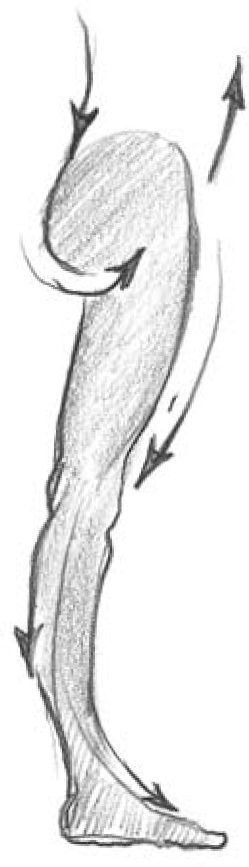
Figure 1

Figure 2

Figure 3
Drawing Tips The six arrows in figure 1 show the overall gesture of the leg. The upper thigh and lower calf create the gesture. (See figure 2.) Figure 3 shows the pattern of tendons in the foot. (See page 19.)
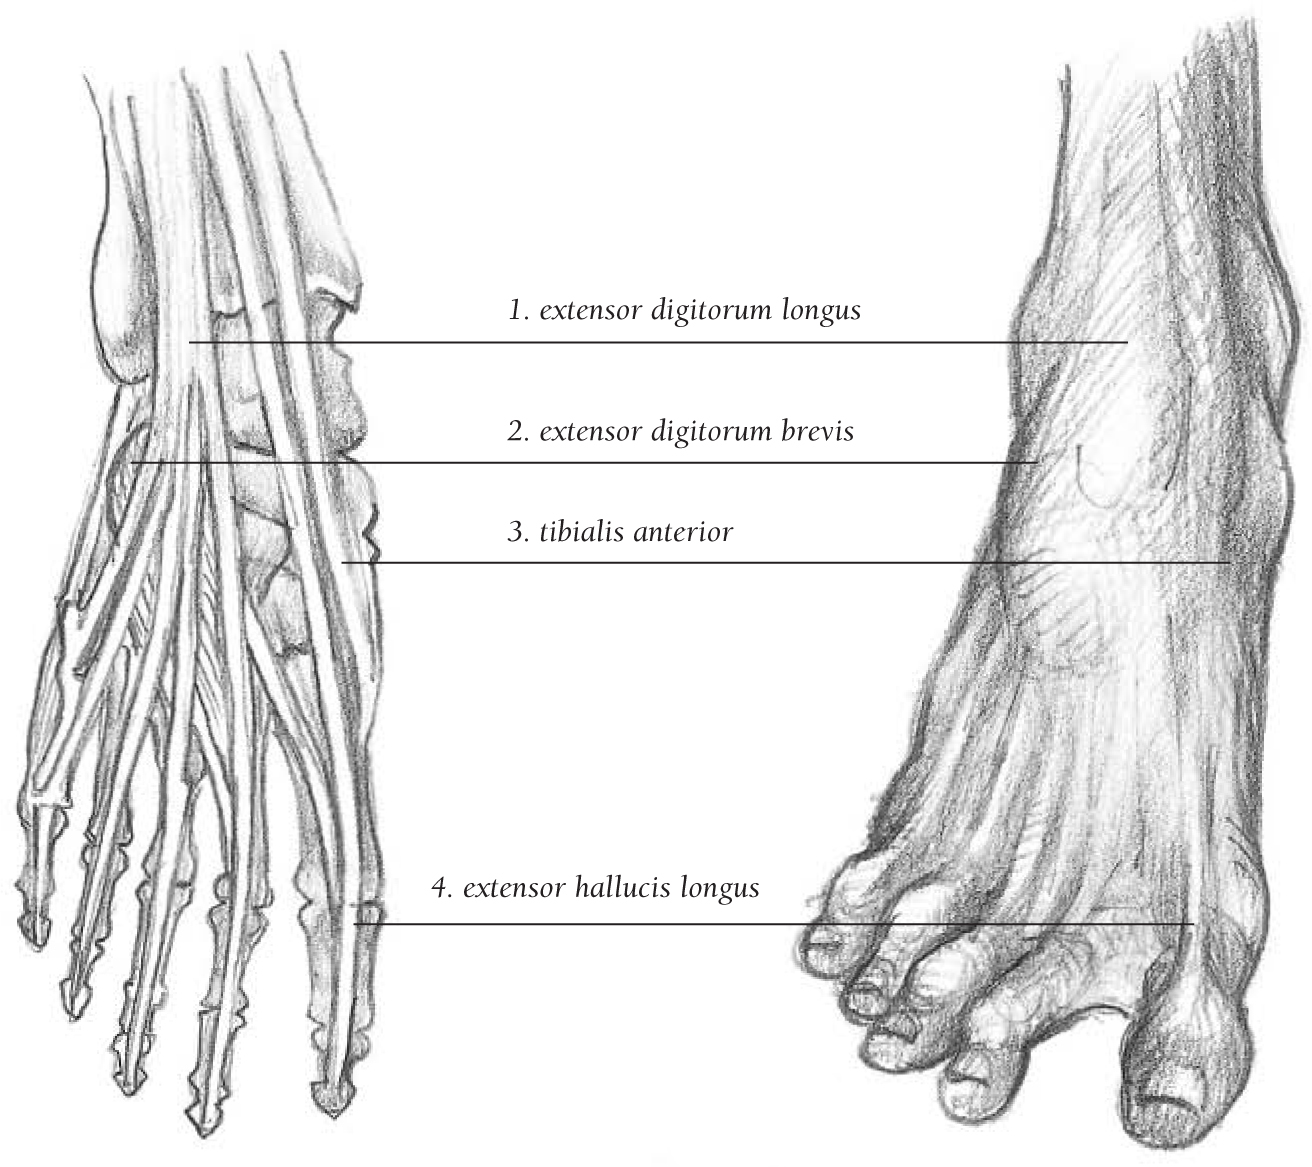
DRAWING THE FOOT
TOP

SIDE
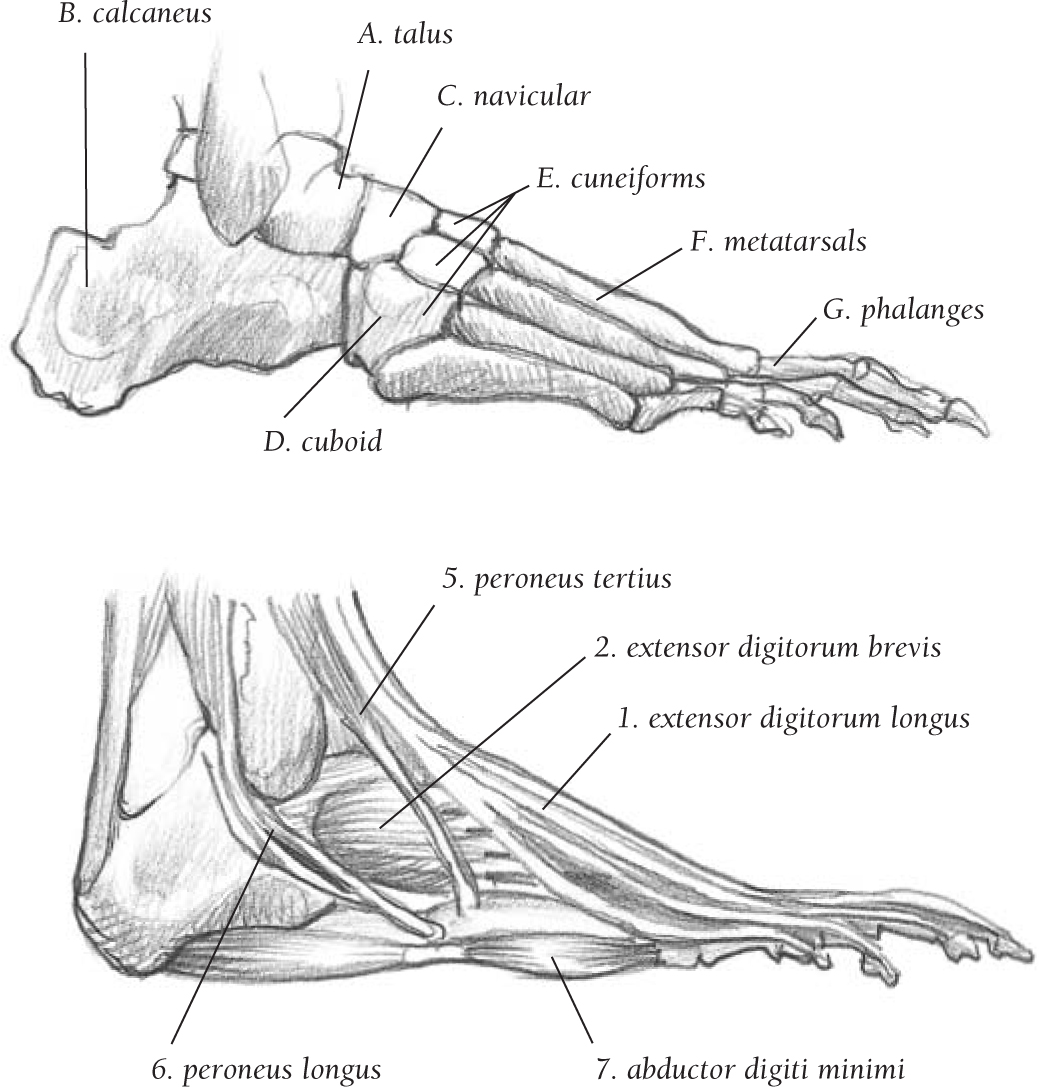
Bones Like the hand, the foot also comprises three parts: seven tarsal bones (A–E), five metatarsals (F), and fourteen phalanges (G). The tarsal bones include the ankle, heel, and instep. The metatarsals are longer and stronger than the five metacarpals of the hand, and they end at the ball of the foot. The phalanges of the toes are shorter than those of the fingers and thumb; the four small toes press and grip the ground surface, and the big toe tends to have a slight upward thrust.

Muscles When the foot is flexed upward, these tendons are evident: extensor digitorum longus (1), extensor digitorum brevis (2), tibialis anterior (3), and extensor hallucis longus (4). (From the side view, extensor digitorum brevis appears as a round shape inside a triangular pocket.) Peroneus longus (6) curves around the ankle, whereas abductor digiti minimi (7) appears as a bulge on the outer side of the foot.
Drawing Tips The tibialis anterior (3) is an obvious landmark on the inverted foot. (See figure 1, above.) In figure 2, dorsi-flexion makes visible the extensor digitorum (1). In figure 3, plantar-flexion lets you see the tendons of peroneus (6).
STUDYING THE HEAD & SKULL

Becoming familiar with the head and skull is an excellent way to improve your portraiture skills. If you purchase a plastic skull, you can practice drawing the skull from all angles, as shown in the charcoal pencil studies above. Start with an outline of the basic shape of the skull; then block in the shapes of the main features and refine the lines (shown in the upper-right corner). The important skull bones for an artist to know are the parietal eminence (A), frontal bone (B), frontal eminence (C), glabella (D), superciliary crest or “brow ridge” (E), temporal line (F), zygomatic process (G), orbit (H), zygomatic bone (I), maxilla (J), ramus of mandible (K), mandible (L), and mental protuberance (M).
FRONT VIEW
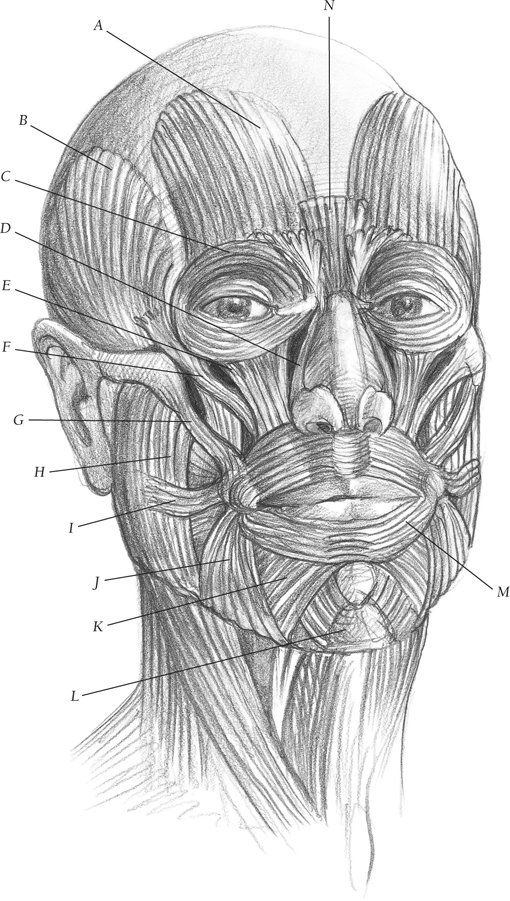
Most of the facial muscles originate from bone and insert into muscle fibers of other facial muscles. They do not create surface form directly, as the skeletal muscles do, because they are much more delicate and usually concealed by facial fat. The visible forms on the face are created by several factors—skin, fatty tissue, underlying skull, cartilage, eyeballs, and some muscles.
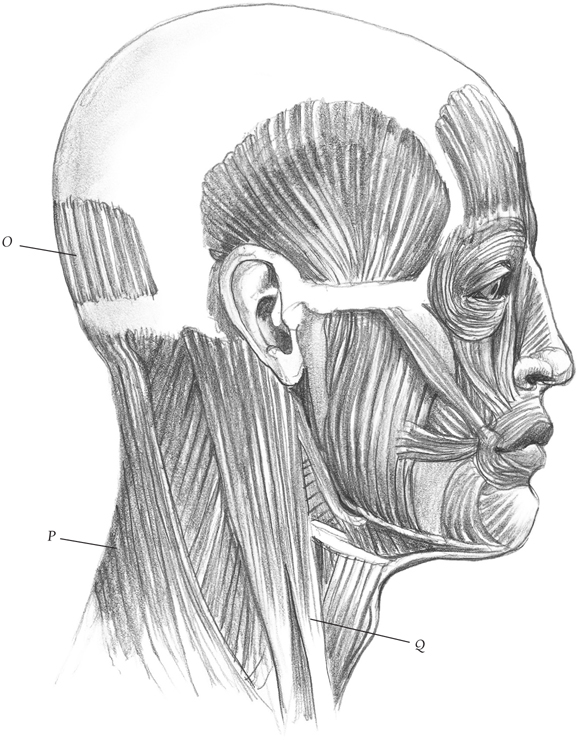
SIDE VIEW
A. frontalis
B. temporalis
C. obicularis oculi
D. nasalis
E. levator labii superioris
F. zygomaticus minor
G. zygomaticus major
H. masseter
I. risorius
J. depressor anguli oris
K. depressor labii inferioris
L. mentalis
M. obicularis oris
N. procerus
O. occipitalis
P. trapezius
Q. sternocleidomastoid
FRONT VIEW

Simplifying the Features When facial muscles contract, they affect the shape of the fatty forms, skin, and other facial muscles, causing the wrinkles, furrows, ridges, and bulges that convey various facial expressions. Simplifying these complex shapes into easily recognizable geometric planes (the “planes of the head”) can help guide an artist in the proper placement of light and shadow. As an artist, there’s no need to actually sketch the planes, but it helps to understand the planes and visualize them when approaching complex features and shading.
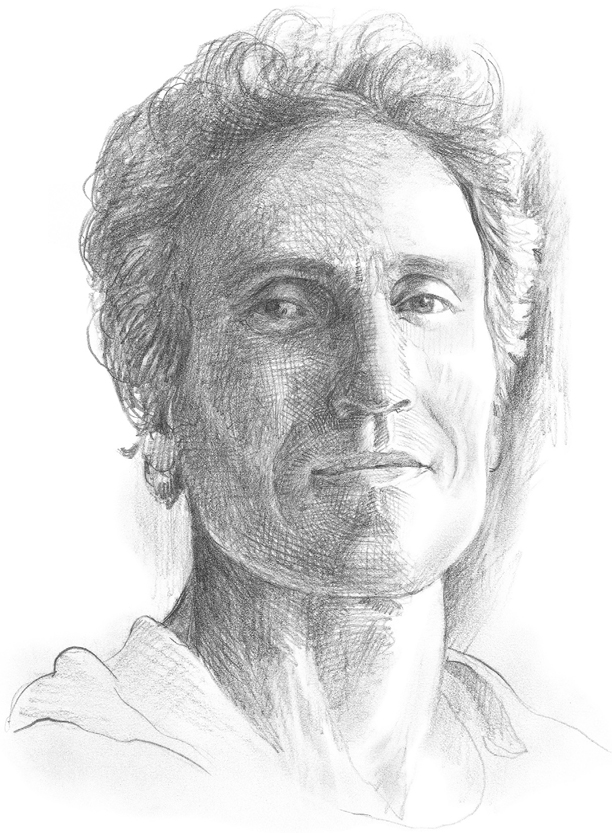
Visualizing Light and Shadow In this final stage, light and shadow are translated from simple planes onto a more subtle, realistic portrait. Self-portraiture is a great way to practice identifying the planes of the head from many different angles. Using a mirror as reference, focus on the placement of the light and dark values that create the form of your face. Just remember to draw what you really see in the mirror, not what you expect to see.
CAPTURING FACIAL FEATURES

The Eye The eyeball is a moist sphere. Because its surface is glossy, the cornea (E) often features a highlight.
Drawing Tips The sclera (A) is the white of the eye. The iris (B) is a colored disc that controls the amount of light entering the round opening of the pupil (C). The domelike, transparent cornea (E) sits over the iris. The inner canthus (D) at the corner of the eye is an important feature of the shape of the eye.

The Lips Because the lips curve around the cylinder of the teeth, it’s helpful to draw and shade the mouth as if it were a sphere.
Drawing Tips The vertical furrow between the nose and upper lip is the philtrum (A). The tubercle (B) of the upper lip is a small rounded form surrounded by two elongated forms; it fits into the middle of the two elongated forms of the lower lip. The node (C) is an oval muscular form on the outer edge of the mouth.

The Nose The nose is made up of bone, cartilage, and fatty tissue. Halfway down from the eyebrows, cartilage replaces the bone.
Drawing Tips The bridge of the nose is formed by two nasal bones (A). The middle section of the nose is made of a rigid septal cartilage (B), surrounded by two lateral cartilages (C). The bulb of the nose is formed by two greater alar cartilages (D). Two wings (E) create the nostrils.

The Ear Think of the ear as an oval disc divided into three sections and placed on a diagonal angle.
Drawing Tips The cartilaginous helix (A) forms the outer rim of the ear. The antihelix (C) lies just inside the helix, running roughly parallel to it; the two are divided by the scapha (B). The tragus (D) is a cartilaginous projection, located over the bowl (the concha, G). The antitragus (E) is located opposite the tragus and just above the fatty lobe (F).