Walter T. Foster was born in Woodland Park, Colorado, in 1891. In his younger years, he worked as a sign painter and a hog medicine salesman. He also performed in a singing and drawing vaudeville act. Mr. Foster invented the first postage-stamp vending machine and drew political caricatures for several large newspapers. In the 1920s, while running his own advertising agency and instructing young artists, Mr. Foster began writing self-help art instruction books. The books were first produced in his home in Laguna Beach, California, where he wrote, illustrated, and printed them himself. In the 1960s, as the product line grew, he moved the operation to a commercial facility, which allowed him to expand the company and achieve worldwide distribution. Mr. Foster passed away in 1981, but he is fondly remembered for his warmth, dedication, and unique instruction books.

PEOPLE
Many people believe that drawing the human face is difficult, but it’s really only a matter of proportion and properly placing the features. The lines and forms involved are just simple curves and basic shapes. The easiest way to learn to draw people is to start with individual features such as the eyes and mouth. It’s best to draw from a photo or a live model. A reference makes rendering the head much easier!
Whether from a frontal view or in profile, eyes and lips are drawn around horizontal and vertical guidelines. Both guidelines are perpendicular in the frontal view, and the vertical line is slanted slightly in the profile view. Then you can build on these guidelines with circles and simple curved lines. Study the outlines on this page, and practice drawing them several times.
EYE


EYE IN PROFILE


The dotted line indicates the shape of the eyeball beneath the eyelid. The curve of the eyelid follows the curve of the eyeball.
MOUTH IN PROFILE


MOUTH


These human profiles are built on two slanted guidelines: one for the line of the plane of the face, and one for the line of the nose. There is a variety of sizes and shapes of noses, eyes, and mouths; study your subject closely and make several practice sketches of his or her features. Then combine the features into a simple profile.
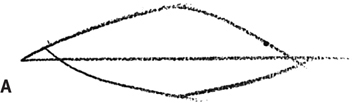
To draw the nose, block in a triangle, and draw the basic outline of the nose within the triangle, as in steps A and B. Refine the outline, and add a small curve to suggest the nostril in step C.
Then add the centerline for the eye at the top of the bridge of the nose. Next place the eye, eyebrow, and upper lip. Once you are satisfied with your sketches, try a complete profile.
For the full profile, start with a slanted guideline from the eyebrow to the chin. Then add horizontal guidelines to place the features. In adults, the bottom of the nose is approximately halfway between the eyebrow and the bottom of the chin. The bottom lip is about halfway between the nose and the chin. Note that these are just general rules of human proportion. The precise placement of features will vary slightly from individual to individual and between men and women.


WOMEN: PROFILE
These heads were drawn from photos (photos serve as good models because they hold still). Try profile views like the ones you see here, keeping them fairly simple. Don’t worry about rendering the hair for now; spend time learning how to draw the face, and work on the hair later.
Step A illustrates the proportions of the face. In this close-up profile, the bottom of the nose is about halfway between the eyebrows and chin. The mouth is about halfway between the bottom of the nose and the chin. Once the proportions are established, sketch the actual features. Study each one closely to achieve an accurate resemblance. This drawing was done on plate-finish Bristol board, which usually is used for pen and ink drawings.


All figure and portrait renderings have been drawn directly from the artist’s imagination or from paid professional models. Any likeness to persons other than those hired for this purpose is purely coincidental.

A tortillon is helpful for blending the contours of the face.
When drawing portraits, make sure you’re comfortably seated and that the drawing board is at a good angle. Rotate the drawing often to prevent your hands from smudging areas you’ve already drawn.
Draw the guidelines in step A to lay out the correct proportions. Lay down each line in the numbered order shown. In step B, sketch the nose, eyebrow, chin, and eyes on the guidelines; then refine them into more recognizable parts of the face. All of these elements must be resolved before shading.


Focus on the dark and light values of the lips in step C, as well as the direction of the strokes. The value contrasts make the lips appear soft and round, especially because the shading is lighter toward the middle of the lip. Note in the final rendering that the hair is merely implied as a surrounding element.


The type of paper you use will affect your drawings. This portrait was done on vellum-finish paper, which has a slight tooth that works well with pencil or crayon.
WOMEN: THREE-QUARTER VIEW
Drawing a three-quarter view is slightly more difficult than the frontal view—but you can do it! Study your subject carefully, and follow the steps. Block in the basic shapes, and use guidelines to place the features. Note that because the face is angled, the features are all set off center, with the nose at the three-quarter point. Curve the line for the bridge of the nose all the way out to the edge of the face, so it partially blocks her left eye.


When you block in the hair, think of it as one mass that has a curved outline. You can suggest some of the individual hairs later.

Check the proportions and the placement of the features. When you’re happy with your sketch, refine the features, and add some light shading to finish off your drawing. Shade as much or as little as you like; sometimes simpler is better.

Browse through books and magazines for subjects to draw, or even look in the mirror and draw yourself. The more you practice and the more diverse your subjects, the better your drawings will become. Young or old, male or female, all portraits start with the same basic steps.


Use the curved, vertical guidelines to help maintain the roundness of the lips and chin.

WOMEN: FRONTAL VIEW
For these frontal-view drawings, you will need to pay special attention to the position of the features. In a profile, for example, you don’t have to worry about aligning the eyes with each other. Study your subject closely, because a small detail such as the distance between the eyes may determine whether or not your drawing achieves a strong likeness to your model.
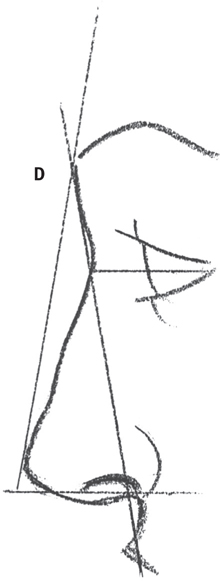
Step A shows minimal proportion guidelines. You will be able to start with fewer lines as you become more comfortable with your drawing and observation skills. Even the two lines shown are helpful for determining placement of the features.

In step B, make the facial features more recognizable, and begin to suggest the hair. Notice that features rarely are symmetrical; for instance, one eye usually is slightly larger than the other. To finish the drawing, create depth by shading the eyes, nose, and lips. If you wish, practice developing form by shading along the planes of the face and around the eyes.

A few loose, curving strokes with a chisel-tipped pencil can create the appearance of a full head of hair.
Notice that the nose is barely suggested; the viewer’s eye fills in the form.
The features of this subject’s face differ from those in the previous drawing. Here the nose is much thinner, and the eyes are closer together. You will need to make these adjustments during the block-in stage.
In step A, use an HB pencil to block in the proportions. Use the guidelines to place and develop the features in step B. Notice the types of strokes used for the hair; they are loose and free. Quick renderings like this one are good for practice; do many of them!

Remember that your preliminary drawing must be correct before continuing. No amount of shading will repair the drawing if the proportions are not accurate.

This rendering shows the finest details in the eyes. Therefore, the eyes appear to be the focus of the drawing, with the hair acting as a framing element.
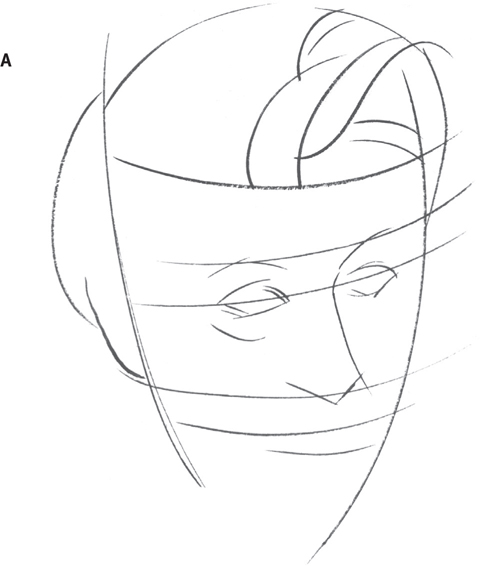
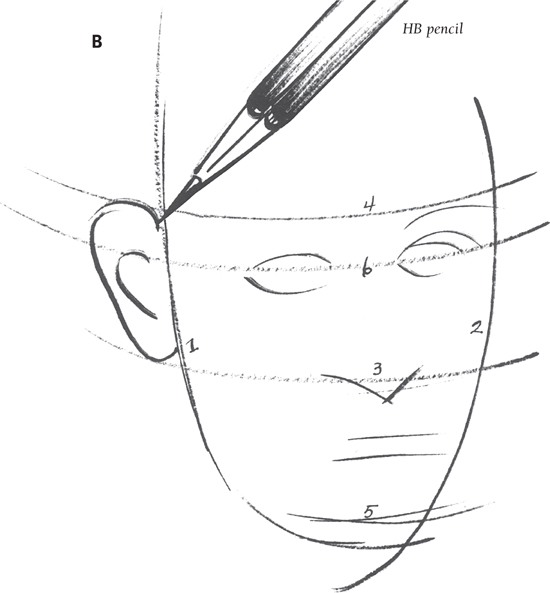
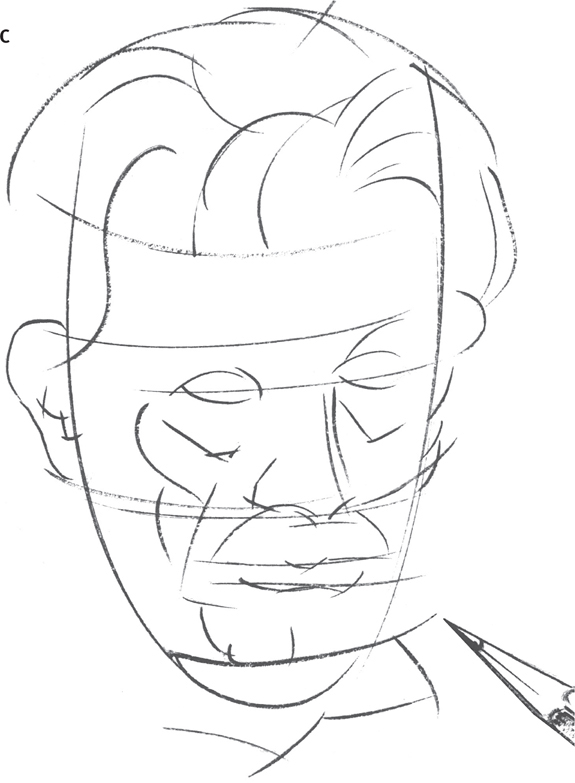
MEN: THREE-QUARTER VIEW
The three-quarter view is more challenging than the profile and frontal views, but if you begin with the usual proportion guidelines, you shouldn’t have any trouble. Simply take your time, and observe closely.
Follow the steps as shown, using charcoal for the block-in stage. When you begin shading, use dark, bold strokes for the eyebrows, mustache, and beard. Notice this subject’s facial expression; his dark eyes are intense. Fill in the irises with the darkest values, but be sure to leave tiny white highlights.

Clothing can be used to identify a character; here the headdress emphasizes the model’s Middle-eastern heritage.


The dark vertical strokes of the background are used to define the outline of the subject’s face.
Use photos from books or magazines to draw people of all types and ethnicities in various styles of dress.
This drawing was done after an old master’s painting. Copying a master’s work is excellent practice; it helps to improve your artistic skills and understanding. When copying a great work, think about the reasons the original artist may have done certain things, and then use your insights to better your own works. Follow the steps as illustrated, blocking in each of the features with quick, confident strokes. Look for the basic shapes in your subject; then refine them as necessary to achieve a likeness.


Notice this character’s piercing expression, which is enhanced by the thick, dark eyebrows.

Use overlapping brush strokes to create the beard.
The tip of the brush is used to create fine lines.
Most of the shading and details for this drawing were done with a brush and India ink, although charcoal was used for the guidelines and initial sketching. Brush and ink is a good choice for creating the thick, dark facial hair.
Keep practicing if you want to become a modern-day master!
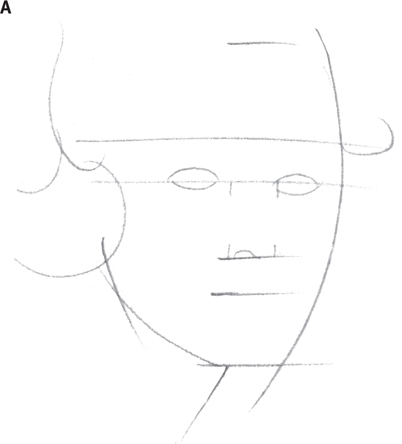
ELDERLY WOMEN
These more advanced renderings bring out the character of the subjects. The elderly woman on this page, for example, appears stern and serious, whereas the woman on the opposite page evokes a certain kindness and gentle spirit.
Using the usual proportion guidelines, block in the face. Remember to include the hat as part of the initial sketch, as shown in step A. Add shapes to indicate the wrinkles and loose skin in step B.
As people age, certain features will begin to sag and perhaps become less symmetrical. Notice that the shading strokes are rather harsh and bold. This technique creates the appearance of rough, weathered skin.

The shapes of the woman’s eyes differ slightly.
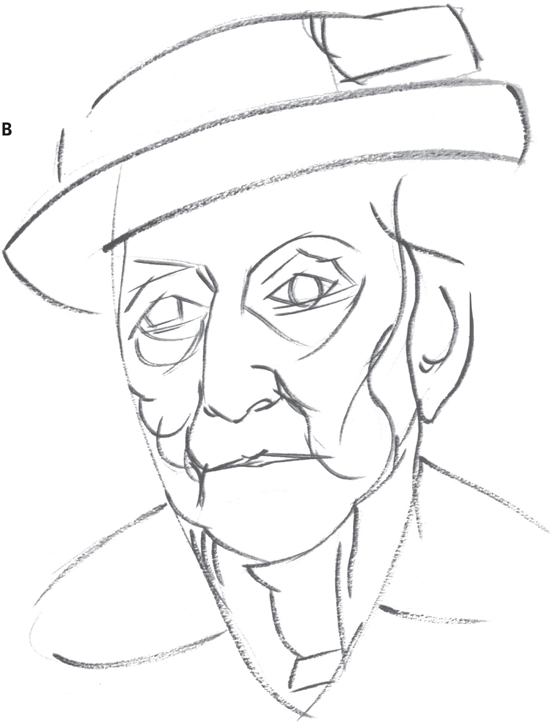
Be sure to include the pronounced creases around the mouth and under the eyes; these details give your subject character.

The small, sparkling eyes and fragile hand of this woman create an entirely different mood from the previous subject. Here the facial expression is more delicate, giving a feeling of compassion and sympathy.
Occasionally step back from your drawing to get a new perspective. Ask yourself if you’ve created the right mood and personality. If not, make adjustments!
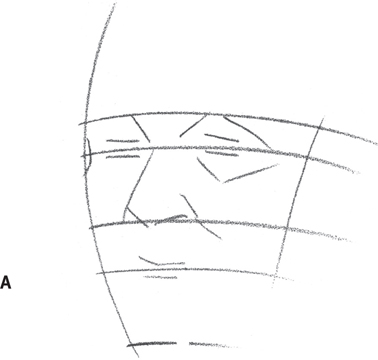
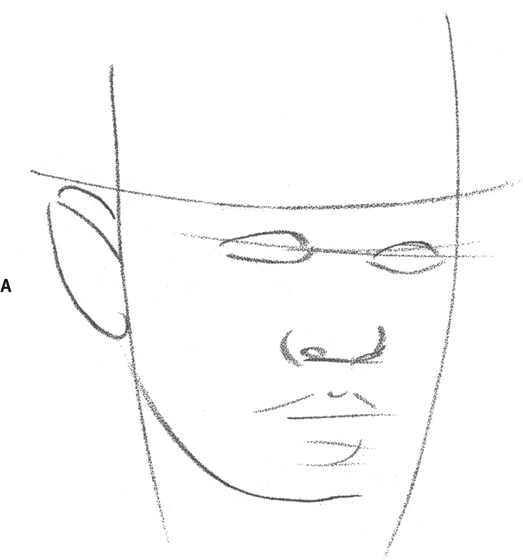
In step A, lay down the guidelines for the features, and lightly block in the ears, nose, and mouth. In steps B, C, and D, continue to develop the features, adding craggy lines for the wrinkles. In the final drawing, shade the face to create the aged appearance.


Hands can be difficult to draw. Study your own hands, and practice drawing them on scrap paper. Check the proportions to make sure your drawings are accurate. For example, the length of the hand is approximately equal to the length of the face. What other hand-proportion rules do you see?


Keep the head wrap simple; it provides a contrasting frame for the face.
Dark hatching strokes enhance the fragile, bony appearance of the hand.
ELDERLY MEN
Elderly men are good subjects for practicing a variety of techniques, such as drawing wrinkles, thinning white hair, and aging features. Pay close attention to the details to create an accurate rendering.

This model exhibits a somewhat worried expression; notice how the eyebrow angles down slightly in step A. Use bold lines to develop the features and hairline in step B. Begin shading with diagonal strokes, changing direction slightly to accommodate the uneven surface.


Coarse shading over the entire face creates the rough skin texture.
Top: Minimal shading on the head suggests thinning white hair. Middle: Notice the loose skin on the neck; the neck blends into the chin. Bottom: Indicate the shirt and tie to finish the drawing; the head shouldn’t appear as though it’s floating on the paper.
Two media were used for this drawing. A chisel-tipped 6B pencil was used for the shading on the face, and a brush and black India ink were used for the darkest details. Experiment with different drawing media to create new effects.
As always, begin with quick proportion guidelines. Then sketch the basic shapes of the features, including the bushy mustache. Keep referring to your subject, checking the proportions and shapes. When the sketch is to your liking, create form through shading.


When observing your subject, look for unique characteristics such as the pronounced brow and the bump on the nose.

Use a brush and ink to bring out fine strands in the hair, eyebrow, and mustache. Keep the shading to a minimum to indicate the white hair.
Practice will allow you to develop your own artistic style. Keep at it!

Shade the darkest areas first. Be sure to leave light areas for highlights.
PEOPLE OF THE WORLD
When drawing subjects of ethnic background, it is important to study their features and proportions closely. Although you may find some characteristics typical of a certain ethnicity, there still are many variances between individuals. Your observation skills will be tested with these drawings! For this young boy, begin as usual with guidelines and a block-in sketch. Look for the features that make the subject unique—for example, large, round eyes, a wide nose, and full lips. Notice that the eyes are especially dark in value, providing a striking contrast to the white highlights.


The slightly darker area here illustrates the cast shadow created by the bill of the cap.
The diverse population provides endless opportunities for drawing subjects; continue to observe people around you to challenge and improve your skills.
To render the dark skin, use charcoal or a soft-lead pencil to shade over the face with even, parallel strokes. Leave areas of white for highlights, especially on the tip of the nose and the center of the lower lip.
This Asian girl has her head tilted forward, which requires you to adjust the proportions. In this position, where the chin is close to the chest, the length of the face should be shortened, leaving a larger area for the top of the head. This adjustment is an example of fore-shortening. For further information on foreshortening, see Perspective (AL13) in Walter Foster’s Artist’s Library series.
Notice how the guidelines are altered in step A. Observe your subject closely to determine the differences. In steps B and C, develop the features, and suggest the hair and costume. Try using a brush and India ink, as shown in step D, to achieve the shiny black hair. Leave small white areas for highlights, enhancing the sheen of the hair.
Don’t try to draw from your imagination; always use a live model or photograph for reference.


The length of the face must be shortened because her head is tilted forward. The best way to master foreshortening is through plenty of practice!


Draw curved lines for the closed eyes, adding short, thick strokes for the lashes.

DEVELOPING YOUR OWN STYLE
These two subjects have distinctive characteristics that will lead to interesting artistic works. As you follow the steps, notice the manner in which the facial features are developed and how shading is used to add depth and create interest.
To develop your own artistic style, experiment with different techniques, and use all kinds of media. Try minimal shading or heavy shading; keep your lines loose or make them deliberate. It’s all up to you!


A dark background can be used to create the shape of the profile.


The unfinished areas of this drawing add an artistic element, focusing the viewer on the fine details of the face.
MALE FACES
A photo of a well-known artist served as the model for this sketch. In steps A and B, place the facial features according to the proportions. Develop some of the details in step C; then add some outlines for the hair.
Use a dry brush and a little ink to create “shading” lines for the final.

MALE FACES
#3 round watercolor brush
As you can see, the final drawing is fairly simple, yet it preserves the likeness of the person. More detail easily could be added, but you might lose the pleasing artistic quality the drawing has at this stage.
Although this face appears to be a difficult drawing subject, if you follow the step-by-step illustrations, you may be surprised at how well you do. When you reach step B, lightly sketch the wrinkles. Step C demonstrates how to use the paper stump to blend and shade the crevices. This combination of both lines and shading creates a terrific aged effect.


You can emphasize the wrinkles by drawing heavy lines over the blended shading.
Remember, one of the most common faults of beginners is lack of patience. Don’t expect your works to be as good as those of an experienced artist who has spent years learning the craft. Take your time, practice, and you’ll improve. Good luck, and enjoy yourself!