
4
Securing Virtual Machines
In the previous chapter, we covered recipes that allow you to provide secure remote access to Azure resources and minimize exposure to management ports on Azure Virtual Machines (VMs).
When we create Azure VMs or any Azure resource, we should take a defense-in-depth (DiD) approach. This means we should not rely on just the identity or network and remote access layers to secure our resources. We should, in addition, also apply protection controls at the resource layer, often referred to as workload protection.
This chapter will teach you how to secure and protect Azure VMs. We will break down the chapter into sections, covering using the VM Update Management service and protection through the Microsoft Antimalware service and disk encryption.
By the end of this chapter, you will have gained skills for securing Azure VMs through the following recipes:
- Implementing VM Update Management
- Implementing VM Microsoft Antimalware
- Implementing VM Azure Disk Encryption
Technical requirements
For this chapter, it is already assumed that you have an Azure AD tenancy and an Azure subscription from completing the recipes in previous chapters of this cookbook. If you skipped straight to this chapter, the information to create a new Azure AD tenancy and an Azure subscription for these recipes is included in the following list of requirements.
For this chapter, the following is required for the recipes:
- A device with a browser, such as Edge or Chrome, to access the Azure portal (https://portal.azure.com)
- An Azure AD tenancy and Azure subscription; you may use an existing subscription or sign up for free: https://azure.microsoft.com/en-us/free
- An Owner role for the Azure subscription
Implementing VM Update Management
Prevention is always better than cure. And so, it is always important to ensure the continued integrity of the software running on our VMs and to minimize the risk of a vulnerability being exploited.
Azure’s VM Update Management is part of the Azure Automation solution and can aid in managing the complex operations of tracking and remediating software patching for Azure and non-Azure VMs.
This recipe will teach you how to implement VM Update Management as part of Azure Automation for your Azure VMs.
Getting ready
This recipe requires the following:
- A device with a browser, such as Edge or Chrome, to access the Azure portal (https://portal.azure.com).
- Access to an Azure subscription, where you have access to the Owner role for the Azure subscription.
- An Azure Automation account to manage VMs; we will step through creating an Automation account as a Getting ready task.
- A Windows Server Azure VM to use with this recipe; we will step through creating this VM as a Getting ready task.
Continue with the following Getting ready tasks for this recipe:
- Creating an Automation account
- Creating a VM
Getting ready task – creating an Automation account
- Sign in to the Azure portal: https://portal.azure.com.
- From the top menu of the Azure portal, click Create a resource:
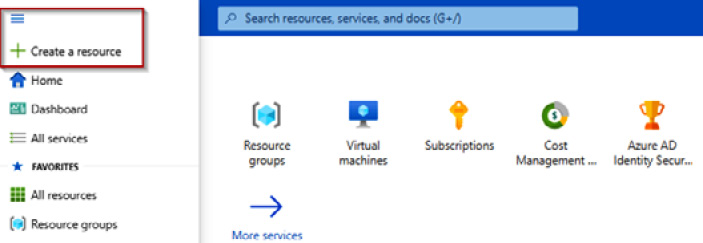
Figure 4.1 – Create a resource
- On the Create a resource screen, in the search box, type automation, select the Automation tile from the results, click Create, and click Automation:
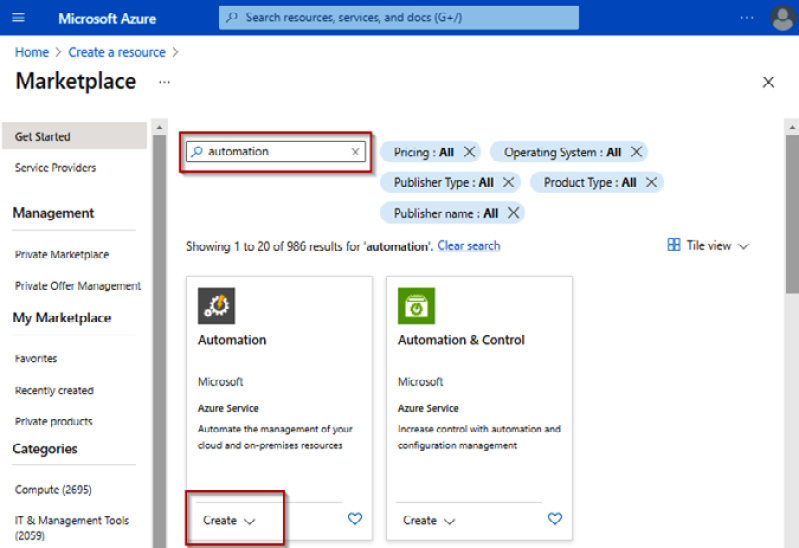
Figure 4.2 – Creating an Automation account
- From the Basics tab of the Create an Automation Account page, under the Project details section, set the Subscription type as required; and for the Resource group type, select Create new, enter a Name value, and click OK.
- Under the Instance details section, set as required the Automation account name and Region values.
- Click Review + create.
- Click Create on the Review + create tab.
- A notification will display that the resource deployment succeeded.
This Getting ready task is complete. Next, we will create a VM for use with this recipe.
Getting ready task – creating a VM
- In the search box in the Azure portal, type virtual machines, and select Virtual machines from the listed Services results.
- Click + Create from the top-left menu bar on the Virtual machine screen and select Azure virtual machine.
- From the Basics tab, under the Project details section, set the Subscription type as required. For the Resource group type, select the same resource group we created for the Automation account.
- Under Instance details, set the following:
- Virtual machine name: Type a name.
- Region: Select a region. VMs can exist in any region, irrespective of the Automation account region.
- Availability options: Select No infrastructure redundancy required.
- Security type: Select Standard.
- Image: Select Windows Server 2019 Datacenter – Gen2.
- Size: Leave the default (or set it as required to reduce recipe costs).
- Under Administrator account, set Username and Password values as required.
- Click Review + create.
- Click Create on the Review + create tab once validation has passed.
- A notification will display that the resource deployment succeeded.
- Click on Go to resource to open the VM page ready for the first task in this recipe.
The Getting ready tasks for this recipe are complete.
You are now ready to continue the main task for this recipe of enabling VM Update Management.
How to do it…
This recipe consists of the following task:
- Enabling Update Management from a VM
Task – enabling Update Management from a VM
- If you have not done so, navigate to the VM we created in the Getting ready task.
- From the VM page, click Updates under the Operations section:

Figure 4.3 – Created VM page
- From the Updates page, under the Updates using Automation section, click Go to Updates using automation:

Figure 4.4 – VM Updates page
- From the Update Management page, leave Log Analytics settings as the default, then select your Automation account subscription type as required. For the Automation account setting, please select the Automation account we created in the Getting ready task, then click Enable:

Figure 4.5 – Update Management settings

Figure 4.6 – Update Management deployment

Figure 4.7 – Deployment succeeded
- You can now start operating the Update Management solution:
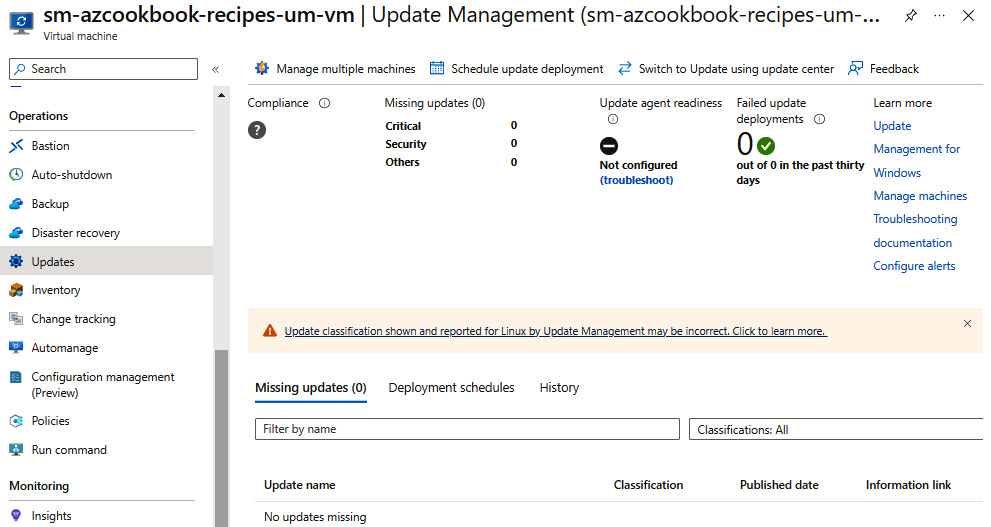
Figure 4.8 – Update Management solution page
This task to enable Update Management from a VM is now completed. In the next task, we'll clean up the resources created in this recipe.
Task – cleaning up resources
- In the search box in the Azure portal, type resource groups and select Resource Groups from the listed Services results.
- From the Resource groups page, select the resource group we created for this recipe, and click Delete resource group; this will delete all the resources created as part of this recipe:

Figure 4.9 – Delete resource group
This task, to clean up the resources created in this recipe, is complete.
How it works…
For this recipe, we looked at enabling the Update Management service, which provides a fully automated and monitored software update solution for Azure VMs. We looked at the scenario for enabling Update Management directly from an Azure VM.
Alternatively, if you need to enable Update Management at scale across many VMs, you can use an alternative method of enabling it from an Automation account. This method is described in the following Microsoft Learn article: https://learn.microsoft.com/en-us/azure/automation/update-management/enable-from-automation-account.
There’s more…
To operate the implemented Update Management solution, you can refer to the following Microsoft Learn articles:
- Manage updates and patches for your VMs: https://learn.microsoft.com/en-us/azure/automation/update-management/manage-updates-for-vm
- Troubleshoot Update Management issues: https://learn.microsoft.com/en-us/azure/automation/troubleshoot/update-management
In our recipe, all required permissions were assigned and inherited from the Owner role for our subscription. Working on the least privileges principle, you should only assign users the least access to perform their tasks in real-world environments.
Please refer to the following Microsoft Learn articles for more information:
- Permissions for enabling Update Management, and Change Tracking and Inventory from a VM: https://learn.microsoft.com/en-us/azure/automation/automation-role-based-access-control#feature-setup-permissions
- Azure Automation account authentication overview: https://learn.microsoft.com/en-us/azure/automation/automation-security-overview
See also
Should you require further information, you can refer to the following Microsoft Learn articles:
- Security best practices for IaaS workloads in Azure: https://learn.microsoft.com/en-us/azure/security/fundamentals/iaas
- Azure Virtual Machines security overview: https://learn.microsoft.com/en-us/azure/security/fundamentals/virtual-machines-overview
- Azure Automation documentation: https://learn.microsoft.com/en-us/azure/automation
- Manage updates and patches for your VMs: https://learn.microsoft.com/en-us/azure/automation/update-management/manage-updates-for-vm
- Configure Update Management: https://learn.microsoft.com/en-us/training/modules/host-security/7-update-management
Implementing VM Microsoft Antimalware
In implementing our DiD strategy, we have looked at recipes to protect our identities and networks and remediate any unpatched Azure VMs on the network.
Our next level of defense is a need for a security capability that will protect our VMs in real time from malicious software (malware) such as viruses, worms, and Trojans.
Microsoft Antimalware is a free built-in solution that offers a protection capability that alerts and remediates these malware threats in real time.
Getting ready
This recipe requires the following:
- A device with a browser, such as Edge or Chrome, to access the Azure portal (https://portal.azure.com)
- Access to an Azure subscription, where you have access to the Owner role for the Azure subscription
How to do it…
This recipe consists of the following task:
- Enabling Antimalware when creating a VM
Task – enabling Antimalware when creating a VM
- Sign in to the Azure portal: https://portal.azure.com.
- In the search box in the Azure portal, type virtual machines and select Virtual machines from the listed Services results.
- Click + Create from the top-left menu bar on the Virtual machine screen and select Azure virtual machine.
- From the Basics tab, under the Project details section, set the Subscription type as required.
- For the Resource group type, click Create new.
- Enter a Name value and click OK.
- Under Instance details, set the following:
- Virtual machine name: Type a name
- Region: Select a region
- Availability options: Select No infrastructure redundancy required
- Security type: Select Standard
- Image: Select Windows Server 2019 Datacenter – Gen2
- Size: Leave the default (or set it as required to reduce recipe costs)
- Under Administrator account, set Username and Password values as required.
- Click the Advanced tab to skip through the wizard to the configuration step we need for this recipe:

Figure 4.10 – Advanced tab
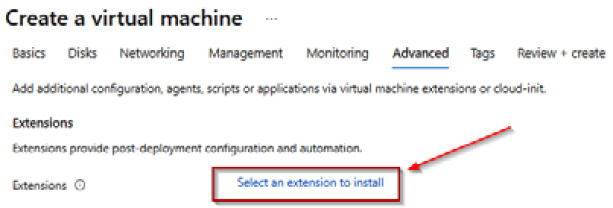
Figure 4.11 – Selecting extensions to install
- From the Install an Extension page, type microsoft antimalware in the search box, select Microsoft Antimalware from the results, and then click Next:
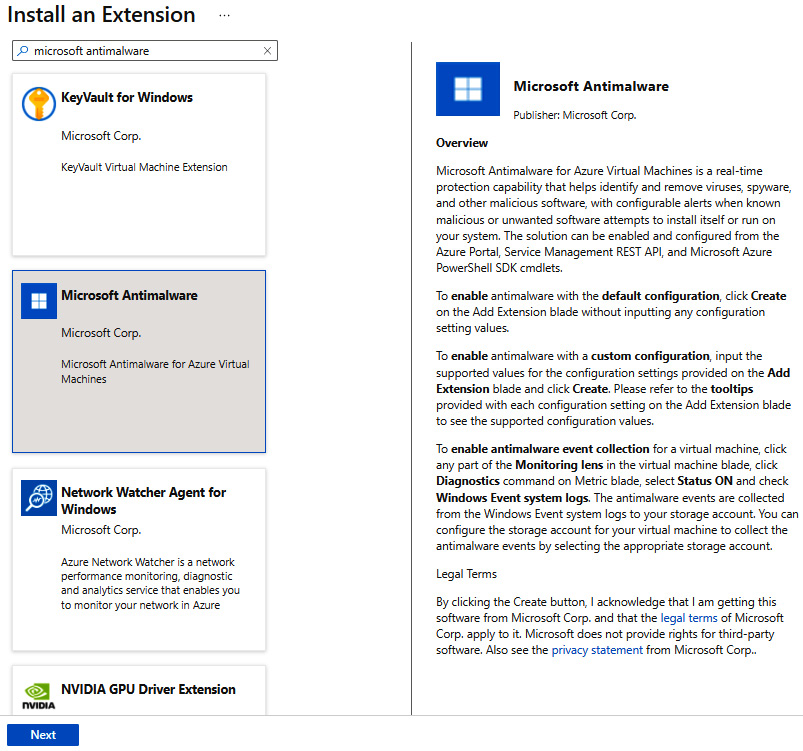
Figure 4.12 – Selecting an extension
- From the Configure Microsoft Antimalware Extension page, make the appropriate selections or leave the defaults, then click Create:

Figure 4.13 – Configuring the extension
- Click Review + create.
- Click Create on the Review + create tab once validation has passed.
- A notification will display that the resource deployment succeeded.
This task to install Antimalware when creating a VM is now completed. In the next task, we'll clean up the resources created in this recipe.
Task – cleaning up resources
- In the search box in the Azure portal, type resource groups and select Resource Groups from the listed Services results.
- From the Resource groups page, select the resource group we created for this recipe, and click Delete resource group; this will delete all the resources created as part of this recipe:

Figure 4.14 – Delete resource group
This task, to clean up the resources created in this recipe, is complete.
How it works…
For this recipe, we looked at implementing Microsoft Antimalware, which offers real-time protection against malware threats. The solution runs without human intervention as an automated and monitored background service.
We deployed the protection capabilities with the secure-by-default basic configuration; you may also implement more advanced custom configurations and Microsoft Defender for Endpoint for an even greater depth of protection.
See also
Should you require further information, you can refer to the following Microsoft Learn articles:
- Security best practices for IaaS workloads in Azure: https://learn.microsoft.com/en-us/azure/security/fundamentals/iaas
- Azure Virtual Machines security overview: https://learn.microsoft.com/en-us/azure/security/fundamentals/virtual-machines-overview
- Understand the malware threat: https://learn.microsoft.com/en-us/training/modules/secure-vms-with-azure-security-center/4-malware-protection
- Microsoft Antimalware for Azure Cloud Services and Virtual Machines: https://learn.microsoft.com/en-us/azure/security/fundamentals/antimalware
Implementing VM Azure Disk Encryption
Azure Disk Encryption (ADE) provides encryption of data on VM disks at rest in Azure Storage. The solution uses an integrated Azure Key Vault to store and manage the encryption keys.
Getting ready
This recipe requires the following:
- A device with a browser, such as Edge or Chrome, to access the Azure portal (https://portal.azure.com)
- You should sign in to an Azure subscription with the Owner role
Continue with the following Getting ready task for this recipe:
- Creating a VM
Getting ready task – creating a VM
- Sign in to the Azure portal: https://portal.azure.com.
- In the search box in the Azure portal, type virtual machines and select Virtual machines from the listed Services results.
- Click + Create from the top-left menu bar on the Virtual machine screen and select Azure virtual machine.
- From the Basics tab, under the Project details section, set the Subscription type as required.
- For the Resource group type, click Create new.
- Enter a Name value and click OK.
- Under Instance details, set the following:
- Virtual machine name: Type a name
- Region: Select a region
- Availability options: Select No infrastructure redundancy required
- Security type: Select Standard
- Image: Select Windows Server 2019 Datacenter – Gen2
- Size: Leave the default (or set it as required to reduce recipe costs)
- Under Administrator account, set Username and Password values as required.
- Click Next: Disks, then Next : Networking, then Next : Management, and finally, Next: Monitoring.
- From the Monitoring tab, check the Enable OS guest diagnostics box, and accept the default name for the new Diagnostics storage account entry:

Figure 4.15 – Enabling guest diagnostics
- Click Review + create.
- Click Create on the Review + create tab once validation has passed.
- A notification will display that the resource deployment succeeded.
- Click on the Go to resource button once you are ready to start the task of encrypting a VM:
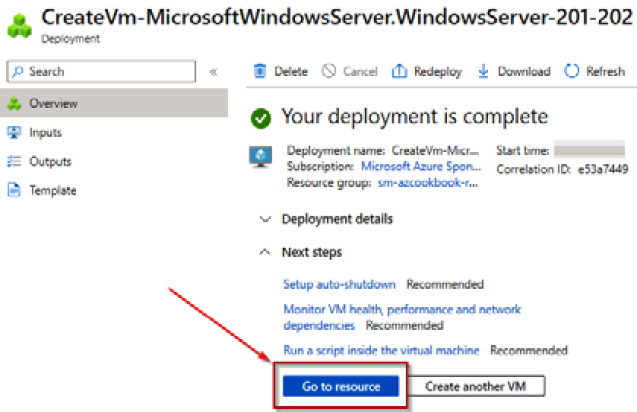
Figure 4.16 – Deployment complete
This Getting ready task, to create a VM for this recipe, is complete.
You are now ready to continue the main tasks for this recipe of encrypting a Windows VM using ADE.
How to do it…
This recipe consists of the following tasks:
- Encrypting a VM
Task – encrypting a VM
- From the screen of your VM in the Azure portal, click on Disks on the left-hand sidebar under the Settings section:

Figure 4.17 – VM page: disk selection
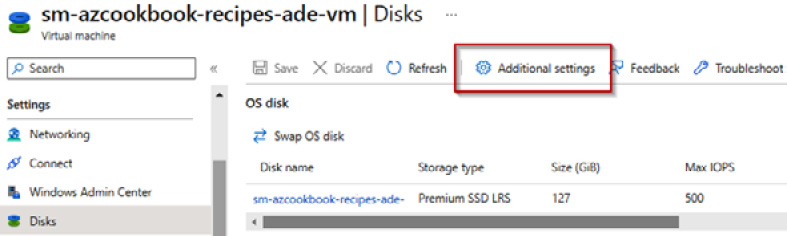
Figure 4.18 – Disks | Additional settings
- From the Disks settings page, under the Encryption settings section, click the dropdown for Disks to encrypt and select OS and data disks:

Figure 4.19 – Encryption settings
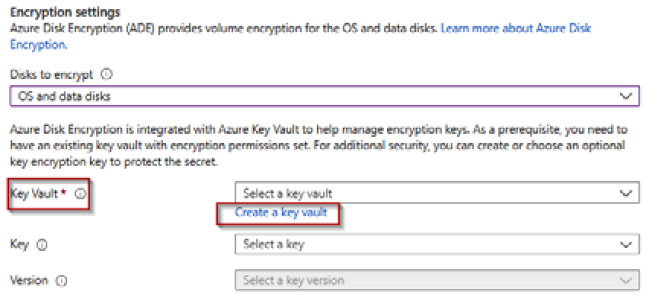
Figure 4.20 – Create a key vault
- From the Create a key vault page, on the Basics tab, under Instance details, enter as required a Key vault name value; this must be a unique name:
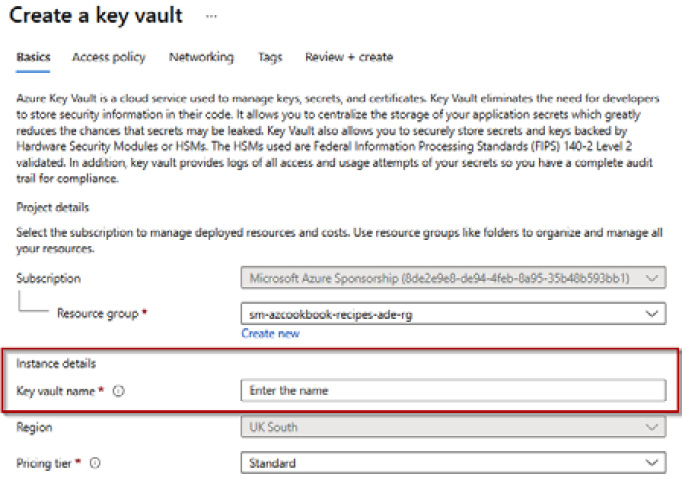
Figure 4.21 – Key vault settings
- Click Next to move to the Access policy tab.
- From the Access policy tab, under the Resource access section, check the Azure Disk Encryption for volume encryption box:

Figure 4.22 – Access policy
- Click Review + create.
- Click Create on the Review + create tab.
- Once the key vault has been successfully created, you will be returned to the Disk settings page.
- For the Key setting, click Create a key:

Figure 4.23 – Create a key
- From the Create a key page, enter the required Name value, then click Create:

Figure 4.24 – Key settings
- Once the key has been successfully created, you will be returned to the Disk settings page.
- Click Save.
- A notification will display that the disk encryption settings succeeded:
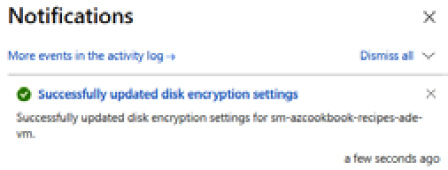
Figure 4.25 – Settings succeeded
- The encryption status of the VM disk volumes can be verified by running the following PowerShell command from Azure Cloud Shell:
Get-AzVmDiskEncryptionStatus -VMName MyVM -ResourceGroupName MyResourceGroup
The following screenshot shows the output of this command:
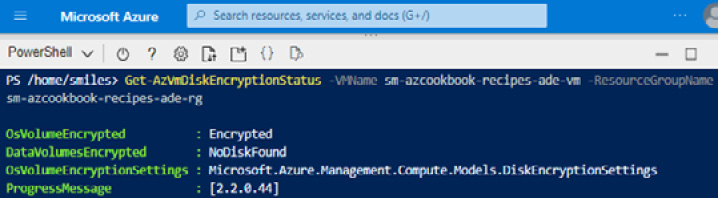
Figure 4.26 – Encryption status
This task of encrypting a Windows VM using ADE is complete. In the next task, we'll clean up the resources created in this recipe.
Task – cleaning up resources
- From Azure Cloud Shell, run the following PowerShell command:
Remove-AzResourceGroup -Name "myResourceGroup"
- Type Y or click Enter to accept removing the resource group:
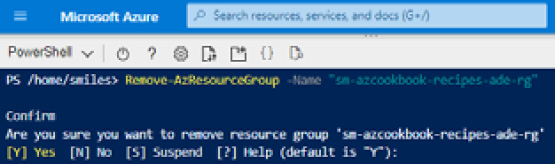
Figure 4.27 – Deleting a resource group
This task to clean up the resources created in this recipe is complete.
How it works…
For this recipe, we looked at implementing ADE using the Azure portal to provide encryption of data on VM disks at rest in Azure Storage. We created a VM and a key vault configured to store encryption keys and then encrypted the OS disk of the VM. We verified the OS disk had been encrypted with ADE using the following PowerShell command run from Cloud Shell:
Get-AzVmDiskEncryptionStatus
ADE provides volume-level encryption for all OSs and data disks attached to a VM and is zone resilient. ADE uses the Windows BitLocker feature, but you do not directly interact with BitLocker or use BitLocker to decrypt a VM that used ADE to perform the encryption.
The supported VMs and OSs are listed as follows:
- Generation 1 and 2 VMs
- VMs with SSD premium storage are also supported
- VMs with more than 2 GB of memory
- Client OS: Windows 8 and newer, including Windows 10 Enterprise multi-session
- Server OS: Windows Server 2008 R2 and newer
Please refer to the following Microsoft Learn article for unsupported scenarios:
You must ensure the following for the Windows VM to have ADE configured:
- Must be able to connect to the login.microsoftonline.com Azure AD endpoint
- Must be able to connect to the Azure Key Vault endpoint; please refer to https://learn.microsoft.com/en-us/azure/key-vault/general/access-behind-firewall
- Must be able to connect to an Azure Storage endpoint that hosts the Azure VM
There’s more…
In addition to ADE as a type of encryption available for managed disks, there are other options available, as follows:
The core difference between ADE and SSE is that ADE operates at the VM virtual hard disk (VHD) level, and only the VM that owns the disk can access the encrypted disk image. SSE operates at the physical disk level when the data is decrypted and loaded into memory when the data on the disk is accessed.
Further information on these additional encryption capabilities can be found in the following Microsoft Learn articles:
- Security best practices for IaaS workloads in Azure: https://learn.microsoft.com/en-us/azure/security/fundamentals/iaas
- Azure Virtual Machines security overview: https://learn.microsoft.com/en-us/azure/security/fundamentals/virtual-machines-overview
- Overview of managed disk encryption options: https://learn.microsoft.com/en-us/azure/virtual-machines/disk-encryption-overview
- Encryption options for protecting Windows and Linux VMs: https://learn.microsoft.com/en-us/training/modules/secure-your-azure-virtual-machine-disks/2-encryption-options-for-protecting-windows-and-linux-vms
See also
Should you require further information, you can refer to the following Microsoft Learn articles:
- Azure Disk Encryption for Windows VMs: https://learn.microsoft.com/en-us/azure/virtual-machines/windows/disk-encryption-overview
- Secure your Azure virtual machine disks: https://learn.microsoft.com/en-us/training/modules/secure-your-azure-virtual-machine-disks