
In This Chapter
Many system administration tasks are associated with a WebLogic Server, but at a high level they can be grouped into the following categories:
Creation of WebLogic domains and their associated WebLogic Servers
The management of the WebLogic domains and their associated hosted Web or Enterprise Java (J2EE) applications
The management and monitoring of WebLogic Server instances that constitute a WebLogic domain
The management of the resources and J2EE services that the domains and deployed applications utilize
WebLogic domain security
As described in Table 11.1, three very important administration tools span the entire spectrum of administration tasks you will need to perform with respect to WebLogic Server: the WebLogic Administration Console, the weblogic.Admin command-line utility, and the Domain Configuration Wizard.
Table 11.1. The Primary WebLogic Administration Tools
Tool Name | Description |
|---|---|
A Web browser-based graphical user interface for managing WebLogic Servers and their associated domains and applications. | |
A command-line Java utility for specifically managing WebLogic Server instances. However, you can also use this utility to manage and monitor the WebLogic Server domains by invoking methods against the WebLogic Server Mbeans, which requires you to understand the WebLogic Server Mbean architecture. | |
A Java client program for creating and configuring WebLogic Server domains based on predefined domain templates. |
From the administration tools listed in Table 11.1, the Domain Configuration Wizard is the only tool that does not directly interact with WebLogic Server. The primary role of the Domain Configuration Wizard is to create and configure the WebLogic domains, as well as provide the necessary scripts to start the instances of WebLogic Servers related to a specific WebLogic domain. Because these tasks are applicable to the installation process of WebLogic Server, a detailed discussion of the Configuration Wizard can be found in Chapter 10, “Installing and Configuring WebLogic Server 7.”
The following sections will focus on describing the WebLogic Administration Console and the weblogic.Admin command-line utility and the ways they can be used toward WebLogic Server system administration. A contextual overview of the WebLogic Server administration environment will also be provided so that you understand how these tools interact with WebLogic Servers and how your administration activities set specific attributes for WebLogic Servers in a domain through the Java Management Extension (JMX) API and WebLogic Server MBeans.
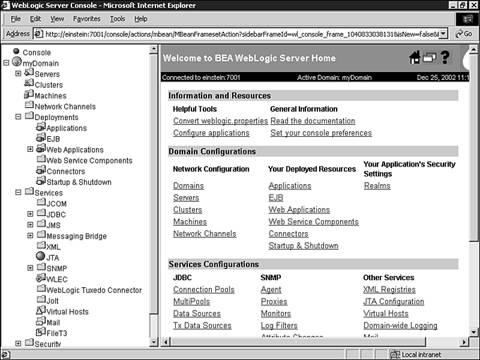
The Administration Console is the recommended tool for performing all system administration tasks related to WebLogic Server. As shown in Figure 11.1, the Administration Console provides an intuitive Web browser-based interface to a multitude of system administration tasks related to a WebLogic domain and its associated WebLogic Servers and applications.
The Administration Console exists as a JSP-based application that is hosted by an Administration Server assigned to a specific WebLogic domain. For this reason, before you can use the Administration Console, the Administration Server that is assigned to your WebLogic Domain must be started and running. If you have installed a standalone WebLogic Server using the Domain Configuration Wizard, as discussed in “The WebLogic Server Installation Process” section in Chapter 10, your WebLogic Server is already configured as an Administration Server. You can start your Administration Server by executing the startWebLogic.cmd script file in the root of your domain directory.
After you start your Administration Server, you can access the Administration Console through a Web browser (Netscape 4.x or higher, or Internet Explorer 4.x or higher) from any machine that has network access to the Administration Server by using one of the following URLs:
http://hostname:port/console (unsecured access)
https://hostname:port/console (secured access)
where
hostnameis the DNS name or IP address of the machine the Administration Server resides onportis the listening port of the Administration Server, which can be either secured (the default is 7001) or unsecured (the default is 7002)
For example, the following URL starts the Administration Console for an Administration Server that resides on a machine named EINSTEIN with the listening port set at the default 7001:
http://EINSTEIN:7001/console
Only if you specified localhost as the Administration Server’s listen address during its installation process can you launch the Administration Console using the following URL:
http://localhost:7001/console
Because an Administration Server is always assigned to a single WebLogic domain, the Administration Console can be used to manage only that active domain. If you need to manage multiple WebLogic Domains, you need to open separate instances of the Administration Console, with each console connecting to a different Administration Server managing a specific WebLogic domain.
After you launch the Administration Console, you need to log in using the System Administration username and password that was set when your Administration Server was created.
Through the Administration Console, you have full administrative control of an entire WebLogic domain and the associated WebLogic Servers. However, to use the Administration Console in a productive and intelligent manner, you must first understand how to navigate its interface.
As shown in Figure 11.2, the Administration Console interface is divided into left and right panes.

The left pane of the Administration Console provides a hierarchical navigation tree (Domain tree) for managing the Administration Console and the active WebLogic domain, including all associated WebLogic Servers and their resources. When you traverse and select a node in the Domain tree, the right pane of the Administration Console displays a table of data, configuration or monitoring information for that selection. Most of the pages displayed in the right pane provide easy-to-use intuitive guides for setting the attributes of the selected node in the Domain tree.
If a node in the Domain tree is preceded by a plus sign, you can click on the plus sign to expand the tree to access additional resources for that node. You can also right-click on certain nodes in the Domain tree to bring up a context menu of administration and monitoring tasks related to that node. For example, Figure 11.3 shows the context menu related to the Administration Server node named AdminServer.

If you need help in using the Administration Console for any reason, you can easily reference the online Administration Console Help system, as shown in Figure 11.4, by clicking the Help icon displayed in the top-right corner of the Administration Console.

Using the Administration Console requires you to first understand the task you want to perform, and the console’s interface provides you with the means to achieve that goal. Because this chapter assumes you have just recently been exposed to WebLogic Server, we’ve provided a simple example to demonstrate how you can set the machine name of the Administration Server.
Follow these steps to configure the machine name for your Administration Server using the Administration Console:
Launch your Administration Console so that it connects to your WebLogic Administration Server.
Enter a valid administration username and password.
Expand your domain tree.
Select the Machines node and click the Configure a New Machine link in the right pane.
In the displayed Configuration, General tab, as shown in Figure 11.5, enter the machine name you want to assign to your Administration Server and click Create.
Select the Configuration, Servers tab and select your Administration Server as the server that runs on that machine, as illustrated in Figure 11.6. Then click Apply.

After you create your machine configuration, you will see it listed under the Machines node in your Domain tree.

The weblogic.Admin command-line utility provides a suite of useful functions that can be used toward the system administration of a WebLogic Server domain. It is an alternative to using the Administration Console, especially if you prefer to use the command line as opposed to a Web browser interface, or the Web browser is just not available.
The syntax and required arguments for using weblogic.Admin are as follows:
java weblogic.Admin [-url URL] [-username username] [-password password]
COMMAND arguments
where
URLspecifies the WebLogic Server host including the TCP port at which Administration Server is listening for client requests. The format for the URL argument ishostname:port; for examplelocalhost:7001.usernamespecifies a username with access to the Administration Server.passwordspecifies a password for theusername.COMMAND argumentsspecifies the command syntax and arguments for a WebLogic Server administration task.
Before you select the weblogic.Admin utility as your primary administration tool, review the following guidelines for its usage:
The machine from which you use the
weblogic.Adminutility must have WebLogic Server software installed to be able to execute theweblogic.Adminclass.If you have satisfied the first guideline and will be performing system administration from a remote machine, you need to enable HTTP Tunneling on the Administration Server, as shown in Figure 11.7. The procedure to enable HTTP Tunneling requires that you restart the Administration Server.
The
weblogic.Adminutility comes with several useful functions for managing WebLogic Servers in a domain. However, to achieve the administration capabilities provided by the Administration Console, you need to understand the internal administration infrastructure of WebLogic Server.

Note
▸ For a brief discussion of the internal administration infrastructure of WebLogic Server, see “Administering a WebLogic Domain from an Infrastructure Perspective,” p. 782.
Embracing the preceding guidelines, until you become familiar with the management infrastructure provided by WebLogic Server, you should use the weblogic.Admin utility for those tasks where the functionality is already provided for you in the form of commands or for tasks for which you have predeveloped and tested scripts.
This section describes the syntax and required arguments for using the more commonly used weblogic.Admin utility commands. To execute these commands, you must first ensure that your Java CLASSPATH environment variable is set correctly. You can easily perform this task by executing the setEnv script file that is automatically generated for you when you created your WebLogic domains.
All the commands listed in this section have a URL argument to specify the target WebLogic Server. If you omit this argument where they are optional, the value defaults to t3://localhost:7001.
CONNECT The CONNECT command allows you to test a connection with a WebLogic Server from a client machine. You specify the number of connections you want to test, and it returns the round-trip time for each connection and the total time each connection was maintained.
Syntax:
java weblogic.Admin [-url URL] [-username username][-password password] CONNECT
 count
where connect specifies the number of connections you want to test.
FORCESHUTDOWN The FORCESHUTDOWN command instructs a WebLogic Server to terminate immediately. When it actually terminates depends on the timeout period set for WebLogic Server, which provides a grace period for any existing transactions to complete.
Syntax:
java weblogic.Admin [-url URL] [-username username][-password password] FORCESHUTDOWN [targetserver]
where targetserver specifies the name of the server to shut down. If you do not specify a value, the command shuts down the server that you specified in the -url argument.
GETSTATE The GETSTATE command returns the current state of WebLogic Server.
Syntax:
java weblogic.Admin [-url URL] [-username username][-password password] GETSTATE targetserver
where targetserver specifies the name of the server to shut down. If you do not specify a value, the command shuts down the server that you specified in the -url argument.
HELP The HELP command provides the syntax and usage information of all or a specific weblogic.Admin utility commands.
Syntax:
java weblogic.Admin HELP [COMMAND]
LICENSES The LICENSES command lists all the WebLogic-licensed products installed for a specific WebLogic Server from the BEA License file.
Syntax:
java weblogic.Admin [-url URL] [-username username][-password password] LICENSES
The PING command allows you to confirm that WebLogic Server is available to accept client requests and to test the speed of the network connectivity between the client and WebLogic Server.
PING can be used as an alternative to the CONNECT command.
Syntax:
java weblogic.Admin [-url URL] [-username username][-password password] PING [round_trips] [message_length]
where round_trips specifies the number of round-trip connections (pings) to test and message_length specifies the size of the message packet to send with each ping; the packet must be less than 10MB.
SERVERLOG The SERVERLOG command allows you to display the contents of a log file that is generated by an Administration or Managed Server depending on the URL you provide as an argument.
Syntax:
java.weblogic.Admin [-url URL] [-username username][-password password] SERVERLOG [[starttime]|[endtime]]
where starttime and endtime (optional) specify the start and end times of message entries you want to extract from the log file, both in the format yyyy/mm/dd hh:mm.
SHUTDOWN The SHUTDOWN command allows you to shut down a specified WebLogic Server. When it actually shuts down depends on the timeout period set for WebLogic Server, which provides a grace period for any existing transactions to complete.
Syntax:
java weblogic.Admin [-url URL] [-username username][-password password] SHUTDOWN [targetserver]
where targetserver should be specified only if the WebLogic Server you want to shut down is another configured WebLogic Server in the same domain as the Administration Server provided by the URL.
VERSION The VERSION command displays the version of WebLogic Server software that is running on the machine specified by the URL.
java weblogic.Admin -url URL -username username -password password VERSION
As a Java developer learning to build J2EE applications, you will encounter your most tedious nonprogramming tasks in the realm of assembling, packaging, and deploying your J2EE components and applications to WebLogic Server.
All WebLogic Server applications and components need to conform to the J2EE specification for their assembly and packaging tasks. However, the way an application is deployed is governed by the deployment requirements of WebLogic Server because WebLogic-specific runtime configurations may need to be specified, such as HTTP session parameters, resource references, security role assignments, and container attributes. The J2EE specification does not govern how a J2EE application is deployed, only how it is assembled and packaged.
WebLogic Server provides four tools that can be leveraged to ensure your J2EE modules or applications are assembled and deployed in a J2EE- and WebLogic Server–compliant manner. These tools are described in the following sections.
The WebLogic Builder tool is a new addition to the WebLogic suite of deployment tools. It is a Java-based graphical application that you can use to
Assemble a J2EE component or application for deployment
Create and edit a J2EE component or application deployment descriptors
Compile and validate the deployment descriptors
Deploy a J2EE module or application to WebLogic Server
The EJBGen utility is a command-line Enterprise Java Beans 2.0 code generator. If you have annotated your Bean class file with javadoc tags, you can use the EJBGen tool to generate the Remote and Home classes as well as the deployment descriptor files for an EJB application.
The weblogic.Deployer utility is a command-line deployment utility that can be used to deploy J2EE modules and applications to WebLogic Server by directly interfacing with the WebLogic Server deployment API. If you intend to automate your deployment process, you can easily embed the weblogic.Deployer utility commands inside a batch or shell script, which can then be invoked from the command line.
The Administration Console provides the same deployment functionality as the WebLogic Builder and weblogic.Deployer utility, but through a Web browser. However, there is one limitation of using the Administration Console: The file system where the EAR, WAR, JAR, or RAR files reside must be accessible to the WebLogic Server machine.
This section showcases ways you can create, package, assemble, and deploy a simple Web application using the WebLogic Builder. Because this may be your first J2EE Web application, details of each step are discussed briefly. However, there is a detailed discussion of deploying Web and Enterprise applications to the WebLogic Server in Chapter 27, “Packaging, Assembling, and Deploying J2EE Applications.”
A typical Web application is composed of the following elements:
One or more J2EE Web components such as servlets and JavaServer Pages (JSPs).
Application resources such as JSP tag libraries, HTML pages, and image files.
An application-specific XML-based deployment descriptor file named
web.xml, which lists your application’s J2EE components and their configurations as J2EE modules. Each J2EE module is a collection of one or more J2EE components of the same container type (Web or EJB) that are represented by one component deployment descriptor for that type in theweb.xmlfile.A WebLogic-specific deployment descriptor file named
weblogic.xml, which defines how named resources in theweb.xmlfile are mapped to WebLogic Server resources. Examples ofweblogic.xmlattributes include HTTP session parameters, HTTP cookie parameters, JSP parameters, resource references, security role assignments, and container attributes.
The HelloWorldApp example described in the following sections is composed of a Welcome HTML page and a servlet, which returns a Hello World HTML page to your Web browser upon invocation. You will use the WebLogic Builder to generate the application deployment descriptors (web.xml and weblogic.xml) and then assemble the application resources into an exploded directory format, which will then be deployed to WebLogic Server.
Follow the steps described in these sections to create, package, assemble, and deploy your first Web application to WebLogic Server.
All J2EE Web applications use a standard hierarchical directory structure to maintain their application resources (servlets, classes, static files, and other resources). This directory structure is described in Table 11.2.
Table 11.2. The Hierarchical Directory Structure of a Web Application
The directory structure described in Table 11.2 complies with the J2EE specification and provides the foundation to assemble and deploy your Web application with any one of the following methods:
Creating a 1WAR archive file of the contents of the document root directory, including all subdirectories. This deployment format allows you to deploy the Web application from a remote machine directly to the Administration Server, which can then propagate the Web application as a WAR file to any of its Managed Servers.
Deploying the Web application as a collection of class files directly from the Web application directory. This type of deployment is known as the exploded directory format of deployment and requires the Web application directory to exist on the same machine as the target Administration Server. This is the method you will use to deploy your Web application.
WebLogic provides a default Web applications directory named applications, which you can find under your WebLogic Server domain directory. For the purposes of following this example, create a directory structure as specified in Table 11.2, using the name HelloWorldApp as your document root. Your HelloWorldApp application directory should resemble Figure 11.8.

Typically, a Web application contains a Welcome page as an entry point to a Web application. Even though this example is relatively simple, you can create a Welcome page to call the servlet you will create shortly.
Use the following HTML to create your Welcome page and save the HTML file as index.html in the root of your HelloWorldApp directory:
<html>
<head>
<title>Welcome to my HelloWorldApp</title>
</head>
<body>
<p> This is the default welcome page for this example.
<p> <a href="./MyServlet">Click here</a> to call the Hello World servlet.
</body>
</html>
A complete discussion of servlets is outside the scope of this book. However, for the purposes of this example, follow these steps to create and compile a servlet named MyServlet, which is part of a package named objectmind.servlets:
Open a text editor and enter the following Java code:
package objectmind.servlets;

import javax.servlet.*;
import javax.servlet.http.*;
import java.io.*;

public class MyServlet extends HttpServlet {
 public void service(HttpServletRequest req,
           HttpServletResponse res)
    throws IOException
 {
  res.setContentType("text/html");
  PrintWriter out = res.getWriter();
  out.println("<html><head><title>" +
        "Hello World!</title></head>");
  out.println("<body><h1>Hello World!</h1></body></html>");
 }
}
Save the Java code as a file named
MyServlet.javain the root of yourHelloWorldAppdirectory.From the command line, change the directory to your
HelloWorldAppdirectory and set up your Java environment by invoking thesetEnvscript.From the command line in your
HelloWorldAppdirectory, compile theMyServlet.javafile using the followingjavacsyntax:javac -d WEB-INF/classes MyServlet.java
This command creates the
MyServlet.classfile in a directory structure under theWeb-INF/classesdirectory according to the package name.
Now that you have created your J2EE components and HTML files, it is time to start using the WebLogic Builder to assemble and deploy your Web application.
Start the WebLogic Builder by choosing Start, Programs, BEA WebLogic Platform 7.0, WebLogic Server 7.0, WebLogic Builder.
Alternatively, you can start the WebLogic Builder from the command line by using the following command:
startWLBuilder.cmd
After the WebLogic Builder is launched, choose File, Open. From the dialog box, you can select an exploded or archived J2EE module. For this example, you have so far partially created an exploded Web application. Hence, select the HelloWorldApp directory, as shown in Figure 11.9, and click Open.

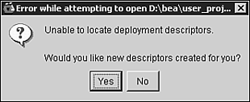
After you click Open, the WebLogic Builder tries to locate and read any deployment descriptors associated with the J2EE module that you have selected to open. Because you have not created any deployment descriptors yet, the WebLogic Builder prompts you to allow it to search for Web modules or classes in your application directory and create the deployment descriptors for you, as shown in Figure 11.10. Click Yes.
When you open the HelloWorldApp module in the WebLogic Builder, you see a screen similar to Figure 11.11.
The WebLogic Builder screen is divided into the following panes:
The left pane is a hierarchical tree representation of the J2EE module you have opened. You can use this pane to explore and select the components of your Web application.
The right pane consists of tabbed panels with fields and other controls for editing the deployment descriptor elements of the J2EE module.
The bottom pane is activated through the View menu. You can use this pane to see information and error messages generated by the WebLogic Builder during the opening, creation, or deployment of a J2EE module.
The WebLogic Builder does its best in ensuring the values assigned to the deployment descriptor elements in the web.xml and weblogic.xml files are correct. However, because they are auto-generated, often you will need to create, modify, or delete certain deployment descriptor elements.
You can edit the deployment descriptors using the WebLogic Builder, or you can directly edit the web.xml and weblogic.xml files using an XML editor, such as the BEA XML Editor. In this example, you will edit the deployment descriptor files using the WebLogic Builder.
Because you have just created your deployment descriptors, to physically save them to your WEB-INF directory, you need to save your J2EE module. After you complete this save operation, you will see the web.xml and weblogic.xml files in the root of your WEB-INF directory.
Up to now, you have partially created the HelloWorldApp Web application. The next step is to assemble the components of the application (servlets and HTML pages) so they are reflected in the deployment descriptors as one Web application. Follow these steps to assemble your HelloWorldApp application:
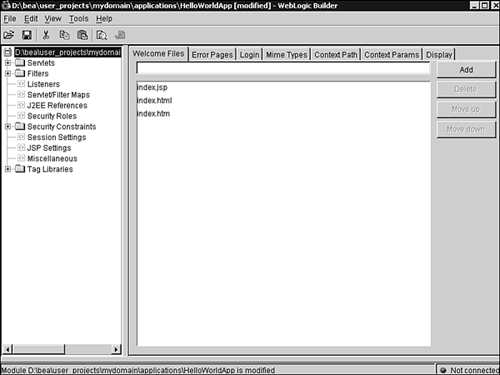
Because you have created a Welcome page named
index.html, you need to specify it in the WebLogic Builder. Select theHelloWorldAppidentifier in the left pane, and in the corresponding Welcome Files tab, remove theindex.jspandindex.htmfiles so that theindex.htmlfile is explicitly stated as the Welcome page, as illustrated in Figure 11.12.So far, the
MyServletservlet has only been compiled and placed into an appropriate directory structure under theWEB-INFdirectory. When you allowed the WebLogic Builder to create the deployment descriptors, it should have automatically discovered yourMyServletservlet and added an entry to theWeb.xmlfile as a J2EE component of your Web application.To ensure this procedure occurred and the appropriate entries were specified as default by the WebLogic Builder, select the Servlets folder in the left pane. If the
MyServletnode exists, select it and ensure the following information is specified correctly, as illustrated in Figure 11.13.Servlet Name=
MyServletServer Class =
objectmind.servlets.MyServletURL Mappings =
/MyServlet/*
If the
MyServletservlet has not been discovered by the WebLogic Builder, click Add in the corresponding right pane. This operation launches a window for you to add the preceding information.The URL Mapping allows you to call the servlet directly from a Web browser after the Web application is deployed, thus allowing you to test the operation of a servlet. After you validate or enter your
MyServletinformation, click OK.Now save your deployment descriptors by choosing File, Save. Your simple
HelloWorldAppapplication is now assembled and ready to be deployed.


You have two options for deploying your HelloWorldApp application. Either you can create a WAR archive file of the entire contents of the HelloWorldApp directory, or you can deploy your application directly from the HelloWorldApp directory as long as the target Administration Server is hosted locally. This exploded directory deployment is possible because the web.xml and weblogic.xml deployment descriptors have been created and edited to reflect the J2EE components and other files that constitute your Web application.
Note
If you have enabled WebLogic autodeployment using -Dweblogic.ProductionModeEnabled=false, your application will automatically be deployed. However, the .jar, .war, and .ear files of the exploded directory must be contained within the applications directory.
The difference between these two deployment methods in the WebLogic Builder is that in an exploded directory deployment, the name of the Web application is stated by the name of the document root directory, which in this case is HelloWorldApp. In the WAR archive deployment method, the name of the Web application is governed by the name you assign to the WAR archive file, and you can deploy the Web application to a remote Administration Server.
The following steps will guide you through the deployment procedures for your exploded directory Web application:
Connect to the target WebLogic Administration Server by choosing Tools, Connect to Server. In the launched dialog box, enter your specific WebLogic connection information, as shown in Figure 11.14, and click Connect.
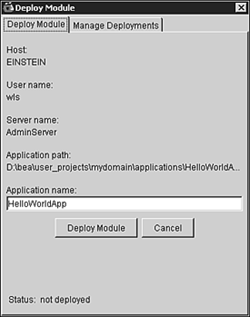
To deploy your Web application, select Tools, Deploy Module. From the launched Deploy screen, as shown in Figure 11.15, click Deploy to initiate deployment of your
HelloWorldAppapplication to WebLogic Server.

To validate your application has been deployed, you can open the Deploy screen by choosing Tools, Deploy Module and clicking the Manage Deployments tab. Here, you can validate the status of your Web application on WebLogic Server. If it does not appear to be deployed, highlight your HelloWorldApp application and click Deploy.
You can test your Web application by typing the following URL in your Web browser:
http://<machine_name>:7001/HelloWorldApp
where machine_name specifies your WebLogic Server’s DNS name or IP address. This URL should launch your Welcome page, as shown in Figure 11.16.

Click the Click here link to invoke your MyServlet servlet to display the Hello World! HTML page. Alternatively, you can invoke it by using the following URL:
http://<machine_name>:7001/HelloWorldApp/Myserlet
In the preceding chapter, you learned how to create and configure WebLogic Server, so the next logical learning step was to understand and experience the tools that support WebLogic Server. Such a discussion of these tools is important early in your WebLogic learning experience because, like most tools, they are there to provide you with an efficient mechanism to perform specific tasks in the context of the WebLogic Server environment.
Many tools come bundled with WebLogic Server. To keep this chapter concise and immediately applicable to the competency you need to practically use WebLogic Server, we focused only on those tools that support two very important operational tasks that are core to WebLogic Server:
The administration of WebLogic Server
The deployment of J2EE-based applications into WebLogic Server domains
For information regarding WebLogic Server tools that fall outside WebLogic Server deployment and administration, you will need to refer to the WebLogic Server documentation.