
In This Chapter
Everyone typically has his or her own approach to learning to program and gaining competency in a specific language, and the Java programming language is no exception to that rule. There are many techniques you can use to exercise your programming skills, but developing software consistently through proven programming standards and best practices is generally the best avenue to take towards guaranteeing competency and success.
Any BEA WebLogic application development effort is in essence a Java-based project, and will require you to develop or inherit a standardized framework consisting of rules and best practices that will regulate how the Java software is developed. This development framework will need to be well thought out and embraced by all the Java developers on the project in order for them to concentrate on design and code in a consistent and fluent fashion.
The focus of this chapter is to provide proven Java programming development standards and best practices that you can use to ensure that a development framework is in place prior to the launch of any Java coding effort. Hence, this chapter has been methodically approached through the following five main sections:
Project Standards, which describes a number of issues that need to be addressed before software development starts.
Java Namespaces and Directories, which describes Java package naming and the directory layout for Java programs including source code control systems.
Java Style Guidelines, which describes a recommended set of style rules to achieve clarity and uniformity for Java source code.
Java Programming Guidelines, which describes a set of Java coding practices for writing easy-to-understand software and identifying areas where Java programs can be optimized.
The Java Development Process, which describes an incremental approach to software development, a dynamic design and coding process that is crucial to the successful deployment and maintenance of Java software.
The purpose of this section is to identify project-related issues that must be addressed before initiating any Java software development effort. The decisions made during this phase will determine the working environment for the Java developer.
Before any coding begins, you must know the answers to two questions:
What are your project objectives?
When and how is the project to be completed?
The answers to these questions affect all Java-related product choices and development methodology decisions.
The project objectives are derived through a business diagnosis study, which concludes with a recommendation that one or more business processes can be improved. This task is typically conducted with business analysts who understand the value proposition of the business domain under investigation.
Note
Only when you understand the value proposition of a business domain can you actually determine whether the proposition is being delivered efficiently.
Once it is determined that a business process can be improved, a project team is formed to begin to assess what kind of business process re-engineering effort is required: social, technical, or a combination of the two. This effort is typically referred to as the Project Inception phase, where the objectives (mission) and feasibility of the project are reconciled. It is imperative for the project objectives to be declared in a clear and concise manner to avoid any misinterpretations by the recipient community who will be giving the green light to go ahead with the project.
If the project is feasible, one of the deliverables of the Project Inception phase should be an initial draft of a project plan that explains at a very high level the tasks required to implement the objectives, as well as a ballpark timeline as to when the respective tasks and overall project will be completed.
The actual timeline of the project is affected by two factors:
Note
For a comprehensive review of methodologies that are best suited for Java software development, please see Chapter 2, “J2EE Software Development Methodologies.”
In essence the software methodology should be qualified by the business delivery requirements, and hence must be considered and selected before development starts. It is extremely valuable to follow an application development methodology from the beginning of a project because it is much more difficult to adopt a new methodology in the middle of a project. Only the new parts of the project will be following the methodology, whereas the other parts are under a different methodology, or are simply the result of ad hoc programming without any methodology.
Many factors come into play when choosing software products for a project. Primary among these factors is your company’s existing environment and standards, and hence you may not have a choice in the product you use. Some of the other major factors include the following:
Your staff’s current experience with a product
A product’s capability to integrate with your legacy systems
The cost of the development products and their respective licensing and maintenance criteria
The learning curve and respective cost required to master a product
The maturity level of a product as well as its industry adoption rate
The financial stability of the company providing the software
Note
For a detailed list of J2EE project attributes, please see Chapter 1, “Understanding the Java 2 Platform, Enterprise Edition.”
When researching a product, ask colleagues for personal recommendations and join newsgroups to gather other opinions regarding a product. Find out, from the vendor or your other sources, about successful implementations where a product was used. If you still have questions about a product that is critical to your project, establish a working relationship with a training company specializing in the product. The trainers generally know the technology and can provide insights into its proper usage that you would obtain only through trial and error.
Initially, it is good practice to list the types of products you will be considering within your Java development effort:
Java SDK (such as Java SDK 1.2, 1.3...). Application servers, like WebLogic, usually ship with the Java SDK.
Legacy software and connection products (such as OrbixWeb, MQSeries, internally developed library of classes, and so on). Refer to Chapter 33, “Introducing WebLogic Integration (WLI),” for components that provide a standards-based approach to existing legacy systems.
Design tools (such as Rational Rose, TogetherSoft Control Center, DB design tools, and so on)
Source code control (such as CVS, Clearcase, Visual Source Safe, and so on)
Java IDEs (such as Together ControlCenter, VisualCafe, JBuilder, Forte, JDeveloper, and so on)
Portal products (such as WebLogic Portal) that provide personalized access to information and applications.
Note
Please refer to the product vendors to verify the current version and release of these software products.
After you have identified the products that will potentially be used in your development effort, gather the following information for each product:
The name and version number for the product.
A time estimate as to when the release will no longer be supported.
For products that are interdependent, list the release versions of those products.
This information will enable you to make intelligent choices about which versions of the products to use. In most cases, an evaluation copy of the product can be downloaded. You should contact the sales account managers from the product company to bring in the systems engineers to present or demonstrate the prospective products and show how the vendor’s products all work together. You should be able to identify any compatibility issues, either now or in the near future, that could affect your delivery date. More importantly, you should be able to determine whether a vendor’s planned release date, with a potential schedule slip, has an impact on your own critical path.
Choosing a software build and source control system are two very important decisions when starting a project. Many projects have these options determined by corporate standards. If you do not already have a source code control system and a software build process, do not underestimate the work involved in getting them in place and do not underestimate the negative impact on your project if you do a poor job.
That said, allocate enough resources to create an easy-to-follow system for building and maintaining your source code. Your source code control system should work hand-in-hand with the procedures for performing system builds. When you have a working system, make sure to create instructions on how to set up and use the system. Provide cookbook instructions covering the day-to-day operations for developers. Also, create a dummy area in your source control system where developers trying to learn the system can practice without doing real damage.
The idea is to simplify compiling and testing as much as possible for the developers. This issue is directly addressed by Integrated Development Environments (IDEs) for Java. For example, the Together ControlCenter design tool includes built-in support for building and packaging the application for a particular platform. If the command-line compiler is being used from the Java SDK, scripts or make files should be developed to ensure that the environment being used for the build is under version control. The development environment and version control systems are discussed later in this chapter.
If you end up requiring the developers to use the make utility, provide build templates and a working demo. Be sure you cover other than the most trivial cases, as make’s error messages (or lack there of) are notoriously cryptic. A trivial application is one that contains all of its source code in a single directory. Enterprise applications are not trivial. Hence, the make file template must provide access to all the tools and libraries required by the developer.
The first step in software development, after at least an initial high-level detailed design, should be the creation of an environment for programming, compiling, testing, and running your applications. An environment at the most basic level consists of directories, control parameters (commonly called environmental variables), and programs. The programs are the software products you have chosen. These are usually installed in their own directory structures, with their own sets of environment variables. It is your task to create a development and runtime environment around these products.
The directory structure should accommodate both the system and the individual developer’s needs. The directories of the individual developers should mirror those of the project wherever possible. The importance of normalizing the directory structures is twofold:
Application and system builds are simplified and more manageable.
Each developers’ environment is the same, which allows them to exchange software and work closely together when writing and testing programs.
Most source control systems will enable the developer to set his own working directory on his machine, and this can vary from one developer’s machine to another. However, the directory structure under that working directory for a specific project should be mirrored against the structure in the source control system.
Figure 4.1 shows a developer’s configuration containing most of the necessary directories.

You should note the following points about Figure 4.1:
Project Name is the login directory for the developer.
The classes directory contains the output classes from the Java compiler. These classes are also used during testing. The directory underlying the classes directory is discussed in the “Java Namespaces and Directory Structure” section.
The config directory contains files used for application-specific configuration setup.
The data directory contains application-specific non-configuration data.
The docs directory contains application specific documentation files.
The lib directory contains files used at runtime, such as JAR files or library binaries.
The prototypes directory holds source code used for testing software. You do not want to mix this up with the deliverable source code.
The source directory contains all of the deliverable source code. The directory underlying the source directory is discussed in the “Java Namespaces and Directory Structure” section.
It is important to become familiar with the development environment and the respective environment variables that can be used to customize your environment. The most important environment variables are PATH and CLASSPATH:
It is important that these variables do not contain references to obsolete or improper versions of the software. The following list provides instructions to identify the Java development environment on a Windows system:
Create a text-based setenv.bat script. For example, see the sample setenv scripts provided with WebLogic Server.
Open a command shell window.
Go to the directory where the setenv script is located.
Execute the setenv.bat script from the command line. This will set the environment variables such as
PATHandCLASSPATH, as illustrated in Figure 4.2.To check what version of the Java SDK you are using, execute the following command:
java -version
For example, Figure 4.3 shows that the version of the Java SDK is 1.3.1_06 and the BEA WebLogic JRockit Virtual Machine is the default JVM.
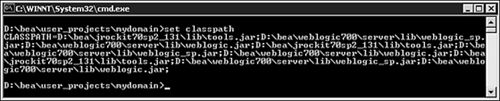
To check what JARs and directories are on the
CLASSPATHenvironment variable, execute the following command:

set classpath

Figure 4.4 shows the output from executing this command.
Note
▸ For information about how to set up a WebLogic Server Java environment, see “Validate Your CLASSPATH and PATH Environmental Variables,” p. 333.
Tip
You can also verify the PATH and CLASSPATH settings by echoing the variables in your respective operating systems.
Identifying the classes the Java Virtual Machine (JVM) uses when running a Java application is not so easy. You can use the -verbose switch on the JVM to list all classes that are being used. You then have to sift through the output to check the environmental setup.
Because many projects have PATH and CLASSPATH variables pointing to every conceivable product and version of that product, its actually good practice to create operating system scripts that will set your environment variable settings on demand.
Tip
Know your development environment and only include the variable settings that you need. This means that you should know what Java SDK you intend to use and verify the PATH is set appropriately, and know what classes and JARs you intend to use and verify the CLASSPATH is set appropriately.
Typically, with proper size development, three environments should be set up: development environment, test and validation environment, and production environment. In the development environment, developers would develop on their own desktop or laptop. The database and application server used could be running locally in the developer’s desktop/laptop or remotely in the development machine. Many companies have chosen to use Windows as the development environment on the developer’s desktop/laptop. If a remote application server or database is used, they would be running in Windows or Unix. This is where unit testing should be performed.
The test and validation environment should closely mirror the production environment in terms of hardware, OS, database and application server, and so on. This is where integration testing and validation is done. Typically, load testing and performance tuning is performed in this environment. The configuration of products used in the test environment are then very similar to the production environment.
Your project’s software and application environment to a large part determines your runtime environment. However, there are other important considerations such as product configuration, performance tuning, security, networking, and so on. Because many of the runtime issues have to be considered and reconsidered throughout the lifetime of the project it is important that you start out as simple as possible and stage the introduction of complexities as you continue with your development.
Namespaces, with their hierarchical framework, were invented to avoid naming ambiguities. A result of their hierarchical structure, they allow logical groupings of related parts. Namespaces are usually chosen to provide a functional decomposition of parts. In the end, the functional decomposition resolves the naming ambiguities. On the other hand, there are many classes in Java that have a very well-known API. Although namespaces will resolve conflicts, avoid using class names such as Vector, Hashtable, and so on, as they will only make the code harder to maintain.
Note
A company’s organizational tree, with its company name, divisions, departments, and so on, is an example of a functional decomposition.
In Java, namespaces are implemented using the package keyword. Every Java program file starts with a package statement.
The package statement is composed of one or more strings delimited by a period (.). For example, java.awt.color is the package name for classes that control color in the Java Abstract Windows Toolkit.
For most business applications, namespaces reflect the organization of a company. The company name is usually near the top of the namespace. Next are the departments, divisions, and projects. The remainder of the namespace usually describes the application and its functional components.
In Java, the package name in a Java source file determines the relative on-disk location of the Java class files generated by the Java compiler. The Java compiler’s -d option determines the root directory of the class file output. The hierarchy defined by the package name is used to store the class files. For example, the class files for a Java source file with a package name com.mycompany.tools resides in the directory com/mycompany/tools relative to the project’s root directory. The full path of the parent directory of the com directory, for this example, would appear in the CLASSPATH.
Note
Sun recommends that you start the namespace with your company’s Internet address in reverse order. For example, if your company’s Internet address were mycompany.com, the first two elements of the package name would be com.mycompany.
The Java package name also determines the relative runtime directory structure for Java class files. The relative runtime directory structure is identical to that created by the Java compiler. A Java program runs under the environment of the JVM. The JVM uses class files generated by the Java compiler. The class files are found either from the CLASSPATH environment variable or from the -classpath command line option. Either way, the JVM finds its classes in a directory tree whose structure is dictated by the Java namespace.
There is another way the package name can be used to organize your Java environment. Although the package name does not impose any specific restrictions on the location of your Java source files, the way the Java compiler and the Javadoc utility work strongly suggests that source files reside in a directory with the same structure as the Java namespace. When Java source files are stored in a directory tree reflecting the package name hierarchy, it can perform dependent compilation. That is, it can find dependent source files, compare them with existing class files, identify those that are out-of-date and if necessary, recompile sources. The Java compiler can only use its make-like feature when Java sources are stored by their package names. In addition, the Javadoc utility only works properly if the source is stored according to the package name hierarchy.
Note
Be sure to place all non-inner classes in a separate file and use the class name as the file name. See the “Java Style Guidelines” in the next section. Also, see pages 170-171 in Core Java 2 Volume 1 by Horstmann and Cornell.
In summary, namespaces resolve naming conflicts, logically separate Java files into functional units, determine the compile and runtime relative class file locations, and determine the relative location of the Java source files.
Let’s look at an example of how to use namespaces in an application. We want to build a foreign exchange application for a financial services company. The company name is FXBank and its Web site is fxbank.com. FXBank has a corporate standards group that has developed a number of common services (such as security, application logging, common functions, and constants) for all software projects within the bank. Our project name is unique within the company. Our project has developed a number of classes shared by programs within the project. We are working on the foreign exchange application that enables traders to book trades. During development, we have discovered that classes and methods, while not usable by the rest of the project, are referenced throughout our application.
The Sun standard suggests that our package name begins with com.fxbank. The project name is Xtrader. The application we are writing is a trading kiosk or Kiosk for short. The package name at the application level is com.fxbank.xtrader.kiosk[i]. By following our recommendations, the namespace layout for package names, classes, and source files are the same. Figure 4.5 shows the namespace represented as a directory structure.

In this directory structure,
com is the top level of the namespace.
The fxbank level contains services common to the company.
The xtrader level contains classes and interfaces specific to the XTrader project.
The kiosk level contains classes and interfaces specific to the Kiosk application.
The Kiosk application contains many types of components, which are reflected in the package naming structure under kiosk.
The data and configuration files should be stored in a hierarchy dictated by the Java package names. If you are using data or configuration files that need to be available at runtime, those files can be placed in your CLASSPATH.[ii]
Tip
These files should be copied from your config or data directories during application build. Don’t keep them in the classes directory tree because during cleanup you generally delete all the files in these directories.
Java programs have access to all files, not just class files, in their CLASSPATH.
The following code snippets demonstrate how to read files from your CLASSPATH. The first snippet, given in Listing 4.1, opens a file, reads the first line, and then displays the result. Listing 4.2 demonstrates how to load a Java properties file into your program and then how to read the property value with a key of "database". Both code snippets require that the file, test.config, be in the same directory as the class that is reading the file.
Example 4.1. Reading a File in the CLASSPATH
BufferedReader br = new BufferedReader(new InputStreamReader(
this.getClass().getResourceAsStream("test.config")));
System.out.println(br.readLine());
br.close();
Example 4.2. Reading a Properties File in the CLASSPATH
BufferedInputStream bis = new BufferedInputStream(
this.getClass().getResourceAsStream("test.config"));
Properties prop = new Properties();
prop.load(bis);
System.out.println(prop.get("database"));
bis.close();
In summary, choose a namespace that represents your organization and application and apply that pattern as a standard.
The objectives of this section are as follows:
To create developer independent source files and ease the job of program maintenance.
To make programs easier to read and understand.
In general, the source code should be self-documenting. The code should read like a book, where comments act as footnotes when a deeper explanation is needed. The format of the source code should follow a structured coding standard. All source files in the project should appear as if the same person wrote them. This makes software maintenance much easier. The coding standard should be well structured to allow the logic and flow to be easily identifiable. Lastly, identifier names should be written using English words.
Note
More information on coding standards is provided in the “Formatting” section later in this chapter.
Naming rules standardize the look and readability of the source code. The rules described in Table 4.1 provide a good starting point for most projects.
Table 4.1. The Naming Rules for Java Identifiers
Formatting rules help standardize the layout of the source code. The following rules are sufficient for most projects:
No line is to exceed 80 columns per line. This promotes readability both on the screen and on printer output.
Do not include tabs or page breaks when formatting source files. These characters have different meaning on different platforms. Use a standard set number of spaces to represent tabs, for example four spaces.
For lines of source code after the first line in multi-line statements, indent from the start of the first line.
Pick a standard for brackets and follow it. Typically starting brackets
{lining up below ending brackets}provides the clearest demarcation.When beginning a line with a
//style comment, start in the same column as the line of code it applies to.Use parentheses. Do not make the reader have to know and apply the order of precedence rules.
Use short names when the name scope is small. For example, if a
StringBufferobject is used in a scope of a few lines of code, you can assign it to a variable name such assb.Use the
+=operator, instead of the= .. + ..construct. The+=operator and its associated constructs execute slightly more efficiently and do not impair readability.
Comments provide a mechanism to convey information about a program that cannot be done using the Java programming language. Ideally, comment usage should fall into the following five distinct categories:
Footnote style comments used to explain details not evident in the code. These are the comments that mix with the code, generally using the
//comment at the end of the line.Block comments are used for explaining what a group of statements is about to do.
To-do or notes comments that explain known bugs, describe future changes, and outline designs yet to be implemented.
/*and*/comments are often used to hide unused code. The final release of your source code should have very few, if any, of these comments.
Javadoc comments consist of special delimiters and tags that when placed in source code can be used by the Javadoc utility to generate HTML pages describing classes, inner classes, interfaces, constructors, methods, and fields. That is, Javadoc enables you to create user documentation from source code comments. The generated HTML pages are available to other programmers on the project. Javadoc comments promote good communication between programmers and their usage is strongly recommended.
Note
More information on Javadoc can be found at http://java.sun.com/j2se/javadoc/.
Javadoc comments begin with a delimiter, /** and end with another delimiter, */. The lines between these two delimiters consist of a description of the element and special tags that direct the Javadoc utility how to format the output. Because the generated output consists of HTML text, you are allowed to include HTML tags. The general form of Javadoc comments is given in Listing 4.3.
You should consider using the following Javadoc guidelines:
Document all non-inner classes and interfaces as in Listing 4.4.
Use the format shown in Listing 4.5 for inner classes, inner interfaces, and non-private instance variables.
Use the format shown in Listing 4.6 for non-private methods.
Use HTML tags for emphasis and text formatting. The following is a list of useful tags:
To format source code use the
<code>,</code>tags.Use
<i>,</i>to italicize text.Use
<b>to make text boldface.Use
<p>to create empty paragraphs for spacing.Use
<pre>,</pre>to display how text appears, with line breaks, spaces, and so on.
Example 4.4. General Form for Class or Interface Javadoc Comments
/**
  *
  *    Descripion of class or interface
  *
  *    @author Name of author. There can be multiple author lines.
  *    @version Version and date string. Use the source code control's version number.
  *    @see reference (you must have access to source code)
*/
Example 4.5. General Form for Inner Class, Inner Interface, or Variable Javadoc Comments
/**
  *
  *    Descripion of inner class, inner interface, or variable.
*/
Example 4.6. General Form for Non-private Methods Javadoc Comments
/**
  *
  *    Descripion of method
  *
  *    @param param1 Description of first parameter.
  *    @param param2 Description of second parameter.
  *    @param paramn Description of nth parameter.
  *    @return Description of return value.
  *    @throws Exception class name. Conditions when exception is thrown.
*/
The program layout is the pattern for how source code files should be constructed. Source code files should be based on a coding template. A sample template is presented in Listing 4.7.
The following elements are listed in the order they appear in the template file:
Standard header that includes your copyright notice
Package name
Import statements
Note
Import statements are ordered from general to specific as shown in the template in Listing 4.7. Also, only import the specific classes that are used by the application; avoid importing * from a package.
Class or interface
Note
Classes, interfaces, variables, and methods are further ordered according to their access modifier. Public identifiers are listed first, followed by protected, package, and then private.
Example 4.7. Template for Program Structure
/*
 * SourceTemplate.java
 *
 * Copyright 2000-2001 ThisCompany, Inc.
 * All rights reserved.
 *
 * This software is the confidential and proprietary information
 * of ThisCompany, Inc. ("Confidential Information"). You
 * shall not disclose such Confidential Information and shall use
 * it only in accordance with the terms of the license agreement
 * you entered into with ThisCompany.
 */

//package name
package thiscompany.thisproject.thisapplication;

//import java package

//import javax package

//import product API packages

//import company API packages

//import project specific API packages

//import application specific API packages

/**
 *
 * This sample source header file describes the structural layout of all Java
 * programs. You can include HTML within this section. In particular,
 * common use is made of
 * <i>italic</i>
 * <code>monospaced font for code</code>
 * <pre>display text how it appears, with spaces, line breaks, and so on</pre>
 *   <b>boldface<b>  <p> - empty paragraphs for spacing
 *
 * @author  Joe Programmer
 * @version %I% %G%
 * @see     Collection
 * @see	          Collections#sort
 *
 */
public class SourceTemplate
{
    //Constants
    public static final String PUBLIC_CONSTANT="Public";
    private static final String PRIVATE_CONSTANT="Private";

    //Static variables
    private static int instanceCounter;

    //Instance variables

    //Static initializer

    //Instance initializer

    //Constructors
    /**
     * Constructs a new SourceTemplate with the command line arguments.
     *
     * @param      args  The command line arguments specifying the
     *                   work to be done
     * @throws     Exception
     */
    public SourceTemplate(String[] args)
    {
    }

    //Methods

    /**
     * Constructs a new SourceTemplate with the command line arguments.
     *
     * @throws     Exception
     * @return     Text message describing the final result
     */
    public String execute()
    {
        return "";
    }

    //Finalizer

    //Main

    /* This main is only for testing so I should not go into Java doc
    */
    public static final void main(String[] args)
    {
        try
        {
            SourceTemplate st = new SourceTemplate(args);
            System.out.println(st.execute());
        }
        catch(Exception e)
        {
        }
    }
The purpose of programming guidelines is to bring uniformity, clarity, correctness, and optimization to programs. Following these guidelines increases productivity for both the development and maintenance of the software. Common programming errors, such as forgetting to close a file, can be avoided by knowing and following these guidelines. Software maintenance is far easier when the code is readable, logically structured, and well-formatted in the first place.
Following standard coding practices is very important for software maintenance. It is very likely that many months after the code was first written, someone will have to fix bugs or add features to the software. Code that is well written makes this task much easier. Java developers have come to expect a common coding style when viewing Java source code. This style was first introduced by Sun and can be viewed on the Internet at http://java.sun.com/docs/codeconv. Virtually all source code found at the java.sun.com Web site follows these coding conventions.
This section provides a list of general and specific rules that should be followed when writing production-grade Java programs:
Don’t litter your source file with code that is commented out.
Write all your Java classes using a source code template file.
Use Java API classes and other standard APIs. Know the APIs and what they have to offer.
Avoid using the * construct on import statements. Import explicit class names from the package.
Strive for simplicity when programming in an area of the program likely to be changed.
Consider obscure optimization coding techniques only in areas where change is unlikely and there is a compelling reason for optimization.
If a method becomes overly complex or long, use private methods to break up the method and enhance its readability.
Don’t declare instance variables as public. Generally, use private instance variables and access them using public accessor and mutator methods. An exception to this rule is in the use of public constants.
If you never change a reference to an instance variable, declare it as final. The contents of the object can still change.
Create get/set methods on an as-needed basis.
Handle all exceptions in the program and report the exception information before exiting the program.
Catch specific exception types.
Don’t use exceptions for normal processing. Exception handling should be used for non-normal processing.
Use the
finallyconstruct to avoid resource leaks. For example, close files in thefinallyblock to ensure the file is closed whether or not an exception occurred.Use interfaces to define constants. Classes using the global constants must implement the interface where the constants are defined.
Use interfaces when a class needs multiple behaviors or it already extends another class and a new behavior is needed.
If your class is not going to be extended, make it final. You can always change this later.
When appropriate, include a main method for testing the class. If the class is not an application entry point, comment out this method before deployment.
Use a Boolean constant to define a debug flag. Use this flag to conditionally execute the debug code. If the constant has a false value, the Java compiler optimizer omits the debugging code from the class files.
There are many facets to optimization: system tuning, database design, optimizing the logical flow within a program, and so on. When doing J2EE development, the performance and scalability of the system can be tuned at the JVM, OS, Database, and Application Server level without any application code change. Industrial-strength J2EE application servers such as WebLogic Server provide many tuning parameters to improve the J2EE applications’ performance and scalability. Therefore, one should not be caught up in performance optimization early on in the project development life cycle. Developers should be focused on the functionalities of the systems. During performance tuning, if the bottlenecks are narrowed down to the application code, then the code needs to be rewritten. This section covers recommended optimization practices for the Java programming language. These practices, when learned, should become part of your everyday coding habits.
We recommend coding choices that promote efficiency, but not at the expense of readability. There are a number of obscure techniques for making code execute faster, but often the real benefits are marginal. First, the Java compiler’s optimizer can perform a number of these programming tricks.
Note
With Java Hotspot, the optimizations are more likely to be done at runtime. See “Java Compiler and JVM Optimizations” later in this chapter for more details on Hotspot.
Although your code optimization may be significant for a few lines of code, it is often very small within the context of the entire program[iii]
Optimization techniques for the following Java elements are discussed in the following sections:
The three areas to be addressed for Java collections are synchronization, memory allocation, and storage efficiency.
If thread safety is not an issue, don’t use collection objects that are synchronized. In particular, only use Vector when you need synchronization. If you do not need synchronization, use an ArrayList. You can use an ArrayList when you need synchronization by calling the Collections.synchronizedList method providing the ArrayList as a parameter.
Other Java collection classes carry the same warning about the unnecessary use of synchronization. For example, HashMap is not synchronized, but Hashtable is. HashMap can be turned into a synchronized structure by calling the Collections.synchronizedMap method.
Improper use of the Vector, ArrayList, and HashMap objects can cause unnecessary CPU usage and waste memory. If adding objects to a collection causes it to grow, it does so by making a copy of itself in a newly allocated block of memory. If the collection objects are initially created large enough, resources will not be wasted. In the case of a Vector object, if the capacity increment is not set, its size is doubled each time the object needs to expand. Choosing the default setting for a Vector that needs a large amount of storage can be particularly bad.
The ArrayList object can also be problematic as its capacity increases by about half for each expansion. This reduces the amount of memory wasted, but at the expense of CPU consumption. Vector and ArrayList objects behave efficiently when elements are added to the end, but adding (removing) to (from) the middle causes arrays of objects to be copied for each operation.
You can control memory allocation of HashMap (and Hashtable) by setting up the initial capacity and the load factor attributes. The default initial capacity for HashMap is 101 and the default load factor is 75%. Exceeding the capacity of the table causes a new HashMap storage array to be allocated and all entries copied to it. Therefore, it is important to allocate a sufficient number of entries for HashMap objects.
If you use exact keyed lookups in a collection, use a HashMap. If you need data sorted sequentially, with keyed lookup access, and the capability to find entries based on a partial key, use a TreeMap. If you need indexed lookup, use an ArrayList, Vector, or an Array.
Just because a method exists for a type of interface, doesn’t mean the implementation is efficient. For example, the LinkedList class has a get method with an index value as its only parameter. What appears to be an ordinary indexed lookup is really a search for an object, starting at the beginning of the linked list and counting forward until the index number is reached.
Method modifiers affect the speed of execution for methods. Table 4.2 is a relative comparison of the cost of making method calls based on the modifier type.
Table 4.2. The Method Modifier Directly Affects the Execution Speed
Method Modifier | Relative Effect on Execution Speed |
|---|---|
static | 1 |
final | 1.4 |
instance | 2.5 |
interface | 3.4 |
synchronized | 6.8 |
Note
See http://www.protomatter.com/nate/java-optimization/ for more information on method call performance.
As you can see synchronized methods require, because of locking, considerably more overhead static methods. Static, private, and final method calls are not polymorphic and are more easily aligned by the Java compiler or Hotspot.
Note
For more details on Hotspot, see the “Java Compiler and JVM Optimizations” section later in this chapter.
One technique for simplifying code reading in a method is to decompose it into a group of simpler methods. An optimizing compiler may inline these methods because they are only used once and are private.
Many of your application methods are never going to be overridden. If this is the case, make the methods final. If necessary, the restriction can be removed later.
There are several issues regarding performance that you should be aware of when using objects:
Don’t use objects where a primitive type can be used.
Re-use objects instead of creating new ones. However, be aware that clearing elements from a collection is usually more expensive than creating a new empty collection.
Use local variables instead of instance variables. They are faster to access and their usage makes it clear which variables the class needs.
Make application classes final if you are sure they are not going to be extended. The Java compiler and Hotspot may be able to inline the final classes’ methods and improve performance.
Use Arrays, instead of Vectors or ArrayLists when the number of elements is not going to change. Array access is faster.
When copying arrays, use the System.arraycopy method because it is 2–10 times faster than copying the elements in a loop.
There are a number of small optimization techniques, such as placing an array element into a temporary variable and referencing the temporary variable, instead of referencing the array element using its index. Directly referencing a temporary variable can be two or three times faster than referencing an array element through its index; however, the savings may be wasted because an optimizing compiler can do this for you.
Lastly, know what the Arrays class has to offer, which is a set of static methods that perform utility functions on arrays. There are four types of functions:
Loops can be a source of poor performance because they may contain other programming inefficiencies repeated many times. The following are some recommendations for using loops:
Any operation that is repeated in the loop that always returns the same value should be done outside the loop. For example, unless there is a synchronization issue, do not call the size method of a
Vectorwhen accessing elements in a loop. Call the size method once outside the loop and use that value inside the loop.Use integers for the loop index variables. This saves the compiler from having to promote a small type to an
int.When using the short-circuit operators always choose the first element as the one most likely to cause conditional termination.
If the operations in the loop take much more time than the code you have optimized, you haven’t saved much in terms of real execution time.
A straightforward demonstration of the last recommendation is as follows. Suppose you optimize some code and are able, using a cryptic series of instructions, to make a part of the code execute twice as fast as before. If these operations only consume 1% of the total processing in the loop, the overall performance gain is only .5%. You have not gained much by adding the difficult-to-maintain code.
There are a couple of less straightforward techniques for improving performance, but these may be of dubious value. Here are some techniques we do not recommend:
Loop unrolling is the process of replacing loops with explicit assignment statements. Don’t bother with this. It may not be any faster because the Java compiler or Hotspot can do this also.
Use a straightforward
forloop construct, such asfor (int j=0; j<10; j++) {}instead of
for (int j=-1; ++j<10; )
Although the loop variable computation in the second construct is up to two times faster than the first, it is hard to read. More importantly, the processing in the loop and not the comparison and index increment is much more likely to determine how long the loop takes to finish.
String usage is one of the easiest places to program inefficiently because strings are so easy to use.
There are four recommendations we have for optimizing the usage of strings.
The most important thing to remember when using String objects is that they are immutable, but StringBuffer objects are not. Therefore, when adding multiple (more than two) strings together or changing the value of a string, use a StringBuffer. For example, if you are adding together three String objects (s1, s2, and s3) and their values are not known at compile time, it is more efficient to use the following construct:
String s4 = new StringBuffer().append(s1).append(s2).append(s3).toString();
instead of
s4 = s1 + s2 + s3;
Note
Use the first construct only if the string concatenation is a performance bottleneck because the second form is easier to read.
There is no advantage to using this technique for adding two String objects because the compiler implicitly uses a StringBuffer object. String buffers should not be used when adding final or literal strings because the compiler concatenates them at compile time.
Don’t initialize String objects by passing a literal value to its constructor that takes a String object as an argument. Passing a literal value to the constructor creates two object references, one to the literal on the heap and one for the String object variable. Initialize your String objects using a literal assignment.
String buffers should be allocated large enough to hold the resultant string. The default initial size of a StringBuffer object is 16 characters. Each time the string buffer has to expand, it doubles its size and copies the contents into a new StringBuffer object. You want to avoid this unnecessary overhead. Poorly configured long strings are especially expensive to construct.
The usual way of comparing a string with many possible values is to create a sieve of if statements and compare each string until a match is found. When comparing four or more strings, it is much faster to use a HashMap and a switch statement. This construct not only provides a dramatic increase in performance, but the execution time is nearly independent of the number of comparisons. Compare this with a sieve of if statements for string variables, where the execution time increases linearly for each additional comparison. An example outlining this technique is given in Listing 4.8.
Example 4.8. Example of Using HashMap for a String switch Statement
// HashMap for storing String
private static final HashMap rules;
// create Strings for comparison and int values
private static final String[] _validOnes = {
        "valid#1",
        "valid#2", etc.}


public static final int VALID01=0;
public static final int VALID02=1; etc.
// initialize the HashMap
static
{
    rules = new HashMap();
    rules.put(values[VALID01],new Integer(VALID01));
    rules.put(values[VALID02,new Integer(VALID02); etc.
}

// Switch construct
//Get String s1 from elsewhere, a method call or an argument
int val = ((Integer)rules.get(s1)).intValue();
switch(val)
{
  case VALID01:
  {
    //do something
    break;
  }
  case VALID02:
  {
    //do something
    break;
  }
// additional cases follow
Synchronization is a mechanism used to allow multi-threaded programs to perform multiple sequential operations as a single atomic operation on shared data structures. Synchronization is necessary to prevent another thread from changing the value of the object’s attributes while an atomic operation is being performed. However, synchronization degrades program performance because of the overhead of locking objects and the side effect of placing threads in wait states, thus preventing other useful work from being done.
Although synchronization is simple to set up, it is difficult to get right. That is why Enterprise Java Beans (EJB) uses a single-threaded model. This section discusses some important considerations when using synchronization:
Isolate the code that needs to be thread-safe. Don’t use a scattershot approach and synchronize everything.
Remember, just because you have a synchronization block around an object doesn’t mean the object is protected. You must have synchronization blocks around every modifying reference to the object.
When you synchronize a method, you are blocking access to all synchronized methods in the object.
When you want to inform threads that a lock is going to be released, use the
Object.notifyAllmethod.The
Object.notifyandObject.notifyAllmethods do not release the lock. The lock is released after the synchronization scope (be it a method or a synchronization block) is exited.
The Java I/O system provides the capability to transfer objects across a data stream through serialization. This is the mechanism that RMI uses to transfer parameters and return values between the client and remote object. It is very easy to make a class serializable by simply indicating that it implements the Serializable interface in its class declaration. The Serializable interface is fairly unique because it does not define any methods to be implemented. You are simply allowing the class to be cast to a Serializable object. Directly related to serialization is the Java keyword transient.
Basically, during serialization, all non-transient attributes of the object are converted into a data stream. During deserialization, an object is created and the non-transient attributes are initialized from the data stream. Any attributes that do not need to be stored persistently, because they are always initialized in some other manner, should be declared transient. This will greatly improve the speed and efficiency of the serialization process.
Serialization can be controlled by the class itself by implementing readObject() and/or writeObject() methods. The ObjectInputStream uses reflection to determine if the object has implemented readObject() or writeObject(). This mechanism can be used to initialize transient attributes when the object is deserialized. In the same manner, ObjectOutputStream will call the object’s writeObject() method if it exists. The readObject() method typically calls the defaultReadObject() followed by additional initialization that the class requires. The writeObject() method calls defaultWriteObject() followed by additional serialization that the class requires.
Note
If the default method is the only method being called, there is no reason to provide these methods.
An example showing the implementation of serialization is shown in Listing 4.9.
Example 4.9. The Class Must Explicitly Initialize Transient Attributes During Serialization
public class TransientExample
{
    private String str;
    private transient String transString;

    // default constructor
    public TransientExample()
    {
        str = "hello";
        initTransients();
    }
    // initialize transients
    private void initTransients()
    {
        transString = "this string is transient";
    }
    // control serialization
    private void readObject( ObjectInputStream stream )
        throws IOException, ClassNotFoundException
    {
        System.out.println( "TransientExample is being de-serialized" );
        stream.defaultReadObject();
        initTransients();
    }
    // if writeObject() only calls defaultWriteObject()
    // there is no need to provide this function
    private void writeObject( ObjectOutputStream stream )
        throws IOException
    {
        System.out.println( "TransientExample is being serialized" );
        stream.defaultWriteObject();
    }
There are very few recommendations directly related to garbage collection (GC) because wasted memory is often the result of sloppy programming. Assuming those types of problems are fixed, there are still a couple of things that you can do to improve memory usage.
First, assign object references to null when they are no longer being used.
Tip
Don’t go overboard with this. If a variable is soon going to be eligible for garbage collection, such as when a method exits, don’t bother setting the object reference to null.
Local variables will not be eligible for garbage collection until the method they reside in exits. Going out of scope within a method does not place an object in the GC bin. Object references for important resources should also be set to null to speed up reclamation.
Secondly, if you expect your program to be idle, request the GC to run by calling the System.gc method.
When compiling your program to generate classes for performance testing or deployment, use the -O (optimize) switch. The -O option directs the compiler to try to generate faster code by inlining static, final, and private methods. The code is strictly optimized for speed of execution, not memory usage. This option may slow down compilation, make larger class files, and/or make it difficult to debug. The -O option implicitly turns on -depend and turns off -g. The -depend option causes the recompilation on any source files on which a class may recursively depend. Without the -depend option, the Java compiler only automatically recompiles the source files that are directly depended upon.
The -O option informs the compiler that all compiled class files are guaranteed to be delivered and upgraded as a unit, enabling optimizations that may otherwise break binary compatibility. Use this option with discretion.
Note
Peter Hagar seems to indicate the -O switch for javac from Sun does nothing; however, this is hard to believe. He is probably right in the sense that it does less than you might think it would do. For more details, see http://www-106.ibm.com/developerworks/java/library/praxis/pr29.html.
The Java compiler performs constant folding and eliminates dead code, and the javac documentation claims its inline static, final, and private methods (at its discretion!).
The major code optimizations occur in the JVM. Sun’s Hotspot JVM combines a dynamic compiler with a JIT framework that turns commonly referenced sections of byte code into compiled native code.
Most inlining occurs during the JIT phase because the JVM knows what is used and inlines only what is necessary. Hotspot even inline calls across virtual method invocations, something static optimizers cannot do. Hotspot uses generational garbage collection, which speeds up and smoothes out program execution. Hotspot and other JIT-based compilers can improve the execution speed of Java code 10 to 50 times.
Note
This does not necessarily mean your Java programs will run 10–50 times faster as I/O waits, synchronization locks, and so on can decrease the effectiveness of the optimizer.
The JVM can be configured to support applications with large memory requirements. The maximum size and the initial size of the garbage collection heap can be set using the JVM -Xmx and -Xms options respectively. The default value for both of these is 6MB. The stack size per thread can also be controlled using the -Xss option. The default value for stack thread size is 128KB.
When adjusting the memory options of the JVM confirm that the physical memory space allowed for processes by the operating system are consistent with the Java memory parameters. Otherwise, you may experience big performance degradations due to swapping.
In summary, when targeting your software for a production environment, follow these rules:
This section outlines the development process from start (setting up your environment) to finish (delivering your software).
Incremental development is the practice of developing software in small, discrete stages comprised of program analysis and design, coding and code refactoring, testing, and incremental integrated deliveries.
For the purposes of this chapter, design refers to program design and not the larger arena of system design, which involves evaluating use-cases, UML diagrams, and so on, although the two are obviously dependent upon one another.
Note
Chapter 3, “A Developer’s Guide to the Unified Modeling Language (UML),” and Chapter 6, “Transitioning from Software Design to J2EE Technology Components and Services,” explain in detail the design phase of a Java or J2EE project.
The process, referred to as the design-coding-testing-delivery cycle, is repeated many times during the development stage, as illustrated in Figure 4.6.

Note
Incremental development is closely related to eXtreme Programming (XP), which is explained in more detail in Chapter 2.
Before a single line of application code is written, an operational and easy-to-use environment should be set up. The last thing you want developers to do is to troubleshoot environmental issues when they have timelines to meet.
This section presents a list of tasks that should be completed before application development begins:
Write a procedure to set up the standardized development environment. The procedure creates directories and sets environment variables.
For J2EE development, provide instructions on how to configure the application server, how to deploy the application to the application server, how to administer the application server, and so on. Industrial strength J2EE application servers such as WebLogic Server have a comprehensive set of examples shipped with the product and excellent online up-to-date product documentations (http://edocs.bea.com).
For products, such as IDEs, design tools, and so on, provide instructions on how they should be configured for the project.
Provide concise instructions and supporting documentation for building software.
Provide concise instructions and supporting documentation for using source code control.
Provide access to a Web page containing links to online product documentation, internal documentation, and other useful information.
Collect and build the initial set of common Java components, which is explained in the next section, “Creating the Common Components.”
Write a sample program that demonstrates how developers should write code. Include all source, configuration, and build files as well as instructions for running the different types of applications (JSP, EJB, Servlets, and so on) used in your project.
Create a source code control area where developers can test the commands of the code control system.
Every Java programming project uses shared classes. Some of these Java classes are business-specific and others are more general. General-purpose classes include error message generation, logging, authentication, exception handling, string handling, and so on. Business-specific classes vary depending on the business.
Ideally, all common components should be in place before application development begins. However, some components are discovered along the way when a developer realizes the same code is needed in various places. Other components are planned, but writing the code requires a lot of work and you don’t want to delay the project.
Before starting application development, at a minimum, skeletal classes should provide features, such as error message handling and exception handling, that are used early in the development cycle.
Don’t worry about designing or coding yet. The developer needs to set up his environment, verify it works, and learn to use it.
After the system administrator has set up your account, log in and run the environment setup procedure. Familiarize yourself with the project directory structure. Examine the environment variables. In particular, look at the CLASSPATH and PATH variables to see which programs you are using and which Java classes are being used. Check the version of your JDK and make sure it is what you expect. Perform any other environmental checks you deem useful at this time.
Next, make sure your tools are installed and they are working at a minimal level. If you find problems, contact the tech support group. Because you are using a common environment, others will eventually encounter the same problems.
After the tools are working, set up any Web links to useful online documentation, such as J2EE, J2SE, and BEA WebLogic documentation or the projectwide documentation page. The Java Developer Connection provides the latest information about Java technology at its Web site, http://java.sun.com/jdc, as well as distribution of highlighted topics through e-mail. Specifically for the WebLogic developer, BEA offers an online developer program at http://developer.bea.com. For all documentation that addresses your project, if you need hardcopy documentation, gather it or have it ordered.
Tip
Join Sun Developer Connection at http://developer.java.sun.com/developer/?frontpage-main.
Join BEA Developer Program at http://developer.bea.com
Read the short version of the build and source code control system documentation. Use the source code control system by setting up a local copy of the project sample application. Try checking software out and in, getting listings, and so on.
If you are learning a product, read the documentation, and, if possible, talk to colleagues and identify the aspects of the product that are relevant to your project. Read for feature functionality and not necessarily deep understanding. Go through the product tutorial. Read and test the product examples. It is strongly recommended to attend BEA product training courses either onsite or offsite.
When you understand the environment and the products well enough, it is time to examine the project’s sample application. Look over the source code, look at build files, look at the configuration files, and so on. Build and run the sample application and verify that it works.
Finally, create a HelloWorld application using the technologies relevant to your assignment. Keep this demo application in your prototypes directory for future reference.
Overall, you need to spend a few days (or more depending on the scope of the project) to look over the documentation and other resources so you understand the products and can effectively develop software.
After you understand how to use the products and the development environment, it is time to get started with application development. At this point, you should have a complete understanding of your project’s objectives and have worked out a preliminary software design.
From the preliminary design, you should be able to code your top-level classes. This will require stubbing out most of the functionality. Include the hooks for common services (security, logging, and so on), if you have this information. After creating the skeletal application, you should be ready to run the first version of your program. Remember, the emphasis in incremental development is design, code, test, and do it over again!
The design-coding-testing-delivery cycle refers to the process of developing programs in many short stages where a design is made, the code is written and tested, and the result is integrated with other parts of the system.
The goal of program design is to translate the user’s requirements into a form that can be implemented in a programming language.
Because requirements are consistently evolving it is best to design for generality and flexibility, but code to the current specific needs. Don’t over-design. Look for simplicity and coherence. Remember, a simple design results in a smaller amount of code and it is easier to understand, maintain, and debug. Recognition of common components (coherence) decreases the amount of source code and amplifies testing of that code.
When working on a design keep at it until you are satisfied it is as clean as possible. Don’t fall into the habit of using the first design that comes to mind as your final solution.
Use programs as working documents, a place to keep notes, and reminders about implementation ideas. Use pseudocode, in the form of comments, as placeholders for future code. Replace the pseudocode with real code as you develop the software.
One dilemma every programmer faces is when to design and when to code. A lot of ugly code has been created when programs are coded and designed at the same time. Programming too soon after a very critical design decision can also result in regrettable code.
Coding and design require fundamentally different thought processes. Designing usually requires considering issues that affect your program as a whole. Designing involves process flows, identification of common functionality, and other generalizations. Coding, on the other hand, concentrates on low-level logic issues, programming constructs, APIs, and so on. In short, design is global and coding is local.
It is important to remember the following points:
The real work is done by the code, so write it well. Code in stages, starting with basic functionality, followed by refactoring, followed by adding more functionality.
Write the code correctly in the first release. Don’t think about retrofits. You don’t get a chance to fix your mistakes. Poorly written working code is more valuable to a business than untested well-written code.
We don’t expect your code to be sparkling at all times during development, but when it is turned in for the final release you should have everything cleaned up.
The message is simple: “Don’t re-invent the wheel.” Don’t be ashamed of borrowing someone else’s code; just make sure you understand it. You can find working code everywhere, in the product demos, on the Internet, and in books. Many books contain complete solutions to the problems you are trying to solve. If you can find a helpful book, buy it. The $30–50 cost of the book will quickly pay for itself even if the book saves you just a few hours of work. Most companies will reimburse you for the book.
Code refactoring is the process of systematically re-evaluating existing software and then making changes to improve it without causing observational changes.
Note
For further information on refactoring, please refer to http://www.objectcentral.com/oobook/oobook.htm.
Refactoring usually refers to going back to completed code, identifying improvements or generalizations, and making code changes to reflect them. However, refactoring applies equally well to new program development.
We have identified five types of refactoring that are to be done during new program development:
Documentation refactoring: Review your Javadoc and program comments. Make corrections to your programs so they conform to project standards. This stage is essentially mechanical, but it is a good time to look for logic problems and any non-conforming constructs. Document, but do not fix these problems during this stage.
Coding guidelines refactoring: Review and update your code to reflect programming and optimization guidelines. This stage is also mechanical.
Generalization refactoring: While reviewing or working on your code you will discover programming patterns or classes that are used in more than one place. These elements are likely candidates for collapsing into a common class or method.
Decomposition refactoring: Decomposition problems are usually discovered during coding. They are usually in the form of long, complex methods or classes that can be broken into a collection of small methods or classes. Decomposing large classes is a great way to isolate and simplify a program. Decomposing methods is nothing more than breaking a method into smaller methods so it can be more easily understood.
Normal form refactoring: During this stage, the code layout is rearranged to the normal form described by the Java programming style standards. No programming logic changes are made during this stage, but the locations of code do change. Remember to save a backup a copy of the original sources and recompile after each source file is changed because it is very difficult to identify mistakes.
Some refactoring is essentially a boilerplate process, whereas others require creative thinking. All Java source files in your application should pass through the five stages of refactoring. The following are our guidelines on applying the refactoring process:
Generally, refactor piece by piece. Some refactoring, especially the more mechanical phases, are big jobs; you can get bored and end up doing a sloppy job if you try to complete it all at once.
Do mechanical refactoring tasks when you need a break or have to mull over a design.
Refactor only after you have gotten it to work; otherwise, you will not know if you made errors.
When writing code, don’t always worry about complying with the rules of normal form and documentation. You should try to follow the programming guidelines, but any mistakes should be caught later. Always be on the lookout for generalizations and decompositions.
The time spent coding should be as free of distractions as possible. Limit the number of meetings and breaks. You should concentrate on one thing: writing the code.
Try to be complete when coding at each stage. If you must put off some complex or tedious code, mark it so it can be corrected later. Use code refactoring as a means to break away from difficult coding or to delay implementing a design decision until you have had more time to think about it.
Before the software is complete, it must pass through each refactoring stage. Finally, make sure the code is complete before commencing with final testing.
Although testing is still pretty much an art, some systematic practices can be followed:
Test standalone components outside the application. By doing this, you can create a test harness to validate all the important test cases.
Keep programming increments small and test frequently. The design-coding-testing cycle encourages this, but you can also perform a lot of unit testing by testing the small changes that are made during the coding stage.
Complete the testing of key components before moving on to use-case level testing. Perform unit testing from the inside out.
Build your code with good debugging support, logging, exception handling, and error messages. This is very important if you are developing servlets or EJBs.
In preparation for the final integration testing, identify a set of test cases for your application. A test case is a set of input values your application is given along with the expected outcomes. Evaluating use-cases and studying the program logic can help identify valid test cases.
The major objective of the design-code-test-deliver cycle is to produce an application system working according to specifications.
Because you are using an incremental approach for development, there are a number of intermediate delivery objections. Although the intermediate objectives are highly dependent on the application, one objective is true across all projects, be sure the progress achieved by the intermediate deliverables can be demonstrated to your end-users and/or managers.