
In This Chapter
JDBC is a significant component of the J2EE architecture as it is the primary mechanism used by a J2EE application server to interact with a Database Server, which serves as a persistent data storage repository. Enterprise applications are generally made up of four logical tiers: the client, Web server, application server, and database server. In a multi-tiered architecture, each tier is a server to the lower tier, and a client to the upper tier. The core Java libraries with the J2EE extensions include the collection of APIs that provide the interface for the communication between the tiers. Thus, the application server tier, which is the container for the Enterprise Java Beans, is a client to the Database Server tier. The API to communicate with the database server is Java Database Connectivity (JDBC). If you are using entity beans with Bean Managed Persistence (BMP), you will be coding JDBC to save and restore your beans’ state. If your application uses entity beans with Container Managed Persistence (CMP), you must provide the object-to-relational mapping and allow the application server to manage the JDBC communication. In either case, an understanding of JDBC is essential for J2EE developers. For example, you may have planned to use Container Managed Persistence, but some restriction or drawback forces you to use Bean Managed Persistence, in which case, you need to know JDBC.
Note
▸ To learn more about the object relationships that require bean providers to write the storage and retrieval of persistent data themselves using JDBC, see “Container-Managed Persistence Versus Bean-Managed Persistence,” p. 657.
Note
▸ For further information on Bean Managed Persistence, see Chapter 21, “Managing Persistence—Entity Beans,” p. 655.
To learn how JDBC works, you will first investigate an application that implements a simple two-tier client/server model. The Java application is the client, and the database server is the server. From this basic understanding of the architecture and API, you will learn how it is integrated into your enterprise application using the BEA WebLogic Server. This detailed knowledge allows you to efficiently and effectively develop enterprise applications. Specifically, your entity beans will contain methods that implement your business logic, as well as ejbCreate(), ejbLoad(), ejbStore(), ejbRemove(), and ejbFindXXX(), which use JDBC to persist your beans.
The recurring theme of Java-based technology is simplicity, portability, and robustness. Java addressed database programming with these goals in mind, and the result was JDBC. The JDBC API has been part of the core Java libraries since JDK 1.1. The simplicity of JDBC is evident in its small set of classes that are very intuitive to use. The portability allows Java programmers to be isolated from vendor-specific details of the database, meaning that EJBs can be created and reused irrespective of the database implementation. The robustness is provided by highly reliable JDBC drivers that translate JDBC API calls to native database calls.
Note
The JDBC API and drivers are explained in the “Understanding JDBC” section later in this chapter.
Database programming is always, at a fundamental level, a client/server model. The database server is a relational database, such as Microsoft SQL Server, Oracle, or Sybase. The Java client application uses JDBC as the interface to communicate with the database server. The messages sent to the database server are in a standard language called the Structured Query Language (SQL). The syntax of SQL is a simple, structured, English format, which intuitively allows you to create, read, update, and delete the data held in the database server. Before you can use JDBC or SQL, you must have a conceptual understanding of the way data is stored in a relational database. When you have this knowledge, you can store and retrieve persistent data in the relational database using JDBC.
Note
All database vendors at a minimum support the ANSI SQL-92/SQL2 standard as a means of manipulating data stored in their databases. However, you will also find that each database vendor will provide a feature-rich environment for storing and manipulating data via enhanced SQL operators and functions, as well as their own specific SQL-type language for developing data-centric stored procedures. For this reason, unless you are developing for a specific type of database vendor, to ensure portability between databases your SQL statements should abide by the ANSI SQL-92/SQL2 standard.
The structure of the way data is stored in a database is referred to as the schema. In other words, the schema is the abstract representation of the way the data is organized. The schema used by relational databases is very natural to object-oriented programmers. The relational database contains a set of tables. The columns in a table represent the data that is stored in that table. In Unified Modeling Language (UML) terminology, this would be a composition relationship. The database has tables, and each table has data. Using an analogy between JavaBeans and relational databases, the JavaBean stores data and provides getter and setter methods to access that data. With database programming, the relational database stores data and SQL commands are executed to perform the get and set on the stored data. The tables in a relational database may share a common key value that allows the tables to be joined for search operations. This simple data structure, a group of tables that share a common key field, provides all the flexibility necessary to store inventories, catalogs, business and customer information, as well as enterprise objects.
The logical data model for a relational database looks very much like a UML class diagram. The entities on the data model diagram are the tables. Each table has a unique name and a list of column names. The columns can be thought of as attributes. Each row can be thought of as an instance holding values for each of the column “attributes.” Typically, one column is used as a unique ID and is referred to as the primary key. Just as in UML class diagrams, the tables in the data model have relationships between each other. The relationship identifies a multiplicity level, which can be
One-to-One—. When one column value in a table relates to only one column value in another table, and vice versa. One-to-one relationships are rarely seen in “real-world” data models, as the relationships result in unnecessary division of data and the two tables are merged back together.
One-to-Many—. When one column value in a table relates to many column values in another table. One-to-many relationships are more common in “real-world” data models as they provide significant data reduction and allow for faster searching.
Many-to-Many—. When many column values in a table relate to many column values in another table. Many-to-many relationships are typically transformed into multiple one-to-many relationships, as they cannot be represented by means of a relational model. This transformation usually requires an assignment, also referred to as a link or pivot table.
An example of a one-to-one relationship is illustrated in Figure 13.1, where one author has authored exactly one book.

Figure 13.1. The one-to-one relationship is represented between entities where one column value in a table relates to only one column value in another table.
If, on the other hand, the author wrote many books, this relationship is represented by the one-to-many multiplicity, as illustrated in Figure 13.2.

Figure 13.2. The one-to-many relationship requires two tables that share a common key, in this case, the author_id.
The common author_id allows you to relate a row in the Books table to a row in the Authors table. Each of the “many” books contains a reference to the “one” author who wrote it. This relationship enables you to join the tables and search for all the books written by a particular author. It also gives the author_name of a particular book. Details of joining tables with the SQL WHERE clause will be discussed later in this chapter.
Finally, the database schema may require a many-to-many relationship between tables. For the many-to-many relationship, a cross-reference table is created. The contents of the cross-reference table are the key fields of the two tables that have a many-to-many relationship. For example, you can organize the books into various categories. Doing so requires a many-to-many relationship because you will allow a book to be included in multiple categories and each category has multiple books. The book you are now reading could be in the Enterprise, WebLogic, and Java categories. The Books and Categories have a many-to-many relationship. The Categories table also includes a rating column that will be used in the WHERE clause examples later in this chapter. A cross-reference table (also frequently called an association table), as illustrated in Figure 13.3, is required to contain this many-to-many relationship.
Figure 13.3. The cross-reference table contains the keys of the tables in a many-to-many relationship.
From these three tables, you can perform these searches:
Display all author names
Display all book names
Display all category names
Display all books for a particular author
Display all categories for a particular author
Display all books for a particular category
Display all categories for a particular book
In summary:
A primary key that consists of one column is likely to be the “one” in a one-to-many-relationship.
A table with a compound primary key of more than one column is likely to be the “many” in a one-to-many or a many-to-many relationship, where the join occurs on one of the columns of the primary key.
A foreign key is likely to be the “many” in a one-to-many relationship.
This introduction to SQL is intended to present the most commonly used features of the language. From the data model, you construct the relational database using SQL commands. The tables are created using the CREATE command and are populated with data using the INSERT and UPDATE commands. Data is removed from the tables using the DELETE command. You search the database by using the SELECT command. These are the five most common SQL commands and are described in the following sections. From this brief introduction, you will be able to use JDBC productively.
The schema for a relational database is represented by tables. Each table has a unique name and a list of columns. Each column has a name, type, and optional modifier. The SQL2 standard has a set of datatypes. Table 13.1 provides the correlation between SQL types and Java types. This information will help you choose the correct column types for your tables.
Table 13.1. The SQL Type–to–Java Type Mapping Table
SQL Type | Java Type |
|---|---|
|
|
|
|
|
|
|
|
|
|
|
|
|
|
|
|
|
|
|
|
|
|
|
|
|
|
|
|
|
|
|
|
|
|
|
|
All the Java primitive types map to an SQL type, and the Java String maps to VARCHAR. The java.sql package provides additional classes to map the remaining SQL types to Java. The two types that are particularly interesting are BLOB and CLOB.
BLOB and CLOB are SQL datatypes for storing large amounts of data. BLOB, which stands for Binary Large OBject, references large amounts of binary data. CLOB, which stands for Character Large OBject, references large amounts of text data. These types have distinct advantages over VARBINARY and VARCHAR when large amounts of data are being stored:
BLOBandCLOBhave a much larger maximum data size. The exact size is dependent on the database vendor implementing theBLOBorCLOBdata types, for example OracleCLOBandBLOBdata types can be 4GB in size.Clients can stream the data rather than receive it in one big chunk.
The streaming capability has a significant effect on performance. Any data field size greater than 100KB is much better served using BLOB or CLOB. Rather than having the query blocked while all the data is being passed across the network, the streaming aspect allows the client to do lazy evaluation and not get the data until it actually needs that data.
Note
Refer to the section “Working with BLOB and CLOB Data Types” later in this chapter for further information.
You create the tables in the database using the standard SQL CREATE TABLE command. The data in the table is modified using INSERT, UPDATE, and DELETE. You can search the database by using the SELECT command. These are the five most commonly used commands in SQL. The UPDATE, DELETE, and SELECT commands introduce the WHERE clause. Again, this section provides only a very brief introduction to SQL, so you should refer to the documentation from your database vendor for more detailed information on SQL commands.
WHERE Clause. The WHERE clause is a Boolean statement that compares column values with matching criteria. The keyword WHERE is followed by a matching pattern that is used to filter which rows are affected by the command. The simplest WHERE clause is to compare the values in a column against a specific value. For example, if you want to search for all the books by your favorite author, you use the WHERE clause with the SELECT command:
WHERE author_name = 'MY_FAVORITE_AUTHOR'
Tables are joined by having a common key field as a column in multiple tables. The one-to-one, one-to-many, and many-to-many relationships are established this way. For example, the Books and Authors tables must be joined for you to be able to search for all the books by your favorite author. Joining tables effectively allows you to create a new temporary table that includes columns from multiple tables. The WHERE clause defines the matching criteria for which rows to select.
Note
Refer to the example shown with the SELECT command later in this chapter to see how to join tables.
The WHERE clause also supports much more complex pattern matching. Some additional features are the wildcard character %, which will match a string of characters. For example, the WHERE clause for finding all names that start with C would be stated as follows:
WHERE name LIKE 'C%'
You can create extensive WHERE clauses using AND, OR, and IN. The AND keyword is equivalent to the && logical operator in Java, and OR is equivalent to the || logical operator in Java. The IN keyword is a unique operator that allows you to perform subquery operations. This capability is necessary when no direct relationship exists between the tables; therefore, a simple join is not possible. For example, the database may also contain a table of publishers with a one-to-many relationship between publishers and books. There is still no direct relationship between authors and publishers. In this case, you must use a subquery. An example of a subquery using the IN keyword is provided in the Select section later in this chapter.
As you can see, there are endless possibilities with the patterns that can be matched with the WHERE clause. Additional examples are covered with the SELECT command.
CREATE. You use the CREATE command to create tables in the database. Each table has a name and a list of columns. Each column has a name, type, and optional modifier. The name is of your choosing, and the type must be a valid SQL datatype. The two most common modifiers are shown in Table 13.2.
Table 13.2. Common Column Modifiers
Column Modifier | Description |
|---|---|
| Indicates this column is the primary key |
| Indicates this column cannot have a null value |
Note
You should always verify the column modifiers your database allows, for example Oracle also provides the DEFAULT, CHECK, and UNIQUE modifiers to enforce referential integrity and data validation for database tables.
The syntax of the CREATE command is
CREATE TABLE table_name (
    column_1_name column_1_type column_1_modifier,
    column_n_name column_n_type column_n_modifier )
Note
The column modifier is an optional specification. The column will only have a column modifier if it is the PRIMARY_KEY column, or the value for the column must be NOT_NULL.
INSERT. You use the INSERT command to add data to an existing table. The table must have been created previously. The data values must match the datatype for the column. The command must be repeated for each row of data being inserted.
The syntax of the INSERT command is
INSERT INTO table_name ( column_1_name, column_n_name )
VALUES (value_1, value_n )
UPDATE. You use the UPDATE command to modify data that was inserted into the table. The WHERE clause matches which rows are modified. All rows that match the WHERE clause are updated. If the WHERE clause is not specified, every row in the table is updated, which is rarely what is desired.
The syntax of the UPDATE command is
UPDATE table_name
SET column_1_name = value_1
   column_n_name = value_n
WHERE column_name = value
DELETE. You use the DELETE command to delete rows from the table. The WHERE clause matches which rows are deleted. All rows that match the WHERE clause are deleted. If the WHERE clause is not specified, every row in the table is deleted, so you should be careful about using this command.
The syntax of the DELETE command is
DELETE FROM table_name
WHERE column_name = value
SELECT. You use the SQL commands described in the preceding sections to create and modify the database, but unless you can query the database, the data does not have much value. You use the SELECT command to search for rows in the database. The WHERE clause in the SELECT statement determines which rows are selected. If the WHERE clause is not specified, every row in the table is selected. In this case, that result may be exactly what you want.
The syntax of the SELECT command is
SELECT column_1_name, column_n_name
FROM table_name
WHERE column_name = value
The topic of joining tables was introduced in the discussion of the WHERE clause. You can generate a search result that selects columns from joined tables. A key factor is that the tables share some common value that can be compared. The syntax of a SELECT command that joins tables is
SELECT table_1.column_name, table_2.column_name
FROM table_1, table_2
WHERE table_1.key_column = table_2.key_column
For example, to select books with the corresponding author, you must join the Books table to the Authors table using the author_id as the key column:
SELECT books.book_name, authors.author_name
FROM books, authors
WHERE books.author_id = authors.author_id
The term subquery was also introduced in the discussion of the WHERE clause. Using a subquery is necessary when a search is being performed and there is no direct relationship between the tables. To search for all the authors of a particular publisher, you can use the following SELECT command:
SELECT authors.author_name
FROM authors, books
WHERE books.author_id = authors.author_id
AND books.book_id IN
( SELECT publishers.book_id
  FROM publishers, books
  WHERE publishers.publisher_name = 'MY_PUBLISHER'
  AND books.publisher_id = publisher.publisher_id )
Some additional keywords and clauses are used with the SELECT command. The two most common are the COUNT keyword and the ORDER BY clause. The COUNT keyword returns the number of rows that matched the search without returning the actual data. To find out how many books are in your database, you can use this SELECT command:
SELECT count(*) FROM BOOKS
To have the results sorted, you use the ORDER BY clause with the SELECT command. To sort all the authors in the database by name, use the following SELECT command:
SELECT * FROM authors ORDER BY author_name
The performance of your application is greatly influenced by how well you create your queries. You should make your WHERE clauses specific enough to return only the data in which you are interested. Do not select the entire table and parse through it on the client side; let the database server do some of the work for you. It is designed to be more than just a storage place for data. The performance issue is the primary reason to become knowledgeable about SQL database programming.
For a final example, you will perform a correlated subquery to select the five books from the database with the highest rating. With a correlated subquery, an entire SELECT statement is used in the WHERE clause of an outer SELECT. The difference here is that the subquery is now specific to each row in the outer query. This is a far more efficient way to search the database because much less data is being passed from the server to the client. Here, we will show how a well thought-out WHERE clause forces the database server to do most of the work, and your client receives only the data that it really wants.
The Categories table has the rating column, with additional columns to allow join relationships for the book and author. To select the book_name for the five highest rated books, you use the following:
SELECT b.book_name, a.author_name
FROM authors a, books b, categories c
WHERE c.book_id = b.book_id AND
c.author_id = a.author_id AND
5 >= ( SELECT count(*) FROM categories cc
WHERE cc.rating >= c.rating );
The action to insert or update data into the database often requires multiple SQL statements. For example, you want to insert all the books for a particular author. The concept is referred to as a transaction, which is a group of SQL commands that either complete as a group or fail as a group. The SQL commands to control transactions are COMMIT and ROLLBACK.
By default, the database is in auto-commit mode, which means each SQL command is considered a transaction and is auto-committed. If auto-commit is disabled, the database server waits for an explicit COMMIT command before it modifies any entries in the database. If a ROLLBACK command is issued, all SQL commands since the last COMMIT are discarded. In JDBC, commit and rollback are performed with the Connection object.
The JDBC Core API is straightforward and intuitive. A simple application that queries a database is basically a five-step process. The steps are as follows:
Load the JDBC driver.
Get a
Connectionfrom theDriverManager.Create a
Statementfrom theConnection.Execute an SQL command.
Check the results.
The primary JDBC classes and interfaces used by the application are DriverManager, Connection, Statement, and ResultSet. They are located in the java.sql package.
The distributed processing and performance requirements of J2EE applications require additional capabilities and features for the database connectivity. An entity EJB may perform hundreds of database accesses per minute. The database architecture may also be implemented across a cluster of database storage providers. The JDBC 2.0 Optional Package addressed these issues and provided support for distributed transactions and connection pooling. Once again, the client application is freed from the details of the database implementation. As with all database-specific details, this is encapsulated within the JDBC driver. The one task you must be aware of is how to choose the proper JDBC driver to meet your needs. To support distributed transactions and connection pooling, you must select a Type 3 multi-tier JDBC driver in conjunction with a Type 1, 2 or 4 driver to access the back-end database.
Connection pools can be utilized from HTTP servlets or EJBs using the WebLogic Pool Driver. A standalone Java client must use the WebLogic RMI Driver in order to use connection pools. Distributed transactions require the WebLogic JTS Driver. The JDBC driver selection is explained further in the “Using the DriverManager” section.
The JDBC driver performs the actual communication with the database. It is hidden from your application by the DriverManager. This means your application never directly invokes methods on the JDBC driver. The Java SDK comes with a JDBC driver known as the JDBC-ODBC bridge. It can communicate with any database that supports the Open Database Connectivity (ODBC) introduced by Microsoft. It is really meant to be used only for learning JDBC. It has performance penalties and limitations that make it unsuitable for production software. The JDBC-ODBC bridge is loaded into your application in a fairly unique fashion. It automatically registers itself with the DriverManager when it is loaded. The Java code to load the JDBC-ODBC bridge is shown in Listing 13.1.
Example 13.1. Loading the JDBC-ODBC Bridge
// load the JDBC-ODBC bridge
try {
  Class.forName( "sun.jdbc.odbc.JdbcOdbcDriver" );
}
catch( ClassNotFoundException x ) {
  System.err.println( x.toString() );
}
The JDBC specification defines four categories for JDBC drivers, as represented in Table 13.3. These categories allow you to select a JDBC driver that meets your performance and deployment needs.
Table 13.3. Categories of JDBC Drivers
BEA WebLogic provides JDBC drivers that are much more reliable and robust than the JDBC-ODBC bridge. The WebLogic drivers offer much higher performance because they do not translate between JDBC and ODBC; they interact with the database directly. The WebLogic drivers are marketed as the jDriver line of JDBC drivers. Instead of loading the JDBC-ODBC bridge, you create a static instance of the WebLogic database driver:
// create a static instance of the Weblogic JDBC driver
static {
  new Weblogic.jdbc.jts.Driver();
}
BEA WebLogic offers JDBC drivers of types 2 and 3. The complete list of JDBC driver types provided by BEA WebLogic is shown in Table 13.4.
Tip
When you’re choosing a driver, your first decision depends on the ability to connect to the database you intend to use. Second, the performance and features offered by the JDBC driver determine which driver best suits your needs.
Table 13.4. JDBC Drivers Provided by BEA WebLogic
Like all Type 2 drivers, the Oracle client installation is required for this JDBC driver. The WebLogic jDrivers for MS SQL Server, Informix, and Sybase also are included with the WebLogic Server distribution. Being Type 4 drivers, they offer a pure Java interface into the database.
The Type 3 Multitier JDBC drivers come in three flavors: RMI Driver, Pool Driver, and JTS Driver. As mentioned previously, Type 3 drivers support distributed transactions and connection pooling. A brief description of each driver in Table 13.5 shows its strongest points.
Table 13.5. Three Multitier JDBC Drivers
JDBC drivers from third-party vendors can be configured for WebLogic Server. They are the Oracle Thin Driver and the Sybase jConnect Driver. Both are pure Java, Type 4, JDBC drivers that provide connectivity to their respective databases. These drivers come bundled with the WebLogic Server distribution.
The Connection object is obtained through a static method of the DriverManager. You must load a JDBC driver prior to getting a connection from the DriverManager. The static method name is DriverManager.getConnection(). Three parameters are passed to this method: the JDBC URL, database user, and database password. The JDBC URL specifies the protocol, which is always jdbc; the subprotocol; and the database identifier. If you are using the JDBC-ODBC bridge, the URL would be the following string:
"jdbc:odbc:DATABASE_ID"
The DATABASE_ID is the name registered by your database administration software to identify the database. On a Microsoft Windows system, the DATABASE_ID is typically the Data Source Name for the ODBC database. If you are using the BEA WebLogic jDriver, the JDBC URL is
"jdbc:Weblogic:jts:ejbpool"
The user and password are also set by the database administration software. The getConnection() method is overloaded to pass only the URL parameter if the database is not password protected. Like most of the JDBC methods, getConnection() throws an SQLException to indicate an error condition. The Java code to get a Connection object using the WebLogic jDriver is
Connection con;
try {
  con = DriverManager.getConnection( "jdbc:Weblogic:jts:ejbpool" );
} catch( SQLException x ) {
  System.err.println( x.toString() );
}
The Statement object is obtained by calling the createStatement() method on your Connection object. It is used to submit SQL commands to the database. Previously, we noted that the most common SQL commands are CREATE, INSERT, DELETE, UPDATE, and SELECT. You use the SELECT command to query the database and the other four commands to update or modify the database. The Statement interface includes executeUpdate() and executeQuery() methods, which have a return value corresponding to the expected results for the SQL command being executed (see Table 13.6). The executeUpdate() method is used with CREATE, INSERT, DELETE, and UPDATE. The return value is an int that contains the number of rows affected in the database. The executeQuery() method is used with SELECT. The return value is a ResultSet that contains the results that match the query.
Table 13.6. Statement Interface Methods
Statement Method | Return Type | Description |
|---|---|---|
| The parameter is an SQL statement as a | |
| The parameter is an SQL SELECT statement as a |
Assuming that con is a Connection object that was created previously, the Java code to create a Statement object from the Connection object is
// create Statement object from Connection
Statement stmt = con.createStatement();
With the Statement object named stmt, you call either the executeQuery() or executeUpdate() method, depending on the SQL command that you want to perform.
The parameter to executeQuery() and executeUpdate() in the Statement class is a String representing an SQL command. Generating this String can be a very complex, unreadable series of concatenations. The string constants containing SQL keywords are interspersed with the table names, column names, and values that make up your SQL command. Listing 13.2 shows a simple example that uses INSERT to add elements into a table.
Example 13.2. Example Using INSERT to Add Elements into a Table
private int update(
Connection con, String table_name,
String column_name, String value )
{
    Statement stmt = con.createStatement();

    String command =
"INSERT INTO " + table_name + " ( " + column_name + " ) " +
"VALUES ( " + value + " )";

return stmt.executeUpdate( command );
    }
The PreparedStatement class gives a much more readable interface for building complex SQL commands over the string concatentation required for the executeUpdate() method. There is also an added bonus: Using this class is a much more efficient way to send the SQL command to the database. When the PreparedStatement object is created, the SQL for the command is immediately sent to the database. Through the PreparedStatement object, you can bind new and different parameters before each execution of the statement, thus allowing you to reuse the prepared SQL command over and over. Listing 13.3 shows a rewrite of the update() method in Listing 13.2 using PreparedStatement.
Example 13.3. Rewrite of the update() Method Using the PreparedStatement
private int update(
Connection con, String column_name,
String value)
{
    PreparedStatement ps = con.prepareStatement(
    "INSERT INTO TABLE_NAME ( ? ) VALUES ( ? )" );
ps.setString( 1, column_name );
ps.setString( 2, value );

int count = ps.executeUpdate();
ps.close();

return count;
    }
A ResultSet object is the return value from the executeQuery() method. It provides methods to navigate through the selected rows and retrieve the values from individual columns. Remember, each column in the table of a relational database has a column name and column type. The column name is a String. Table 13.1 in the “SQL Datatypes” section earlier in this chapter showed how to map between SQL datatypes and Java types. The ResultSet API includes a separate getXXX() method for each type of column data. You therefore must know what type of data is stored in the column and use the appropriate getXXX() method. All the getXXX() methods, shown in Table 13.7, are overloaded to take either a column index or a column name as the parameter. The column index is 1 relative; the first column is column 1.
Table 13.7. The getXXX() Methods
Statement Method | Return Type | Column Type |
|---|---|---|
|
|
|
|
|
|
|
|
|
|
|
|
|
|
|
|
|
|
|
|
|
|
|
|
|
|
|
|
|
|
|
|
|
|
|
|
|
|
|
|
|
|
|
|
|
|
|
|
|
|
|
|
|
You can use various methods in ResultSet to navigate through the rows. Typically, you just want to start at the beginning and work through to the end. This approach is analogous to treating the ResultSet as an enumeration. The most straightforward way is to use the next() method. Immediately upon return from the executeQuery() method, the ResultSet cursor appears just before the first row. Therefore, the first call to next() sets the current position to the first row. Each subsequent call to next() increments the current position by one row. The next() method continues to return true until you move past the last row. This makes it well suited for the Boolean expression of a while() statement, as shown in Listing 13.4.
Example 13.4. Boolean Expression of a while() Statement
// Query the database for all columns in the Authors table
ResultSet rs = stmt.executeQuery( "SELECT * from Authors" );
// parse through the ResultSet of an SQL Query
while( rs.next() ) {
  // display the Author's name
  System.out.println( "Author's name is " + rs.getString( "author_name" );
}
The ResultSet interface includes the two methods getBlob() for accessing the data in a column of type BLOB, and getClob() for accessing the data in a column of type CLOB. The return value from these methods is a java.sql.Blob or java.sql.Clob object, respectively. The APIs for BLOB and CLOB are similar; both allow the query result data to be accessed in chunks or as a data stream. The difference is that BLOB accesses the data as an array of bytes, and CLOB accesses the data as an array of characters.
In the example shown in Listing 13.5, you will add a column to the Authors table that contains a JPG image of the author. This data value is stored in the database as a large amount of binary data. The BLOB datatype is used as the column type for the table to contain the JPG image data. The SQL INSERT command stores the image data into the BLOB using PreparedStatement.
Example 13.5. Example of SQL INSERT Command Storing Image Data into the BLOB Using PreparedStatement
/**
    Store image data as BLOB in database
    @param    con        Connection
    @param table_name    String
    @param column_name    String
    @param    image        byte[]
    @exception        SQLException
*/
public void storeImage(
Connection con, String table_name, String column_name, byte[] image )
throws SQLException {
    PreparedStatement ps = con.prepareStatement(
    "INSERT INTO TABLE_NAME ( ? ) VALUES ( ? )" );
ps.setString( 1, column_name );
ps.setObject( 2, image );
int count = ps.executeUpdate();
ps.close();
    }
To retrieve the BLOB data from the database, you must execute a SELECT command that returns the BLOB column in the ResultSet (see Listing 13.6). From the ResultSet, get the JDBC BLOB object. The API for java.sql.Blob provides the methods getBytes(), to retrieve the data as a byte[], and getBinaryStream(), to read the data from an InputStream.
Example 13.6. Retrieving an Image from a Database
/**
    Retrieve image from database
    @param    con        Connection
    @param    table_name    String
    @param    column_name    String
    @return        image data
    @exception    Exception
*/
public byte[] retrieveImage( Connection con, String table_name, String column_name )
throws SQLException {
    Statement statement = con.createStatement();
    ResultSet rs = statement.executeQuery(
"SELECT " + column_name + " FROM " + table_name );
        rs.next();
        Blob b = rs.getBlob();
        int len = (int)b.length();
        return b.getBytes( 0, len );

    }
A complete JDBC example is provided in Listing 13.7 to show the syntax and semantics of using the JDBC API. It uses the JDBC-ODBC bridge as the driver. This is what the bridge is intended for, to allow Java developers to learn how to interact with an SQL relational database using JDBC. Production software would use a commercial-quality JDBC driver, such as WebLogic jDriver, to benefit from the higher performance and robustness. This Bookstore JDBC example creates and queries the Authors and Books tables described previously. The BookStore class includes a main() method and therefore can be compiled and run as a stand-alone application. In this simple client/server example, the BookStore is the client, and a database server is the server. A query will be performed to join these two tables. The application will perform the following steps:
Load the JDBC-ODBC bridge.
Get a
Connection.Create a
Statement.Create the tables.
Insert data into the tables.
Query the database by joining tables.
Example 13.7. Java Source for Bookstore Example
/** The Book Store JDBC Example. */
public class BookStore {
  // constants
  private static final String JDBC_DRIVER =
"sun.jdbc.odbc.JdbOdbcDriver";
  private static final String JDBC_URL =
    "jdbc:odbc:bookstore";
  // object attributes
  private Connection con;
  private Statement stmt;
  /** Default Constructor
      @param user database user
      @param pswd database password
      @exception ClassNotFoundException  failed to load driver
      @exception SQLException  failed to get connection
  */
  public BookStore( String user, String pswd )
  throws ClassNotFoundException, SQLException {
    // load the JDBC driver
    Class.forName( JDBC_DRIVER );
    // get Connection
    con = DriverManager.getConnection( JDBC_URL, user, pswd );
    // create Statement
    stmt = con.createStatement();
  }
  /** Create table
      @param sqlCommand String
      @exception SQLException  failed to execute SQL command
  */
  public void createTable( String sqlCommand )
  throws SQLException {
    // perform the SQL update
    statement.executeUpdate( sqlCommand );
  }
  /** Insert Data
      @param sqlCommand String
      @return numRows  numbers of rows inserted
      @exception SQLException  failed to execute SQL command
  */
  public void insertData( String sqlCommand )
  throws SQLException {
    // perform the SQL update
    int rowCount = statement.executeUpdate( sqlCommand );
    return rowCount;
  }
  /** Query
      @param sqlCommand String
      @exception SQLException  failed to execute SQL command
  */
  public ResultSet query( String sqlCommand )
  throws SQLException {
    // perform the SQL query
    ResultSet rs = statement.executeQuery( sqlCommand );
    return rs;
  }
  /** Main method */
  public static void main( String[] args ) {
    // SQL commands to create tables
    String authorTable =
      "CREATE TABLE authors ( " +
      "author_id INTEGER PRIMARY KEY, " +
      "author_name VARCHAR(40) )";
    String bookTable =
      "CREATE TABLE books ( " +
      "book_id INTEGER PRIMARY KEY, " +
      "author_id INTEGER, " +
      "book_name VARCHAR(80) )";
    // Author Data
    String[] authorData = { "Twain", "Shakespeare" };
    // Book Data
    Object[][] bookData = {
      { new Integer( 1 ), "Huckleberry Finn" },
      { new Integer( 2 ), "Romeo and Juliet" },
      { new Integer( 2 ), "Julius Caesar" } };
    try {
      BookStore books = new BookStore( "dbuser", "dbpswd" );
      books.createTable( authorTable );
      books.createTable( bookTable );
      // insert author data
      for( int I = 0; I < authorData.length; I++ ) {
        books.insertData( "INSERT INTO authors" +
          " ( author_id, author_name ) VALUES ( " +
           (I + 1) + ", " + authorData[ I ] + ")" );
      // insert book data
      for( int I = 0; I < bookData.length; I++ ) {
        books.insertData( "INSERT INTO books" +
          " ( book_id, author_id, book_name ) VALUES ( " +
           (I + 1) + ", " +
           bookData[ I ][ 0 ] + ", " +
           bookData[ I ][ 1 ] + ")" );
      // query database
      ResultSet rs = books.query(
        "SELECT books.book_name, authors.author_name " +
        "FROM books, authors " +
        "WHERE books.author_id = authors.author_id" );
      // display results
      while( rs.next() ) {
        System.out.println(
          rs.getString( 0 ) + ", " + rs.getString( 1 ) );
      }
    } catch( Exception x )
      System.err.println( x.printStackTrace() );
  }
}
BEA WebLogic Server provides services for JDBC. The J2EE services for JDBC are
Connection Pools
MultiPools
DataSources
TxDataSources
JDBC Data Source Factories
Each of these services are configured through the WebLogic Administration Console. A description of the service and how to configure and use the service is provided in the following sections.
Tip
Each field in the configuration form in the WebLogic Administration Console is preceded with a “?” character. Click on the “?” to view context sensitive help for the particular field.
Connection pooling provides a significant performance enhancement by maintaining a set of open database connections. These ready-to-use connections are made available by a connection pool, which saves the overhead of creating connections whenever an application wants to connect to the database. WebLogic Server can also load balance database connections by dynamically shrinking and increasing the number of connections in a connection pool to a database based upon peak and off-peak workload conditions.
The connections in the connection pool are accessed through a DataSource or TxDataSource. Through the DataSource, the application borrows a connection from the connection pool, uses it, and returns it to the connection pool by closing it.
To create a connection pool using the Administration Console, follow these steps:
From the Administration Console, expand the JDBC node in the left pane.
Click the Connection Pools node, which will display all the connection pools defined in your domain in the right pane.
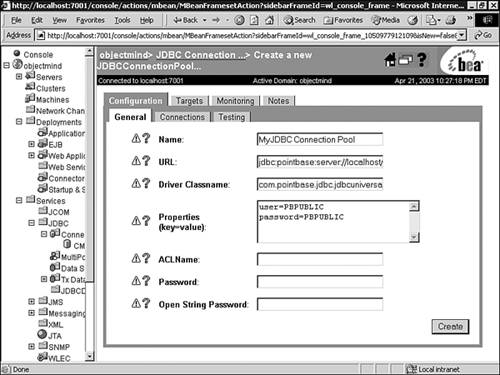
Click the Configure a New JDBC Connection Pool text link. A new page will display in the right pane (Configuration, General tab) allowing you to configure a new connection pool. The fields in the configuration form for a new connection pool are described in Table 13.8.
Enter values in the Name, URL, Driver Classname, Properties, and Passwords attribute fields. These connection pool general attributes are described in Table 13.8.
Table 13.8. The Connection Pool Fully Encapsulates the Configuration for the DriverManager
For example, in order to create a connection pool named MyConnectionPool for the demo Pointbase database provided with WebLogic Server, you would enter the following values, as shown in Figure 13.4:
Name = MyConnectionPool
URL = jdbc:pointbase:server://localhost/demo
Driver Classname = com.pointbase.jdbc.jdbcUniversalDriver
Properties = user=PBPUBLIC, password=PBPUBLIC
Click Create to create a connection pool instance with the name you specified in the Name field. The new instance is added under the Connection Pools node in the left pane.
Click the Configuration, Connections tab and change the attribute fields or accept the default values, as shown in Figure 13.5. The value for the Initial Capacity attribute must be at least 1 in order for WebLogic Server to establish a database connection when the server is started. Click Apply to save your changes.
Click the Targets tab and assign the connection pool to your WebLogic servers or clusters, as shown in Figure 13.6. Click Apply to save your changes.


Once you have created your connection pool, you can have your database connections verified and monitored by WebLogic Server by setting the attributes in the Configuration, Testing tab of your connection pool in the Administration Console. Setting these attributes allows WebLogic Server to test a database connection with a test table in your database before and/or after assigning and releasing a database connection from the connection pool. Since this procedure will add a small delay in either serving a client requesting a database connection, or releasing a database connection back to the connection pool, you should use this option for development environments only.
The attributes for the Configuration, Testing tab, as shown in Figure 13.7, are:

Test Table Name—. The name of the table used when testing a physical database connection.
Test Reserved Connections—. Enables WebLogic Server to test a connection before giving it to a requesting client.
Test Released Connections—. Enables WebLogic Server to test a connection before returning it to the connection pool.
The TestTableName must exist and be accessible to the database user for the connection. Also, it is important to note that the default SQL code used to test a connection is
select count(*) from TestTableName
For this reason it is a good idea to set TestTableName to the name of a table that is known to have few rows, or even no rows, for example DUAL in Oracle, MEMBER in Microsoft SQL Server or USERS in Pointbase.
To monitor the status and activity of your connections using the Administration Console, follow these steps:
A MultiPool is a meta-pool, a pool of connection pools that provides load balancing or high availability for the connection pools which they contain.
MultiPools and Connection Pools are completely hidden from the application. As stated in the previous section, “Configuring and Using Connection Pools,” the application locates a DataSource and uses the DataSource for the database connection. The DataSource or TxDataSource is configured to be a member of a connection pool, which can be configured to be members of a MultiPool. Hence, the application accesses the DataSource while the application server provides the high performance through the connection pool configured for that DataSource. The load-balancing or high-availability of the connection pool is provided through the MultiPool configured for that connection pool.
To create a MultiPool using the Administration Console, follow these steps:
From the Administration Console, click to expand the JDBC node.
Click the MultiPools node, which will display the MultiPools defined in your domain.
Click the Configure a New JDBC MultiPool text link. A new page displays in the right pane showing the Configuration, General tab associated with configuring a new MultiPool, as shown in Figure 13.8.
In the Configuration, General tab enter values associated with the attributes described in Table 13.9.
Table 13.9. The Attributes to Create a MultiPool
Click Create to create a MultiPool instance which will be added under the MultiPools node in the left pane.
From the Configuration, Pools tab select the connection pools from the Pool List in the Available column that you want to assign to your MultiPool.

The DataSource is an enhancement to JDBC and is provided in the JDBC Optional Package. DataSources provide access to connection pools to establish database connectivity, and therefore must be created for each individual connection pool you have defined.
Create and configure DataSources through the WebLogic Administration Console by following these steps:
In the left pane of the Administration Console, click to expand the JDBC node.
Click the Data Sources node. The Data Sources table displays in the right pane showing all the data sources defined in your domain.
Click the Configure a New JDBC Data Source text link. A new page displays in the right pane showing the Configuration tab for creating a new DataSource, as shown in Figure 13.9.
Enter values in the Name, JNDI Name, and Pool Name attribute fields, and at a minimum accept the default values for the other attributes. A description of the attributes associated with creating a new DataSource are described in Table 13.10.
Table 13.10. The Administration Console Attributes for Creating a New DataSource
Click Create to create a data source. The new data source will be added under the Data Sources node in the left pane.
Click the Targets tab and select one or more target servers in the Available column to which you want to assign the data source.

The TxDataSource is a DataSource that supports distributed transactions. Distributed transactions are the subject of Chapter 16, which also describes TxDataSources and how to configure them.
The JDBC DataSource Factories are used by entity EJBs to produce database connections from a connection pool. To configure a JDBC DataSource Factory using the Administration Console, follow these steps:
Set up a JDBC connection pool in the Administration Console, described earlier in the “Configuring and Using Connection Pools” section.
In the left pane, click Services and expand JDBC.
Select JDBC DataSource Factories and in the right pane click the Configure a New JDBC DataSource Factory text link. A new page displays in the right pane showing the Configuration tab for creating a new JDBC DataSource Factory, as shown in Figure 13.10.
In the displayed Configuration tab, enter values for the Name, User Name, URL, Driver Class Name, and Factory Name attribute fields. These attributes are described in Table 13.11.
Table 13.11. Configuring the JDBC DataSource Factories
Field Name
Description
Name:
Any name of your choosing as long as no other WebLogic server configurations are using it.
User Name:
The user name to connect to the database. This may be overridden by the user-name element in the deployment descriptor.
URL:
The URL to connect to the database. This may be overridden by the
urlelement in the deployment descriptor.Driver Classname:
The JDBC driver to connect to the database. This may be overridden by the
driver-nameelement in the deployment descriptor.Factory Name:
The name of this DataSource factory. This is the name that is referenced by the
connection-factoryelement in weblogic-application.xml.Properties:
Click Create to create the JDBC Data Source Factory. The new Data Source Factory will be added under the JDBC DataSource Node in the left pane.

Note
▸ For further information on JDBC DataSource Factories see Chapter 21, “Managing Persistence—Entity Beans,” p. 655.
Now you are ready for advanced techniques using JDBC. The persistence of stored data for J2EE applications is provided through JDBC DataSource connections communicating with a relational database server. If the persistence management for an entity EJB is bean-managed, you must write JDBC code in your entity bean. The ejbCreate() method inserts the attributes of the bean as a new row in the database table. The ejbFindByPrimaryKey() method queries the database to find a row that matches the primary key. The attributes of the bean object are updated with the results returned from the SELECT operation.
The BookEntityBean is an entity EJB that is implemented using bean-managed persistence. The primary purpose for this example is to show how and where JBDC is used in an Enterprise JavaBean.
Note
Refer to Chapter 21 for further information on entity EJBs.
The BookEntityBean contains three attributes: book_id, author_id, and book_name. The ejbCreate() method for this bean inserts a new row into the books table of the database containing these three fields. A BookEntityPK object is then created using the book_id as the primary key for this entity EJB. The ejbFindByPrimaryKey() method performs a query on the database to select the row with the matching book_id. The columns from the matching row are used to initialize the corresponding attributes of the BookEntityBean object.
This example was created using Together ControlCenter version 6.0. An Entity EJB was added to the class diagram using the Entity EJB tool. The Properties Inspector includes an EJB Entity tab, which allows you to set the Persistence Management to Bean managed. The ejbCreate() and ejbFindByPrimaryKey() methods in the generated code must be modified to include your JDBC statements. The code is commented with
//Write your code here
to indicate where your code modifications should be entered. Figure 13.11 illustrates the class diagram for the BookEntityBean example, while Listing 13.8 details the Java source code for the BookEntityBean example.

Example 13.8. Java Source for BookEntityBean Example
/* Generated by Together */
import java.sql.SQLException;
import java.sql.DriverManager;
import java.sql.Connection;
import java.sql.PreparedStatement;

/**
 * @ejbHome <{BookEntityHome}>
 * @ejbRemote <{BookEntity}>
 * @ejbPrimaryKey <{BookEntityPK}
 * @ejbTransactionAttribute Required
 * @persistent*/
public class BookEntityBean implements javax.ejb.EntityBean {
    private javax.ejb.EntityContext ctx;
    public int book_id;
    private int author_id;
    private String book_name;

    public void setEntityContext(javax.ejb.EntityContext context) throws javax.ejb.EJBException {
        ctx = context;
    }

    public void unsetEntityContext() throws javax.ejb.EJBException {
        ctx = null;
    }

    public void ejbActivate() throws javax.ejb.EJBException {
    }

    public void ejbPassivate() throws javax.ejb.EJBException {
    }

    public void ejbRemove() throws javax.ejb.EJBException {
    }

    public void ejbStore() throws javax.ejb.EJBException {
    }

    public void ejbLoad() throws javax.ejb.EJBException {
    }

    public BookEntityPK ejbCreate() throws javax.ejb.CreateException, javax.ejb.EJBException, SQLException {
        // Write your code here
        // insert a row into the database containing this object's attributes
        try {
            Connection con = openConnection();
            PreparedStatement ps = con.prepareStatement(
                "INSERT INTO books ( book_id, author_id, book_name ) " +
                "VALUES ( ?, ?, ? )" );
            ps.setInteger( 1, getBook_id() );
            ps.setInteger( 2, getAuthor_id() );
            ps.setString ( 3, getBook_name() );
            if( ps.executeUpdate() != 1 ) {
                throw new CreateException( "Failed to create a row in the database" );
        ps.close()
            }

            BookEntityPK pk = new BookEntityPK();
            pk.book_id = book_id;
            return pk;
        } catch( Exception x ) {
            throw new CreateException( x.getMessage() )
        }

        return null;
    }

    public void ejbPostCreate() throws javax.ejb.CreateException, javax.ejb.EJBException, SQLException {
            // Write your code here
        }

    public int getBook_id(){ return book_id; }

    public void setBook_id(int param){ this.book_id = param; }

    public BookEntityPK ejbFindByPrimaryKey(BookEntityPK pk) throws javax.ejb.FinderException, javax.ejb.EJBException {
            // Write your code here
            // refresh this object's attributes by searching the database
            // for the primary key
            if( pk == null ) {
                throw new FinderException( "primary key cannot be null" );
            }

            try {
                Connection con = openConnection();
                PreparedStatement ps = con.prepareStatement(
                    "SELECT author_id, book_name FROM books " +
                    "WHERE book_id = ?" );
                ps.setInteger( 1, pk.book_id );
                ps.executeQuery();
                ResultSet rs = ps.getResultSet();
                if( rs.next() ) {
                    book_id = pk.book_id;
                    author_id = rs.getInt( 1 );
                    book_name = rs.getString( 2 );
                } else {
                    throw new FinderException( "Could not find " + pk.book_id );
                }
                ps.close();
            } catch( Exception x ) {
                throw new FinderException( x.getMessage() );
            }

            return pk
        }

    public int getAuthor_id(){ return author_id; }

    public void setAuthor_id(int property){ this.author_id = property; }

    public String getBook_name(){ return book_name; }

    public void setBook_name(String property){ this.book_name = property; }

    // create a static instance of the database driver
    static {
        new Weblogic.jdbc.jts.Driver();
    }

    // get Connection from DriverManager
    public Connection openConnection() throws SQLException {
        return DriverManager.getConnection( "jdbc:Weblogic:jts:ejbPool" );
    }

}
This chapter provided an overview of the JDBC Core API. The topics addressed the needs of the majority of database applications. The PreparedStatement object introduced in this chapter is just one of many topics for advanced JDBC. The advanced needs for JDBC focus on extended functionality. The JDBC Core API offers everything that most programmers require. The additional extended functionality provided by JDBC includes
Stored Procedures
Batch Processing
Meta-Data
In the description of the SELECT statement, it was noted that you should create smart queries to let the database server do most of the work for you. Stored procedures take the idea of putting the database to work a step further. A stored procedure is a method that is built into the database. From your application you call this procedure and can also pass parameters to it. There are some very significant advantages to using stored procedures:
Most database engines pre-compile stored procedures, therefore, they run much faster than dynamic SQL.
Errors in the procedure can be identified at compile time rather than runtime.
The application developer only needs to know the name of the procedure and its input and output parameters. Since the implementation is hidden, you do not need to know the schema of the data being accessed.
The JDBC class CallableStatement is used to prepare and execute the stored procedure. The CallableStatement object is returned from the Connection object with the method prepareCall(). The parameter to prepareCall() is a String that identifies the stored procedure name and parameter list. Once the statement is prepared, invoke the execute() method to run the stored procedure.
Listing 13.9 shows a sample of a stored procedure that is written in Oracle’s stored procedure language. For this example we have added a price column to the books table. The parameter to this stored procedure is a book_name. The stored procedure will reduce the price of the book by 10%.
Example 13.9. Stored Procedure Example
CREATE OR REPLACE PROCEDURE discount_book
(name IN VARCHAR,
pr IN OUT FLOAT) IS
BEGIN
SELECT price
INTO pr
FROM books
WHERE book_name = name;

pr := pr * 0.90;

UPDATE books
SET price = pr
WHERE book_name = name;
END;
Assuming con is an open JDBC Connection object, Listing 13.10 shows the JDBC code to call this stored procedure.
Example 13.10. Java Source Calling a Stored Procedure Example
try {
    CallableStatement st = con.prepareCall( "{call discount_book[(?,?)]}");
    st.setString(1, MY_FAVORITE_BOOK);
    st.registerOutParameter(2, java.sql.Types.FLOAT);
    st.execute();
    System.out.println( "New price is " + st.getFloat(2);
}
catch( Exception x ) { x.printStackTrace();}
There are two distinct modes of processing data with a database. So far, we have dealt exclusively with online processing. This is basically an interactive process where a user is waiting for the results. Alternatively, batch processing is a set of transactions that are processed in the background. Most likely you are familiar with the term batch as used with computer applications. Listing 13.11 shows an example to set the price for a list of books using batch processing.
Example 13.11. Java Source for Batch Processing Example
String[] titles = { "title_1", "title_2", "title_3" };
float[] prices = { 29.99, 7.98. 14.92 };
Statement st = con.createStatement();
for( int i = 0; i < titles.length; i++ ) {
    st.addBatch( "UPDATE books SET price = " + price[i] +
    "WHERE book_name = " + titles[i] );
}
int[] rows = st.executeBatch();
The return value from executeBatch() is an array of int containing each of the individual return values.
Meta-Data is a means whereby you can interrogate the schema of the database. The concept is very similar to reflection or runtime type identification in Java. JDBC meta-data is provided by two classes: java.sql.ResultSetMetaData and java.sql.DatabaseMetaData. The ResultSetMetaData class is obtained from a ResultSet object using the getMetaData() method. The executeQuery() method of Statement has been covered. In addition, the Statement class has an execute() method that can be used for an SQL command. This method returns true if the command returned a ResultSet, and false otherwise. The getResultSet() method on the Statement object is used to get the ResultSet. The information that can be derived from a ResultSetMetaData is
The getColumnCount() method returns the number of columns in the ResultSet. From this value, a for loop can be used to get specific information about individual columns. The getXXX() methods take an int column index as a parameter, which is 1 relative. Listing 13.12 shows an example of using ResultSetMetaData to list all the column names for a table.
Example 13.12. Java Source for Meta-Data Example
private void dumpMetaData( String sqlStatement ) {
    try {
        Statement st = con.createStatement();
        if( st.execute( sqlStatement ) ) {
        ResultSet rs = st.getResultSet();
        ResultSetMetaData meta = rs.getMetaData();
        int count = rsmd.getColumnCount();
        for( int i = 1; i <= count; i++ )
            System.out.print( meta.getColumnLabel( i ) );
        System.out.println();
    } catch( Exception x ) { x.printStackTrace(); }
}
While ResultSetMetaData relates to a ResultSet, DatabaseMetaData relates to an open Connection. The type of information that can be derived from the DatabaseMetaData includes
As stated at the beginning of this chapter, the data in a relational database is defined by a schema. The DatabaseMetaData allows you to retrieve the schema which contains a ResultSet of catalog names. Each catalog name can be passed to the getTables() method of DatabaseMetaData along with table matching parameters to get the tables for that particular catalog. The API for java.sql.DatabaseMetaData provides methods to retrieve all the information described in the preceding list. Listing 13.13 uses DatabaseMetaData to retrieve the schemas for the database connection in a ResultSet.
JDBC is a powerful, full featured, technology to access relational databases. The elegance is that it manages to maintain a relatively simple API while offering extensive features. A novice user can quickly learn the syntax and semantics to query the database and parse through the ResultSet. Much more sophisticated users can fully control and manipulate the schema and stored data of the database all from a JDBC application. JDBC is one of the most essential features of the J2EE architecture with its ability to reliably store the persistent Enterprise Java Beans and other associated application data.