
In This Chapter
In today’s organizations, the movement toward distributed computing is influencing a requirement for software processes (applications and components) to interact with each other and exchange information across heterogeneous technology languages, platforms, and protocols.
The Java Message Service is a Java API that is an important part of J2EE because it defines a common set of Java interfaces and semantics for Java applications to create, send, receive, and read messages via an enterprise messaging system, which within a distributed application framework can serve as an ideal integration point for applications, including legacy and external systems. Messaging products, commonly referred to as Message-Oriented Middleware (MOM), enable separate software applications and components (clients) to communicate and coordinate their activity via messages by providing critical services such as message queuing, guaranteed once-and-only-once delivery, priority delivery, and transaction support.
It is important to understand that JMS is a Java API for accessing Message-Oriented Middleware for the production, distribution, and delivery of asynchronous and transaction-oriented messages. When the JMS API was first introduced in 1998, its mission was to enable Java applications to interoperate with MOMs such as MQSeries from IBM and TIB/Rendezvous from TIBCO Software. Today, many messaging system vendors have adopted and implemented the JMS API, which minimizes the interfaces a Java developer has to learn to leverage a messaging system. Developers writing in other languages have their own APIs for accessing MOM services. Hence, a J2EE application can use JMS to send a message and a C++ application can use a C++ API to receive a message. Communication between these decoupled components can span both machine and language boundaries.
With the addition of the JMS API to the J2EE 1.3 platform 1.3, any J2EE component (an Enterprise JavaBean or a Web component) can send or synchronously receive a JMS message. Also, message-driven beans can be used to enable the asynchronous consumption of messages, and message sends and receives can now participate in Java Transaction API (JTA) transactions.
The real power of JMS is derived from the fact that the communication format is a message, which provides a level of abstraction that enables you to separate the details about the destination system from the source application code. For example, using JMS, a component can send a message to a destination, and the recipient can retrieve it from that destination. However, the sender and receiver do not have to be available at the same time in order to communicate, or need to know anything about each other. They both only need to know what message format is being used to communicate and what destination to use to send and receive the message. In this respect, messaging differs from tightly coupled technologies such as Remote Method Invocation (RMI) or Remote Procedure Calls (RPC), which both require an application to know a remote application’s interface (methods).
There are many scenarios where JMS messaging is a preferred communication means over a tightly coupled technology API:
An application needs to be operational whether or not all components are up and running simultaneously.
An application enables a component to send information to another component and continues to operate without receiving an immediate response.
The application’s components are prone to change frequently; hence other interoperating components should minimize knowledge of the interfaces as much as possible.
You will find the concept of messaging very prevalent in manufacturing systems, financial services applications, health services applications, auctioning and community-based trading, workflow systems, supply-chain systems, and many others that need to leverage loosely coupled and asynchronous communication.
Also, with the industrywide adoption of XML, there are several organizations and industry consortia working on developing common XML DTDs and schemas for e-commerce interchange. In fact, BEA WebLogic Integration (WLI) includes B2Bi and Business Process Management (BPM) functionality based largely on XML delivered over JMS. To learn more about the features and capabilities of WebLogic Integration, see Chapter 33, “Introducing WebLogic Integration (WLI).”
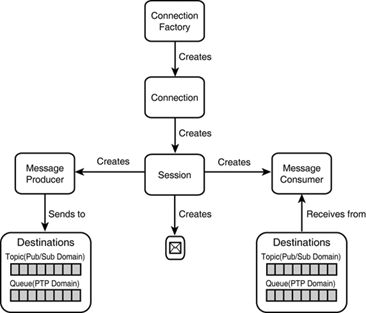
The first step in understanding JMS from a programming or administration perspective is becoming familiar with the architecture of a simple JMS application. As illustrated in Figure 15.1, a simple JMS application is comprised of the following components and messaging concepts:
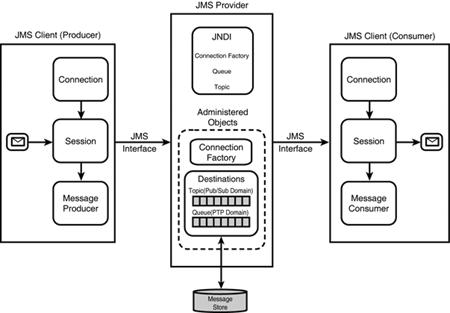
JMS provider is a messaging product that implements the JMS interfaces and provides administrative and control features. An implementation of J2EE 1.3 includes a JMS provider, such as WebLogic Server.
JMS clients are the Java programs or components that produce and consume messages.
Java Naming and Directory Interface (JNDI) provides a server lookup facility.
Messages are the objects that communicate information between JMS clients. The JMS specification defines the structure of a JMS message.
Connection objects represent an open communication channel between an application and the JMS provider, and are used to create a session for the production and consumption of messages.
Session provides a single threaded context for sending and receiving messages.
MessageProducer is an object created by a session that is used for sending messages to a destination.
MessageConsumer is an object created by a session that is used for receiving messages sent to a destination.
Administered objects are preconfigured JMS objects created by an administrator for the use of clients. There are two kinds of administered objects:
Administered Objects are stored in the naming service Java Naming and Directory Interface (JNDI) for access by clients.
JMS Interfaces define a set of message interfaces that are implemented by the JMS provider.
JMS Domains classify the type of messaging a MOM supports:
Point-to-Point (PTP) messaging is built around the concept of message queues. Each message is addressed to a specific queue; clients extract messages from the queue(s) established to hold their messages.
Publish and subscribe (Pub/Sub) clients address messages to some node in a content hierarchy. Publishers and subscribers are generally anonymous and may dynamically publish or subscribe to the content hierarchy. The system takes care of distributing the messages arriving from a node’s multiple publishers to its multiple subscribers.
JMS provides client interfaces tailored for each of these messaging domains.
Note
Non-JMS clients are programs that use a messaging product’s native client API instead of the JMS API. If the application predated the availability of the JMS API, it is likely to include both JMS and non-JMS clients.
Messaging systems are divided into two categories or domains. These are the Point-to-Point (PTP) and Publish/Subscribe (Pub/Sub) domains. The JMS specification does not require JMS providers to support both messaging domains. However, WebLogic Server, and most competing products, implement both.
Note
Before the JMS API existed, most messaging products supported either the point-to-point or the publish/subscribe approach to messaging.
The defining concept in the point to point domain is the message queue. Producers send messages to a queue, which serializes the messages into a linear order. Hence, when consumers receive messages from the queue, the messages are taken in a first-in, first-out (FIFO) order, as illustrated in Figure 15.2. Every message in the queue is associated with a single producer and more importantly, a single consumer. However, multiple producers and consumers can share a single message queue. Queues have the added advantage of holding messages until they are consumed. Many applications use message queues as a way of deferring certain non-essential or time-consuming tasks (like logging) to be handled when resources are available.
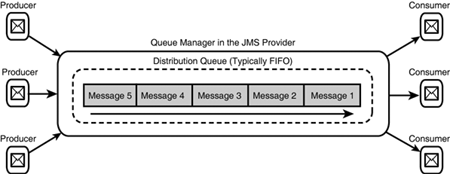
The JMS API does not define how queues are created or managed. In WebLogic Server, developers and administrators use the WebLogic Administration Console to create, manage, and configure message queues. Administrators will normally create and configure queues and developers will write clients that access them.
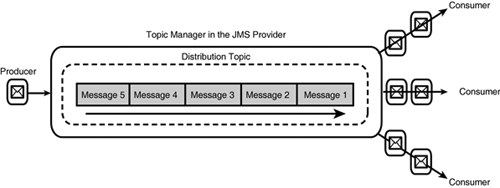
In the Publish/Subscribe domain the topic is the analog of the queue. Message producers publish messages to a topic and multiple consumers (called subscribers) receive messages from the topic, as illustrated in Figure 15.3.
Note
Having publishers publish to a topic instead of a list of subscribers—and the anonymity between publishers and subscribers—decouples the publishers and subscribers.
Topics retain messages for as long as it takes to distribute them. However, there is a timing dependency between publishers and subscribers, where a topic can only consume messages after a client has created a subscription to that topic, and the subscriber must be active in order for it to consume messages. The JMS API relaxes this timing dependency by enabling clients to create durable subscribers, which guarantees messages will be delivered to them, even if the subscribers are inactive for a period. When a disconnected durable subscriber comes back online, the topic delivers all the waiting messages to that durable subscriber. Hence, when all messages for a topic must be received, a durable subscriber should be used. If missed messages are tolerable, non-durable subscribers should be used.
A stock ticker application is an example of a scenario where pub/sub messaging domain would be applicable, as a topic can be created for each stock. When the price of the stock changes, the new price is reflected in the topic. The MOM would at this point be responsible for broadcasting the stock price (message) to the connected subscribers to that specific topic (stock).
In some non–JMS-based broadcast messaging systems, subscribers receive all messages within the system. The client then has to implement some sort of filtering solution. In fact it is often the case that every client must filter out important messages from noise. The problem with such a system is twofold. First, every client must do this filtering. Second, the message server has to deliver messages to clients who will eventually filter them out. This wasted effort has tremendous performance implications.
JMS enables message consumers to register a message selector with the JMS provider, which defines filtering logic indicating which messages will be delivered to the consuming client. Importantly, this filtering is performed by the JMS provider and not by the client. Therefore the server does not have to send any unnecessary messages.
JMS message consumption occurs in one of two ways:
Synchronously, where a client explicitly fetches the message from the destination by calling the
receivemethod. Thereceivemethod can block further processing until a message arrives, or it can time-out if a message does not arrive within a specified time duration.Asynchronously, where a client can define a message listener, which is similar to an event listener. Whenever a message arrives at the destination, the JMS provider delivers the message by calling the listener’s
onMessagemethod, which acts on the contents of the message.
JMS message delivery covers a range of once-and-only-once to at-least-once delivery. In the once-and-only-once delivery mode, a message is guaranteed by the JMS provider to arrive at the intended destination, and it is sent once. To implement a guaranteed delivery, the JMS provider uses a store-and-forward mechanism and rigidly defined message acknowledgments.
Note
The store-and-forward mechanism is implemented by a JMS provider using a persistent backing store (file or JDBC database).
In the at-least-once delivery mode, the JMS provider is permitted to lose a message once in a while. An example of an at-least-once delivery mode is the broadcast of stock price information, where if a message does not reach its intended destination, another message will be sent quickly. This type of delivery mode typically uses non-persistent messages, which are stored in the memory of the JMS provider and are guaranteed to be delivered at least once unless there is a system failure. If a connection is closed or recovered, all non-persistent messages that have not yet been acknowledged will be redelivered. Once a non-persistent message is acknowledged, it will not be redelivered.
The JMS API defines several interfaces that message servers must implement to support the two messaging domains. Client applications will interact with the server using these interfaces. Each interface has two forms to support the PTP and Pub/Sub domains. Table 15.1 shows the base interface and the specialized versions for the two domains.
To make a messaging scheme work, all participants must agree on just what a message is. The JMS API defines a basic message structure that is not only simple, but also very flexible, allowing messages to be created to match formats suitable for non-JMS applications on heterogeneous platforms.
As illustrated in Figure 15.4, a JMS message object is composed of Header fields, a set of application-specific properties, and a message body.
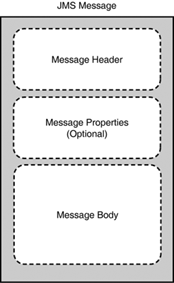
A header contains values used by both clients and providers to identify and route messages, for example the destination, a reply-to destination, the message type, and the message expiration time. All messages support the same standard set of header fields as described in Table 15.2.
Table 15.2. JMS Supported Message Types
These fields contain a set of application-defined name/value pairs that are accessible via the getter and setter methods on the Message object.
Although message property fields may be used for application-specific purposes, JMS provides them primarily for use in conjunction with message selectors for filtering messages by the consumer.
A JMS message body contains the content being delivered from a producer to a consumer. JMS provides five types of message bodies that extend javax.jms.Message, which consists of message headers and properties, but no message body. The message types supported by WebLogic JMS are described in Table 15.3.
Table 15.3. JMS Supported Message Types
All JMS clients, both JMS senders and receivers, use the following basic steps to access a JMS server:
Look up a JMS ConnectionFactory in JNDI.
Use the ConnectionFactory to create a JMS Connection.
Use the Connection to create one or more Sessions.
Look up one or more Destinations (Queue or Topic) in JNDI.
Use the Sessions and Destinations to create the MessageProducers and MessageConsumers.
Instruct the Connection to start the delivery of messages.
Figure 15.5 illustrates the preceding steps in the context of a JMS client.
The following section will describe each of these components in detail.
A JMS Connection Factory is an abstraction that hides provider-specific connection configuration information from clients and enables JMS applications to create a Connection. Typically, it is the responsibility of the WebLogic Administrator to define and configure one or more uniquely named connection factories via the WebLogic Administration Console. Upon startup WebLogic Server binds the connection factories to the WebLogic JNDI namespace, which enables JMS clients the capability to look up a connection factory.
Note
A Connection Factory supports concurrent use, enabling multiple threads to access the object simultaneously.
WebLogic JMS defines one default connection factory that can be looked up using the JNDI name, weblogic.jms.ConnectionFactory. You only need to define a connection factory if this default provided by WebLogic JMS is not suitable for your application.
Caution
With WebLogic Server, you have no control over the JMS server on which the default connection factory may be deployed. However, you can create a new connection factory and specify the appropriate JMS server target(s).
The ConnectionFactory class does not itself define any messaging methods. For this reason its subclasses define methods for the respective messaging models (PTP and Pub/Sub) as follows:
A connection object encapsulates a virtual connection between an application and the JMS provider, and is used to create a Session for producing and consuming messages. Like connection factories, connections come in two forms—the QueueConnection (PTP) or the TopicConnection (Pub/Sub) interface. For example, after you have a QueueConnectionFactory or TopicConnectionFactory object, you can use it to create a connection.
Clients use a Session to send or receive messages. Sessions are single-threaded. The Session interfaces (QueueSession and TopicSession) provide methods to create MessageProducers and MessageConsumers. Sessions order the messages sent to them and also persist messages until they are delivered. In a non-transacted session, the application creating the session can select one of the following acknowledgement modes for its messages:
Session.AUTO_ACKNOWLEDGE—. The acknowledgement is sent by the session after the consumer has finished processing the message.Session.CLIENT_ACKNOWLEDGE—. The acknowledgement has to be sent programmatically by the consumer of the message.Session.DUPS_OK_ACKNOWLEDGE—. The acknowledgement is sent by the session after the consumer has finished processing the message. This acknowledgement allows duplicate messages to be sent in case an acknowledgement is lost or if an initial attempt to deliver a message fails.Session.NO_ACKNOWLEDGE—. A message is removed from the destination after it is consumed. The session does not send any acknowledgements. This mode is supported for applications that do not want to incur the associated overhead of session acknowledgement.Session.MULTICAST_NO_ACKNOWLEDGE—. Messages sent to aMULTICAST_NO_ACKNOWLEDGEsession share the same characteristics asNO_ACKNOWLEDGEmode.
In a transacted session, only one transaction is active at any given time. Any messages sent or received during a transaction are treated as an atomic unit and the acknowledgement mode is ignored. However, when a transaction commits, all the messages that the application received during the transaction are acknowledged by the messaging system. If an application rolls back a transaction, the messages that the application received during the transaction are not acknowledged and messages it sent are discarded.
Because sessions represent resources, like MessageServer connections, it is important to invoke close() on a connection to ensure that critical resources are released before the garbage collector frees the associated object.
A destination is the object a JMS client uses to specify the target of the messages it produces and the source of the messages it consumes. In a PTP messaging domain, destinations are called Queues, and in the Pub/Sub messaging domain, destinations are called Topics.
Similar to a connection factory, a WebLogic administrator defines and configures the destination and WebLogic Server adds it to the WebLogic JNDI namespace during startup.
The JMS API also enables you to create destinations (TemporaryQueue and TemporaryTopic objects) that last only for the duration of the connection in which they are created. Temporary destinations are private to the application in which they are created. Any session created by the same connection as the temporary destination can create consumers for it. However, Sessions created by other connections cannot. If you close the connection that the temporary destination belongs to, the destination is closed and its contents are lost. If you create a temporary destination and specify it as the value of the JMSReplyTo message header field, the consumer of the message can use the JMSReplyTo field as the destination to which it sends a reply and can also reference the original request by setting the JMSCorrelationID header field of the reply message to the value of the JMSMessageID header field of the request.
JMS Queues and Topics extend javax.jms.Destination with the following Destination subclasses:
Queue(PTP)—. The JMS PTP provider.TemporaryQueue(PTP)—. JMS PTP provider, and exists for the duration of the JMS connection in which the messages are created.Topic(Pub/Sub)—. The JMS Pub/sub provider.TemporaryTopic(Pub/Sub)—. The JMS PTP provider exists for the duration of the JMS connection in which the messages are created.
MessageProducer is an interface that encapsulates the functionality necessary to send messages. There are two specialized versions of MessageProducers for the two messaging domains.
The QueueSender interface extends MessageProducer. PTP clients use QueueSender to send messages. When a client creates a QueueSender it is bound to a queue. The interface also has several overloaded send() methods. TopicPublisher is the Pub/Sub version of MessageProducer.
Clients use the MessageConsumer interface to receive messages. PTP clients use the QueueReceiver interface and Pub/Sub clients use topic subscriber.
Because JMS is asynchronous, the MessageConsumer interface provides asynchronous and synchronous receive methods to give developers a degree of control over the way messages are consumed. Table 15.4 describes the four ways to receive a message in JMS.
Table 15.4. JMS Supported Message Types
WebLogic Server provides a fully compliant JMS messaging service that is implemented as a JMS server—WebLogic JMS. WebLogic JMS strictly adheres to the JMS API specification 1.0.2b and provides the following feature set:
A single, unified messaging API that can be leveraged by other WebLogic Server APIs and facilities, such as Enterprise Java Beans (EJB), JDBC connection pools, servlets, and RMI.
Full support for the PTP and Pub/Sub messaging domains.
Support for durable subscribers by storing messages until the durable subscriber becomes active again to receive messages.
Support for distributed transactions and the two-phase commit protocol using Java Transaction API (JTA) transactions. JMS applications can also participate in transactions with other Java APIs that use JTA, including non-WebLogic XA-compliant message brokers.
Support for messages containing XML.
Support for Session acknowledgement-based delivery of messages by persistently storing messages until the consumer issues an acknowledgement reply that indicates a successful receipt of the message.
Support for multicasting, allowing the broadcast of messages to a select group of hosts using an IP multicast address.
Can use either a database or a file for persistent message storage.
Allows Administration objects to be configured by setting attributes from the WebLogic Administration Console and/or using the JMS API to override values.
Supports service continuity in the event of a WebLogic Server failure within a cluster by enabling you to configure multiple physical destinations (queues and topics) as members of a single distributed destination set. Through WebLogic distributed destinations, producers and consumers are able to send and receive messages. WebLogic JMS then distributes the messaging load across all available destination members within the distributed destination. When a member becomes unavailable due to a server failure, traffic is then redirected toward other available destination members in the set.
Using the Flow Control feature, you can enable a JMS server or destination to slow down message producers when WebLogic JMS determines that it is becoming overloaded.
The WebLogic Messaging Bridge enables you to configure a forwarding mechanism between any two messaging products, thereby providing interoperability between separate implementations of WebLogic JMS or between WebLogic JMS and another messaging product.
The Message Paging feature can free up virtual memory during peak message load periods by swapping out messages from virtual memory to persistent storage when message loads reach a specified threshold.
Provides support for the configuration of a server-side session pool that provides a pool of JMS Sessions that connection consumers can retrieve in order to process messages concurrently.
The following sections will describe the configuration and administration tasks related to the WebLogic JMS. Only after you have correctly configured a WebLogic JMS will you be able to develop a WebLogic JMS application, which is described in the section “Developing a WebLogic JMS Application” later in this chapter.
The basic configuration of WebLogic JMS involves using the Administration Console to perform the following tasks:
Configure a JMS store for the persistent storage of messages. (This step is only required if you need to support durable subscribers or enable JMS Paging feature.)
Configure a JMS server, the WebLogic messaging service.
Configure one or more destinations (Queues and Topics) for your JMS server.
Configure
ConnectionFactoriesto enable your JMS clients to create connections to your JMS server.
The following sections will describe each of these tasks using an operational WebLogic Server instance, which you must be able to access to via the Administration Console.
If your WebLogic JMS server will be supporting durable subscriptions by using the JMS Paging feature to free memory or you want in-flight messages to persist across server restarts, messages stored in memory must be written out to persistent storage. To enable persistent messaging you will need to perform the following tasks:
However, before configuring JMS stores, it is important you take the following into consideration:
No two JMS stores should be allowed to use the same database tables or files as this will result in data corruption.
If you intend to use a database store, it is recommended that you use a separate and empty database set up for high availability.
JMS persistent stores can increase the amount of memory required during the initialization (startup) of a WebLogic Server instance if there is a large number of stored messages increase. If initialization fails due to insufficient memory, increase the heap size of the Java Virtual Machine (JVM) proportionally to the number of messages that are currently stored in the JMS persistent store.
File persistence is much faster than JDBC because of the transactional overhead incurred by the database for read and write operations.
You can ensure your JDBC connection pools automatically reconnect to failed databases after they come back online by enabling the
TestConnectionsOnReserveattribute of the connection pool.
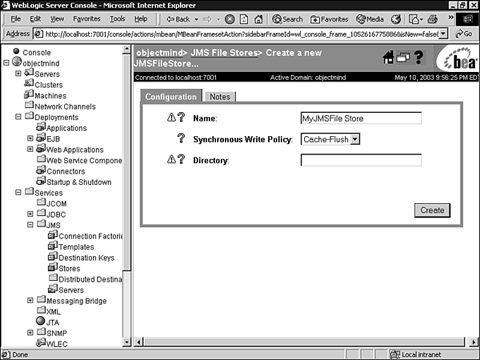
For storing persistent messages in a disk-based file, you must create a JMS file store by following these steps:
Create a directory on the file system of WebLogic Server where the JMS file store will be kept.
From the Administration Console, expand the JMS node.
Expand the Stores node. The JMS stores table displays in the right pane showing all the configured JMS stores.
In the displayed Configuration tab, shown in Figure 15.6, enter values for the following attributes:
Name: The name of the JMS file store.
Synchronous Write Policy: Select how the file store writes data to disk. The options are as follows:
Disabled—. File store writes are allowed to use both the operating system’s cache as well as the file system’s on-disk cache. This policy is the fastest, but the least reliable because power outages or operating system failures can cause lost or duplicate messages.
Cache-Flush—. Transactions cannot complete until all of their writes have been flushed down to disk. This policy is reliable and scales well as the number of simultaneous users increases.
Direct-Write—. File store writes are written directly to disk. This policy’s reliability and performance depend on operating system and hardware support of on-disk caches.
Directory: The directory on the local file system where the file-based persistent store exists.
Click Create to create a file store instance. The new instance is added under the Stores node in the left pane.
If you intend to leverage the JMS Paging feature, you must also repeat the above steps to configure an additional “paging” JMS file store for temporarily swapping message bodies out to disk when WebLogic Server’s memory allocation is exhausted. Hence, you could configure two file stores such as JMSFileStore and JMSPagingStore to take into account message persistence as well as paging.
WebLogic Server creates the JMS file store files in their specified directories once the file store has been assigned to an active JMS server that has queues or topics assigned to it receiving messages from a message producer.
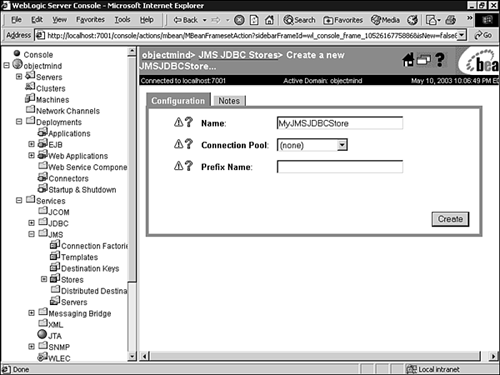
For storing persistent messages in a JDBC-accessible database, you must create a JMS JDBC store using the following steps:
Expand the JMS node.
Expand the Stores node and click the Configure a New JMSJDBCStore text link.
In the displayed Configuration tab, shown in Figure 15.7, enter values for the following attributes:
Name: The name of the JMS JDBC store.
Connection Pool: Select an existing JDBC Connection Pool that will be used to provide a connection to your target database.
Prefix Name: Enter a name that will serve as a prefix to easily identify the JMS tables created in your database. The default names for the JMS tables that will be created are JMSSTATE and JMSSTORE. For example, you can use “WebLogic_” as a prefix.
Click Create to create your JDBC store instance. The new instance is added under the Stores node in the left pane.
WebLogic Server will automatically create the JMS tables in the target database after the JMS JDBC Store has been assigned to a JMS server and WebLogic Server rebooted. During WebLogic Server’s initialization process, WebLogic Server uses the assigned connection pool to connect to the target database and create the JMSSTATE and JMSSTORE tables with the appropriate prefixes in the default schema defined for the connecting user.
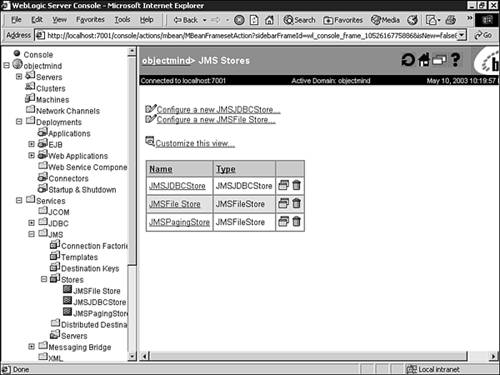
After you have created your JMS stores, you can view them by clicking the Stores node in the Administration Console. Figure 15.8 shows three stores—JMSFileStore, JMSPagingStore, and JMSJDBCStore.
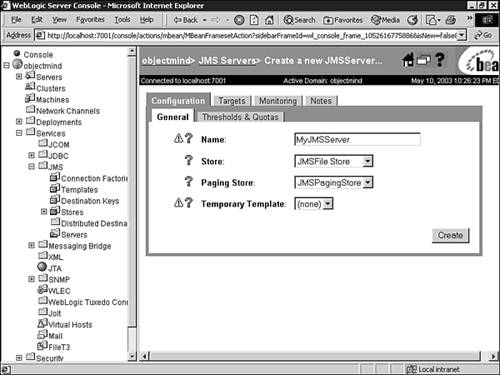
A WebLogic JMS server manages connections and message requests on behalf of JMS clients (JMS Producers and Consumers). Before you can configure any JMS Destinations (Queues or Topics), you must first configure a JMS server.
To create a JMS server using the Administration Console, follow these steps:
Expand the JMS Node in the left pane of the Administration Console and select Servers.
In the right pane, click the Configure a New JMSServer link.
In the displayed Configuration-General tab, enter values for the following attributes:
Name: Enter a unique name for the JMS server.
Store: Select the backing store used by the JMS server’s destinations. A value of none implies that destinations on this server will not support persistent messaging.
Paging Store: The name of the persistent store where non-persistent messages are paged for this JMS server. This store cannot be the same store used for persistent messages.
Temporary Template: Specifies the template that will be used to drive the attributes for all temporary destinations assigned to this JMS server. JMS store attributes are not inherited from JMS templates as temporary destinations do not support persistent messaging.
Figure 15.9 shows a sample configuration for a JMS server using existing JMS file and paging stores.
Click Create to create your JMS server.
Click the Targets Tab and select the target WebLogic Server to deploy the JMS server as follows:
If you select a WebLogic Server via the Servers tab, then when the target WebLogic Server boots, the JMS server boots as well. If no target WebLogic Server is specified, the JMS server will not boot.
If you select a WebLogic Server via the Migratable Targets tab, you are defining a user-preferred WebLogic Server instance in a WebLogic cluster that will boot the JMS server. However, if that server incurs a failure, the JMS server and all of its destinations will migrate to another WebLogic Server within the cluster to ensure messaging continuity.
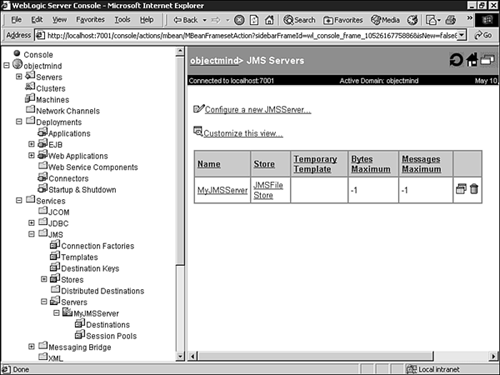
Your new JMS server will be added to the JMS servers node under the JMS node in the left pane of the Administration Console. By default, WebLogic Server also creates a Destination and Session Pool node under your new JMS server to enable you to configure associated Queues, Topics, and Session Pools, as shown in Figure 15.10.
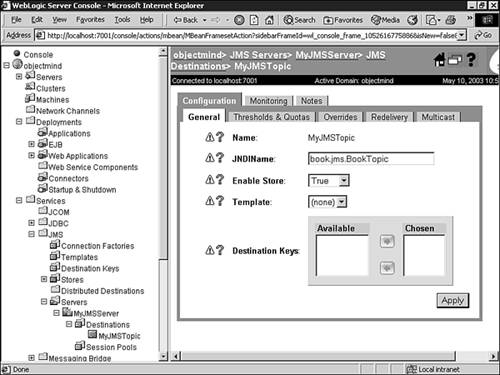
After defining a JMS server, you must configure one or more destinations for your JMS server. The steps to create a JMS queue or topic associated with your JMS server are very similar using the Administration Console, as follows:
Click the Destinations node under your JMS server instance node in the left pane of the Administration Console.
Click the Configure a new JMSQueue... text link to create a queue or click the Configure a new JMSTopic text link to create a topic.
In the displayed Configuration-General tab, enter the values for the following attributes:
Name: The name of the destination.
JNDIName: Enter the name used by clients to look up the destination in the JNDI namespace. If not specified, the destination name is not advertised through the JNDI namespace and cannot be looked up and used.
Enable Store: Flag specifying whether the destination uses the persistent store specified by the JMS server. If this flag is enabled (true), but no persistent store is defined for the JMS server, the configuration fails and WebLogic JMS does not boot. If this flag is disabled (false), the destination does not support persistent messages. If this flag is set to “default,” the destination uses the persistent store, if one is defined for the JMS server, and hence supports persistent messaging.
Template: The JMS template from which the destination is derived.
Destination Keys: These enable you to select destination keys that a topic or queue can use.
Figure 15.11 and Figure 15.12 show the JMS topic and queue configurations for the JMS application examples used later in this chapter.
Click Create to create your queue or topic instance for your JMS server.

You will need to reboot your WebLogic Server once you have configured your JMS server’s destinations.
If you will be creating many JMS destinations, it is a good idea to create a JMS template using the Administration Console. A JMS Template provides an efficient means of defining multiple destinations with similar attribute settings, enabling you to modify shared attribute settings dynamically simply by modifying the template. These configuration attributes are inherited by the destinations that use them, with the following exceptions:
If the destination that is using a JMS template specifies an override value for an attribute, the override value is used.
If the destination that is using a JMS template specifies a message redelivery value for an attribute, that redelivery value is used.
The Name attribute is not inherited by the destination as you must explicitly define a unique name for all destinations.
The JNDI Name, Enable Store, and Template attributes are not defined for JMS templates.
The Multicast attributes are not defined for JMS templates because they apply only to topics.
Any attributes that are not explicitly defined for a destination are assigned default values. If no default value exists, you must specify a value within the JMS template or as a destination attribute override; otherwise the configuration information will remain incomplete and the WebLogic JMS server will not start. You can define JMS templates for destinations from the Templates node in the Administration Console.
After you have created a JMS server and an associated destination object, you can specify thresholds and quotas to control the size and number of messages stored in the JMS server and destination objects, respectively.
You can use quotas to limit the number of messages or the size of all messages that can be stored. Messages sent after a quota has been exceeded are rejected and the sender is notified through an exception. Quotas can be used to control individual applications from consuming all resources within WebLogic JMS.
Thresholds are used to signal high or low load congestion periods based upon the number or size of the messages stored in the JMS server or destination. Upon exceeding an upper or lower threshold, triggered events are launched; for example messages are logged on the WebLogic Server indicating the respective threshold condition being exceeded.
To configure the thresholds and quotas for your JMS server or destination, select your JMS server or Destination node in the Administration Console, and then select the Threshold & Quotas tab. As shown in Figure 15.13, there are threshold and quota attributes related to the number of messages and size of messages.
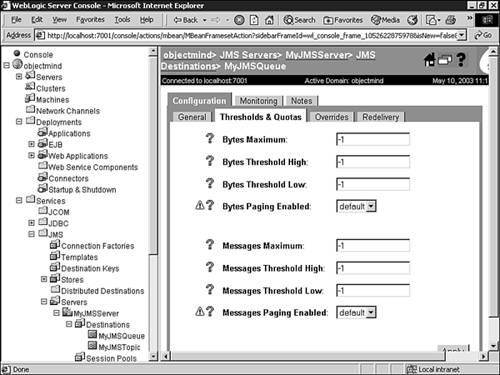
The default values, which are set to –1, imply there is no limit to the size or number of messages in your JMS server or destination object. You should understand the messaging behavior of your JMS application and the performance of your WebLogic Server under expected normal, off-peak, and peak operational conditions before you modify these default settings.
Note
▸ To learn how to performance test your WebLogic Server, see “Performance Tuning the WebLogic Server,” p. 1011.
In the event of a WebLogic Server instance failure within a WebLogic cluster, you can ensure JMS service continuity through the configuration of multiple physical destinations (queues and topics) as members of a single Distributed Destination set. Once configured, your producers and consumers look up the destination as a normal JNDI lookup and send/receive messages through what appears to be a single destination. Behind the scenes, WebLogic JMS distributes the messaging load across all the available destination members (Queues or Topics) within the distributed destination. In the event that a member (queue or topic) becomes unavailable due to a server failure, messaging traffic is redirected to the other available destination members in the destination set.
The following steps will describe how to create a JMS distributed topic:
Expand the JMS node and click the Distributed Destinations node.
In the right pane, click the Configure a New Distributed Topic link.
In the displayed Configuration-General tab, enter values for the following attributes:
Name: Uniquely identify the distributed topic within a WebLogic Server domain.
JNDI Name: Enter the name used to bind the distributed topic into the JNDI namespace.
Load Balancing Policy: Select how producers will distribute their messages across the members of a distributed topic. The valid values are Round-Robin and Random.
Figure 15.14 shows an example configuration for a distributed topic.
Click Create to create the distributed topic.
Click the Thresholds & Quotas tab and define the following attributes for all of the distributed topic members:
Click Apply to store the new attribute values.
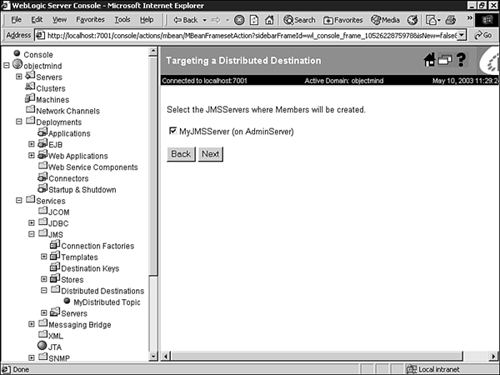
Click the Auto Deploy tab and click the Create Members on the Selected Servers (and JMS servers) link. An auto deploy dialog box prompts you to select one of the following options:
Select a cluster to target the distributed topic, and then click Next.
Accept the None option to bypass this dialog box so you can select an individual server.
Select a WebLogic cluster or None to proceed and select the target server(s) for the destination topic. All JMS servers that are deployed on the selected WebLogic Server instances, and that are not already hosting a distributed topic, will be listed and selected by default, as shown in Figure 15.5.
To exclude a JMS server from hosting the distributed topic member, clear the corresponding check box. If there are no existing distributed topic members on the selected JMS servers, one new JMS topic will be created on each JMS server and added as a member of the distributed topic.
Click Next to proceed to the final Auto Deploy dialog and click Apply to commit the changes.
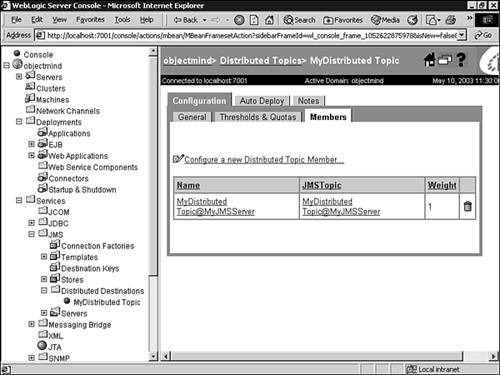
Click the Configuration-Members tab to view the topic members that were automatically created for the new distributed topic, as shown in Figure 15.16.

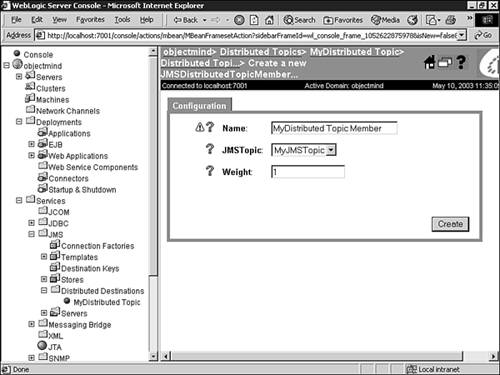
If, after you have created a distributed destination set, a requirement arises to add a previously configured destination, you can manually add your existing physical queues or topics as members to that set. The following steps describe how to add an additional member to a distributed topic set:
Expand the JMS node and the Distributed Destinations node to display your configured distributed destinations.
Select the distributed topic set to which you want to add a destination.
Click the Configure a new Distributed Topic Member in the right pane.
In the displayed Configuration tab, enter values for the following attributes:
Note
The random distribution load-balancing algorithm uses the weight assigned to the physical destinations to compute a weighted distribution for the set of physical destinations.
Figure 15.17 depicts adding the JMS topic named “MyJMSTopic” to an existing distributed topic set.
Click Create to create the new distributed topic member. The new member is added to the Distributed topic table.
If necessary, repeat steps 1–4 to continue adding topic members to the distributed topic set.
You can define and configure one or more uniquely named connection factories to create JMS connections with predefined attributes. Once created, WebLogic Server adds the connection factories to the JNDI namespace during startup, which JMS clients can retrieve using WebLogic JNDI. By default WebLogic JMS defines one connection factory, weblogic.jms.ConnectionFactory. However, all configuration attributes are set to their default values for this default connection factory, preventing you from having any control over the JMS server on which the connection factory may be deployed. For this reason, if you would like to target a connection factory to a particular JMS server, you must create a new connection factory and specify the appropriate JMS server target(s).
To create a new JMS connection factory, follow these steps:
Expand the JMS node.
In the right pane click the Configure a New JMS Connection Factory link.
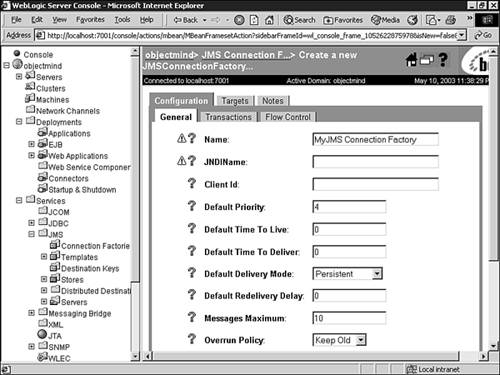
On the Configuration-General tab, shown in Figure 15.18, enter values in the following attribute fields:
Name: The name of the connection factory.
JNDIName: The JNDI name of the JMS connection factory, which is assigned to and used to look up the connection factory within the JNDI namespace.
Client ID: The client ID for a durable subscriber that uses this connection factory.
Default Priority: The priority for all messages for which a priority is not explicitly defined. All messages produced on a connection created with this connection factory will receive this value.
Default Time to Live: The default maximum length of time, in milliseconds, that a message will exist. A value of 0 indicates that the message has an infinite amount time to live. This attribute is primarily used for messages for which a priority was not explicitly defined.
Default Time to Deliver: Defines the delay, in milliseconds, between when a message is produced and when it is made visible on its destination.
Default Delivery Mode: A default persistent or non-persistent delivery mode used for messages for which a delivery mode is not explicitly defined.
Default Redelivery Delay: Defines the delay, in milliseconds, before rolled back or recovered messages are redelivered.
Messages Maximum: The maximum number of messages that may exist for an asynchronous session and that have not yet been passed to the message listener. A value of –1 indicates that there is no limit on the number of messages; however, the limit is set to the amount of remaining virtual memory.
Overrun Policy: When the number of outstanding messages reaches this attribute value, messages are discarded based on the specified policy. If set to Keep New, the most recent messages are given priority over the oldest messages, and the oldest messages are discarded, as needed. If set to Keep Old, the oldest messages are given priority over the most recent messages, and the most recent messages are discarded, as needed. Message age is defined by the order of receipt.
Allow Close In On Message: Indicates whether a connection factory creates message consumers that enable a close() method to be issued within its onMessage() method call.
Acknowledge Policy: Applies to implementations that use the CLIENT_ACKNOWLEDGE acknowledge mode for a non-transacted session. An acknowledge policy of Previous acknowledges all messages up to and including the message being acknowledged. An acknowledge policy of All ensures all messages received by the given session are acknowledged regardless of which message is being used to affect the acknowledge.
Load Balancing Enabled: Specifies whether non-anonymous producers created through a connection factory are load balanced within a distributed destination on a per-call basis.
Server Affinity Enabled: Specifies whether a WebLogic Server that is load balancing consumers or producers across multiple physical destinations in a distributed destination set will first attempt to load balance across any other physical destinations that are also running on the same WebLogic Server.
Click Create to create a new instance of a connection factory instance. The new instance is added under the JMS Connection Factories node in the left pane.
Click the Transactions tab and enter attribute values for transaction time-out, whether Java Transaction API (JTA) user transactions are allowed, and whether a transaction (XA) queue or XA topic connection factory is returned.
Click Apply to save your changes.
Click the Flow Control tab and enter attribute values that will enable a message producer to adjust its message flow.
Click Apply to save your changes.
Click the Targets tab and assign the connection factory to a WebLogic Server instance or a server cluster.
Click Apply to save your changes.
You will now need to reboot WebLogic Server to bind the JNDI name for this newly created JMS connection factory to WebLogic JNDI in order for message producers and consumers to gain a connection to your JMS server.
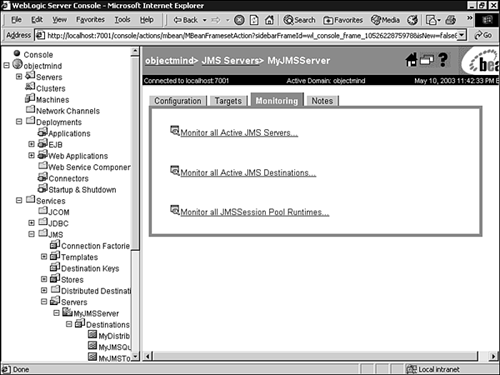
Once you have configured your JMS server, you can monitor run-time statistics related to your JMS server and all its associated destinations and session pools using the following steps:
Expand the JMS node in the left pane.
Click the JMS server node that you want to monitor.
In the right pane, select the Monitoring tab, as shown in Figure 15.19, to display the following text monitoring links:
Click the appropriate text link to view monitoring data for that JMS object.
JMS statistics continue to increment as long as the server is running. Statistics are only reset when WebLogic Server is rebooted.
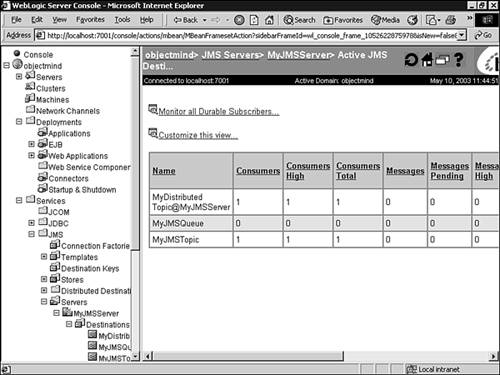
You can also monitor durable subscribers to the destinations associated with your JMS server using the following steps:
Expand the JMS node in the left pane.
Click the JMS server node that you want to monitor.
Click the Monitor All Active JMS Destinations link. A table displays in the right pane showing all active JMS destinations for the current domain, similar to Figure 15.20.
Click the Monitor All Durable Subscribers text link. Durable Subscribers information is displayed in a table in the right pane for all durable subscribers running (if any) for the destination topics listed in the table.
To view durable subscriber information for a specific topic, click the icon (or actual number) in the Durable Subscribers column for the desired topic.
All JMS clients need to access WebLogic’s JNDI to gain access to a ConnectionFactory. When connecting to WebLogic, clients need to specify the vendor-specific InitialContextFactory. The following sample code (see Listing 15.1) demonstrates obtaining an InitialContextFactory using RMI over a proprietary WebLogic protocol called “t3” to access the JNDI server. It is worth noting that the RMI specification uses JRMP as the default transport protocol but enables vendors to replace it with their own protocol—the RMI API is left untouched. Clients may need to pass username and password for authentication by the JNDI server. The InitialContext constructor may throw javax.naming.NamingException.
Note
Creating an InitialContext applies to both producers and consumers in the PTP and Pub/Sub domains.
Example 15.1. Creating a JNDI InitialContext Object
// Create a JNDI InitialContext
Properties props = new Properties() ;
props.put(
      Context.INITIAL_CONTEXT_FACTORY, "weblogic.jndi.WLInitialContextFactory");
props.put( Context.PROVIDER_URL, "t3://localhost:7001");

// Clients may need to authenticate
// props.put( Context.SECURITY_PRINCIPAL,  "username");
// props.put( Context.SECURITY_CREDENTALS, "password");

InitialContext ic = new InitialContext(props);
PTP and Pub/Sub clients are similar. They follow similar steps using different interfaces. PTP clients must acquire a QueueConnectionFactory and then use it to create a QueueConnection. The connection then serves as a session factory and creates a QueueSession.
PTP clients use the following code to acquire a connection factory, a connection, and a session:
// Lookup a Connection Factory in JNDI
QueueConnectionFactory qCF = (QueueConnectionFactory)ic.lookup("javax.jms.QueueConnectionFactory");

// Create a Connection
QueueConnection qCon = qCF.createQueueConnection();

// Create a Session
QueueSession qSession = qCon.createQueueSession(false,Session.AUTO_ACKNOWLEDGE);
PTP producers need to look up a queue in JNDI. The JNDI name is designated when the queue is created in the WebLogic Administration Console:
// Lookup the Queue
Queue queue = (Queue)ic.lookup("book.jms.BookQueue");
After getting the queue, a producer needs to create a QueueSender to actually send messages. Clients use the session to create a sender bound to the queue:
// Create a QueueSender bound to the Queue
QueueSender qSender = qSession.createSender(queue);
Next the client creates a message. In this example the client creates a TextMessage and initializes it with “Hello World!”:
// Create a TextMessage
TextMessage mes = qSession.createTextMessage("Hello World!");
Finally the client starts the connection and sends the message five times. Then the client closes the connection.
 qCon.start() ;
    for (int i = 0; i<5; i++ ) {
      qSender.send(mes);
    }
 finally {
   try {
        qCon.close();
        qSender.close();
        qSession.close();
   }
   catch (JMSException je) {
       System.out.println(je);
   }
 }
Listing 15.2 provides the complete PTPProducer JMS application.
Example 15.2. The PTPProducer JMS Application
import javax.naming.*;
import javax.jms.*;
import java.util.*;

public class PTPProducer {

  private final static String NAMING_FACTORY=
                       "weblogic.jndi.WLInitialContextFactory";
  private final static String QCON_FACTORY="javax.jms.QueueConnectionFactory";
  private final static String MESSAGE_QUEUE="book.jms.BookQueue";

public static void main ( String[] argv )
      throws NamingException, JMSException
  {
      QueueConnection qCon = null;
      QueueSender qSender = null;
      QueueSession qSession = null;

    try {

      // Create a JNDI initial context
      Properties props = new Properties() ;
      props.put( Context.INITIAL_CONTEXT_FACTORY, NAMING_FACTORY);
      props.put( Context.PROVIDER_URL, "t3://localhost:7001");
      InitialContext ic = new InitialContext(props);

      // Look up a Connection Factory in JNDI
      QueueConnectionFactory qCF =
                 (QueueConnectionFactory)ic.lookup(QCON_FACTORY);

      // Create a Connection
      qCon = qCF.createQueueConnection();

      // Create a Session
      qSession =
              qCon.createQueueSession(false,Session.AUTO_ACKNOWLEDGE);

      // Lookup the Queue
      Queue queue = (Queue)ic.lookup(MESSAGE_QUEUE);

      // Create a QueueSender bound to the Queue
      qSender = qSession.createSender(queue);

      // Create a TextMessage
      TextMessage mes = qSession.createTextMessage("Hello World!");

      // Start the Queue, send the message
      qCon.start()
         for (int i = 0; i<5; i++ ) {
           qSender.send(mes);
           System.out.println("Sending Hello World - " + i +
                              " to the JMS Queue");
         }
    }
    catch ( NamingException e ) {
           System.out.println(e);
    }
    finally {
       //Release all JMS resources
        try {
             qCon.close();
             qSender.close();
             qSession.close();
        }
        catch (JMSException je) {
            System.out.println(je);
        }
    }
  }
}
PTP consumers share the basic steps with PTP producers. The differences begin after acquiring a queue. A PTP consumer must get a QueueReceiver to interact with the queue as follows:
// Create a QueueReceiver bound to the Queue
QueueReceiver qReceiver = qSession.createReceiver(queue);
The PTP consumer uses a blocking read in an endless loop to receive messages from the queue. Listing 15.3 provides the entire PTPConsumer JMS application.
Example 15.3. The PTPConsumer JMS Application
import javax.naming.*;
import javax.jms.*;
import java.util.*;

public class PTPConsumer {

  private final static String NAMING_FACTORY=
                             "weblogic.jndi.WLInitialContextFactory";
  private final static String QCON_FACTORY="javax.jms.QueueConnectionFactory";
  private final static String MESSAGE_QUEUE="book.jms.BookQueue";

  public static void main ( String[] argv ){

    try {

      // Create a JNDI initial context
      Properties props = new Properties() ;
      props.put( Context.INITIAL_CONTEXT_FACTORY, NAMING_FACTORY);
      props.put( Context.PROVIDER_URL, "t3://localhost:7001");
      InitialContext ic = new InitialContext(props);

      // Look up a Connection Factory in JNDI
      QueueConnectionFactory qCF =
                             (QueueConnectionFactory)ic.lookup(QCON_FACTORY);

      // Create a Connection
      QueueConnection qCon = qCF.createQueueConnection();

      // Create a Session
      QueueSession qSession =
                        qCon.createQueueSession(false,Session.AUTO_ACKNOWLEDGE);

      // Look up the Queue
      Queue queue = (Queue)ic.lookup(MESSAGE_QUEUE);

      // Create a QueueReceiver bound to the Queue
      QueueReceiver qReceiver = qSession.createReceiver(queue);

      // Start the Queue, send, and close
      qCon.start() ;

      TextMessage msg;

         while( true ) {
           msg = (TextMessage)qReceiver.receive();
           System.out.println(msg.getText()) ;
          }
    } catch ( NamingException e1 ) {
      System.out.println(e1);
    } catch ( JMSException e2 ) {
      System.out.println(e2);
    }
  }
}
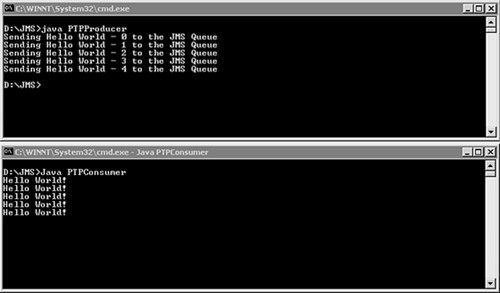
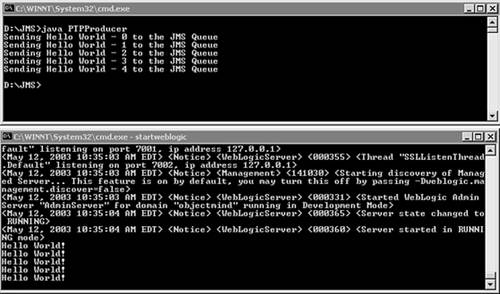
To run the PTPProducer and PTPConsumer JMS applications, follow these steps:
Compile respective java files using the javac utility.
Start WebLogic Server and ensure you have a JMS server configured with a JMS Queue identified through the JNDI name “book.jms.BookQueue”.
Start a command shell for each of the JMS applications, PTPProducer and PTPConsumer, and also set the appropriate Java environments in each shell session.
Launch the PTPProducer and PTPConsumer JMS Application through the following commands in their respective command shell sessions:
java PTPProducer

java PTPConsumer
Figure 15.21 shows the PTPProducer sending messages and the PTPConsumer receiving messages.
JMS Clients are not limited to blocking receive calls. Clients may create and register listeners to listen asynchronously for JMS messages. These listeners are classes that implement javax.jms.MessageListener. This interface has only one method, public void onMessage(Message msg). Using a message listener requires a JMS consumer to first register as a listener for a specific destination with WebLogic JMS. After a message is delivered to this destination, WebLogic JMS calls the attached listener and passes the message to its onMessage() method, which is then processed by the consumer to that destination.
The following code sample shows how a listener implements MessageListener, which is a local class:
// Start the Queue
qCon.start() ;

class Listener implements MessageListener {
  public void onMessage( Message msg ) {
    try {
      System.out.println(((TextMessage)msg).getText()) ;
    } catch (JMSException ex) {
      System.out.println(ex);
    }
  }
}
qReceiver.setMessageListener(new Listener()) ;
while(true);
Listing 15.4 shows the PTPConsumerAsync JMS application with a complete implementation of the asynchronous listener.
Example 15.4. The PTPConsumerAsync Application
import javax.naming.*;
import javax.jms.*;
import java.util.*;

public class PTPConsumerAsync {

  private final static String NAMING_FACTORY=
                                     "weblogic.jndi.WLInitialContextFactory";
  private final static String QCON_FACTORY="javax.jms.QueueConnectionFactory";
  private final static String MESSAGE_QUEUE="book.jms.BookQueue";

  public static void main ( String[] argv ){

    try {

      // Create a JNDI  initial context
      Properties props = new Properties() ;
      props.put( Context.INITIAL_CONTEXT_FACTORY, NAMING_FACTORY);
      props.put( Context.PROVIDER_URL, "t3://localhost:7001");
      InitialContext ic = new InitialContext(props);

      // Look up a Connection Factory in JNDI
      QueueConnectionFactory qCF =
                             (QueueConnectionFactory)ic.lookup(QCON_FACTORY);

      // Create a Connection
      QueueConnection qCon = qCF.createQueueConnection();

      // Create a Session
      QueueSession qSession =
                      qCon.createQueueSession(false,Session.AUTO_ACKNOWLEDGE);

      // Look up the Queue
      Queue queue = (Queue)ic.lookup(MESSAGE_QUEUE);

      // Create a QueueReceiver bound to the Queue
      QueueReceiver qReceiver = qSession.createReceiver(queue);

      // Start the Queue, send, and close
      qCon.start() ;
      class Listener implements MessageListener {
        public void onMessage( Message msg ) {
          try {
            System.out.println(((TextMessage)msg).getText());
          } catch (JMSException ex) {
            System.out.println(ex);
          }
        }
      }
      qReceiver.setMessageListener(new Listener());
      while(true);
    } catch ( NamingException e1 ) {
      System.out.println(e1);
    } catch ( JMSException e2 ) {
      System.out.println(e2);
    }
  }
}
Alternatively, an easier and more scalable means to receiving asynchronous messages is by configuring JMS Session Pools (a WebLogic JMS feature), which can receive messages from a destination and forward them to a server-side message listener class that you provide to process messages. The message listener class processes the message through a single-threaded onMessage() method. It is important to note that the message listener class does not need to implement the code to create server objects, such as connection factories and sessions, because they are created by the Session Pool. For example, Listing 15.5 provides the code for a simple SessionConsumer class that can be used in conjunction with JMS Session Pools.
Example 15.5. The SessionConsumer Class
import javax.jms.*;

public class SessionConsumer implements MessageListener {
        public void onMessage( Message msg ) {
          try {
            System.out.println(((TextMessage)msg).getText());
          } catch (JMSException ex) {
            System.out.println(ex);
          }
        }
}
After you have compiled your message listener class, it is important you deploy it to the WebLogic classpath. You can also modify your operating system or WebLogic classpath variable to include the directory where your class files reside.
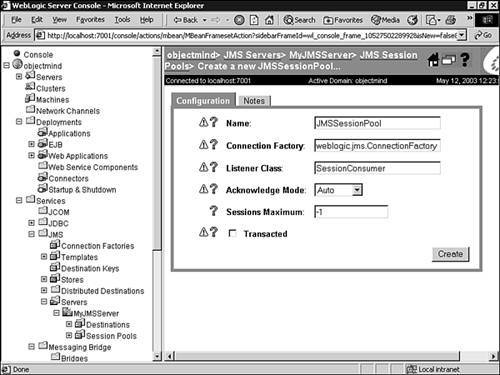
To create a WebLogic session pool using the Administration Console, follow these steps:
Click the Session Pools node under your JMS server node in the left pane.
Click the Configure a New JMS Session Pool link in the right pane.
In the displayed Configuration tab, enter values for the following attributes:
Name: Enter a name for your server session pool.
Connection Factory: Enter the connection factory the server session pool will be associated with to create sessions.
Listener Class: Enter the name of your message listener (consumer) class used to receive and process messages concurrently.
Acknowledge Mode: Enter the acknowledge mode used for non-transacted sessions. Select the default, Auto.
Sessions Maximum: Enter the maximum number of concurrent sessions enabled for this session pool.
For example, Figure 15.22 shows the session pool configuration to use the default WebLogic connection factory and the
SessionConsumerclass as the message listener class.
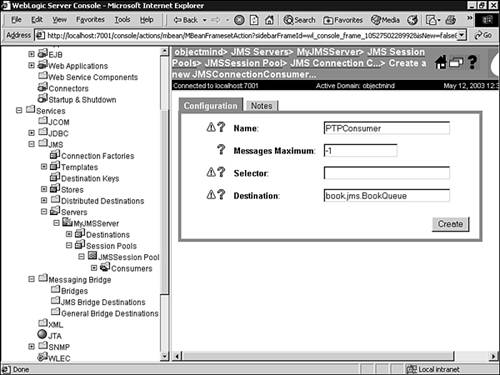
After you have defined a session pool, you must configure one or more connection consumers (queues or topics) that will be used to retrieve server sessions and process messages. To configure connection consumers using the Administration Console, follow these steps:
Click the Consumers node under your newly created Session Pool node in the left pane.
In the displayed Configuration tab, enter values for the following attributes:
Name: Enter the name for the connection consumer.
Messages Maximum: Enter the maximum number of messages that can be accumulated by the connection consumer.
Selector: Enter a JMS selector expression used to filter messages (optional).
Destination: The JNDI name for the destination on which the connection consumer will listen.
For example, Figure 15.23 shows a session pool consumer configuration for the
book.jms.BookQueueused for the PTPProducer JMS application in Listing 15.2.Click Create to create the session pool consumer.
To test the operation of a session pool, you can run the PTPProducer application in Listing 15.2, which will send messages to the book.jms.BookQueue. The message listener (SessionConsumer) class will process and output the messages to WebLogic command shell, as shown in Figure 15.24.
Pub/Sub producers need to look up a topic in JNDI as follows:
// Look up the Topic
Topic topic = (Topic)ic.lookup("book.jms.BookTopic");
The JNDI name is designated when the topic is created via the WebLogic Administration Console.
After getting the topic, a producer needs to create a TopicPublisher to actually send messages. Clients use the session to create a publisher bound to the topic:
// Create a TopicPublisher bound to the Topic
TopicPublisher tPublisher = tSession.createPublisher(topic);
Next the client creates a message. In this example the client creates a TextMessage and initializes it with “Hello World!”:
// Create a TextMessage
TextMessage mes = qSession.createTextMessage("Hello World!");
Finally the client starts the connection and sends the message five times. Then the client closes the connection:
// Start the Queue, send, and close
qCon.start();
for(int i = 0; i<5; i++) {
  tPublisher.publish(mes);
}
qCon.close();
Listing 15.6 is the complete PubSubProducer application.
Example 15.6. The PubSubProducer Application
import javax.naming.*;
import javax.jms.*;
import java.util.*;

public class PubSubProducer {

  private final static String NAMING_FACTORY=
                                     "weblogic.jndi.WLInitialContextFactory";
  private final static String TCON_FACTORY="javax.jms.TopicConnectionFactory";
  private final static String MESSAGE_TOPIC="book.jms.BookTopic";

  public static void main ( String[] argv ){

    try {

      // Create a JNDI  initial context
      Properties props = new Properties() ;
      props.put( Context.INITIAL_CONTEXT_FACTORY, NAMING_FACTORY);
      props.put( Context.PROVIDER_URL, "t3://localhost:7001");
      InitialContext ic = new InitialContext(props);

      // Look up a Connection Factory in JNDI
      TopicConnectionFactory tCF =
                           (TopicConnectionFactory)ic.lookup(TCON_FACTORY);

      // Create a Connection
      TopicConnection tCon = tCF.createTopicConnection();

      // Create a Session
      TopicSession tSession =
                   tCon.createTopicSession(false,Session.AUTO_ACKNOWLEDGE);

      // Look up the Topic
      Topic topic = (Topic)ic.lookup(MESSAGE_TOPIC) ;

      // Create a TopicPublisher bound to the Topic
      TopicPublisher tPublisher = tSession.createPublisher(topic);

      // Create a TextMessage
      TextMessage mes = tSession.createTextMessage("Hello World!");

      // Start the Topic, send the message, and close the topic
      tCon.start() ;

      for(int i = 0; i<5; i++ ) {
        tPublisher.publish(mes);
        System.out.println("  Sending Hello World - " + i +
                               " to the JMS Topic");
      }
         tCon.close() ;

    } catch ( NamingException e1 ) {
      System.out.println(e1);
    } catch ( JMSException e2 ) {
      System.out.println(e2);
    }
  }
}
Pub/Sub consumers share the basic steps with Pub/Sub producers. The differences begin after acquiring a topic. A Pub/Sub consumer must get a TopicSubscriber to interact with the topic:
// Create a TopicSubscriber bound to the Topic
TopicSubscriber tSubscriber = tSession.createSubscriber(topic);
The Pub/Sub consumer uses a blocking read in an endless loop to receive messages from the queue. Listing 15.7 is the entire PubConsumer application.
Example 15.7. The PubSubConsumer Application
import javax.naming.*;
import javax.jms.*;
import java.util.*;

public class PubSubConsumer {

  private final static String NAMING_FACTORY=
                                     "weblogic.jndi.WLInitialContextFactory";
  private final static String TCON_FACTORY="javax.jms.TopicConnectionFactory";
  private final static String MESSAGE_TOPIC="book.jms.BookTopic";

  public static void main ( String[] argv ){

    try {

      // Create a JNDI initial context
      Properties props = new Properties() ;
      props.put( Context.INITIAL_CONTEXT_FACTORY, NAMING_FACTORY);
      props.put( Context.PROVIDER_URL, "t3://localhost:7001");
      InitialContext ic = new InitialContext(props);

      // Look up a Connection Factory in JNDI
      TopicConnectionFactory tCF =
                               (TopicConnectionFactory)ic.lookup(TCON_FACTORY);

      // Create a Connection
      TopicConnection tCon = tCF.createTopicConnection();

      // Create a Session
      TopicSession tSession =
                        tCon.createTopicSession(false,Session.AUTO_ACKNOWLEDGE);

      // Look up the Topic
      Topic topic = (Topic)ic.lookup(MESSAGE_TOPIC);

      // Create a TopicSubscriber bound to the Topic
      TopicSubscriber tSubscriber = tSession.createSubscriber(topic);

      // Start the Topic, send the message, and close the topic
      tCon.start() ;

      TextMessage msg;

      while( true ) {
        msg = (TextMessage)tSubscriber.receive();
        System.out.println(msg.getText()) ;
      }

    } catch ( NamingException e1 ) {
      System.out.println(e1);
    } catch ( JMSException e2 ) {
      System.out.println(e2);
    }
  }
}
To run the PubSubProducer and PubSubConsumer JMS applications:
Compile the respective Java files using the javac utility.
Start WebLogic Server and ensure you have a JMS server configured with a JMS Topic identified through the JNDI name “book.jms.BookTopic”.
Start a command shell for each of the JMS applications—PubSubProducer and multiple PubSubConsumers, and also set the appropriate Java environments in each shell session.
Launch the PubSubProducer and PubSubConsumer JMS Applications through the following commands in their respective command shell sessions:
java PubSubProducer

java PubSubConsumer
Figure 15.25 shows both the PubSubProducer and three PubSubConsumer applications. All the consumers receive all the messages placed in the topic.

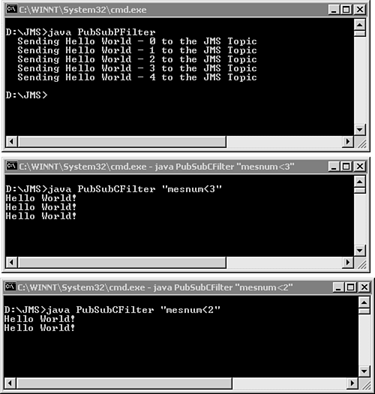
Not all JMS clients need every message on a queue or topic. Clients may create QueueReceiver or TopicSubscriber objects with message selectors. A message selector acts as a filter to control which messages get delivered. Message selectors are SQL-like clauses that evaluate to true or false. If a selector is true the message will be delivered. Selector expressions may use standard JMS headers or optional properties, including user settable properties, to use in the Boolean evaluation. Message selectors cannot filter a message based upon the contents of the message body.
The PubSubProducer application (refer to Listing 15.5) can be adapted to set an optional property field. In this case each text message will get a message number. The name of the property is mesnum:
// set the mesnum property for selectors
mes.setIntProperty("mesnum",i);
A subscriber, such as the PubSubConsumer application in Listing 15.6, that only wanted messages 0 and 1 would need to define a selector like “mesnum=0” or “mesnum=1”, which would be a command-line parameter to the application (argv[0]):
// Create a TopicSubscriber bound to the Topic
TopicSubscriber tSubscriber = tSession.createSubscriber(topic,argv[0],true);
The createSubscriber method takes a topic, selector, and a flag. The flag indicates whether to ignore messages that may be sent by this client.
Figure 15.26 shows the output of the modified PTPProducer and PTPConsumer applications, PubSubPFilter (Producer) and PubSubCFilter (Consumer). PubSubPFilter creates five text messages with the property mesnum set to 0 through 4. PubSubCFilter has been started two times with different message selectors.
Messaging services provide a viable and flexible form of communication between distributed applications, which can be implemented on heterogeneous software platforms. The Java Messaging Service API is an important technology service provided by J2EE because it enables Java developers to use standards-based messaging concepts, such as Point-to-Point (Queues) and Publisher/Subscriber (Topics) to implement message production and consumption pipelines from within their Java applications to a majority of the messaging service products available in the industry.
WebLogic Server implements a very robust, scalable, and JMS-compliant messaging service, WebLogic JMS, which not only supports today’s complex messaging requirements, such as transactional, non-transactional, synchronous, and asynchronous messaging, but also provides service continuity within the context of a WebLogic Cluster. The WebLogic JMS is a configurable core subsystem of WebLogic Server enabling you to design a messaging system that supports J2EE and Java applications, as well as applications founded on WebLogic Platform (portal and integration systems).
This chapter has provided examples to assist you in gaining knowledge in developing JMS applications as well as configuring WebLogic JMS. The topic of JMS is further explored in the context of message-driven EJBs in Chapter 22, “Asynchronous Message Processing—Message-Driven Beans.”