
In This Chapter
This chapter presents WebLogic Workshop (WLW), BEA’s integrated visual development framework and environment for creating enterprise-class Web services. First you delve into the impetus behind WebLogic Workshop and the problems it solves for Web services development. Next is a discussion on WLW architecture and concepts to provide a background for explaining features of the Workshop Visual Development Environment (VDE), Integrated Development Environment (IDE), and Runtime Framework. You will dive into some technical depth on how WLW’s constructs are coded. Although this depth might seem contrary to Workshop’s goal of shielding the developer from many plumbing details, knowing the underlying technology clarifies your journey through the VDE. You then walk through a simple, short tutorial of creating an actual Web service by using the VDE to solidify your understanding of the concepts.
“Why yet another Integrated Development Environment tool?” you might ask. It is a worthwhile question, one with many answers. The primary answer is that for IT organizations, expectations and the measurement bar have been elevated considerably. Businesses today face unprecedented integration challenges as the need for information sharing becomes more critical, both within an enterprise and between companies. Years of tightly coupled and proprietary integrations have produced fragile IT processes that do not interoperate and are becoming impossible to maintain. The proliferation of different operating systems, programming languages, development platforms, and interfaces has amounted to astronomical training costs and steep learning curves. Complexity is a real problem that must be managed. All these issues invariably cause businesses to lose agility in adapting to business process changes, meeting partner collaboration demands, and completing new IT projects within a reasonable amount of time and at a reasonable cost.
In addition, there is a tremendous market need to simplify Java and J2EE development. Although J2EE has become a de facto enterprise platform, much as COBOL was in the ’80s and ’90s, there is a scarcity of developers who have the skill set necessary to build J2EE applications. It’s estimated that fewer than 10% of developers available in the enterprise have the skills to build applications in J2EE. In contrast, the majority of developers in the enterprise are application developers who are far more likely to have skill sets in procedural or visual languages, such as Microsoft Visual Basic, PowerBuilder, or COBOL. In addition, J2EE development still requires a great deal of low-level plumbing code that is not necessarily related to the business problem at hand.
Web services hold incredible promise for solving many of today’s enterprise integration problems. However, today’s tools and technologies are optimized for an implementation of Web services that does not easily support the typical requirements of any realistic enterprise integration scenario. Instead, most tools help you easily build a simple, synchronous “stock ticker” Web service. However, to support any realistic integration use case between two enterprise systems, Web services must go beyond the simple synchronous Remote Procedure Call (RPC) paradigm first introduced in the early Web services hype and easily support key requirements, such as asynchrony.
For Web services to support today’s enterprise integration requirements, developers must be able to build enterprise-class Web services that support the following requirements:
Loose coupling—. Separation between the public contract and the underlying implementation is required so that changes to your application component model do not necessarily change your Web service interface. Loose coupling does not automatically happen, however, despite the use of Simple Object Access Protocol (SOAP) and Web Services Description Language (WSDL) technologies. Many of today’s tools and technologies help you easily create a WSDL for a bean or a class, but any change in the implementation means a new interface, unless you’re ready to spend some time coding low-level XML Application Programming Interfaces (APIs) to preserve the interface so that Web service consumers won’t notice the change.
Asynchronous interaction—. In reality, most service requests incur an indeterminate amount of latency before a response becomes available. Service providers cannot block the caller while processing the response, nor can they suspend their own execution, as they might be responsible for aggregating and reporting other responses simultaneously. Most asynchronous messaging architectures make heavy use of message queueing to help the receiver smooth out spikes in the load and to persist messages if the receiver becomes unavailable.
Coarse-grained interfaces—. Fine-grained interactions usually result when you directly expose your underlying implementation as a Web service. They not only produce excessive network traffic and server load, but also tend to trigger exception-handling complications. Instead, the basis of a Web service communication should be coarse-grained, at a business level, where a unit of work can be accomplished with a minimal number of calls. Because business interactions usually change less frequently than technical interactions, business-based services tend to be more stable and robust. Many of today’s Web services tools and technologies excel at the fine-grained approach, but do not scale in an enterprise environment.
A good framework must not only make enterprise-class Web services possible, but also make it possible for developers to build them. The framework must abstract the plumbing code required to implement asynchronous, loosely coupled, coarse-grained messaging from the developer. Whether developers are enterprise J2EE experts or application developers with no previous J2EE experience, they shouldn’t have to spend most of their effort solving plumbing problems. This is where WebLogic Workshop comes in. WebLogic Workshop is a framework that enables any developer to build enterprise-class Web services.
WebLogic Workshop is a simplifying framework for enterprise-class Web services, similar to the way Visual Basic drove the explosion in client/server development in the early ’90s. Before Visual Basic, few developers had the sophisticated skills in Microsoft APIs required to implement a client/server application. Visual Basic came along and provided a visual development approach for specifying application design and business logic, with a runtime framework that implemented the plumbing details.
Similarly, JavaServer Pages (JSP) provide a simplifying framework for servlets to enable a typical user interface (UI) developer to build Web applications on J2EE. JSP enables an important type of enterprise developer resource—the UI developer—to contribute and be productive using J2EE.
WLW was designed specifically as a simplifying framework, combining visual development with a runtime abstraction layer, to enable you to build enterprise-class Web services, effectively and efficiently, regardless of whether you are an expert in J2EE. WLW enables you to build robust, powerful enterprise-class Web services as Java Web Services (.jws files) that support enterprise integration scenarios by offering the following features:
Asynchronous communications through JWS conversations—. Long-running and stateful interactions can be maintained between a service client and provider, across multiple requests. That is, a Web service remembers the state of a conversation and “continues” a thread of context, until a final response is available and returned to the appropriate client. In addition, message buffers can be defined, which further streamlines asynchronous communications by minimizing wait times. This feature provides for true bidirectional asynchronous interactions.
Loose coupling through JWS XML Maps—. This feature enables developers to specify the format of the SOAP request and response, independently of the underlying implementation’s Java method signature. One distinct advantage is that you can change the back-end business logic without necessarily affecting the service’s public contract. This feature promotes loose coupling.
Custom XML Maps—. This feature enables developers to import XML templates and build Web services that generate business-level documents used as units of communication. This feature also facilitates the use of coarse-grained interfaces.
Simplified access to enterprise resources through JWS Controls—. Developers no longer need to know the details of invoking external Web services or the intricacies of using J2EE resources, such as Java Messaging Service (JMS), Enterprise JavaBeans (EJBs), Java Database Connectivity (JDBC), or J2EE Connector Architecture (J2CA) APIs. JWS Controls shield developers from these plumbing complexities so that they can easily access resources and focus on writing code that delivers business value. This feature helps manage development complexity and cost.
Create and run Web services using 100% J2EE technology—. Two Java Specification Requests (JSRs 175 and 181) are driving the
.jwsfile format introduced with WebLogic Workshop back into the standards layer through the Java Community Process (JCP). Therefore, your development investment will have longevity and be well protected. The winning combination of Web services and J2EE ensures maximum interoperability now and in the future.
WebLogic Workshop, in essence, greatly simplifies Web service development and testing using J2EE, thus enabling application developers to harness the power of J2EE without having to climb the ultra-steep learning curve of J2EE programming. If used properly, it also embodies and imposes best practices in Web service authoring, enforcing a standard architecture for complex enterprise features, such as asynchronous communications.
These are the three main components of Workshop:
Java Web Service (JWS) application files—. These files embody your Web service definition, its properties, and the resources it interacts with. A Web service definition file is a regular Java file with a file type of
.jws, containing special javadoc-style annotations. These files are consumed by the Workshop Runtime Framework (discussed later in this list), which processes and acts on these special annotations. In addition, a.jwsfile can access resources (such as EJBs, databases, and message queues) via JWS Controls, a metaphor for simplifying and hiding J2EE resource interactions, which exist as.ctrlfiles. JSRs 175 and 181 are inducting.jwsand.ctrlfiles as standard Web service constructs under the J2EE umbrella.Visual Development Environment (VDE)—. This visual tool has a Design View pane that enables you to design and code your Web service (
.jwsfiles) and its interactions with J2EE resources via JWS Controls (.ctrlfiles). That is, all your.jwsand.ctrlfiles and their special annotations can be built for you in this environment. In addition to the Design View pane, the WebLogic Workshop VDE provides a Source View pane with a fully functional code editor, code-completion features, and an integrated debugger for writing business logic in standard procedural Java.Runtime Framework (also called the JWS container)—. This component is the workhorse that makes it happen at runtime. When your Web service is started and invoked inside the Workshop VDE, this container digests your.
jwsand .ctrlfiles, implements your Web service as J2EE components (such as EJBs and JMS queues), and deploys them as standard J2EE Web applications. These laborious tasks that require a high level of J2EE skills are now automatically done for you.
This container can also, by working in concert with the Workshop VDE, enable you to run, test, and debug your visually authored Web services. When you’re in development mode (as opposed to production mode), the Runtime Framework automatically generates a test harness for your Web service and facilities for your Web service clients’ use, such as client proxies and WSDL files.
Figure 32.1 illustrates how these components work together and in concert with WebLogic Server.
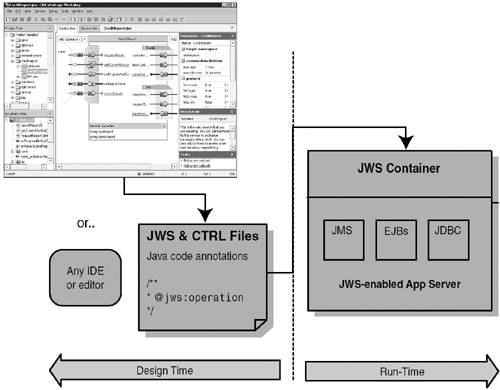
The window snapshot shown in Figure 32.1 is the Design View pane of the Workshop VDE. It offers an easy way of producing .jws and .ctrl files. You are not limited to using the VDE to build these files. Any text editor can be used to create .jws files. However, without a visual or semantically rich environment, you need to be familiar with JWS annotations and manually code them. Note that since the release of WebLogic Workshop, several IDE vendors have announced support for JWS development (for example, Together ControlCenter Accelerator for BEA WebLogic Workshop and JBuilder, WebLogic Edition by Borland).
The JWS container does not get involved until the Web service is started (for testing or debugging in development mode or for client invocation in production mode), when it handles all complex J2EE mechanisms and marshals and unmarshals all Web service messages (SOAP, XML over HTTP, or JMS).
A .jws file is a standard Java source file with special javadoc-style annotations prefixed with @jws:. These files declare the Web service’s functionality (such as message queuing or conversations) and expose specific logic as Web services. A .jws file strives to produce a clean separation between Web service plumbing and business logic. In development mode, the Workshop VDE provides on-the-fly compilation and execution of .jws files, giving them a write-and-run lifecycle akin to JSP. However, a JWS-enabled container and compiler must be used to compile or run a .jws file because these processors can understand JWS construction rules.
A .jws file contains the following items:
The definition of the service interface that will be exposed through a WSDL file. That is, the public contract can be separate from the implementation interface.
The bindings that specify how the service interface is bound to physical wire formats, protocols, and server locations.
A single class of the service implementation, including business logic, which can hold state over time as needed (per instance or per class).
The controls that access enterprise resources (databases), J2EE resources (EJBs, message queues), or other Web services.
A canonical description of a Web service complete enough to be compiled and run on-the-fly.
Of course, you can use the WebLogic Workshop VDE to handle all these details for you.
Listing 32.1 shows a simple but complete JWS Web service file, which is the HelloWorld.jws sample file that ships with Workshop.
Example 32.1. A Simple JWS Web Service File: HelloWorld.jws
import Weblogic.jws.*;

class HelloWorld {

   /**
    *
    * @jws:operation
    *
    */
   public String sayHello(String name) {
      return "Hello" + name;
   }
}
Normally, there would be javadoc tags in the comment block immediately preceding the sayHello() method, but instead there is a special annotated tag:
/**
 * @jws:operation
 */
This tag informs the WebLogic Workshop Runtime Framework (the JWS container) that the sayHello() method should be exposed as a Web service operation. Although many defaults take place, this is a valid Web service file in a JWS-enabled J2EE Web server. In fact, deployed in such a server, this Web service is accessible via the service endpoint URL: http://server:port/app/HelloWorld.jws. You can use the URL directly or use the WebLogic Workshop Test Harness to test your Web service automatically.
There are several other JWS annotations in the current specification. Here’s a more complex example that uses a few more annotations:
/**
 * @jws:operation
 * @jws:conversation phase="start"
 * @jws:message-buffer enable="true"
 * @jws:protocol jms-soap="false" http-soap="true"
 * @jws:control
 * @jws:parameter-xml xml-map::
 * <purchaseOrder>
 *      <customerInformation>
 *         <customerNumber>{customerNo}</customerNumber>
 *      </customerInformation>
 * </purchaseOrder>
 ::
 */
Each of the preceding annotations indicates to the server that the method following the declaration should support one of the features that has been detailed. Conversations are indicated by @jws:conversation, message buffers by @jws:message-buffer, and so on. (The WebLogic Workshop documentation contains a full reference manual, including detailed documention on each JWS tag.) Some common annotations are covered later in this chapter.
In short, these annotations replace the need for you to code hundreds of lines of J2EE code to implement enterprise-class Web service features, such as asynchronous conversations and message buffering. You don’t even need to code the annotations—you can use the WebLogic Workshop VDE to do all this work by visually adding methods controls and setting properties.
Workshop supports the use of asynchronous communications in several ways—namely, conversations, callbacks, and buffering. The following sections illustrate where and why such features can be used.
A conversation is a long-running interaction between a client and a service, in which state information is maintained throughout the conversation’s duration. A single instance of a Web service conversation has associated state that persists for the conversation’s lifetime. At a minimum, this state includes a “conversation ID, ” which is proposed by the client and used to correlate incoming and outgoing messages with a specific conversation instance. By definition, each conversation has a Start, Continue, and Finish phase. Often a conversational Web service method, when invoked, indicates the start of a conversation, and then continues its execution thread. When the service is completed, it invokes a callback on the client, indicating the finish of the conversation. A more elaborate conversation is shown in Figure 32.2.

WebLogic Workshop developers need not worry about handling the complex plumbing details associated with converations (such as persisting state and member variables, correlating unique conversation IDs, and keeping track of callback locations). Instead, developers can use the WebLogic Workshop framework to manage this plumbing and need specify only the conversation phase for the appropriate service method by setting the Conversation property in the WebLogic Workshop VDE.
Any JWS method can be designated as participating in a conversation by using this annotation:
/**
 * @jws:conversation phase="start"
 */
In this annotation, the phase can be "start", "continue", or "finish". Conversations can occur only between a client and a Web service. This annotation is inserted whenever the developer sets the Conversation property to "start" in the WebLogic Workshop VDE.
An external Web service need not be built in WebLogic Workshop to participate in a conversation, but it does need to support the Conversation parameters in the SOAP headers that specify the conversation ID and callback locations.
A callback is a method that a service invokes to contact its client, either to inform the client of an event or to return some requested information. The client actually defines and hosts this callback method for the service (that it’s requesting something of) to asynchronously contact its client. The point is that with a callback, the client does not need to wait (suspend execution) for a response from the service, assuming it does not need a response to proceed. There are two kinds of callbacks, client and handler callbacks, illustrated later in Figure 32.3. Both kinds of callbacks are defined in the .jws file, but in different ways, as discussed in the following sections.

A client callback refers to a callback to a Web service client. A client (Java or otherwise) built and run outside of Workshop can participate in conversations, but it must support the conversation ID and include the callback location (the location of the client) in the SOAP headers. Also, the client must be a server, capable of supporting a method being invoked on it. Otherwise, the client must substitute the callback mechanism with a process such as a polling strategy.
A client callback is defined in a .jws file. To define a callback, simply use the VDE’s Add Operation drop-down box to see the correct JWS annotations being added to the .jws file in the Source View pane. Listing 32.2 shows a simple example of how a callback is implemented in JWS.
Example 32.2. A Simple Client Callback Definition in a .jws File
 1  public Callback callback;

 2  public interface Callback
    {
 3     /**
       * @jws:conversation phase="finish"
       * @jws:message-buffer enable="true"
       *
       * ::
       */
 4     public void onCreditReportDone(Applicant applicant, String response);
    }

    // Let's ping the client
 5   callback.onCreditReportDone(null, "No bankruptcy data found for" +
                                     taxID + ".");
If you wanted to code this allback yourself in JWS without using the VDE, you’d start by declaring a global callback variable in the public class of your .jws file, in Line 1. This type of variable is an inner interface class (within the main JWS class) you define next, in Line 2. The annotations starting in Line 3 pertain to the callback method onCreditReportDone() defined in Line 4. Because every callback must participate in a conversation, you need to specify the @jws:conversation tag to declare the conversation phase this callback invocation will result in. In Listing 32.2, the onCreditReportDone() method ends the current conversation between the client and this Web service. Optionally, you can enable buffering for this callback (discussed in the “Buffering” section, later in this chapter). Of course, you can use the VDE to correctly add these annotations, and then you need worry about just the business logic in your callback.
You might wonder why a callback is merely an interface, and who will implement this interface? Because a client callback’s sole purpose is to return information to a client, and no business logic should need to reside in a callback, Workshop needs to know only the interface of your callback, and it does the rest. All you need to do is invoke the callback when your Web service is ready, as shown in Line 5.
WebLogic Workshop controls are discussed in “JWS Controls” later in this chapter, but in essence a control is a simplified way for your Workshop Web service to access an enterprise resource, such as a database, another Web service, or an EJB. Because these resource requests usually possess inherent response delays, your Workshop Web service can define handlers for a control to “ping” it when resource requests are completed or responses are available. The only controls that can be configured to invoke control handlers (also called “control callbacks”) are Service, JMS, Timer, and Application View controls.
A control handler is also defined in the .jws file, as shown in Listing 32.3.
Example 32.3. A Simple Handler in a .jws File, for a Control to Ping Its JWS Caller
 1  private void creditCardReportTimer_onTimeout(long time) {

      // Because the credit card service has not returned, cancel the request.
 2    creditCardReportControl.cancelRequest();

      // Send a response to the client, saying something about what happened.
      // Remember that this will also effectively finish the conversation.
 3    callback.onCreditReportDone(null, "Unable to get credit card info.");

    }
Unlike a client callback, a control handler contains business logic pertinent for the event that is implied by a handler being invoked. Line 1 defines a control handler named creditCardReportTimer_onTimeout(), with an access modifier of private, even though it is called from outside this .jws file! The construction of this two-part method name is significant: The first part of the name creditCardReportTimer is the control name, and the second part, onTimeout, is the control handler name. (Remember that the Workshop VDE constructs all this infrastructure when you create .jws and .ctrl files.) When this handler is invoked, a timeout has occurred. Earlier in this .jws file, a Timer control was engaged to start a timer, probably right after a getCreditReport method was invoked. In fact, that is exactly the case, as you will see in the section “A Short Tutorial,” later in this chapter. There is a Service control (for accessing another Web service) called creditCardReportControl, and Line 2 cancels the getCreditReport request because it is taking longer than the time allowance allocated for this operation. Line 3 pings the Web service client, using the callback defined in Listing 32.2, to indicate that a credit report couldn’t be acquired in a timely manner.
The Workshop VDE generates all the callback and handler definitions for you in the .jws file. You need to manually add only business logic in control handlers.
Buffering can be turned on for any method in a Web service (JWS) for the following purposes:
Buffering can be used when a client invokes a Web service method to implement “queued delivery” of a call (if requests are overwhelming the server). This queued delivery is used so that a service can send a synchronous request immediately back to a client, enabling it to proceed with execution without having to wait for the service to acknowledge the request. In effect, the buffer is acknowledging the request. Of course, this assumes that the client is not expecting any meaningful response—that in essence the client is invoking a submit operation, or one-way request. For this reason, all methods that request buffering must return void.
Buffering can be used when a Web service provider sends a response back to the client to implement “queued delivery” of responses (if responses are arriving faster than the client can process and acknowledge them). In this way, a provider does not need to wait for a client to acknowledge the response. This allows the provider to proceed immediately to servicing the next request.
Buffering can also be turned on for client callbacks. Only one control supports buffering: the Service control, for both its methods and control handlers.
Buffering is turned on by using the JWS tag. For developers using the WebLogic Workshop VDE, this tag is automatically inserted into the source code when the developer sets the message-buffering property to "true", as follows:
    /**
     * @jws:message-buffer enable="true"
     */
A control is a JWS construct that simplifies the task of accessing enterprise resources (such as a database) or J2EE resources (for example, EJBs, JMS queues) via Java APIs. A control, representing a resource, is essentially a Java class that you instantiate and then invoke methods on it to accomplish tasks on that resource. Each control possesses a unique set of methods pertaining to the resource it represents. Some controls might require callbacks to the JWS, in which case control handlers need to be defined. Workshop provides the following control types:
Database control—. This control is for accessing any database for which a JDBC driver is available and for which a data source is configured in WebLogic Server. The Database control enables a developer to focus on SQL without needing to know JDBC.
EJB (Enterprise JavaBean) control—. EJB components can be invoked via these local control objects, and details such as JNDI lookups, instance creation, and so forth are automatically done.
Service control—. Use this control to invoke any Web service, locally or remotely hosted, implemented in Java or .NET. An existing WSDL file can be used to “import” and hence automatically create a Web service control.
JMS (Java Messaging Service) control—. This control allows publishing or subscribing to JMS queues. The Web service client then “listens” on this JMS control (for messages) via callbacks defined in the client.
Timer control—. This control notifies your service when a specified period of time has elapsed or when a specific time (such as 10:15:00) has been reached.
Application View control—. This control represents a Java 2 Connection Architecture (J2CA) adapter, used for accessing or integrating with enterprise applications and legacy systems.
Control interactions can be synchronous or asynchronous, depending on your design needs. For instance, a Database control that reads data might be synchronous if the returned information is necessary to proceed with execution. On the other hand, a Web service control might incur latency in its response and suspend client (Web service) execution inordinately, so a callback to the Web service client would be more appropriate. Figure 32.3 shows how your Web service can interact with various resources through controls.
It is important to note the following:
Only certain controls allow control handlers: JMS, Timer, and Service controls.
A Service control can be automatically generated if a Web service WSDL file is available. This auto-generation feature is particularly useful when accessing an external Web service.
Unlike other controls, a Timer control does not really access any enterprise resource, so it is not represented as a
.ctrlfile.
Each type of control you create is a separate class defined in a file with the .ctrl extension, and extends a particular base class for that control type. For instance, to define a Database control, you might create a file called BankruptciesDatabaseControl.ctrl where you define a class called BankruptciesDatabaseControl that extends the Workshop class Weblogic.jws.control.DatabaseControl. The “Controls—A Closer Look” section later in this chapter describes the details and implementation of .ctrl files.
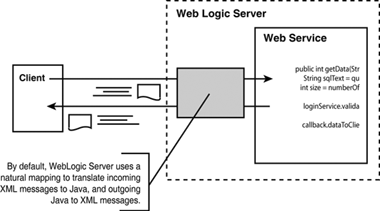
Recall that standard Web services communicate via SOAP, an XML-based specification for how to encode an operation request with its parameters and how to format XML-based responses. By default, WebLogic Workshop accepts incoming and creates outgoing SOAP messages by directly and naturally mapping them to the structure and signature of your Web service method implementation, as illustrated in Figure 32.4.
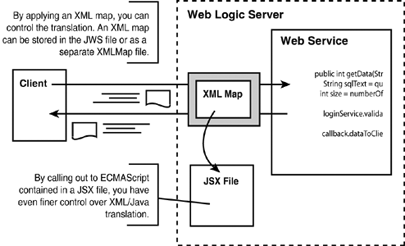
However, as you’ll see, the real power behind XML Maps is that they enable you to easily map to your specific XML shape requirement, even if it isn’t the default. This is how XML Maps provide true “loose coupling” and facilitate the separation between interface and implementation. You can fix your XML document shape as the Java implementation evolves (or vice versa), so that consuming Web services are unaffected by your change.
WebLogic Workshop can actually show you the default mapping SOAP message for any method in your Web service. In the Web service’s Design View pane, click on a method name to see its default mapping. Then position your cursor by the fat arrow icon in the center of the method bar, as shown in Figure 32.5.

Double-clicking the fat arrow icon opens the Edit Maps and Interface dialog box, shown in Figure 32.6.

The dialog box has tabs for Parameter XML (the request format) and Return XML (the response format), and you are currently looking at the naturally mapped request. (The Default option has been selected.) Fields that you want to map from your XML document to Java are indicated by terms in curly brackets ({ }) corresponding to the same terms in the method declaration in the lower Java section.
However, you might need to specify a different SOAP format or shape for incoming or outgoing SOAP messages, different from what Workshop can glean directly from the implementation interface. Reshaping is sometimes necessary for the following reasons:
Reshaping incoming messages—. Your Web service client might demand a SOAP request message that looks different from what your Workshop implementation needs or wants to be.
Reshaping outgoing messages—. Your Web service client might require a response format different from what you anticipated, after implementation has been completed.
Reshaping messages—. Actually helps decouple your implementation from your service contract, which promotes loose coupling and robustness. That is, whenever you need to change an implementation, you won’t necessarily need to change the public contract, and vice versa.
In these cases, reshaping can be accomplished through XML Maps and scripting. Figure 32.7 shows a map/script in action.

There are actually two ways of accomplishing mapping:
Simple mapping—. Specify which XML elements and/or XML attribute values correspond to which arguments in your Java Web service method and return values. Use this technique if the mapping is static, simple, and straightforward, similar to the one-to-one mapping shown in Figure 32.6.
Script mapping—. If you need finer control and some data transformation logic to produce the reshaping, you can divert processing to a script file or a more extensive XML Map file.
Simple mapping and script mapping are not mutually exclusive. Each can be used standalone or in combination (a script can be used inside a mapping), as is shown later in this chapter. Figure 32.8 illustrates this mapping process.
Simple mapping inline with Java code is also done with JWS annotations. For instance, Listing 32.4 shows a simple map in which the input message specifies two arguments; the Java method implementation takes only one argument.
Example 32.4. Mapping a Two-Argument SOAP Request to a One-Argument JWS Method
   /**
     * @jws:conversation phase="start"
     * @jws:parameter-xml xml-map::
     *  <getQuote xmlns="http://www.openuri.org/">
     *      <customerID>1234567890</customerID>
     *      <tickerSymbol>{tickerSymbol}</tickerSymbol>
     *  </getQuote>::
     */
    public void getQuote (String tickerSymbol);
Remember that you can also locate the map specification in a file external to the .jws file. This method allows multiple .jws files to potentially share an XML Map. An external mapping file has a .xmlmap extension and must contain special <xm:..> tags. For more information on XML Map files, see the Workshop online documentation.
At times your XML message differs dramatically from your Java method signature, or calculations and transform logic become necessary while mapping. In these cases, you need to use ECMAScript (discussed later in this chapter, under “ECMAScript”) to augment your static map statements. ECMAScript code resides in .jsx files and can be invoked from within a map.
Figure 32.9 shows an example of a script invocation from inside a map specification converting from XML to Java.

This particular mapping converts an XML message to Java objects. When this function completes, the two arguments shown, currentOrder and currentCustomer, will reference real Java object instances of the appropriate type. The ECMAScript function definition, however, looks somewhat odd, as shown in Figure 32.10.

First, the function name differs slightly from the function call: It always has the suffix FromXML (for functions converting from XML to Java) or ToXML (for functions converting from Java to XML). Second, the argument list does not match the function invocation, either, because the function call is not a direct execution branch to the function definition. Instead, it is a directive to WebLogic Server to perform some predefined tasks, one of which is to determine what function to call and what argument value to pass it, and eventually to invoke the script. Figure 32.11 shows what transpires when converting from XML to Java.

When scripting from an XML request to the JWS method, the one input parameter is the XML document, and the return value is one or more Java objects.
The corollary script call for the placeOrder service shown in the previous section might be as follows:
<placeOrderResponse>
   {CustomerServices.OrderScripts.convertOrderResponse(return)}
</placeOrderResponse>
This would be the corresponding ECMAScript definition (note the boldface ToXML suffix of the script name mentioned previously):
convertOrderResponseToXML(returnValue) {
   ...
   return xmlResponse;
}
That is, the return value of the Java Web service method is passed in to the ECMAScript function, which then crafts the appropriate response XML string incorporating this return value, and returns the XML string as a response. Again, WebLogic Server automatically connects the script invocation to the script definition, passing in parameters and passing on return values appropriately. Figure 32.12 illustrates this flow.

When scripting from Java to an XML response, the one input parameter is the return value of the JWS Web service method, and the return value is the crafted XML response.
ECMAScript, formally known as ECMA 262, is the international Web standard for scripting languages. That is, ECMAScript is not a language implementation, but a scripting language specification. Some popular examples of ECMA implementations are JavaScript and JScript. WebLogic Workshop provides an ECMAScript implementation so that you can use its script language for data conversions or XML mapping. In fact, Workshop’s implementation contains extensions that, among other things, support XML elements as first-class script objects, which greatly facilitates XML text creation and manipulation. For information on the WebLogic Workshop ECMAScript implementation, consult the Workshop online documentation under “Guide to Building Web Services.”
To give you an idea of what Workshop ECMAScript code looks like, Figure 32.13 shows a scriptlet that converts from Java to XML.

Line 1 defines a new variable, orderMessage, that starts out as an empty order element. Lines 2 and 3 then add two child elements to <order>. Finally, the returned XML string looks like that shown in Listing 32.5 (if orderInfo.name = "Dog Brush" and customerInfo.name = "Debbie").
Example 32.5. The Converted XML String from the convertOrderToXML Function
   <order>
     <item_name>Dog Brush</item_name>
     <customer_name>Debbie</customer_name>
   </order>
Conversely, Figure 32.14 shows a scriptlet that converts from XML to Java objects.

Say that the XML to be converted (passed into convertOrderFromXML) is what’s shown in Listing 32.5. Line 1 defines a variable that extracts the value of the <order_info> element. The dot operator (.) is used to construct a direct path through an XML document hierarchy, much like XPath. Line 3 returns an array of two Java strings to a .jws file.
For more information on map scripting, consult the Workshop online documentation under “Guide to Building Web Services.”
You can apply XML maps to a method or callback exposed to clients as well as to the methods and handlers of a Service control, a JMS control, and an Application View control. Figure 32.15 points out where XML mapping can be defined in the Workshop Design View pane.
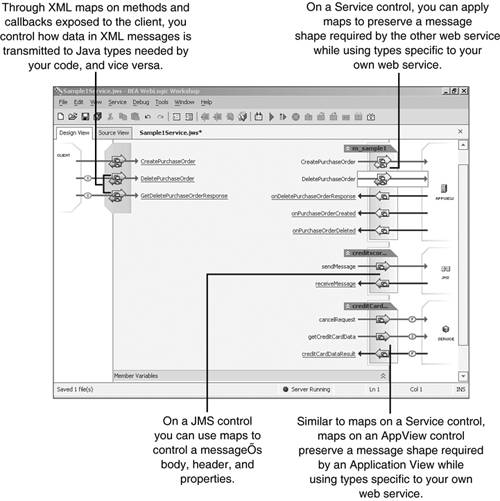
The numbers in Figure 32.15 correspond to the numbers in the following list:
Through XML maps on methods and callbacks exposed to the client, you control how data in XML messages is translated to Java types needed by your code, and vice versa.
On a Service control, you can apply maps to preserve a message shape required by the other Web service while using types specific to your own Web service.
On a JMS control, you can use maps to control a message’s body, header, and properties.
Similar to maps on a Service control, maps on an Application View control preserve a message shape required by an Application View while using types specific to your own Web service.
In the following sections, take a look at a few of these controls in detail because you will be using them in the tutorial that follows.
Although this section discusses a Database control, the example presented is akin to creating and using any control (with the exception of Timer controls, which are not stored as .ctrl files).
To use a Database control in your Web service .jws file, you can simply use the WebLogic Workshop VDE to create a new control by selecting Database Control from the Add Control drop-down list. However, if you’d like to know the details or add the control in your own source code editor, you must do three things:
Import the Database control class.
Declare a variable reference to the Database control class and annotate the control.
Invoke methods on it, as shown in Figure 32.16.

The import statement shown in Figure 32.16 is unnecessary because the JWS and CTRL classes belong to the same Java package, but it is there to remind you to do so when necessary. Note that the control annotation (@jws:control) is required along with a declaration of the control instance variable.
Next, look at the .ctrl file. As you can infer, you need to create one .ctrl file for each datasource to be accessed. That is, you cannot use the same control class to access more than one datasource. The annotation @jws:connection binds this control to a datasource that must have been configured in WebLogic Server before running this control. Every method in a Database control must be annonated with the @jws:sql tag to identify the exact SQL statement to be executed when the method is invoked. In this case, the checkForBankruptcies method is reading a row from the BANKRUPTCIES table, and each row in this table is represented by the Java object Investigate.Applicant.
You might find it odd that in Investigate.jws the bankruptciesDB variable did not get initialized before its use, but that is part of the magic of Workshop. It is automatically initialized to the appropriate control instance. You can also instantiate new controls on-the-fly by using a supplied Control Factory class. This method is useful when you need to handle one or more resources simultaneously, but the number and nature of these resources might not be known at development time.
The VDE enables you to quickly develop and test your Web services. Your Web services are stored as Projects, which are initially composed of your Web service’s source files (.jws and .ctrl files). After you run your Web service (after starting WebLogic Server from within the VDE), the VDE automatically generates all necessary J2EE components and deploys them to the running WebLogic server. For quick and easy testing, debugging, and fixing your Web services under development, these underlying components are deployed in expanded form.
When you have finished developing your Web services, somehow you need to make them publicly available to clients running outside the WebLogic Workshop VDE. Also, you should not require the VDE to be up and running just to implement your Web service. This is where deployment comes in. You must take your Workshop VDE Project and convert it to a more compact and static format: a standard J2EE Enterprise Application Archive (EAR) file. This EAR file can then be deployed to a running production-mode WebLogic Server instance, ready to serve client requests, without needing the Workshop VDE to be running. Figure 32.17 illustrates this process.
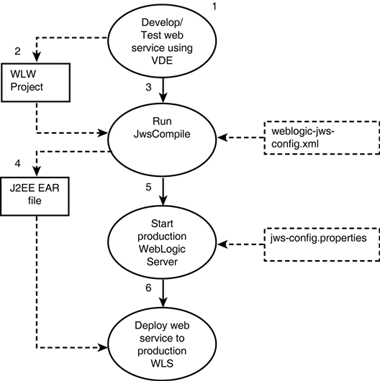
The rounded icons in Figure 32.17 represent actions or processes, and the rectangular icons represent an aggregated or single file. The following numbered points correspond to those in Figure 32.17:
Using the VDE, you visually design your Web service, adding controls or callbacks as required and writing your business logic, in one or more WLW Projects.
A WLW Project is a folder on the file system, containing all your Web service source files (
.jwsand.ctrlfiles).Run the
JwsCompilecommand, which takes an input WLW Project folder, parameters such as which Web services to compile, and the name of the output EAR file. Optionally, a deployment descriptor file,Weblogic-jws-config.xml, can be input toJwsCompile, configuring runtime parameters such as protocol, hostname, ports, and so on.A standard J2EE EAR file is generated that contains your Web service source files and all necessary J2EE components, such as EJBs, servlets, JMS queues, and Web applications.
Start an instance of WebLogic Server in production mode, using a special Workshop start script that also runs the WebLogic Workshop JWS container. At this time, you can specify a properties file called
jws-config.properties, overriding Workshop defaults for properties such as the JMS server name, the JMS connection factory, datasources, and so forth.Deploy your generated Web service EAR file by invoking the
weblogic.Deployerprogram or using the standard WebLogic Server Administration Console.
Figure 32.18 shows the VDE and explains its major parts.

The numbers in Figure 32.18 correspond to the numbers in the following list:
Provides a place to add a method or callback for communication with clients and resources.
Displays the source code for the current Web service. As you design a Web service, source code is written to the
.jwsfile.Provides a place to select controls for access to resources.
Represents a client to request functionality of your service by calling its methods.
The Web service (JWS) you are editing. You can click it to view its properties, double-click it to view source code, and right-click it to add methods, callbacks, and variables.
Displays the properties of an item currently selected in the Design View or Structure pane. Properties are exposed through custom javadoc tags in source code.
Displays a hierarchical representation of the source files in your project and provides a place from which you can save, open, add, and delete project files. Projects group source files as WebLogic Server “Web applications.”
Displays information about the currently selected item, including properties.
Updates as you add member variables, methods, and callbacks. You can select an item to view its properties in the Properties pane. You can also double-click an item to quickly go to its source code.
Displays a list of tasks that you can perform for the currently selected item. In many cases, you can click a link to perform a task.
These are the major parts of the VDE:
Project tree (upper left)—. Lists all your Web services and components and, like a file browser, enables you to add folders and files as well as select the components you want displayed in the main work area.
Structure pane (lower left)—. Like any good Integrated Development Environment (IDE), this pane reveals the structure of your code (the
.jwsfile) and enables you to fast-path to any method in the.jwsfile; for example, double-clicking on a method name displays that method’s source view in the main work area.Main work area (center)—. Displays your entire Web service in this area, with all its interacting components (client and controls). There are two view modes: Design View (graphical) and Source View (textual).
Properties (upper right)—. Any Web service element, such as
.jwsand.ctrlfiles, methods, or callbacks, has properties that can be configured. These properties result in JWS annotations within your JWS source code. Any time you select an element, its properties are displayed in this area.Description (lower right)—. Displays text documentation on the currently selected component, gleaned from javadocs.
Tasks (bottom right)—. Documents miscellaneous tasks that can be performed on or using the currently selected component.
The following sections delve into the few areas that typically get high traffic.
A Project is a collection of Web services or Web service components, much like your typical IDE project. In Workshop, an individual Web service resides in a folder under the Project. That Web service can be self-contained or use components found in other folders. Figure 32.19 shows a Project’s logical organization.
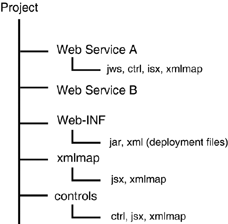
A Web service folder should contain only one .jws file, one Web service. The WEB-INF folder is a special location containing JAR files for any back-end code or J2EE resource (such as EJBs) that any Web service in this project can access. The Xmlmap and Controls folders can be used for storing logic shared among multiple Web services. This structure is certainly not the only way to organize components; folders can actually accommodate any kind of files.
In addition to the usual operations allowed on hierarchy trees, you can also drag and drop files and folders within the project tree and between the project tree and the file system. You can also invoke code-generation facilities in the project tree. Because a .jws file is a Web service, you can request the following:
To invoke code generation, select a .jws file and right-click it, as shown in Figure 32.20.

This center pane presents a graphical and unified view of a .jws file, including all its interacting partners, such as clients and controls. The following parts of the main work area are shown in Figure 32.21:

The center box is the canvas on which you create the JWS Web service (the one titled “Investigate”).
The left box has a CLIENT icon representing an entity that can invoke operations on the Web service. Arrows pointing from CLIENT to Investigate represent callable methods on the service (these methods are underlined). Arrows pointing from Investigate to CLIENT represent callbacks from the Web service. A circled letter decorating an arrow indicates that the method participates in a conversation, and the letter signifies whether it starts (S), continues (C), or finishes (F) the conversation. A coil-like icon indicates that buffering is enabled. The fat arrows indicate that a default or custom XML mapping is in place for the method.
The boxes on the right labeled DATABASE, EJB, JMS, and so forth represent enterprise resources that are accessed by controls added to the Investigate Web service. Each mini-box that straddles the right edge of Investigate represents the control that interfaces the Web service to the resource. A right-pointing arrow is a potential API call to the control. A left-pointing arrow is a control callback that allows the control to invoke a method in the
.jwsfile, informing it of some event (these callbacks are underlined).
Note that the Web service–to–control arrows do not indicate that the Web service business logic invokes the control method, only that it is available and can potentially be called. Note that callbacks (client or control) are rendered in a darker shade.
A JWS Web service can be rendered in two possible views:
Design View—. This is the view shown in Figure 32.21.
Source View—. This view shows the textual code listing behind the Web service or control.
These two views are not two separate objects; they are just two possible renderings or views of the .jws file.
The WebLogic Workshop Test Harness enables you to test and debug your Web service. To start it, click the Start icon (the right-pointing green arrow) on the toolbar.
By default, the Test Form is displayed (see Figure 32.24). The following sections go through each section of this Test Harness.
Click the Overview tab to see the Overview section shown in Figure 32.22.
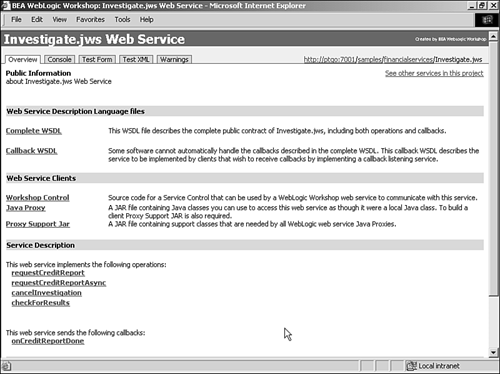
Think of the Overview section as the “home page” for your Web service, where a potential client can come to get information and tools for invoking your service. It contains the following information:
Complete WSDL—. The service description is in standard WSDL format so that your non-Workshop clients know how and where to access your service.
Callback WSDL—. Because Workshop Web services can invoke callback methods to the client, this is the callback service description. It tells a client how it might implement your service’s callback methods.
Workshop control—. What if another Workshop Web service is interested in invoking your Web service? This link downloads code for a Service control to your Web service.
Java proxy—. Java proxy code comes in handy if you need to write a Java client that invokes this service. The proxy can be made into a class that your Java client imports, allowing it to call your service methods without needing to create the SOAP request or parsing the SOAP response manually.
Proxy support JAR—. Other code needed by the Java proxy.
Service description (for each method)—. Links to the Test Form for each operation in your service.
Useful links—. Links to various industry specifications (not visible in Figure 32.22).
Think of the console page as the administration page for your Web service, much like the WebLogic Server Administration Console, except much simpler. Figure 32.23 shows the Workshop console page.

This page contains information pertaining to your Web service implementation and configuration (hence, non-public information), such as the following:
Historical records of the time this service was built
The back-end components and resources involved in your Web service
The WebLogic Workshop build label
Log settings to specify how much logging is needed and how many old messages to keep around
Persistence and caching settings to reset log records and force component redeployment
The Test Form page, shown in Figure 32.24, is where you get to test-invoke methods in your Web service.
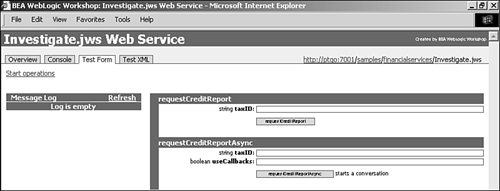
There are two sections in this page:
Message Log (left section)—. As you invoke the method and as any long-running conversations unfold, a list of methods being invoked (method traffic), including callbacks, is built and displayed in the Message Log section. You can click on any call that’s listed to reveal its input XML and output XML in the Method Details section.
Method Details (right section)—. This section starts out as a list of methods that can be invoked, with input fields for call arguments. As a conversation unfolds or a method call ends, this section automatically switches to display input and output XML. The section “A Short Tutorial” later in this chapter illustrates this process in more depth.
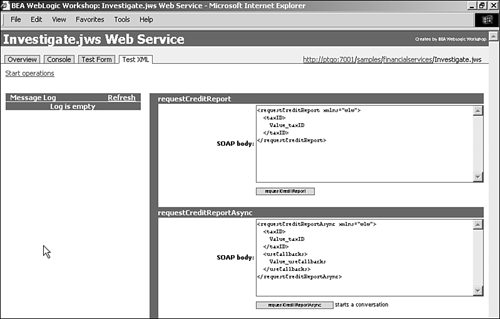
The Test XML page (see Figure 32.25) is similar to the Test Form, except all inputs to method calls are specified in the actual XML request to be sent. All responses are also shown in XML format.
In this section, you walk through the Workshop VDE performing a simple task of creating an asynchronous Web service that checks an applicant’s credit history (used throughout discussions in this chapter) by using a Database control and an EJB control. The completed source files for this task are shown in Listing 32.6.
Example 32.6. Source Code for the creditCheck Web Service
Investigate.jws

package creditCheck;
import Weblogic.jws.control.JwsContext;

public class Investigate
{
    /**
     * @jws:control
     */
    private ValidateCreditControl validateCreditEJB;

    /**
     * @jws:control
     */
    private BankruptciesDatabaseControl bankruptciesDB;

    public Callback callback;

    public interface Callback
    {
        /**
         * @jws:conversation phase="finish"
         * @jws:message-buffer enable="true"
         */
        public void onCreditReportDone(Applicant applicant, String responseMsg);
    }
    /** @jws:context */
    JwsContext context;

    public static class Applicant implements java.io.Serializable
    {
        public String taxID;
        public String firstName;
        public String lastName;
        public boolean currentlyBankrupt;
        public int availableCCCredit;
        public int creditScore;
        public String approvalLevel;
        public Applicant(String taxID)
        {
            this.taxID = taxID;
        }
        public Applicant() {}
    }
    Applicant m_currentApplicant = new Applicant();

    /**
     * @jws:operation
     * @jws:conversation phase="start"
     * @jws:message-buffer enable="true"
     * @jws:parameter-xml xml-map::
     *     <requestCreditReportAsync xmlns="http://www.openuri.org/">
     *     <taxID>{taxID}</taxID>
     *     <name>*</name>
     *     <address>*</address>
     *     </requestCreditReportAsync>
     *
     * ::
     */
    public void requestCreditReportAsync(String taxID) throws
                     java.rmi.RemoteException, java.sql.SQLException
    {
        m_currentApplicant.taxID = taxID;
        String summary = null;

        Applicant dbApplicant = bankruptciesDB.checkForBankruptcies(taxID);
        if (dbApplicant != null) {
           m_currentApplicant = dbApplicant;
           if (m_currentApplicant.currentlyBankrupt == true)
              summary = "Currently Bankrupt.";
           else
              summary = "Not currently bankrupt.";
           }
        else {
           m_currentApplicant.approvalLevel = validateCreditEJB.validate(2000);
           summary = "No bankruptcy information found.";
           }

        callback.onCreditReportDone(m_currentApplicant, summary);
    }
}
Listing 32.7 shows the source code for the creditCheck Web service’s controls.
Example 32.7. Source Code for the Web Service’s Controls
BankruptciesDatabaseControl.ctrl

package creditCheck;

import weblogic.jws.*;
import weblogic.jws.control.*;
import java.sql.SQLException;

/**
 * Defines a new database control.
 *
 * The @jws:connection tag indicates which WebLogic datasource will be used by
 * this database control. Please change this to suit your needs. You can see a
 * list of available data sources by going to the WebLogic console in a browser
 * (typically http://localhost:7001/console) and clicking Services, JDBC,
 * Data Sources.
 *
 * @jws:connection data-source-jndi-name="cgSampleDataSource"
 */
public interface BankruptciesDatabaseControl extends DatabaseControl
{
    // Sample database function.  Uncomment to use

    // static public class Customer
    // {
    //   public int id;
    //   public String name;
    // }
    //
    // /**
    //  * @jws:sql statement="SELECT ID, NAME FROM CUSTOMERS WHERE ID = {id}"
    //  */
    // Customer findCustomer(int id);

    // Add "throws SQLException" to request that SQLExeptions be thrown on errors.

    /**
     * @jws:sql statement::
     *     SELECT TAXID, FIRSTNAME, LASTNAME, CURRENTLYBANKRUPT FROM BANKRUPTCIES WHERE TAXID={taxID}
     * ::
     */
    public Investigate.Applicant checkForBankruptcies(String taxID);

}
ValidateCreditControl.ctrl

package creditCheck;

import weblogic.jws.*;
import weblogic.jws.control.*;

/**
 *   @jws:ejb home-jndi-name="financial.ValidateCredit"
 *   @editor-info:ejb home="ValidateCreditBean.jar"
 *                    bean="ValidateCreditBean.jar"
 */
public interface ValidateCreditControl
        extends financial.ValidateCreditHome,    // home interface
                financial.ValidateCredit,    // bean interface
                weblogic.jws.control.SessionEJBControl     // control interface
{
}
Of course, because you’re using the Workshop VDE to create this Web service, you are not going to be typing all this code in by hand. Workshop generates all the infrastructure and plumbing code, so you should concern yourself only with business logic. Here are the steps and specifications:
Create the creditCheck Web service, with two methods that are both conversational and buffered:
requestCreditReportAsync(taxID)—. This asynchronous call starts a conversation (@jws:conversation phase=start). By doing so, Workshop immediately returns control back to the client, while this method proceeds to fulfill the request. In addition, you will specify a custom mapping scheme because your Web service client already has a predefined SOAP message it wants to use.OnCreditReportDone(applicant, responseMessage)—. This client callback is invoked when the information requested by therequestCreditReportAsynchmethod is available. Make this method end the conversation (use the finish phase).
Create the
BankruptciesDatabaseControlDatabase control, which reads from theBANKRUPTCIESdatabase table, with each row of data being mapped to theApplicantJava object.Create the
validateCreditEJBEJB control. The back-end EJB component has already been written and deployed into the default project, so all you need to do is create the EJB control. You won’t even need to create any methods in the EJB control because Workshop reflects on the EJB and creates the appropriate methods automatically.Test the Web service, using some canned
taxIDs that have data in theBANKRUPTCIESdatabase.
To start WebLogic Workshop, click Start, Programs, WebLogic Platform 7.0, WebLogic Workshop. Workshop ships with a project called Sample, which you’ll use to build the tutorial Web service. Choose File, Open Project to open the Open Project dialog box. Select the Samples item in this dialog box.
To do this tutorial, you need to start WebLogic Server by choosing Tools, Start WebLogic Server. It takes some time for the server to come up, but when it does, you should see the green light icon on the bottom status bar of Workshop, which indicates that the server is running.
To create the creditCheck Web service, follow these steps:
In the project tree (upper-left side of the Workshop window), right-click the Project Samples node and select New Folder. When the Create New Folder dialog box opens, enter
creditCheck, and click OK.The new creditCheck folder appears under the Project Samples node. Right-click it, and choose New File. In the Create New File dialog box (see Figure 32.26), type
Investigatein the File Name text box, and click OK. You have just created theInvestigate.jwsfile for your Web service.Now you need to add two methods to your Web service. Click the Design View tab (if you are not already there). From the Add Operation drop-down list, select Add Method. In the space provided, type
requestCreditReportAsyncand press Enter. Again, from the Add Operation drop-down list, select Add Callback. In the space provided, typeonCreditReportDone. Your new design should now look like Figure 32.27.Next, you need to use the Properties pane (to the right of the Design View pane) to make the
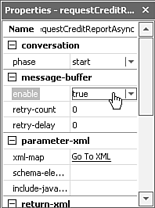
requestCreditReportAsyncmethod an initiator of a new conversation and to turn on buffering. First, select this method by clicking the requestCreditReportAsync icon. Under the Conversation box, click the drop-down arrow and select Start, as shown in Figure 32.28.Under the Message-Buffer box, click the drop-down arrow and select True, as shown in Figure 32.29.
Repeat step 5 for the callback method
onCreditReportDone, except this time choose the Finish conversation phase. Your Design View pane should now look like Figure 32.30.Notice the “s” icon in the
requestCreditReportAsyncmethod, which indicates that it starts a conversation. (The “f” icon in the callback method indicates that it finishes the conversation.) The coil-like icons indicate that buffering is turned on.Next, customize these methods by adding input parameters to their signatures. Double-click the fat arrow icon in the middle of the requestCreditReportAsync icon in the Design View pane. The Edit Maps and Interface dialog box opens. In the Java section, replace the default signature with the following:
public void requestCreditReportAsync(String taxID)
While you’re in this dialog box, specify your custom XML Map. In the XML box, select the Parameter XML tab, click the Custom radio button, and then enter the XML text shown in Figure 32.31. This text indicates that the client is sending two additional pieces of information (name and address) that you will ignore.
Then replace the generated default signature for the
onCreditReportDonemethod in the Java section with the following code to specify that the method return a response string indicating the credit report result:public void onCreditReportDone(Applicant applicant, String responseMsg)
Next, you need to add a business object and instance to your
.jwsfile. In Source View mode, insert the following code snippet intoInvestigate.jws, after thejwsContextdeclaration:public static class Applicant implements java.io.serializable { public String taxID; public String firstName; public String lastName; public Boolean currentlyBankrupt; public int availableCCCredit; public int creditScore; public String approvalLevel; public Applicant (String taxID) { this.taxID = taxID; } public Applicant() {} } Applicant m_currentApplicant = new Applicant();


If you have not done so already, save your work by clicking the Save icon in the toolbar or choosing File, Save from the menu bar.
To create the Bankruptcies Database control, follow these steps:
Click the Add Control drop-down list to the right of the Design View pane for Investigate, and select Add Database Control. When the Add Database Control dialog box opens, fill it out as shown in Figure 32.32.
When you click the Create button, a new file called
Bankruptcies.ctrlis created under the creditCheck folder in the project tree (upper left), and a corresponding Database control icon is added to the Design View pane. In addition, a new instance variable declaration forbankruptciesDB(STEP1 in Figure 32.32) is automatically added toInvestigate.jws.A control is useless without methods, so add one named
checkForBankruptciesthat retrieves information from the database. Normally, you would need to code several JDBC statements in your client, including setting up connection pools, building a SQL statement programmatically, parsing the result set, and releasing resources. However, you don’t need to do that with Workshop. Next, right-click the Database control icon in the Design View pane and select Add Method. In the space provided for the method name, type incheckForBankruptcies.To complete this control, you need to specify this method’s correct signature and function. Double-click the fat arrow icon in the center of the Database control icon (in the Design View pane), and fill it in as shown in Figure 32.33.


To create the Validate Credit control, follow these steps:
In the Add Control drop-down list (refer to step 1 in the previous section), select Add EJB Control. Fill in the Add EJB Control dialog box as shown in Figure 32.34.
Click the Create button, and you’re done. As with the Database control, an EJB control variable called
validateCreditEJB(STEP1 in Figure 32.34) has been automatically added toInvestigate.jws. You might be wondering about adding methods. As mentioned before, Workshop reflects on the target EJB and generates the necessary methods automatically. Your Design View pane should now look like Figure 32.35.


The Database control is finished, but how does Investigate.jws know when or where to invoke it? You need to tell it by adding business logic. Back in the Design View pane, click the requestCreditReportAsync method (to the left of the Investigate.jws icon), which takes you to the Source View pane for that method. Type in the following code:
public void requestCreditReportAsync(String taxID) throws
              java.rmi.RemoteException, java.sql.SQLException
{
    m_currentApplicant.taxID = taxID;
    String summary = null;

    Applicant dbApplicant = bankruptciesDB.checkForBankruptcies(taxID);
    if (dbApplicant != null) {
       m_currentApplicant = dbApplicant;
       if (m_currentApplicant.currentlyBankrupt == true)
          summary = "Currently Bankrupt.";
       else
          summary = "Not currently bankrupt.";
       }
    else {
       m_currentApplicant.approvalLevel = validateCreditEJB.validate(2000);
       summary = "No bankruptcy information found.";
       }
    callback.onCreditReportDone(m_currentApplicant, summary);
}
This code basically checks the BANKRUPTCIES database for history on the applicant. It invokes the EJB control to validate the applicant’s credit score (hard-coded at 2000), and then calls back the client. Remember that the client had execution control before either control was invoked. The callback with conversation implements a true asynchronous communication model.
If you look at the Source View pane for the Investigate.jws, BankruptciesDatabaseControl.ctrl, and ValidateCreditControl.ctrl files, they should all match the source files shown in Listing 32.6 and Listing 32.7.
Workshop enables you to write and run your code using the Test Harness pane, a browser-based tool through which you can call your Web service’s methods. To start it, click the Start icon on the toolbar. Click the Stop button to halt execution of your Web service.
Clicking the Start icon causes Workshop to build your project, checking for errors along the way. It then launches your Web browser to display a page you can use to test the service method with possible values. Figure 32.36 shows the Test Harness pane for the Investigate Web service.

Because an incoming XML Map is in place, the only way to specify input is through XML. Otherwise, the Test Harness pane can provide input fields for each parameter of the method being invoked. Try entering some meaningful values. The shipped BANKRUPTCIES database has values for known users, such as 111111111, 222222222, and so forth. In Figure 32.37, a taxID of 222222222 has been substituted for the placeholder string Value_taxID.

Clicking the requestCreditReportAsync button sends a SOAP message to the Investigate Web service, and the results window in Figure 32.37 is displayed, where you actually see the SOAP request and response messages.
Because this method starts a conversation, control immediately returns to the caller without any real return value, while the request is still being processed (notice the “Processing Request” label at the bottom). When the callback has finished, as shown in the upper-left Message Log section in Figure 32.37, you can click on the callback (in this case, onCreditReportDone) and get the real results that came back in the callback (see Figure 32.38).

You have had a taste of the ease and elegance of developing Web services with WebLogic Workshop, but you have barely scratched the surface. There is much more to explore and learn with this powerful tool. However, you have seen the best practices and sound engineering principles that Workshop brings to Web services design and development: loose coupling, asynchronous communications, and coarse-grained (business level) interactions. Just think—you built and deployed a Web service using J2EE technologies without needing to know a thing about J2EE.