
Loops are a fundamental component of any programming language. If you’ve taken any programming classes, even BASIC, you’ve likely encountered a For...Next loop. Luckily, VBA supports all the usual loops, plus a special loop that is excellent to use with VBA.
This chapter covers the basic loop constructs:
For...NextDo...WhileDo...UntilWhile...LoopUntil...Loop
We also discuss the cool loop construct unique to object-oriented languages:
For Each...Next
For and Next are common loop constructs. Everything between For and Next is run multiple times. Each time that the code runs, a certain counter variable (specified in the For statement) has a different value.
Consider this code:
For I = 1 to 10
Cells(I, I).Value = I
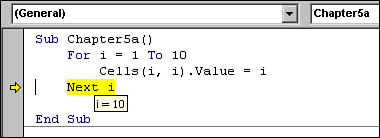
Next IAs this program starts to run, we’ve given the counter variable a name of I. The first time through the code, the variable I is set to 1. The first time that the loop is executed, I is equal to 1, so the cell in Row 1, Column 1 will be set to 1 (see Figure 5.1).

Let’s take a close look at what happens as VBA gets to the line that says Next I. Before running this line, the variable I is equal to 1. During the execution of Next I, VBA must make a decision. VBA adds 1 to the variable I and compares it to the maximum value in the To clause of the For statement. If it is within the limits specified in the To clause, the loop is not finished. In this case, the value of I will be incremented to 2. Code execution then moves back to the first line of code after the For statement. Figure 5.2 shows the state of the program before running the Next line. Figure 5.3 shows what happens after executing the Next line.


The second time through the loop, the value of I is 2. The cell in Row 2, Column 2 (that is, cell B2) gets a value of 2 (see Figure 5.4).

As the process continues, the Next I statement advances I up to 3, 4, and so on. On the tenth pass through the loop, the cell in Row 10, Column 10 is assigned a value of 10.
It is interesting to watch what happens to the variable I on the last pass through Next I. In Figure 5.5, you can see that before executing Next I the tenth time, the variable I is equal to 10.
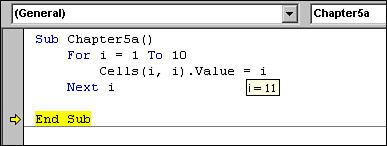
VBA is now at a decision point. It adds 1 to the variable I. I is now equal to 11, which is greater than the limit in the For...Next loop. VBA then moves execution to the next line in the macro after the Next statement (see Figure 5.6). In case you are tempted to use the variable I later in the macro, it is important to realize that it might be incremented beyond the limit specified in the To clause of the For statement.
At the end of the loop, you get the result shown in Figure 5.7.

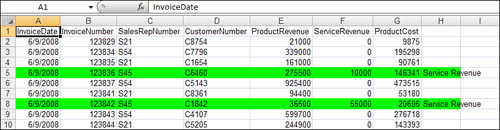
The common use for such a loop is to walk through all the rows in a dataset and decide to perform some action on the basis of some criteria. For example, if you want to mark all the rows with positive service revenue in Column F, you could use this loop:
For I = 2 to 10
    If Cells(I, 6).Value > 0 Then
        Cells(I, 8).Value = "Service Revenue"
        Cells(I, 1).Resize(1, 8).Interior.ColorIndex = 4
    End If
Next i
This loop checks each item of data from Row 2 through Row 10. If there is a positive number in Column F, Column H of that row will have a new label, and the cells in Columns A:H of the row will be colored green. After running this macro, the results look like Figure 5.8.
The previous example is not very useful in that it works only when there are exactly ten rows of data. It is possible to use a variable to specify the upper/lower limit of the For statement. This code sample identifies FinalRow with data, and then loops from Row 2 to that row:
FinalRow = Cells(Rows.Count, 1).End(xlUp).Row
For I = 2 to FinalRow
    If Cells(I, 6).Value > 0 Then
        Cells(I, 8).Value = "Service Revenue"
        Cells(I, 1).Resize(1, 8).Interior.ColorIndex = 4
    End If
Next I
Exercise caution when using variables. What if the imported file today is empty and has only a heading row? In this case, the FinalRow variable is equal to 1. This makes the first statement of the loop essentially say, “For I = 2 to 1.” Because the start number is higher than the end number, the loop does not execute at all. The variable I is equal to 2, and code execution jumps to the line after Next.
In a For...Next loop, it is possible to have the loop variable jump up by something other than 1. You might use it to apply green-bar formatting to every other row in a dataset, for example. In this case, you would want to have the counter variable I examine every other row in the dataset. Indicate this by adding the Step clause to the end of the For statement:
FinalRow = Cells(Rows.Count, 1).End(xlUp).Row
For i = 2 to FinalRow Step 2
    Cells(i, 1).Resize(1, 8).Interior.ColorIndex = 35
Next i
While running this code, VBA adds a light green shading to Rows 2, 4, 6, and so on (see Figure 5.9).

The Step clause can easily be any number. You might want to check every tenth row of a dataset to extract a random sample. In this case, you would use Step 10:
FinalRow = Cells(Rows.Count, 1).End(xlUp).Row
NextRow = FinalRow + 5
Cells(NextRow-1, 1).Value = "Random Sample of Above Data"
For I = 2 to FinalRow Step 10
    Cells(I, 1).Resize(1, 8).Copy Destination:=Cells(NextRow, 1)
    NextRow = NextRow + 1
Next i
You can also have a For...Next loop run backward from high to low. This is particularly useful if you are selectively deleting rows. To do this, reverse the order of the For statement and have the Step clause specify a negative number:
' Delete all rows where column C is the Internal rep - S54
FinalRow = Cells(Rows.Count, 1).End(xlUp).Row
For I = FinalRow to 2 Step -1
    If Cells(I, 3).Value = "S54" Then
        Cells(I, 1).EntireRow.Delete
    End If
Next iSometimes you don’t need to execute the whole loop. Perhaps you just need to read through the dataset until you find one record that meets a certain criteria. In this case, you want to find the first record and then stop the loop. A statement called Exit For does this.
The following sample macro looks for a row in the dataset where service revenue in Column F is positive and product revenue in Column E is 0. If such a row is found, you might indicate a message that the file needs manual processing today and move the cell pointer to that row:
' Are there any special processing situations in the data?
FinalRow = Cells(Rows.Count, 1).End(xlUp).Row
ProblemFound = False
For I = 2 to FinalRow
    If Cells(I, 6).Value > 0 Then
        If cells(I, 5).Value = 0 Then
            Cells(I, 6).Select
            ProblemFound = True
            Exit For
        End If
    End If
Next I
If ProblemFound Then
    MsgBox "There is a problem at row " & I
    Exit Sub
End IfIt is okay to run a loop inside another loop. Perhaps the first loop is running through all the rows in your recordset. The second loop then might run through all the columns in your recordset. Consider the dataset shown in Figure 5.10.

' Loop through each row and column
' Add a checkerboard format
FinalRow = Cells(Rows.Count, 1).End(xlUp).Row
FinalCol = Cells(1, 255).End(xlToLeft).Column
For I = 2 to FinalRow
    ' For even numbered rows, start in column 1
    ' For odd numbered rows, start in column 2
    If I Mod 2 = 1 Then
        StartCol = 1
    Else
        StartCol = 2
    End If
    For J = StartCol to FinalCol Step 2
        Cells(I, J).Interior.ColorIndex = 35
    Next J
Next I
In this code, the outer loop is using the I counter variable to loop through all the rows in the dataset. The inner loop is using the J counter variable to loop through all the columns in that row. Because Figure 5.10 has seven data rows, the code runs through the I loop seven times. Each time through the I loop, the code runs through the J loop six or seven times. This means that the line of code that is inside the J loop ends up being executed several times for each pass through the I loop. Figure 5.11 shows the result.

There are several variations of the Do loop. The most basic Do loop is great for doing a bunch of some mundane task. I once had someone send me a list of addresses going down a column, as shown in Figure 5.12.

I needed to rearrange these addresses into a database with name in Column B, street in Column C, city and state in Column D. By setting Relative Recording (see Chapter 1, “Unleash the Power of Excel with VBA”) and using a hot key of Ctrl+A, I recorded this little bit of useful code. The code is designed to copy one single address into database format. It also navigates the cell pointer to the name of the next address in the list. This allowed me to sit at my desk, and each time that I pressed Ctrl+A, it would reformat one address for me.
→ | For a discussion of Relative Recording, see “A Possible Solution: Using Relative References When Recording,” p. 25, in Chapter 1. |
Sub Macro3()
'
' Macro3 Macro
' Macro recorded 10/29/2003 by Bill Jelen
' Move one address into database format.
' Then move the cell pointer to the start of the next address.
'
' Keyboard Shortcut: Ctrl+Shift+A
'
    Selection.Copy
    ActiveCell.Offset(0, 1).Range("A1").Select
    ActiveSheet.Paste
    ActiveCell.Offset(1, -1).Range("A1").Select
    Application.CutCopyMode = False
    Selection.Copy
    ActiveCell.Offset(-1, 2).Range("A1").Select
    ActiveSheet.Paste
    ActiveCell.Offset(2, -2).Range("A1").Select
    Application.CutCopyMode = False
    Selection.Copy
    ActiveCell.Offset(-2, 3).Range("A1").Select
    ActiveSheet.Paste
    ActiveCell.Offset(4, -3).Range("A1").Select
End Sub
Note
I am not suggesting that the preceding code is suitable for a professional application. However, sometimes we are writing macros just to automate a one-time mundane task.
Without a macro, I would have done a lot of copying and pasting manually. Now, with the preceding recorded macro, I could place the cell pointer on a name in Column A and press Ctrl+Shift+A. That one address would be copied into three columns, and the cell pointer would move to the start of the next address (see Figure 5.13).

I was pretty happy with this macro because it allowed me to process an address every second using the hot key. I soon realized that I had 5,000 addresses and I didn’t want to keep running the same macro over and over.
Using a Do...Loop, I could set up the macro to run continuously. If I were to just enclose the recorded code with Do at the top and Loop at the end, VBA would continuously run my code over and over. This would allow me to sit back and watch the code do the work. This insanely boring task was now done in minutes rather than hours.
Note that this particular Do...Loop will run forever. There is no mechanism to stop it. That worked for the task at hand—I could watch the progress on the screen and after the program had advanced past the end of this database, I just pressed Ctrl+Break to stop execution:
Sub Macro3()
'
' Macro3 Macro
' Macro recorded 10/29/2003 by Bill Jelen
' Move one address into database format.
' Then move the cell pointer to the start of the next address.
'
' Keyboard Shortcut: Ctrl+Shift+A
'
Do
    Selection.Copy
    ActiveCell.Offset(0, 1).Range("A1").Select
    ActiveSheet.Paste
    ActiveCell.Offset(1, -1).Range("A1").Select
    Application.CutCopyMode = False
    Selection.Copy
    ActiveCell.Offset(-1, 2).Range("A1").Select
    ActiveSheet.Paste
    ActiveCell.Offset(2, -2).Range("A1").Select
    Application.CutCopyMode = False
    Selection.Copy
    ActiveCell.Offset(-2, 3).Range("A1").Select
    ActiveSheet.Paste
    ActiveCell.Offset(4, -3).Range("A1").Select
Loop
End Sub
All of these examples are “quick and dirty” loops. They are great for when you need to accomplish a task quickly. The Do...Loop provides a number of options to allow you to automatically have the program stop when it accomplishes the end of the task.
The first option is to have a line in the Do...Loop that detects the end of the dataset and exits the loop. In the current example, this could be accomplished by using the Exit Do command in an If statement. If the current cell is on a cell that is empty, you can assume that you’ve reached the end of the data and stopped processing the loop:
Do
    If Not Selection.Value > "" Then Exit Do
    Selection.Copy
    ActiveCell.Offset(0, 1).Range("A1").Select
    ActiveSheet.Paste
    ActiveCell.Offset(1, -1).Range("A1").Select
    Application.CutCopyMode = False
    Selection.Copy
    ActiveCell.Offset(-1, 2).Range("A1").Select
    ActiveSheet.Paste
    ActiveCell.Offset(2, -2).Range("A1").Select
    Application.CutCopyMode = False
    Selection.Copy
    ActiveCell.Offset(-2, 3).Range("A1").Select
    ActiveSheet.Paste
    ActiveCell.Offset(4, -3).Range("A1").Select
Loop
End SubThere are four variations of using While or Until. These clauses can be added to either the Do statement or the Loop statement. In every case, the While or Until clause includes some test that evaluates to True or False.
With a Do While <test expression>...Loop construct, the loop is never executed if <test expression> is false. If you are reading records from a text file, you cannot assume that the file has one or more records, so you need to test to see whether you are already at the end of file with the EOF function before you enter the loop:
' Read a text file, skipping the Total lines
    Open "C:Invoice.txt" For Input As #1
    R = 1
    Do While Not EOF(1)
        Line Input #FileNumber, Data
        If Not Left (Data, 5) = "TOTAL" Then
            ' Import this row
            r = r + 1
            Cells(r, 1).Value = Data
        End If
    Loop
    Close #1
In this example, I used the NOT keyword. EOF(1) evaluates to True after there are no more records to be read from invoice.txt. Some programmers believe it is hard to read a program that contains a lot of NOTs. To avoid the use of NOT, use the Do Until <test expression> ...Loop construct:
' Read a text file, skipping the Total lines
    Open "C:Invoice.txt" For Input As #1
    R = 1
    Do Until EOF(1)
        Line Input #1, Data
        If Not (Data, 5) = "TOTAL" Then
            ' Import this row
            r = r + 1
            Cells(r, 1).Value = Data
        End If
    Loop
    Close #1
In other examples, you always want the loop to be executed the first time. In these cases, you move the While or Until instruction to the end of the loop. This code sample asks the user to enter sales amounts made that day. It continually asks them for sales amounts until they enter a zero:
TotalSales = 0
Do
    x = InputBox(Prompt:="Enter Amount of Next Invoice. Enter 0 when done.")
    TotalSales = TotalSales + x
Loop Until x = 0
MsgBox "The total for today is $" & TotalSales
In the following loop, a check amount is entered, and then it looks for open invoices to which to apply the check. It is often the case that a single check is received, and it covers many invoices. This program sequentially applies the check to the oldest invoices until 100 percent of the check has been applied:
' Ask for the amount of check received
AmtToApply = InputBox("Enter Amount of Check") + 0
' Loop through the list of open invoices.
' Apply the check to the oldest open invoices and Decrement AmtToApply
NextRow = 2
Do While AmtToApply > 0
    OpenAmt = Cells(NextRow, 3)
    If OpenAmt > AmtToApply Then
        ' Apply total check to this invoice
        Cells(NextRow, 4).Value = AmtToApply
        AmtToApply = 0
    Else
        Cells(NextRow, 4).Value = OpenAmt
        AmtToApply = AmtToApply - OpenAmt
    End If
    NextRow = NextRow + 1
Loop
Because you can construct the Do...Loop with the While or Until qualifiers at the beginning or end, you have a lot of subtle control over whether the loop is always executed once, even if the condition is True at the beginning.
While...Wend loops are included in VBA for backward compatibility. In the VBA help file, Microsoft suggests that Do...Loops are more flexible. However, because you might encounter While...Wend loops in code written by others, here is a quick example. In this loop, the first line is always While condition. The last line of the loop is always Wend. Note that there is no Exit While statement. In general, these loops are okay, but the Do...Loop construct is more robust and flexible. Because the Do loop offers either the While or Until qualifier, this qualifier can be at the beginning or end of the loop, and there is the possibility to exit a Do loop early:
' Read a text file, adding the amounts
    Open "C:Invoice.txt" For Input As #1
    TotalSales = 0
    While Not EOF(1)
        Line Input #1, Data
        TotalSales = TotalSales + Data
    Wend
    MsgBox "Total Sales=" & TotalSales
Close #1This is an excellent loop, and the macro recorder never records this type of loop. VBA is an object-oriented language. It’s common to have a collection of objects in Excel, such as a collection of worksheets in a workbook, cells in a range, pivot tables on a worksheet, or data series on a chart.
This special type of loop is great for looping through all the items in the collection. Before discussing this loop in detail, you need to understand a special kind of variable called object variables.
At this point, you’ve seen a variable that contains a single value. When you have a variable such as TotalSales = 0, TotalSales is a normal variable and generally contains only a single value. It is also possible to have a more powerful variable called an object variable. An object variable holds many values; basically, any property that is associated with the object is associated with the object variable.
I generally do not take the time to declare my variables. Many books implore you to use the DIM statement to identify all your variables at the top of the procedure. This allows you to specify that a certain variable is of a certain type, such as Integer or Double. Although this saves a tiny bit of memory, it requires you to know up front which variables you plan on using. I tend to invent variables as I go, whipping up a new variable on-the-fly as the need arises. However, there are great benefits to declaring object variables. The VBA AutoComplete feature turns on if you declare an object variable at the top of your procedure. The following lines of code declare three object variables, one as a worksheet, one as a range, and one as a pivot table:
Sub Test()
    Dim WSD as Worksheet
    Dim MyCell as Range
    Dim PT as PivotTable
    Set WSD = ThisWorkbook.Worksheets("Data")
    Set MyCell = WSD.Cells(Rows.Count, 1).End(xlUp).Offset(1, 0)
    Set PT = WSD.PivotTables(1)
    ...
In the preceding example, you can see that just an equals statement is not used to assign object variables. You need to use the Set statement to assign a specific object to the object variable.
There are many great reasons for using object variables, not the least of which is the fact that it can be a great shorthand notation. It is a lot easier to have a lot of lines of code referring to WSD rather than ThisWorkbook.Worksheets("Data").
Also, as mentioned earlier, the object variable inherits all the properties of the object to which it refers.
The For Each...Loop employs an object variable rather than a Counter variable. The following code loops through all the cells in Column A. The code uses the .CurrentRegion property to define the current region and then uses the .Resize property to limit the selected range to a single column. The object variable is called Cell. I could have used any name for the object variable, but Cell seems more appropriate than something arbitrary like Fred:
For Each cell in Range("A1").CurrentRegion.Resize(, 1)
    If cell.Value = "Total" Then
        cell.resize(1,8).Font.Bold = True
    End If
Next cell
This code sample searches all open workbooks, looking for one with a particular sheet name:
For Each wb in Workbooks
    If wb.Worksheets(1).Name = "Menu" Then
    WBFound = True
    WBName = wb.Name
    Exit For
End If
Next wb
In this code sample, all shapes on the current worksheet are deleted:
For Each Sh in ActiveSheet.Shapes
    Sh.Delete
Next Sh
This code sample deletes all pivot tables on the current sheet:
For Each pt in ActiveSheet.PivotTables
    pt.TableRange2.Clear
Next pt
Another aspect of programming that will never be recorded by the macro recorder is the concept of flow control. Sometimes, you do not want every line of your program to be executed every time you run the macro. VBA offers two excellent choices for flow control: the If...Then...Else construct, and the Select Case construct.
The most common device for program flow control is the If statement. Suppose, for instance, that you have a list of products as shown in Figure 5.14. You want to loop through each product in the list and copy it to either a Fruits list or a Vegetables list. As a beginning programmer, I was tempted to loop through the rows twice; I wanted to loop through once looking for fruit, and a second time looking for vegetables. However, there is no need to loop through twice. On a single loop, you can use an If...Then...Else construct to copy each row to the correct place.

Any If statement needs a condition that is being tested. The condition should always evaluate to TRUE or FALSE. Here are some examples of simple and complex conditions:
If Range("A1").Value = "Title" ThenIf Not Range("A1").Value = "Title" ThenIf Range("A1").Value = "Title" And Range("B1").Value = "Fruit" ThenIf Range("A1").Value = "Title" Or Range("B1").Value = "Fruit" Then
After the If statement, you may include one or more program lines that will be executed only if the condition is met. You should then close the If block with an End If line. Here is a simple example of an If statement:
Sub ColorFruitRedBold()
    FinalRow = Cells(Rows.Count, 1).End(xlUp).Row

    For i = 2 To FinalRow
        If Cells(i, 1).Value = "Fruit" Then
            Cells(i, 1).Resize(1, 3).Font.Bold = True
            Cells(i, 1).Resize(1, 3).Font.ColorIndex = 3
        End If
    Next i

    MsgBox "Fruit is now bold and red"
End SubSometimes you will want to do one set of statements if the condition is true, and another set of statements if the condition is not true. To do this with VBA, the second set of conditions would be coded after the Else statement. There is still only one End If statement associated with this construct. Suppose, for example, that you want to color the fruit red and the vegetables green:
Sub FruitRedVegGreen()
    FinalRow = Cells(Rows.Count, 1).End(xlUp).Row

    For i = 2 To FinalRow
        If Cells(i, 1).Value = "Fruit" Then
            Cells(i, 1).Resize(1, 3).Font.ColorIndex = 3
        Else
            Cells(i, 1).Resize(1, 3).Font.ColorIndex = 50
        End If
    Next i

    MsgBox "Fruit is red / Veggies are green"
End SubNotice that our product list includes one item that is classified as an herb. We really have three conditions for which to test. It is possible to build an If...End If structure with multiple conditions. First, test to see whether the record is a fruit. Next, use an Else If to test whether the record is a vegetable. Then, test to see whether the record is an herb. Finally, if the record is none of those, highlight the record as an error:
Sub MultipleIf()
    FinalRow = Cells(Rows.Count, 1).End(xlUp).Row

    For i = 2 To FinalRow
        If Cells(i, 1).Value = "Fruit" Then
            Cells(i, 1).Resize(1, 3).Font.ColorIndex = 3
        ElseIf Cells(i, 1).Value = "Vegetable" Then
            Cells(i, 1).Resize(1, 3).Font.ColorIndex = 50
        ElseIf Cells(i, 1).Value = "Herbs" Then
            Cells(i, 1).Resize(1, 3).Font.ColorIndex = 5
        Else
            ' This must be a record in error
            Cells(i, 1).Resize(1, 3).Interior.ColorIndex = 6
        End If
    Next i

    MsgBox "Fruit is red / Veggies are green / Herbs are blue"
End SubWhen you have many different conditions, it becomes unwieldy to use many Else If statements. VBA offers another construct known as the Select Case construct. In our running example, we always want to check the value of the Class in column A. This value is called the test expression. The basic syntax of this construct starts with the words Select Case followed by the test expression:
Select Case Cells(i, 1).Value
Thinking about our problem in English, you might say, “In cases where the record is fruit, color the record with red.” VBA uses a shorthand version of this. You write the word Case followed by the literal "Fruit". Any statements that follow Case "Fruit" will be executed whenever the test expression is a fruit. After these statements, you would have the next Case statement: Case "Vegetables". You would continue in this fashion, writing a Case statement followed by the program lines that will be executed if that case is true.
After you’ve listed all the possible conditions you can think of, you may optionally include a Case Else section at the end. This section includes what the program should do if the test expression matches none of your cases. Finally, close the entire construct with the End Select statement.
The following program does the same operation as the previous macro, but uses a Select Case statement:
Sub SelectCase()
    FinalRow = Cells(Rows.Count, 1).End(xlUp).Row

    For i = 2 To FinalRow
        Select Case Cells(i, 1).Value
            Case "Fruit"
                Cells(i, 1).Resize(1, 3).Font.ColorIndex = 3
            Case "Vegetable"
                Cells(i, 1).Resize(1, 3).Font.ColorIndex = 50
            Case "Herbs"
                Cells(i, 1).Resize(1, 3).Font.ColorIndex = 5
            Case Else
        End Select
    Next i

    MsgBox "Fruit is red / Veggies are green / Herbs are blue"
End SubIt is possible to have fairly complex expressions in Case statements. You might want to perform the same actions for all berry records:
Case "Strawberry", "Blueberry", "Raspberry"
     AdCode = 1
If it makes sense, you might code a range of values in the Case statement:
Case 1 to 20
    Discount = 0.05
Case 21 to 100
    Discount = 0.1
You can include the keyword Is and a comparison operator, such as > or <:
Case Is < 10
    Discount = 0
Case Is > 100
    Discount = 0.2
Case Else
Discount = 0.10It is possible and common to nest an If statement inside another If statement. In this situation, it is very important to use proper indenting. You will find that you often have several End If lines at the end of the construct. By having proper indenting, it is easier to tell which End If is associated with a particular If.
The final macro has a lot of logic. Our discount rules are as follows:
For Fruit, quantities under 5 cases get no discount.
Quantities from 5 to 20 cases get a 10 percent discount.
Quantities above 20 cases get a 15 percent discount.
For Herbs, quantities under 10 cases get no discount.
Quantities from 10 cases to 15 cases get a 3 percent discount.
Quantities above 15 cases get a 6 percent discount.
For Vegetables except Asparagus, 5 cases and above earn a 12 percent discount.
Asparagus requires 20 cases for a discount of 12 percent.
None of the discounts apply if the product is on sale this week. The sale price is 25 percent off the normal price. This week’s sale items are Strawberry, Lettuce, and Tomatoes.
The code to execute this logic follows:
Sub ComplexIf()
    FinalRow = Cells(Rows.Count, 1).End(xlUp).Row

    For i = 2 To FinalRow
        ThisClass = Cells(i, 1).Value
        ThisProduct = Cells(i, 2).Value
        ThisQty = Cells(i, 3).Value

        ' First, figure out if the item is on sale
        Select Case ThisProduct
            Case "Strawberry", "Lettuce", "Tomatoes"
                Sale = True
            Case Else
                Sale = False
        End Select

        ' Figure out the discount
        If Sale Then
            Discount = 0.25
        Else
            If ThisClass = "Fruit" Then
                Select Case ThisQty
                    Case Is < 5
                        Discount = 0
                    Case 5 To 20
                        Discount = 0.1
                    Case Is > 20
                        Discount = 0.15
                End Select
            ElseIf ThisClass = "Herbs" Then
                Select Case ThisQty
                    Case Is < 10
                        Discount = 0
                    Case 10 To 15
                        Discount = 0.03
                    Case Is > 15
                        Discount = 0.05
                End Select
            ElseIf ThisClass = "Vegetables" Then
                ' There is a special condition for asparagus
                If ThisProduct = "Asparagus" Then
                    If ThisQty < 20 Then
                        Discount = 0
                    Else
                        Discount = 0.12
                    End If
                Else
                    If ThisQty < 5 Then
                        Discount = 0
                    Else
                        Discount = 0.12
                    End If
                End If ' Is the product asparagus or not?
            End If ' Is the product a vegetable?
        End If ' Is the product on sale?

        Cells(i, 4).Value = Discount

        If Sale Then
            Cells(i, 4).Font.Bold = True
        End If

    Next i

    Range("D1").Value = "Discount"

    MsgBox "Discounts have been applied"

End SubLoops add a tremendous amount of power to your recorded macros. Any time that you need to repeat a process over all worksheets or all rows in a worksheet, a loop is the way to go. Excel VBA supports the traditional programming loops of For...Next and Do...Loop, as well as the object-oriented loop of For Each...Next. Next, Chapter 6, “R1C1-Style Formulas,” discusses the seemingly arcane R1C1 style of formulas and shows you why it is important in Excel VBA.