
7
Code Quality Tools
In the previous parts of this book, we learned the basics of clean code. Now, it is time to apply that knowledge to our everyday work. There are literally dozens of tools available for the PHP ecosystem that can help us detect flaws and potential bugs, apply the correct code styling, and generally inform us about quality issues.
To ensure a quick and easy start within the world of code quality tools, this section will introduce you to the most commonly used ones. For each, you will learn how to install, configure, and use it directly on your code. You will also learn about some useful extra features they provide.
We will look at the following groups of tools:
- Syntax checking and code styling
- Static code analysis
- IDE extensions
Technical requirements
For this chapter, you only need a bare minimum of tools to already be set up. The chances are high that you already have them installed if you have ever worked with PHP code before:
- A local installation of a recent PHP version (PHP 8.0 or higher is recommended).
- A code editor – often called an Integrated Development Environment (IDE).
- Composer, either installed as binary or globally. Please check https://getcomposer.org/ if you are not familiar with Composer yet.
Please note that for the rest of this book, all examples are based on a Linux environment such as Ubuntu or macOS. If you are using Windows for development, you will most likely need to make some adjustments, as described here: https://www.php.net/manual/en/install.windows.commandline.php.
The code files for this chapter can be found here: https://github.com/PacktPublishing/Clean-Code-in-PHP
Syntax checking and code styling
The first group of tools we want to discuss helps us keep our code syntactically correct (i.e., it can be executed correctly by PHP) and formatted in a structured way. It seems to be obvious that the code needs to be written without errors, but it is always good to double-check, as some tools can actively change your code. Having a simple and fast way to ensure this will be essential when we automate the whole code quality process later in this book.
Having your code formatted following a common style guide reduces the effort required to read and understand your code, as well as the code of others. Especially when you are working in a team, an accepted style guide saves you hours of discussions about how to correctly format the code.
We will learn about the following tools:
- A PHP built-in linter
- The PHP CS Fixer tool
The PHP built-in linter
The first tool we want to look at is actually not a code quality tool of its own but rather an option built into the PHP binary itself: the Linter. It checks any code for syntax errors without executing it. This is particularly useful to ensure that the code works after refactoring sessions or when your code has been changed by an external tool.
Installation and usage
Since the Linter is already part of your PHP installation, we can immediately start using it by looking at an example. If you look closely, you will probably notice the error the author made in the following class example:
<?php
class Example
{
    public function doSomething() bool
    {
        return true;
    }
}
Do not worry if you do not spot the error immediately – that is precisely what the Linter is there for! Simply pass the full name and path of the file to be checked to the PHP binary, using the -l option. By adding the -f option, PHP will also check for fatal errors, which is something we want. Both options can be combined into -lf.
Let us assume the preceding class can be found in the example.php file in the current folder – then, all we need to type is the following:
$ php -lf example.php
We will get the following output:
PHP Parse error: syntax error, unexpected identifier
  "bool", expecting ";" or "{" in example.php on line 5
Errors parsing example.php
You can tell the linter to check a complete directory as well:
$ php -lf src/*
Note
The built-in PHP linter stops on the first error – as in, it will not give you a full list of all the detected errors. So, you better make sure to run the command again after resolving the issue.
A recap of the PHP built-in Linter
The built-in PHP linter is a handy tool for quick code checks but cannot do much more than that. There are other more sophisticated linters such as https://github.com/overtrue/phplint. Not only will this one return a full list of errors but it can also run multiple processes in parallel, which will be noticeably faster on large code bases. However, other code quality tools already include a linter, such as the tool that we will check in the next section.
PHP CS Fixer: a code sniffer
Another essential tool is a code sniffer. It scans PHP code for coding standard violations and other bad practices. PHP CS Fixer (https://github.com/FriendsOfPHP/PHP-CS-Fixer) is a viable choice to start with, since, as the name already implies, it not only reports the findings but also fixes them right away.
Other code sniffers
PHP CS Fixer is not the only available code sniffer. Another well-known one is the PHP_CodeSniffer (https://github.com/squizlabs/PHP_CodeSniffer), which we can fully recommend using as well.
Installation and usage
Using Composer, the installation is straightforward:
$ composer require friendsofphp/php-cs-fixer --dev
Alternatives to Composer
There are multiple ways to install the tools we will introduce in this book. We will also check more options out later in this book.
The typical use case for code sniffers is to take care of the placement of brackets and the number of indentations, whether they’re whitespaces or tabs. Let’s check out the following PHP file with its ugly format:
<?php
class Example
{
  public function doSomething(): bool { return true; }
}
If we run the code sniffer with its default settings, the command is nice and short:
$ vendor/bin/php-cs-fixer fix example.php
This will scan and fix the example.php file all in one go, leaving our code neat and shiny:
<?php
class Example
{
    public function doSomething(): bool
    {
        return true;
    }
}
If you do not want to fix the file immediately, you can use the --dry-run option to just scan for issues. Add the -v option as well, to display the findings:
$ vendor/bin/php-cs-fixer fix example.php --dry-run -v
As with all code quality tools, you can also run it on all the files in a folder. The following command will scan the src folder recursively, so all subfolders are scanned as well:
$ vendor/bin/php-cs-fixer fix src
Rules and rulesets
So far, we used PHP CS Fixer with its default settings. Before we can change these defaults, let us have a closer look at how it knows what to check and fix.
A common pattern within code quality tools is the organization of rules within rulesets. A rule is a simple instruction that tells PHP CS Fixer how our code should be formatted regarding a certain aspect. For example, if we want to make use of strict types in PHP, every PHP file should contain the declare(strict_types=1); instruction.
There is a rule in PHP CS Fixer that can be used to force this:
$ vendor/bin/php-cs-fixer fix src
--rules=declare_strict_types
This command will check each file in src and add declare(strict_types=1); after the opening PHP tag.
Since a coding standard such as PSR-12 (https://www.php-fig.org/psr/psr-12/) includes many instructions on how the code should be formatted, it would be cumbersome to add all these rules to the preceding command. That is why rulesets have been introduced, which are simply a combination of rules, and even other rulesets.
If we want to format code following PSR-12 explicitly, we can just run this:
$ vendor/bin/php-cs-fixer fix src --rules=@PSR12
As you can see, a ruleset is indicated by the @ symbol.
Rules and ruleset documentation
It is impossible to discuss every rule and ruleset for PHP CS Fixer within the scope of this book. If you are curious about what else it has to offer, please check out the official GitHub repository: https://github.com/FriendsOfPHP/PHP-CS-Fixer/tree/master/doc
Configuration
Executing commands manually is fine to start with, but at some point, we will not want to remember all the options every time. That is where configuration files come into play: most PHP code quality tools allow us to store the desired configuration in one or more files and in various formats, such as YAML, XML, or plain PHP.
For PHP CS Fixer, all the relevant settings can be controlled via the .php-cs-fixer.dist.php configuration file. Here, you will find an example:
<?php
$finder = PhpCsFixerFinder::create()
    ->in(__DIR__)
    ->exclude('templates');
$config = new PhpCsFixerConfig();
return $config->setRules([
    '@PSR12' => true,
    'declare_strict_types' => true,
    'array_syntax' => ['syntax' => 'short'],
])
->setFinder($finder);
Numerous things are happening here. Firstly, an instance of PhpCsFixerFinder is created, which is configured to use the same directory to look for PHP files where this configuration file is located. As the root folder of the application is usually located here, we may want to exclude certain subdirectories (such as templates in this example) from being scanned.
Secondly, an instance of PhpCsFixerConfig is created. Here, we tell PHP CS Fixer which rules and rulesets to apply. We already discussed the @PSR-12 ruleset, as well as the declare_strict_types rule. The array_syntax rule forces the usage of the short array syntax.
You may have noticed that the name of the configuration file, .php-cs-fixer.dist.php, contains the abbreviation dist. This stands for distribution and usually indicates that this file is the one the project gets distributed with. In other words, this is the file that gets added to the Git repository and is immediately available after checkout.
If you want to use your own configuration on your local system, you can create a copy of it and rename it .php-cs-fixer.php. If this file exists, PHP CS Fixer will use it instead of dist-file. It is good practice to let Git ignore this file. Otherwise, you might accidentally add your local settings to the repository.
Advanced usage
The ability of PHP CS Fixer does not stop at automatically fixing coding standard violations. It can also be used to apply small refactoring tasks. One great use case, for example, is the automated migration to a higher PHP version: PHP CS Fixer ships with migration rulesets, which can introduce some new language features to your code base.
For example, with PHP 8.0, it is possible to use the class keyword instead of the get_class() function. PHP CS Fixer can scan your code and replace certain lines – for example, see the following:
$class = get_class($someClass);
It can replace the preceding line with this:
$class = $someClass::class;
The migration rulesets are separated into non-risky and risky ones. Risky rulesets can potentially cause side effects, while non-risky ones usually do not cause any problems. A good example of a risky change is the declare_strict_types rule we discussed previously. Be sure to test your application thoroughly after applying them.
The capabilities of these migrations are limited – your code will not suddenly include all new PHP version features.
Code fixers cannot fix syntax errors for us. For example, the Example class that we checked with PHP’s built-in linter in the previous section would still require the developer to manually fix it first.
Linting
PHP CS Fixer checks the files that you want to have sniffed for syntax errors as the very first step and will not apply any changes in case it finds syntax errors. This means that you do not have to run the PHP built-in linter as an additional step.
A recap of PHP CS Fixer
A code sniffer such as PHP CS Fixer should be part of every serious PHP project. The ability to fix rule violations automatically will save you many hours of work. If you chose not to apply any risky fixes, it will hardly cause any problems at all.
We have now learned how to ensure that our code is well-formatted and syntactically correct. While this is the foundation of any high-quality code, it does not help us to avoid bugs or maintainability issues. At this point, Static code analysis tools come into play.
Static Code Analysis
Static Code Analysis means that the only source of information is the code itself. Just by scanning the source code, these tools will find issues and problems that even the most senior developer in your team would miss during a code review.
These are the tools we would like to introduce you to in the next sections:
- phpcpd
- PHPMD
- PHPStan
- Psalm
phpcpd – the copy and paste detector
Copy and paste programming can be anything from simply annoying to a real threat to your projects. Bugs, security issues, and bad practices will get copied around and thus become harder to fix. Think of it as though it were a plague spreading through your code.
This form of programming is quite common, especially among less experienced developers, or in projects where the deadlines are very tight. Luckily, our clean code toolkit offers a remedy – the PHP copy and paste detector (phpcpd).
Installation and usage
This tool can only be downloaded as a self-containing PHP archive (phar), so we will not use Composer to install it this time:
$ wget https://phar.phpunit.de/phpcpd.phar
Handling phar files
In Chapter 9, Organizing PHP Quality Tools, we will learn how to keep phar files organized. For now, it’s enough to just download it.
Once downloaded, phpcpd can be used immediately without further configuration. It just requires the path of the target directory as a parameter. The following example shows how to scan the src directory for so-called “clones” (i.e., code that has been copied multiple times). Let’s execute it with the default settings first:
$ php phpcpd.phar src
phpcpd 6.0.3 by Sebastian Bergmann.
No clones found.
Time: 00:00, Memory: 2.00 MB
If phpcpd does not detect any clones, it is worth checking the two options, min-lines and min-tokens, that control its “pickiness”:
$ php phpcpd.phar --min-lines 4 --min-tokens 20 src
phpcpd 6.0.3 by Sebastian Bergmann.
Found 1 clones with 22 duplicated lines in 2 files:
- /src/example.php:12-23 (11 lines)
  /src/example.php:28-39
  /src/example3.php:7-18
32.35% duplicated lines out of 68 total lines of code.
Average size of duplication is 22 lines, largest clone has
  11 of lines
Time: 00:00.001, Memory: 2.00 MB
The min-lines option allows us to set the minimum number of lines a piece of code needs to have until it is considered a clone.
To understand the usage of min-tokens, we must clarify the meaning of a token in this context first: when you execute a script, PHP will internally use a so-called “tokenizer” to split the source code up into single tokens. A token is an independent component of your PHP program, such as a keyword, an operator, a constant, or a string. Think of them as words in human language. The min-tokens option therefore controls the number of instructions a piece of code contains before it is considered a clone.
You may want to play around with both parameters to find a good balance of “pickiness” for your code base. A certain amount of redundancy in your code is not automatically a problem and you also do not want to bother your fellow developers too much. Using the defaults to start with, therefore, is a good choice.
Further options
There are two more options you should be aware of:
- --exclude <path>: Excludes a path from the analysis. For example, unit tests often contain a lot of copy-and-paste code, so you want to exclude the tests folder. If you need to exclude multiple paths, the options can be given multiple times.
- --fuzzy: With this especially useful option, phpcpd will obfuscate the variable names when performing its check. This way, clones will be detected even if the variable names have been changed by a smart but lazy colleague.
Recap of phpcpd
Although phpcpd is easy to use, it is a significant help against the slow spread of copy and paste code in your projects. That is why we recommend adding it to your clean coder toolkit.
PHPMD: the PHP mess detector
A mess detector will scan code for potential issues, also known as “code smells” – parts of code that can introduce bugs, unexpected behavior, or are, in general, harder to maintain. As with the code style, there are certain rules that should be followed to avoid problems. The mess detector applies those rules to our code. The standard tool in the PHP ecosystem for this is PHPMD, which we will show you in this section.
Installation and usage
Before we take a closer look at what this tool has to offer for us, let us install it first using Composer:
$ composer require phpmd/phpmd --dev
After the installation is complete, we can run PHPMD already on the command line. It requires three arguments:
- The filename or path to scan (e.g., src). Multiple locations can be comma-separated.
- One of the following formats in which the report should be generated: html, json, text, or xml.
- One or more built-in rulesets or ruleset XML files (comma-separated).
For a quick start, let’s scan the src folder, create the output as text, and use the built-in cleancode and codesize rulesets. We can do this by running the following command:
$ vendor/bin/phpmd src text cleancode,codesize
PHPMD writes all output to the standard output (stdout), which is on the command line. However, all output formats except text are not meant to be read there. If you want to get a first overview, you may want to use the html output, as it generates a nicely formatted and interactive report. To store the output in a file, we will redirect it to a file using the > operator as follows:
$ vendor/bin/phpmd src html cleancode,codesize > phpmd_report.html
Simply open the HTML file on your browser and you will see a report similar to the one shown in Figure 7.1:
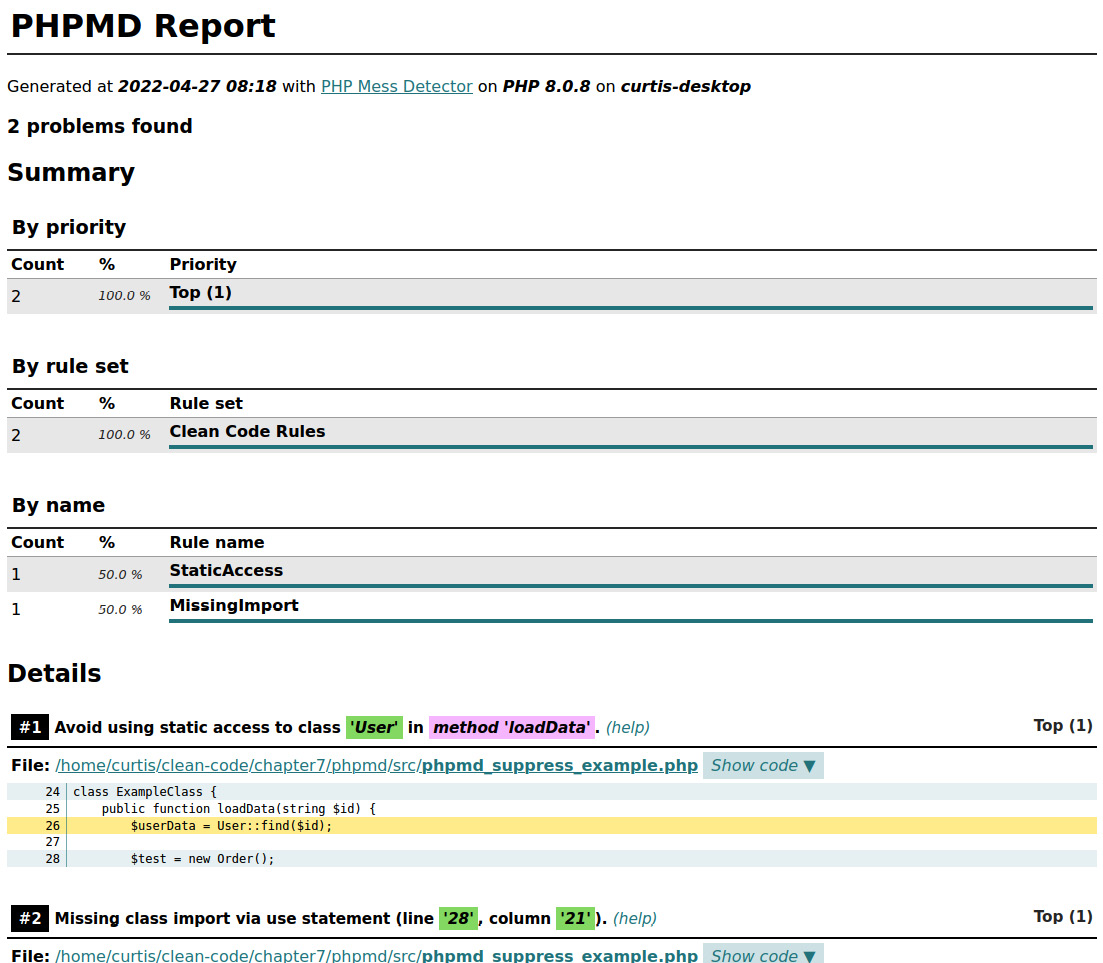
Figure 7.1: A PHPMD HTML report in a browser
The report is interactive, so make sure to click on buttons such as Show details or Show code to display all the information there is.
Rules and rulesets
In the preceding example, we used the built-in cleancode and codesize rulesets. Firstly, the rulesets are named according to the problem domain the rules check – as in, for the cleancode rule, you will only find rules that help to keep the code base clean. However, you can still end up with huge classes with many complex functions. To avoid this, adding the codesize ruleset is necessary.
The following table shows the available rulesets and their usage:
|
Ruleset |
Short name |
Description |
|
Clean code rules |
cleancode |
Enforces clean code in general |
|
Code size rules |
codesize |
Checks for long or complex code blocks |
|
Controversial rules |
controversial |
Checks for best and bad practices where there are controversial opinions about them |
|
Design rules |
design |
Helps find software design-related issues |
|
Naming rules |
naming |
Avoids names that are too long or short |
|
Unused code rules |
unused |
Detects unused code that can be deleted |
Table 7.1: PHPMD rulesets
These built-in rules can simply be used by giving the aforementioned short names as arguments to the function call, as seen in the previous example.
If you are lucky enough to start a project on the green (i.e., from scratch), you can and should enforce as many rules from the beginning as you can. This will keep your code base clean right from the beginning. For existing projects, the effort is a bit greater, as we will see in the next section.
Using PHPMD in legacy projects
Often enough, you want to use PHPMD for an existing project, though. In this case, you will most likely be overwhelmed by the countless warnings that it will throw upon the first run. Do not give up – there are some options to help you!
Adjusting rulesets
If you plan to add PHPMD to an existing project, going all-in with the rulesets will surely lead to frustration because of how many issues are reported. You may want to concentrate on one or two rulesets at a time instead.
It is also highly likely that you will end up with rules that you find annoying or counter-productive at first – for example, the ElseExpression rule, which forbids the usage of else in an if expression. Leaving the discussion about the usefulness of this rule aside, the effort of rewriting countless statements that are working fine is not worth it. So, if you don’t want to use that rule in your project, you need to create your own ruleset.
Rulesets are configured via XML files, which specify the rules that belong in them. Each rule is basically a PHP class that contains the rule logic. The following XML file defines a custom ruleset that just includes the cleancode and codesize rulesets:
<?xml version="1.0"?>
<ruleset name="Custom PHPMD rule set"
    xmlns=http://pmd.sf.net/ruleset/1.0.0
    xmlns:xsi=http://www.w3.org/2001/XMLSchema-instance
    xsi:schemaLocation=http://pmd.sf.net/ruleset/1.0.0  http://pmd.sf.net/ruleset_xml_schema.xsd
xsi:noNamespaceSchemaLocation=
  "http://pmd.sf.net/ruleset_xml_schema.xsd">
    <description>
        Rule set which contains all codesize and cleancode
        rules
    </description>
    <rule ref="rulesets/codesize.xml" />
    <rule ref="rulesets/cleancode.xml" />
</ruleset>
XML seems to be a bit out of fashion nowadays, but it still serves its purpose well. You usually do not need to worry about all the attributes of the <ruleset> tag – just make sure that they are present. The <description> tag can contain any text that you deem to be a good description for the ruleset.
The <rule> tag is important for us. In the preceding example, we referenced both the codesize and cleancode rules.
Tip
At this point, it is a good idea to dig through the built-in rule sets in the GitHub repository https://github.com/phpmd/phpmd/tree/master/src/main/resources/rulesets. Thanks to XML being a quite verbose file format, you will get familiar with it very quickly.
Imagine we want to remove the mentioned ElseExpression rule from our checks. To achieve this, you just need to add an <exclude> tag within the according <rule> tag as follows:
<rule ref="rulesets/cleancode.xml">
    <exclude name="ElseExpression" />
</rule>
This way, you can exclude as many rules from a ruleset as necessary. If you just want to pick certain rules from different rulesets, you can also go the other way round and reference the desired rules directly. If you want your custom ruleset to only include the StaticAccess and UndefinedVariable rules, your XML file should contain the following two tags:
<rule ref="rulesets/cleancode.xml/StaticAccess" />
<rule ref="rulesets/cleancode.xml/UndefinedVariable" />
One last important thing to know about the XML configuration files is how to change the individual properties of a rule. Again, a good way to figure out all the properties is to check out the actual ruleset file. Alternatively, you can check out the actual PHP classes of each rule at https://github.com/phpmd/phpmd/tree/master/src/main/php/PHPMD/Rule.
A typical example is to define exceptions for the StaticAccess rule. It is usually good practice to avoid static access, but often enough, you can’t avoid it. Let us say your team agreed on allowing static access for the DateTime and DateTimezone objects – you can simply configure this as follows:
<rule ref="rulesets/cleancode.xml/StaticAccess">
    <properties>
        <property name="exceptions">
            <value>
                DateTime,
                DateTimezone
            </value>
        </property>
    </properties>
</rule>
To use this custom ruleset in the future, simply save the preceding XML in a file (usually called phpmd.xml) and pass it over to PHPMD upon the next run:
$ vendor/bin/phpmd src text phpmd.xml
Location of the configuration file
It is a common practice to place phpmd.xml with the rulesets you want to use in the root folder of your project and use it as the single source of configuration. If there are any modifications in the future, you only have to adjust one central file.
Suppressing warnings
Another useful tool for dealing with legacy code is the @SuppressWarnings DocBlock annotation. Let us assume one class in your project makes use of a static method call and that cannot be changed right now. By default, any static access will throw a warning. Since you do not want to use static access anywhere else in your code, but just in this class, removing the StaticAccess rule would be counterproductive.
In these cases, you can make use of the @SuppressWarnings annotation:
/**
* @SuppressWarnings(PHPMD.StaticAccess)
*/
class ExampleClass {
    public function getUser(int $id): User {
        return User::find($id);
    }
}
You can use multiple annotations in one DocBlock if required. Finally, if you want to suppress any warnings on a class, just use the @SuppressWarnings(PHPMD) annotation.
Be aware that using the Suppress annotations should be your last resort. It is very tempting to just add it everywhere. However, it will silence the output, but it will not solve the problems.
Accepting violations
Instead of suppressing warnings at the file level or excluding rules from rulesets, you can also decide to acknowledge existing violations. For example, when you want to use PHPMD on a legacy project, you can decide to ignore all violations that are already in the code for now. However, if new violations are introduced by a new class, they will be reported.
Luckily, PHPMD makes this task quite easy by providing a so-called baseline file, which it will generate for you automatically by running the following:
$ vendor/bin/phpmd src text phpmd.xml --generate-baseline
In the preceding command, we expect that a phpmd.xml file already exists in the project root folder. Using the preceding command, PHPMD will now create a file called phpmd.baseline.xml.
Now, you may run the following:
$ vendor/bin/phpmd src text phpmd.xml
The next time, PHPMD will automatically detect the previously generated baseline file and use it to suppress all warnings accordingly. However, if a new rule violation is introduced in a new location, it will still be detected and reported as a violation.
A word of warning: as with the @SuppressWarning annotation, the baseline feature is not a tool that can be used once and safely ignored in the future. The problematic code blocks are still part of your project as technical debt with all the negative effects. That is why if you decide to go with the baseline feature, you should make sure you don’t forget about addressing these hidden problems in the future.
We will discuss how to deal with these problems later in the book. For now, it is only important for you how to update the baseline file from time to time. Again, PHPMD makes this an easy task. Simply run the following:
$ vendor/bin/phpmd src text phpmd.xml --update-baseline
All violations that no longer exist in your code will be removed from the baseline file.
A recap on PHPMD
Unless you are starting a project on the green, the configuration of PHPMD will require a bit more time. Especially if you are working within a team, you will spend more time arguing about which rules to use and which to exclude. Once this is done, though, you have a powerful tool at your disposal that will help developers write high-quality, maintainable code.
PHPStan – a static analyzer for PHP
You might have noticed that PHPMD, which we looked at in the previous section, was not very PHP-specific but generally took care of the best coding practices. While this is, of course, very important, we want to use PHPStan to analyze our code with bad PHP practices in mind now.
As with every static analysis tool, PHPStan can only work with the information it can get out of the code. Therefore, it works better with modern object-oriented code. If, for example, the code makes strong use of strict typing, the analyzer has additional information to process, and will therefore return more results. But for older projects, it will be of immense help as well, as we will see in the following section.
Installation and usage
Installing PHPStan with Composer is just a one-liner again:
$ composer require phpstan/phpstan --dev
As with most code quality tools, PHPStan can be installed using PHAR. However, only when using Composer can you also install extensions. We will have a look at those a bit later in this section.
Let us use the following simplified example and store it inside the src folder:
<?php
class Vat
{
    private float $vat = 0.19;

    public function getVat(): int
    {
        return $this->vat;
    }
}
class OrderPosition
{
    public function getGrossPrice(float $netPrice): float
    {
        $vatModel = new Vat();
        $vat = $vatModel->getVat();
        return $netPrice * (1 + $vat);
    }
}
$orderPosition = new OrderPosition();
echo $orderPosition->getGrossPrice(100);
To execute a scan, you need to specify the analyse keyword, together with the path to scan, which is src in our case:
$ vendor/bin/phpstan analyse src
Figure 7.2 shows the output produced by PHPStan:
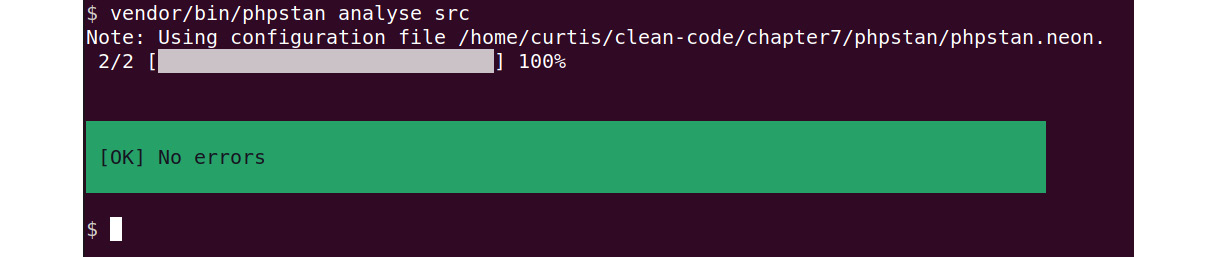
Figure 7.2: An example output of PHPStan
When we execute the PHP script, it will output 100. Unfortunately, this is not correct because adding 19% of taxes to the net price should return 119, and not 100. So, there must be a bug somewhere. Let us see how PHPStan can help us here.
Rule levels
Unlike PHPMD, where you configure in detail which rules to apply, we will use different reporting levels here. These levels have been defined by the developers of PHPStan, starting from level 0 (just performing basic checks) to level 9 (being very strict on issues). To not overwhelm users with errors at first, PHPStan by default will use level 0, which only executes very few checks.
You can specify the level using the level (-l|--level) option. Let us try the next highest level:
$ vendor/bin/phpstan analyse --level 1 src
Using the level approach, you can effortlessly increase the quality of your code step by step, as we will demonstrate using the following, made-up example. Levels 1 and 2 will not return any errors either, though. As we eventually reach level 3, however, we will finally find a problem:
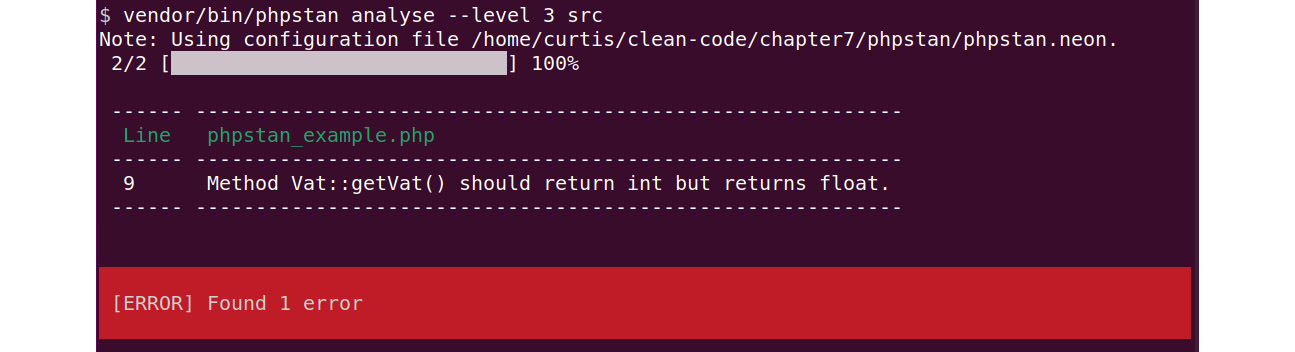
Figure 7.3: PHPStan reports one error with level 3
Checking our code again, we can spot the problem quickly: the getVat() method returns a float number (0.19) but using the int return type casts it to 0.
Strict typing
If we had used strict mode by adding the declare(strict_types=1); statement at the top of the example code, PHP would have thrown an error instead of silently casting the return value to int.
This demonstrates the beauty and power of Static Code Analysis: fixing this little bug will make our code work as expected and it takes us just a couple of seconds to do since we are still in our development environment. However, if this bug had reached the production environment, it would have taken us much longer to fix and left some angry customers behind.
Configuration
You can use configuration files to make sure that the same level and the same folders are always checked. The configuration is written in NEON (https://ne-on.org/), a file format that is very similar to YAML; if you can read and write YAML, it will work out just fine.
The basic configuration only contains the level and the folders to be scanned:
parameters:
level: 4
paths:
- src
It is a good practice to save this configuration in a file named phpstan.neon in the root folder of your project. That is the location where PHPStan expects it to be by default. If you follow this convention, the next time you want to run it, you only need to specify the desired action:
$ vendor/bin/phpstan analyse
If you used the above example configuration, PHPStan will now scan the src folder, using all rules from level 0 to level 4.
That is not everything you can configure here. In the next section, we will learn about some additional parameters.
Using PHPStan in legacy projects
If you want to use PHPStan in existing projects of a certain age, you will most likely end up with hundreds if not thousands of errors, depending on the chosen level. Of course, you can decide to keep using a lower level; but that also means that the analyzer will miss more bugs, not only existing ones but also in new or modified code.
In an ideal world, you would start with level 0, solve all errors, then continue with level 1, solve all new errors, and so on. This requires a lot of time, though, and, if no automated tests are available, a complete manual test run at the end would be necessary. You probably won’t have that much time, so let us see what other options we have.
There are two ways that PHPStan can be told to ignore errors: firstly, using PHPDocs annotations, and secondly, using a special parameter in the configuration file.
Using PHPDocs annotations
To ignore a line of code, simply add a comment before or on the affected line, using the special @phpstan-ignore-next-line and @phpstan-ignore-line PHPDocs annotations:
// @phpstan-ignore-next-line
$exampleClass->foo();
$exampleClass->bar(); // @phpstan-ignore-line
Both lines of code will not be scanned for errors anymore. It is up to you to choose the way you prefer. It is not possible to ignore bigger code blocks or even entire functions or classes, though (unless you want to add a comment to every line, that is).
Using ignoreErrors parameters
The PHPDocs annotations are perfect for quick fixes in only a few locations, but you will need to touch many files if you wish to ignore numerous errors. Using the ignoreErrors parameter in the configuration file is not very comfortable, though, as you have to write a regular expression for every error you would like to ignore.
The following example will explain how it works. Let’s assume we keep getting an error as follows:
Method OrderPosition::getGrossPrice() has no return type specified.
Although theoretically, this would be easy to fix, the team decides against adding a type hint so as not to risk any side effects. The OrderPosition class is awfully written and not covered with tests, yet still works as expected. Since it will be replaced soon anyway, we are not willing to take the risk and touch it.
To ignore this error, we need to add the ignoreErrors parameter to our phpstan.neon configuration file:
parameters:
    level: 6
    paths:
        - src
    ignoreErrors:
        - '#^Method OrderPosition::getGrossPrice() has no return type specified.$#'
Instead of defining a rule or ruleset to ignore, we need to provide a regular expression here that matches the message of the error that should be ignored.
Tip
Writing regular expressions can be challenging. Luckily, the PHPStan website offers a very useful little tool to generate the necessary phpstan.neon part from the error message: https://phpstan.org/user-guide/ignoring-errors#generate-an-ignoreerrors-entry.
Upon the next run, the error will no longer be displayed regardless of where it occurs, as it matches the regular expression here.
PHPStan does not inform you about the fact that errors are ignored. Do not forget to fix them at some point! However, if you improve your code further over time, PHPStan will let you know when errors that are set to be ignored are no longer matched. You can safely remove them from the list then.
If you want to ignore certain errors completely, but just in one or more files or paths, you can do so by using a slightly different notation:
ignoreErrors:
    -
        message: '#^Method
          OrderPosition::getGrossPrice() has no return
          type specified.$#'
        path: src/OrderPosition.php
The path needs to be relative to the location of the phpstan.neon configuration file. When given, the error will only be ignored if it occurs in OrderPosition.php.
Baseline
As we just saw in the previous section, adding errors you want to be ignored manually to your configuration file is a cumbersome task. But there is an easier way: similar to PHPMD, it is possible to automatically add all the current errors to the list of ignored errors at once by executing the following command with the --generate-baseline option:
$ vendor/bin/phpstan analyse --generate-baseline
The newly generated file, phpstan-baseline.neon, is in the same directory as the configuration file. PHPStan will not make use of it automatically, though. You have to include it manually in the phpstan.neon file as follows:
includes:
    - phpstan-baseline.neon
parameters:
    …
The next time you run PHPStan now, any previously reported errors should not be reported anymore.
Internally, the baseline file is nothing more than an automatically created list of the ignoreErrors parameters. Feel free to modify it to your needs. You can always regenerate it by executing phpstan using the --generate-baseline option again.
Extensions
It is possible to extend the functionality of PHPStan. The vivid community has already created a respectable number of useful extensions. For example, frameworks such as Symfony, Laminas, or Laravel often make use of magic methods (such as __get() and __set()), which cannot be analyzed automatically. There are extensions for these frameworks that provide the necessary information to PHPStan.
While we cannot cover these extensions in this book, we encourage you to check out the extension library: https://phpstan.org/user-guide/extension-library. There are also extensions for PHPUnit, phpspec, and WordPress.
A recap of PHPStan
PHPStan is a powerful tool. We cannot cover all its functionality in just a few pages but we have given you a good idea of how to start using it. Once you are familiar with its basic usage, check out https://phpstan.org to learn more!
Psalm: A PHP static analysis linting machine
The next and last static code analyzer we want to introduce is Psalm. It will check our code base for so-called issues and report any violations. Furthermore, it can resolve some of these issues automatically. So, let us have a closer look.
Installation and usage
Once again, installing Psalm with Composer is just a matter of a few keystrokes:
$ composer require --dev vimeo/psalm
It is available as a phar file as well.
After installation, we cannot just start, though – rather, we need to set up a configuration file for the current project first. We can use the comfortable --init option to create it:
$ vendor/bin/psalm --init
This command will write a configuration file called psalm.xml in the current directory, which should be the project root. During its creation, Psalm checks whether it can find any PHP code and decides which error level is suitable, to begin with. Running Psalm doesn’t require any more options:
$ vendor/bin/psalm
Configuration
The configuration file was already created during the installation process and could, for example, look similar to this:
<?xml version="1.0"?>
<psalm
errorLevel="7"
resolveFromConfigFile="true"
xmlns:xsi=http://www.w3.org/2001/XMLSchema-instance
xmlns=https://getpsalm.org/schema/config
xsi:schemaLocation=https://getpsalm.org/schema/config vendor/vimeo/psalm/config.xsd
>
<projectFiles>
<directory name="src" />
<ignoreFiles>
<directory name="vendor" />
</ignoreFiles>
</projectFiles>
</psalm>
Let us have a look at the attributes of the <psalm> node. You do not need to worry about the schema- and namespace-related information, only about the following two things:
- errorLevel: The levels go from 8 (basic checks) to 1 (very strict). In other words, the lower the level, the more rules will be applied.
- resolveFromConfigFile: Setting this to true lets Psalm resolve all relative paths (such as src and vendor) from the location of the configuration file – so usually, from the project root.
Psalm documentation
Psalm offers many more configuration options that we cannot cover in this book. As always, we recommend checking the documentation (https://psalm.dev/docs) to learn more about this tool.
Inside the <psalm> node, you will find more settings. In the previous example, Psalm is told to only scan the src folder and ignore all the files in the vendor folder. Ignoring the vendor folder is important, as we don’t want to scan any third-party code.
Using Psalm in legacy projects
We will now have a look at how we can adjust Psalm to deal with existing projects better. As with the previous tools, there are basically two ways to ignore issues: using the configuration file or docblock annotations.
There are three code issue levels: info, error, and suppress. While info will just print info messages if minor issues have been found, issues that are at the level of an error type, on the other hand, require you to get active. An issue of the suppress type will not be shown at all.
Continuous Integration
The difference between info and error becomes more important when building a Continuous Integration pipeline. info issues would let the build pass, while error issues would break it. We will have a closer look at this topic later.
Docblock suppression
The @psalm-suppress annotation can be used either in a function docblock or a comment for the next line. The Vat class from the previous examples could look as follows:
class Vat
{
    private float $vat = 0.19;
    /**
     * @psalm-suppress InvalidReturnType
     */
    public function getVat(): int
    {
        /**
         * @psalm-suppress InvalidReturnStatement
         */
        return $this->vat;
    }
}
Configuration file suppression
If we want to suppress issues, we need to configure issueHandler for them, where we can set the type to suppress manually. This is done in the configuration file by adding an <issueHandler> node inside the <psalm> node:
<issueHandlers>
<InvalidReturnType errorLevel="suppress" />
<InvalidReturnStatement errorLevel="suppress" />
</issueHandlers>
The preceding configuration would suppress all the InvalidReturnType and InvalidReturnStatement issues in the whole project. We can make this a bit more specific, though:
<issueHandlers>
<InvalidReturnType>
<errorLevel type="suppress">
<file name="Vat.php" />
</errorLevel>
</InvalidReturnType>
<InvalidReturnStatement>
<errorLevel type="suppress">
<dir name="src/Vat" />
</errorLevel>
</InvalidReturnStatement>
</issueHandlers>
In the documentation (https://psalm.dev/docs/running_psalm/dealing_with_code_issues/), you will find even more ways to suppress issues – for example, by the variable name.
Baseline
As with the previous static code analyzers we discussed, Psalm also provides a feature to generate a baseline file, which will include all the current errors so that they will be ignored during the next run. Please note that the baseline feature only works for error issues, but not info issues. Let us create the file first:
$ vendor/bin/psalm --set-baseline=psalm-baseline.xml
Psalm has no default name for this file, so you need to pass it as an option to the command:
$ vendor/bin/psalm --use-baseline=psalm-baseline.xml
You can also add it as an additional attribute to the <psalm> node in the configuration file:
<psalm
...
errorBaseline="./psalm-baseline.xml"
>
Finally, you can update the baseline file – for example, after you have made some improvements to the code:
$ vendor/bin/psalm --update-baseline
Fixing issues automatically
Psalm will not only find the issue but it can also fix many of them automatically. It will let you know when this is the case and you can use the --alter option:
Psalm can automatically fix 1 issues.
Run Psalm again with
--alter --issues=InvalidReturnType --dry-run
to see what it can fix.
Let’s execute the command as Psalm suggests:
$ vendor/bin/psalm --alter --issues=InvalidReturnType --dry-run
The --dry-run option tells Psalm to only show you what it would change as diff, but not to apply the changes. This way, you can check whether the change is correct:
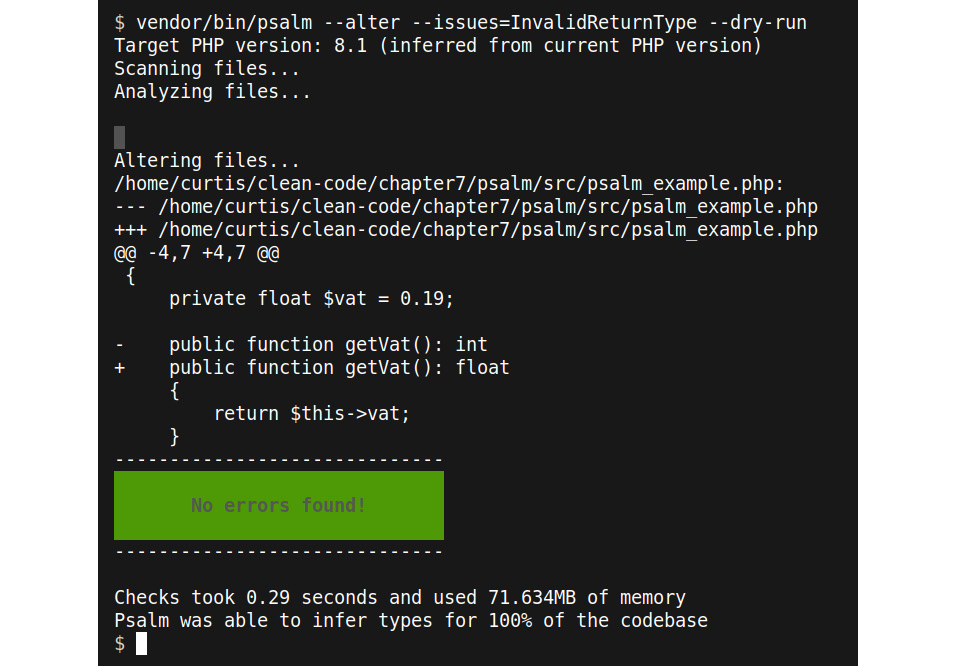
Fig 7.4: Psalm showing proposed changes
If you remove the --dry-run option, the changes will be applied.
A recap on Psalm
Psalm is a standard tool in the clean coder’s toolkit for good reason. It is fast, easy to use, and powerful. Additionally, the code manipulation feature will save you a lot of time. Of course, there are numerous similarities with PHPStan, but often enough, you will find both tools working together on the same code base without problems. At least, you should consider giving it a try.
IDE extensions
The tools we looked at so far share something in common: they need to be applied to our code after we have written it. Of course, this is much better than nothing, but wouldn’t it be great if the tools gave us their feedback immediately at the time that we wrote the code?
That is what many other developers thought as well, so they created extensions for the most popular IDEs, which are currently Visual Studio Code (VS Code) and PhpStorm:
- PhpStorm is an established, commercial IDE from JetBrains with several PHP-specific tools, checks, and built-in integrations for many of the code quality tools we discussed in this chapter. There are many useful extensions available for it as well. You can try it out for 30 days for free.
- VS Code is a highly flexible code editor from Microsoft with tons of third-party (partly commercial) extensions that can turn these tools into an IDE for virtually every relevant programming language today. Because the code editor itself is free, is it becoming more and more popular.
Alternative PHP IDEs
PhpStorm and VS Code are not the only IDEs that exist for PHP. Other alternatives are NetBeans (https://netbeans.apache.org), Eclipse PDT (https://www.eclipse.org), or CodeLobster (https://www.codelobster.com).
In this section, we will introduce you to three extensions for these two IDEs:
- PHP Inspections (EA Extended) for PhpStorm
- Intelephense for VS Code
Code quality tool integration in PhpStorm
PhpStorm offers seamless integration for the following tools that we have discussed: PHP CS Fixer, PHPMD, PHPStan, and Psalm. More information can be found here: https://www.jetbrains.com/help/phpstorm/php-code-quality-tools.html.
PHP Inspections (EA Extended)
This plugin (https://github.com/kalessil/phpinspectionsea) is for PhpStorm. It will add even more types of inspections to the pool of already existing ones, covering topics such as code style, architecture, or possible bugs.
IDE Inspections
Modern IDEs are already equipped with a lot of useful code checks. In PHPStorm, they are called Inspections. Some are already enabled by default – more can be activated manually (https://www.jetbrains.com/help/phpstorm/code-inspection.html#access-inspections-and-settings). For VS Code, you need to install an extension first. Check out the documentation (https://code.visualstudio.com/docs/languages/php) for more information.
Installation
As with every PhpStorm plugin, the installation is done via the File -> Settings -> Plugins dialog. You will find detailed information on how to install a plugin on the vendor’s website (https://www.jetbrains.com/help/phpstorm/managing-plugins.html). Simply search for EA Extended. Please note that there is a second version of this plugin, EA Ultimate, which you have to pay for. We will not cover it in this book.
After installation, not all the inspections are immediately active. Let us have a look at the PhpStorm inspections configuration, as shown in Figure 7.4:
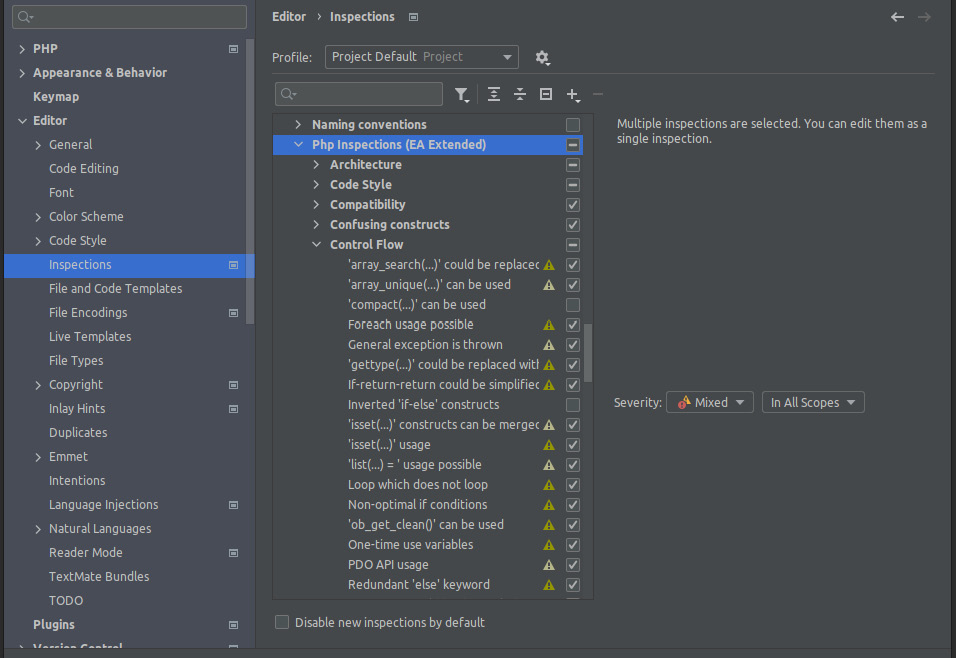
Figure 7.5: The Inspections configuration dialog in PhpStorm
All the inspections of this plugin can be found in the Php Inspections (EA Extended) section. The inspections that are not active by default can easily be activated by checking the checkbox next to them. We recommend reading the documentation (https://github.com/kalessil/phpinspectionsea/tree/master/docs) before activating any further inspections – otherwise, you might end up with too many rules. You can revisit them later.
Usage
PHP Inspections (EA Extended) not only warns you about problems but often also offers so-called Quick-Fixes, which let the IDE do the work for you. Here, you will find an example. Note the highlighted if clause on line 7:
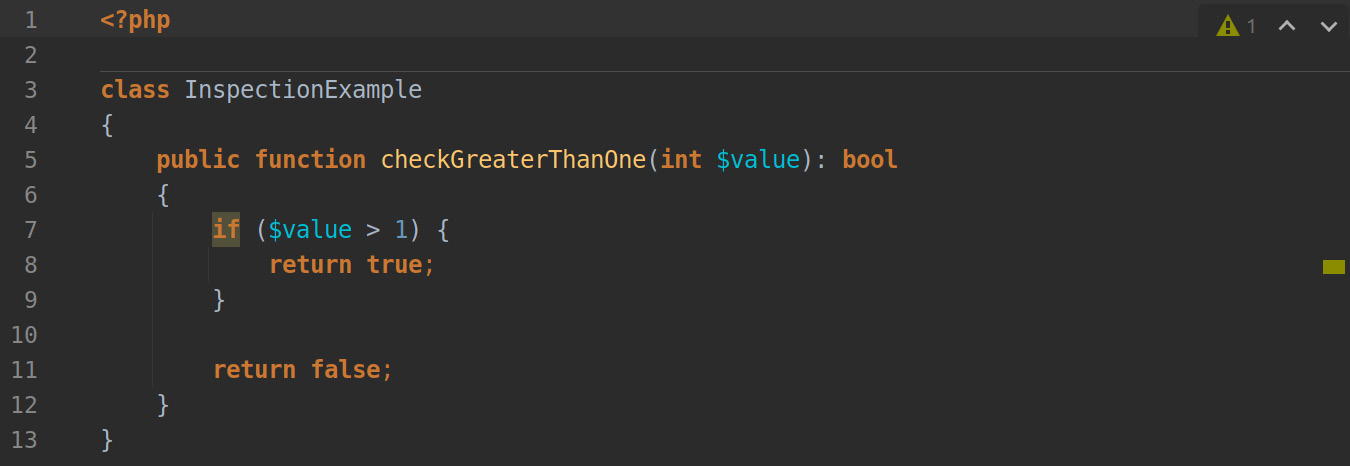
Figure 7.6: Example code with an issue found by PHP Inspections (EA Extended)
When you hover your mouse pointer over the highlighted area, PhpStorm will show a pop-up window with further instructions about the suggested improvement:
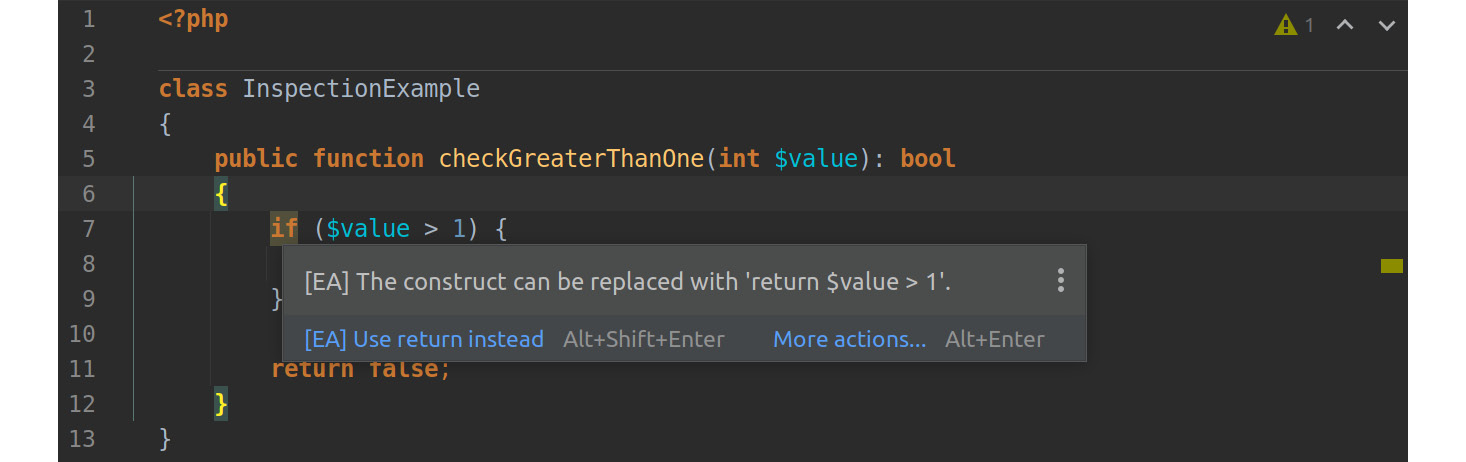
Figure 7.7: PHP Inspections (EA Extended) suggesting a code improvement
You can choose to fix the issue directly by pressing Alt + Shift + Enter at the same time, or you can click on the highlighted area to show the Quick-Fix bubble. If you click on the bubble, you will see a menu with some more options. You can also invoke the following dialog by pressing Alt + Enter:
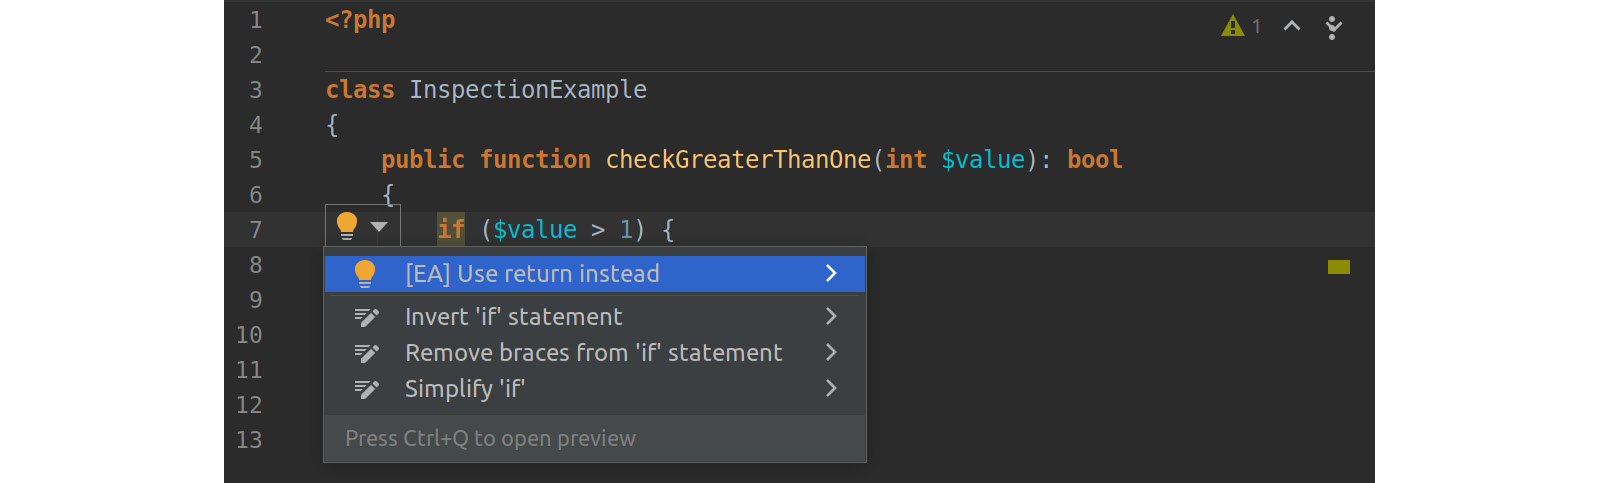
Figure 7.8: The Quick-Fix options menu
PhpStorm offers you several fixes now. The first one, marked with [EA], is a suggestion by the plugin. Another click will apply the fix:
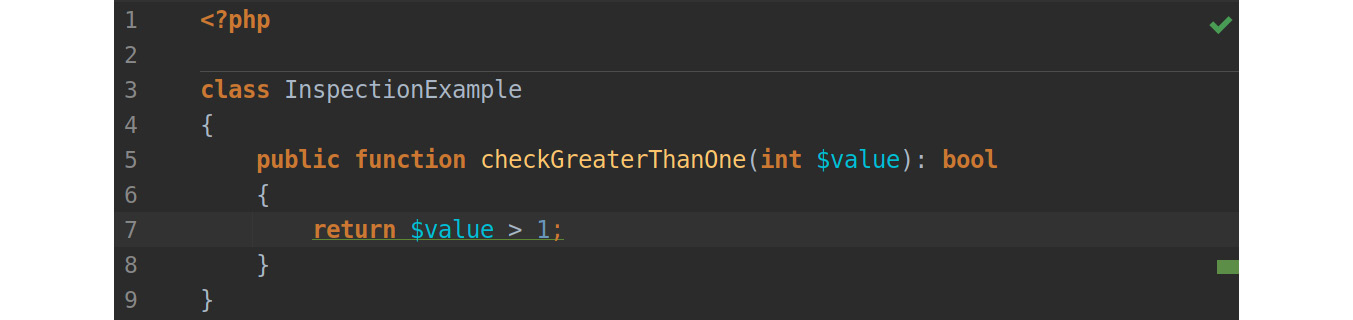
Figure 7.9: The code after applying a Quick-Fix
That’s it! Within just a few seconds, you made your code shorter and easier to read. PHP Inspections (EA Extended) is a great addition to PhpStorm, as it offers sensible inspections and integrates them seamlessly. If you are using this IDE, you should not hesitate to install it.
Inspections when working in a team
These inspections are a great way to improve your code and educate yourself on best practices. However, there is a huge drawback: how do you ensure that every developer working on your project has the same inspections activated? We will cover this topic in Working in a Team.
Intelephense
The second extension we want to introduce is Intelephense for VS Code. It is the most frequently downloaded PHP extension for this editor and provides a lot of functionality (such as code completion and formatting), which turns VS Code into a fully capable PHP IDE. There is also a commercial, premium version of this extension that offers even more functionality. To install it, please follow the instructions on the Marketplace website for this plugin (https://marketplace.visualstudio.com/items?itemName=bmewburn.vscode-intelephense-client).
Intelephense does not have the range of functionality that a full-grown, commercial IDE would offer by any means, yet for a free service, it is a perfect choice. It offers so-called Diagnostics (which are similar to Inspections in PhpStorm) that can be configured in the plugin settings screen, as shown in Figure 7.9:
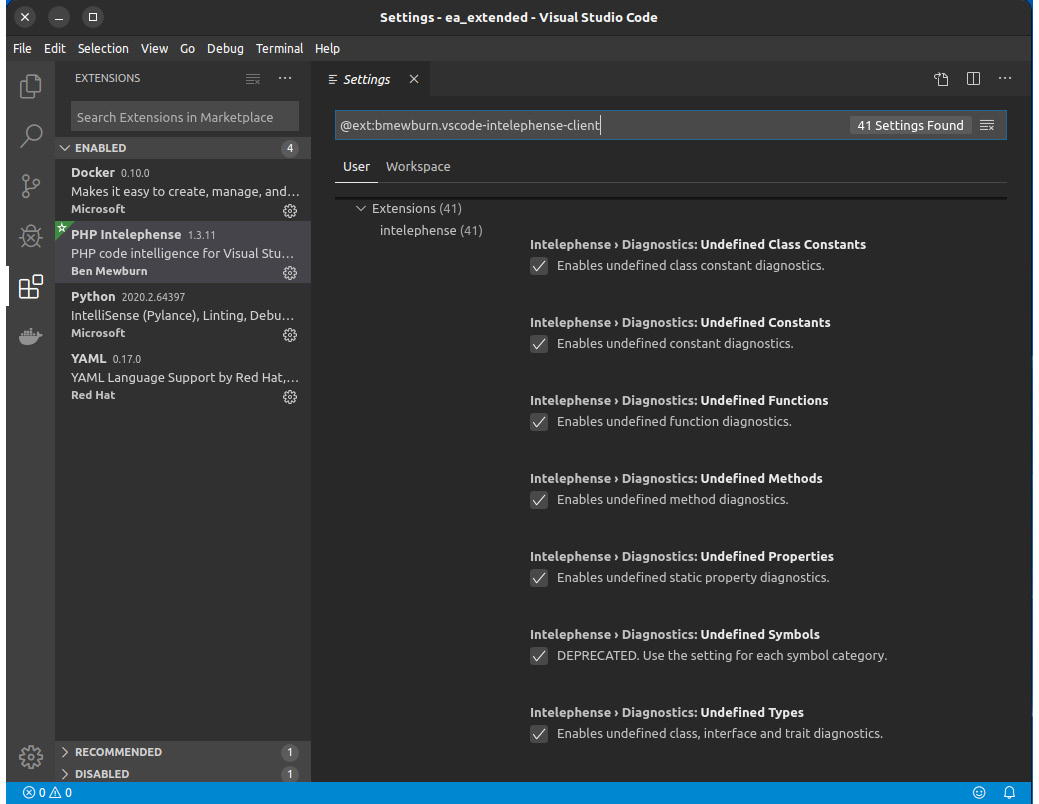
Figure 7.10: The Intelephense settings screen
Usage
The following figure shows Diagnostics in Intelephense in action:
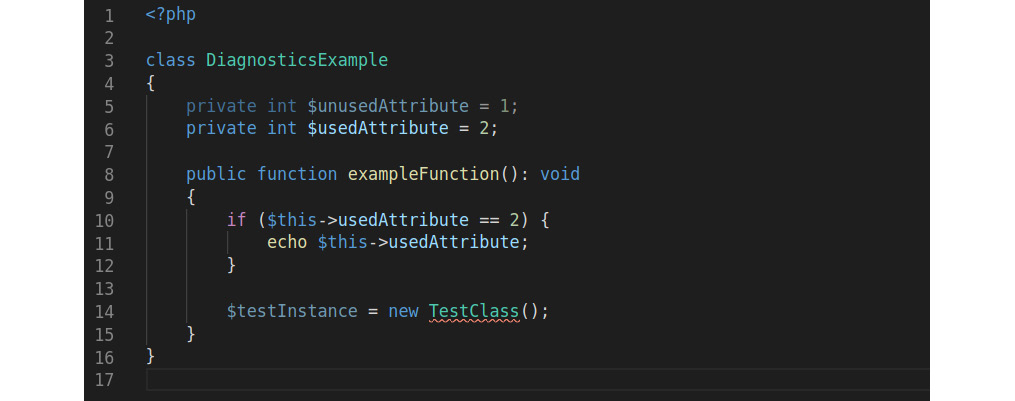
Figure 7.11: A sample class showing how Intelephense highlights issues
Two things can be seen here. Firstly, and more obviously, is the red line underneath TestClass. Hovering the mouse pointer over TestClass will show a pop-up window with an explanation: Undefined type TestClass. This makes sense since this class does not exist.
Secondly, and more subtly, you will notice that $ununsedAttribute and $testInstance have a slightly darker color than the other variables. This indicates another issue, which can be revealed by hovering the mouse over one of the variables:
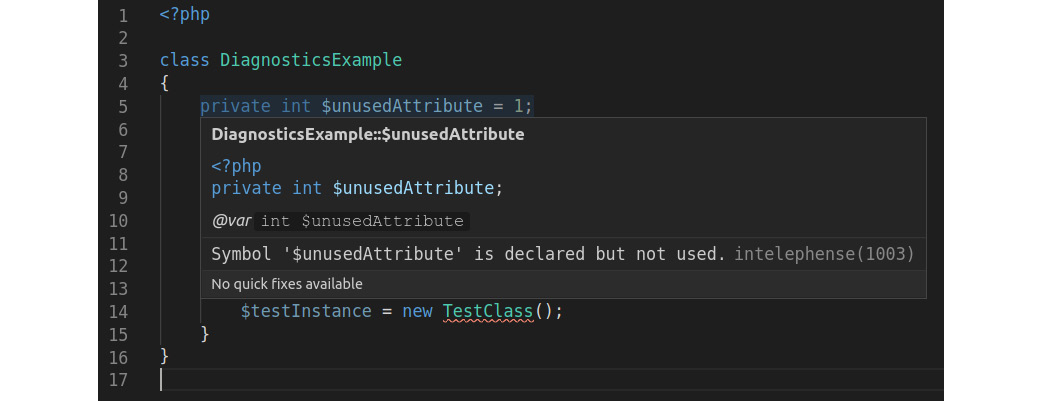
Figure 7.12: An info popup in Intelephense
The popup tells us that $unsuserAttribute is not used elsewhere in the code. The same applies to $testInstance as well.
Although it provides some basic issue detection rules and code formatting, it clearly can be said that, at the time of writing, the focus of this plugin is not on clean code. However, given the fact that VS Code and this plugin are freely available, you already have a decent PHP IDE on hand to start coding.
Code quality tool integration in VS Code
As in PhpStorm, it is possible to integrate some common code quality tools into VS Code using plugins, such as for PHPStan (https://marketplace.visualstudio.com/items?itemName=calsmurf2904.vscode-phpstan), PHP CS Fixer (https://marketplace.visualstudio.com/items?itemName=junstyle.php-cs-fixer), and PHPMD (https://marketplace.visualstudio.com/items?itemName=ecodes.vscode-phpmd). So, if you want to code with VS Code, be sure to check Marketplace for new plugins every now and then.
Summary
In this chapter, we learned about state-of-the-art tools to assist you in creating high-quality PHP code. They will help you spot issues early in the Software Development Life Cycle (SDLC), which saves you vast amounts of time. The PHP community is still vivid and very productive, and we were not able to cover all the fantastic software that exists out there in this book. However, with the tools we introduced in this chapter, you are now well equipped for your journey towards clean code.
In the next chapter, you will learn about how to evaluate code quality by using the established metrics and, of course, the necessary tools to gather them. See you there!
Further reading
If you want to try out even more code quality tools, consider the following projects:
- Exakat (https://www.exakat.io) – A tool that also covers security issues and performance, for example. It can fix issues automatically, too.
- Phan (https://github.com/phan/phan) – A static code analyzer that you can try out immediately in your browser
- PHP Insights (https://phpinsights.com/) – Another analyzer, yet with easy-to-use metrics in terms of the code, architecture, complexity, and style