Chapter 14. Windows Operating Systems Features and Installation
This chapter covers the following subjects:
![]() Differences Between Windows Versions—Components and features are compared and contrasted in this section.
Differences Between Windows Versions—Components and features are compared and contrasted in this section.
![]() Boot Methods—Network, optical disc, and USB boot methods are described in this section.
Boot Methods—Network, optical disc, and USB boot methods are described in this section.
![]() Installation Types—Installation methods from clean install to image deployment are covered in this section.
Installation Types—Installation methods from clean install to image deployment are covered in this section.
![]() Partitioning Methods—Partitioning methods are different on drives over 2.1TB. Learn what has changed.
Partitioning Methods—Partitioning methods are different on drives over 2.1TB. Learn what has changed.
![]() Windows File Systems—Use this section to choose the best file system.
Windows File Systems—Use this section to choose the best file system.
![]() Configuring Windows During/After Installation—Learn how to bring Windows up to date as quickly as possible.
Configuring Windows During/After Installation—Learn how to bring Windows up to date as quickly as possible.
![]() Using the Factory Recovery Partition—The factory recovery partition resets your system to its original state. Here’s how to use it safely.
Using the Factory Recovery Partition—The factory recovery partition resets your system to its original state. Here’s how to use it safely.
![]() Refresh and Reset (Windows 8/8.1/10)—Refresh and reset have very different effects, so this section helps you figure out when to use each option.
Refresh and Reset (Windows 8/8.1/10)—Refresh and reset have very different effects, so this section helps you figure out when to use each option.
![]() Characteristics of a Properly Formatted Boot Drive—Discover what a properly formatted boot drive looks like in this section.
Characteristics of a Properly Formatted Boot Drive—Discover what a properly formatted boot drive looks like in this section.
Windows Vista/7/8/8.1 differ widely in features, but use similar installation methods. In this chapter, you are introduced to the differences in appearance and features as well as the many options available for installing Windows on individual systems or for deployment to multiple computers.
220-902: Objective 1.1 Compare and contrast various features and requirements of Microsoft Operating Systems (Windows Vista, Windows 7, Windows 8, Windows 8.1).
220-902: Objective 1.2 Given a scenario, install Windows PC operating systems using appropriate methods.
Foundation Topics
Differences Between Windows Versions
System requirements for different versions of Windows vary widely. Table 14-1 compares the hardware requirements for Windows 8/8.1, Windows 7, and Vista.

The terms x86 and x64 are important to understand: x86 refers to older CPU names that ended in an “86”—for example, the 80386 (shortened to just 386), 486, and so on. Generally, when people use the term x86, they are referring to 32-bit CPUs that allow for 4GB of address space, while x64 (or x86-64) refers to newer 64-bit CPUs that are a superset of the x86 architecture. This technology can run 64-bit software as well as 32-bit software and can address a maximum of 1TB.
32-bit Windows and 64-bit Windows versions are available for Windows Vista/7/8/8.1/10 so that users from both generations of computers can run the software efficiently. 32-bit versions are primarily used on tablets that use the Intel ATOM or Celeron processors.
Windows Vista, Windows 7, and Windows 8/8.1 Features Compared
These versions of Windows share many features in common, particularly system management features in Control Panel. However, from the standpoint of user features, there are many differences. Table 14-2 summarizes these features, and the following sections describe them in more detail.


Windows Desktop (Aero, Aero Glass, Sidebar, Gadgets, Start Screen, Start Menu)
One of the biggest differences between Windows Vista and Windows 7 and their successors, Windows 8/8.1, is the desktop. Introduced with Windows Vista, Aero features translucent windows, window animations, three-dimensional viewing of windows, and a modified taskbar. You can make modifications to the look of Aero by right-clicking the desktop and selecting Personalization. From here, you can modify things such as the window color and translucency of windows (Aero Glass). To disable Windows Aero, select Windows Basic or Windows 7 Basic from the Themes menu.
By contrast, Windows 8/8.1 do not use Aero, because these versions of Windows are designed to work on less powerful systems (low-end laptops and tablets) as well as full-featured desktop and laptop computers.
Figure 14-1 shows Aero Glass in the comparison of Windows 7’s Start menu to Windows 8.1’s Start screen.

Figure 14-1 The Windows 7 Aero desktop and Start menu with gadgets (top) compared to the Windows 8.1 Start screen (bottom).
Windows Vista also introduced the Windows Sidebar and small programs called gadgets. Gadgets are small programs such as clocks set for other time zones, slideshows, RSS newsfeeds, weather updates, and more. Windows Vista and Windows 7 include a number of gadgets.
In Windows Vista, gadgets run only in the Windows Sidebar (see Figure 14-2), but in Windows 7, gadgets can run anywhere on the Windows desktop. In both versions of Windows, gadgets can have different opacities and sometimes are available in different sizes.

Note
Although existing gadgets continue to work, Microsoft no longer offers downloadable gadgets for Windows 7 or Vista because the Windows Sidebar platform has serious security vulnerabilities. For details, see http://windows.microsoft.com/en-US/windows/gadgets.
Live tiles in Windows 8/8.1/10 provide much of the functionality of gadgets without the security risks. For example, the Weather tile can display the current weather for your location, and the News tile can display headlines.
Vista and 7 can be configured to display a desktop and Start menu that emulate older Windows versions.
Note
To change only the Start menu to the Classic mode (Windows Vista only), right-click the Start button, select Properties, and choose Classic Start menu. To change the Start menu and the desktop to the Classic mode in Windows 7 or Windows Vista, open the Display properties sheet, select Personalization, select Themes, and select Windows Classic. You can open the Display properties sheet from Control Panel or by right-clicking an empty area of the desktop and selecting Properties.
Control Panel Views
Windows Vista offers two views of the Control Panel: Category view vs Classic view. Category view (the default) collects related applets into categories. Classic view displays all Control Panel icons individually. Classic view is known as Small Icons and Large Icons views in Windows 7/8/8.1/10, but Category view works the same as in Vista. For more information about Control Panel, see Chapter 15, “Managing Microsoft Windows.”
Shadow Copy
Windows Vista Business, Ultimate, and Enterprise, and Windows 7 Professional and Ultimate include the Windows Shadow Copy feature. Shadow Copy stores previous versions of files in Windows restore points or in Windows Backup.
Note
By default, Windows creates restore points only for the system drive. To enable restore points for other drives, you must enable System Restore for those drives and specify Restore previous versions of files. For more details, see the “Configuring System Restore Options” section on page 803 in Chapter 15.
If you overwrite a file with a newer one but want to return to the previous version of the file, follow this procedure:
Step 1. Right-click the file in Windows Explorer.
Step 2. Select Properties.
Step 3. Click the Previous Versions tab.
Step 4. Select the file version to restore. (If none are listed, no shadow copies are available.) If the file location is listed as Backup, insert the last disk in the backup media set, or attach the backup drive that contains the old version of the file.
Step 5. Click Restore (see Figure 14-3).

Step 6. To confirm the restoration, click Restore. The previous version replaces the current version.
Introduced in Windows 8, Windows now uses File History to make versioned backup copies of files. By default, it backs up files in the user’s Documents, Pictures, Music, and Videos folders, but can also be configured to back up files in other folders. Just as with Shadow Copy, you can choose the file version to restore.
Compatibility Mode
Most commercial business applications should run properly on Windows 8.1/8/7/Vista as well as on older versions of Windows. However, some commercial and custom applications designed for older versions of Windows and some games might not run properly on Windows 8.1/8/7/Vista.
To enable applications written for older versions of Windows to run properly on your current version of Windows, you can use compatibility tools such as the Program Compatibility Wizard built in to Windows or the Compatibility tab located on the executable file’s properties sheet to run the program in a selected compatibility mode.
Starting Program Compatibility Wizard in Windows 8/8.1
To start the program in Windows 8/8.1, search for Run Programs Made for Previous Versions of Windows and click the matching app. You can also start it by opening Control Panel from the Windows desktop, pressing Windows key+X and then selecting Control Panel, Programs, Run Programs Made for Previous Versions of Windows.
Starting Program Compatibility Wizard in Windows 7
To start the program in Windows 7, click Start, Control Panel > Programs > Run Programs Made for Previous Versions of Windows.
Using Program Compatibility Wizard in Windows 7/8/8.1
After the wizard starts, click Next on the opening screen and select the program that doesn’t work properly. To try the recommended compatibility settings, click Try Recommended Settings and click Start the Program. If the program runs properly, click Next and then click Yes.
If the program doesn’t run properly, click No, Try Again and answer questions about the problems you noticed (see Figure 14-4). From the answers you select, Windows selects settings to try (see Figure 14-5) and prompts you to run the program. After you find settings that work, Windows uses them every time you run the program.

Figure 14-4 Answering questions about problems with an older program with Windows 7’s Program Compatibility Wizard.

Figure 14-5 Based on your answers, Windows 7’s Program Compatibility Wizard selects settings to help your older program run properly.
Program Compatibility Wizard in Windows Vista
To start the wizard in Windows Vista, click Start, Control Panel > Programs > Use an Older Program with This Version of Windows.
After the wizard starts, you can select from programs already installed on your computer, select the current program disc in the optical drive, or browse to the program manually. After you select a program, you can select the version of Windows the program worked best under.
On the next screen, you can select one or more of the following options to aid compatibility:
![]() 256 Colors—Many older Windows programs can’t run under 16-bit or higher color depths.
256 Colors—Many older Windows programs can’t run under 16-bit or higher color depths.
![]() 640 × 480 Screen Resolution—Many older Windows programs use a fixed screen size and can’t run properly on a high-resolution screen.
640 × 480 Screen Resolution—Many older Windows programs use a fixed screen size and can’t run properly on a high-resolution screen.
![]() Disable Visual Themes—Many older Windows programs were created before visual themes were common.
Disable Visual Themes—Many older Windows programs were created before visual themes were common.
After selecting the options, test the program (which applies the settings you selected and runs the program). After you close the program, Windows switches back to its normal screen settings if necessary, and you can decide whether to use these settings for your software or try others. You can choose whether to inform Microsoft of your settings, and the settings you chose for the program are used automatically every time you run the program.
Keep in mind that the Program Compatibility Wizard won’t work with all old Windows programs; in particular, the wizard should not be used with antivirus, disk, or system utilities that are not compatible with the Windows version in use. Instead, replace outdated applications with updated versions made for the version of Windows in use.
As an alternative to the Program Compatibility Wizard in Windows, you can apply the same settings by using the Compatibility tab on an executable file’s properties sheet (see Figure 14-6). Use this method if you already know the appropriate settings to use.

Figure 14-6 Using the Compatibility tab to specify compatibility settings in Windows 8.1. Older versions of Windows lack the OneDrive options checkbox.
Tip
To access the properties sheet for an app running Windows 8/8.1, right-click or press and hold the app’s icon in the Apps or All Apps dialog, click or tap Open file location, right-click or press and hold the app in File Manager, and click or tap Properties.
Virtual XP Mode
Windows 7 Professional, Ultimate, and Enterprise support a virtualization environment called Windows XP Mode or Virtual XP Mode. This mode enables users of these versions of Windows 7 to use a virtualization-ready edition of Windows XP Professional within a virtualization program called Windows Virtual PC. Programs installed in Windows XP Mode can be run from the Windows 7 Start menu as well as from Windows XP Mode. To download Windows Virtual PC, go to https://www.microsoft.com/en-us/download/details.aspx?id=3702. To download Windows XP Mode (also known as Virtual XP Mode), go to https://www.microsoft.com/en-us/download/details.aspx?id=8002.
Caution
Windows XP is no longer supported by Microsoft, so no new security updates are available for Virtual XP Mode. Use this as a short-term workaround until apps can be updated for use with Windows 7, 8/8.1, or newer Windows versions.
To learn more about virtualization, see the “Client-Side Virtualization Overview” section on page 958 in Chapter 19.
Administrative Tools
Vista/7/8/8.1/10 all include a Control Panel folder called Administrative Tools. This folder provides shortcuts to a variety of management, configuration, and troubleshooting tools:
![]() Component Services—Used by developers and administrators to configure and administer Component Object Model (COM) components
Component Services—Used by developers and administrators to configure and administer Component Object Model (COM) components
![]() Computer Management—Manages local and remote computers, including viewing system events, managing services, configuring hard drive storage, and others
Computer Management—Manages local and remote computers, including viewing system events, managing services, configuring hard drive storage, and others
![]() Data Sources (ODBC)—Moves data between different types of databases using Open Database Connectivity (ODBC)
Data Sources (ODBC)—Moves data between different types of databases using Open Database Connectivity (ODBC)
![]() Event Viewer—Displays the contents of system logs for errors, program start and stop, and other significant events
Event Viewer—Displays the contents of system logs for errors, program start and stop, and other significant events
![]() iSCSI Initiator—Configures devices on storage networks that use Internet Small Computer System Interface (iSCSI) connections
iSCSI Initiator—Configures devices on storage networks that use Internet Small Computer System Interface (iSCSI) connections
![]() Local Security Policy—Views and edits Group Policy security settings
Local Security Policy—Views and edits Group Policy security settings
![]() Performance Monitor—Monitors performance of CPU, memory, hard drive, and network
Performance Monitor—Monitors performance of CPU, memory, hard drive, and network
![]() Print Management—Manages and administers network printers and print servers
Print Management—Manages and administers network printers and print servers
![]() Services—Manages background services (print spooler, search, others)
Services—Manages background services (print spooler, search, others)
![]() System Configuration—Starts MSConfig, which helps troubleshoot problems with Windows
System Configuration—Starts MSConfig, which helps troubleshoot problems with Windows
![]() Task Scheduler—Schedules programs and tasks
Task Scheduler—Schedules programs and tasks
![]() Windows Firewall with Advanced Security—Creates rules and other advanced firewall settings for local and remote computers on the network
Windows Firewall with Advanced Security—Creates rules and other advanced firewall settings for local and remote computers on the network
![]() Windows Memory Diagnostic—Tests computer RAM to verify proper functioning before the Windows desktop appears
Windows Memory Diagnostic—Tests computer RAM to verify proper functioning before the Windows desktop appears
![]() Windows PowerShell Modules—Runs Windows PowerShell, a powerful scripting language
Windows PowerShell Modules—Runs Windows PowerShell, a powerful scripting language
Note
See Chapter 15 for more information about Computer Management, Device Manager, Event Viewer, local security policy, Windows Firewall with Advanced Security, Performance Monitor, Print Management, Services, Msconfig (System Configuration), Windows Memory Diagnostics, Component Services, Disk Management, and Task Scheduler.
Modern UI
Windows 8/8.1 introduced Modern UI (previously known as Metro UI), which runs apps in full-screen. The tiles on the Start screen and the All Apps screen are used to launch programs, and some of these tiles can be live (Weather, Photos, News, Sports, and others), displaying updated information.
Figure 14-7 shows a Modern UI app, Internet Explorer.

Tip
Starting with Windows 8.1 Update 1, Modern UI apps can also be closed by moving the mouse to the top-right corner of the screen. The app’s title bar appears. Click the X to close the app, or the – to minimize the app, just as with Win32 desktop apps.
Side-by-Side Apps
Windows 8/8.1 support side-by-side apps: when at least two apps are running (the desktop and all the apps running in the desktop count as one app), the apps can share the screen.
After starting the apps, drag one app from the upper-left side of the display into the screen. The screen splits to make room (see Figure 14-8).

Pinning Programs to the Taskbar
Pinning programs to the taskbar is supported in Windows 7 and newer releases. If the program is already running, right-click or press and hold the program icon on the taskbar and select Pin this program to taskbar (with Windows 8/8.1, the taskbar is only available on the Windows desktop).
To pin a program that is not running, drag the program shortcut from the Start menu or desktop to the taskbar. You can also right-click the program shortcut and select Pin to Taskbar (see Figure 14-9).

OneDrive Cloud Storage
OneDrive (formerly known as SkyDrive) cloud storage is a free service available to any user with a Microsoft (formerly Windows Live) account. Higher-capacity storage plans are available free to users of Office 365.
Note
In late 2015, Microsoft introduced a subscription version known as OneDrive for Business.
In Windows Vista, 7, and 8, OneDrive can be used by logging into the Microsoft OneDrive Live website and using a browser interface. Windows 7 and 8 can also install the OneDrive client available at https://onedrive.live.com/about/en-us/download/. Windows 8.1 and Windows 10 have an integrated OneDrive app (see Figure 14-10).

Whether OneDrive is used with a browser or the integrated client, it provides file synchronization between the cloud and the selected device.
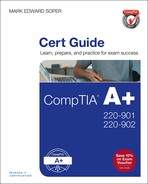
Windows Store
Windows 8 introduced the Windows Store (see Figure 14-11) for free and paid apps. Apps installed through the Windows Store can be easily updated and will be reinstalled when the computer is refreshed. By contrast, apps installed from disc or downloads are removed and must be reinstalled.
The update from Windows 8 to Windows 8.1 must be acquired through the Windows Store.
Multi-monitor Task Bars
In Windows 8.1/10, when you use multiple displays, you can enable the taskbar to be displayed across all screens (multi-monitor task bars) with a setting in the taskbar properties sheet.
Charms
Windows 8/8.1 introduced Charms (see Figure 14-12), which are displayed when the user swipes in from the right or moves the mouse to the lower-right corner of the screen. The charms in Windows 8/8.1 are Search, Share, Start, Devices, and Settings.

Note
Charms have been discontinued in Windows 10. Their replacements are available in the left side of the Start menu.
Live Sign In
Starting with Windows 8, the preferred way to sign into your computer is with a Microsoft account, also known as a Live sign in. Although you can continue to use a local account (the only kind of account used in Windows Vista and 7), using a local account in Windows 8/8.1/10 prevents use of the Windows Store or synchronization of desktops and settings between computers used by the same account. Also, users with a local account must sign in manually with their Microsoft account before using OneDrive or other services that use a Microsoft account.
Action Center
The Windows Action Center is available from the taskbar in Windows 7/8/8.1/10. It replaces the Security Center in Windows Vista. Click the flag icon to display messages about your computer. When the flag is white, there are no issues. When the flag is marked with a yellow or red sign, action is recommended or urgent. Click or tap the flag for a digest of needed actions (see Figure 14-13a). Click or tap Open Action Center for more information (see Figure 14-13b).

File Structure and Paths
Windows Vista, Windows 7, and Windows 8/8.1/10 file structure and paths vary both by operating system version and by whether a 32-bit or 64-bit version of Windows is in use.
In all of these versions of Windows, user folders are stored in the path
C:UsersUserName
Libraries (Documents, Music, Pictures, and Videos) as well as folders such as Desktop, Download, Favorites, Saved Games, and so on are stored as subfolders of UserName.
On some systems, particularly those upgraded from older versions of Windows, Documents might be identified as My Documents, Pictures as My Pictures, and so on.
Libraries
Libraries are a folder structure introduced in Windows 7 that permit multiple folders containing related material to be viewed as a single logical folder. For example, by default, the user’s Documents library includes the user’s My Documents or Documents folder and the shared Public Documents folder. Libraries can be modified by adding other folders, such as a folder on an external drive or a network folder. All local folders in a library are backed up by Windows Backup when the library is selected for backup.
In Windows 8/8.1/10, libraries are still available, but are not created automatically. You can specify whether to use libraries in File Explorer.
32-Bit Versus 64-Bit File Structure and Paths

In 32-bit versions of Windows Vista/7/8/8.1/10, all program files are stored in a subfolder of C:Program Files. However, in 64-bit editions C:Program Files is used for 64-bit programs and drivers. 32-bit programs are stored in C:Program Files (x86).
Windows Upgrade Paths
You can use various types of system analysis programs and tools to verify that a system’s hardware will be compatible with Windows 8/8.1, Windows 7, or Windows Vista. If you are checking a computer that already has an operating system installed, use the tools discussed next.
If you are upgrading a system to Windows 7, run the Windows 7 Upgrade Advisor, available from https://www.microsoft.com/en-us/download/details.aspx?id=20. It will determine if your system is ready for Windows 7, and what changes might need to be made. Figure 14-14 shows a typical report.

If you are upgrading to Windows 8.1, download and run the Windows 8.1 Upgrade Assistant, available from http://windows.microsoft.com/en-us/windows-8/upgrade-from-windows-7-tutorial. It will determine if your system is ready for Windows 8.1, and what changes might need to be made. Figure 14-15 shows a typical report.

Figure 14-15 The Windows 8.1 Upgrade Assistant report on this system finds four issues (a). Click to see details (b).
On the 220-902 exam, these utilities are referred to as Windows OS upgrade advisor.
If you want more details about your system’s hardware and software, use one of these tools:
![]() System Information—You can access the Windows System Information tool by opening the Run/Search prompt and typing msinfo32.exe. See Figure 14-16.
System Information—You can access the Windows System Information tool by opening the Run/Search prompt and typing msinfo32.exe. See Figure 14-16.

Figure 14-16 System Information shows that this computer has enough RAM and a fast enough processor to run Windows 8.1.
![]() Belarc Advisor—Currently a free download, you can find this program at www.belarc.com/free_download.html. It’s extremely quick and painless; all you need to do is double-click it after the download is complete. It automatically installs, looks for updates, and creates a profile of your computer that runs in a browser window. Here you can find all the hardware-related (and software-related) information on one screen. It also lists system security status.
Belarc Advisor—Currently a free download, you can find this program at www.belarc.com/free_download.html. It’s extremely quick and painless; all you need to do is double-click it after the download is complete. It automatically installs, looks for updates, and creates a profile of your computer that runs in a browser window. Here you can find all the hardware-related (and software-related) information on one screen. It also lists system security status.
![]() SiSoftware Sandra—Powerful, flexible system reporting, benchmarking, and evaluation program. Available in limited-feature free and various commercial versions from www.sisoftware.co.uk (current versions support Windows 7 and newer versions).
SiSoftware Sandra—Powerful, flexible system reporting, benchmarking, and evaluation program. Available in limited-feature free and various commercial versions from www.sisoftware.co.uk (current versions support Windows 7 and newer versions).
For computers without an installed operating system, use self-booting diagnostic programs such as
![]() #1-TuffTEST (available from www.tufftest.com)
#1-TuffTEST (available from www.tufftest.com)
![]() PC Check (available from www.eurosoft-uk.com)
PC Check (available from www.eurosoft-uk.com)
![]() Ultimate Boot CD (available from www.ultimatebootcd.com/index.html)
Ultimate Boot CD (available from www.ultimatebootcd.com/index.html)
Boot Methods
You can use many methods to boot a system during the installation process:
![]() CD-ROM boot or DVD boot (booting from the distribution DVD or CD)—Use this method to install Windows to an individual PC and to create a master PC from which disk images can be created.
CD-ROM boot or DVD boot (booting from the distribution DVD or CD)—Use this method to install Windows to an individual PC and to create a master PC from which disk images can be created.
![]() PXE boot (Preboot eXecution Environment)—Use this method to install Windows to one or more systems that have working network connections. To use this method, network adapters must be configured to boot using the PXE boot ROM to a network location that contains an operating system image.
PXE boot (Preboot eXecution Environment)—Use this method to install Windows to one or more systems that have working network connections. To use this method, network adapters must be configured to boot using the PXE boot ROM to a network location that contains an operating system image.
Note
Netboot is a similar network boot technology developed by Apple. Netboot uses the boot server discovery protocol (BSDP) to locate and install operating system files.
![]() USB boot (booting from USB thumb drive)—Use this method (also known as solid state/flash drives boot) when installing from a DVD isn’t feasible, such as installing Windows to a computer that lacks a DVD drive. The Windows USB/DVD Download Tool available from https://www.microsoft.com/en-us/download/windows-usb-dvd-download-tool can create a bootable USB drive from a Windows ISO (.iso) image you have downloaded. If necessary, change the boot order in the system BIOS or UEFI firmware to permit booting from USB.
USB boot (booting from USB thumb drive)—Use this method (also known as solid state/flash drives boot) when installing from a DVD isn’t feasible, such as installing Windows to a computer that lacks a DVD drive. The Windows USB/DVD Download Tool available from https://www.microsoft.com/en-us/download/windows-usb-dvd-download-tool can create a bootable USB drive from a Windows ISO (.iso) image you have downloaded. If necessary, change the boot order in the system BIOS or UEFI firmware to permit booting from USB.
Other sources for Windows installation files include:
![]() Internal hard drive (partition)
Internal hard drive (partition)
With each of these types of drives, the Windows installation files could be extracted or, with Windows 7 or later, the ISO file could be used as an installation source.
![]() As an upgrade to an existing version
As an upgrade to an existing version
![]() As a clean install to an empty hard drive or to the same partition as the current version
As a clean install to an empty hard drive or to the same partition as the current version
![]() To unused disk space (new partition) to multiboot the current or new version as needed
To unused disk space (new partition) to multiboot the current or new version as needed
![]() As a repair installation to fix problems with the current installation
As a repair installation to fix problems with the current installation
![]() With the recovery partition (resets the system to its original installed state)
With the recovery partition (resets the system to its original installed state)
![]() Refresh/reset (Windows 8/8.1/10)
Refresh/reset (Windows 8/8.1/10)
Note
Refresh/reset may be listed as “Refresh/restore” on the 220-902 exam.
The preceding installation options typically use the original distribution media or preinstalled recovery files.
Large-scale or customized installations might use the following methods:
![]() Unattended installation
Unattended installation
![]() Remote network installation
Remote network installation
![]() Image deployment
Image deployment
This second group of installation options typically require the creation of an image file.
Upgrade Installation
To perform an upgrade installation of Windows, start the installation process from within your existing version of Windows. You can upgrade directly from Windows Vista to Windows 7, and from Windows 7 to Windows 8, from Windows 8 to 8.1, and from Windows 8/8.1 to Windows 10. These upgrade paths enable the user to retain apps and settings as well as personal files. Other upgrade paths, such as from Windows 7 to Windows 8.1, enable the user to keep personal files but not apps or settings.
The exact upgrade paths between Windows versions vary according to the Windows edition currently in use. You can upgrade to the equivalent or better edition of Windows but not a lower edition. For example, Windows 7 Professional or Ultimate to Windows 8 Pro but not to Windows 8 Home; Windows 8 Pro to Windows 8.1 Pro, but not Home. The 32-bit versions can upgrade to 32-bit versions only; 64-bit versions can upgrade to 64-bit versions only.
Note
To learn more about Windows 8/8.1 upgrade paths, see https://technet.microsoft.com/en-us/library/jj203353.aspx. To learn more about Windows 10 upgrades, see www.microsoft.com/en-us/windows/windows-10-upgrade.
Clean Install
Before starting a clean install process, check the following:
![]() Make sure the drive for installation is placed before the hard drive in the boot sequence. The system needs to boot from the Windows distribution media if you are installing to an empty hard drive. You can perform a clean install of Windows 7 from within an older version of Windows if you want to replace the older installation.
Make sure the drive for installation is placed before the hard drive in the boot sequence. The system needs to boot from the Windows distribution media if you are installing to an empty hard drive. You can perform a clean install of Windows 7 from within an older version of Windows if you want to replace the older installation.
![]() If you will be installing to a drive that might require additional drivers (SATA, RAID, or third-party host adapters on the motherboard or in an expansion slot), have the drivers available on any type of removable media supported by the system. To learn more, see “Loading Alternative Drivers,” later in this chapter.
If you will be installing to a drive that might require additional drivers (SATA, RAID, or third-party host adapters on the motherboard or in an expansion slot), have the drivers available on any type of removable media supported by the system. To learn more, see “Loading Alternative Drivers,” later in this chapter.
If you are installing from optical media, a disk image (ISO or VXD), or within a virtual machine (VM), after restarting the system with the CD or DVD media or image file in place, press a key when prompted to boot.
During the installation process, be prepared to confirm, enter, select, or provide the following settings, information, media, or options when prompted:
![]() Custom installation—Choose this option if you are performing a “clean boot” installation to an unused portion of the hard drive or if you want to wipe out the existing installation rather than upgrade it.
Custom installation—Choose this option if you are performing a “clean boot” installation to an unused portion of the hard drive or if you want to wipe out the existing installation rather than upgrade it.
![]() Edition of Windows you are installing—If you specify the incorrect version, the installation cannot be activated.
Edition of Windows you are installing—If you specify the incorrect version, the installation cannot be activated.
![]() Location (home, work/office, or public—The location information is used to configure Windows Firewall.
Location (home, work/office, or public—The location information is used to configure Windows Firewall.
![]() Network settings—These are normally detected automatically for a wired connection. If your connection is wireless, make sure you have the SSID and password (encryption key) available, or you will need to skip this part of the process.
Network settings—These are normally detected automatically for a wired connection. If your connection is wireless, make sure you have the SSID and password (encryption key) available, or you will need to skip this part of the process.
![]() Partition location, partition type, and file system—See “Partitioning Overview” and “Windows File Systems” in this chapter for details.
Partition location, partition type, and file system—See “Partitioning Overview” and “Windows File Systems” in this chapter for details.
![]() Password and password hint—Windows prompts for a password, but only Windows 7 and newer versions also prompt for a password hint.
Password and password hint—Windows prompts for a password, but only Windows 7 and newer versions also prompt for a password hint.
![]() Product key—Some installation processes enable you to skip this temporarily, but you must provide it before you can activate Windows.
Product key—Some installation processes enable you to skip this temporarily, but you must provide it before you can activate Windows.
![]() Time, date, language, and region—See “Time/Date/Language/Region Settings” in this chapter for details.
Time, date, language, and region—See “Time/Date/Language/Region Settings” in this chapter for details.
![]() Time zone, time, and date—U.S. editions of Windows default to Pacific time.
Time zone, time, and date—U.S. editions of Windows default to Pacific time.
![]() Username and company name—The company name is optional.
Username and company name—The company name is optional.
![]() Workgroup or domain name—See “Workgroup Vs. Domain Setup,” later in this chapter, for details.
Workgroup or domain name—See “Workgroup Vs. Domain Setup,” later in this chapter, for details.
Note
The settings in the previous list are in alphabetical order. Operating systems prompt for this information at different points in the installation process.
At the end of the process, remove the distribution media. Windows is ready to download the latest updates and service packs.
Multiboot Installation
A multiboot installation of Windows enables you to choose from two or more operating systems when you start your computer. Windows Vista, Windows 7, and Windows 8/8.1 all support multiboot installations. If you want to use the multiboot support built in to Windows, follow these rules:
![]() Install the oldest version of Windows first—For example, if you want to multiboot Windows 7 and Windows 8.1, install Windows 7 first.
Install the oldest version of Windows first—For example, if you want to multiboot Windows 7 and Windows 8.1, install Windows 7 first.
![]() You must install Windows into a separate disk partition than the previous operating systems, and the partition must be prepared as a primary partition—For example, say you want to install Windows 7 and Windows 8.1 to multiboot on a 2TB hard drive. First, install Windows 7 to a primary partition that uses only a portion of the disk, and leave the rest of the drive unassigned. When you install Windows 8.1, you would create a new primary partition on the remainder of the drive and install to that partition.
You must install Windows into a separate disk partition than the previous operating systems, and the partition must be prepared as a primary partition—For example, say you want to install Windows 7 and Windows 8.1 to multiboot on a 2TB hard drive. First, install Windows 7 to a primary partition that uses only a portion of the disk, and leave the rest of the drive unassigned. When you install Windows 8.1, you would create a new primary partition on the remainder of the drive and install to that partition.
![]() If you want to install multiple editions of Windows as a multiboot, each installation must be to its own primary partition—You can have up to four primary partitions on a hard drive. However, you can create primary partitions on more than one hard drive, so if you have two bootable hard drives, you could (theoretically) install up to eight different Windows editions.
If you want to install multiple editions of Windows as a multiboot, each installation must be to its own primary partition—You can have up to four primary partitions on a hard drive. However, you can create primary partitions on more than one hard drive, so if you have two bootable hard drives, you could (theoretically) install up to eight different Windows editions.
![]() Windows’ multiboot support does not cover non-Windows operating systems such as Linux—Use a third-part boot manager if you want to multiboot Windows and non-Windows operating systems, or if you need to install an older version of Windows to multiboot on a system that already has a newer Windows version installed.
Windows’ multiboot support does not cover non-Windows operating systems such as Linux—Use a third-part boot manager if you want to multiboot Windows and non-Windows operating systems, or if you need to install an older version of Windows to multiboot on a system that already has a newer Windows version installed.
Tip
If you need access to older Windows versions or non-Windows operating systems and don’t want to reboot your system to switch between operating systems, use virtualization. Virtualization enables you to run operating systems in their own windows inside your primary operating system. To learn more, see the “Virtualization” section in Chapter 19, “Virtualization, Cloud Computing, and Network Services.”
Repair Installation
If a Windows operating system installation becomes corrupt, you can use a repair installation to restore working files and Registry entries without losing existing programs or information. Repair installations are available in Windows Vista/7/8/8.1. You should make a backup copy of your data files (stored in UserUsername for each user of your PC) before performing a repair installation in case of problems.
To perform a repair installation of Windows Vista or Windows 7:
Step 1. Boot your computer normally (that is, to the Windows desktop).
Step 2. Insert your Windows disc.
Step 3. Start the setup program when prompted.
Step 4. Specify or accept the language, time and currency format, and keyboard layout, and click Next (see Figure 14-17).

Step 5. Click Repair your computer.
Step 6. Accept the end-user licensing agreement.
Step 7. Select Upgrade as the installation option.
The remainder of the installation proceeds as with a normal installation.
At the end of the installation, be sure to install the latest service pack and updates available for your version of Windows.
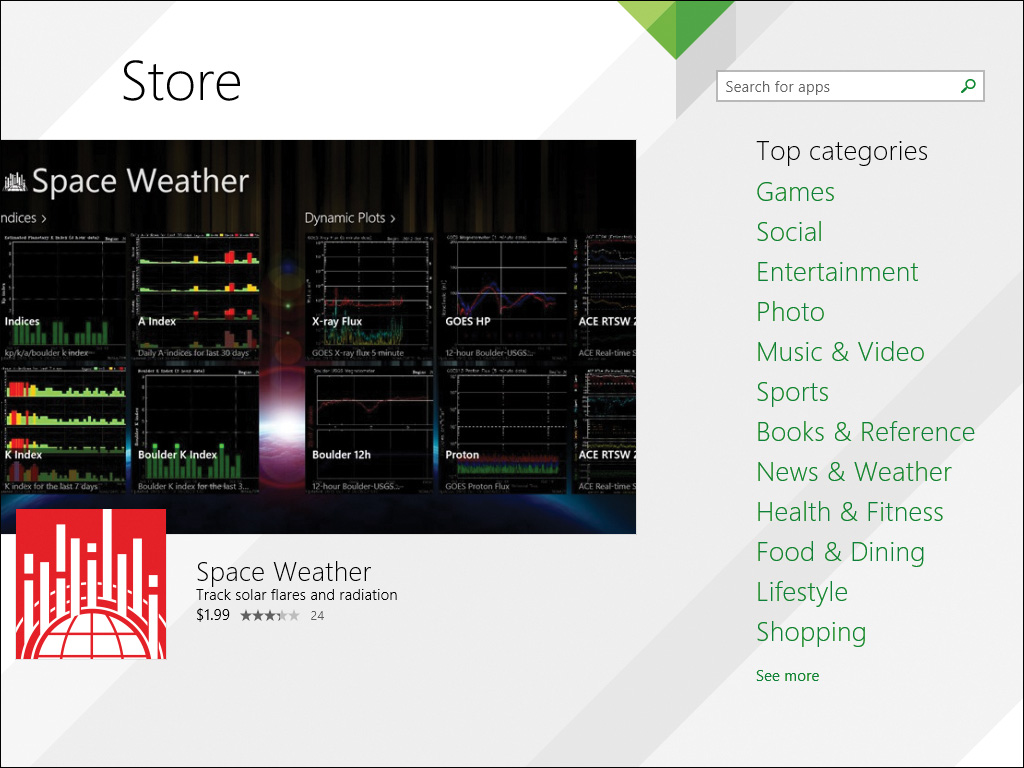
To perform a repair installation on Windows 8/8.1 (see Figure 14-18):
Step 1. Boot your computer normally (that is, to the Windows Start screen).
Step 2. Insert your Windows disc.
Step 3. Start the setup program when prompted.
Step 4. Confirm language and other settings. Click Next.
Step 5. Click Repair your computer.

The remainder of the installation proceeds as with a normal installation.
At the end of the installation, be sure to install the latest service pack or updates available for your version of Windows.
Caution
If you run a repair installation on a system that was upgraded from Windows 8 to Windows 8.1, your system will revert to Windows 8. Install necessary updates via Windows Update until you can install Windows 8.1 from the Windows Store. Then update your Windows 8.1 installation via Windows Update.
Unattended Installation
In an attended installation, you must provide information at various points during the process. To perform an unattended installation, you must create the appropriate type of answer file for the installation type. Microsoft currently offers the Microsoft Deployment Toolkit (MDT) 2013 Update 2 for automated installation of Windows 7, Windows 8.1, Windows 10, and Windows Server 2008 R2 and newer versions. The MDT creates and updates the Unattend.xml file (used to provide answers during the process) automatically during the deployment. Download the MDT from the Microsoft website (https://technet.microsoft.com/en-us/windows/dn475741.aspx).
Windows 7 and Vista use the Windows System Image Manager to create the Unattend.xml file.
Note
The Windows System Image Manager (SIM) for Vista and Windows 7 is part of the Windows Automated Installation Kit (AIK), which can be downloaded from Microsoft’s website—search for Windows Automated Installation Kit (AIK).
Remote Network Installation
A remote network installation (installing Windows from a network drive) begins by starting the computer with a network client and logging on to the server to start the process. If you want to automate the process, Windows 8/8.1, and 7, and Vista can all be installed from a network drive automatically using Windows Deployment Services. Windows Deployment Services is included in Windows Server 2008 and newer server operating systems.
Server-based programs work along with the Microsoft Development Toolkit or Windows System Image Manager program. These programs are used to create an answer file. The answer file provides the responses needed for the installation.
Image Deployment
An image deployment is the process of installing Windows from a disk image of another installation. This process is also called disk cloning. You can create a disk image with a variety of tools, including Acronis True Image (www.acronis.com), Seagate DiscWizard (based in part on Acronis True Image, available from www.seagate.com), Acronis True Image WD Edition (available from www.wdc.com), Daemon Tools (www.daemon-tools.cc/eng/downloads), Macrium Reflect (www.macrium.com), and others.
Note
You can burn a disc image file, which often has either an .iso or .img filename extension, to a recordable CD or DVD by using Windows Disc Image Burner in Windows 7/8/8.1/10.
However, if you plan to deploy a disk image to multiple computers, rather than as a backup of a single computer, you must consider special issues:
![]() Hardware differences—Traditional image cloning methods, such as those using Acronis True Image, were designed for restoration to identical hardware (same motherboard, mass storage host adapters, same BIOS configuration, same Hardware Abstraction Layer [HAL] and same Ntoskrnl.exe [NT kernel] file). For organizations that have different types and models of computers, this poses a problem.
Hardware differences—Traditional image cloning methods, such as those using Acronis True Image, were designed for restoration to identical hardware (same motherboard, mass storage host adapters, same BIOS configuration, same Hardware Abstraction Layer [HAL] and same Ntoskrnl.exe [NT kernel] file). For organizations that have different types and models of computers, this poses a problem.
![]() Same Security Identifier—A cloned system is identical in every way to the original, including having the same Security Identifier (SID). This can cause conflicts in a network.
Same Security Identifier—A cloned system is identical in every way to the original, including having the same Security Identifier (SID). This can cause conflicts in a network.
To overcome these problems, use cloning programs designed to capture an image that can be deployed to different types of computers (laptops, desktops, and tablets) with different hardware and software.
To create an image of Windows 7 or Windows Vista for installation, use the free Microsoft ImageX utility (ImageX.exe) that is part of the Windows Automated Installation Kit. For Windows 8/8.1 (as well as Windows 7), use the Deployment Imaging Servicing and Management (DISM) tool included in the Windows Assessment and Deployment Kit (ADK). DISM is also installed on some Windows 10 editions.
Third-party tools, such as Symantec Ghost Solution Suite (www.symantec.com) and Acronis Snap Deploy (www.acronis.com), are also designed to create images that can be deployed to dissimilar hardware.
To fix problems with the SID and network settings, use the Sysprep utility from Microsoft to enable a system image created with ImageX, DISM, or other imaging tools to make needed changes in SID and network settings after it has been transferred to a destination system. (Ghost Solution Suite and Snap Deploy include similar features.)
The Sysprep utility for Windows is installed with the operating system and can be found by navigating to C:WindowsSystem32Sysprep. Sysprep is installed on a system that will be used for cloning before it is cloned.
When Sysprep for Windows is run as a GUI (see Figure 14-19), the following options are available: System Audit Mode, enabling additional apps and drivers to be added; Generalize, which clears away unique system identification information, such as security ID, restore points, and event logs (this option must be selected for any system that will be used for cloning); and System-Out-of-Box Experience (OOBE), which prompts the user to customize, set up user accounts, name the computer, and perform other first-time startup tasks. Sysprep can be run with additional options from the command line, including the option to use an answer file (Unattend.xml). If the answer file does not have the answer needed by the setup program, the user setting up the system is prompted to provide this information, such as the Windows license number (Product key).

All cloning tools can work with a target drive that is the same size or larger than the original cloned system drive. Some can also work with a smaller drive; check documentation for details.
Caution
Do not use disk cloning to make illegal copies of Windows. You can use disk-cloning software legally to make a backup copy of your installation, but if you want to duplicate the installation on another PC, make sure you clone a system created with a volume license for Windows and make sure that you do not exceed the number of systems covered by that license, or make sure you have the correct license number (Product key) for each duplicate system. You can clone standalone computers or those connected to a workgroup (but not those that are members of a domain). For more information about licensing, see https://www.microsoft.com/en-us/licensing/default.aspx.
Partitioning Methods
Whether Windows is being installed to an empty hard drive or to a hard drive that has unassigned space (for multibooting), at least one new hard drive partition must be created. To do this successfully, you need to understand the differences between
![]() Master boot record (MBR) and GUID Partition Table (GPT) partition tables
Master boot record (MBR) and GUID Partition Table (GPT) partition tables
![]() Primary and extended partitions
Primary and extended partitions
![]() Extended partitions and logical disk drives
Extended partitions and logical disk drives
![]() Dynamic and Basic disks
Dynamic and Basic disks
Partitioning Overview
A hard drive cannot be used until it is prepared for use. There are two steps involved in preparing a hard drive:
![]() Creating partitions
Creating partitions
![]() Formatting partitions (which assigns drive letters)
Formatting partitions (which assigns drive letters)
A disk partition is a logical structure on a hard drive that specifies the following:
![]() Whether the drive can be bootable
Whether the drive can be bootable
![]() How many drive letters (one, two, or more) the hard drive will contain
How many drive letters (one, two, or more) the hard drive will contain
![]() Whether any of the hard drive’s capacity will be reserved for a future operating system or other use
Whether any of the hard drive’s capacity will be reserved for a future operating system or other use
Although the name “disk partition” suggests the drive will be divided into two or more logical sections, every hard drive must go through a partitioning process, even if you want to use the entire hard drive as a single drive letter. All versions of Windows support two major types of disk partitions:
![]() Primary—A primary partition can contain only a single drive letter and can be made active (bootable). Only one primary partition can be active. Although a single physical drive using MBR can hold up to four primary partitions, you need only one primary partition on a drive that contains a single operating system. If you install a new operating system in a multiboot configuration with your current operating system, you must install the new operating system to a different disk partition than the previous Windows version. If you want to use a non-Windows operating system along with your current operating system, it should be installed into its own primary partition. A drive partitioned using GPT can have up to 128 primary partitions.
Primary—A primary partition can contain only a single drive letter and can be made active (bootable). Only one primary partition can be active. Although a single physical drive using MBR can hold up to four primary partitions, you need only one primary partition on a drive that contains a single operating system. If you install a new operating system in a multiboot configuration with your current operating system, you must install the new operating system to a different disk partition than the previous Windows version. If you want to use a non-Windows operating system along with your current operating system, it should be installed into its own primary partition. A drive partitioned using GPT can have up to 128 primary partitions.
Note
Depending on the layout and contents of your current disk partitions, you might be able to shrink the size of existing partitions with Windows Disk Management to make room for a new primary partition, or you might need to use third-party software such as Acronis Disk Director or EaseUS Partition Master.
![]() Extended—An extended partition differs from a primary partition in two important ways:
Extended—An extended partition differs from a primary partition in two important ways:
![]() An extended partition doesn’t become a drive letter but can contain one or more logical drives, each of which is assigned a drive letter.
An extended partition doesn’t become a drive letter but can contain one or more logical drives, each of which is assigned a drive letter.
![]() Neither an extended partition nor any drive it contains can be bootable.
Neither an extended partition nor any drive it contains can be bootable.
Only one extended partition can be stored on each physical drive. Extended partitions are used only with MBR drives.
MBR Versus GPT Partition Types
Master boot record (MBR) partitions are supported by classic ROM BIOS as well as UEFI firmware. MBR supports a maximum drive size of 2TB and up to four primary partitions.
GPT (GUID partition table) supports drives up to 256TB and up to 128 primary partitions. GPT is also more reliable than MBR because it protects the partition table with replication and cyclic redundancy check (CRC) of the partition table’s contents. GPT also provides a standard way for system vendors to create additional partitions. GPT partition tables are supported by UEFI firmware.
To boot from a GPT drive, the system must have a 64-bit version of Windows Vista/7/8/8.1 or later (Windows Server 2003 SP1 and newer also support GPT). 32-bit versions of Windows can use GPT drives for data.
Disk Preparation Using MBR
If the drive will be used by a single operating system using an MBR partition table, one of these three ways of partitioning the drive will be used:
![]() Primary partition occupies 100% of the physical drive’s capacity—This is typically the way the hard drive on a system sold at retail is used and is also the default for disk preparation with Windows. This is suitable for the only drive in a system or an additional drive that can be used to boot a system but should not be used for additional drives in a system that will be used for data storage.
Primary partition occupies 100% of the physical drive’s capacity—This is typically the way the hard drive on a system sold at retail is used and is also the default for disk preparation with Windows. This is suitable for the only drive in a system or an additional drive that can be used to boot a system but should not be used for additional drives in a system that will be used for data storage.
![]() Primary partition occupies a portion of the physical drive’s capacity, and the remainder of the drive is occupied by an extended partition—This enables the operating system to be stored on the primary partition and the applications and data to be stored on one or more separate logical drives (drive letters created inside the extended partition). This is a common setup for laptops but requires the partitioning process to be performed with different settings than the defaults. This configuration is suitable for the only drive or first drive in a multiple-drive system.
Primary partition occupies a portion of the physical drive’s capacity, and the remainder of the drive is occupied by an extended partition—This enables the operating system to be stored on the primary partition and the applications and data to be stored on one or more separate logical drives (drive letters created inside the extended partition). This is a common setup for laptops but requires the partitioning process to be performed with different settings than the defaults. This configuration is suitable for the only drive or first drive in a multiple-drive system.
![]() Extended partition occupies 100% of the physical drive’s capacity—The drive letters on the extended partition can be used to store applications or data but not for the operating system. An extended partition cannot be made active (bootable). This configuration is suitable for additional hard drives in a system (not the first drive); an extended partition can contain only one logical drive or multiple logical drives.
Extended partition occupies 100% of the physical drive’s capacity—The drive letters on the extended partition can be used to store applications or data but not for the operating system. An extended partition cannot be made active (bootable). This configuration is suitable for additional hard drives in a system (not the first drive); an extended partition can contain only one logical drive or multiple logical drives.
You can also leave some unpartitioned space on the hard drive for use later, either for another operating system or another drive letter.
After a disk is partitioned, the drive letters must be formatted using a supported file system.
![]() Extended—An extended partition differs from a primary partition in two important ways:
Extended—An extended partition differs from a primary partition in two important ways:
![]() An extended partition doesn’t become a drive letter but can contain one or more logical drives, each of which is assigned a drive letter.
An extended partition doesn’t become a drive letter but can contain one or more logical drives, each of which is assigned a drive letter.
![]() Neither an extended partition nor any drive it contains can be bootable.
Neither an extended partition nor any drive it contains can be bootable.
Only one extended partition can be stored on each physical drive.
After local drives are created in an extended partition, the drive letters must be formatted using a supported file system.
Partitioning Using GPT
GPT partitioning creates one or more primary partitions. There are no extended partitions or logical drives on a GPT drive; each partition can be assigned a drive letter. However, only one can be active.
Dynamic and Basic Disks
Windows supports two types of disks: basic and dynamic. A dynamic disk is more versatile than a basic disk because you can span two physical drives into a single logical drive, create striped or mirrored arrays, and adjust the size of a partition. However, during installation, Windows creates only basic disks. Only basic disks can be bootable.
Note
To learn more about working with disk drives in Windows after installation, see “Disk Management” in Chapter 15.
Creating Partitions During Windows Vista/7/8/8.1/10 Installation
If you install Windows Vista/7/8/8.1 to an empty hard drive, you will be prompted for a location:
![]() To use all the space in the disk, make sure that the disk and partition you want is highlighted, and click Next (see Figure 14-20).
To use all the space in the disk, make sure that the disk and partition you want is highlighted, and click Next (see Figure 14-20).

![]() To use only part of the space, click Drive Options (Advanced), click New, specify the partition size, and click Apply. Windows displays a message that it is creating an additional partition. Click OK to clear the message. A system-reserved partition is created, followed by the partition size you selected, which will be used by Windows, and the unused (unallocated) space. See Figure 14-21.
To use only part of the space, click Drive Options (Advanced), click New, specify the partition size, and click Apply. Windows displays a message that it is creating an additional partition. Click OK to clear the message. A system-reserved partition is created, followed by the partition size you selected, which will be used by Windows, and the unused (unallocated) space. See Figure 14-21.

![]() To use an existing partition, highlight the wanted partition, and click Next. Be careful; whatever partition you select for the installation will be formatted, and all data on that partition will be erased.
To use an existing partition, highlight the wanted partition, and click Next. Be careful; whatever partition you select for the installation will be formatted, and all data on that partition will be erased.
You can also format partitions from here; they are automatically formatted as NTFS. In addition, you can extend existing partitions to increase the size of the partition but without losing any data.
Note
When you use the entire drive for Windows, a system-reserved partition is also created. You can see it after starting Windows by using the Disk Management administrative tool.
Windows File Systems
What exactly is a file system, anyway? A file system describes how data and drives are organized. In Windows, the file system you choose for a hard drive affects the following:
![]() The rules for how large a logical drive (drive letter) can be and whether the hard drive can be used as one big drive letter, several smaller drive letters, or must be multiple drive letters.
The rules for how large a logical drive (drive letter) can be and whether the hard drive can be used as one big drive letter, several smaller drive letters, or must be multiple drive letters.
![]() How efficiently a system stores data; the less wasted space, the better.
How efficiently a system stores data; the less wasted space, the better.
![]() How secure a system is against tampering.
How secure a system is against tampering.
![]() Whether a drive can be accessed by more than one operating system.
Whether a drive can be accessed by more than one operating system.
The term file system is a general term for how an operating system stores various types of files. Windows supports three different file systems for hard drives and USB flash drives: FAT32, NTFS, and exFAT, and CDFS for CD drives.
Note
CDFS is the file system used for CD media. Some external drives used for hard drive backup, such as Clickfree Automatic Backup drives, use a small CDFS partition for utility software.
FAT32
FAT32 was introduced in 1995 and has the following characteristics:
![]() The 32-bit file allocation table, which allows for 268,435,456 entries (232) per drive. Remember, an entry can be a folder or an allocation unit used by a file.
The 32-bit file allocation table, which allows for 268,435,456 entries (232) per drive. Remember, an entry can be a folder or an allocation unit used by a file.
![]() The root directory can be located anywhere on the drive and can have an unlimited number of entries, which is a big improvement over FAT.
The root directory can be located anywhere on the drive and can have an unlimited number of entries, which is a big improvement over FAT.
![]() FAT32 uses an 8KB allocation unit size for drives as large as 16GB.
FAT32 uses an 8KB allocation unit size for drives as large as 16GB.
![]() The maximum logical partition size allowed is 2TB (more than 2 trillion bytes).
The maximum logical partition size allowed is 2TB (more than 2 trillion bytes).
Note
Windows can’t create a FAT32 partition larger than 32GB. However, if the partition already exists, Windows can use it.
You can use FAT32 to format hard drives, flash memory, and removable media drives. However, it is primarily used today for flash memory cards and USB flash drives.
Note
If you want to store scheduled backups on a hard drive with Windows, you must use a backup hard drive that uses the NTFS file system.
exFAT (FAT64)
exFAT (also known as FAT64) is a file system designed to enable mobile personal storage media to be used seamlessly on mobile and desktop computers. ExFAT is designed to be as simple as FAT32, but with many improvements in capacity and scalability.
exFAT is also called FAT64 because it supports 64-bit addressing. exFAT’s main features include
![]() Support for volumes (drive letters) larger than 32GB. 512TB is the recommended maximum volume size, but the theoretical volume size is 64ZB (zettabytes; 1ZB = 1 billion TB).
Support for volumes (drive letters) larger than 32GB. 512TB is the recommended maximum volume size, but the theoretical volume size is 64ZB (zettabytes; 1ZB = 1 billion TB).
![]() Recommended and maximum file sizes also increase to 512TB and 64ZB, respectively.
Recommended and maximum file sizes also increase to 512TB and 64ZB, respectively.
![]() Improvements in file system structure for better performance with flash media and for movie recording.
Improvements in file system structure for better performance with flash media and for movie recording.
![]() Support for Universal Time Coordinate (UTC) date stamps.
Support for Universal Time Coordinate (UTC) date stamps.
exFAT support is included in Windows Vista SP1, 7, 8/8.1, and 10. To find information about non-Microsoft operating systems that support exFAT, see http://en.wikipedia.org/wiki/ExFAT.
Figure 14-22 illustrates exFAT as a formatting option for a USB thumb drive in Windows 8.1.

Figure 14-22 File system formatting options for a 16GB USB thumb drive in Windows 8.1 include FAT32, NTFS, and exFAT.
NTFS
The New Technology File System (NTFS) is the native file system of Windows Vista/7/8/8.1. NTFS has many differences from FAT32, including:
![]() Access Control—Different levels of access control by group or user can be configured for both folders and individual files.
Access Control—Different levels of access control by group or user can be configured for both folders and individual files.
![]() Built-in compression—Individual files, folders, or an entire drive can be compressed without the use of third-party software.
Built-in compression—Individual files, folders, or an entire drive can be compressed without the use of third-party software.
![]() Individual Recycle Bins—Unlike FAT32, NTFS includes a separate recycle bin for each user.
Individual Recycle Bins—Unlike FAT32, NTFS includes a separate recycle bin for each user.
![]() Support for the Encrypting File System (EFS)—EFS enables data to be stored in an encrypted form. No password and no access to files!
Support for the Encrypting File System (EFS)—EFS enables data to be stored in an encrypted form. No password and no access to files!
![]() Support for mounting a drive—Drive mounting enables you to address a removable-media drive’s contents; for example, as if its contents are stored on your hard drive. The hard drive’s drive letter is used to access data on both the hard drive and the removable media drive.
Support for mounting a drive—Drive mounting enables you to address a removable-media drive’s contents; for example, as if its contents are stored on your hard drive. The hard drive’s drive letter is used to access data on both the hard drive and the removable media drive.
![]() Disk quota support—The administrator of a system can enforce rules about how much disk space each user is allowed to use for storage.
Disk quota support—The administrator of a system can enforce rules about how much disk space each user is allowed to use for storage.
![]() Hot-swapping—Removable-media drives that have been formatted with NTFS (such as USB) can be connected or removed while the operating system is running.
Hot-swapping—Removable-media drives that have been formatted with NTFS (such as USB) can be connected or removed while the operating system is running.
![]() Indexing—The Indexing service helps users locate information more quickly when the Search tool is used.
Indexing—The Indexing service helps users locate information more quickly when the Search tool is used.
Note
If you want to boot from a 3TB or larger hard drive, you must use a 64-bit version of Windows 7 or later on a system that has an EFI or UEFI (Extensible Firmware Interface or Unified Extensible Firmware Interface) BIOS. EFI and UEFI support the GPT partition table. 3TB drives can be used on older systems by splitting the drive into partitions no larger than 2TB each.
3TB and larger hard drives also use a new low-level format scheme known as Advanced Format (4KB sectors rather than 512-byte sectors). If you are planning to move legacy partitions to these drives, you will want to use an alignment tool to realign the drive for maximum performance. See www.pcworld.com/article/235088/everything_you_need_to_know_about_3tb_hard_drives.html and http://msdn.microsoft.com/en-us/windows/hardware/gg463524 for more information.
Follow these steps to determine what file system was used to prepare a Windows hard drive:
Step 1. Open Windows Explorer or File Explorer.
Step 2. Right-click the drive letter in the Explorer Window and select Properties.
The Properties sheet for the drive lists FAT32 for a drive prepared with FAT32 and NTFS for a drive prepared with NTFS (see Figure 14-23).

Figure 14-23 A hard drive formatted with NTFS version 5 (left) and a flash memory drive formatted with FAT32 (right).
Converting a Drive’s File System with CONVERT.EXT
Windows includes the command-line program CONVERT.EXE, which is designed to help you convert a drive from a FAT file system to NTFS.
To convert a drive’s file system using CONVERT.EXE, follow these steps:
Step 1. Open a command-prompt window in elevated mode (Run as Administrator).
Step 2. Type Convert x: /fs:ntfs and press Enter. For example, to convert f:, type Convert f: /fs:ntfs.
To see advanced options for Convert, type convert /?. To learn more, see https://support.microsoft.com/en-us/kb/214579.
Note
Other file systems you need to understand for the CompTIA A+ Certification exam include NFS, ext3, and ext4. Ext3 and ext4 file systems are used by Linux. NFS (network file system) is used in networks that have a mixture of Linux, Windows, and other operating systems.
For more information, see Chapter 18, “OS X and Linux.”
During installation, Windows Vista/7/8/8.1/10 automatically format the partitions created by the partition process with NTFS.
Quick Formatting versus Full Formatting
Quick formatting is an option with all versions of Windows discussed here. With new hard drives or existing drives known to be error-free, use quick format to quickly clear the areas of the hard drive that store data location records. If you choose the full format option, Windows must rewrite the disk structures across the entire disk surface. This can take many minutes with today’s large hard drives.
Note
If you are concerned about the condition of a used hard drive you plan to reuse with Windows, use Windows CHKDSK if the drive has been formatted to check its state. You can also use the drive vendor’s disk diagnostic utility program to verify the condition of a drive.
Configuring Windows During/After Installation
Some configuration settings for Windows are made during installation, and others afterwards. Here are the major issues to keep in mind.
Loading Alternative Drivers
If Windows does not detect your hard drives during installation, you must provide alternate third-party drivers. The most likely situations in which this could occur include when third-party SATA or RAID onboard or add-on card host adapters are used in Windows Vista/7/8/8.1.
In Windows Vista/7/8/8.1, device drivers are added within the same screen where partitioning was done by clicking Load Driver (refer to Figures 14-20 and 14-21). These drivers can be installed from CD, DVD, or USB flash drive.
If you click Load Driver and cannot supply a proper driver for Windows or if the computer cannot read the media where the driver is stored, you must exit the installation program.
Workgroup vs Domain Setup
During the installation process, Windows can connect to either a workgroup (the default setting) or to a network managed by a domain controller. Domain controllers are typically used in large networks at workplaces or schools. Home networks and small-office networks use workgroups, and computers running Windows 7 or newer might also belong to a homegroup. During a manual installation, the user is prompted to supply network information as prompted. The appropriate network login information should be inserted into automatic setup scripts.
To learn more about these network types, see Chapter 16, “Networking Microsoft Windows.”
Time/Date/Language/Region Settings
On a new installation, Windows prompts for time, date, language, and region settings early in the installation process. However, in the case of a repair (“upgrade in place”) installation, the previous Windows installation’s settings are used.
Installing Drivers, Software, Updates
After Windows is installed, it should be updated with the latest drivers, hotfixes, and service packs. For individual PCs, the easiest way to perform these steps is to set up Windows Update for automatic updates.
However, if you are installing Windows for the first time and your system or motherboard was supplied with a driver disc, perform driver installation first before running Windows Update. Windows updates can also be performed manually in some cases.
Using Windows Update and Microsoft Update
To install additional updates for Windows through Windows Update, follow these steps in Windows Vista/7:
Step 1. Click Start > All Programs > Windows Update.
Step 2. When the Windows Update window appears, click the Install Updates button. With Windows 7 only, click Show all available updates.
Note
Do not select Express or let Microsoft automatically install all updates if you do not want to use newer applications.
Step 3. Windows Update automatically scans for updates. Updates are divided into the following categories
![]() Important—Critical updates and service packs
Important—Critical updates and service packs
![]() Optional—Driver updates and updates to Windows features
Optional—Driver updates and updates to Windows features
Step 4. If you have selected an Express install or if you selected wanted updates, they are downloaded to your system and installed. You might need to restart your computer to complete the update process.
To install additional updates for Windows through Windows Update using the Start screen, follow these steps in Windows 8.1:
Step 1. Open the Charms menu and select Settings.
Step 2. Select Change PC Settings.
Step 3. Select Update and Recovery.
Step 4. Select Check now.
Step 5. Select View details. Windows Update displays Important, Recommended, and Optional updates. Updates already selected for you are checked (see Figure 14-24).

Step 6. Check any additional updates desired, then click Install. Your updates are downloaded and installed.
Step 7. You might need to restart your computer to complete the update process.
Note
Windows 8/8.1 automatically installs selected updates over the next day or so if you don’t choose Install in step 6.
If you prefer to work from the Windows desktop in Windows 8/8.1, follow this procedure:
Step 1. Press the Windows key+X.
Step 2. Select Control Panel from the menu.
Step 3. Select System and Security from the menu.
Step 4. Select Windows Update from the menu.
Step 5. Select Check for updates from the menu.
To continue, see step 3 for Windows Vista/7.
If you use Microsoft Office or other Microsoft applications as well as Microsoft Windows, Windows Update offers to install Microsoft Update, which provides software updates for Microsoft apps as well as for Windows. After you install Microsoft Update, it runs automatically whenever you run Windows Update. Keep in mind that Microsoft Office uses service packs as well.
Installing Service Packs Manually
Microsoft recommends using Windows Update to receive updates (including service packs). However, service packs for Windows Vista/7 are also available for manual download. Service packs for Windows and other Microsoft programs can include hundreds of updates, which means that they can be several hundred megabytes in size. If you need to install service packs on several computers, it can be faster and put less stress on the network’s Internet connection to download and install them manually.
Note
Updates for Windows 8/8.1/10 are normally received only through Windows Update.
To download service packs manually, go to the Service Pack and Update Center at http://windows.microsoft.com/en-US/windows/service-packs-download. Select your operating system, and choose from the updates available.
Note
Before downloading and installing a service pack, determine whether the service pack includes all previous service packs or if you need to install a service pack or other updates first.
To download and install a service pack for Windows manually, follow these steps:
Step 1. Determine whether the system has any service packs installed. You should perform this check even if you have just installed Windows because you can install Windows with service packs included and newer Windows DVDs contain a service pack. Right-click Computer and select Properties to determine the current service pack. You can also use the command winver.exe in the Command Prompt to discern this information. Figure 14-25 illustrates a Windows 7 system with Service Pack 1 installed.

Step 2. Go to http://windows.microsoft.com/en-us/windows/service-packs-download, select your operating system, and follow the links provided for downloads for the version of Windows you need to update.
Step 3. Review the release notes for the service pack to see whether it will cause any problems for your particular configuration, such as problems with networking, peripherals, CD/DVD mastering software, and so forth. Take the necessary actions as noted. (Some might require changes before you perform the service pack installation; others might take place afterward.)
To save the specific document referenced in the release notes so that you can follow up on the problem, use the File > Save as Web Archive option in Internet Explorer. This saves the entire web page (including graphics) as a single file with an .htm or .html extension. You can then view the file offline with Internet Explorer if necessary.
Step 4. Select the correct language, and click the link.
Step 5. Shut down real-time virus checkers.
Step 6. Select the Manually Installing option to download the service pack from the Download Center.
Step 7. Click the link to download the service pack. Use Save As and when prompted, select a location to store the file with Network Installation.
Step 8. Open the file you downloaded in step 7 to start the installation process.
Step 9. You should update your system backup media and back up your files before you install the service pack, and select the option to archive existing Windows files during the service pack installation.
Step 10. Restart the system when prompted.
Tip
In some cases, you might need to reinstall third-party applications or utilities after you install a service pack.
Service packs are large because they contain hundreds of updates and hotfixes. Hotfixes, which are solutions for specific problems experienced only by users with certain combinations of hardware and software, can also be downloaded individually. When a hotfix is deemed safe for all users, it will usually be distributed via Windows Update or Microsoft Update. However, it can also be downloaded manually or requested by the user. Hotfixes are listed as part of Help and Support (formerly Knowledge Base) articles about specific problems. See http://support.microsoft.com for Help and Support articles.
At one time, it was necessary to call Microsoft to request hotfixes that were not available for automatic downloading. Now, Microsoft provides a link on the Help and Support pages where you can make the request. Enter the wanted information and your email address, and a link to the requested hotfix will be emailed to you.
Using the Factory Recovery Partition
Most vendors no longer provide a full installation DVD/CD of Windows for computers with preinstalled Windows. Instead, the factory recovery partition (a disk partition containing a special recovery image of the Windows installation) is provided. Typically, you are prompted to burn the restore image to one or more DVDs or CDs or a USB thumb drive.
Note
A recovery disc is also known as a system restoration disc. These special versions of Windows aren’t standalone copies of Windows, meaning you can’t use them to install Windows on another PC (unless the PC is identical to the one for which the disc was made).
Typically, you have limited choices when you want to restore a damaged installation with a recovery disc or recovery files on a disk partition. Typical options include
![]() Reformatting your hard drive and restoring it to just-shipped condition (causing the loss of all data and programs installed after the system was first used)
Reformatting your hard drive and restoring it to just-shipped condition (causing the loss of all data and programs installed after the system was first used)
![]() Reinstalling Windows only
Reinstalling Windows only
![]() Reinstalling support files or additional software
Reinstalling support files or additional software
After you run the recovery disc to restore your system to its original factory condition, you need to activate your Windows installation again.
Caution
You might need the Windows Product key or your system’s serial number to run the recovery disc program. Keep this information handy. Most systems with preinstalled Windows have a sticker with the Windows license key (Product key) somewhere on the system case.
If you want to restore your system, not to its original-out-of-the-box condition but to its most recent status, create an image and file backup of the system and update it frequently. See Chapter 15.
Refresh and Reset (Windows 8/8.1/10)
As an alternative to performing a repair installation, you can use the Refresh or Reset options in Windows 8/8.1/10 to restore a system to proper operation. These options are available from the Update and Recovery dialog in PC Settings in Windows 8/8.1 (see Figure 14-26). In Windows 10, a single Get Started button opens a menu with separate choices for Keep my files (equivalent to Windows 8/8.1’s Refresh) or Remove everything (equivalent to Windows 8/8.1’s Restore).
Use Refresh to remove apps that were not obtained from the Windows Store (downloaded or installed from disc). This includes the installed apps as well as downloaded apps in the Downloads folder. Windows Store apps are reinstalled. However, user files are not affected.
Tip
To keep downloaded files, copy them to the Documents folder before running Refresh.
Use Reset to return the system to its originally installed (out of box) condition. All apps, including apps from the Windows Store, and all user files are removed.
Characteristics of a Properly Formatted Boot Drive
A properly formatted boot drive with the correct partitions/format has these characteristics:
A boot drive for Windows Vista uses a primary partition (preferably NTFS) occupying all or a portion of the disk.
A boot drive for Windows 7 has a reserved area formatted with NTFS of about 200MB at the beginning of the physical disk, followed by a bootable NTFS partition. On drives that were prepared in a system sold at retail, there might be a FAT32 partition used for OEM-specific tools after the bootable partition. Any unallocated space is located at the end of the physical disk.
A boot drive for Windows 8/8.1 has a reserved area formatted with NTFS of less than 500MB at the beginning of the physical disk, followed by a bootable NTFS partition. Any unallocated space is located at the end of the physical disk. A Windows 10 boot drive typically has a 5GB recovery partition, a 200MB EFI system partition (for use with UEFI firmware), and the Windows partition. As with Windows 8/8.1, any unallocated space is left at the end of the drive. If Windows 8/8.1/10 were upgraded from earlier versions of Windows, additional recovery partitions of 500MB or less each might also be present.
Exam Preparation Tasks
Review All the Key Topics
Review the most important topics in the chapter, noted with the key topics icon in the outer margin of the page. Table 14-3 lists a reference of these key topics and the page numbers on which each is found.

Define Key Terms
Define the following key terms from this chapter, and check your answers in the glossary.
category view vs. classic view
internal hard drive (partition)
time/date/region/language settings
Complete the Tables and Lists from Memory
Print a copy of Appendix B, “Memory Tables” (found on the companion website), or at least the section for this chapter, and complete the tables and lists from memory. Appendix C, “Answers to Memory Tables,” also on the companion website, includes completed tables and lists to check your work.
Complete Hands-On Lab
Complete the hands-on lab, and then see the answers and explanations at the end of the chapter.
Lab 14-1: Using Windows Features
Perform as many of these tasks as you can:
![]() Restore a file from a Shadow Copy (Windows Vista or 7).
Restore a file from a Shadow Copy (Windows Vista or 7).
![]() Install a program made for an older version of Windows and use the Compatibility Wizard to see if it needs any compatibility settings to work. For old games (Windows 95/98), see www.old-games.com.
Install a program made for an older version of Windows and use the Compatibility Wizard to see if it needs any compatibility settings to work. For old games (Windows 95/98), see www.old-games.com.
![]() Download and run Windows Virtual PC and Virtual XP mode (Windows 7 Professional, Ultimate, Enterprise editions).
Download and run Windows Virtual PC and Virtual XP mode (Windows 7 Professional, Ultimate, Enterprise editions).
![]() Use two Modern UI or a Win32 (classic Windows) and Modern UI apps side-by-side (Windows 8/8.1).
Use two Modern UI or a Win32 (classic Windows) and Modern UI apps side-by-side (Windows 8/8.1).
![]() Pin a program to the taskbar (Windows 7/8/8.1/10).
Pin a program to the taskbar (Windows 7/8/8.1/10).
![]() Open the Action Center (Windows 7/8/8.1/10).
Open the Action Center (Windows 7/8/8.1/10).
![]() Run the appropriate Windows upgrade advisor/assistant to see if a Vista, 7, or 8 system is ready for an upgrade.
Run the appropriate Windows upgrade advisor/assistant to see if a Vista, 7, or 8 system is ready for an upgrade.
![]() Download Windows 8.1 and save it to an .iso file. Get it from http://windows.microsoft.com/en-us/windows-8/upgrade-product-key-only and also follow the tips at www.cnet.com/how-to/how-to-download-the-official-microsoft-windows-8-1-iso/.
Download Windows 8.1 and save it to an .iso file. Get it from http://windows.microsoft.com/en-us/windows-8/upgrade-product-key-only and also follow the tips at www.cnet.com/how-to/how-to-download-the-official-microsoft-windows-8-1-iso/.
![]() Install Windows 8.1 to an empty hard disk. Do not activate it unless you have a spare license key.
Install Windows 8.1 to an empty hard disk. Do not activate it unless you have a spare license key.
![]() During installation, create a partition that uses only about half the hard disk.
During installation, create a partition that uses only about half the hard disk.
Tip
If you don’t have a spare system or hard disk, download VirtualBox (www.virtualbox.org) and use it to set up a VM. Install Windows 8.1 in the VM. Enable AMD-V or Intel VT-x (hardware virtualization) in the BIOS/UEFI firmware.
Answer Review Questions
1. Which of the following statements best describes the term x86?
A. x86 is a type of architecture that supports 86-bit CPUs.
B. x86 is a system that supports 86GB or more of address space.
C. x86 is a system that requires a minimum of 8.6GB of RAM for installation.
D. x86 is old nomenclature referring to the 80386 or 80486 CPU family.
2. Which of the following statements best describes why the gadgets utility in Windows Vista and Windows 7 was discontinued in Windows 8/8.1?
A. The gadgets utility included serious security vulnerabilities.
B. Many of the real-time streaming gadgets did not work.
C. There was very little interest in using these gadgets.
D. Gadgets have been replaced by Charms in Windows 8/8.1.
3. Which of the following restore options is used by Windows 8/8.1 instead of Shadow Copy to restore earlier versions of a file?
A. System Restore
B. Image Backup
C. File History
D. File Backup
4. Which utility is used to ensure that older applications or games run properly on newer versions of an operating system?
A. Compatibility Mode
B. Virtual XP Mode
C. Easy Transfer
D. Ready Boost
5. Which of the following is Window’s cloud storage program?
A. FirstUp
B. OneDrive
C. Cloud Drive
D. Easy Transfer
6. Which of the following statements are true? (Choose three.)
A. Apps from the Windows Store are free to anyone with a Microsoft account.
B. Apps from the Windows Store can be easily updated.
C. Apps from the Windows Store will automatically be reinstalled when the computer is refreshed.
D. Files created using apps from the Windows Store will automatically be synced each time you access the Windows Store online.
E. Use of the Windows Store requires a Microsoft account using a Live sign in.
7. In Windows 7/8/8.1/10, the Action Center performs which of the following functions?
A. It allows you to easily apply updates and service packs to your system.
B. It is a quick resource for updating drivers.
C. It warns you about potential security and maintenance problems.
D. It allows you to change the computer name or join a workgroup.
8. In Windows 7 or 8/8.1/10, libraries do which of the following?
A. They allow multiple folders stored in different locations to be viewed as a single logical folder.
B. They allow users to borrow apps for a specified length of time from the Microsoft Store.
C. They are critical files used in troubleshooting system problems.
D. They contain updates and service packs.
9. When installing a multi-boot system, which of the following steps should be completed? (Choose all that apply.)
A. Install the oldest operating system first.
B. Install the newest operating system first.
C. Install a Windows operating system and a Linux system on separate primary partitions.
D. Install all Windows systems on the same primary partition.
E. Create up to four primary partitions on an MBR drive.
F. Use a virtual machine if you want to switch between operating systems without rebooting.
10. Which of the following statements best describes how to boot a new computer using the PXE (Preboot eXecution Environment) method?
A. Use a CD or DVD to boot the computer.
B. Boot the computer through a network connection.
C. Use a thumb drive or some other portable media to boot the computer prior to inserting the installation CD or DVD.
D. Create an ISO image with which to boot the computer.
11. A Windows repair installation allows you to do which of the following?
A. It allows you to reinstall only selected files, such as corrupt registry files.
B. It allows you to easily repair corrupt data files without changing the system files.
C. It allows you to repair the partition on which the operating system is installed.
D. It allows you to reinstall the operating system without having to reinstall your existing applications and files.
12. Which of the following allows you to create an image of a perfect installation and then deploy that image on one or more computers across a network?
A. An unattended installation
B. A repair installation
C. An image deployment or disk cloning
D. A multiboot installation
13. Which of the following statements best describes advantages that the exFAT file system offers over FAT32?
A. exFAT provides support for 64-bit addressing.
B. exFAT provides increased security with group- and user-level access control.
C. exFAT supports the use of compression and encryption.
D. exFAT supports the use of disk quotas.
14. Which of the following statements best describes advantages that the NTFS file system offers over FAT32? (Choose all that apply.)
A. NTFS provides support for 64-bit addressing.
B. NTFS provides increased security with group and user level access control.
C. NTFS supports the use of compression and encryption.
D. NTFS supports the use of disk quotas.
15. After installing the operating system, which of the following should be performed next?
A. You should update the latest service packs, hotfixes, and drivers.
B. You should format the drive before beginning any updates.
C. You should partition the drive containing the operating system.
D. You should create the file system you plan to use.
16. Which of the following best describes how to determine whether a service pack has already been installed on your computer?
A. In the Control Panel, open Administrative Tools and select System Configuration.
B. In the Control Panel, open the Device Manager and select Disk Drives.
C. In Windows Explorer or File Explorer, right-click Computer and select Properties.
D. In Windows Explorer or File Explorer, right-click Computer, select Manage, then select Disk Management.
Answers and Explanations to Hands-On Labs
Using Windows Features
To be able to restore a file from a Shadow Copy, do the following:
Step 1. Make sure System Restore is enabled on a system running Business/Professional/Ultimate/Enterprise editions.
Step 2. Create a file on C: drive (such as a text file, photo, document). If you decide to use an existing file, make a backup copy first.
Step 3. Create a restore point on C: drive.
Step 4. Edit the file and save the changes.
Step 5. Open Windows Explorer, right-click the file, select Versions, and choose the old version.
Use the Compatibility Wizard or the compatibility tab as you prefer. A common requirement for old games is to run them as Administrator.
If the Windows upgrade advisor or assistant indicates problems with your system, follow the links to get updates or advice.
Even if you aren’t currently using hardware virtualization, enabling AMD-V or Intel VT-x (hardware virtualization) in the BIOS/UEFI firmware helps get your system ready for virtualization in the future.
Answers and Explanations to Review Questions
1. D. x86 refers to older computers called 80386 or 80486 (or just simply 386 or 486 or x86). These computers used 32-bit CPUs, which provided 4GB of address space. Newer systems, known as x86-64, can run 64-bit CPUs, address up to 1TB of RAM, and support both 32- and 64-bit software.
2. A. Gadgets represented a serious flaw in security. Attackers could gain access to your computer’s system files or your document files or could even use remote access to take over complete control of your computer.
3. C. Shadow Copy was removed from the Windows 8/8.1 operating systems and was replaced with File History.
4. A. Compatibility Mode is used to ensure that older programs will run on newer operating systems.
5. B. OneDrive is Window’s cloud storage program. It ships with Windows 8/8.1/10 but it can also be downloaded as an app for earlier Windows systems, OS X, Android, iOS, and others. It can also be used from a web browser.
6. B, C, E. Apps installed using the Windows Store are easy to update and they will be reinstalled automatically if the computer is refreshed. Apps that are downloaded from the Internet or installed from discs will be removed when the computer is refreshed and they must be manually reinstalled. Windows 8/8.1/10 recommendations include using a Microsoft Account and a Live sign in. If you log on using a local account, you will not be able to access the Windows Store. Apps from the Windows Store may either be free or paid. Files are synced in the OneDrive cloud storage system, not when accessing the Windows Store.
7. C. The Action Center displays messages warning you about potential security and maintenance problems in your system. The Action Center may be accessed from the taskbar at the bottom-right of the screen or from the Control Panel inside System and Security. A white flag means that no issues have been detected. A yellow flag is an alert meaning that you have an issue of moderate importance. A red flag warns you about more serious issues.
8. A. A library is a group of files that are stored in a variety of physical locations but that appear to reside in a single logical folder. When a file in the library folder is opened and changes to that file are saved, the original file in the original location will automatically be saved as well.
9. A, C, E, F. When creating a multi-boot system, each operating system must be installed on its own separate primary partition with the oldest operating system being installed first. You may create up to four primary partitions on a single MBR hard drive. You will need third-party software if you want to install a Windows system and a non-Windows system and you will need to create a virtual machine if you want to avoid rebooting each time you switch operating systems. You should never install a second operating system on a single partition unless you are doing an upgrade installation because you will lose the original system when the new one overwrites it.
10. B. PXE allows you to boot through a network connection prior to installing an operating system. The advantage of using a network connection is that you can first boot and then install operating systems on multiple computers simultaneously by accessing an image located on the network. To use this method, each computer must be connected to the network.
11. D. A repair installation (also known as an in-place upgrade) allows you to reinstall the operating system without reinstalling your applications and files. In a repair installation, you are simply upgrading from one operating system to the same operating system. This will replace any corrupt system files without changing your data files.
12. C. Image deployment or disk cloning allows you to create a perfect installation, make an image of that installation and then deploy the image on multiple computers on the network. Problems may arise if the hardware on every computer is not identical. Also, each computer must have a different computer name and SID, which can create network conflicts. Both of these problems (and other problems) can be solved depending on what type of software you use to make the image.
13. A. exFAT is designed for use with mobile devices and has many improvements over FAT32. It uses 64-bit addressing, but it does not support increased security, compression, encryption, or disk quotas.
14. A, B, C, D. NTFS has many advantages over FAT32. It supports 64-bit addressing, increased security, compression, encryption, and disk quotas. exFAT also supports 64-bit addressing, but only NTFS supports the other features listed above.
15. A. After installing the operating system, you should update the system with any service packs, hot fixes, or drivers that might be needed. Never format a drive on which an active operating system is installed. Formatting will overwrite the drive and you will lose everything that had been written to that drive. Partitioning is done prior to formatting and installing, and while you might be able to add additional partitions after installation, the drive containing the operating system must be partitioned before installation. The file system is created during the installation of the operating system.
16. C. Open Windows Explorer in Vista and Windows 7. Right-click Computer, select Properties, and look under Windows Edition at the top of the page.