Chapter 15. Managing Microsoft Windows
This chapter covers the following subjects:
![]() Command-Line Tools—From TASKKILL to DIR, learn how to use Windows command-line tools.
Command-Line Tools—From TASKKILL to DIR, learn how to use Windows command-line tools.
![]() Microsoft Administrative Tools—Discover computer and device management, troubleshooting, scheduling, and security policy settings in Windows.
Microsoft Administrative Tools—Discover computer and device management, troubleshooting, scheduling, and security policy settings in Windows.
![]() Task Manager—Learn how to view and shut down apps and processes.
Task Manager—Learn how to view and shut down apps and processes.
![]() MSCONFIG—Use this tool to configure boot and startup processes.
MSCONFIG—Use this tool to configure boot and startup processes.
![]() Disk Management—Learn how to add and manage hard drives.
Disk Management—Learn how to add and manage hard drives.
![]() Storage Spaces—Discover a new, more versatile way to work with hard drives in Windows 8/8.1/10.
Storage Spaces—Discover a new, more versatile way to work with hard drives in Windows 8/8.1/10.
![]() Windows Upgrade Tools—Discover how to move data from old to new Windows installations.
Windows Upgrade Tools—Discover how to move data from old to new Windows installations.
![]() System Utilities—From Notepad to Explorer and Dxdiag to MMC, discover even more tools for managing Windows.
System Utilities—From Notepad to Explorer and Dxdiag to MMC, discover even more tools for managing Windows.
![]() Control Panel Utilities—Learn how to switch between category and icon views, find and change display settings, tweak folder options and virtual memory, adjust power settings, adjust audio playback, and locate troubleshooters in this section.
Control Panel Utilities—Learn how to switch between category and icon views, find and change display settings, tweak folder options and virtual memory, adjust power settings, adjust audio playback, and locate troubleshooters in this section.
Microsoft Windows includes a wide variety of management tools, including command-line utilities, components in Control Panel and Accessories, and others. Some can be run from an object’s properties sheet. Understanding how to use them is a big challenge (and a large part of the 220-902 exam), and that’s exactly what this chapter is intended to help you do.
220-902: Objective 1.3 Given a scenario, apply appropriate Microsoft command line tools.
220-902: Objective 1.4 Given a scenario, use appropriate Microsoft operating system features and tools.
220-902: Objective 1.5 Given a scenario, use Windows Control Panel utilities.
Foundation Topics
Command-Line Tools
Windows contains a number of command-line tools for systems operation and management. These commands and their uses are listed in Table 15-1. Commands are listed in all caps, but can be run in either lowercase or uppercase.


For more information about these commands, see the following sections.
In this chapter and throughout this book, “Windows” refers to Windows Vista, 7, 8/8.1. Specific Windows versions will be listed only if a command is not available or has different syntax in different versions of Windows.
Commands Available with Standard Privileges vs. Administrative Privileges
Most of the commands shown in Table 15-1 can be run with standard privileges (in other words, by any user). However, some commands listed can only be run with administrative privileges (also known as elevated mode or administrative mode). See the table footnotes for details.
Starting a Command Prompt Session with CMD.EXE
Although most computer users won’t use the command prompt often, technicians use it frequently because it enables you to
![]() Recover data from systems that can’t boot normally
Recover data from systems that can’t boot normally
![]() Reinstall lost or corrupted system files
Reinstall lost or corrupted system files
![]() Print file listings (believe it or not, you can’t do this in Windows Explorer, File Explorer, This PC, or Computer)
Print file listings (believe it or not, you can’t do this in Windows Explorer, File Explorer, This PC, or Computer)
![]() Copy, move, or delete data
Copy, move, or delete data
![]() Display or configure certain operating system settings
Display or configure certain operating system settings
You can start a command prompt session in Windows by clicking the Command Prompt option in the Start menu. However, other methods can be faster:
![]() In Windows 7/Vista—Click Start, type cmd in the Search box, and then press Enter or press Ctrl+Shift+Enter to run in elevated mode. (It might be necessary for some commands.) You can also right-click cmd and select Run as Administrator to run in elevated mode.
In Windows 7/Vista—Click Start, type cmd in the Search box, and then press Enter or press Ctrl+Shift+Enter to run in elevated mode. (It might be necessary for some commands.) You can also right-click cmd and select Run as Administrator to run in elevated mode.
![]() In Windows 8/8.1 (also works in 10)—Press the Windows key+X and then click or tap Command Prompt to run in standard mode. Click or tap Command Prompt (Admin) to run in elevated mode (equivalent to Run as Administrator). See Figure 15-1.
In Windows 8/8.1 (also works in 10)—Press the Windows key+X and then click or tap Command Prompt to run in standard mode. Click or tap Command Prompt (Admin) to run in elevated mode (equivalent to Run as Administrator). See Figure 15-1.

What is elevated mode? Some commands shown in Table 15-1 cannot be run unless they are run with administrative privileges (also known as elevated mode, run as administrator): SFC, CHKDSK, and DISKPART.
Figure 15-2 shows a typical command prompt session in Windows 7.

Tip
To get help for any command prompt function or program, type the command name followed by /?. For example, DIR /? displays help for the DIR command.
Using Wildcards to Specify a Range of Files
Command-prompt functions and utilities can be used to operate on a group of files with similar names by using one of the following wildcard symbols:
![]() ? replaces a single character.
? replaces a single character.
![]() * replaces a group of characters.
* replaces a group of characters.
For example, DIR *.EXE displays files with the .EXE extension in the current folder (directory). DEL MYNOVEL??.BAK removes the following files: MYNOVEL00.BAK, and MYNOVEL01.BAK, but not MYNOVEL.BAK.
TASKKILL
TASKKILL is a command-line utility for Windows used to shut down a task on a local or remote system. It is a companion utility to Tasklist and shares some of its syntax:
TASKKILL [/S system [/U username [/P [password]]]]
{ [/FI filter] [/PID processid | /IM imagename] } [/T] [/F]
TASKKILL is used to terminate tasks by process id (PID) or image name.
Note
These rules apply when running TASKKILL:
![]() Wildcard * for /IM switch is accepted only when a filter is applied.
Wildcard * for /IM switch is accepted only when a filter is applied.
![]() Termination of remote processes will always be done forcefully (/F).
Termination of remote processes will always be done forcefully (/F).
![]() “WINDOWTITLE” and “STATUS” filters are not considered when a remote machine is specified.
“WINDOWTITLE” and “STATUS” filters are not considered when a remote machine is specified.
The following task kills the notepad.exe app (to try this yourself, be sure to start notepad.exe first):
TASKKILL /IM notepad.exe
The task is killed as soon as the command is issued. When a command is successful, TASKKILL reports that the task has been terminated:
SUCCESS: Sent termination signal to the process "notepad.exe" with
PID 4692.
This command kills apps with the PID values listed:
TASKKILL /PID 1299 /PID 11440 /PID 6784
Note
To determine the PID values for running apps, use Task Manager.
For a list of all options, use taskkill /?.
BOOTREC
The BOOTREC command is available only from the command prompt available when using startup repair options.
To learn how to start Windows to repair your system, see the “System Recovery Options (Windows)” section and the “Safe Mode (Windows)” section in Chapter 22.
BOOTREC is used to repair the boot record or boot configuration database (BCD). Command syntax is bootrec /option, using one of the options from Table 15-2.

Note
For more information about using Bootrec, see “Windows Boot Errors,” p.1082, Chapter 22 or visit https://support.microsoft.com/en-us/kb/927392.
SHUTDOWN
The SHUTDOWN command is used to shut down Windows and power down the specified local or remote computer(s) from the command prompt:
shutdown [/i | /l | /s | /r | /g | /a | /p | /h | /e] [/f]
[/m \computer][/t xxx][/d [p|u:]xx:yy [/c "comment"]]
When SHUTDOWN is run without any options, it also displays a list of reasons for the shutdown. Use the numbers displayed when you use the /d option.
The remote shutdown dialog displayed with the SHUTDOWN /I option is shown in Figure 15-3.

Figure 15-3 SHUTDOWN’s graphical user interface is configured to restart one computer for planned application restart with a 30-second delay.
The remote shutdown banner displayed on all systems being shut down is shown in Figure 15-4.

TASKLIST
Use TASKLIST to learn about tasks running on the current system or on a remote system. When you use the simple command TASKLIST, it displays a list of all running tasks on the current system. However, TASKLIST supports many option switches:
TASKLIST [/S system [/U username [/P [password]]]]
[/M [module] | /SVC | /V] [/FI filter] [/FO format] [/NH]
TASKLIST displays a list of currently running processes on either a local or remote machine.
Here are some examples to try:
Figure 15-5 shows TASKLIST used to displays programs that use the kernel32.dll module.

TASKLIST can create a .CSV (comma separated value) list of tasks (as well as a table or list). A CSV file can be opened with Microsoft Excel or other spreadsheet programs, and can be imported into most database programs.
For all program options, use tasklist /?.
MKDIR, CHDIR, and RMDIR (MD, CD, and RD)
You can make, change to, or remove folders (directories) with the following commands, as shown in Table 15-3.

Folders (directories) can be referred to in two ways:
![]() Absolute—An absolute path provides the full path to the directory (folder). For example, to change to the folder BackupsWord from the folder My Documents on the same drive, you would use the command CD BackupsWord.
Absolute—An absolute path provides the full path to the directory (folder). For example, to change to the folder BackupsWord from the folder My Documents on the same drive, you would use the command CD BackupsWord.
![]() Relative—A relative path can be used to change to a folder one level below your location. For example, to change to the folder BackupsWord from the folder Backups, you would use the command
Relative—A relative path can be used to change to a folder one level below your location. For example, to change to the folder BackupsWord from the folder Backups, you would use the command CHDIR Word (or just CD Word). No backslash is necessary.
Note
You can’t use the CHDIR (CD) command to change to a different drive and folder. It works only on the current drive.
To change to the root folder from any folder, use CHDIR (or just CD). To change to the folder one level higher than your current location, use CHDIR .. (or just CD ..).
DEL
The DEL command is an internal command (that is, a command built in to CMD.EXE) used to delete files. The syntax for DEL (or ERASE, which can be used interchangeably with DEL) is
DEL [/P] [/F] [/S] [/Q] [/A[[:]attributes]] names
ERASE [/P] [/F] [/S] [/Q] [/A[[:]attributes]] names
For example, the following deletes all *.bak files in the current folder:
del *.bak
The following deletes all temp files in the C:Temp folder and its subfolders:
del c: emp*.tmp /s
Note
File deletions at the command prompt bypass the Windows Recycle Bin. However, files deleted with DEL (ERASE) can be retrieved with third-party disk data recovery tools.
FORMAT
In Windows, the FORMAT command is used primarily to create or recreate the specified file system on recordable or rewriteable storage (magnetic, flash, or optical). In the process, the contents of the drive are overwritten.
FORMAT appears to “destroy” the previous contents of magnetic storage (such as a hard disk), but if you use FORMAT on a hard disk by mistake, third-party data recovery programs can be used to retrieve data from the drive. This is possible because most of the disk surface is not changed by FORMAT when a quick format option is selected.
Windows overwrites the entire surface of a disk with zeros if the quick format option is not selected. If the Quick Format or Safe Format option is used, the contents of the disk are marked for deletion but can be retrieved with third-party data recovery software.
Note
The hard-disk format process performed by the FORMAT command (which creates the file system) is sometimes referred to as a standard format to distinguish it from the low-level format used by hard drive manufacturers to set up magnetic structures on the hard drive.
Using FORMAT with USB Flash and Removable-Media Drives
Although USB flash memory drives and removable-media drives are preformatted at the factory, FORMAT is still useful as a means to:
![]() Erase the contents of a disk quickly, especially if it contains many files or folders.
Erase the contents of a disk quickly, especially if it contains many files or folders.
![]() Place new sector markings across the disk.
Place new sector markings across the disk.
Formatting Drives with Windows Explorer and File Explorer
You can use Windows Explorer/Computer (Vista/7) or File Explorer/This PC (8/8.1) to format all types of drives. Right-click the drive you want to format and select Format. The Format options for Windows display, as shown in Figure 15-6.

Windows also offers the exFAT (FAT64) file system option for hard disks and high-capacity flash drives. Windows Vista and 7 do not offer the compression option on the Format menu, but if you want to compress the drive after formatting it, you can do so from the General tab of the drive’s properties sheet.
Note
Writeable optical media must also be formatted before it can be used. To learn more about the format options used with these types of media, see Chapter 6, “Storage Devices.”
Using FORMAT from the Command Prompt
The FORMAT command overwrites the current contents of the target drive unless the /Q (Quick Format) option is used. When /Q is used, only the file allocation table and root folder are overwritten. To retrieve data from a drive that has been formatted, you must use third-party data-recovery software.
FORMAT includes a variety of options for use with hard disks, removable-media and optical drives, and USB flash memory drives. The most useful examples include:
FORMAT F: /FS:exFAT Formats drive F: using the exFAT file system.
FORMAT F: /Q Performs a quick format on drive F:
For additional options for Format, use Format /?.
Note that the FAT and FAT32 files systems impose the following restrictions on the number of clusters on a volume:
![]() FAT—Number of clusters <= 65526
FAT—Number of clusters <= 65526
![]() FAT32—65526 < Number of clusters < 4177918
FAT32—65526 < Number of clusters < 4177918
FORMAT immediately stops processing if it decides that the preceding requirements cannot be met using the specified cluster size. NTFS compression is not supported for allocation unit sizes above 4096.
COPY
The COPY command copies files from one drive and folder to another folder and drive. The folder specified by COPY must already exist on the target drive. COPY does not work with files that have the system or hidden file attributes; to copy these files, use XCOPY or ROBOCOPY instead.
The syntax for COPY in Windows is
COPY [/D] [/V] [/N] [/Y | /-Y] [/Z] [/L] [/A | /B ] source [/A | /B]
[+ source [/A | /B] [+ ...]] [destination [/A | /B]]
Examples include:
![]()
COPY *.* F:—Copies all files in the current folder to the current folder on the F: drive
![]()
COPY *.TXT C:UsersUsername—Copies all .txt files in the current folder to the Username folder on the C: drive
![]()
COPY C:WINDOWSTEMP*.BAK—Copies all *.bak files in the WindowsTemp folder on drive C: to the current folder
![]()
COPY C:WINDOWS*.BMP D:—Copies all .bmp files in the Windows folder on drive C: to the current folder on drive D:
For all options for Copy, use Copy /?.
XCOPY
The XCOPY command can be used in place of COPY in most cases and has the following advantages:
![]() Faster operation on a group of files—XCOPY reads the specified files into conventional RAM before copying them to their destination.
Faster operation on a group of files—XCOPY reads the specified files into conventional RAM before copying them to their destination.
![]() Creates folders as needed—Specify the destination folder name in the XCOPY command line, and the destination folder will be created if needed.
Creates folders as needed—Specify the destination folder name in the XCOPY command line, and the destination folder will be created if needed.
![]() Operates as backup utility—Can be used to change the archive bit from on to off on files if wanted to allow XCOPY to be used in place of commercial backup programs.
Operates as backup utility—Can be used to change the archive bit from on to off on files if wanted to allow XCOPY to be used in place of commercial backup programs.
![]() Copies files changed or created on or after a specified date—Also useful when using XCOPY as a substitute for commercial backup programs.
Copies files changed or created on or after a specified date—Also useful when using XCOPY as a substitute for commercial backup programs.
XCOPY can be used to “clone” an entire drive’s contents to another drive. For example, the following copies the entire contents of the D: drive to the H: drive:
XCOPY D: H: /H /S /E /K /C /R
This command copies all files from drive D:’s root folder (root directory) and subfolders to drive H:’s root folder and subfolder, including system and hidden files, empty folders and subfolders, and file attributes. This will continue even if errors are detected and will overwrite read-only files.
For all options for XCOPY.EXE, use Xcopy /?.
ROBOCOPY
ROBOCOPY is a robust file-copying utility included in Windows that can be used in place of XCOPY. ROBOCOPY has several advantages over XCOPY, including the capability to tolerate pauses in network connections, to mirror the contents of the sources and destination folders by removing files as well as copying files, to perform multithreaded copies for faster copying on multicore PCs, to log copy processes, list or copy files matching specified criteria including minimum file size, and others.
The syntax for ROBOCOPY for Windows is available from https://technet.microsoft.com/en-us/library/cc733145.aspx. Here are two examples of what you can do with ROBOCOPY:
To copy files in sourcefolder that are at least 16MB (16,777,216 bytes) in size to targetfolder:
ROBOCOPY C:SOURCEFOLDER D:TARGETFOLDER /MIN:16777216
Add the /L option to the end of this command to list the files that would be copied.
To mirror a local folder to a network folder with tweaks for more reliable operation (/FFT uses the two-second rule for comparing files, which can prevent files that are unchanged but have a time stamp that’s off by a second or two from the destination’s version from being copied again; /W:5 changes the wait time between retries from the default of 30 seconds to 5 seconds) and omit hidden files (/XA:H), use:
ROBOCOPY \SOURCESERVERSHARE \DESTINATIONSERVERSHARE /MIR /FFT /Z
/XA:H /W:5
These examples were adapted from the excellent TechNet Wiki posting “Robocopy and a Few Examples” available at http://social.technet.microsoft.com/wiki/contents/articles/1073.robocopy-and-a-few-examples.aspx.
As you can see from these examples, ROBOCOPY uses much different syntax than XCOPY and, for those who used ROBOCOPY in Windows XP or older versions, keep in mind that ROBOCOPY has had syntax changes over its different editions. For these reasons, you might prefer to run it by means of a GUI, such as the ROBOCOPY GUI available at http://technet.microsoft.com/en-us/magazine/2006.11.utilityspotlight.aspx (see Figure 15-7) or third-party GUIs available online.

Figure 15-7 The ROBOCOPY GUI available from Microsoft TechNet provides a convenient click-to-select interface for setting ROBOCOPY’s many option switches.
Note
Microsoft TechNet has also introduced RichCopy as an alternative to the ROBOCOPY GUI. To learn more, see http://technet.microsoft.com/en-us/magazine/2009.04.utilityspotlight.aspx.
Diskpart
DISKPART is a disk management program included in Windows. It can be used to perform disk partitioning and management commands that are not included in Computer Management’s Disk Management module.
When you run DISKPART, a new window opens with a DISKPART> prompt. Only DISKPART commands can be entered in the window. For a full list of DISKPART commands, use DISKPART /?.
Figure 15-8 demonstrates two DISKPART commands:
Select disk x
Detail disk

DISKPART shows that the selected disk drive is the boot drive, contains the pagefile, and is used to store crashdump information.
Tip
To learn more about using DISKPART, see http://support.microsoft.com/kb/300415 and http://technet.microsoft.com/en-us/library/cc766465(v=ws.10).aspx. DISKPART commands can be included in scripts.
Note
A script is a series of commands for one or more supported languages stored in a text file. Windows Script Host, which is included in Windows, is used to interpret and run scripts. A good introduction to Windows scripting is available at www.brighthub.com/computing/windows-platform/articles/83172.aspx. Windows PowerShell, which is included in Windows, is a popular choice for creating and running scripts, and contains many built-in commands. To learn more about PowerShell, see https://msdn.microsoft.com/powershell.
SFC
System File Checker (SFC) is a Windows utility that checks protected system files (files such as .DLL, .SYS, .OCX, and .EXE, as well as some font files used by the Windows desktop) and replaces incorrect versions or missing files with the correct files.
Use SFC to fix problems with Internet Explorer or other built-in Windows programs caused by the installation of obsolete Windows system files, user error, deliberate erasure, virus or Trojan horse infections, and similar problems.
To run SFC, open the command prompt in elevated mode (Run as Administrator) and type SFC with the appropriate switch. A typical option is SFC /scannow, which scans all protected files immediately (see Figure 15-9).

Another option is SFC /scanonce, which scans all protected files at the next boot. If SFC finds that some files are missing and replacement files are not available on your system, you will be prompted to reinsert your Windows distribution disc so that the files can be copied to the DLL cache. Other options include /scanboot, which scans all protected files every time the system starts; /revert, which returns the scan setting to the default; and /purgecache and /cachesize=x, which enable a user to delete the file cache and modify its size.
If errors are detected, they are logged in the CBS.log file found in %WinDir%LogsCBS.
To read the contents of CBS.log, you can use the findstr command, which sends the details to a separate file called sfcdetails.txt.
For more information about using SFC and findstr, and to learn how to replace corrupted system files manually if SFC is not able to do it, see https://support.microsoft.com/en-us/kb/929833.
CHKDSK
CHKDSK is a command-line tool for checking disk drives (other than optical) for errors and optionally repairing those errors. It must be run in elevated mode (open cmd.exe as administrator). Note that some commands differ according to the file system (FAT/FAT32 or NTFS) of the target drive.
CHKDSK [volume[[path]filename]]] [/F] [/V] [/R] [/X] [/I] [/C]
[/L[:size]] [/B]
For a complete list of CHKDSK options, use CHKDSK /?.
Example:
![]()
CHKDSK /F—Scans for and fixes errors on the current drive.
![]()
CHKDSK F: /F—Scans for and fixes errors on drive F:.
If CHKDSK /F is run on the system drive, the following message appears:
The type of the file system is NTFS.
Cannot lock current drive.
Chkdsk cannot run because the volume is in use by another
process. Would you like to schedule this volume to be
checked the next time the system restarts? (Y/N)
Answer Y, and CHKDSK runs before the Windows desktop appears, and displays a message in the notification area about the condition of your drive. If CHKDSK /F is run on a non-system drive, it runs immediately.
GPUPDATE
GPUPDATE is used to update the group policy on a local or remote computer:
Syntax: GPUPDATE [/Target:{Computer | User}] [/Force] [/
Wait:<value>]
[/Logoff] [/Boot] [/Sync]
Use this command to refresh the group policy on a specified computer called AccountingPC and reboot that computer after the processing is complete:
GPUPDATE /target:accountingpc /boot
For a complete list of options, use GPUPDATE /?.
GPRESULT
Use GPRESULT to display the current policy for a specified user and computer.
GPRESULT [/S system [/U username [/P [password]]]] [/SCOPE scope]
[/USER targetusername] [/R | /V | /Z] [(/X | /H) <file-
name> [/F]]
For a complete list of options, use GPRESULT /?. Examples:
![]()
GPRESULT /R—Displays summary data
![]()
GPRESULT /H GPReport.html—Saves report as GPReport.html
![]()
GPRESULT /USER targetusername /V—Verbose information for specified username
![]()
GPRESULT /S system /USER targetusername /SCOPE COMPUTER /Z—Super-verbose information for specified remote system and user name, limited to computer in scope
![]()
GPRESULT /S system /U username /P password /SCOPE USER /V—Verbose information for specified system and user, includes password to avoid being prompted for it, and limited to user in scope
DIR
Use DIR to display a list of files and subfolders (subdiretories) in a folder (directory). DIR provides many more options for listing files and folders than Windows Explorer or File Explorer.
Use DIR /? for a complete list of options.
DIR [drive:][path][filename] [/A[[:]attributes]] [/B] [/C] [/D] [/L]
[/N]
[/O[[:]sortorder]] [/P] [/Q] [/R] [/S] [/T[[:]timefield]] [/W] [/X]
[/4]
[drive:][path][filename]
Specifies drive, directory, and/or files to list.
Examples:
![]()
DIR /Q/P—Displays owner of file and filename and pauses after each screen
![]()
DIR /AH—Displays hidden files/folders in current location
EXIT
Use EXIT to close an app that has its own command prompt. For example, to close DISKPART, type EXIT at the DISKPART> prompt to close it and return to the command prompt.
When run from the command-line, this command closes the command prompt window and returns you to the Windows GUI. For additional options, use EXIT /?.
HELP
The HELP executable in Windows can be used to get help for most command-line utilities:
![]()
HELP—Displays a list of commands with brief descriptions.
![]()
HELP /command—Displays detailed help for the specified command.
EXPAND
The EXPAND executable is used to view compressed files in a .CAB (cabinet) archive and uncompress them to the current or specified folder. .CAB files are used by some versions of Windows for installation or update files. Windows XP Recovery Console also uses Expand for system repair. For command syntax for a particular version of Windows, use EXPAND /?. Examples:
![]()
EXPAND -d filename.cab—Displays files stored in specified archive
![]()
EXPAND filename.cab -f:FilesInCAB—Specifies files to extract to current location. To extract files to a different location, specify it at the end of this command.
Command /?
Command /? is used to display help for the specified command.
For example, CHKDSK /? displays help for CHKDSK. If the /? option is not supported for a command, use HELP Command or search for help online.
Microsoft Administrative Tools

Windows contains a number of administrative tools and features designed to help you manage operations and users. The following sections discuss many of these components, including:
![]() Computer Management
Computer Management
![]() Device Manager
Device Manager
![]() Performance Monitor
Performance Monitor
![]() Services
Services
![]() Task Scheduler
Task Scheduler
![]() Component Services
Component Services
![]() Data Sources
Data Sources
![]() Print Management
Print Management
![]() Local Security Policy
Local Security Policy
![]() Windows Memory Diagnostic
Windows Memory Diagnostic
Note
The following Administrative Tools are covered in other chapters:
![]() Local users and groups; see “Users and Groups,” p.1039, Chapter 21.
Local users and groups; see “Users and Groups,” p.1039, Chapter 21.
![]() Windows Firewall and advanced settings, “Firewall Settings,” p.862, Chapter 16.
Windows Firewall and advanced settings, “Firewall Settings,” p.862, Chapter 16.
To start any of the Administrative Tools:
Step 1. Open Control Panel.
Step 2. Open the System and Security category.
Step 3. Click or tap Administrative Tools.
Step 4. Click or tap the tool you want to use.
Computer Management (MMC)
Instead of hunting around for different utilities in different places in Windows, it’s simpler to use the Computer Management console window because it has most of the tools you need in one organized window system. Here are the ways to open Computer Management:
In Windows Vista and 7, use one of the following:
![]() Click Start; then right-click Computer/My Computer and select Manage.
Click Start; then right-click Computer/My Computer and select Manage.
![]() Navigate to Start > All Programs > Administrative Tools > Computer Management.
Navigate to Start > All Programs > Administrative Tools > Computer Management.
![]() Open the Run prompt (Windows key+R) and type compmgmt.msc (a personal favorite).
Open the Run prompt (Windows key+R) and type compmgmt.msc (a personal favorite).
In Windows 8/8.1/10:
Press the Windows key+X and select Computer Management from the menu. In Computer Management, you find the Event Viewer > Device Manager > Local Users and Groups > Services > Disk Management.
Using Device Manager
Windows Device Manager is used to display installed device categories and specific installed devices, and to troubleshoot problems with devices.
You can also start Device Manager using these steps.
To start Device Manager in Windows 7/Vista, follow these steps:
Step 1. Click Start, right-click Computer, and select Properties. This displays the System window.
Step 2. Click the Device Manager link on the left side under Tasks.
To start Device Manager in Windows 8/8.1/10:
Step 1. Open the Charms menu and click Search (8/8.1) or click the Search window (10).
Step 2. Search for Device Manager.
Step 3. Click or tap the Device Manager link.
Alternatively:
Step 1. Press the Windows key+X.
Step 2. Click or tap Device Manager.
Note
You can also start Device Manager from the Computer Management console window: click Device Manager in the left window pane.
To view the devices in a specific category, click the plus (+) sign next to the category name, as shown in Figure 15-10. If a particular category contains a device with problems, the category automatically opens when you start Device Manager.

Different systems will have different categories listed in Device Manager because Device Manager lists only categories for installed hardware. For example, the system shown in Figure 15-10 is a laptop, so it has a Batteries category.
If your computer has devices that are malfunctioning in a way that Device Manager can detect, or has devices that are disabled, they will be displayed as soon as you open Device Manager. For example, in Figure 15-10 the Imaging devices category lists a disabled device, indicated by a down-arrow icon. The Other devices category lists a device that cannot run, indicated by an exclamation mark [!] in a yellow triangle.
If the malfunctioning or disabled device is an I/O port, such as a serial, parallel, or USB port, any device attached to that port cannot work until the device is working properly.
To see more information about a specific device, double-click the device to open its properties sheet. Device properties sheets have a General tab and some combination of other tabs:
![]() General—Displays device type, manufacturer, location, status, troubleshoot button, and usage. Applies to all devices.
General—Displays device type, manufacturer, location, status, troubleshoot button, and usage. Applies to all devices.
![]() Properties—Device-specific settings. Applies to multimedia devices.
Properties—Device-specific settings. Applies to multimedia devices.
![]() Driver—Driver details and version information. Applies to all devices.
Driver—Driver details and version information. Applies to all devices.
![]() Details—Technical details about the device. Applies to all devices.
Details—Technical details about the device. Applies to all devices.
![]() Policies—Optimizes external drives for quick removal or performance. Applies to USB, FireWire (IEEE 1394), and eSATA drives.
Policies—Optimizes external drives for quick removal or performance. Applies to USB, FireWire (IEEE 1394), and eSATA drives.
![]() Resources—Hardware resources such as IRQ, DMA, Memory, and I/O port address. Applies to I/O devices.
Resources—Hardware resources such as IRQ, DMA, Memory, and I/O port address. Applies to I/O devices.
![]() Volumes—Drive information such as status, type, capacity, and so on. Click Populate to retrieve information. Applies to hard disk drives.
Volumes—Drive information such as status, type, capacity, and so on. Click Populate to retrieve information. Applies to hard disk drives.
![]() Power—Power available per port. Applies to USB root hubs and generic hubs.
Power—Power available per port. Applies to USB root hubs and generic hubs.
![]() Power Management—Specifies device-specific power management settings. Applies to USB, network, keyboard, and mouse devices.
Power Management—Specifies device-specific power management settings. Applies to USB, network, keyboard, and mouse devices.
Figure 15-11 illustrates some of these tabs.

Figure 15-11 Selected Device Manager tabs: The General tab for a disabled device (A); the Driver tab for a network storage device (B); and the Power tab for a USB hub (C).
To troubleshoot problems with a device in Device Manager, open its Properties sheet by double-clicking the device. Use the General tab shown in Figure 15-11a to display the device’s status and to troubleshoot a disabled or malfunctioning device.
When you have a malfunctioning device such as the one in Figure 15-11a, you have several options for resolving the problem:
![]() Look up the Device Manager code to determine the problem and its solution (see Table 15-4 for a few examples).
Look up the Device Manager code to determine the problem and its solution (see Table 15-4 for a few examples).
![]() Click the Troubleshoot button (if any) shown on the device’s General Properties tab; the button’s name and usage depends on the problem. Table 15-4 lists a few examples, their meanings, and the solution button (if any).
Click the Troubleshoot button (if any) shown on the device’s General Properties tab; the button’s name and usage depends on the problem. Table 15-4 lists a few examples, their meanings, and the solution button (if any).
![]() Manually change resources (applies primarily to older systems that don’t use ACPI power management). If the nature of the problem is a resource conflict, you can click the Resources tab, change the settings, and eliminate the conflict if possible.
Manually change resources (applies primarily to older systems that don’t use ACPI power management). If the nature of the problem is a resource conflict, you can click the Resources tab, change the settings, and eliminate the conflict if possible.
![]() Manually update drivers. If the problem is a driver issue but an Update Driver button isn’t available, open the Driver tab and install a new driver for the device.
Manually update drivers. If the problem is a driver issue but an Update Driver button isn’t available, open the Driver tab and install a new driver for the device.

Note
For a comprehensive discussion of Device Manager error codes in Windows, see https://support.microsoft.com/en-us/kb/310123.
You can also use the Device Manager to disable a device that is conflicting with another device. To disable a device, follow these steps:
Step 1. Click the plus (+) sign next to the device category containing the device.
Step 2. Double-click the device, click the Driver tab, and select Disable.
Depending on the device, you might need to physically remove it from the system to resolve a conflict. To use the Device Manager to remove a device, follow these steps:
Step 1. Click the plus (+) sign next to the device category containing the device.
Step 2. Double-click the device and select Uninstall.
Step 3. Shut down the system and remove the physical device.
Step 1. Double-click the device and select Properties.
Step 2. Click the Driver tab and click the Uninstall button.
Step 3. Shut down the system and remove the physical device.
If a device malfunctions after a driver update, roll back the driver. Use the Roll Back Driver button on the Driver tab to return to the preceding driver version.
Performance Monitor
The Windows Performance Monitor can be used for real-time performance monitoring or to record performance over time.
To access Performance Monitor, open the Run prompt, type perfmon.exe, and press Enter. Windows 7/8/8.1/10 opens the Performance Monitor window. In Windows Vista, the Reliability and Performance Monitor window opens. In either case, you must then click the Performance Monitor node.
Many different types of performance factors can be measured with these programs. This is done by measuring objects. Objects include physical devices, such as the processor and memory, and software, such as protocols and services. The objects are measured with counters. For example, a common counter for the processor is % Processor Time.
To see whether additional RAM is needed in a system, select the object called Paging File; then select the counters % Usage and Pages/Sec, as shown in the following steps:
Step 1. Click the + sign or right-click in the table beneath the graph and select Add Counters.
Step 2. Select Paging File as the Performance Object and then choose % Usage.
Step 3. Click Add.
Step 4. Select Memory as the Performance Object and then choose Pages/Sec from the drop-down menu.
Step 5. Click Add.
Step 6. Click OK and then run normal applications for this computer.
If the Performance Monitor/System Monitor indicates that the Paging File % Usage is consistently near 100 percent or the Memory Pages/Sec counter is consistently higher than 5, add RAM to improve performance. Figure 15-12 shows an example of inadequate memory within Windows 7’s Performance monitor.

Figure 15-12 This Windows 7 system needs more RAM for the programs it is running, as indicated by the high levels of the Memory Pages/Sec counters.
Services (Services.msc)
Many of Windows’ core functions are implemented as services, including features such as the print spooler, wireless network configuration, DHCP client service, and many more. Services.msc can be run automatically or manually and are controlled through the Services node of the Computer Management Console. To open the Computer Management Console, right-click Computer/This PC and select Manage. Then expand the Services and Applications node and click Services.
You can also access the Services dialog from the Services applet in Control Panel’s Administrative Tools folder or by running Services.msc from the Run line dialog; opening Services in these ways displays the dialog shown in Figure 15-13. The Services dialog lists each service by name, and provides a description, status message, and startup type, and whether the service is for a local system or network service.
To view the properties for a particular service, double-click the service listing. The General tab of the properties sheet, as shown in Figure 15-14, displays the service name, description, path to executable file, startup type, and status. You can also stop, pause, or resume a service from this dialog, as well as from the Services dialog.

Use the Log On tab if you need to configure the service to run for a specific user, the Recovery tab to specify what to do if the service fails, and the Dependencies tab to see what other services work with the specified service.
If a system cannot perform a task that uses a service, go to the Services dialog and restart the service. If a service prevents another task from running (for example, a third-party wireless network client might not run if the Windows WLAN Autoconfig service is running), go to the Services dialog and stop the service.
Note
For more information about specific Windows services, I recommend The Elder Geek’s Windows Services Guide (Windows 7 version at www.theeldergeek.com/windows_7/windows_7_services.htm), Black Viper’s Windows 8 and 8.1 Services Configuration (http://www.blackviper.com/service-configurations/black-vipers-windows-8-service-configurations/ and http://www.blackviper.com/service-configurations/black-vipers-windows-8-1-service-configurations/), or the Answers That Work list of “Task List Programs” at www.answersthatwork.com.
Task Scheduler
Windows uses Task Scheduler to run a task on a specified schedule.
Create a Task in Windows
To create a basic task in Windows, follow this procedure:
Step 1. Open Control Panel in Small Icons or Large Icons mode.
Step 2. Open the Administrative Tools folder.
Step 3. Double-click Task Scheduler.
Note
You can also run Task Scheduler from the Run or Search box as taskschd.msc /s.
Step 4. Click Create Basic Task in the Actions menu.
Step 5. Enter a name for the task and a description and click Next.
Step 6. Select an interval (daily, weekly, monthly, one-time only, when my computer starts, when I log on, or when a specific event is logged) and click Next.
Step 7. Specify when to start the task and recurrence and whether to synchronize across time zones, and then click Next.
Step 8. Specify what to do (start a program, send an e-mail, or display a message) and click Next. The following steps assume that Start a Program has been selected.
Step 9. Select a program or script to run, add options (arguments), and specify where to start the program or script. Click Next.
Step 10. Review the settings for the task (see Figure 15-15) and click Finish.

The task is saved in the Task Scheduler library (see Figure 15-16). You can edit or delete tasks in this folder as needed.

Note
Some tasks need to be configured for Windows 7 or Windows Vista. To see this option and other settings you might need to adjust, click the Open the Properties dialog for this Task When I Click Finish checkbox in Step 10 before clicking Finish.
Print Management
Print Management is a utility for managing printers connected to the computer or on a network.
To start print management, open the Administrative Tools folder in Control Panel, and double-click Print Management. The Print Management console opens (see Figure 15-17). From it, you can view print servers and connected printers, manage jobs, manage printer ports and forms, and perform other tasks.

Component Services
Developers and administrators use the Component Services MMC snap-in to manage Component Object Model (COM), COM+ applications, and the Distributed Transaction Coordinator (DTC).
Data Sources (ODBC)
The ODBC Data Source Administrator is used to list and manage data sources and drivers. 64-bit versions of Windows include both 64-bit and 32-bit versions. Data sources are listed by user, system, and file, and the administrator also lists drivers and provides options for tracing and pooling data sources.
Local Security Policy
Local Security Policy is a Microsoft Management Console snap-in. Use it to view and set security policies for the local system or a system on a workgroup network. To select a setting for a policy, open the category in the left pane, scroll to the policy in the right pane, and select the setting desired.
For example, to set up an account lockout policy, expand Account policies and click Account Lockout Policy in the left pane. In the right pane, select a value for Account lockout threshold (number of invalid login attempts). Then, specify a lockout duration and other settings as desired.
Windows Memory Diagnostics
The Windows Memory Diagnostics tool tests system and cache memory before the Windows desktop is loaded. When it loads, the user can select the type of test and number of test repetitions to perform (see Figure 15-18). The results are displayed in a pop-up message from the taskbar after the Windows desktop reloads.

Windows Memory Diagnostics is also available from the System Recovery Options menu. To learn how to launch System Recovery or repair options, see “System Recovery Options (Windows),” p.1107, Chapter 22.
Task Manager
The Task Manager utility provides a useful real-time look into the inner workings of Windows and the programs that are running. There are several ways to display Task Manager including:
![]() Right-click the taskbar and select Task Manager.
Right-click the taskbar and select Task Manager.
![]() Press Ctrl+Shift+Esc.
Press Ctrl+Shift+Esc.
![]() Open the Run or Search box and type taskmgr.
Open the Run or Search box and type taskmgr.
![]() Press Ctrl+Alt+Del and select Task Manager from the Windows Security dialog.
Press Ctrl+Alt+Del and select Task Manager from the Windows Security dialog.
In Windows Vista/7, Task Manager opens to the Applications window shown in Figure 15-19.

The Task Manager tabs include:
![]() Applications—Shows running applications
Applications—Shows running applications
![]() Processes—Program components in memory
Processes—Program components in memory
![]() Performance—CPU, memory, pagefile, and caching stats
Performance—CPU, memory, pagefile, and caching stats
![]() Networking—Lists network utilization by adapter in use
Networking—Lists network utilization by adapter in use
![]() Services—Lists services and their status
Services—Lists services and their status
Use the Applications tab to determine whether a program has stopped responding; you can shut down these programs by using the End Task button.
Use the Processes tab to see which processes are consuming the most memory. Use this dialog along with the System Configuration Utility (MSCONFIG) to help determine whether you are loading unnecessary startup applications; MSCONFIG can disable them to free up memory. If you are unable to shut down a program with the Applications tab, you can also shut down its processes with the Processes tab, but this is not recommended unless the program cannot be shut down in any other way.
Use the Performance tab to determine whether you need to install more RAM memory or need to increase the computer’s paging file size. Use the Networking tab to monitor the performance of the computer’s connection to the network. Use the Services tab to see the services currently running on a system.
In Windows 8/8.1/10, Task Manager uses a new design that lists only running programs when you start it (see Figure 15-20). Click or tap More details to see details about those programs and additional tabs (see Figure 15-21).


The Task Manager tabs in the Windows 8/8.1 version include
![]() Processes—Apps and background processes in memory
Processes—Apps and background processes in memory
![]() Performance—CPU, memory, disk drives, Bluetooth, Ethernet, and Wi-Fi stats
Performance—CPU, memory, disk drives, Bluetooth, Ethernet, and Wi-Fi stats
![]() App history—App resource usage in current system session
App history—App resource usage in current system session
![]() Startup—Startup programs and their impact on system performance
Startup—Startup programs and their impact on system performance
![]() Users—Lists current users
Users—Lists current users
![]() Details—PID, status, user name, CPU, and memory usage by app or service
Details—PID, status, user name, CPU, and memory usage by app or service
![]() Services—Lists services and their status
Services—Lists services and their status
MSCONFIG
The Microsoft System Configuration utility, MSCONFIG, enables you to selectively disable programs and services that run at startup. If your computer is unstable, runs more slowly than usual, or has problems starting up or shutting down, using MSCONFIG can help you determine whether a program or service running when the system starts is at fault. To start MSCONFIG with Windows Vista/7:
Step 1. Click Start to open the Windows Desktop Search pane.
Step 2. Type MSCONFIG and press Enter.
To start MSCONFIG with Windows 8/8.1:
Step 1. Press the Windows key+X.
Step 2. Click or tap Run.
Step 3. Type MSCONFIG and press Enter.
All versions of MSCONFIG have a multitabbed interface used to control startup options. The General tab (see Figure 15-22) enables you to select from Normal, Diagnostic (clean boot) or Selective Startup. (You choose which items and services to load.) Use the Boot tab (see Figure 15-23) to specify how to boot a Windows system.


Use the Services tab to disable or reenable system services. Use the Startup tab to disable or reenable startup programs. Use the Tools tab to launch System Restore, Computer Management, and other management tasks.
Tip
When you select a tool from the Tools tab, MSCONFIG displays the command line needed to run it. Add any options desired before starting the tool.
Disk Management
The Disk Management snap-in of the Computer Management Console is the GUI-based application for analyzing and configuring hard drives. You can do a lot from here. Try some of the configurations listed on a test computer. All you need is one or two drives with unpartitioned space.
Caution
Some operations wipe out all drive contents. Make sure you back up any data you want to keep before trying any of these tasks.
Drive Status
Disk Management displays the status of connected drives with Drive Status.
In Figure 15-24, you also can see the disks at the top of the window and their status. For example, the C: partition is healthy. It also shows the percentage of the disk used and other information, such as whether the disk is currently formatting, whether it’s Basic or Dynamic, or whether it has failed.

In some cases, you might see “foreign” status. This means that a dynamic disk has been moved from another computer (with another Windows operating system) to the local computer, and it cannot be accessed properly. To fix this and be able to access the disk, add the disk to your computer’s system configuration.
To add a disk to your computer’s system configuration, right-click the disk and then click Import Foreign Disks. Any existing volumes on the foreign disk become visible and accessible when you import the disk.
Note
For more information on the plethora of disk statuses, see the Microsoft TechNet article, “Disk Status Descriptions,” at http://technet.microsoft.com/en-us/library/cc738101(WS.10).aspx. Although Windows Vista/7/8/8.1/10 are not mentioned in this document, the terminology is still accurate.
Initializing a Disk
When you connect a new drive, you might be prompted to initialize it. If prompted by the Initialize Disk dialog, select the disk and choose the partition style to use (MBR for drives under 2.1TB, and GPT for larger drives). After this, an unformatted drive will appear as Unallocated in Disk Management.
Note
An MBR drive can have up to four primary partitions. A GPT drive can have more than four primary partitions. A GPT partition must be used for drives more than 2.1TB in size.
Creating a New Simple Volume
Adding a drive happens when you create a new simple volume. A new simple volume can occupy a portion or all of the space on an unallocated disk.
Step 1. Right-click unallocated space on a drive. (With a new drive, the entire drive will be listed as unallocated.)
Step 2. Select New Simple Volume.
Step 3. Click Next.
Step 4. To use the entire space for a volume (drive letter), click Next. To use only part of the space, specify the amount of space to use (in MB) and then click Next.
Step 5. Select the drive letter to install and click Next. (You can also select the option to not assign a drive letter or to mount the drive in an empty NTFS folder on an existing drive.)
Step 6. Specify the file system (NTFS is default), the volume name, and whether to use a quick format or prepare the drive as compressed. Click Next.
Step 7. Review all options and click Finish (see Figure 15-25).

Extending Partitions
Windows enables you to extend the size of a partition (volume) with the Disk Management utility. It’s highly recommended that you back up your data before attempting this operation.
Step 1. Right-click the volume to be extended.
Step 2. Select Extend Volume. (Remember that a volume is any section of the hard drive with a drive letter.)
Step 3. Click Next for the wizard and select how much space you’d like to add to the partition.
Step 4. Click Finish at the summary screen.
A reboot is not required, and this process should finish fairly quickly. This process can also be done using the Diskpart command.
Shrink Partitions
If you need to free up space on a drive so you can install another operating system, you can shrink a partition. As with extending a volume, we recommend you back up your data before starting.
Step 1. Right-click the volume to be shrunk.
Step 2. Select Shrink Volume.
Step 3. Select how much space you’d like to shrink the partition.
Step 4. Click Shrink.
The free space created by the Shrink Volume process is listed as unallocated.
Splitting Partitions
If you need to split a single partition into two or more partitions using Disk Management, follow this procedure:
Step 1. Shrink the existing partition to make room for an additional partition.
Step 2. If you are unable to shrink the partition sufficiently, back up some of the information in the partition and try step 1 again.
Step 3. Create one or more new partition(s) in the unallocated space you created in step 1.
Mounting a Drive
You can also mount drives in Disk Management. A mounted drive is a drive mapped to an empty folder within a volume that has been formatted as NTFS. Instead of using drive letters, mounted drives use drive paths. This is a good solution for when you need more than 26 drives in your computer because you are not limited to the letters in the alphabet. Mounted drives can also provide more space for temporary files and can enable you to move folders to different drives if space runs low on the current drive. To mount a drive, follow these steps:
Step 1. Right-click the partition or volume you want to mount and select Change Drive Letters and Paths.
Step 2. In the displayed window, click Add.
Step 3. Click Mount in the following empty NTFS folder.
Step 4. Browse to the empty folder you want to mount the volume to and click OK.
Step 5. Click Next (see Figure 15-26).

Step 6. Choose drive partitioning settings, then click Next.
Step 7. Review the settings, then click Finish.
As shown in Figure 15-26, the hard disk partition has been mounted within a folder on the system hard drive called MountPoint. To remove the mount point, go back to Disk Management, right-click the mounted volume, select Change Drive Letters and Paths, and then select Remove. Remember that the folder you want to use as a mount point must be empty and must be within an NTFS volume.
Assigning/Changing Drive Letters
If you created a volume without assigning a drive letter, you also use Change Drive Letters and Paths. Here’s how:
Step 1. Right-click the partition or volume and select Change Drive Letters and Paths.
Step 2. In the displayed window, click Add.
Step 3. Make sure Assign the following drive letter is selected. The next available drive letter is listed. To keep the default, skip to step 5.
Step 4. If you prefer a different drive letter, use the pull-down menu to choose the drive letter desired.
Step 5. Click OK. The drive is now referred to by the drive letter you selected.
If you want to change the drive letter of a connected drive (for example, so that a USB drive can use the same drive letter on different computers), follow this procedure:
Step 1. Right-click the partition or volume you want to change and select Change Drive Letters and Paths.
Step 2. The current drive letter assignment is shown. Click Change.
Step 3. To change the drive letter, use the pull-down menu to choose the preferred drive letter.
Step 4. Click OK.
Step 5. Click Yes to change the drive letter. The drive is now referred to by the drive letter you selected.
Adding Arrays
Disk Management supports basic disks, which can be bootable, and dynamic disks. Although dynamic disks can’t be used as boot disks, they can be used in the following types of drive arrays:
![]() Spanned—The capacity of all disks is added together. Equivalent to just a bunch of disks (JBOD) hardware array. Requires at least two disks.
Spanned—The capacity of all disks is added together. Equivalent to just a bunch of disks (JBOD) hardware array. Requires at least two disks.
![]() Striped—Data is written across all drives to enhance speed. Equivalent to RAID 0 hardware array. Requires two disks.
Striped—Data is written across all drives to enhance speed. Equivalent to RAID 0 hardware array. Requires two disks.
![]() Mirrored—Copies of data are written to all disks at the same time to enhance data security. If one drive fails, data is still safe and the array can be rebuilt. Equivalent to a RAID 1 hardware array. Requires two disks.
Mirrored—Copies of data are written to all disks at the same time to enhance data security. If one drive fails, data is still safe and the array can be rebuilt. Equivalent to a RAID 1 hardware array. Requires two disks.
![]() RAID 5—Data and recovery information is written across all disks to enable recovery if one disk in the array fails. Equivalent to RAID 5 hardware array. Requires at least three disks.
RAID 5—Data and recovery information is written across all disks to enable recovery if one disk in the array fails. Equivalent to RAID 5 hardware array. Requires at least three disks.
To create any of these arrays, follow these steps:
Step 1. Make sure the disks you are going to use in the drive array have been backed up. Any disk in an array has its previous information overwritten.
Step 2. Right-click the first drive to add to your array and select the array type.
Step 3. Click Next to continue.
Step 4. Select the next drive to add to your array and click Add.
Step 5. If you are creating a RAID 5 array, repeat step 3 until you have added all of the disks you want to add to the array.
Step 6. Click Next to continue.
Step 7. Assign a drive letter or mount point. Click Next.
Step 8. Select the option to format the volume and name it. Click Next.
Step 9. Review your settings. Click Finish.
Step 10. Click Yes to convert the drives to dynamic disks (required for arrays). The array is created.
Figure 15-27 shows how two 500GB drives appear in a mirrored, spanned, or striped array.

Windows Disk Management’s disk arrays are slower than some hardware RAID arrays (the difference in performance depends on the hardware RAID host adapter in the comparison) but can be set up with standard non-RAID SATA host adapters.
Storage Spaces
Windows 8/8.1/10 include a new way to use multiple hard disk or SSDs to increase available storage: Storage Spaces.
Storage Spaces enables the user to combine the capacity of drives together into a storage pool that is used to create storage spaces. Storage spaces can be expanded in size by adding additional drives. Table 15-5 provides an overview of the options available.

Here’s how to use Storage Spaces:
Step 1. Open Search and search for Storage Spaces.
Step 2. Click or tap Storage Spaces.
Step 3. Click or tap Create a new pool and storage space.
Step 4. Select the drive(s) you want to use.
When you use a drive for a storage pool, all existing files on the drive are deleted, bypassing the Recycle Bin. Make sure you have backups of any files you want to keep before you assign a drive to a storage pool!
Step 5. Click Create pool.
Step 6. Storage Spaces displays a recommended layout. Make any changes desired and click or tap Create storage space (see Figure 15-28).

After the storage space is created, the Manage Storage Spaces dialog displays the new storage space.
In Windows 8.1/10, you can select from two file systems, NTFS and ReFS (resilient file system). ReFS is designed for larger amounts of data and is self-healing. To learn more, see “Resilient File System Overview” at https://technet.microsoft.com/en-us/library/hh831724.aspx.
The Storage Spaces storage pool is assigned a drive letter and shows up in File Explorer and Disk Management as a normal drive. If a drive fails, warnings are displayed in Action Center. Click the link to open Storage Spaces. Take the recommended action to bring your pool back to health.
You must use Storage Spaces to manage the drives in a drive pool. As far as Disk Management is concerned, a drive pool is recognized as only a single drive.
Windows Upgrade Tools
There are different considerations involved when a user upgrades an existing computer to a new operating system or switches to a different computer:
![]() With an upgrade to an existing system, we need to find out the readiness of the existing computer and apps for a new operating system.
With an upgrade to an existing system, we need to find out the readiness of the existing computer and apps for a new operating system.
![]() With a move to a new system, we need to transfer data files and settings to the new computer.
With a move to a new system, we need to transfer data files and settings to the new computer.
Microsoft offers the following utilities to help with these upgrade challenges:
![]() Windows Upgrade Advisor—Determines whether a computer can run Windows 7. The Windows 8/8.1 versions are known as Windows 8 Upgrade Assistant and Windows 8.1 Upgrade Assistant. To learn more, see “Windows Upgrade Paths,” p.694, Chapter 14.
Windows Upgrade Advisor—Determines whether a computer can run Windows 7. The Windows 8/8.1 versions are known as Windows 8 Upgrade Assistant and Windows 8.1 Upgrade Assistant. To learn more, see “Windows Upgrade Paths,” p.694, Chapter 14.
![]() Windows Easy Transfer—Copies files, photos, music, e-mail, and settings (collectively known as the user state) to a Windows 8.1, 8, 7, or Windows Vista computer from a Windows Vista, Windows 7, or Windows 8 computer.
Windows Easy Transfer—Copies files, photos, music, e-mail, and settings (collectively known as the user state) to a Windows 8.1, 8, 7, or Windows Vista computer from a Windows Vista, Windows 7, or Windows 8 computer.
![]() User State Migration Tool (USMT)—A command-line tool used to migrate user files and settings for one or more computers. The program can be downloaded from www.microsoft.com/downloads.
User State Migration Tool (USMT)—A command-line tool used to migrate user files and settings for one or more computers. The program can be downloaded from www.microsoft.com/downloads.
The following sections discuss Windows Easy Transfer and USMT and their use.
Windows Easy Transfer (WET)
The Windows Easy Transfer (WET) feature included in Windows Vista, Windows 7, and Windows 8 copies files, photos, music, e-mail, and settings (collectively known as the user state) to a Windows 8.1, 8, 7 or Windows Vista computer. To run WET in Windows 7 or Windows Vista:
Step 1. Click Start to open the Windows Desktop Search pane.
Step 2. Type Windows Easy Transfer and press Enter.
To run WET in Windows 8/8.1:
Step 1. Sweep in from the right or move the mouse to the lower-right corner to open the Charms menu.
Step 2. Click Search.
Step 3. Type Windows Easy Transfer and press Enter.
To learn more, see http://windows.microsoft.com/en-us/windows/transfer-files-settings-from-another-computer#1TC=windows-7.
With Windows Easy Transfer for Windows Vista, 7, or 8, files and settings can be migrated over the network or by a specially designed Easy Transfer cable. The data can also be stored on media like a CD, DVD, or USB flash drive or hard disk until the destination computer is ready (see Figure 15-29).

Caution
Windows 8.1 can receive data from Windows 7 or Windows 8 computers via Windows Easy Transfer, but only via a USB flash drive or hard disk (network or USB Easy Transfer cable methods are no longer supported). Windows 8.1’s version of Windows Easy Transfer cannot send data to another computer, but is used only to receive data from another computer.
First, run Windows Easy Transfer on the computer that has the files and settings that you want to transfer (the source computer). You can transfer the files and settings for one user account or all the accounts on the computer. All the files and settings will be saved as a single .MIG file (Migration Store).
Then, move to the computer to which you want to transfer the files (destination computer), start Windows Easy Transfer on that computer, and load the .MIG file from the network, USB cable, optical media, USB flash drive, or USB hard disk source where it is stored. With Windows 8.1, you can choose only from USB hard disk or flash drive.
Tip
Windows 10 does not include Windows Easy Transfer. As a replacement, Microsoft has teamed up with Laplink Software to offer PCmover Express free for personal use. PCmover Express can transfer files and settings from a PC running Windows XP or later to one running Windows 8.1 or Windows 10. Learn more at http://pcmover10.laplink.com/.
User State Migration Tool (USMT)
The User State Migration Tool (USMT) is a command-line tool that you can use to migrate user files and settings for one or more computers. USMT 5.0, which is designed for Windows Vista, 7, 8, and 8.1, is part of the Windows Assessment and Deployment Kit (Windows ADK) for Windows 8.1, which is available from http://go.microsoft.com/fwlink/p/?LinkId=393005.
The Windows ADK for Windows 10, which contains a version of USMT, is available from http://go.microsoft.com/fwlink/p/?LinkId=526740.
USMT uses two different tools: Scanstate.exe saves all the files and settings of the user (or users) on a computer, known as the user state; and loadstate.exe transfers that data to the destination computer(s). There are many options when using the scanstate and loadstate commands, including the ability to select which users are migrated and whether the store of data is uncompressed, compressed, or compressed and encrypted. By using scripting programs, the transfer of files to multiple computers can be automated over the network. For more information on how to transfer files and settings with USMT 5.0, visit https://technet.microsoft.com/en-us/library/hh825256.aspx.
For an illustrated step-by-step procedure with examples, visit http://blogs.technet.com/b/nepapfe/archive/2013/04/15/using-usmt-v-5-to-migrate-your-profile-data-apps-amp-profile-settings.aspx.
System Utilities
Windows contains a variety of command-line utilities known as system utilities that are used for system management. A command-line utility is a program you can start by using the Run dialog. You can also start these utilities by using Windows Desktop Search in Windows Vista and 7 or by opening the program’s icon from Windows Explorer (My Computer). In Windows 8/8.1, open the Charms menu and use Search, or open the program’s icon in This PC or File Explorer. In Windows 10, use the Search window or open the program’s icon in This PC or File Explorer. The most significant ones for the purposes of the A+ exams include:
![]() SERVICES.MSC—Views Windows Services
SERVICES.MSC—Views Windows Services
![]() MMC—Starts Microsoft Management Console
MMC—Starts Microsoft Management Console
![]() NOTEPAD—Opens Notepad text editor/viewer
NOTEPAD—Opens Notepad text editor/viewer
![]() EXPLORER—Starts Windows Explorer (Vista/7) or File Explorer (8/8.1/10)
EXPLORER—Starts Windows Explorer (Vista/7) or File Explorer (8/8.1/10)
![]() MSINFO32—Starts Windows System Information
MSINFO32—Starts Windows System Information
![]() DXDIAG—Starts DirectX Diagnostic
DXDIAG—Starts DirectX Diagnostic
![]() MSCONFIG—Starts System Configuration utility
MSCONFIG—Starts System Configuration utility
![]() REGEDIT—Launches Registry Editor
REGEDIT—Launches Registry Editor
![]() CMD—Opens the command prompt
CMD—Opens the command prompt
Utilities not otherwise covered are discussed in the following sections.
Note
SERVICES.MSC is discussed earlier in this chapter, in the “Services (Services.MSC)” section. MMC is discussed earlier in this chapter, in the “Computer Management Console (MMC)” section.
Using REGEDIT
Under most normal circumstances, the Registry will not need to be edited or viewed. However, Registry editing might be necessary under the following circumstances:
![]() To view a system setting that cannot be viewed through normal interfaces.
To view a system setting that cannot be viewed through normal interfaces.
![]() To add, modify (by changing values or data), or remove a Registry key that cannot be changed through normal Windows menus or application settings. This might be necessary to remove traces of a program or hardware device that was not uninstalled properly or to allow a new device or program to be installed.
To add, modify (by changing values or data), or remove a Registry key that cannot be changed through normal Windows menus or application settings. This might be necessary to remove traces of a program or hardware device that was not uninstalled properly or to allow a new device or program to be installed.
![]() To back up the Registry to a file.
To back up the Registry to a file.
To start REGEDIT, open the Run or Windows Desktop Search window, type REGEDIT, and press Enter. Changes made in REGEDIT are automatically saved when you exit; however, you might have to log off and log back on or restart the system for those changes to take effect.
Caution
The Registry should never be edited unless a backup copy has been made first because there is no Undo option for individual edits and no way to discard all changes when exiting REGEDIT.
Editing the Windows Registry is even more difficult because Registry keys can be expressed in decimal, hexadecimal, or text. When editing the Registry, be sure to carefully follow the instructions provided by a vendor.
Figure 15-30 shows the Registry in Windows 7 with a modification being made to the MenuShowDelay registry key, which isn’t accessible within normal Windows display menus.

Making Changes to the Registry by Importing a Text File
Some changes to the Registry are performed by importing a text file into the Registry. See the “Let Me Fix It Myself” section at http://support.microsoft.com/kb/950505 for an example of importing a Registry key into the Registry. Some support websites also offer downloadable text files containing registry keys.
Backing Up the Registry Before Editing
Always back up the Registry before editing it. Follow these steps to back up part or all of the Registry to a text file:
Step 1. Start REGEDIT.
Step 2. To make a partial backup, highlight the section of the Registry you want to back up.
Step 3. Click File.
Step 4. Select Export.
Step 5. Select a location to store the Registry backup.
Step 6. Enter a name for the backup.
Step 7. Click All to back up the entire Registry. Click Selected Branch to back up only the Registry branch you selected in step 2.
Step 8. Click Save.
COMMAND
In old versions of Windows, command.com was the 16-bit command interpreter, and CMD.EXE was a 32-bit or 64-bit command interpreter. However, in Windows Vista and later, running Command actually runs CMD.EXE.
MSTSC (Remote Desktop Connection)
To facilitate connections to remote computers and allow full remote control, Microsoft uses MSTSC, better known as the Remote Desktop Connection program (see Figure 15-31), which is based off the Remote Desktop Protocol (RDP). MSTSC works in three ways. First, users can be given limited access to a remote computer’s applications such as Word or Excel. Second, administrators can be given full access to a computer so that they can troubleshoot problems from another location. Third, another part of the program known as Remote Assistance allows users to invite a technician to come and view their desktop in the hopes that the technician can fix any encountered problems. These invitations can be made via e-mail or by Windows Messenger or other instant-messaging programs. A remote user needs to have an account on the host computer.
Compatibility with MSTSC Connections
You can use a PC running Windows 8, Windows RT, Windows 8.1, Windows 10, or Windows RT 8.1 to initiate a connection. But you can only connect to PCs that are running these Windows operating systems: Windows 10 Pro or Enterprise; Windows 8.1 Pro or Enterprise; Windows 8 Enterprise or Pro; Windows 7 Enterprise, Professional, or Ultimate; Windows Vista Enterprise, Ultimate, or Professional; Windows XP Professional.
Note
Home editions of Windows Vista/7/8/8.1/10 can use Remote Assistance. The checkbox for Remote Assistance is on the same Remote tab used to configure Remote Desktop.
See http://windows.microsoft.com/en-us/windows/remote-desktop-app-faq#1TC=windows-8 for details.
Configuring Remote Settings on the Host Computer
To set up a computer’s remote settings options to receive remote connections:
Step 1. Open the System properties sheet in Control Panel.
Step 2. Click or tap Remote.
Step 3. Click or tap the empty Allow remote connections to this computer checkbox.
Step 4. Specify which users can connect, and whether the connection must use Network Level Authentication (NLA). Use NLA unless you need to support connections from Windows XP SP2 or earlier versions.
Step 5. Click OK when done.
Starting MSTSC and Connecting to a Remote Computer
To run MSTSC in Windows 7 or Windows Vista:
Step 1. Click Start to open the Windows Desktop Search pane.
Step 2. Type MSTSC and press Enter.
To run MSTSC in Windows 8/8.1:
Step 1. Press Windows key+X.
Step 2. Click Run.
Step 3. Type MSTSC and press Enter.
To connect to the remote computer:
Step 1. Enter its name or IP address.
Step 2. Click Connect.
Step 3. Select or enter the account name and enter the account password.
The connection starts.
To see options for saving the connection or using a saved connection, click Show options. These options are shown in Figure 15-31.

Note
If you are having trouble connecting to a system remotely using a remote program such as Remote Desktop Connection or helping someone with using Remote Assistance, RDP port 3389 may be blocked at the firewall and need to be allowed/open for you to connect. The A+ exam may ask you what to do in this scenario.
NOTEPAD
NOTEPAD is a simple plain-text editor; however, it has several uses in system management:
![]() Creating batch files and scripts. When saving a batch file or script, use quotes around the filename and extension thus: “myscript.scr” or “mybatch.bat”.
Creating batch files and scripts. When saving a batch file or script, use quotes around the filename and extension thus: “myscript.scr” or “mybatch.bat”.
![]() Viewing text-based reports.
Viewing text-based reports.
![]() Editing HTML files.
Editing HTML files.
NOTEPAD is the default program for opening up .txt (plain-text) files.
To open a text file with a different extension in NOTEPAD:
Step 1. Right-click the file in Windows Explorer or File Explorer.
Step 2. Select Open With.
Step 3. Choose NOTEPAD.
EXPLORER
Windows Explorer is the file management utility in Windows Vista/7. In Windows 8/8.1/10, it has been renamed as File Explorer. This section uses Explorer to discuss common features.
Windows can use Explorer to view both local drive/network and Internet content. By default, Explorer doesn’t display hidden and system files unless the View options are changed; see the section Folder Options, later in this chapter, for details.
Tip
To view the contents of a particular drive with Explorer, type Explorer x: into the Run prompt or Search box (replace x with the actual drive letter) and press Enter.
Windows Explorer (Windows Vista/7)
Explorer can be started in any of the following ways in Windows Vista/7:
![]() From the Start menu, click Start > All Programs > Accessories > Windows Explorer.
From the Start menu, click Start > All Programs > Accessories > Windows Explorer.
![]() Open the Search box, type Explorer, and press Enter.
Open the Search box, type Explorer, and press Enter.
![]() Open Computer from the Start menu to start Explorer.
Open Computer from the Start menu to start Explorer.
Figure 15-32 shows Windows Explorer in Windows 7.

Figure 15-32 Windows Explorer in Windows 7 provides a scrolling pane with access to libraries, local and network locations, and homegroup computers. The Computer view using Tiles is shown here.
Windows 7 groups shortcuts to a wide variety of locations in its left pane. The Favorites section includes shortcuts to the current user’s desktop, downloads folder, and recently visited objects (folders and libraries). The Libraries section includes shortcuts to the current user’s Documents, Music, Pictures, and Videos libraries. If the computer is part of a homegroup network (a network type introduced in Windows 7 and supported in Windows 8/8.1/10), the Homegroup section lists other computers in the homegroup. The Computer section lists all connected drives (see Figure 15-32). The Network section lists all computers on the network. The right pane lists the contents of the current location. Common tasks are in a menu strip above the panes.
Windows Vista uses the Favorite Links view, as shown in Figure 15-33. Favorite Links provides shortcuts to the current user’s Documents, Pictures, and Music folders, and searches for recently changed files, saved searches, and the system’s Public folder. Click the up or down pointer below Favorite Links to toggle Folders on/off. The right pane lists the contents of the current location. Common tasks are in a menu strip above the panes.

Figure 15-33 The Favorite Links view in Windows Vista provides shortcuts to the most common locations.
File Explorer (Windows 8/8.1/10)
File Explorer (see Figure 15-34) can be started in any of the following ways in Windows 8/8.1:
![]() Open the Charms menu, search for Explorer, and tap or click File Explorer.
Open the Charms menu, search for Explorer, and tap or click File Explorer.
![]() Tap or click the Desktop tile and click or tap the File Explorer icon on the taskbar.
Tap or click the Desktop tile and click or tap the File Explorer icon on the taskbar.
![]() Press the Windows key+X and click or tap File Explorer.
Press the Windows key+X and click or tap File Explorer.

Note
In Windows 10, you can use Windows key+X or open the Start menu and click the File Explorer icon to start File Explorer.
Windows 8/8.1/10’s File Explorer opens to the This PC view, which combines the Computer and Libraries views from Windows 7. It uses a multi-tabbed ribbon menu for working with files, computer settings (default tab), and view options.
Displaying Drives, Files, and Folders
Explorer offers the following viewing options:
![]() Small icons, List—Small icons in rows across the Explorer window; List arranges objects in columns
Small icons, List—Small icons in rows across the Explorer window; List arranges objects in columns
![]() Medium, Large, and Extra Large icons—Different-sized thumbnails of supported file types
Medium, Large, and Extra Large icons—Different-sized thumbnails of supported file types
![]() Details—File or folder name, date modified, type, size. Right-click or press and hold the header to select additional details to display.
Details—File or folder name, date modified, type, size. Right-click or press and hold the header to select additional details to display.
![]() Tiles—Displays capacity of USB, hard disk drives, and SSDs.
Tiles—Displays capacity of USB, hard disk drives, and SSDs.
Windows 7/8/8.1/10 also include the following:
![]() Content—Lists medium icons (thumbnails) along with the file’s last-modified date and size.
Content—Lists medium icons (thumbnails) along with the file’s last-modified date and size.
Figure 15-35 illustrates the same folder using Large icons, Details, and Content views.

Windows Vista also incorporates the Stacks view, which groups files according to what is specified by the user. You can click the stacks to filter the files shown in Windows Explorer.
Libraries (Windows 7/8/8.1/10)
When you open Windows Explorer in Windows 7, the default view shows your libraries. A library includes the contents of the current user’s documents, music, pictures, or videos folder, but also includes the contents of the corresponding public folder and can display the contents of any other local or network folder the user adds to the library. In Figure 15-36, the Pictures library has been expanded in the left pane to reveal two additional folders that have been added. In any Windows Explorer view in Windows 7, click Organize to display file, folder, and layout options and to view properties for the currently selected object.

Figure 15-36 Windows Explorer in Windows 7 provides a scrolling pane with access to libraries, local and network locations, and homegroup computers. The Libraries view is the default view.
Windows 8/8.1/10 also include library support. To display libraries in Windows 8/8.1/10, click or tap the View tab, click or tap Options, and check the Show libraries checkbox.
To learn more about libraries, see “File Structure and Paths,” p.693, Chapter 14.
MSINFO32 (System Information)
MSINFO32, also known as System Information, displays a great deal of information about the computer hardware and Windows installation in a system. The System Summary (see Figure 15-37) provides basic information about the Windows installation and hardware configuration. To dig deeper, open the nodes in the left pane. Figure 15-38 lists loaded program modules.

Figure 15-37 MSINFO32 system summary. Click a subnode (left pane) for more detailed information about system hardware, components, or software environment.

Use the Find window to locate specific information. Use the File menu to save the report or to export it as a text file.
DXDIAG (DirectX Diagnostics)
DXDIAG displays and troubleshoots DirectX components in Windows. Use it to determine the version of DirectX on your system and to test DirectX components (see Figure 15-39).

Figure 15-39 DXDIAG’s System tab displays the DirectX version installed, Windows version, and computer hardware features.
Note
DirectX is Microsoft Windows’s 3D gaming application programming interface (API).
Note
If DXDIAG finds problems with your system, download updated drivers for any problem devices. If you need to download replacement DirectX files for version 9.0x or earlier, use the link in DXDIAG’s Help menu. To repair problems with DirectX, see https://support.microsoft.com/en-us/kb/179113. Depending upon your version of Windows, you might need to download and install DirectX manually or use Windows Update.
System Restore
System Restore enables you to fix problems caused by a defective hardware or software installation by resetting your computer’s configuration to the way it was at a specified earlier time. The configuration is stored in a file called a restore point. The driver or software files installed stay on the system, and so does the data you created, but Registry changes made by the hardware or software are reversed, so your system works the way it did before the installation. Restore points can be created by the user with System Restore and are also created automatically by the system before new hardware or software is installed. Restore points in Windows Vista and Windows 7 also store older versions of data files created by the Windows Shadow Copy service. Windows 8/8.1/10 use File History to store older versions of data files.
Tip
Before you make changes to your system configuration, create a restore point so that you can easily reverse the changes if they are not satisfactory.
Creating a Restore Point
To create a restore point in Windows Vista, 7, or 10, follow these steps:
Step 1. Open the Start menu, right-click Computer and select Properties. This opens the System Properties window.
Step 2. Click the System Protection task, which opens the System Protection tab on the System properties sheet.
Step 3. Click the Create button. This opens the System Protection window.
Step 4. Type a name for the restore point and click Create. The computer’s current hardware and software configuration is stored as a restore point.
To create a restore point in Windows 8/8.1, follow these steps:
Step 1. Swipe in from the right to open the Charms menu.
Step 2. Click or tap Search and enter System Restore.
Step 3. Click or tap Create a restore point.
Step 4. Click the Create button. This opens the System Protection window.
Step 5. Type a name for the restore point and click Create. The computer’s current hardware and software configuration is stored as a restore point.
Restoring Your System to an Earlier Condition
Follow these steps to restore your system to an earlier condition:
Step 1. Open the System Protection tab again and this time click the System Restore button. This opens the Restore system files and settings window.
For Windows Vista:
Step 2. Click either Recommended Restore or Choose a Different Restore Point.
Step 3. The Recommended Restore point dialog asks you to confirm. If you are choosing a different restore point, you will need to select the appropriate one and confirm.
The system initiates the restore and automatically restarts.
For Windows 7/8/8.1/10:
Step 2. Click Next, which displays the Restore your computer to the state it was in before the selected event.
Step 3. Select a restore point to restore to and click Next. (Note: You can also select the box Show more restore points to display a list of older created restore points.)
Step 4. Click Finish on the Confirm your restore point page. The system initiates the restore and automatically restarts.
You can also undo a system restore if it did not repair the problem.
If you cannot boot the system, you can also run System Restore from the Windows Recovery Environment.
Configuring System Restore Options
If System Restore is not available, it might be turned off. You can enable or disable System Restore on any volume from the System Properties window/System Protection tab. Click or tap Configure to add or remove a drive from the list of drives protected by System Restore, to change the amount of disk space to reserve for System Restore, or to delete all restore points.
What to Try Before Using System Restore
Be aware that System Restore is not necessarily the first step you should try when troubleshooting a computer. Simply restarting the computer has been known to “fix” all kinds of issues. It’s also a good idea to try the Last Known Good Configuration. You can access this within the Windows Advanced Boot Options menu by pressing F8 (Vista/7) or using the Special Startup Options (Windows 8/8.1/10) when the computer first boots. Also, if System Restore doesn’t seem to work in normal mode, attempt to use it in Safe Mode. Safe Mode is another option in the Windows Advanced Boot Options menu. Learn more about these options in Chapter 22.
Be wary of using System Restore if you’re fighting a computer virus or malware infection. If you (or the system) create a restore point while the system is infected, you could re-infect the system if you revert the system to that restore point. To prevent re-infection, most antivirus vendors recommend that you disable System Restore (which eliminates stored restore points) before removing computer viruses.
Windows Update
Use Windows Update to install security, functionality, and other updates to Windows. By enabling Microsoft Update, Windows Update can also be used to install updates to Microsoft Office or other Microsoft products. To learn more, see “Using Windows Update and Microsoft Update,” p.719, Chapter 14.
Control Panel Utilities
The Control Panel is the major starting point for adjusting the hardware and user interface settings in Windows. Although Windows 8/8.1/10 include PC Settings (available from the Charms menu in Windows 8/8.1), most configurations in those versions of Windows are performed through the Control Panel.
Items not discussed elsewhere are covered in the following sections of this chapter.
Note
Windows Internet options, Network and Sharing Center, and Windows Firewall are discussed in Chapter 16. User accounts are discussed in Chapter 21. Printing options are discussed in Chapter 10. Device Manager is covered in the “Using Device Manager” section of this chapter.
![]() Click Start and select Control Panel from the right-most menu.
Click Start and select Control Panel from the right-most menu.
![]() If it is not listed in that menu, click All Programs > Windows Accessories > System Tools > Control Panel.
If it is not listed in that menu, click All Programs > Windows Accessories > System Tools > Control Panel.
To start Control Panel in Windows 8/8.1:
![]() Press Windows key+X and then click or tap Control Panel. From a touch screen, open the Charms menu (Windows 8/8.1), search for Control Panel, and then tap Control Panel.
Press Windows key+X and then click or tap Control Panel. From a touch screen, open the Charms menu (Windows 8/8.1), search for Control Panel, and then tap Control Panel.
To start Control Panel in Windows 10:
![]() Press Windows key+X, then click or tap Control Panel.
Press Windows key+X, then click or tap Control Panel.
![]() Click or tap Start and then click or tap Control Panel.
Click or tap Start and then click or tap Control Panel.
![]() Click the Search window, search for Control Panel, and then tap Control Panel.
Click the Search window, search for Control Panel, and then tap Control Panel.
Category and Icon Views
The Control Panel’s default view is known as Category view. When you click a category icon, it displays various available tasks.
Figures 15-40, 15-41, and 15-42 show the Windows 8.1, 7, and Vista versions of the Control Panel configured for the default view.


Note
Tasks marked with the Windows security shield trigger a User Account Control (UAC) dialog when opened.
If you’re a Windows newcomer, you might prefer the Category view’s task-oriented design. However, if you’re already familiar with Control Panel, you’ll probably prefer to see each individual applet. This option is known as the Classic view in Vista and the All Control Panel Items view (available in Large or Small Icons variations) in Windows 7/8/8.1/10. Figures 15-43, 15-44, and 15-45 show Windows 8/8.1, 7, and Vista versions of the Control Panel configured to display individual applets.


Figure 15-44 The Windows 7 Control Panel in its alternative All Control Panel Icons (small icons) view.

Note
Switching to a view that displays all applets is sometimes necessary to locate applets not part of a category. You can also use the Search tool to locate an applet by name.
For the exam, you must know how to open the Control Panel, how to access some of the Control Panel functions by way of Properties sheets, which are located in various areas of Windows, and which Control Panel options to use to configure or solve problems in Windows.
Shortcuts to Control Panel Functions
Some Control Panel functions can be accessed through properties sheets. Here are some examples:
Right-click each of the following to open the listed Control Panel properties sheet:
![]() Right-click Computer/This PC and select Properties to open the System properties sheet.
Right-click Computer/This PC and select Properties to open the System properties sheet.
![]() Right-click Taskbar and select Properties to open the Taskbar and Start Menu Properties sheet.
Right-click Taskbar and select Properties to open the Taskbar and Start Menu Properties sheet.
![]() Right-click Desktop in Windows Vista and select Personalize to configure various display properties.
Right-click Desktop in Windows Vista and select Personalize to configure various display properties.
![]() Right-click Desktop in Windows 7/8/8.1 and choose one of the following: Personalize, Screen Resolution, or Gadgets (Windows 7 only) options.
Right-click Desktop in Windows 7/8/8.1 and choose one of the following: Personalize, Screen Resolution, or Gadgets (Windows 7 only) options.
![]() Right-click Network and select Properties to open the Network and Sharing Center dialog.
Right-click Network and select Properties to open the Network and Sharing Center dialog.
Display/Display Settings
Depending on the version of Windows you use, there may be several different Control Panel applets to use to configure Display settings. Table 15-6 provides a reference to these.


Folder Options
The Folder Options properties sheet affects how Explorer:
![]() Displays file and folder information (View options tab)
Displays file and folder information (View options tab)
![]() Selects folders to index for searching (Search tab)
Selects folders to index for searching (Search tab)
![]() Opens folders (General options tab)
Opens folders (General options tab)
You can open Folder Options in Control Panel, or open it from the Options menu in Explorer.
Note
In Windows Vista and Windows 7, the menu bar is hidden by default. To show it temporarily, press Alt+T (which in this case brings up the Tools menu). To show it permanently, click the Organize button, Layout, and then Menu Bar. In Windows 8/8.1/10, open the View tab to see the Options menu.
By default, Explorer hides the following file information:
![]() File extensions for registered file types; for example, a file called LETTER.DOCX displays as LETTER because Microsoft Word is associated with .docx files
File extensions for registered file types; for example, a file called LETTER.DOCX displays as LETTER because Microsoft Word is associated with .docx files
![]() The full path to the current folder
The full path to the current folder
![]() Files or folders with hidden or system attributes, such as the AppData folder
Files or folders with hidden or system attributes, such as the AppData folder
![]() The Windows folder
The Windows folder
Concealing this information is intended to make it harder for users to “break” Windows, but it makes management and troubleshooting more difficult.
As an alternative to using the Folder Options applet in Control Panel, you can use this procedure in Windows Vista/7:
Step 1. Open Windows Explorer.
Step 2. Click Tools on the menu bar, Folder Options, and select the View tab. If you use the Folder Options applet in Control Panel, select the View tab. Continue with step 3.
In Windows 8/8.1/10:
Step 1. Open File Explorer.
Step 2. Click or tab the View tab. Continue with step 3.
Step 3. Select the options you want (see Figure 15-49). The following changes are recommended for experienced end users:
![]() Enable the Display the Full Path in the Title Bar option. (In Vista and 7, this works only if you are using the Classic theme.)
Enable the Display the Full Path in the Title Bar option. (In Vista and 7, this works only if you are using the Classic theme.)
![]() To see all file extensions, disable the Hide Extensions for Known File Types option.
To see all file extensions, disable the Hide Extensions for Known File Types option.
![]() If you are maintaining or troubleshooting a system, I also recommend you change the following:
If you are maintaining or troubleshooting a system, I also recommend you change the following:
![]() To view hidden files, enable the Show Hidden Files, Folders, and Drives setting.
To view hidden files, enable the Show Hidden Files, Folders, and Drives setting.
![]() Disable the Hide Protected Operating System Files setting.
Disable the Hide Protected Operating System Files setting.

Figure 15-49 The Windows Explorer Folder Options, View tab in Windows 7 after selecting recommended options for use by technicians and experienced end users.
Note
You should probably change these settings back to their defaults before you return the system to normal use.
Step 4. Click OK to close the Folder Options window.
System
Use the System properties sheet to view:
![]() Windows version
Windows version
![]() 32-bit or 64-bit edition
32-bit or 64-bit edition
![]() Processor model number and clock speed
Processor model number and clock speed
![]() Windows Experience Index (WEI) (Vista and 7 only)
Windows Experience Index (WEI) (Vista and 7 only)
Figure 15-50 illustrates the System properties sheet for Windows 8.1. Figure 15-51 illustrates the System properties sheet for Windows 7.


You can also use the System applet to change
![]() Computer name
Computer name
![]() Workgroup name
Workgroup name
![]() Domain name
Domain name
![]() System protection settings (System Restore)
System protection settings (System Restore)
![]() Hardware profiles
Hardware profiles
![]() Remote settings
Remote settings
![]() Performance and virtual memory settings
Performance and virtual memory settings
For more about computer, workgroup, and domain settings, see Chapter 16, “Networking Microsoft Windows.”
Performance (Virtual Memory) Settings
If you run short of money, you can borrow some from the bank (assuming your credit’s in decent shape). However, there’s a penalty: interest. Similarly, if your system runs short of memory, it can borrow hard disk space and use it as virtual memory. The penalty for this type of borrowing is performance: Virtual memory is much slower than real RAM memory. However, you can adjust how your system uses virtual memory to achieve better performance.
Tip
To minimize the need to use virtual memory, increase the physical memory (RAM) in a 32-bit Windows system to at least 3GB and on a 64-bit Windows system to at least 8GB. The largest amount of usable RAM on a 32-bit Windows system is 3.25GB; 64-bit Windows systems can use 4GB or more.
When additional RAM is added to a computer running Windows, it is automatically used first before the paging file.
The performance of the paging file can be improved by:
![]() Setting its minimum and maximum sizes to the same amount.
Setting its minimum and maximum sizes to the same amount.
![]() Moving the paging file to a physical disk (or disk partition) that is not used as much as others.
Moving the paging file to a physical disk (or disk partition) that is not used as much as others.
![]() Using a striped volume for the paging file. A striped volume is an identical area of disk space stored on two or more dynamic disks referred to as a single drive letter. Create a striped volume with the Windows Disk Management tool. If a RAID 0 (striped) disk array is available, use it instead of a striped volume for even better paging file performance.
Using a striped volume for the paging file. A striped volume is an identical area of disk space stored on two or more dynamic disks referred to as a single drive letter. Create a striped volume with the Windows Disk Management tool. If a RAID 0 (striped) disk array is available, use it instead of a striped volume for even better paging file performance.
![]() Creating multiple paging files on multiple physical disks in the system.
Creating multiple paging files on multiple physical disks in the system.
![]() Moving the paging file away from the boot drive.
Moving the paging file away from the boot drive.
To adjust the location and size of the paging file in Windows, follow these steps:
Step 1. From the System Properties window, click Advanced System Settings under Tasks.
Step 2. Click the Settings button in the Performance box.
Step 3. Click the Advanced tab and then click the Change button.
Step 4. Clear the Automatically Manage Paging File Size checkbox.
Step 5. Click or tap the Custom size radio button.
Step 6. Specify the initial and maximum sizes you want to use for the paging file and its location (see Figure 15-52). Click Set and then click OK to finish.

Step 7. If you make any changes to size or location, you must restart the computer for the changes to take effect.
Power Options
You can manage power options from an applet in the Control Panel. If a Power options icon is available in the notification area of the Windows taskbar, you can use it to view the current power option setting and select a different one.
Hibernate
You can select Hibernate as an option from the shutdown menu in Windows Vista/7. Hibernate creates a special disk file (hiberfil.sys) that records open apps, memory contents, and the apps’ positions on-screen. In effect, it “pauses” your system so you can return to right where you left off.
In Windows 8/8.1, Hibernate is not a listed option for the shutdown menu. However, it can be added by modifying a power plan.
To awaken a system from hibernation, press the power button on the computer. If the system uses a password for access, you are prompted to enter the password to restart the system.
Sleep/Suspend/Standby
In Windows Vista, what looks like a power button on the Start menu actually puts the computer into sleep/standby mode. In this mode, the computer uses very little power and can be awakened much more quickly than from Hibernate. This mode is also known as suspend to RAM (STR).
Note
To shut down or hibernate a system running Windows Vista, click the right arrow after the sleep/standby button.
For sleep/standby mode to work correctly, the system needs to support the S3 power setting in the system BIOS.
Sleep/suspend mode is also supported in Windows 7/8/8.1/10.
If the system does not sleep/standby correctly, there might be a problem with startup programs interfering with sleep/standby. Use MSCONFIG to disable startup programs selectively until you discover the offending app.
With most laptops and many desktops, you can put the computer into sleep mode by pressing a special sleep key or by pressing the power key and releasing it right away. To change how the sleep or power key works, modify your power plan.
Power Plans
Windows offers three standard power plans (see Figure 15-53):
![]() Balanced—Default plan
Balanced—Default plan
![]() High performance—Fastest CPU performance, brightest screen, and shortest battery life
High performance—Fastest CPU performance, brightest screen, and shortest battery life
![]() Power saver—Reduces CPU performance and screen brightness more than with Balanced plan for longest battery life
Power saver—Reduces CPU performance and screen brightness more than with Balanced plan for longest battery life

Desktop computers hide Power Saver by default; laptop computers hide High Performance by default. To see these and other plans, click Show Additional Plans.
Note
Some portable vendors might offer additional plans in systems with pre-installed Windows. Tablets offer only one power plan, Balanced.
To change a plan, click Change Plan Settings. You can change the display of and sleep settings for each plan, and to change additional settings, click Change Advanced Power Settings. You can change power settings for
![]() Hard-disk shutoff timing
Hard-disk shutoff timing
![]() Desktop backgrounds
Desktop backgrounds
![]() Wireless adapters
Wireless adapters
![]() Sleep timings
Sleep timings
![]() Hibernation options
Hibernation options
![]() USB ports and devices
USB ports and devices
![]() Power buttons and lid
Power buttons and lid
![]() PCI Express devices
PCI Express devices
![]() CPU performance and cooling
CPU performance and cooling
![]() Display shutoff timings
Display shutoff timings
![]() Multimedia idle time and screen quality
Multimedia idle time and screen quality
![]() Internet Explorer JavaScript timing frequency
Internet Explorer JavaScript timing frequency
To create a new power plan, click Create a Power Plan from the Power Options dialog. From the Create a Power Plan dialog, follow these steps:
Step 1. Select a plan to use as the basis for your plan.
Step 2. Enter a plan name and click Next.
Step 3. Specify timings for the display and sleep and click Create.
To change additional settings, click Change Plan Settings, select the custom plan, and change other settings. See Figure 15-54.

Note
To learn more about a system’s power management features, use the command-line POWERCFG.EXE program to control additional power settings. To learn more, see http://support.microsoft.com/kb/980869.
Programs and Features
Programs and Features is used to uninstall or change a program (see Figure 15-55), to turn Windows features on and off (see Figure 15-56), and to view installed updates.


HomeGroup (Windows 7/8/8.1/10)
Windows 7 introduced the HomeGroup feature as part of its network functionality. HomeGroup enables the creation of an easy-to-manage but secure home or home office network, provided it contains only Windows 7 or Windows 8 PCs. HomeGroup can coexist with traditional wired or wireless workgroup networking, enabling systems that are part of a homegroup to also be in a network with computers running other operating systems.
Note
Microsoft refers to the technology as HomeGroup, and networks based on that technology are called “homegroups.” To learn more about HomeGroup, see “HomeGroup Networking,” p.842, Chapter 16.
Devices and Printers
Windows 7/8/8.1/10 include the Devices and Printers folder. This folder makes access to managing the most common devices in (or connected to) your computer easier to perform. You can launch Devices and Printers from the Hardware and Sound category of Control Panel or add it to your Start menu.
Devices and Printers is divided into two sections. The upper section contains icons for connected devices, and the lower section contains icons for printers, faxes, and all-in-one units. To manage a device, right-click it, and choose from the options listed. The options available for each device vary with the device selected.
For example, if you right-click the computer icon, you can AutoPlay removable-media drives; browse files; eject drives; configure network, sound, mouse, keyboard, and region and language settings; and view and configure system properties, power options, device installation settings, and Windows Update (see Figure 15-57). Right-click a display and you can access the Display settings dialog. Right-click a mouse and you can access the Mouse properties dialog.

To learn more about managing printers, faxes, and multifunction devices with Devices and Printers, see Chapter 10.
Sound
To manage audio recording, playback, system sounds, and how to handle calls when media is already playing, open the Sound icon in Control Panel. Use the Playback tab to select which device to use for playback (for example, whether to use analog or digital speakers or HDMI output to a home theater system or HDTV). Use the Recording tab to select a built-in or headset microphone and adjust its volume. Use the Sounds tab to choose which sounds to play during system events; select a sound theme or choose your own. Use the Communications tab to specify what to do with phone calls to/from your PC while audio is already playing. The Sound icon is located in the Hardware and Sound category.
Troubleshooting
Windows Control Panel offers a variety of troubleshooters that can find and fix problems with specific Windows features. Figure 15-58 displays the troubleshooting categories available in Windows 8.1.

Click or tap a category to see all the troubleshooters in the category.
Internet Options
The Internet Options icon in Control Panel has seven tabs. The tabs and their uses are listed in Table 15-7.

Exam Preparation Tasks
Review All the Key Topics
Review the most important topics in the chapter, noted with the key topics icon in the outer margin of the page. Table 15-8 lists a reference of these key topics and the page numbers on which each is found.

Define Key Terms
Define the following key terms from this chapter, and check your answers in the glossary.
[command name] /?
Windows Firewall and Advanced Settings
User State Migration tool (USMT)
Complete the Tables and Lists from Memory
Print a copy of Appendix B, “Memory Tables” (found on the CD), or at least the section for this chapter, and complete the tables and lists from memory. Appendix D, “Memory Tables Answer Key,” also on the CD, includes completed tables and lists to check your work.
Complete Hands-On Labs
Complete the hands-on labs, and then see the answers and explanations at the end of the chapter.
Lab 15-1: Determining System Components
Use these Windows tools (System properties sheet, Msinfo32, and Dxdiag) to determine the following information for a particular system. Be sure to indicate which menu or tab contains the information you are looking for.

Lab 15-2: Checking Power and Display Settings
A client reports that his system does not appear to be optimized for fastest performance and best display resolution. The client recently switched to a larger display. Use the following Control Panel utilities to check on possible optimization issues.
![]() Power (plan)
Power (plan)
![]() Display (resolution)
Display (resolution)
Answer Review Questions
1. In the following table, match the command used to execute the respective tasks.
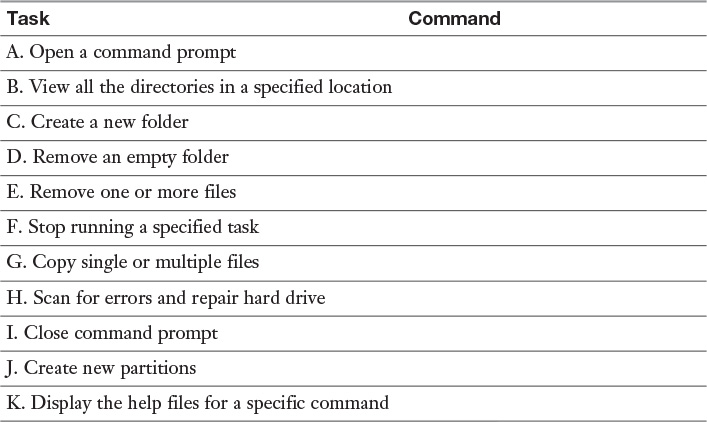
2. CMD or COMMAND
3. COMMAND/?
4. DEL
5. DIR
6. DISKPART
7. EXIT
8. MD or MKDIR
9. RD or RMDIR
10. TASKKILL
11. XCOPY, ROBOCOPY
2. When using a command prompt, what does it mean to run in elevated mode?
A. The CPU runs at faster speed.
B. You are running disk maintenance utilities, such as check disk, scandisk, and defrag.
C. You have access to the help files.
D. You are executing commands as an administrator.
3. Which of the following are wildcard symbols that can be used with command-prompt commands? (Choose two.)
A. *
B. ?
C. !
D. $
4. Which of the following statements best describes the MMC? (Choose two.)
A. The MMC is a collection of frequently used utilities stored in a single console for easy access.
B. The MMC is a collection of music and multimedia devices.
C. The MMC is a utility for troubleshooting your computer’s hardware.
D. The MMC is a console for managing the services currently running on your computer.
5. Which of the following utilities should be used to begin troubleshooting your hardware or updating your drivers on a Windows system?
A. Device Manager
B. System Utility
C. System Configuration
D. Component Services
6. Your network adapter is failing. How will this be indicated in the Windows Device Manager?
A. The device will not be listed.
B. An “!” will be displayed over the device icon.
C. A down-arrow icon will be displayed over the device icon.
D. A “?” will be displayed over the device icon.
7. As part of the troubleshooting process, you want to temporarily disable a device. How will this device be displayed in the Device Manager after you disable it?
A. An “!” will be displayed over the device icon.
B. The device icon is crossed out.
C. A down-arrow icon will be displayed over the device icon.
D. The device is moved to the Unknown Device category.
8. Based on the information in the Performance Monitor shown here, which of the following statements describes the most effective course of action?

A. You should add more RAM.
B. The page file is working well and the usage is at 40%, so no action is required.
C. You are trying to print too many pages per second, so you should slow your print speed.
D. Click on the green “+” in the menu bar to gather more information.
9. Which of the following utilities would you use to see the items that are set to run automatically at a particular time?
A. Task Scheduler
B. Services
C. Device Manager
D. Performance
10. Which keys are pressed simultaneously to open Task Manager? (Choose all that apply.)
A. Esc
B. F1
C. Alt
D. Tab
E. Ctrl
F. Del
G. Windows
H. Fn
11. Which of the following utilities displays all the programs currently running on your computer?
A. Disk Management
B. Task Manager
C. System Configuration
D. Device Manager
12. A client reports that the system is starting up very slowly. Which of the following utilities is best for determining what’s going on?
A. Devices and Printers
B. Programs and Features
C. System Protection
D. System Configuration
13. The client wants a RAID array installed but the system doesn’t have hardware RAID onboard. Which of the following Windows utilities is used to create a RAID array?
A. Disk Management
B. RAID BIOS utility
C. CHKDSK
D. MSCONFIG
14. Which of the following utilities determines the readiness of your Windows 7 computer to upgrade to a new Windows 8.1 operating system?
A. Windows Easy Transfer
B. Windows Update
C. Windows Upgrade Assistant
D. Windows Upgrade Advisor
15. In the following table, write the command used to open the respective utilities.

1. mmc
2. MSCONFIG
3. msinfo32
4. regedit
16. Which of the following is the file management system used by Windows 8/8.1?
A. Registry Editor
B. Windows Explorer
C. System Information
D. File Explorer
17. Display settings include which of the following? (Choose all that apply.)
A. Resolution
B. Synchronization
C. Refresh rate
D. File system
18. Which utility allows you to show file extensions for known file types, show hidden files, and show system files?
A. Folder Properties
B. System Configuration
C. System Properties
D. Folder Options
19. As a computer technician, you must be able to evaluate a system’s health and you must be able to find the information with which to diagnose a problem. A utility that contains a wealth of information and with which you should be familiar is the System properties sheet. Which information will you not find in the System utility or System Properties?
A. Which file system your hard drive uses
B. Which operating system is installed
C. Any service packs that have been installed
D. The amount of installed RAM
E. Whether you are using a 32- or 64-bit operating system
20. Enter the power option that matches the description listed in the following table.

A. Sleep/Suspend/Standby
B. High Performance
C. Balanced
D. Hibernation
Answers and Explanations to Hands-On Labs
The following are examples of what you can expect to find as you work through Labs 15-1 and 15-2 on the systems you have.
Lab 15-1: Determining System Components

Lab 15-2: Checking Power and Display Settings
A client reports that his system does not appear to be optimized. The client recently switched to a larger display. Use the following Control Panel utilities to check on possible optimization issues.
![]() For fastest performance, select the High Performance Power Plan.
For fastest performance, select the High Performance Power Plan.
![]() Resolution should be set to the Recommended value (which varies by display size and type).
Resolution should be set to the Recommended value (which varies by display size and type).
Answers and Explanations to Review Questions
1.

2. A. Elevated mode is the same as Run as Administrator. Some commands cannot be executed except with administrator privileges.
3. A, B. The “*” symbol replaces multiple characters. The “?” symbol replaces a single character.
4. A, D. The MMC is a collection of frequently used utilities stored in a single console for easy access, and it is a console for managing the services currently running on your computer. You can customize the MMC with snap-ins.
5. A. Device Manager contains a list of hardware devices and reports on their condition. From Device Manager, you can update drives and disable or enable or uninstall devices.
6. B. If the problem with the network adapter is detected by Windows Device Manager, an “!” will be displayed over the device icon.
7. C. A down-arrow icon will be displayed over the device icon.
8. A. Performance Monitor provides real-time monitoring of your system’s performance. In the display, memory pages/second is running very high and your system would run more efficiently if you were to add more RAM.
9. A. Use the Task Scheduler to schedule the Backup utility to run at regularly scheduled intervals.
10. C, E, F. Press Ctrl+Alt+Del and select Task Manager. You can also press Ctrl+Shift+Esc, right-click the taskbar, or type taskmgr at the Run line or in the Search box.
11. B. Disk Management allows you to analyze and configure your hard drive. Task Manager displays all the applications currently running on your computer and allows you to selectively shut down any programs that have stopped responding. System Configuration (MSCONFIG) allows you to select the programs and services that run automatically at startup. Device Manager allows you to view, manage, and troubleshoot hardware.
12. D. Devices and Printers provides centralized management of the computer and most of the hardware connected to it. Programs and Features is used to manage programs installed and Windows features available on the computer. System protection is used to configure System Restore. System Configuration allows you to select the programs and services that run automatically at startup.
13. C. Disk Management allows you to analyze and configure your hard drives. A RAID BIOS utility is available at startup only on systems with hardware RAID, which is not available on this computer. CHKDSK is used to locate and optionally repair problems with files stored on a drive. MSCONFIG is used to adjust boot options.
14. C. Windows Easy Transfer is used to copy files, photos, music, e-mail, and settings from one computer to another. Windows Update is used to download updates, service packs, and fixes for your operating system. Windows Upgrade Assistant is used to determine the readiness of a system to upgrade to Windows 8/8.1. Windows Upgrade Advisor is used to determine the readiness of a system to upgrade to Windows 7 or Vista.
15.

16. D. Windows Explorer has been renamed File Explorer in Windows 8/8.1.
17. A, C. Display settings include resolution, refresh rate, color depth, screen saver, background and theme.
18. D. Folder Options allows you to do all of these things and much more.
19. A. You will not find the file system listed in the System utility. The file system is found in the Drive Properties and in Disk Management. The rest of the information is available in System properties and you should be familiar with what is there and how to find it.
20.
