Chapter 10. Using, Maintaining, and Installing Printers and Multifunction Devices
This chapter covers the following subjects:
![]() Laser Printers—Detailed review of laser printers, the seven-step laser imaging process, and maintenance guidelines are in this section.
Laser Printers—Detailed review of laser printers, the seven-step laser imaging process, and maintenance guidelines are in this section.
![]() Inkjet Printers—This section includes a detailed look at how inkjet printers work and how to maintain them.
Inkjet Printers—This section includes a detailed look at how inkjet printers work and how to maintain them.
![]() Thermal Printers—Thermal transfer, direct thermal, and dye-sublimation printers and maintenance guidelines are the focus of this section.
Thermal Printers—Thermal transfer, direct thermal, and dye-sublimation printers and maintenance guidelines are the focus of this section.
![]() Impact Printers—This section covers printheads, ribbons, paper feed types, and maintenance for this venerable but still useful printer type.
Impact Printers—This section covers printheads, ribbons, paper feed types, and maintenance for this venerable but still useful printer type.
![]() Virtual Printers—The “printers” in the Printer menu that create documents instead of printouts are covered in this section.
Virtual Printers—The “printers” in the Printer menu that create documents instead of printouts are covered in this section.
![]() Installing Your Printer or Multifunction Device—Installation processes for Windows, OS X, Linux, iOS, and Android are the focus of this section.
Installing Your Printer or Multifunction Device—Installation processes for Windows, OS X, Linux, iOS, and Android are the focus of this section.
![]() Configuring Your Printer or Multifunction Device—From collation to paper type, this section discusses how to set print options in Windows, OS X, Linux, iOS, and Android.
Configuring Your Printer or Multifunction Device—From collation to paper type, this section discusses how to set print options in Windows, OS X, Linux, iOS, and Android.
![]() Device Sharing Options—In this section, learn how to share a printer with an Ethernet network.
Device Sharing Options—In this section, learn how to share a printer with an Ethernet network.
![]() Wireless Device Sharing Options—In this section, learn how Bluetooth as well as Wi-Fi can be used for printer sharing.
Wireless Device Sharing Options—In this section, learn how Bluetooth as well as Wi-Fi can be used for printer sharing.
![]() Cloud and Remote Printing—Discover what vendors and services exist to make these types of printing a reality.
Cloud and Remote Printing—Discover what vendors and services exist to make these types of printing a reality.
![]() Configuring Your Operating System to Share a Printer or Device—In this section, discover the services that Windows, OS X, and Linux use to share printers.
Configuring Your Operating System to Share a Printer or Device—In this section, discover the services that Windows, OS X, and Linux use to share printers.
![]() Maintaining Data Privacy—In this section, discover methods for making printing more secure.
Maintaining Data Privacy—In this section, discover methods for making printing more secure.
Whether standalone devices or multifunction devices that also incorporate copy, scan, and fax features, printers are important output devices—second only to video displays. They output hard-copy versions of files stored on the computer, such as documents, spreadsheets, photos, and web pages, using laser, inkjet, thermal, impact, and virtual (software) technologies.
Printers and multifunction devices can connect to a computer’s USB or parallel port via Bluetooth, Wi-Fi, cellular wireless networks, or directly to a wired network. This chapter focuses on laser, inkjet, thermal, and impact printers. Virtual printing techniques such as printing to a file, PDF, XPS, or image are also covered.
Generally, Windows Vista/7/8/8.1/10 behave the same when it comes to printers. So whenever Windows is mentioned in this chapter, the information applies to modern Windows versions unless otherwise stated. This chapter also deals with printer issues for OS X, Linux, iOS, and Android operating systems.
220-901: Objective 1.14 Compare and contrast differences between the various print technologies and the associated imaging process.
220-901: Objective 1.15 Given a scenario, perform appropriate printer maintenance.
Foundation Topics
Laser Printers
A laser printer is a page printer that stores the entire contents of the page to be printed in its memory before printing it. By contrast, inkjet, thermal, and impact printers print the page as a series of narrow bands.
Laser Components
The major components of a laser printer include:

![]() Imaging drum—Applies the page image to the transfer belt or roller; frequently combined with the toner supply in a toner cartridge
Imaging drum—Applies the page image to the transfer belt or roller; frequently combined with the toner supply in a toner cartridge
![]() Developer—pulls toner from the toner supply and sends it to the imaging drum
Developer—pulls toner from the toner supply and sends it to the imaging drum
![]() Fuser assembly—Fuses the page image to the paper
Fuser assembly—Fuses the page image to the paper
![]() Transfer belt or transfer roller—Transfers the page image from the drum to the page
Transfer belt or transfer roller—Transfers the page image from the drum to the page
![]() Pickup rollers—Picks up paper
Pickup rollers—Picks up paper
![]() Paper separation pad (separate pad)—Enables pickup rollers to pick up only one sheet of paper at a time
Paper separation pad (separate pad)—Enables pickup rollers to pick up only one sheet of paper at a time
![]() Duplexing assembly (optional)—An assembly that switches paper from the front to the back side so that the printer can print on both sides of the paper
Duplexing assembly (optional)—An assembly that switches paper from the front to the back side so that the printer can print on both sides of the paper
Here’s a closer look at how these and other components work together to make printing possible.
Toner Cartridges
Most monochrome laser printers use toner cartridges that combine the imaging drum and the developer along with a supply of black toner. This provides you with an efficient and easy way to replace the laser printer items with the greatest potential to wear out.
Depending on the model, a new toner cartridge might also require that you change a wiper used to remove excess toner during the fusing cycle. This is normally packaged with the toner cartridge.
Recycled toner cartridges are controversial in some circles, but many firms have used new and rebuilt toner cartridges for years without problems. Major manufacturers (such as Apple, HP, and Canon) place a postage-paid return label in cartridge boxes to encourage you to recycle your toner cartridges.
Reputable toner cartridge rebuilders can save you as much as 30 percent off the price of a new toner cartridge.
When you install the toner cartridge, be sure to follow the directions for cleaning areas near the toner cartridge. Depending on the make and model of the laser printer, this can involve cleaning the mirror that reflects the laser beam, cleaning up stray toner, or cleaning the charging corona wire or conditioning rollers inside the printer. If you need to clean the charging corona wire (also called the primary corona wire on some models), the laser printer will contain a special tool for this purpose. The printer instruction manual will show you how to clean the item.
Keep the cartridge closed; it is sensitive to light, and leaving it out of the printer in room light can damage the enclosed imaging drum’s surface.
Caution
When you change a toner cartridge, take care to avoid getting toner on your face, hands, or clothing. It can leave a messy residue that’s hard to clean. For information about cleaning up toner spills and taking precautions against inhaling toner, see Chapter 17, “Operational Procedures.”
Laser Imaging Process
A laser printer is an example of a page printer. A page printer does not start printing until the entire page is received. At that point, the page is transferred to the print mechanism, which pulls the paper through the printer as the page is transferred from the printer to the paper.
Tip
To master this section, make sure you
![]() Memorize the seven steps involved in laser printer imaging.
Memorize the seven steps involved in laser printer imaging.
![]() Master the details of each step and their sequence.
Master the details of each step and their sequence.
![]() Be prepared to answer troubleshooting questions based on these steps.
Be prepared to answer troubleshooting questions based on these steps.
The laser printing process often is referred to as the electrophotographic (EP) process.
Before the seven-step laser printing process can take place, the following events must occur:
![]() Laser printers are page-based; they must receive the entire page before they can start printing.
Laser printers are page-based; they must receive the entire page before they can start printing.
![]() After the page has been received, the printer pulls a sheet of paper into the printer with its feed rollers.
After the page has been received, the printer pulls a sheet of paper into the printer with its feed rollers.
After the paper has been fed into the print mechanism, a series of seven steps takes place, which results in a printed page: processing, charging, exposing (also known as writing), developing, transferring, fusing, and cleaning.
The following section describes this process in more detail. Steps 1–7 are identified in Figure 10-1.

Tip
Make sure you know this exact order for the exam:
1. Processing
2. Charging
3. Exposing
4. Developing
5. Transferring
6. Fusing
7. Cleaning
Also, make sure you know the parts that make up a laser printer:
![]() imaging drum
imaging drum
![]() developer
developer
![]() fuser assembly
fuser assembly
![]() transfer belt
transfer belt
![]() transfer roller
transfer roller
![]() pickup rollers
pickup rollers
![]() separate pads
separate pads
![]() duplexing assembly
duplexing assembly
Step 1: Processing
The printer’s raster image processing engine receives the page, font, text, and graphics data from the printer driver, creates a page image, and stores it in memory. Depending on the amount of information on the page compared to the amount of memory in the printer, the printer might need to compress the page image to store it. If there is not enough memory to store the page image, a memory error is triggered.
Step 2: Charging
The cylinder-shaped imaging drum receives an electrostatic charge of –600Vdc (DC voltage) from a conditioning roller. (Older printers used a primary corona wire.) The smooth surface of the drum retains this charge uniformly over its entire surface. The drum is photosensitive and will retain this charge only while kept in darkness.
Step 3: Exposing
A moving mirror moves the laser beam across the surface of the drum. As it moves, the laser beam temporarily records the image of the page to be printed on the surface of the drum by reducing the voltage of the charge applied by the charger corona to –100Vdc. Instead of using a laser beam, an LED printer activates its LED array to record the image on the page.
Step 4: Developing
The drum has toner applied to it from the developer; because the toner is electrostatic and is also at –600Vdc, the toner stays on only the portions of the drum that have been reduced in voltage to create the image. It is not attracted to the rest of the drum because both the toner and the drum are at the same voltage, and like charges repel each other. This “like charges repel” phenomenon is similar to two like poles of magnets that repel each other.
Step 5: Transferring
While the sheet is being fed into the printer, it receives an electrostatic charge of +600Vdc from a corona wire or roller; this enables it to attract toner from the drum, which is negatively charged (see Step 3). As the drum’s surface moves close to the charged paper, the toner adhering to the drum is attracted to the electrostatically charged paper to create the printed page.
As the paper continues to move through the printer, its charge is canceled by a static eliminator strip, so the paper itself isn’t attracted to the drum.
Step 6: Fusing
The printed sheet of paper is pulled through fuser rollers, using high temperatures (approximately 350°F) to heat the toner and press it into the paper. The printed image is slightly raised above the surface of the paper.
The paper is ejected into the paper tray, and the drum must be prepared for another page.
Step 7: Cleaning
To prepare the drum for a new page, the image of the preceding page placed on the drum by the laser or LED array (see Step 3) is removed by a discharge lamp. Toner that is not adhering to the surface of the drum is scraped from the drum’s surface for reuse.
Color Laser Printing Differences
Color laser printers differ from monochrome laser printers in two important ways: They include four different colors of toner (cyan, magenta, yellow, and black) and the imaging drum is separate from the toner. Thus, instead of waste toner being reused as in a monochrome laser printer that has a toner cartridge with an integrated imaging drum, waste toner in a color printer is sent to a separate waste toner container.
Color laser printers use the same basic process as monochrome lasers, but some use a transfer belt instead of an imaging drum. The use of a transfer belt enables all four colors (cyan, magenta, yellow, and black) to be placed on the paper at the same time, enabling color print speeds comparable to monochrome print speeds. When a transfer belt is used, the conditioning and transferring processes are performed on the transfer belt. See Figure 10-2.

Laser Media Types
Laser printers use standard smooth-finish printer or copier paper. Use labels and transparency media especially designed for laser printers, as other types of media might jam the printer or become distorted because of the high heat used in the laser printing process.
Labels made for copiers are not suitable for laser printers because they can come off the backing and stick to the printer’s internal components.
Laser Maintenance
The major elements in laser printer maintenance include: Replacing toner, applying maintenance kit, calibration (color lasers only), and cleaning.
Replacing Toner Cartridges
If the laser printer’s toner cartridge also includes the imaging drum, replacing the toner cartridge also replaces the imaging drum. Because the imaging drum’s surface can become damaged, leaving marks on print output, changing the toner cartridge is helpful in improving print quality.
Installing Maintenance Kits
Many HP and other laser printers feature components that should be replaced at periodic intervals. These components often include fuser assemblies, air filters, transfer rollers, pickup rollers, other types of rollers, and separation pads (separate pads). These components wear out over time, and can usually be purchased as a maintenance kit as well as separately.
A printer that uses a maintenance kit will display a message or an error code with a meaning such as “Perform printer maintenance” or “Perform user maintenance” when the printer reaches the recommended page count for maintenance kit replacement. Depending upon the printer model and whether it is used for color or monochrome printing, the recommended page count could be at as few as 50,000 pages or as much as 300,000 pages or more.
Note
Sources for maintenance kits can also provide useful installation instructions. Sources for HP and Lexmark printers include PrinterTechs.com, Inc. (http://www.printertechs.com/maintenance-kits.php) and Depot International (http://www.depot-america.com) among others.
Resetting Paper Counts
After a fuser assembly or full maintenance kit is installed in a laser printer, the page count must be reset; otherwise, you will not know when to perform recommended maintenance again. Typically, the page count is reset by pressing a specified combination of buttons on the printer’s control panel.
Note
If the printer is under service contract or being charged on a per-page (or per-click) basis, it is not recommended to reset the paper count after servicing. However, most laser printers print the page count when you perform a self-test.
Calibration
Color laser printers should be calibrated if print quality declines. The printer calibration process on a color laser printer adjusts image density settings to make up for changes caused by environmental differences or aging print cartridges.
Some color laser printers perform automatic calibration, but you can also force the printer to perform calibration on an as-needed basis. See the instruction manual for your printer for details.
Note
Print quality is affected by many factors, such as the print resolution for graphics (the higher the dpi, the sharper and better), while using an economy printing mode that uses less toner reduces print quality. A damaged imaging drum or dirty rollers leaves marks on the paper that detract from print quality. If a color laser printer requires four passes to print in color and the colors are not properly lined up (a process known as color registration), print quality is affected.
Cleaning
Because laser printers use fine-grain powdered toner, keeping the inside of a laser printer clean is an important step in periodic maintenance. If you want to use a vacuum cleaner to pick up loose toner, be sure to use a vacuum cleaner that is designed to pick up toner, as toner particles are so small they will pass through conventional bags and filters. If you prefer to use a damp cloth, be sure to turn off the laser printer and disconnect it from power first.
To keep the paper path and rollers clean, use cleaning sheets made for laser printers, as follows:
Step 1. Insert the sheet into the manual feed tray on the laser printer.
Step 2. Create a short document with Notepad, WordPad, or some other text editor and then print it on the sheet.
As the sheet passes through the printer, it cleans the rollers. If a specialized cleaning sheet is not available, you can also use transparency film designed for laser printers. Some laser printers use a special software program to print a cleaning pattern onto plain paper.
Note
Be sure to know how to maintain a laser printer for the 220-901 exam: Replacing toner, applying a maintenance kit, calibration, and cleaning.
Never use transparency media not designed for laser printers in a laser printer. Copier or inkjet media isn’t designed to handle the high heat of a laser printer and can melt or warp and possibly damage the printer.
Inkjet Printers
Inkjet printers represent the most popular type of printer in small-office/home-office (SOHO) use today and are also popular in large offices. Their print quality can rival laser printers and virtually all inkjet printers in use today are able to print both color and black text and photographs.
From a tightly spaced group of nozzles, inkjet printers spray controlled dots of ink onto the paper to form characters and graphics. On a typical 5,760×1,440 dots per inch (dpi) printer, the number of nozzles can be as high as 180 for black ink and more than 50 per color (cyan, magenta, yellow). The tiny ink droplet size and high nozzle density enables inkjet printers to perform the seemingly impossible at resolutions as high as 1,200dpi or higher: fully formed characters from what is actually a high-resolution, non-impact, dot-matrix technology.
Inkjet printers are character/line printers. They print one line at a time of single characters or graphics up to the limit of the print head matrix. Inkjet printers are functionally fully formed character printers because their inkjet matrix of small droplets forming the image is so carefully controlled that individual dots are not visible.
Larger characters are created by printing a portion of the characters across the page, advancing the page to allow the print head to print another portion of the characters, and so on until the entire line of characters is printed. Thus, an inkjet printer is both a character and a line printer because it must connect lines of printing to build large characters. Some inkjet printers require realignment after each ink cartridge/print head change to make sure that vertical lines formed by multiple print head passes stay straight (this may be automatic or require the user to start the process); with other models, alignment can be performed through a utility provided as part of the printer driver when print quality declines due to misalignment.
Inkjet Components
The essential components in the inkjet printing process include: ink cartridges, print head, roller, paper feeder, duplexing assembly, carriage, and belt.
Note
Make sure you know this list of components for the 220-901 exam.
Some inkjet printers use external ink tanks for longer ink life between refills.
Figure 10-3 shows how many of these components look in a typical printer.

Inkjet Printing Process
Inkjet printers use ink cartridges filled with liquid ink for printing. Some older inkjet printers use a large tank of black ink and a second tank with separate compartments for each color (typically cyan, magenta, and yellow; some models feature light versions of some of these colors for better photo-printing quality). However, almost all inkjet printers produced for a number of years use a separate cartridge for each color. This improves print economy for the user because only one color at a time needs to be replaced. With a multicolor cartridge, the entire cartridge needs to be replaced, even when only one of the colors runs out.
Note
Inkjet printers are sometimes referred to as CMYK devices because of the four ink colors used on most models: cyan, magenta, yellow, and black.
The carriage and belt mechanism move the print head back and forth to place ink droplets as the paper passes under the printer. Depending on the printer, the print head might be incorporated into the ink tank; be a separate, user-replaceable item; or be built into the printer.
Some inkjet printers feature an extra-wide (more nozzles) print head or a dual print head for very speedy black printing. Some models enable the user to replace either the ink cartridge only or an assembly comprising the print head and a replaceable ink cartridge.
Note
On an inkjet printer, print quality settings are typically good, better, best or text, text and image, photo, and best photo and are selected in the printer settings dialog. However, clogged nozzles (leading to ink dropouts), mismatch of paper type setting to actual paper used, and dirty rollers reduce actual print quality.
An inkjet printer is only as good as its print head and ink cartridges. Clogged or damaged print heads or ink cartridges render the printer useless. If an inkjet printer fails after its warranty expires, you should check service costs carefully before repairing the unit. Failed inkjet printers are often “throwaway” models and can be replaced, rather than repaired, even during the warranty period.
Caution
Inkjet printers should never be turned off with the power switch on a surge protector; doing so prevents the printer from self-capping its ink cartridges, which is a major cause of service calls and printer failures. Cleaning the print head, either with the printer’s own cleaning feature, a cleaning utility built into the printer driver, or with a moistened cleaning sheet, will restore most printers to service.
Always use the printer’s own power switch, which enables the printer to protect the ink cartridges and perform other periodic tasks (such as self-cleaning) properly.
Two major methods are used by inkjet printers to create the ink dots that make up the page. Most inkjet printers heat the ink to boiling, creating a tiny bubble of ink that is allowed to escape through the print head onto the paper. This is the origin of the name BubbleJet for the Canon line of inkjet printers. Printers using this method feature either ink cartridges that include the print head, or print heads with removable ink cartridge inserts. In case of a severely clogged print head, you can simply replace the ink cartridge if the ink cartridge incorporates the print head.
Another popular method uses a piezo-electric crystal to distribute the ink through the print head. This method makes achieving high resolutions easier; the Epson printers using this method were the first to achieve 5,760×1,440 dpi resolutions. This method also provides a longer print head life because the ink is not heated and cooled. However, the print heads are built into the printer, making a severely clogged print head harder to clean. Both types of inkjet printers are sometimes referred to as drop-on-demand printers.
During the inkjet print process:
Step 1. The paper or media in a feed tray is pulled into position by a roller mechanism.
Step 2. The print head is suspended on a carriage over the paper, and is moved across the paper by a belt. As the print head moves across the paper, it places black and color ink droplets as directed by the printer driver.
Step 3. At the end of the line, the paper or media is advanced, and the print head either reverses direction and continues to print (often referred to as Hi-Speed mode) or returns to the left margin before printing continues.
Step 4. After the page is completed, the media is ejected.
Inkjet Media Types
Inkjet printers can use the same types of paper and labels that laser printers can use. However, inkjet printers can also use special matte or glossy-coated paper and business card stock for presentation or photo-realistic images. Transparency stock must be designed specifically for inkjet use. Because of improvements in media and print design, old inkjet photo paper should be recycled rather than used, as older paper types have very slow drying times compared to recent types.
When printing, it’s important to select the correct media type in the printer driver to avoid banding, overuse of ink, and other poor-quality results.
Inkjet Maintenance
Ink cartridge replacement, calibration, nozzle check, and head cleaning, and clearing jams are the major elements in maintaining an inkjet printer.
Note
Make sure you know ink cartridge replacement, calibration, nozzle check, and head cleaning, and clearing jams for the 220-901 exam.
Replacing Ink Cartridges
Use the printing preferences or printer properties dialog (varies by printer and operating system) to determine when it’s time to purchase additional ink or replace the ink cartridges (see Figure 10-4).

Figure 10-4 All of the ink levels in this printer are low, but the ink cartridge marked with an ! is about to run out.
Note
Most inkjet printers stop printing when one color runs out, even if that color is not being used in the current print job. Some printers offer to use a mixture of photo black and colors if the normal black ink runs low during a print job.
Some printers run automatic nozzle cleaning or calibration routines when you change ink cartridges. If the ink cartridge includes a print head, whenever you change the ink cartridge you also change the print head. Consequently, replacing ink cartridges is the single best maintenance item you can perform on an inkjet printer.
Calibration
Inkjet printers might require or recommend some type of printer calibration, most typically print head alignment. This process involves printing one or more sheets of paper and selecting the print setting that produces straight lines. Some printers perform this step automatically, while others might require user intervention to determine the best setting.
Some inkjet printers can use two printing methods: unidirectional, in which the printer prints only when the print head is moving from left to right, and bidirectional, in which the printer prints when the print head is moving in either direction (left to right or right to left). If the print head is misaligned, bidirectional printing (sometimes referred to as high-speed printing) will have much poorer print quality than unidirectional printing.
Be sure to align the print head as needed, using the calibration or alignment utility provided in the printer driver (see Figure 10-5A), to permit successful use of bidirectional printing.

Figure 10-5 Aligning the print head (a) helps produce better-quality high-speed (bidirectional) printing (b).
To enable bidirectional printing, select this option (when it’s offered) in the Print Preferences menu (see Figure 10-5B).
Note
With some printers, it might be necessary to realign the print head each time after changing ink cartridges (some of these printers perform this task automatically). However, with others, it might be an optional utility that you can run on an as-needed basis.
Nozzle Check and Head Cleaning
Periodically, especially if a printer has not been used for a while or has been used only for monochrome printing, it’s a good idea to use the nozzle check routine to verify that all the print heads’ nozzles are working correctly.
The nozzle check or pattern check routine prints a pattern that uses all of the nozzles in all of the print heads and displays the pattern’s correct appearance. Compare the printout to the on-screen display, and if you see gaps or missing colors, activate the head cleaning routine (see Figure 10-6). Repeat these steps until the nozzle check printout matches the screen display. Keep in mind that using nozzle check uses ink.

Figure 10-6 The Pattern Check (nozzle check) dialog from a Canon inkjet printer driver’s maintenance tab.
Depending on the printer, these options might be located in the printer preferences’ Maintenance tab, a toolbox dialog, or other places, such as the printer’s onboard menu. See your printer’s documentation for details.
Caution
If you use a Windows-provided printer driver, these options might not be available. Install a driver from your printer vendor.
Thermal Printers
A thermal printer uses heat transfer to create text and graphics on the paper. Thermal printers are used in point-of-sale and retail environments as well as for some types of portable printing.
Thermal printers are available using three different technologies:
![]() Thermal transfer
Thermal transfer
![]() Direct thermal
Direct thermal
Thermal Feed Assembly and Heating Element
Thermal printers can use a dot-matrix print mechanism or a dye-sublimation technology to transfer images. Direct thermal printers use heat-sensitive paper (special thermal paper), while thermal transfer printers use a wax, resin, or dye ribbon to create the image. Some printers can use either heat-sensitive media or a ribbon.
The feed assembly on a typical thermal receipt or point-of-sale printer pulls paper from a roll wound around a center plastic spool or spindle. The feed assembly on a typical desktop thermal barcode printer uses notched rollers and spring-loaded sprockets to advance roll paper. Larger thermal barcode printers might also use fanfold media as well as roll media.
The heating element in the print head is used to heat thermal paper or ribbons to make the image. Printers that use ribbons are thermal transfer printers, and printers that use thermal paper are known as direct thermal printers.
Thermal Printer Ribbons
Thermal transfer printers use wax or resin-based ribbons, which are often bundled with paper made especially for the printer. Dye-sublimation (dye-sub) printers use dye-based film ribbons technology to print continuous-tone photographs. Examples of consumer-grade dye-sublimation printers include Kodak printer docks and Canon’s Selphy CP series; these printers print 4×6-inch photos. Many vendors also sell larger-format dye-sublimation printers for use in photo labs and professional photography studios.
Figure 10-7 illustrates a typical dye-sublimation ribbon for a Canon Selphy CP printer.

Thermal Print Process
Although thermal transfer, direct thermal printing, and dye sublimation all involve heating the elements in a print head to a particular temperature to transfer the image, there are some differences in operation. The basic process of thermal printing works like this:
Step 1. The print head has a matrix of dots that can be heated in various combinations to create text and graphics.
Step 2. The print head transfers text and graphics directly to heat-sensitive thermal paper in direct thermal printing, or to a ribbon that melts onto the paper in thermal transfer printing.
Step 3. If a multicolor ribbon is used on a thermal transfer or dye-sublimation printer, each ribbon is moved past the print head to print the appropriate color. In the case of dye-sublimation printers, the paper is moved back into position to enable the next color to be printed.
Step 4. Once all colors have been printed, the paper is ejected.
Figure 10-8 compares direct thermal and thermal transfer printing technologies.

Thermal Paper and Media
Direct thermal printers use special thermal (heat-sensitized) paper, while thermal transfer printers might use either standard copy paper or glossy photo paper, depending on their intended use.
If the printer uses direct thermal printing, heat-sensitive paper with characteristics matching the printer’s design specifications must be used. For portable printers using direct thermal printing such as the Brother PocketJet series, the usual source for such paper is the printer vendor or its authorized resellers. If the direct thermal printer is used for bar codes or point-of-sale transactions, you can get suitable paper or label stock from bar code or POS equipment suppliers and resellers.
Thermal transfer ribbons are available in three categories: wax (for paper; smooth paper produces the best results), wax/resin (synthetics), and resin (glossy hard films such as polyester). Choose the appropriate ribbon type for the material you will be printing on.
Dye-sublimation photo printers in the consumer space use special media kits that include both a ribbon and suitable photo paper stocks. Larger format dye-sublimation printers are designed to print on standard-size and special-format roll and sheet dye-sublimation paper stocks available separately from the ink or ribbon.
Thermal Maintenance
The elements of thermal printer maintenance include replacing the paper when it runs out, cleaning the heating element as directed and removing debris from the heating element, rollers, or other components as needed.
Note
For the 220-901 exam, be sure to know the steps for thermal printer maintenance: Replace paper, clean heating element, remove debris.
Cleaning Heating Elements
Because the heating element in a thermal printer is the equivalent to the print head in impact or inkjet printers, it must be kept clean in order to provide maximum print quality. Many vendors recommend cleaning the print head after each roll of thermal transfer ribbon.
Some thermal transfer ribbons for POS and warehouse printers include special cleaning materials at the beginning of the roll. Some thermal printer vendors also supply special cleaning film you can use to remove dust, debris, and coating residue from print heads.
You can also use isopropyl alcohol to clean print heads. It is available in wipes, pens, pads, and swabs from various vendors. The ribbon must be removed before using isopropyl alcohol. When isopropyl alcohol is used in cleaning, it is essential to wait until the printer dries out before reinstalling the ribbon.
Removing Debris
Debris from torn paper, solid ink flakes, and label coatings can build up on rollers and other components as well as the print head. Use isopropyl alcohol wipes or other cleaning materials as recommended by the printer supplies to clean up debris for better print quality and longer print life.
Impact Printers
An impact printer is so named because it uses a mechanical print head that presses against an inked ribbon to print characters and graphics. Impact printers are the oldest printer technology, and are primarily used today in industrial and point-of-sale applications.
Dot-matrix printers, the most common form of impact printers, are so named because they create the appearance of fully formed characters from dots placed on the page.
Note
For the 220-901 exam, be sure to know the basic elements of impact printing: print head, ribbon, tractor feed, and impact paper.
Impact Components and Print Process
Impact dot-matrix printers have the following parts moving in coordination with each other during the printing process:
Step 1. The paper is moved past the print head vertically by pull or push tractors or by a platen.
Step 2. The print head moves across the paper horizontally, propelled along the print head carriage by a drive belt, printing as it moves from left to right. Bidirectional printing prints in both directions but is often disabled for high-quality printing because it can be difficult to align the printing precisely.
Step 3. As the print head moves, the pins in the print head are moving in and out against an inked printer ribbon as the print head travels across the paper to form the text or create graphics.
Step 4. The ribbon is also moving to reduce wear during the printing process.
Steps 1–4 are repeated for each line until the page is printed. Figure 10-9 illustrates a typical impact dot-matrix printer.

Figure 10-9 Components of a typical impact dot-matrix printer. The model pictured is a wide-carriage version, but its features are typical of models using either standard or wide-carriage paper.
Impact Dot-Matrix Print Heads
The most common types of print heads include 9-pin, 18-pin (two columns of nine pins), and 24-pin (which produces Near Letter Quality or NLQ quality printing when used in best quality mode).
Figure 10-10 shows actual print samples from a typical 9-pin printer’s draft mode, a typical 24-pin printer’s draft mode, and the Near Letter Quality (NLQ) mode of the same 24-pin printer.

Figure 10-10 Actual print samples illustrating the differences in 24-pin and 9-pin impact dot-matrix printers.
Note
The print samples shown in Figure 10-10 are taken from printers that use 8.5 ×11-inch or wider paper sizes. The print head design and print quality vary greatly on printers that use smaller paper sizes in point-of-sale applications.
Impact Printer Ribbons
Printer ribbons for impact printers use various types of cartridge designs. Some span the entire width of the paper, and others snap over the print head. Figure 10-11 compares various types of ribbons for impact printers.

Impact Printer Paper Types
Impact printers use plain uncoated paper or labels in various widths and sizes. Impact printers designed for point-of-sale receipt printing might use roll paper or larger sizes of paper. When larger sizes of paper are used, these printers typically use a tractor feed mechanism to pull or push the paper past the print head. Paper and labels used with tractor-fed printers has fixed or removable sprocket holes on both sides of the paper. This type of media is often called “impact paper,” “dot matrix,” “continuous feed,” or “pin-feed” paper or labels. Media with standard perforations can be difficult to separate from the paper edge after printing, but are less likely to separate prior to use than micro-perforated media.
Multi-part forms are frequently used with impact printers used in point-of-sale (POS) systems. Be sure to adjust the head gap appropriately to avoid print head or ribbon damage.
Impact Printer Maintenance
The keys to successful maintenance of an impact printer include: replacing the ribbon, replacing the print head, and replacing the paper.
Note
For the 220-901 exam, be sure to know the basic elements of impact printer maintenance: replace ribbon, replace print head, and replace paper.
Replacing the Ribbon
When the ribbon is worn, the quality of printing goes down. But what you might not realize is that the ribbon on an impact dot-matrix printer also lubricates the pins in the print head and protects the print head from impact damage.
In addition to replacing the ribbon when print quality is no longer acceptable, be sure to immediately discard a ribbon that develops cuts or snags, as these can snag a print head pin and break or bend the pin.
Replacing the Print Head
If you replace ribbons when needed, you minimize the chances of needing to replace the print head. However, if a print head suffers damage to one or more pins, you must replace it. Damaged pins might snag the ribbon, and if a pin breaks, it will leave a gap in the characters output by the printer.
Instead of purchasing a new print head, consider having the old print head reconditioned or rebuilt.
Tip
If you need a replacement quickly, some vendors offer advance exchange programs, which enable you to obtain a remanufactured or refurbished print head on a cross-shipped basis rather than waiting until they receive your old print head.
Replacing Paper
When you replace paper, be sure to check continuous-feed (tractor-fed) paper for problems with torn sprocket holes, separated tear-offs, and damaged sheets. Tear off any problem pages and use only good paper from the stack in your printer.
Be sure tractor feeders are properly adjusted, and if the printer can be run as either a push tractor (allows zero-tear paper feed) or a pull tractor, be sure the printer is properly configured for the feed type.
Check the head gap carefully: be sure to adjust it if you need to run multi-part forms, thick labels, or envelopes. An incorrect head gap can lead to ribbon and print head damage.
Virtual Printers
The term “virtual printer” applies to any utility that is used as a printer by an app, but creates a file instead of a printout. There are three major categories of virtual printers:
![]() Print to file
Print to file
![]() Print to PDF or XPS
Print to PDF or XPS
![]() Print to image
Print to image
Print to File
Print to file is used to create a file that can be copied to a specific printer for output. This type of file contains not only the text and graphics but also specific printer control sequences and font references for the targeted printer.
Caution
To avoid problems with print output, make sure you use fonts in your document that are also available to the target printer. If the printer doesn’t have the same fonts as the system used to create the file, font substitutions will take place.
To use print to file in Microsoft Windows:
Step 1. Open the print dialog.
Step 2. Select the printer.
Step 3. Check the Print to file box.
Step 4. Click Print.
Step 5. You are typically prompted for a file location. If not, check your Documents folder to locate the file after printing. The file is stored with the PRN file extension (.prn).
Print to file is intended for use primarily with printers using the parallel (LPT) port and is not available with all apps. The printer that will be used to output the PRN file must be configured as the default port. However, by sharing a USB printer, it is possible to copy a print file to a USB printer.
Note
For more information about printing to a file, see http://filext.com/faq/print_from_prn_file.php
As an alternative, use Print to PDF or XPS. With these options, it is not necessary to be concerned about font matching.
With OS X, use the Print dialog and select PostScript for output to a PostScript printer. For PDF options, see “Print to PDF or XPS,” coming up next.
Linux can print text, PostScript, PDF, and image files using the lpr command or CUPS (Common Unix Printing System). For more information about CUPS, see www.cups.org.
Print to PDF or XPS
Some recent Windows apps can save files directly to PDF (Adobe Acrobat/Adobe Reader) format. For apps that don’t support direct save to PDF, you can install a print to PDF virtual printer. Some versions of Windows include this capability or it can be added by installing Adobe Acrobat or most third-party PDF reading or editing apps.
Print to PDF or XPS in Windows
When you print to PDF using a Windows app, you are prompted to specify the destination for the file. However, most other PDF options (compression, metadata support, and others) are not available. Use the Save to PDF option, when offered, to control these settings.
Current versions of Windows include the Microsoft XPS Document Writer virtual printer. Select this printer if you want to create an XPS (XML Paper Specification) document. When you select this option, you can optionally enable the opening of your XPS file after it is saved.
Print to PDF in OS X
With OS X, use the Print dialog and open the PDF menu to select the type and destination for the PDF file:
![]() Save as PDF—With this option, you can add Title, Author, Subject, and Keywords metadata. Use the Security Options button to set up password restrictions for opening, copying content, or printing the document.
Save as PDF—With this option, you can add Title, Author, Subject, and Keywords metadata. Use the Security Options button to set up password restrictions for opening, copying content, or printing the document.
![]() Fax PDF—Sends the PDF to your fax device
Fax PDF—Sends the PDF to your fax device
![]() Mail PDF—Creates a new email message and attaches your PDF.
Mail PDF—Creates a new email message and attaches your PDF.
![]() Save as PDF-X—Creates a PDF-X file (used by professional print shops).
Save as PDF-X—Creates a PDF-X file (used by professional print shops).
![]() Save PDF to iPhoto—Imports your PDF into iPhoto.
Save PDF to iPhoto—Imports your PDF into iPhoto.
![]() Save PDF to Web Receipts—Saves your PDF to your Web Receipts folder.
Save PDF to Web Receipts—Saves your PDF to your Web Receipts folder.
Print to PDF in Linux
To print to PDF in Linux, install CUPS-PDF (the CUPS printer driver for PDF). Restart your system (if necessary) and PDF will show up in your list of printers.
Print to Image
Some virtual printer apps are designed to convert documents directly into common bitmap graphics formats such as TIFF, JPEG, BMP, and others. Some of these apps can also create PDF files.
Print to Image for Windows
Some of the apps available for Windows include:
![]() Image Printer Pro—https://code-industry.net
Image Printer Pro—https://code-industry.net
![]() Print&Share—www.printandshare.info
Print&Share—www.printandshare.info
![]() Raster Image Printer and TIFF Image Printer—www.peernet.com
Raster Image Printer and TIFF Image Printer—www.peernet.com
![]() Universal Document Converter—www.print-driver.com
Universal Document Converter—www.print-driver.com
![]() Zan Image Printer—www.zan1011.com
Zan Image Printer—www.zan1011.com
Print to Image for OS X
The print subsystem in OS X can be used to create many types of bitmap images. A freeware app that makes this easy is Spool Pilot for Mac: www.colorpilot.com/spool.html.
Ghostscript (Linux, OS X, and Windows)
Ghostscript is an open-source command-line utility that can output to PDF, PostScript, EPS, text, and most current and legacy bitmap formats (PSD, PCX, TIFF, JPG, PNG, and others). For more information, see www.ghostscript.com.
Installing Your Printer or Multifunction Device
Printers and multifunction devices cannot function without operating system support. Depending on the printer or multifunction device and operating system, the printer or device might be recognized automatically and the drivers installed, or it might be necessary to download and install drivers manually.
Printer/Multifunction Device Installation for Windows
Windows offers a variety of methods for installing a printer or multifunction device. Choose the appropriate method based on your version of Windows and the source of your driver file.
Using Add Printer (Windows 7/8/8.1)
The Add Printer option can be used if Windows includes a suitable driver and the enhanced features that might be provided by a vendor-supplied driver are not necessary. Add Printer is run from the Devices and Printers Control Panel applet in Windows 7 and 8/8.1/10; Windows 8/8.1/10 can also run Add Printer from the Devices dialog in PC Settings. Local printers are automatically detected when connected to a USB port and turned on, or you can manually specify a local port, network share, wireless network, or Bluetooth network connection.
After selecting the printer brand and model, Windows installs the printer. You can also specify the option to use Windows Update to locate a suitable driver or select Have Disk to use the printer vendor’s driver disc or file (see Figure 10-12).

After the printer is installed, specify whether or not to share the printer, whether the new printer is the default printer, and (optionally) print a test page. The printer is added to your list of printers and multifunction devices.
Installing a Printer with a Vendor-Supplied Driver
Whether you use a vendor-supplied install disc or a downloaded file, the installation process is quite different from the Add printer method. After opening the disc or the downloaded driver file, connect your printer to the USB (or FireWire) port as needed but don’t turn it on. Select your device, then turn on the printer or device when prompted. After the installation process is complete, you might be prompted to restart your system.
Printer/Multifunction Device Installation for OS X
To install a printer or multifunction device, open the Printers & Scanners dialog in System Preferences. Click the plus (+) sign at the bottom of the left-hand pane to add a printer (refer to Figure 10-14).
Local and network printers and multifunction devices are listed (see Figure 10-13). Select the desired printer or device and the driver file is downloaded from the Apple website.
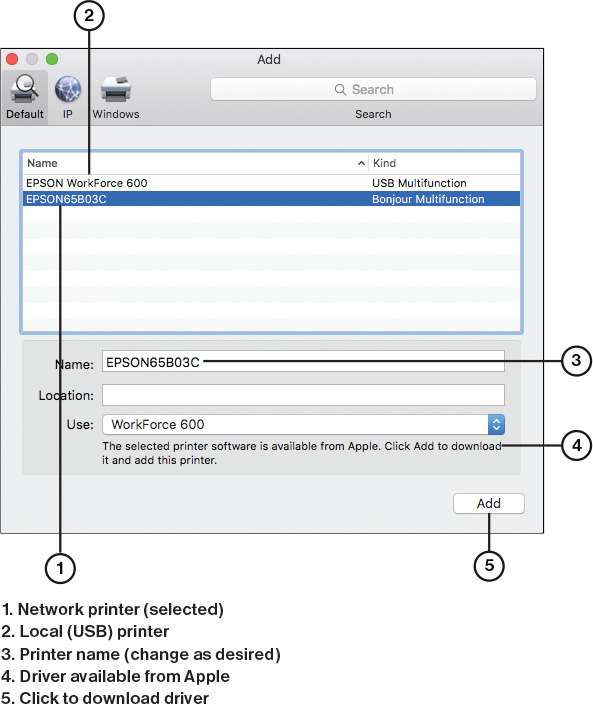
At the end of the process, the printer or device is listed in the Printers & Scanners menu (see Figure 10-14). Click the plus (+) sign in the left pane to install another printer when necessary.

If you need to install a driver manually, download a driver made for your printer and OS X version and install it before connecting your printer and turning it on.
Printer/Multifunction Device Installation for Linux
Use the Printers dialog (found in System Settings in many Linux distros) to install a printer (see Figure 10-15).

If you need to install a driver manually, use the printer configuration tool included with most distros to:
![]() Select the correct printer driver (or one for a similar model that will work with your printer) from the database of printers provided.
Select the correct printer driver (or one for a similar model that will work with your printer) from the database of printers provided.
![]() Install a PPD (Postscript Printer Description) file or download a driver.
Install a PPD (Postscript Printer Description) file or download a driver.
Note
See the Printer Driver List at www.openprinting.org/drivers/ for driver links and sources supporting many brands and models of inkjet and laser printers. Be sure to choose the correct driver type for your distro (Debian or RPM).
When the printer or multifunction device is installed, it is displayed in the list of installed printers (see Figure 10-16).

Printer/Multifunction Device Installation for iOS and Android
Android and iOS users can connect to wireless printers and multifunction devices by installing drivers available through each device’s app store. These drivers are released by the printer/device vendor.
Connect to the same wireless network that is used by your printer or device. Some printers and devices can also be configured to use Ad-Hoc (local, routerless) Wi-Fi connections for direct wireless connection between devices. If your printer or device supports Bluetooth, you might prefer to use it for printing.
Verify that the printer or device has its own IP address (Wi-Fi). After you visit your mobile device’s app store and download the printer software, use it to locate your printer on the network.
Figure 10-17 illustrates a typical Android printing app, Epson iPrint. Similar apps are available for iOS.

Configuring Your Printer or Multifunction Device
Typical configuration options for printers or multifunction devices include:
![]() Duplex (double-sided) printing—This option may be available on single-sided printers as well as true duplex (both-side of paper) printers. With a single-side printer, the duplex setting is used to determine how to position the paper for printing the second side.
Duplex (double-sided) printing—This option may be available on single-sided printers as well as true duplex (both-side of paper) printers. With a single-side printer, the duplex setting is used to determine how to position the paper for printing the second side.
![]() Collating—The collate setting is used when printing two or more copies of a document with two or more pages. When enabled, each copy of page 1 is printed before printing page 2, and so on. Useful when creating print jobs for binding, stapling, or punching, but is slower than uncollated print jobs.
Collating—The collate setting is used when printing two or more copies of a document with two or more pages. When enabled, each copy of page 1 is printed before printing page 2, and so on. Useful when creating print jobs for binding, stapling, or punching, but is slower than uncollated print jobs.
![]() Orientation—Portrait (long side up) or landscape (short side up) may be selected automatically in some printer drivers by the orientation of the document to be printed. If not selected automatically, choose the correct orientation. Use print preview to help determine the setting needed.
Orientation—Portrait (long side up) or landscape (short side up) may be selected automatically in some printer drivers by the orientation of the document to be printed. If not selected automatically, choose the correct orientation. Use print preview to help determine the setting needed.
![]() Print quality (laser)—With laser printers and multifunction devices, you might be able to select the desired resolution (dots per inch [DPI]). Higher DPI levels produce smoother text output and more finely detailed graphics, but require more printer RAM. As an alternative, some drivers have options to enable smoother text printing or adjust page compression.
Print quality (laser)—With laser printers and multifunction devices, you might be able to select the desired resolution (dots per inch [DPI]). Higher DPI levels produce smoother text output and more finely detailed graphics, but require more printer RAM. As an alternative, some drivers have options to enable smoother text printing or adjust page compression.
![]() Print quality (inkjet)—Instead of specific resolutions, inkjet printers use quality settings such as High, Standard, Fast (Canon); Draft, Text, Text and Image, Photo, and Best Photo (Epson); Draft, Normal, Best (HP). Each setting optimizes the size of the ink droplet and paper coverage for the best results with the specified paper.
Print quality (inkjet)—Instead of specific resolutions, inkjet printers use quality settings such as High, Standard, Fast (Canon); Draft, Text, Text and Image, Photo, and Best Photo (Epson); Draft, Normal, Best (HP). Each setting optimizes the size of the ink droplet and paper coverage for the best results with the specified paper.
![]() Paper type (inkjet)—In addition to specifying the print quality desired, it is critical to select the actual paper type in use. The default is plain paper, but if matte presentation, semi-gloss, or glossy paper is used with the plain paper setting, the resulting printouts will be of very poor quality.
Paper type (inkjet)—In addition to specifying the print quality desired, it is critical to select the actual paper type in use. The default is plain paper, but if matte presentation, semi-gloss, or glossy paper is used with the plain paper setting, the resulting printouts will be of very poor quality.
Configuring Printer Settings in Windows
To configure these and other printer settings in Windows, right-click the printer or multifunction device in Devices and Printers and select Printing Preferences.
Note
Printing Preferences is used to set options such as print quality, resolution, scaling, and maintenance features. The location of options on tabs and the names of the tabs vary from printer to printer. Use Printer Properties to configure printer/multifunction device sharing, color management, security, and other less-frequently-used settings.
Figure 10-18 illustrates the Paper/Quality dialog for an HP LaserJet Pro M402 printer as print resolution is being selected.

Figure 10-19 illustrates the Page Setup menu for a Canon inkjet printer on Windows 8.1. This dialog includes settings for page size, orientation, page layout, duplex printing, copies, and collation.

Configuring Printer Settings in OS X
Although a few settings can be configured through the Printers & Scanners menu, most printer configuration is performed through the File/Print menu in an app. Select the printer, and you can configure the number of prints, paper size, and orientation from the main menu (see Figure 10-20). Open the submenus to select media type, print quality, and other settings.

If you print a photo, you are also prompted to choose the size and layout of the photo on a page (see Figure 10-21).
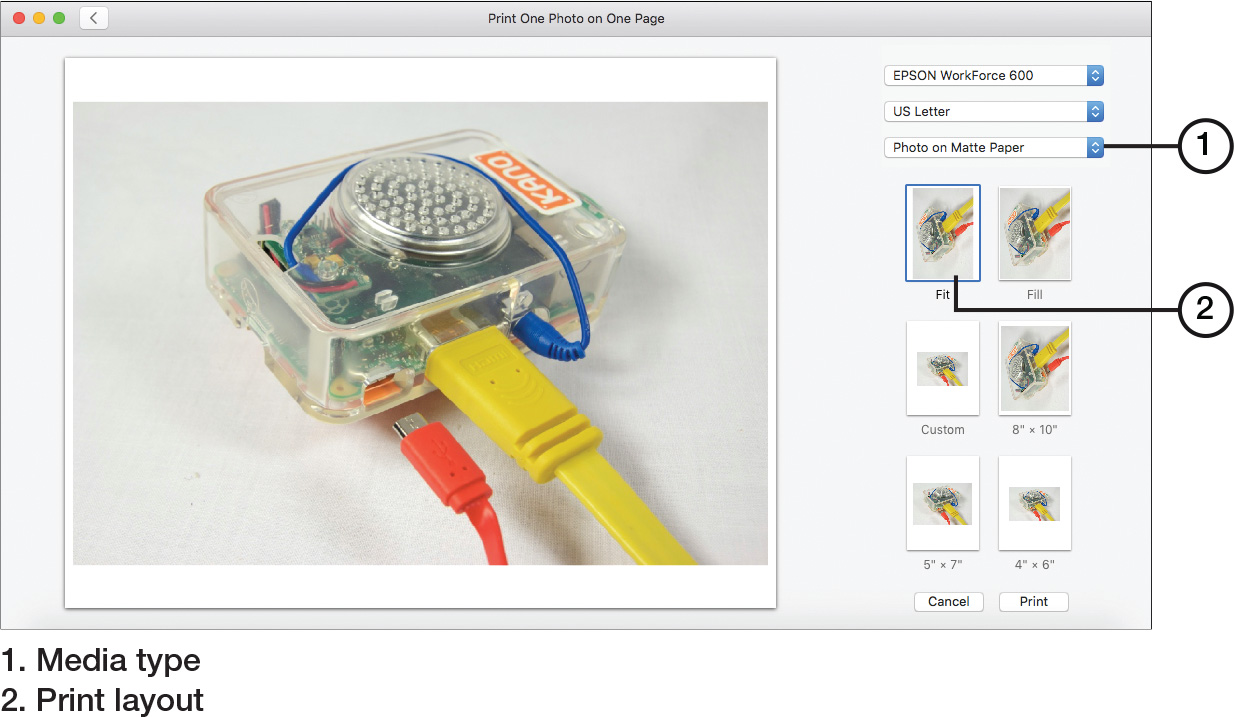
Use the Paper Handling submenu to specify collation, pages to print, and scaling. Use the Print Settings menu and submenus (shown in Figure 10-20) to specify print quality and media type.
Use the Presets menu to save your settings for reuse.
Configuring Printer Settings in Linux
Use the Printer Properties dialog (a submenu of Printers) to configure print settings. In Figure 10-22, you see paper and quality settings for an Epson inkjet printer being used to print on glossy photo paper.

Figure 10-22 Using the Ubuntu 14 Printer Properties dialog to configure an inkjet printer for 4x6-inch glossy photos.
Figure 10-23 shows job options (copies, orientation, and image options) in Ubuntu 14. For additional settings such as resolution, click or tap the More button.

Configuring Printer Settings in iOS and Android
The exact features in a Print Settings menu for an iOS or Android printer app vary by printer and app, but Figure 10-24 shows a typical example (Epson app for Android).

Device Sharing Options
Printer and multifunction devices can be shared between two or more computers by using one of the following wired sharing methods: USB, Serial, or Ethernet.
Serial (RS-232) and USB sharing use switchboxes that can be manually switched between devices or can automatically detect print jobs and switch to the active computer. Serial switchboxes are obsolete for most tasks, and USB switchboxes are limited by the number of computers that can share a printer: typically two or four.
Both serial and USB printer sharing are also limited by relatively short cable runs and a lack of management capabilities. Most wired printer/multifunction device sharing now uses Ethernet.
Integrated Ethernet Print/Multifunction Device Sharing
Many recent printers and multifunction devices include an integrated print server with support for Ethernet network printing. To configure them for sharing:
Step 1. Connect the printer or multifunction device to the network via an Ethernet (RJ-45) cable.
Step 2. Configure the printer or multifunction device to use Ethernet.
Step 3. Name the printer so it can be located on the network.
Step 4. Specify whether the printer or device will get an IP address from a DHCP router.
Step 5. If you need to configure the printer or device’s IP address manually, determine which IP addresses on the network are not in use and manually assign the printer or device to one of those addresses.
Step 6. Record the configuration information for reuse. Some printers and devices might print the information at the end of the setup process.
Figure 10-25 shows some print server setup dialogs from a typical small office printer with wireless Ethernet support.

Adding Ethernet Print/Multifunction Device Sharing
To add support for Ethernet local area networking to a printer that does not have a built-in Ethernet port, connect it to an Ethernet print server. Print servers enable the printer to be accessed via the print server’s IP address. Figure 10-26 illustrates a typical Ethernet print server for USB printers.

When a printer includes its own Ethernet port, it is assigned an IP address on a TCP/IP network; similarly, a print server is also assigned an IP address on a TCP/IP network. Print servers are configured and managed via your computer’s web browser, and some also support configuration via FTP.
To print to a network printer or device, you might need to install a network printer driver instead of the normal printer driver on the computer that will use the printer or multifunction device. To learn more about TCP/IP, see Chapter 11, “Networking.”
Wireless Device Sharing Options
The two major network protocols used for wireless device sharing include Bluetooth and 802.11 (Wi-Fi). Bluetooth is suitable for very short-range sharing among a few devices, while 802.11-based print sharing supports a much larger number of guest devices at much longer ranges.
Bluetooth
Most printers with built-in Bluetooth support are portable or receipt printers.
Printers lacking Bluetooth support can use special Bluetooth adapters to enable them to connect with computers or mobile devices that use Bluetooth. Check with the printer device vendor for models compatible with a specific printer.
Before a computer or mobile device can connect to a printer or multifunction device using Bluetooth, both the computer/mobile device and the printer/multifunction device must have Bluetooth transceivers. Bluetooth support is common among laptop and mobile devices, and can be added with a USB dongle to computers lacking Bluetooth support.
After enabling Bluetooth on the printer and computer, you must configure both for pairing and pair them before print jobs can be sent. For details, see Chapter 11.
802.11(a,b,g,n,ac)
Many recent printers and multifunction devices now include some level of 802.11 (Wi-Fi) support. The configuration process is typically similar to that used for wired Ethernet, with the added step of specifying the wireless network’s SSID and encryption key (if used). Refer to Figure 10-25.
To add support for 802.11 Wireless Ethernet local area networking to a printer, connect it to a Wireless Ethernet (Wi-Fi) print server. As with their Ethernet siblings, Wi-Fi print servers are managed via browser interfaces.
Note
Most Wireless Ethernet print servers also include Ethernet support.
Infrastructure vs. Ad Hoc
If you want to use wireless Ethernet (Wi-Fi) printers or multifunction devices but don’t use Wi-Fi networking with a wireless router, configure the printers/devices to work in Ad-Hoc (adhoc) mode. In Ad-Hoc mode, each device is connected directly to other devices: no router is used.
Infrastructure mode supports WPA2 encryption, while Ad-Hoc mode supports only WEP encryption, making it unsuitable for secure networking.
Ad-Hoc Wireless Network Support in Windows
Ad-hoc wireless networking is supported in Windows 7 through the Network and Sharing Center. It is also available in Windows 8/8.1 from the command line using Netsh, but it has been removed in Windows 10.
Ad-Hoc Wireless Network Support in OS X
OS X supports Ad-Hoc wireless networking through the Wi-Fi Status icon on the Finder menu. OS X refers to this feature as “computer-to-computer” networking. When you enable this feature, your computer cannot connect to other Wi-Fi networks at the same time. Figure 10-27 illustrates the dialog.

Ad Hoc Wireless Networking Support in Linux
Ad Hoc wireless networking in Linux is sometimes referred to as an IBSS (independent basic service set) network. Depending on the distro, this can be done by turning on the Wireless Hotspot service in Network settings or by using command-line utilities iw and ip. NetworkManager (https://wiki.gnome.org/Projects/NetworkManager) can be installed on distros that lack easy network management.
Wireless Hosted Networking
As a replacement for Ad Hoc mode, Windows 7 introduced Wireless Hosted Networking, which is also available in Windows 8/8.1/10. With Wireless Hosted Networking, you can create a Wi-Fi network that is detectable and usable by Wi-Fi-enabled printers and other computers and devices.
To create an unsecured wireless hosted network, open a command prompt and enter this command:
netsh wlan start hostednetwork
(replace “hostednetwork” with the name of your network).
Set up your printer or multifunction device to use the same network name. To print, have each user connect to that network. A printer or multifunction device can only use one network at a time, but computers can connect to this network and to other networks (including wireless) at the same time.
Note
For more information on Windows 7 and older Windows versions’ Ad-Hoc support, see http://www.cryptoman.com/storage/Pubs/en/ntwk_guide/d0e744.html.
For a good introduction to Windows Hosted Networking, see http://www.aztcs.org/meeting_notes/winhardsig/WiFi-peer-to-peer/wirelessHostedNetwork.pdf. See also https://msdn.microsoft.com/en-us/library/windows/desktop/dd815243(v=vs.85).aspx.
For more about creating a computer-to-computer (Ad-Hoc) network on OS X, see http://www.macobserver.com/tmo/article/how-to-create-and-use-an-ad-hoc-network-on-your-mac.
Cloud and Remote Printing
With cloud printing, you no longer need to be at your office or home office to make a printout. With remote printing, you can print a document stored on your host with your remote printer.
Cloud and remote printing require the following:
![]() A printer or multifunction device that can be accessed from the cloud or remotely via the Web.
A printer or multifunction device that can be accessed from the cloud or remotely via the Web.
![]() An app that supports remote or cloud printing.
An app that supports remote or cloud printing.
Using Public and Shared Devices
Public cloud printing devices are available in some hotels, hospitals, libraries, print and copy businesses, schools, and airport lounges. Depending upon the specific device and service in use, print jobs can be submitted via email, web interfacing, mobile apps, or special print drivers. Thus, public cloud printing is available to any type of computer or device with Internet access.
To receive the print job from the printer, provide the credentials needed (such as a retrieval or account code). By using public cloud printing services, it is no longer necessary to have a printer you might only use occasionally.
Some of the major vendors of cloud printing include Google (Google Cloud Print, www.google.com/cloudprint/learn/), HP Connected (formerly HP ePrint, www.hpconnected.com), PrinterOn Hosted (www.printeron.com), and Ricoh (HotSpot, www.ricoh-usa.com/services_and_solutions/hotspot/MobilePrintingOfferings.aspx).
Using Apps
Smartphones and tablets running Android or Apple iOS operating systems typically install apps from their respective app stores to make cloud or remote printing possible.
Connect older printers and multifunction devices that do not have built-in Google Cloud Print support to a computer running Google Chrome and enable its Google Cloud Print feature to enable cloud printing. The Google Print Connector can be used to enable multiple printers in businesses or schools to be used with Google Cloud Print.
Remote access apps such as LogMeIn and GoToMyPC enable remote users to print host documents directly to their remote printers.
Configuring Your Operating System to Share a Printer or Device
Windows, MacOS, and Linux offer a variety of ways to make a local printer available on the network. For Windows computers, File and Print sharing is used. OS X can use Bonjour Print Services or AirPrint. Linux computers can use Bonjour or the distro’s own Print server settings.
Windows Print Sharing
Printer sharing in Windows 7 and 8/8.1/10 is enabled through the Network and Sharing Center. Printers shared with Network and Sharing are available to any Windows computers on the same workgroup.
To restrict printer usage to specified computers using Windows 7 or later, create a homegroup from the Network and Sharing Center. Each computer on the workgroup can share or disallow sharing of printers and folders with other computers, and a single password is used to protect the homegroup.
To enable OS X or Linux computers to use a shared Windows printer, install LDP Print Services from Programs and Features in Control Panel, then share the printer using the Printer Properties tab for the printer in Devices and Printers. Make sure that the OS X or Linux and Windows computers are on the same network and the same workgroup.
TCP/IP
When a printer or multifunction device connects directly to a wired or wireless network, it can be discovered and used through TCP/IP by browsing to it using Windows, OS X, or Linux.
When you set up a printer as a network printer in Windows, you have the option of searching for the printer by the printer or host device’s IP address or specifying the correct IP address.
Bonjour
Bonjour is a zero-configuration print sharing service originally designed for OS X. Bonjour is included in OS X, and it is also distributed as part of iTunes for Windows. When you install iTunes for Windows, you install the appropriate version of Bonjour for your operating system (32-bit or 64-bit). You can also extract the MSI (.msi) installation file manually from the iTunes archive with third-party archive tools such as 7-Zip (www.7-zip.org).
When Bonjour is running on a Windows computer, an OS X computer on the same network can detect and use printers hosted on the Windows computer. Likewise, a Windows computer running Bonjour can detect and use printers hosted on the OS X computer. Linux includes support for Bonjour.
When a printer is hosted on OS X or Linux and a Windows computer connects with it using Bonjour, Bonjour might not install the best possible driver for your printer. For example, instead of a driver for a specific Epson printer, Bonjour running on OS X installed the Epson ESC/P-R driver on a Windows PC. This driver lacks support for maintenance and most other printer functions.
Rather than using the driver provided by Bonjour, install a model-specific driver from the manufacturer, set up the printer as a network printer, and search for the printer by the host’s IP address.
AirPrint
AirPrint enables iOS and OS X devices to print wirelessly to AirPrint-compatible printers without installing printer drivers. Linux computers that use CUPS printer drivers also support AirPrint. Microsoft Windows computers can also provide AirPrint services with legacy printers. For details, see http://jaxov.com/2010/11/install-airprint-for-windows-the-easy-way/.
For a list of AirPrint-compatible printers, see https://support.apple.com/en-us/HT201311.
Maintaining Data Privacy
When a document is sent to a printer, a special print file is created by the print spooler. To prevent unauthorized users from opening the print file and extracting information from it, two methods can be used: user authentication and hard drive caching.
Using User Authentication
User authentication (which matches print jobs to the IP address of the computer or device requesting the print job) can be enabled at the printer itself or by security settings used on Active Directory-enabled networks.
When user authentication is enabled in the printer (a common feature on enterprise-level print or multifunction devices), the user must provide the appropriate identification during the print process. On an OS X system, this can be done through the Job Log portion of the printer submenu (the same menu that includes sections for Layout, Print Settings, and so on). On a Windows system, the printer driver or the network might prompt for this information.
Using Hard Drive Caching
On a system running Windows, print spool files are normally stored on the system hard drive at C:Windowssystem32spoolPRINTERS. If a different location is desired, make sure the location is not shared on the network to avoid access from unauthorized users.
The default location of the print spool files can be changed by selecting the printer or multifunction device in Devices and Printers, opening the Print Server properties dialog, clicking Advanced, clicking Change Advanced Settings, and specifying a different location.
Exam Preparation Tasks
Review All the Key Topics
Review the most important topics in the chapter, noted with the key topics icon in the outer margin of the page. Table 10-1 provides a reference to these key topics and the page numbers on which each is found.

Table 10-1 Key Topics for Chapter 10
Complete the Tables and Lists from Memory
Print a copy of Appendix B, “Memory Tables” (found on the CD), or at least the section for this chapter, and complete the tables and lists from memory. Appendix C, “Answers to Memory Tables,” also on the CD, includes completed tables and lists to check your work.
Define Key Terms
Define the following key terms from this chapter, and check your answers in the glossary.
electrophotographic (EP) process
Complete Hands-On Labs
Complete the hands-on lab, and then see the answers and explanations at the end of the chapter.
Lab 10-1: Printer Maintenance
Open the access panels on a laser printer and observe the position and appearance of the toner cartridge or imaging drum, fuser assembly, and paper trays. Clean the fuser if it appears dirty.
Check the page count on the laser printer and compare the count to the maintenance interval for installing a maintenance kit.
Check the ink levels in an inkjet printer. Run a nozzle check. If some nozzles are clogged, run the cleaning routine. Run the calibration utility.
Check the heating element on a thermal printer for debris and clean it if necessary.
Check the ribbon on an impact printer and change it if it appears faint or worn.
Lab 10-2: Printer Properties and Sharing
Review the printer properties and print preference dialogs for the printers you or your client uses. Note any settings that might cause sub-par print quality.
Use a virtual printer to create a PDF file.
Check the network settings for a printer being shared via Ethernet or Wi-Fi.
Set up a Windows Hosted Network connection for wireless print sharing.
Answer Review Questions
1. Place the steps in the laser printing imaging process in the correct order.
Charging
Cleaning
Developing
Exposing
Fusing
Processing
Transferring
2. True or False: During the charging step in the laser printing imaging process, the drum receives an electrostatic charge of -600 volts. Because the drum is photosensitive, it will retain its charge only if it is kept in the dark.
3. In Devices and Printers, which of the following graphics indicates the default printer?

A. A red square outlines the default printer.
B. A white checkmark on a green background indicates the default printer.
C. The two heads in the box indicate the default printer.
D. The red exclamation mark indicates the default printer.
4. A laser printer uses which of the following processes?
A. Line-by-line printing
B. Impact plus heat transfer
C. Impact against an inked ribbon
D. Whole page printing
5. You are attempting to print a large document to a laser printer. Each time you try to print, the printer stops at the same page in the document and generates a memory overflow error. Which of the following solutions does not solve this printing problem?
A. Adding more memory to your printer
B. Adding more memory to your computer
C. Removing graphics from the page where the error occurred
D. Printing the document at a lower resolution
6. How do inkjet printers create characters and graphics?
A. By spraying tiny dots of ink onto the page
B. By fusing fine grains of toner into the page
C. By using a thermal transfer ribbon
D. By using an ink impregnated ribbon
7. Which acronym refers to the colors used by an inkjet printer?
A. CMYB
B. CMYK
C. RBG
D. RBGY
8. In the following figure, which kind of problem does the right half of the screen demonstrate?

A. The drum of a laser printer has old toner clinging to it and needs cleaning.
B. The ribbon on an impact printer is old and is wearing out.
C. The heating mechanism of a thermal printer is not getting hot enough.
D. The print heads on an inkjet printer are clogged or faulty.
9. Thermal printers use which of the following?
A. A non-impact matrix of dots that can be heated and used in various combinations to create an image.
B. Toner to create an image and heated rollers to fix the toner to the paper.
C. Closely grouped nozzles of heated ink to produce an image.
D. An ink impregnated ribbon to create an image, followed by heated rollers to set the image.
10. Which type of printer typically uses multi-part forms?
A. Laser printer
B. Impact printer
C. Inkjet printer
D. Thermal printer
11. What is the name of the open-source printing system used by Linux?
A. PRT
B. LPT
C. XPS
D. CUPS
12. You have just bought a new printer and are about to install it. Which of the following statements best describes the best way to be sure that your drivers are up to date?
A. Use the installation disc that shipped with the printer.
B. Use Windows Update to automatically select the best drivers.
C. Go to the vendor’s website to select drivers.
D. Connect the printer to the computer and allow it to auto install.
13. Which of the following is not a typical print configuration setting for your printer or multifunction device?
A. Selecting duplex printing
B. Configuring collating
C. Choosing a cover page
D. Changing the orientation of the page
14. Which type of encryption is supported by a printer in Ad-Hoc mode?
A. WEP
B. WPA
C. WPA2
D. NIC
Answers and Explanations for Hands-On Labs
Lab 10-1: Printer Maintenance
The diagrams shown in Chapter 10 may vary from some actual models. Note any differences you might see.
If you discovered that the page count on a laser printer is beyond the maintenance interval, check with management to see if the printer has had a maintenance kit installed. The page count might not have been reset.
If you find that there are clogs in an inkjet print head but the printer has one or more colors almost empty, keep in mind that the cleaning process uses ink. Make sure replacement ink cartridges are available before cleaning. I recommend labeling ink cartridges and laser printer toner cartridges with the date of installation to help determine how long a typical cartridge lasts in use.
Lab 10-2: Printer Properties and Sharing
Some settings that could cause sub-par printing would be a mismatch of paper type settings and actual paper used on an inkjet printer or the use of economy print settings for final drafts. Call the users’ attention to issues of this type.
Most printers with built-in network ports can create a printout of the network settings. Make a printout for information or to have a way to recreate the settings in case of a problem with the printer.
Answers and Explanations to Review Questions
1. Step 1: Processing
Step 2: Charging
Step 3: Exposing
Step 4: Developing
Step 5: Transferring
Step 6: Fusing
Step 7: Cleaning
2. True. As long as the drum is kept in the dark, it will retain its charge. During the exposing phase, when the laser writes an image onto the drum, the areas where the laser strikes the drum lose their strong negative charge and become charged at only -100 volts. This lesser charge allows the toner—also charged at -600 volts—to stick to only the lower voltage areas, which contain the image to be printed.
3. B. A white checkmark on a green background indicates the default printer.
4. D. A laser printer stores an entire page in its memory and then prints the entire page at one time. An inkjet printer prints one line at a time. Thermal printers do not use impact printing. A dot matrix printer is an impact printer. It creates characters by pressing each character onto an inked ribbon and then onto the paper.
5. B. Because a laser printer is a page printer, it will not print any part of a page until the entire page has been loaded into the printer’s memory. Increasing the computer’s memory will not improve the printer’s ability to receive and store the pages of the document. Increasing the printer’s memory will enable it to store more information. Also, removing graphics and lowering the resolution will decrease the amount of information stored on a single page and will therefore decrease the amount of memory required to store the page in the printer’s memory.
6. A. Inkjet printers use closely grouped nozzles of ink to spray tiny dots of color onto the paper to form letters, numbers and graphics.
7. B. CMYK refers to cyan, magenta, yellow, black.
8. D. The diagram shows the result of a nozzle check for an inkjet printer. If the print head nozzles are clean and are working properly, the test pattern should look like the left half of the screen. If they are clogged and are in need of cleaning, the pattern may look similar to the right side of the screen.
9. A. Thermal printers use either dot matrix or dye sublimation. The dot-matrix mechanism has a print head that uses a series of raised dots that can be used to create an image. These dots are heated and used in conjunction with special heat-sensitive paper or ribbon to transfer the image to the paper.
10. B. Multi-part forms require an impact printer to transfer the image through multiple layers of paper. Laser, inkjet and thermal printers will only print on the top layer of the multi-part form.
11. D. CUPS is the open-source printing system used by Linux.
12. C. The vendor’s website will have the most updated drivers available. The disc that ships with the printer will contain the vendor’s drivers, but they might not be the most updated versions. The drivers included in Windows might not support recent printers and Windows Update in version 8/8.1/10 does not update printer drivers.
13. C. Choosing a cover page is a function of the current application (such as a word processor), not the printing process.
14. A. Ad-Hoc mode supports only WEP encryption. This type of encryption is not as secure as WPA or WPA2 and is not generally recommended for secure networking. The NIC is a network interface card, not a type of encryption.