
Today, with the proliferation of multi-touch devices, any visualization targeting mass consumption needs to worry about its interactability not only through the traditional pointing device, but through multi-touches and gestures as well. In this recipe we will explore touch support offered by D3 to see how it can be leveraged to generate some pretty interesting interaction with multi-touch capable devices.
Open your local copy of the following file in your web browser:
https://github.com/NickQiZhu/d3-cookbook/blob/master/src/chapter10/touch.html.
In this recipe we will generate a progress-circle around the user's touch and once the progress is completed then a subsequent ripple effect will be triggered around the circle. However, if the user prematurely ends his/her touch, then we shall stop the progress-circle without generating the ripples:
<script type="text/javascript">
    var initR = 100,
        r = 400,
        thickness = 20;

    var svg = d3.select("body")
            .append("svg");

    d3.select("body")
            .on("touchstart", touch)
            .on("touchend", touch);

    function touch() {
        d3.event.preventDefault();

        var arc = d3.svg.arc()
                .outerRadius(initR)
                .innerRadius(initR - thickness);

        var g = svg.selectAll("g.touch")
                .data(d3.touches(svg.node()), function (d) {
                    return d.identifier;
                });

        g.enter()
            .append("g")
            .attr("class", "touch")
            .attr("transform", function (d) {
                return "translate(" + d[0] + "," + d[1] + ")";
            })
            .append("path")
                .attr("class", "arc")
                .transition().duration(2000)
                .attrTween("d", function (d) {
                    var interpolate = d3.interpolate(
                            {startAngle: 0, endAngle: 0},
                            {startAngle: 0, endAngle: 2 * Math.PI}
                        );
                    return function (t) {
                        return arc(interpolate(t));
                    };
                })
                .each("end", function (d) {
                    if (complete(g))
                        ripples(d);
                    g.remove();
                });

        g.exit().remove().each(function () {
            this.__stopped__ = true;
        });
    }

    function complete(g) {
        return g.node().__stopped__ != true;
    }

    function ripples(position) {
        for (var i = 1; i < 5; ++i) {
            var circle = svg.append("circle")
                    .attr("cx", position[0])
                    .attr("cy", position[1])
                    .attr("r", initR - (thickness / 2))
                    .style("stroke-width", thickness / (i))
                .transition().delay(Math.pow(i, 2.5) * 50).duration(2000).ease('quad-in')
                    .attr("r", r)
                    .style("stroke-opacity", 0)
                    .each("end", function () {
                        d3.select(this).remove();
                    });
        }
    }
</script>
This recipe generates the following interactive visualization on a touch enabled device:

Touch Interaction
Event listener for touch events are registered through D3 selection's on function similar to what we have done with mouse events in the previous recipe:
d3.select("body")
            .on("touchstart", touch)
            .on("touchend", touch);
One crucial difference here is that we have registered our touch event listener on the body element instead of the svg element since with many OS and browsers there are default touch behaviors defined and we would like to override it with our custom implementation. This is done through the following function call:
d3.event.preventDefault();
Once the touch event is triggered we retrieve multiple touch point data using the d3.touches function as illustrated by the following code snippet:
var g = svg.selectAll("g.touch")
    .data(d3.touches(svg.node()), function (d) {
        return d.identifier;
    });
Instead of returning a two-element array as what d3.mouse function does, d3.touches returns an array of two-element arrays since there could be multiple touch points for each touch event. Each touch position array has data structure that looks like the following:
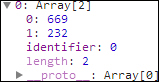
Touch Position Array
Other than the [x, y] position of the touch point each position array also carries an identifier to help you differentiate each touch point. We used this identifier here in this recipe to establish object constancy. Once the touch data is bound to the selection the progress circle was generated for each touch around the user's finger:
        g.enter()
            .append("g")
            .attr("class", "touch")
            .attr("transform", function (d) {
                return "translate(" + d[0] + "," + d[1] + ")";
            })
            .append("path")
                .attr("class", "arc")
                .transition().duration(2000).ease('linear')
                .attrTween("d", function (d) { // <-A
                    var interpolate = d3.interpolate(
                            {startAngle: 0, endAngle: 0},
                            {startAngle: 0, endAngle: 2 * Math.PI}
                        );
                    return function (t) {
                        return arc(interpolate(t));
                    };
                })
                .each("end", function (d) { // <-B
                    if (complete(g))
                        ripples(d);
                    g.remove();
                });
This is done through a standard arc transition with attribute tweening (line A) as explained in Chapter 7, Getting into Shape. Once the transition is over if the progress-circle has not yet been canceled by the user then a ripple effect similar to what we have done in the previous recipe was generated on line B. Since we have registered the same event listener touch function on both touchstart and touchend events, we can use the following lines to remove progress-circle and also set a flag to indicate that this progress circle has been stopped prematurely:
        g.exit().remove().each(function () {
            this.__stopped__ = true;
        });
We need to set this stateful flag since there is no way to cancel a transition once it is started; hence, even after removing the progress-circle element from the DOM tree the transition will still complete and trigger line B.
We have demonstrated touch interaction through the touchstart and touchend events; however, you can use the same pattern to handle any other touch events supported by your browser. The following list contains the proposed touch event types recommended by W3C:
touchstart: Dispatched when the user places a touch point on the touch surfacetouchend: Dispatched when the user removes a touch point from the touch surfacetouchmove: Dispatched when the user moves a touch point along the touch surfacetouchcancel: Dispatched when a touch point has been disrupted in an implementation-specific manner
- Chapter 6, Transition with Style, for more details on object constancy and the ripple effect technique used in this recipe
- Chapter 7, Getting into Shape, for more details on the progress-circle attribute tween transition technique used in this recipe
- W3C Touch Events proposed recommendation for a complete list of touch event types: http://www.w3.org/TR/touch-events/
- d3.touch API document for more details on multi-touch detection: https://github.com/mbostock/d3/wiki/Selections#wiki-d3_touches