
So far we have covered some important aspects of the force layout such as gravity, charge, friction, and momentum. In this recipe we will discuss another critical functionality: links. As we have mentioned in the introduction section, D3 force layout implements a scalable simple graph constraint, and in this recipe we will demonstrate how link constraint can be leveraged in conjunction with other forces.
Open your local copy of the following file in your web browser:
https://github.com/NickQiZhu/d3-cookbook/blob/master/src/chapter11/link-constraint.html.
In this recipe, whenever the user clicks their mouse we will generate a force-directed ring of particles constrained by links between nodes. Here is how it is implemented:
<script type="text/javascript">
    var force = d3.layout.force()
            .gravity(0.1)
            .charge(-30)
            .friction(0.95)
            .linkDistance(20)
            .linkStrength(1);

    var duration = 60000; // in milliseconds

    var svg = d3.select("body").append("svg:svg");

    force.size([1100, 600])
        .on("tick", function () {
            // omitted, will be discussed in details later
            ...
        });

    function offset() {
        return Math.random() * 100;
    }

    function createNodes(point) {
        var numberOfNodes = Math.round(Math.random() * 10);
        var nodes = [];

        for (var i = 0; i < numberOfNodes; ++i) {
            nodes.push({
                x: point[0] + offset(),
                y: point[1] + offset()
            });
        }

        return nodes;
    }

    function createLinks(nodes) {
        // omitted, will be discussed in details later
        ...
    }

    svg.on("click", function () {
        var point = d3.mouse(this),
                nodes = createNodes(point),
                links = createLinks(nodes);

        nodes.forEach(function (node) {
            svg.append("circle")
                    .data([node])
                .attr("class", "node")
                .attr("cx", function (d) {return d.x;})
                .attr("cy", function (d) {return d.y;})
                .attr("r", 1e-6)
                .call(force.drag)
                    .transition()
                .attr("r", 7)
                    .transition()
                    .delay(duration)
                .attr("r", 1e-6)
                .each("end", function () {force.nodes().shift();})
                .remove();
        });

        links.forEach(function (link) {
            // omitted, will be discussed in details later
            ...
        });

        nodes.forEach(function (n) {force.nodes().push(n);});
        links.forEach(function (l) {force.links().push(l);});

        force.start();
    });
</script>
This recipe generates force-directed particle rings on a mouse click as shown in the following screenshot:

Force-Directed Particle Rings
Link constraint adds another useful dimension to force assisted visualization. In this recipe we set up our force layout with the following parameters:
var force = d3.layout.force()
            .gravity(0.1)
            .charge(-30)
            .friction(0.95)
            .linkDistance(20)
            .linkStrength(1);
Besides gravity, charge, and friction, this time we have two additional parameters: link distance and link strength. Both parameters are exclusively link related:
linkDistance: Could be a constant or a function; defaults to 20 pixels. Link distances are evaluated when the layout starts, and it is implemented as weak geometric constraints. For each tick of the layout, the distance between each pair of linked nodes is computed and compared to the target distance; the links are then moved towards each other or away from each other.linkStength: Could be a constant or a function; defaults to 1. Link strength sets the strength (rigidity) of links with value in the range of[0, 1]. Link strength is also evaluated on layout start.
When the user clicks their mouse, a random number of nodes are being created and put under force layout's control similar to what we have done in the previous recipes. The major addition in this recipe is the link creation and its control logic is shown in the following code snippet:
    function createLinks(nodes) {
        var links = [];
        for (var i = 0; i < nodes.length; ++i) { // <-A
            if(i == nodes.length - 1)
                links.push(
                    {source: nodes[i], target: nodes[0]}
                );
            else
                links.push(
                    {source: nodes[i], target: nodes[i + 1]}
                );
        }
        return links;
    }
...
svg.on("click", function () {
        var point = d3.mouse(this),
                nodes = createNodes(point),
                links = createLinks(nodes);
    ...

        links.forEach(function (link) {
            svg.append("line") // <-B
                    .data([link])
                .attr("class", "line")
                .attr("x1", function (d) {
                   return d.source.x;
                    })
                .attr("y1", function (d) {
                   return d.source.y;
})
                .attr("x2", function (d) {
                   return d.target.x;
                    })
                .attr("y2", function (d) {
                   return d.target.y;
    })
                    .transition()
                    .delay(duration)
                .style("stroke-opacity", 1e-6)
                .each("end", function () {
                   force.links().shift();
    })
                .remove();
        });

        nodes.forEach(function (n) {force.nodes().push(n);});
        links.forEach(function (l) { // <-C
          force.links().push(l);
   });

        force.start();
}
In the createLinks function, n-1 link objects were created connecting a set of nodes into a ring (for loop on line A). Each link object must have two attributes specified as source and target, telling force layout which pair of nodes are connected by this link object. Once created, we decided to visualize the links in this recipe using svg:line element (line B). We will see in the next recipe that this does not have to always be the case. As a matter of fact, you can use pretty much anything; you can imagine to visualize (including hiding them, but retain the links for layout computation) the links as long as it makes sense for the audience of your visualization. After that we also need to add link objects to force layout's links array (on line C) so they can be put under force layout's control. Finally, we need to translate the positioning data generated by force layout to SVG implementation in the tick function for each link similar to what we did for the nodes:
force.size([1100, 600])
        .on("tick", function () {
            svg.selectAll("circle")
                .attr("cx", function (d) {return d.x;})
                .attr("cy", function (d) {return d.y;});

            svg.selectAll("line")
                .attr("x1", function (d) {return d.source.x;})
                .attr("y1", function (d) {return d.source.y;})
                .attr("x2", function (d) {return d.target.x;})
                .attr("y2", function (d) {return d.target.y;});
        });
As we can see here, D3 force layout has again done most of the heavy lifting, therefore, all we need to do is simply set {x1, y1} and {x2, y2} on the svg:line elements in the tick function. For reference, the following screenshot is what a link object looks like after it has been manipulated by force layout:

Link Object
One last additional technique worth mentioning in this recipe is force-enabled dragging. All nodes generated by this recipe are "draggable" and force layout automatically re-computes all forces and constraints as user drags the rings around as shown in the following screenshot:
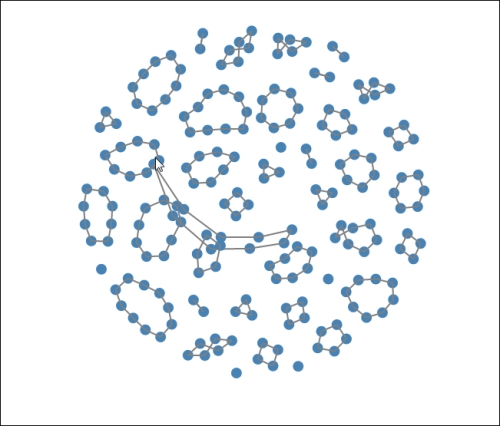
Dragging with Force Layout
D3 force layout has dragging built-in, hence, this fancy effect is quite easily achieved by simply calling force.drag on the svg:circle selection (line D):
nodes.forEach(function (node) {
            svg.append("circle")
                    .data([node])
                .attr("class", "node")
                ...
                .call(force.drag) // <-D
                    .transition()
                ...
                .each("end", function () {force.nodes().shift();})
                .remove();
});- Scalable, Versatile and Simple Constrained Graph Layout: http://www.csse.monash.edu.au/~tdwyer/Dwyer2009FastConstraints.pdf
force.links(): https://github.com/mbostock/d3/wiki/Force-Layout#wiki-linksforce.linkDistance(): https://github.com/mbostock/d3/wiki/Force-Layout#wiki-linkDistanceforce.linkStrength(): https://github.com/mbostock/d3/wiki/Force-Layout#wiki-linkStrengthforce.drag: https://github.com/mbostock/d3/wiki/Force-Layout#wiki-drag