
The Magic of Light

Mt. Whitney is the highest point in California at 14,494 feet. A shaft of sunshine broke through the dense overcast this morning providing dramatic light for this mountain icon.
The path to shooting excellent nature photographs is easier to follow if you truly understand how crucial light is to making extraordinary images. If you photograph a hawk, wildflower, or landscape, you are not capturing the subject with your digital sensor. No matter how hard you examine the sensor, you won’t find the subject hidden in it somewhere. Yet, you can produce an image of it so something had to be captured. Photographers capture the light that illuminates the subject. Information about the light regarding intensity and color is captured by pixels. This data is processed to reconstruct an image of the subject.
Light provides plenty of information about the subject. It reveals the color and shape of the subject. Certain kinds of light such as the soft light of a foggy morning or the red light of dawn create mood. Light can show texture and suggest depth in an image. Some photographers say there is good light and bad light. Actually, I think all light is good, but some light is better for making certain types of photographs. Even poor light for photography can be modified to become beautiful light. Understanding those factors that make light photogenic is the key to using light well. I cannot stress this enough! If you learn to photograph using the best possible light for the subject, your photos improve quickly and you will certainly achieve the pleasure and success you are seeking from nature photography.
FANTASTIC LIGHT CAN BE FLEETING
Before we examine the qualities of light and methods to influence the light on the subject, I want to emphasize that it is critical to master your camera and make it your friend. When the weather conditions and the sun interact to create truly extraordinary light, it often doesn’t last very long. You must be able to react instantly to rapidly changing natural light that is often created by small openings suddenly appearing in cloud cover, only to disappear minutes later. If you are struggling with a tripod that is difficult to use, trying to figure out what shooting mode to use or metering pattern, or slow in getting your gear out of the camera bag, many wonderful images that are blessed with fabulous light will only be a memory in your head. Most photographers understand the need to be speedy when photographing wildlife action, but even landscapes may require speed to capture the light. At times, it does seem like you are chasing the light, trying to catch it at just the right moment before it disappears beneath the horizon or behind the clouds.

The soft light and fog impart a strong sense of depth as the far bison disappear into the damp mist.
Some excellent light conditions are easy to predict, but all too temporary. I photograph in some of the best game parks of Kenya which include Samburu, Lake Nakuru, and Masai Mara every year. The opportunities for photographing wildlife are superb every day. I especially like the red light at dawn or dusk for wildlife photography because the warm light brings out the colors in the animals fur and the low angle of the sun softens the shadows. Unfortunately, the equatorial sun rises rapidly in the sky so by 2 hours after sunrise, the golden color in the light is gone.
Let’s look at one example where fleeting light really makes the image. I have been fortunate to conduct fall color photography workshops in Michigan’s beautiful Upper Peninsula for the past 25 years. The fall colors are superb every year, but the peak does vary from 1 year to the next. Early October tends to be an unsettled period as summer loses out to “Old Man Winter”. The weather changes rapidly from hour to hour as storm clouds gallop across the moody skies on a northwest wind.
On calm mornings during the peak of fall color, I lead my students to small lakes where the opposite side is a riot of reds, oranges, and yellows from the maple and birch trees. All of these colors are reflected in the lake’s still water offering stunning photo opportunities. The red light of early morning sun really brings out the colors in the fall foliage and the reflections. This is terrific light, but if luck prevails, it can get even better. Occasionally, we’ll have a calm, but mostly cloudy morning, but we may gather at a secluded lake anyway hoping for a break in the clouds. Should the early morning sun worm it’s way through a hole in the clouds as they drift by, the entire lake lights up and the storm clouds in the western sky turn black. The contrast between the colorful fall foliage and the black storm clouds is so dramatic and photogenic that it can overload your visual senses. It is a rare opportunity to make images with incredible light, but it may not last long. Often, in only a matter of minutes, another cloud slides in from the north and chases away the spellbinding light.
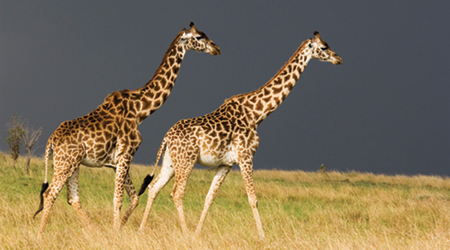
These Masai giraffes are bathed with golden sunshine at sunset. The black storm clouds behind them make this scene especially stunning.

Thornton Lake in Northern Michigan is always stunning at peak autumn color, but especially so at dawn when black storm clouds fill the western sky.
THE QUALITIES OF LIGHT
Light possesses four qualities that determine how photogenic it is. You must have enough light so it can be accurately recorded by the cameras sensor. Numerous factors influence a second important quality which is color. A third factor is the direction the light is coming from. Finally, harsh light such as bright sun tends to create brilliant highlights with dark shadows which is known as high contrast light. The light on a cloudy day tends to minimize deep shadows so the light is low in contrast. It’s imperative that you understand how these four factors: amount, color, direction, and contrast work together to offer you fantastic light or work against you.
AMOUNT OF LIGHT
You need a certain amount of light to photograph. If it is totally dark, you won’t be taking many traditional images. Often you won’t have enough shutter speed to shoot sharp images with sufficient depth of field if the light is too dim.
Assume you are focused on a deer in dim predawn light. With a 500 mm f/4 lens, your camera suggests proper exposure is 1/30 second at f/8 with the cameras ISO set at ISO 100. You know from experience (and reading this book) that shooting a crisp image at 1/30-second shutter speed with a 500 mm lens is slim to none-even on a tripod. What are your options? Perhaps it might be possible to wait a bit for the sun to rise above the horizon increasing the amount of light. Most animals tend to move on so it’s not a good option here, but could work if you were photographing a wildflower that isn’t going to wander away. An effective way to “increase” the amount of light is to increase the sensitivity of the sensor by changing the ISO from ISO 100 to ISO 400, a gain of 2 stops of light. Now you could successfully photograph the deer by using an exposure combination of 1/125 second at f/8. Another way to “increase” the ambient light without changing the ISO speed is to open up the lens 2 stops, from f/8 to f/4. This also permits using 1/125 second at f/4 giving you enough shutter speed, but reducing your depth of field.

About 100 wood ducks frequent this wooded pond. The light was so dim on this cloudy morning that using ISO 500 was necessary to get enough shutter speed to shoot sharp images.
Another way to work in dim light is to use a tilt/shift lens to tilt the lens a bit so you still get plenty of depth of field without stopping down the lens much. You wouldn’t use the tilt/shift lens on a deer, but it works fine on a patch of wildflowers. Finally, if all else fails, it is possible to bring extra light with you and fire a flash.
Dim light is effective for certain subjects because the contrast is low, but forces you to learn and use the best techniques. Using a tripod is mandatory and be sure to use a cable release or self timer to fire the camera for critical sharpness. The tripod enables you to use slow shutter speeds in most situations and still get perfectly sharp images.
TOO MUCH LIGHT?
You might be surprised to find there can be too much ambient light at times. Anyone who likes to turn a waterfall or wave crashing on the rocks into a silky mass of motion knows what I mean. During the middle of a cloudy day which provides wonderful light for a waterfall in the forest, the exposure might be 1/8 second at f/22 with the camera set on ISO 400. To show the motion of the water cascading over the rocky falls, a longer shutter speed in the 1 or 2-second range is needed. There are several ways to effectively reduce the amount of ambient light hitting the sensor. The obvious way is to set the ISO to the lowest possible setting, typically ISO 100, but it could be ISO 50 on some cameras and ISO 200 on others. In this example, moving the ISO from ISO 400 to ISO 100 eliminates 2 stops of light so proper exposure is now ½ second at f/22. To make the shutter speed even longer, put a polarizing filter on the lens. Depending on how it is rotated, it subtracts about 1 to 2 stops of light and removes quite a bit of glare too, revealing the color and detail hidden behind the glare. Let’s say the polarizer subtracts 2 stops of light. Now proper exposure is 2 seconds at f/22 which easily blurs the flowing water.
USE THE TIME OF DAY TO ADVANTAGE
I am a waterfalls addict so I seek them out to photograph frequently. An excellent strategy for photographing them so all the slow shutter speed options are available to you is to visit the waterfalls late in the day. As the sun gradually sets, the ambient light drops until it reaches a level where it is easy to use the shutter speed you want. If you are looking for the silky water effect of an 8-second exposure, waiting till sunset will certainly give you the chance to shoot it. Just be sure to have a flashlight or headlamp (my choice) with you to make your return trip easier.
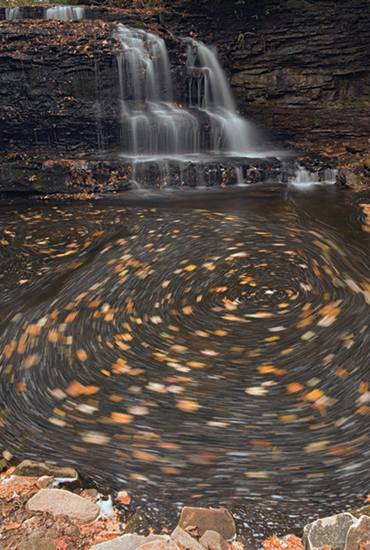
The shutter was open for a few seconds allowing these recently fallen autumn leaves to trace their path as they swirl about in the whirlpool at the base of Rock River Falls. This is an unusual image depicting motion that can be captured with a camera, but you can’t see when viewing the scene.
Digital photographers don’t need to use many filters because it is so easy to adjust color later on, but some filters are exceedingly useful to digital photographers. A special filter that allows you to use a long exposure to let a flock of geese blur as they explode from the marsh, wildflowers to become swaths of color as they sway in the breeze, or showcase the movement of water is called the neutral density (ND). It does not (or shouldn’t) affect the color of the light that passes through it because it is a neutral gray. These filters come in different strengths which block a specific amount of light. The one I favor is a 0.9ND filter. ND filters are made by most companies that make filters. They come in various sizes to fit the filter threads of your lenses and in different densities. Each 0.1 value is equivalent to 1/3 stop of light. Therefore, a 0.6ND filter blocks 2 stops of light while the 0.9ND filter I use blocks 3 stops of light from passing to the sensor. If the exposure is ½ second at f/22 without the filter, adding a 0.9ND filter blocks 3 stops of light, making a 4-second exposure possible. The drawback to using strong ND filters is they make the viewfinder darker and may make the autofocus mechanism become inaccurate or not work at all. The 0.9ND filter I use darkens the viewfinder by 3 stops so it is harder to compose the image and focus critically, especially if the light is already dim. A stronger ND filter makes the viewfinder so dark that it might be impossible to focus accurately in dim light so don’t overdo it.
COLOR OF LIGHT
The color of light is determined by its wavelength. In college physics, I met Roy G. Biv who isn’t a person, but rather a way to memorize the sequence of visible colors in the light. If you take the first letter of each color in the series of colors: red, orange, yellow, green, blue, indigo, and violet, you generate the mnemonic device Roy G. Biv. Red light has the longest wavelength of the colors listed here and the wavelengths get progressively shorter as you proceed to violet. Short wavelengths have high energy, but they don’t penetrate obstacles very well. Red wavelengths are less energized, but penetrate better because they are longer.
Enough of this physics! How does all this help us understand the colors of the natural things we want to photograph. A sunrise is red because all the light has to penetrate a great deal of our earth’s atmosphere when the sun is low on the horizon as opposed to being directly overhead. The shorter wavelengths on the blue end tend to be absorbed or scattered by dust and water molecules leaving only the longer red wavelengths to penetrate. That’s why sunlight at the beginning or end of the day has such a pronounced red cast. Since only a small portion of the other colors are able to penetrate the atmosphere, the red and orange wavelengths predominate. The red light early and late in the day is extremely photogenic light for many subjects. Mammals, birds, and landscapes photograph beautifully in red light. However, red light isn’t always desirable. Red hurts the color of blue wildflowers, imparting an unwanted magenta cast to them.
As the sun climbs higher in the sky, the light from the sun travels through less atmosphere so the other colors penetrate better which increases their amount in the light, reducing the red effect. Eventually, the light may approach a middle of the day bright sun temperature of 5500 K which is often called white light. A lower Kelvin temperature such as 3000 K is very red while a higher value such as 9000 K is blue light indeed. As the sun descends in the western sky, the Kelvin temperature falls again and becomes red just as it sinks below the horizon.
During the middle portions of a sunny day, the color temperature of the light can change dramatically. While the color temperature might be close to 5500 K, if you photograph a wildflower that is growing in the shade of a large oak tree, the color is quite different. Since the sun cannot strike the wildflower directly because the tree is blocking the light, the wildflower is illuminated by the blue sky. The sky is blue because molecules in the upper atmosphere tend to scatter the shorter wavelengths on the blue end of the visible light spectrum. Eventually, this scattered blue light is reflected down to the earth and illuminates the shady areas. This means a lot to photographers. Photographing a yellow wildflower in the shade will produce an image that is unnaturally blue in color, something to be avoided. On the other hand, the natural blue cast in the shade can be used to enhance the color of a blue wildflower so it can be beneficial too, depending on the subject. Normally it is wise to avoid photographing warm-colored subjects in blue light.

The light on a cloudy day has a blue cast in it. Extra blue in the light is unfavorable for photographing warm-colored subjects, but can be helpful when blue is a key component of these larkspur wildflowers.
Film photographers use warming filters or a touch of fill-flash to reduce the effect of the blue light. Digital photographers have it much easier which I will explain shortly.
Another light condition that you frequently encounter is cloudy weather. Clouds tend to scatter blue light too so light has a blue cast on cloudy days. However, the blue in the light on a cloudy day isn’t as great as the blue in the shade of a sunny day. It is important to understand that open shade tends to have more blue in the light than on a cloudy day. You will soon be introduced to the concept of white balance so understanding how and why the color of light changes during the day helps you master white balance.
Your surroundings influence the color of the light on the subject. A terrible situation is a white mushroom growing in a forest. Whether it is cloudy or sunny, if the mushroom isn’t in the sun, the light has a blue cast to it. You could use a warming filter or touch of fill-flash to take out the blue, but another color is present too. Green leaves reflect primarily green light. So in addition to the blue light, there is a strong green color cast to deal with too. Warming filters won’t remove the green light so you might have to resort to a magenta filter which does absorb green. This witch’s stew of blue–green light was tough for film to handle, but it is easy to solve with digital by using the white balance controls.
White Balance
The color of natural light depends on the time of the day, cloud cover, and colored objects reflecting light on the subject. Our brain tends to filter out color casts. We can look at a white flower on an overcast day without seeing the blue color cast in the light. But, digital sensors record the light as they “see” it. A white flower photographed in blue light has a blueish cast unless we take corrective action first. Fortunately, digital cameras offer a white balance control so you can closely (but not always perfectly) adjust the prevailing color cast in the light to make the image appear as if it was taken in white light without a color cast.
Digital cameras offer several white balance settings which may include auto, daylight, shade, cloudy, tungsten, white fluorescent light, flash, custom, and color temperature. Custom, color temperature, and auto are settings that can be adjusted. Daylight, shade, cloudy, tungsten, white fluorescent light, and flash are fixed corrections that are often referred to as presets. You must learn to decide which setting is best for the shooting situation.
Auto white balance
The auto setting let’s the camera examine the light so it can adjust the white balance to match the light. This might sound like the best way to go and it often works well, but sometimes the camera just doesn’t know what you want. For instance, using auto white balance to photograph a gorgeous red sunset drains the color from the sky-not exactly your intention. For outdoor images, the auto setting normally works fine and gets you close to the best white balance.
Daylight, shade, and cloudy
Daylight, shade, and cloudy presets are easy enough. If the subject is illuminated by the sun, use the daylight preset to avoid color casts. As you will remember from our previous discussion, the light is somewhat blue on a cloudy day so selecting the cloudy preset removes the unwanted blue cast. The light in the shade is even more blue so the shade preset works well anytime the subject is in the shade. However, it isn’t always desirable to remove a color cast. When photographing blue flowers in the shade, it might be best to put the white balance on daylight to keep the blue cast so the blue flowers do come out blue in the image.
Tungsten and fluorescent light
You’ll encounter tungsten and white fluorescent light indoors. While you won’t be making many (if any) nature images using this light source, you will certainly want to use one of these presets to match the light source when photographing your friends, family, and pets indoors. These light sources vary a lot in terms of color, so using custom white balance may be more accurate.
Flash
Digital cameras offer a flash preset because the color temperature of most flashes is slightly higher in degrees Kelvin (around 6000 K) than standard white daylight. Unless the flash has a built-in filter that is pale yellow, the color of the light emitted by the flash is slightly blue. Using the flash preset takes care of the blue color cast by producing a slightly warm (yellow) balance when it is chosen.
Custom white balance
This setting sounds complicated and difficult to use, but it is easy once you get used to it and incredibly useful in difficult light situations. If I shot JPEGs most of the time, I would use custom white balance most of the time too. The exact method of using custom white balance varies from camera to camera, but here is a summary of how it works. Go to a well-stocked camera store and buy an 18% gray card for a few bucks. (Some manuals tell you to use a white sheet of paper, but the gray card may be more accurate.) Set the camera on any white balance setting and photograph the gray card in the exact same light as the subject you intend to photograph. Set the camera on custom white balance. Now bring the image of the gray card up on the LCD monitor. Select the image of the gray card to import the white balance data. With the camera set on custom white balance, go ahead and photograph the subject to get excellent color. Using custom white balance is a way to teach the camera how to render white as white, no matter what color casts are present in the light. Not only does white come out as white, but also all of the other colors are accurate too.

The light illuminating this mushroom has a decided blue color cast on this cloudy day and a green cast too from light reflecting off the green leaves in the forest. The best way to deal with this blue–green light is to use custom white balance if you shoot JPEGs. If you shoot RAW images, then the blue–yellow and green–magenta colors are easily adjusted in the RAW conversion.
The advantage custom white balance has over picking a cloudy setting is the cloudy setting merely takes out some of the blue and thereby makes the image more yellow. But, a green or magenta color cast would not be corrected by the cloudy setting. Custom white balance corrects for both blue/yellow and green/magenta color casts at the same time. Remember the white mushroom in the green forest on a cloudy day? The light has a blue and green color cast that is nicely neutralized with the custom white balance setting. Just be sure to photograph that gray card using the same light that is illuminating the mushroom.
Color temperature
Finally, the color temperature choice permits you to set the color temperature in degrees Kelvin. The Canon 20D for example can be set anywhere between 2800 K and 10,000 K in 100 K increments. This setting is useful if you have a color temperature meter that measures the color casts in the light so you can determine how much filtration is necessary to neutralize the light. Since color temperature meters are expensive and not necessary anymore to get great color, you probably won’t be using this setting much. Nevertheless, you can use color temperature effectively without a color temperature meter. If you like magenta sunrises or sunsets, try setting the color temperature to 10,000 K. Your image will have a strong magenta color cast which might be just what you want!
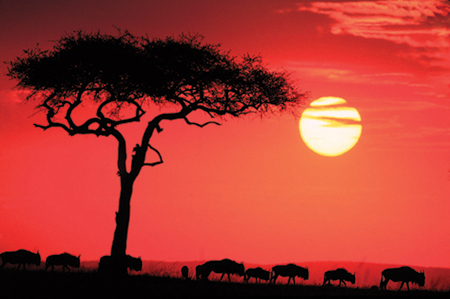
Setting the color temperature white balance control at 10,000 K will add lots of magenta to your sunrise or sunset. These are migrating wildebeest as they pass underneath an acacia tree at dawn.
Are you surprised that setting the color temperature to 10,000 K produces a magenta image? Isn’t the color of 10,000 K light extremely blue? It sure is! Magenta light on the Kelvin scale is around 2000 K, not 10,000 K. This can be confusing at first because digital cameras and image editing software such as PhotoShop work the same way. By setting the color temperature to 10,000 K, you are telling (lying if you will) the camera or software program that you are shooting in very blue light so the camera and software add a lot of red to counteract the blue light. Since the light really wasn’t blue, you get a magenta image which might be just what you want.
JPEG AND RAW WHITE BALANCE CONSIDERATIONS
One of the drawbacks to shooting JPEGs is you don’t have as much color adjustment capability as you do with RAW. You do have some, but it is not desirable to make a lot of color corrections to a JPEG image because the file is already compressed so some data is lost. It is important to get the white balance as close to what you want as possible when you shoot the image. Either use the presets to match the light or use the custom white balance setting for best results.
If you prefer to shoot RAW files, the white balance can easily be adjusted after the image is made without any loss of quality. You might decide to use the auto setting all of the time since you plan to manually adjust the blue/yellow and green/magenta color sliders anyway with your RAW converter program. That means you don’t need to worry about actually matching the light while shooting in the field. It is one less thing to worry about. This is an effective way to operate, but many still prefer to match the color of the light so take your choice.
Here is what we do. We shoot RAW images only and process them later with PhotoShop CS3. Even though we only shoot RAW, we can still view the image on the LCD monitor of our cameras. How is this possible? A part of the RAW image is a tiny JPEG file that brings up the image on the monitor. We find it easier to do our initial edit of RAW images if this JPEG is as attractive as possible. Since we like warmcolored images, we tend to leave the white balance setting on cloudy most of the time even if it is sunny. This produces a little warmer (yellow) JPEG image which helps us make our initial selection before converting the RAW images.
CHOOSING THE COLOR SPACE
You must select the appropriate color space which ultimately determines the range of colors you’ll see in your image and get on the print. The two common color spaces found on digital cameras are sRGB and Adobe RGB 1998. The color space sRGB is often the default setting. This color space is best for photographers who shoot JPEG images and plan to make prints from the images by sending the image file directly to the printer without working on the file with software. This color space was originally developed to work with the limitations of computer monitors for displaying a wide range (gamut) of colors. Now computer monitors are much better at displaying colors so the more narrow range of color offered by sRGB is a limiting factor.
Adobe RGB 1998 offers a wider range of colors and is the preferred color space for professional nature photographers. This color space was made for commercial printing to extract the maximum color detail out of a digital file. Since skilled nature photographers want the best color possible in their prints, it is the color space most frequently used. Stock agencies also prefer digital images that are sent to them to be shot in this color space. If you hope to sell images, make your own prints, and plan to work on your images with software such as PhotoShop, be sure to set the camera to Adobe RGB 1998. This is the color space I always use. However, some applications such as digital projection and posting web images at the present time require sRGB color space for the best results. This is not a problem since images shot with Adobe RGB 1998 can easily be converted to the sRGB color space when it is needed.
DIRECTION OF LIGHT
Front-Lighting
From the very beginning, most photographers are advised to photograph their subject with the light coming from behind them. This direction of light is called front-lighting and it does reveal the shape and colors of the subject nicely. Front-lighting is low in contrast because the frontal direction of the light on the subject causes shadows to fall behind the subject so they aren’t “seen” by the sensor. Front-lighting works very nicely for many subjects so it is wise to use it much of the time. However, front-lighting is used so much that it tends to make images appear commonplace and even boring. Whenever possible, I suggest trying another light direction to see if it works better than front-light.
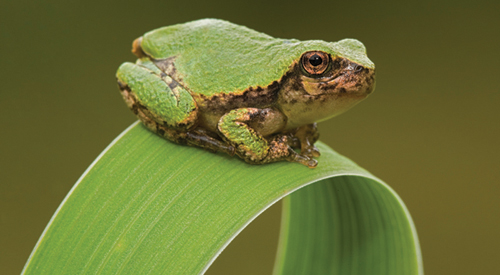
This baby gray treefrog (adults are gray) is quietly waiting for a snack to walk by. Due to the blue and green light that is present, this frog photographs best by using custom white balance and soft front-lighting to reveal the detail in the skin.
This light strikes the subject from the side. This is a gorgeous light direction to use when it works, but you do need the right kind of subject. Sidelighting has more inherent contrast than front-lighting because it causes shadows to fall to the side of the subject opposite the light source which is recorded by the camera’s sensor. This increase in contrast is frequently effective because it reveals texture in the subject. Sidelighting is particularly good on sand dunes, snow scenes, and even wildlife if the light isn’t too harsh. Sidelight is perfect for revealing the patterns in a sand dune such as those in Death Valley National Park. The shadows created by sidelight impart a feeling of depth in a two-dimensional image. While sidelight isn’t right for every subject, when it does work, it produces memorable images.
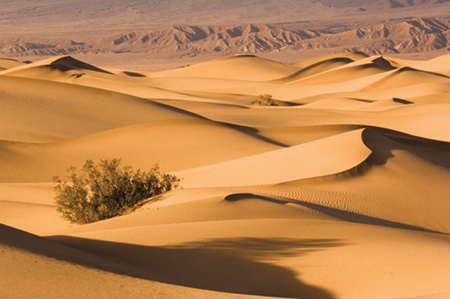
Anytime you have a subject that has plenty of texture such as these sand dunes in Death Valley, always consider sidelighting.
BackLight
Backlight is the most dramatic light direction of all. This light comes from behind the subject to the camera. It works exceeding well on all translucent subjects such as leaves, dewy spider webs, water drops, frost patterns on windows, and the delicate petals of wildflowers. This light direction is probably the least used by beginners, but successful photographers soon learn to exploit this wonderful light direction to make many outstanding images. By it’s very nature, backlight tends to be higher in contrast than all other light directions because shadows face the camera so the sensor must record plenty of contrast.
Backlight doesn’t work for everything, but when it does work, the results are beautiful. The best way to learn to use backlighting well is to spend some time shooting nothing but backlit images. Certain subjects tend to be better for backlighting than others. Backlight always works well for translucent subjects because the light passing through the subjects reveals intricate details most effectively. The translucent leaves of ferns, shrubs, and trees are amazing when photographed with backlight. During autumn, it’s effective to collect colorful leaves and lay them on a light table. By filling the frame with the pattern in the leaf, the light table is excluded from the image and the details in the leaf that are revealed by the backlight make the image pop. For those who never shot slides, light tables were used to edit and sort slides. While you won’t need a light table for that purpose anymore, you might consider keeping the one you have to use for backlit close-up images of nature. Backlight also works well on nearly all hairy or fuzzy subjects. Rabbits, milkweed seeds, hairy wildflowers such as prairie smoke, and the spines on cacti all photograph superbly with backlight.
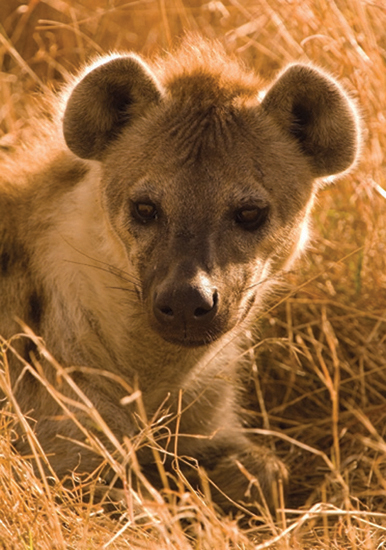
Backlight works fine for translucent or fuzzy subjects. The hairs on this spotted hyena are nicely rimmed with Backlight.
Photographing toward the sunrise or sunset is another example of using backlighting since you are shooting toward the light. The first rays of sunlight at dawn or the last rays near dusk are both red in color and fairly low in contrast so your digital sensor can handle the contrast in the light. Mammals and birds photographed in this type of backlight make outstanding images. This is a time to make silhouettes as well. Placing a nicely shaped tree, cacti, wildflower, sleeping butterfly, bird, or mammals against the red sky so the subject is entirely in silhouette is most effective and a sign that you have joined the ranks of advanced photographers. Beginners tend to use front-lighting most of the time, while seasoned photographers employ the creative uses of side and backlighting whenever possible.
Sometimes you have light coming from all directions at once. A good example is a cloudy day where the clouds act as a giant diffuser, scattering light everywhere so shadows are weak or nonexistent. Due to the lack of harsh shadows, this is wonderful light for making portraits of wildflowers or photographing a large clump of them. It is superb for making enchanting close-up images of mushrooms, lichens, berries, frogs, amphibians, and similar subjects. Normally on cloudy days, it is best to avoid including the white sky in the photo so concentrate on subjects that lie entirely below the horizon. Leaving out the white sky is not a rule though since there can be successful exceptions. In fact, I tend to avoid rules anyway, preferring to call dropping out the white sky a guideline. I only have one guideline that is almost a rule and that is if the subject is translucent, shoot it backlit!
It doesn’t have to be a cloudy day to have soft light from all directions. The light is very soft and diffuse before sunrise and after sunset. Light is soft in the shade cast by a nearby mountain or forest too. Many canyons in the Western US reflect beautiful red light into the bottom of the canyon that can be used most effectively to make stunning images.
CONTRAST
Contrast can be good or evil! It’s the difference between the darkest part of the image and the lightest. A bird photographed on a cloudy day is low in contrast while that same bird photographed backlit in bright sun has high contrast. Film and digital sensors do not see the light like our eyes do. We are able to see details in a wider range of contrast that either film or digital plus our eyes quickly adjust to allow us to see detail in the darkest shadows and the brightest highlights. Cameras cannot do this since at the moment of exposure, only one f/stop is being used while our eyes instantly open up and close down as needed.
Too much contrast is often harmful to making a beautiful image because the highlights might be overexposed so they are lacking in detail. The shadows could be blocked up or totally black with no detail too. In the worst case, both the shadows and the highlights have no detail. Having critiqued many thousands of images made by my students over three decades, a common problem is excessive contrast because too many images are shot in the middle of a sunny day without any regard for selecting the angle of the light carefully. Perhaps this is such a common problem because we are taught to shoot on bright sunny days early on. Skillful photographers learn to scout for subjects when the light is harsh, but don’t use that light very often to photograph unless they can modify it. Excessive contrast is one of the top four problems I find when critiquing images. The others are unsharp images, poor subject selection, and distracting backgrounds.
Excessive contrast doesn’t only happen during the middle of a sunny day. It is quite possible to have soft light on a cloudy day and still have too much contrast. Photographing a white flower where the background is a shaded forest that is almost black could easily be too much contrast for the sensor. Unless you like black backgrounds, the contrast inherent in this situation could result in a harsh image. Perhaps it is possible to select another blossom or change the shooting angle to include a more natural green background behind the white flower.
Skunks, bufflehead ducks, black-billed magpies, and zebras have high subject contrast. All of these are mostly black and white to begin with so your digital sensor may have trouble recording detail in both the light and dark portions of the subject. These subjects were a huge problem for slide film due to the narrow latitude of contrast that the film could record. Fortunately, digital can work effectively with a bit more contrast, especially if you shoot RAW images because RAW converter software offers some tools to expand the dynamic range effectively. Of course, always shoot the exposure so the histogram begins close to the right side without clipping. Since backlight and sidelight tend to increase the contrast of a subject, it is a good guideline (not a rule) to photograph high contrast subjects like skunks in soft, low contrast light that is typical on a cloudy day.

Black and white subjects are inherently high in contrast. The front-lighting on this Grevy’s Zebra with the Redbilled Oxpecker works best for this situation. Side-or back lighting tend to compound the excessive contrast problem.
While too much contrast is often a problem, sometimes it is exactly what is needed to make the image exciting. The shadows cast by the early morning sun on sand dunes is the perfect example. The shadows delineate the shape of the dunes, imparting a sense of depth. It creates an image that appears you can walk into. The same image of the sand dunes shot on an overcast day with no shadows lacks depth and is uninteresting. This is an important use of contrast. A digital image is a two-dimensional object. It has width and height, but no depth. Shadows used well imply depth in the image.
Shadows can make a subject look round. Photographing giant saguaros (a tall cacti found in Southwestern Arizona) using backlight not only make the spines glow, but also the highlights along the edge of the cactus that gradually becomes shadows on the side facing you give the cactus shape. The interplay of highlights and shadows on the cactus makes it appear round in the image, a most pleasing effect.
How to Control Contrast
Although contrast can be useful, more often it is detrimental to your photos because it hides detail in deep shadows or overexposed highlights. Fortunately, there are many tactics that can be successfully employed to manage contrast. The most obvious way to avoid excessive contrast in your images is to shoot in low contrast light. Soft early or late sunlight or the revealing light on cloudy days are perfect examples. By avoiding harsh bright sun during the middle of the day, your problems with excessive contrast are reduced enormously.
Diffusion cloths, disks, or panels are perfect for turning harsh bright sunlight into bright diffused light that is low in contrast. These useful devices which are made by PhotoFlex and other companies are frequently used by nature photographers to improve the light on small subjects such as wildflower blossoms, mushrooms, lichens, frogs, and even lizards. The cloth, panel, or disk is made with a white material that nicely diffuses sunlight to eliminate harsh shadows. The diffusion disk is exactly that, a piece of white material that is enclosed in a flexible wire frame that snaps open. It is easily used by holding the disk so bright sun passes through the material on the way to the subject. The material diffuses the light quite nicely, but it is important to get a diffuser big enough so the sun on the subject and the background are both diffused. If you diffuse only the light on the subject, the background which is still lite by sun is too harsh and will likely be overexposed in the final image. A diffusion cloth is a large piece of white material that you hold up to diffuse bright sun. It is hard to do this yourself, but easy to do if you have a helper. Diffusion disks are made in several popular sizes. The 32-inch diameter one works well for most nature photographers. Diffusion cloths can be purchased at any fabric store in various sizes. Old parachutes that can be purchased quite inexpensively at army surplus stores work too.
REFLECTORS
These light modifying devices come in a variety of sizes and colors and work fine for lowering the contrast in your subject. The reflecting surface might be silver, gold, or a combination of silver and gold called soft gold or perhaps some other color such as white. The reflector doesn’t usually need to be as large as a diffuser because you are bouncing light into the shadows of the subject and not trying to influence the background which is more distant (usually). Reflectors are quite effective for photographing wildflowers or insects in soft early morning sun when backlighted. Since the camera is pointed toward the light source, hold the reflector so the light coming to the camera bounces off the reflector and lights up the shaded side of the subject.
LOWER CONTRAST WITH ELECTRONIC FLASH
Modern electronic flash equipment can easily lower contrast too. By using fill-flash, the objectionable shadows in the subject can be reduced. Modern flash that is dedicated to your system is easy to use. These flashes automatically measure the fill-flash exposure, turning the flash off when you get the amount of fill light you asked for. A good place to start is to set the flash for –1.5 stops. Normally this control is on the flash and the camera body as well. Meter the subject to determine the best natural light exposure. When the flash fires, the camera measures the light from the flash, turning it off when the flash exposure is still 1.5 stops too dark. If you had shadows in the subject that were 3 stops underexposed, the flash opens up the shadows by 1.5 stops, reducing the contrast. We’ll cover flash is much more detail later.
SPLIT-ND FILTERS
These are made so one side of the filter blocks more light than the other side. These filters come in various strengths and may have a hard edge where the clear glass becomes tinted or a soft edge where the transition is more gradual. Common graduated ND filters include the 2 stop and 3 stop versions with soft and hard breaks. These filters were enormously useful for shooting film and popularized by the late Galen Rowell, one of the great photographers of our time. They are still useful in digital photography too, but their value is declining due to the power computer software programs offer in processing your digital images. High-quality split-ND filters are expensive so you may want to put off buying them until you find that you truly need them.
COMPUTER SOFTWARE ADJUSTMENTS
Contrast can be reduced or increased easily with many computer software programs such as PhotoShop or PhotoShop Elements. While the exact details are beyond the scope of this book, a number of tools are available to tame or at least control contrast. One popular tool is the shadow-highlight control in PhotoShop CS3. By moving a slider, it is easy to bring up the exposure in the shadows and/or to lower the exposure in the highlights to effectively reduce the contrast in the scene.
Levels and curves are other controls that offer more precision for adjusting the contrast in your images. These tools can reduce contrast with amazing results, especially if you shoot RAW images. There are times to increase contrast too. While photographing bison in a heavy snowstorm, I used a slow shutter speed to permit the snow to streak against the dark fur of the bison. There was so much streaking snow though that the bison no longer had black fur. Using a levels slider to make the darkest pixels in the scene even darker, the streaking snow showed up much better against the dark fur of the bison.
It is possible to shoot two images of the same scene while changing only the exposure. A scene with too much contrast can be tamed by shooting one shot with the highlights properly exposed. Then shoot a second image to properly expose the shadows. Using software, the two images can be combined so detail in both the shadows and highlights are preserved. This is a wonderful way to expand the dynamic range of your image!
FILTERS
The need for filters has entirely changed for me since switching from slide film to digital. When I shot film, I used numerous filters that include the 81 warming series, 85C, polarizing, warm-toned polarizing, magenta, neutral density, and split-neutral density. All of these filters were needed in various sizes which cost plenty of money and added considerable weight to the camera bag. In addition, it takes time putting filters on the lens and taking them off and they have to be cleaned frequently too. Since it is so easy to adjust the colors of a digital image with software, no longer are 81 warming series, 85C, magenta, and warm-toned polarizing filters needed.
Polarizing Filters are Critical
The most useful filter for digital photography is the polarizing filter. Some are called linear while others are circular. Both do the same thing by removing polarized light, but the linear polarizer may not work well with certain metering systems. Circular polarizing filters work with all metering systems so it is wise to get this type.
Polarizing filters are made with two pieces of glass that are mounted in a ring so one piece of glass can be rotated separately to achieve the desired effect. This makes the filter thicker than most which becomes an even bigger problem if the polarizing filter is mounted on still another filter such as a UV protection filter. A common problem that happens is the thick polarizing filter causes vignetting (dark image corners) when used on short focal length lenses. What happens is the wide angle of view permits the lens to “see” the edge of the filter causing black corners.
Solving the Vignetting Problem
Vignetting caused by thick polarizing filters can be solved in a number of ways. First, avoid using them on short focal length lenses (just kidding). If your camera has a digital crop factor, it is less likely to have a vignetting problem because the image is recorded only with the center of the lens. The edges where the vignetting may occur are already cropped off. Second, you might consider buying a large polarizing filter for your short focal lengths lenses. If the filter size is 72 mm on the wide-angle lens, buy a 77 mm polarizing filter and an adapter ring that has 72 mm threads on one side and 77 mm on the other. Since the edge of the polarizing filter is further away from the edge of the lens, the angle of view of the lens is less likely to see the filter ring eliminating vignetting problems. Third, some polarizing filters are made extra thin to solve vignetting problems. These cost a bit more and are somewhat fragile, but they can eliminate the problem with wide-angle lenses. Fourth, some software programs such as Adobe’s PhotoShop CS3 have advanced features that include vignetting correction. Fifth, you could always crop any digital image where vignetting is a problem.
Polarizing Filter Strategies
These filters are marvelous for removing or reducing glare on wet objects, revealing the colors and detail underneath. Polarizing filters are highly recommended for anything wet such as autumn foliage or wildflowers after a gentle rain. By removing glare, the subjects colors are visible and become more saturated. Anytime you photograph lakes, streams, or waterfalls, consider using the polarizer. At times it can be difficult to see the effect of the polarizer. The best way to see it is to concentrate on water. As you turn the polarizer, the water on a stream for example darkens a bit when the glare is removed. This is the polarizer position you normally what to use. A word of warning, always turn the polarizer in the direction you normally turn it to screw the filter on the lens. If you turn the polarizer the other way, you might accidently unscrew the filter from the lens and drop it, destroying an expensive filter.
The polarizing filter darkens blue sky by removing polarized light. This effect is most noticeable when shooting at right angles to the sun because more polarized light (which is eliminated by the filter) is present in the sky at that angle. To find the area of the sky where the polarizer has the most impact, point your right hand at the sun. With you left hand, draw an arc keeping the angle at 90 degrees to the sun. The polarizer has the greatest effect anywhere along the arc you drew. Just after sunrise and before sunset, the polarizer will darken the sky in the north, south, and directly above you most. If the sun is high overhead, then the greatest impact will be anywhere near the horizon. However, it isn’t necessary to always turn the polarizer to get the maximum darkening effect because it can be too much. Images with a nearly black sky because too much polarized light was eliminated can appear quite unnatural so be careful with it.
Many photographers are not aware that if you change the composition from vertical to horizontal or vice-versa, the polarizing filter must also be adjusted to be effective. Always check to be certain you are using the polarizer to best advantage. Everyone needs to use a polarizing filter most of the time and do it correctly to get the maximum content in their images.
Finally, the useful polarizing filter can be used as a variable neutral density filter. Depending on how you adjust the filter, it absorbs 1 to 2 stops of light. If you need to use a longer shutter time such as 4 seconds instead of 1 second, mounting the polarizing filter on the lens and setting it for maximum effect will enable you to blur flowing water or perhaps make an impressionistic image of wildflowers waving in the breeze.