
The Exciting World of Closeups and Macro

This Leonardus skipper spent the night sleeping on the gray-headed coneflower. A 180 mm macro lens supported on a tripod along with some fill-flash easily captured the image.
Closeup nature photography is available to everyone. You are limited only by equipment and your own imagination. Closeup opportunities abound in your backyard, especially if you maintain a flower garden that attracts insects. Nearby woods and fields offer numerous closeup opportunities too. Even if you live in a densely populated city, urban parks and local nature centers offer many closeup subjects. Even during winter, it is easy to grow your own flowers or buy flowers at the local greenhouse so you can photograph gorgeous blossoms indoors, perhaps by window light with a reflector or fill flash to reduce contrast. Shooting indoors eliminates the problem of trembling flowers due to the breeze enabling the use of long exposures for maximum depth of field.
Just what is a closeup? Making a tight shot of a maple tree that fills the frame with autumn foliage and branches is a closeup of the tree. But, generally the closeup range is considered to begin with a much smaller subject such as a tulip or rose blossom. While there is no definite place where everyone agrees the closeup range begins, let’s pick a subject that is 5 inches in diameter or smaller. This covers thousands of potential subjects so you won’t run out of possibilities.
MAGNIFICATION
Magnification describes the relationship between the actual size of the subject and the size of its image on the sensor. Photographing a 4-inch butterfly so its image size is 1 inch long on the sensor means the magnification is 1/4 (1:4) life-size. Dividing the size of the subject’s image on the sensor by the actual size of the subject determines the magnification. In other words, at 1:4 magnification, the image of the subject on the sensor is 1/4 of its actual size in real life. At 1:2 life-size, the size of the subject on the sensor is half as big as it is in real life.
The closeup range ends once you reach life-size magnification which is usually written as 1:1 magnification. Here the size of the subject and its image on the digital sensor are exactly the same size. When this magnification is reached, shooting at life-size and higher magnification is called macro photography. The subject must be tiny to effectively use such high magnifications. However, nature abounds with wonderful macro subjects such as a tiny spider, flower bud, dew drop on a flower or blade of grass, a single snowflake, the face of a cute grasshopper, or the delicate pattern in a butterfly wing.
Anyone can be an excellent closeup and macro photographer for two reasons. First, the information available on closeup photography in the form of books, magazine articles, and web content makes the techniques you must know available to everyone. Second, the equipment to make closeup and macro images is much better than it was years ago. There are plenty of ways to get close which include macro lenses, quality closeup lenses on zoom lenses, and extension tubes that preserve automatic features between the camera and the lens. Tripods that work easily near the ground, through-the-lens metering for both natural light and flash, simple fill-flash techniques with modern equipment, reflectors and diffusers to improve the light, and even plamps to stabilize the subject all simplify closeup photography.
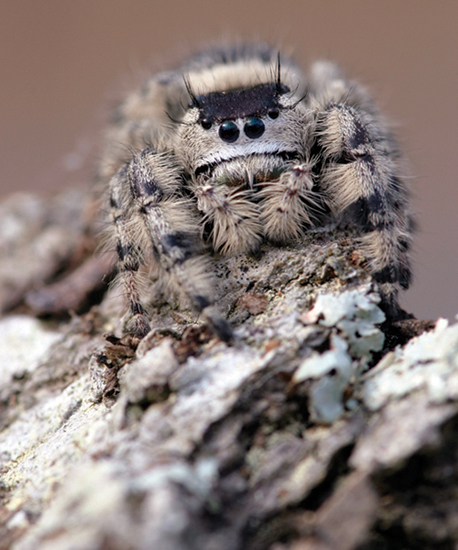
A 100 mm macro lens with a 25 mm extension tube was used to capture this adorable jumping spider at greater than life-size magnification.
Digital cameras make it easier and cheaper for everyone to shoot closeups and enter the macro range of life-size (1:1) or higher. Since the digital sensor on most cameras is smaller than a 35 mm slide that was 36 mm × 24 mm in size, the crop factor of the digital camera makes it easier to fill the frame with a tiny subject. For example, the 100 mm macro lens that is made by most camera systems probably obtains life-size or 1:1 magnification just by focusing the lens to the closest focusing distance. If your digital camera has a 1.6x crop factor (due to the smaller sensor size), the 100 mm macro now acts like a 160 mm lens and your subject is larger in the viewfinder without using other macro accessories. Finally, since it is so easy to crop the digital image with software, it is practical to make the subject even larger by cropping out part of the image. The image file size is reduced by cropping the image which may limit the size of the print that can be made from the smaller number of pixels being used. However, if you don’t crop too much, increasing subject size in this way is useful at times.
It’s fun to make big images of tiny subjects. These images have appeal to other viewers because they reveal the intricate parts of a flower or insect that most people never notice. However, you must develop excellent shooting habits to consistently produce sharp images. In addition, the working distance which is the distance between the subject and the lens gets much smaller as magnification increases, so this causes problems. Also, depth of field, which is the zone of sharp focus is very tiny at macro magnifications. These limitations make macro photography challenging, but the problems they create can be minimized.

A highly magnified macro shot of this little sunflower reveals color and texture that most people never get close enough to see.
There are many ways to make excellent closeup images that cover a wide range of budgets from inexpensive to expensive. No one way is the right way for everyone. We all have our preferences.
TRUE MACRO LENSES
A variety of macro lenses are made by most camera systems that focus much closer than regular lenses. Most true macro lenses can focus close enough to reach life-size magnification at the closest focusing distance. These lenses are optimized to produce incredibly sharp images in the closeup range. Macro lenses are convenient because you can switch from photographing a maple tree to a single leaf under the tree just by focusing the lens closer.
Macro lenses are more expensive, larger, and heavier than other closeup accessories such as extension tubes or closeup filters so they do have some drawbacks. Nevertheless, macro lenses are extremely efficient for creating high-quality closeup images.
LONG MACRO LENS PROS AND CONS
Macro lenses are widely available in three common focal lengths. You may find macro lenses for your system in the 50 mm, 100 mm, and 200 mm range. The exact focal length may not precisely match these numbers, but they should be close. For instance, the Nikon intermediate macro is a 105 mm lens while the long Canon macro is 180 mm in focal length. Longer macros are more expensive and weigh more than shorter focal length macros so these factors need to be considered.
However, if money isn’t a deterrent and you don’t mind carrying a bit more weight, do consider a long macro in the 180 mm to 200 mm focal length. These macros have three enormous advantages over macros in the 50 mm and 100 mm range. I feel the most important advantage is the lens angle of view. The longer the focal length, the smaller the angle of view that the lens “sees.” This means it is much easier to select or control the background. Distracting backgrounds frequently ruin closeup images which are easily avoided by using a longer focal length macro and selecting the shooting angle carefully to eliminate or minimize distractions.

Using a 180 mm or 200 mm macro lens to capture this green darner dragonfly portrait easily throws the distant background completely out-of-focus.
Increased working distance is the second reason for going with the 200 mm macro. Since most macro shots require the use of a tripod, having extra working distance is always beneficial. Photographing a dew-laden spider web or grasshopper is easier if you can set up the tripod further away from the subject. If you have to put the tripod only inches from the subject which would be necessary with a 50 mm macro, most likely the grass that is attached to the spider web or supporting the grasshopper would be bumped causing the dew drops to fall or grasshopper to jump away. Having the working distance of the 200 mm macro greatly simplifies placing the tripod. By moving slowly, it is often possible to carefully move the tripod and 200 mm macro into position for wary subjects like butterflies or frogs without scaring them away. Many tiny animals like this have a small fear circle that you must respect to get the image. We have a fear circle too! Wonderful closeup subjects that make great images, but you don’t want to hug include rattlesnakes, spiders, scorpions, cactus’ spines, and poison ivy berries.
Staying further away from the subject helps in other ways too. If it is easier to use a reflector or diffuser to improve the light then you have more room to work with. When using flash, having more working distance tends to reduce the problem of the lens or lens hood blocking the light from the flash.
All long macro lenses in the 180 mm to 200 mm range come with a tripod collar built-in to the lens. This makes the lens easier to use on a tripod. The large macro lens is attached to the tripod head instead of the camera body. This balances the weight of the lens and camera better than if the camera body was attached directly to the tripod head. Since the lens easily rotates in the collar, it is easy to switch the composition from horizontal to vertical. This permits working on top of the tripod instead of flopping the camera off to the side which let’s gravity pull the lens down making the image hard to compose. However, this problem can be solved by using an L-bracket on the camera body with 50 and 100 mm macro lenses.
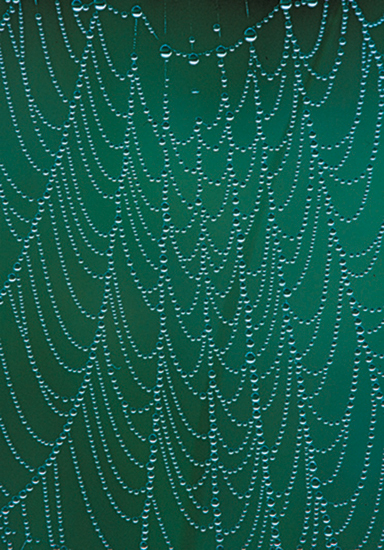
This dewy spider web image is nearly impossible to capture with a 50 mm macro because the distance from the dew drops to the front of the lens is much too short. The working distance of a 200 mm macro solves the problem.

Long macro lenses have tripod collars that make vertical compositions in closeup photography easier to do. The Canon 180 mm macro lens used to capture this dew-laden damselfly offered plenty of working distance and simplified the background too.
We are strong advocates of using 180 mm and 200 mm macros for closeup images and always recommend them first. But, a new 200 mm macro might cost $1400 or more while the 100 mm macro is several hundred dollars cheaper in the $450 range. Is it really necessary to spend $1000 more for the 200 mm macro? The answer depends on your circumstances. If you have the money to spend and don’t mind carrying the extra weight of the 200 mm macro, then that is the best answer. If weight or money is a factor, do consider the 100 mm macro. If you control the background by carefully selecting the shooting angle and picking a moderate aperture for less depth of field such as f/11 over f/22, busy or distracting backgrounds can be avoided.
The digital crop factor that most digital cameras have is another reason the 100 mm macro is a viable option. If the digital camera you own has a 1.6x crop factor, it makes the 100 mm macro appear to be a 160 mm lens that has the working distance of a 160 mm lens, a smaller angle of view, and increases magnification. To be accurate, the crop factor is often called the magnification factor, even though nothing is being magnified. The focal length of the 100 mm macro lens doesn’t actually change either. While the 100 mm macro lens used on a digital camera that has a crop factor seems to have more magnification, it really doesn’t, but appears to when the image is cropped in the camera due to the smaller sensor.
PROBLEMS WITH 50 MM MACROS
I would not recommend using a 50 mm macro for most closeup nature photography in the field. The lack of working distance and wide angle of view of the 50 mm lens is certain to be a serious problem. The only way you might try one is if it is dirt cheap or you get it free. A 50 mm macro on a digital camera with a 1.6 crop factor acts like an (50 mm × 1.6) 80 mm macro lens which is workable, but far from ideal.
CLOSE-UP AND ZOOM LENSES
Another excellent way to create closeup images is to put a high-quality close-up lens on the front of a good zoom. If you already own a lens that zooms out to a minimum of 300 mm at the longest focal length, then you have an excellent alternative to using more expensive macro lenses. Common zoom lenses that work well include the 75–300 mm, 100–300 mm, 100–400 mm, and 80–400 mm. Zoom lenses that reach at least 300 mm work better than short zoom lenses such as the 28–105 mm because they offer smaller angles of view, more working distance, and greater magnification. Many long zoom lenses also have built-in tripod collars too.
The close-up lens which is sometimes called a closeup filter, supplementary lens, or diopter is a piece of glass that looks like a filter and screws on the front of the zoom lens. The close-up lens enables the lens to focus very close which greatly increases magnification. Many different close-up lenses are made. Some are quite inexpensive, but the quality is lacking. Cheap ones often suffer from a lack of sharpness and lower the contrast in the image. High-quality close-up lenses cost more, but more than make up for the added cost by producing much higher-quality images with vastly improved sharpness.

If you already own a zoom lens that reaches 300 mm, attaching a quality close-up lens to the front of it permits you to photograph this tiny grasshopper hiding in a flower.
NIKON AND CANON CHOICES
Both Canon and Nikon make high-quality close-up lenses in the $60 to $150 range, depending on brand and size. The Nikon close-up lenses are made in the following sizes and powers.
• 52 mm
• 3T (1.5 power)
• 5T (2.9 power)
• 62 mm
• 4T (1.5 power)
• 6T (2.9 power)
Canons’ high-quality 500D close-up lenses are all the same power, but come in four different sizes to fit a variety of zoom lenses. These are made in 77 mm, 72 mm, 62 mm, and 58 mm sizes. Canon also offers the 250D series, but these are designed for use on lenses with focal lengths of 135 mm or less, so don’t consider buying these.
It is important to use high-quality close-up lenses to obtain excellent images. Unfortunately, most camera stores only stock inexpensive close-up lenses that you should avoid. If the salesman wants you to buy a set of three close-up lenses that include a +1, +2, and +4 power, don’t buy them. These are most likely single element close-up lenses that won’t produce sharp images. Most likely you will have to special order good close-up lenses or buy them from a large mail order camera store.
As long as the close-up lens screws on the front of the lens, they should work on any zoom lens. If you intend to use a close-up lens on a variety of lenses that take different filter sizes, it is wise to buy one to fit on the lens with the largest filter size. For example, suppose you plan to use the close-up lens on a 100–400 mm zoom that has a filter size of 77 mm, a 75–300 mm zoom with a filter size of 58 mm, and a 180 mm macro with a filter size of 72 mm. Buy a Canon 77 mm 500D close-up lens which works perfectly on the 100–400 mm zoom. Then buy two adapter rings, each with 77 mm threads on one side so the 500D lens can be attached to it. On the other side of one adapter ring, get 72 mm threads. On the second adapter ring, get 58 mm threads. Now you can use the same close-up lens on all three lenses.
Advantages
Using close-up lenses is much cheaper (even the good ones) than macro lenses and are easy to carry since they are light and small. These filters don’t cost you any light, unlike extension tubes and macros, so the viewfinder stays bright and exposure times don’t get too long.
A huge advantage close-up lenses have is once you have sharply focused the subject, zooming out to increase magnification or zooming in to a shorter focal length to reduce magnification has little effect on focusing distance. This means it is easy to keep the subject in focus without having to move the tripod. Once you zoom a bit, it is only necessary to fine-tune the focus once again in the normal manner. With both macro lenses and extension tubes, changing the magnification usually means the camera distance needs to change too, forcing you to move the tripod. This sounds like a small thing, but the ease of using close-up lenses on zoom lenses is a powerful reason for using them. Although we prefer long macros, many other professional nature photographers use quality close-up lenses on good zoom lenses only and their results are superb!
Disadvantages
If you put a close-up lens on the front of any lens, you won’t be able to focus on far away objects without removing it. This isn’t much of a problem though since you are shooting closeup images anyway. To take a landscape image, just remove the close-up lens. With a macro lens, you can focus on infinity or on something very close by changing the focusing distance, so macro lenses are more convenient.
Close-up lenses work by shortening the focal length of the lens they are put on and thereby increase the angle of view. A reduction in working distance and an increase in the angle of view is not helpful. That’s why using close-up lenses on zoom lenses that reach 300 mm works so well. With a closeup lens on the front of it, the real focal length might be 220 mm which is still quite good. If you used a close-up lens on the front of an 80–200 mm zoom, the lens might only be a 130 mm lens with all the problems of a shorter focal length.
No matter how high quality the closeup lens is, putting any additional glass in the optical path will cost you a slight loss of sharpness, which you probably wouldn’t notice without running special tests to check sharpness. Macro lenses tend to be somewhat sharper because they are optically made for closeup images and no extra glass is put in the optical path unless a filter such as a polarizing filter is used.
Extension tubes are metal spacers that fit between the camera body and the lens. They permit any lens to focus closer and come in different sizes. It is often best to buy extension tubes made by your camera’s manufacturer. If available, it is important to buy dedicated extension tubes that preserve autofocusing, autoexposure, and auto aperture operation. Nikon makes extension tubes in different sizes while Canon makes a 12 mm and 25 mm tube. Tubes in the 25 mm to 50 mm range are the most useful. The bigger the extension tube, the more magnification you get with any lens.
Without getting too mathematical, extension tubes yield more magnification with shorter focal lengths. For example, a 25 mm tube yields life-size magnification with a 25 mm lens. This same tube only yields about 1:2 life-size on a 50 mm lens and 1:4 on a 100 mm lens. Of course, these lenses focus closer than the infinity setting, so you get additional magnification.
Extension tubes work really well on the common 300 mm f/4 lens. By putting a total of 50 mm of extension tubes between the 300 mm lens and the camera body, the 300 mm lens is now able to focus so close that you can think of it as a 300 mm macro lens. If your digital camera has a 1.6x crop factor, you can fill the viewfinder with even smaller subjects while enjoying the benefits of having more working distance and a smaller angle of view. Moreover, nearly all 300 mm telephoto lenses have tripod collars too. It is quite likely that your camera system doesn’t make a 50 mm extension tube. With my Canon system, I stack two 25 mm extension tubes together to make 50 mm of extension. While Nikon offers many extension tubes, they don’t preserve autofocus and may not work with your digital SLR. Instead, consider buying a set of Kenko extension tubes that work with your system. The Kenko set I use for the Canon EOS system comes in a set of three which includes 12 mm, 20 mm, and 36 mm tubes. These can be used individually or in any combination. Autofocusing and autoexposure is preserved!
The advantages of extension tubes are that they are inexpensive and effective. Being light and compact, they are easy to carry in the field. Since extension tubes don’t have any glass, they don’t hurt the optical quality of the lens. Extension tubes work tremendously well behind any fixed focal length lens.
There are some disadvantages in using extension tubes, but they are easy to deal with. Putting an extension tube between the lens and the camera body makes it impossible to focus on infinity unless you remove the tube. Extension tubes sometimes don’t work well on zoom lenses and may not even couple to them. Since you have to put the extension tube on and take it off when not needed, they are slower to use than a macro lens. Extension tubes do cost you light (unlike close-up lenses), so you may lose some of your automatic capabilities such as autofocusing and/or autometering. When buying extension tubes for your system, always check with the dealer to make sure they are compatible with your system. It is wise to buy extension tubes that preserve AF if they are available from the camera manufacturer or an aftermarket brand such as Kenko or Sigma.
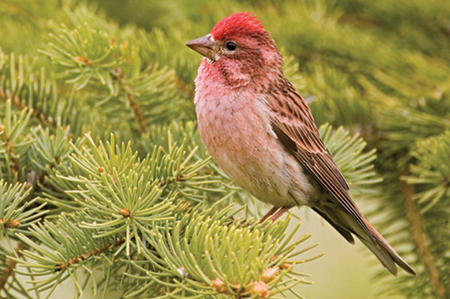
Extension tubes are used for more than macro images. Most big telephoto lenses don’t focus very close. Using a 25 mm extension tube increases close focusing capability so small birds such as this Cassin’s finch appear larger in the image.
Closeup images require adopting techniques and strategies that consistently produce sharp results. Light is lost when using extension tubes or macro lenses to magnify the image. As magnification increases, depth of field decreases rapidly so apertures such as f/16 are necessary to make the most important parts of the subject sharp. Due to loss of light and depth of field considerations, typical shutter speeds for closeups are frequently in the 4–1/8 second range. Magnifying the image also magnifies any movement of the camera or subject, so it becomes far more challenging to make super sharp images. Using a tripod is absolutely mandatory for making stunning images with natural light. Be sure to use a tripod that is designed so the legs can be spread wide making it easy to work near the ground where so many closeup subjects are found.
Depth of field which is the zone of acceptably sharp focus becomes very shallow at high magnifications from 1/4 life-size and greater. For instance, at three times life-size, the depth of field at f/16 is only a couple of millimeters. It is critical to focus carefully in all nature photography, but especially macro since the limited depth of field available isn’t sufficient to mask minor focusing errors. It is best to manually focus the lens on the most important part of the subject such as the eye of a robber fly or wing of a butterfly. Perhaps a specific part of a wildflower is most important such as the stamens so focus on those.
Since depth of field is so limited in closeup photography, align the focusing plane with the most important plane in the subject. Consider a dewy spider web or the wings of a sleeping butterfly. To make the dew on the web or the wings of the butterfly as sharp as possible, the focusing plane and the plane of the dew drops caught in the web or the wings of the butterfly must be parallel, so the limited depth of field covers the subject as completely as possible. Shooting the dew-laden web or butterfly wing at an angle will certainly throw part of the subject out-of-focus. The greater the angle to the plane of the wing, the more out-of-focus part of the subject will be. It is better to choose an angle where the dominant subject plane and sensor plane are parallel.

A tripod is absolutely mandatory for making natural light images in low light. These dewy blueberries might be a fine breakfast snack, but never eat the good compositions until you are done. Neither one of us noticed the jumping spider until we viewed the image on the computer.
USE OPTIMAL APERTURES FOR SHARPNESS
The apertures on most lenses begin at f/2.8 or f/4 and end with f/22 or perhaps f/32. Depth of field is shallow at f/2.8 and greatest at f/32. Since depth of field decreases as magnification increases, surely f/22 or f/32 is the best aperture to use to get the most depth of field. While f/22 offers far more depth of field than f/11, it does not produce sharper images. The aperture value refers to the physical size of the aperture in the lens. As the aperture size decreases, a higher percentage of light rays passing through the aperture strike the edge which causes those rays to bend. This bending of light is called diffraction and reduces sharpness. It is possible to get more depth of field at f/32 for example, but sharpness declines due to diffraction. Lenses are most sharp about 2 to 3 stops down from the largest aperture (smallest f-number) on the lens. If your macro lens covers the range of f/4 to f/32, the sharpest apertures hover around f/8 to f/11. The f/4 and f/5.6 apertures are quite good though so don’t be afraid to use them if you wish. At f/16, sharpness begins to decline slightly due to diffraction and becomes much worse at f/22, but it still may be acceptable. The smallest aperture is f/32, but diffraction renders this aperture useless unless sharpness is not that critical.
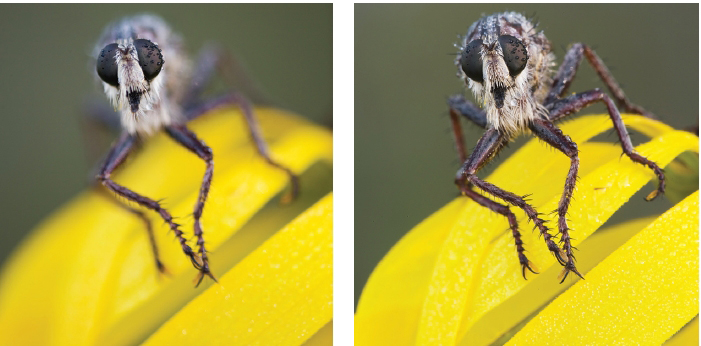
Depth of field is limited in closeup photography. Focus on the most important part of the subject such as the eyes of this robber fly. This image shows the depth of field at f/3.5. RIGHT: Here is the same image using f/19 for more depth of field.
Wind makes shooting sharp closeup images almost impossible with natural light. Fortunately, there are many strategies that can be employed to minimize wind problems. One effective technique is to trip the camera with a cable or remote release. By waiting for a lull in the breeze, fire the camera immediately when the subject finally stops moving by pressing the cable release which is connected to the camera. Some cameras have remote releases which are not connected directly to the camera, but still permit you to fire the camera at the optimal moment. It is effective to peer through the viewfinder of the camera without touching the camera or the tripod. By watching the subject sway back and forth in the viewfinder, it is easy to see when the subject is perfectly still relative to any of the lines etched on the viewing screen. When you see the subject is motionless against a line on the viewing screen, trip the shutter immediately. Unfortunately, this technique requires patience or it may make you a patient. Too many photographers become impatient and trip the camera when the subject is almost holding still, not when it is motionless. When using shutter speeds of 1/8 second and longer, the subject must be motionless or it will not be sharp.

This green gentian wiggles if the air is moving at all. Use a plamp to stabilize the plant and a cable or remote release to trip the shutter as soon as it is completely still.
Many photographers use the self-timer instead of a remote release to trip the shutter. The self-timer works fine most of the time. By setting the camera on self-timer, you can compose the shot on the tripod, press the shutter button gently and the camera fires the shot two to perhaps 10 seconds later. This lets any vibration created in the camera by pressing the shutter button to dissipate. The amount of delay depends on your camera model which can be varied in many models. Two seconds is plenty of time to allow vibration created by pressing the shutter button to disappear. While this technique works very well when wind is not a factor, it is ineffective if you are waiting for your flower to stop wiggling in a slight breeze because you don’t know if the subject will be holding still when the selftimer runs out and trips the shutter. In this case, the remote or cable release is clearly the best way to fire the camera since you can shoot as soon as the subject holds still, not two, four, or perhaps 10 seconds later.
Avoiding wind is an effective strategy. Since the best light tends to occur early or late in the day when the atmosphere is often calm, closeup nature photographers tend to shoot most of their images during these two periods of time. On calm mornings, dew and frost might be present to add their own special closeup opportunities. Some of my best closeup meadows are surrounded by tall trees which block the prevailing wind from blowing the subjects too much. Hanging a cloth on the upwind side of a wildflower can help block the breeze making sharp images possible.
PLAMPS TO THE RESCUE
The plamp (plant-clamp) is a device made by Wimberley that works enormously well for holding subjects still. By carefully attaching the plamp to a wildflower to avoid hurting the stem, the flower can be forced to hold still permitting sharp images. Using the plamp is easy. Attach the plamp to a light stand or cheap tripod and place it near the flower. Now attach the other side of the plamp to the flower so the plamp doesn’t appear in the image. This holds the flower still most of the time. By bending the plamp carefully to change the angle of the subject, it is easy to adjust the shooting angle of the flower to utilize a different background such as a green meadow or blue sky.
MIRROR-LOCKUP
There are times when there is no breeze at all, so using the camera’s self-timer is quite effective. Hopefully, your camera offers a choice of timer delays. Ten seconds is useful if you plan to run around the camera and get in the photo too, but it is a long time to wait if you don’t need the time. Many cameras offer a 2-second delay which is the best choice for closeup photos. Be sure to check the cameras instruction manual carefully to see if the self-timer delay is adjustable. Many cameras do have adjustable delays, but this fact is often hidden in the manual. For example, the popular Canon 20D uses a 10-second delay when the camera is set on self-timer. If the mirror-lockup option is set and the selftimer drive mode is selected, the self-timer defaults to a useful 2-second delay.
The motion of the mirror may cause the camera to vibrate on the tripod a bit causing a slight loss of sharpness, especially with shutter speeds in the 1/8 to 1/30 second range. If you do not need to peer through the viewfinder to see if the subject is swaying a bit, it is a good habit to use the mirror-lockup control if your camera offers it. If your camera does not provide for mirror-lockup prior to the exposure, avoid the shutter speed range just mentioned.
TERRIFIC LIGHT FOR CLOSEUPS
Unlike landscape photography, closeup subjects are small making it easy to modify the light to improve the image. Wildflowers, mushrooms, frogs, and nearly all other closeup subjects photograph well under overcast conditions because the light has low contrast which reduces the problem of overexposed highlights or shadows with no detail.
Unfortunately, most of us find wonderful subjects when the light is not ideal for them. A super flower blossom in bright sun might be way too high in contrast, especially if the background is shaded.
Diffusion Disks
Too much contrast is easily solved by using a white diffuser. When the diffuser is placed between the subject and the sun, the light instantly becomes low in contrast, being similar to the light on a cloudy day. Be sure to use a diffuser that is large enough to diffuse the light on the flower and the background. If you diffuse the light only on the flower and leave the background in bright sun, the background will be too bright. Most of the time, I use 32-inch diameter diffusion disks made by PhotoFlex. These disks have a metal frame, so the diffusion cloth is stretched to maintain its shape. The disk is easily held above the subject by a helpful friend or you. Since the camera is mounted on the tripod, one hand trips the shutter while the other holds the diffuser. The diffusion disk is the best way to work for any subject such as cactus flowers, poison ivy, or dewy butterflies where you absolutely don’t want the diffuser to touch the subject.
Diffusers that work fine include white nylon parachutes from military surplus stores and white nylon material purchased from fabric stores. These must be supported, but they do work well when they can be hung between two trees with snap clothes pins or held by a friend. Make sure the diffusion cloth is thick enough to diffuse the light to eliminate hard shadows, but not so thick that it reduces the exposure too much. A 2 to 3 stop reduction in light is just about right. Using a large parachute is effective when the subject requires you to photograph it by shooting toward the ground.
Here is how to use the parachute successfully to reduce contrast. Find a wonderful subject such as a mushroom family or wildflower. Push a stick in the ground on the other side of the subject to hold the parachute up so it doesn’t droop between the lens and the subject. Throw the parachute over you and the subject and work underneath it. Bright sun instantly becomes bright overcast with the parachute. If you carefully pull the edge of the parachute all around you and the subject, it blocks gentle breezes too making sharp images easier to obtain.
Never throw a diffusion cloth over cactuses because the spines of the plant tear holes in the fabric or break off, becoming embedded in the cloth where they may end up in you when you fold the cloth up.
All diffusers work best if the shooting angle is toward the ground because the device can easily diffuse the light falling on the subject and the background. If the shooting angle is parallel to the ground, the diffuser may not work because it won’t diffuse the light on the background. In this situation, it may be better to modify bright light by using reflectors or fill-flash.
REFLECTORS
These light-modifying devices come in a wide variety of shapes and colors. You can make them at home by attaching aluminum foil to a piece of cardboard. The reflector you put in the front window of your car to keep it cooler could double as a photographic reflector too. We have used the 22-inch multidisk made by PhotoFlex for years with wonderful success. The disk comes with four reflector colors and a diffuser all in one. The four reflector colors are gold, gold and silver combined, silver, and white. The gold or gold/silver combination is terrific for orange, red, and yellow subjects because it enhances the colors. Use the silver or white side for blue, white, or violet colors to avoid adding unnatural warm color casts.

On a sunny day, using a diffuser to soften the light on this aster and the background lowers contrast and saturates the color.
Reflectors are easy to use since you can see their effect as you move the reflector from side to side. The reflector is used to bounce light into the shadows of the subject. Moving the reflector closer to the subject increases the amount of light striking the subject which reduces the contrast. Moving the reflector further away reduces its ability to soften shadows.
When light is very soft and low in contrast such as might be the case on an overcast day, it is possible to use the reflector very close to the subject to actually increase the contrast a bit. Reflectors can add enough light to the subject without adding anything to a background that is several feet away so the background darkens relative to the subject. Changing the light ratios helps to separate the subject from the background.
Cross-Lighting with Reflectors
Nature photographers often use front-lighting which works fine much of the time. However, if you always use front-light, your images tend to have a look of sameness after awhile. Here’s a wonderful way to use your reflector. During dawn when the light has a reddish color cast, assume you find a gorgeous wildflower blossom or butterfly laden with dew. Instead of photographing the subject front-lighted by shooting toward the West, instead put the camera on the shadowed side so the lens is pointed toward the East. Now the subject is backlighted. If it is not translucent, major portions of the subject will be severely underexposed if you expose for the highlights. This light is very high in contrast which creates deep shadows and perhaps overexposed highlights too. However, backlight does nicely rimlight the subject. To lower the contrast, place a reflector near the camera to bounce the golden sunlight back toward the shaded side of the subject. When held at the proper distance (a couple feet away), the light bouncing off the reflector nicely opens up the shadowed side of the subject eliminating dark shadows. Since contrast is greatly reduced, it is easy to obtain detail in both the dark and light portions of the subject. Using the reflector in this way is known as cross-lighting because the dawn sunlight comes from the East and the reflector bounces it back toward the East so the light crosses itself. When done properly, you still get wonderful rim-lighting on the subject and plenty of detail in the shaded side too! It is a hugely successful technique so be sure to add it to your bag of tricks.
CLOSEUP FLASH TECHNIQUES
Advances in camera and flash technology have made using flash for closeups no more difficult that using natural light.
Modern flash units are called dedicated flashes when they are made for a particular camera system. The camera measures the light emitted by a flash and turns it off when the desired exposure is achieved. This is called through-the-lens flash metering. It is a wonderful system because using any photographic equipment that cost you light such as an extension tube, macro lens, or filter is automatically compensated for by the flash meter in the camera. The camera turns the flash off when the sensor records enough light.
Selecting the flash unit to purchase is easy. If you are using a Nikon camera body, choose from any of the fine Nikon flash units that are dedicated to the camera body you have. If you shoot Canon, Pentax, or Olympus, choose a dedicated flash for your camera. Sometimes a system may make more than one dedicated flash. The features will vary a bit, but the biggest variable will most likely be the power of the flash unit. Bigger and more expensive flashes emit more light which is important if you hope to light a subject that is some distance away. Macro subjects are close to the camera so power is not that important. A small dedicated flash works fine for closeup photography, as long as it can be used off-camera and placed near the front of the lens.
Flash is especially useful for nocturnal subjects like night-blooming cacti, singing frogs, and moths. Very tiny subjects such as horse flies, spiders, beetles, and some wildflowers also need flash to put enough light on the subject to make a sharp image. In these examples, flash is used as the sole light source. Since the flash duration with a dedicated flash unit is 1/1000 second or shorter, making sharp images when using flash as the sole light source is easy if the lens is properly focused, even if shooting hand-held!
Another important reason to use electronic flash for closeups is to fill in shadows. Using the flash as a fill light to open up shadows in the closeup subject that are caused by natural light is a skill that all closeup photographers must master. Effective fill-flash is an enormously successful technique that helps you become an exceptional photographer.
Placing the Flash
Before using an electronic flash as the sole light source or as a fill light, the flash must be put in the best location. Most cameras come with a hot shoe on the top of the camera. Unfortunately, this position creates lousy light when flash is used as the only source of light. On camera flash is too frontal, eliminating all shadows which makes the photo look flat since there are few shadows so little depth is suggested. This position often causes the red-eye effect in animals where the eyes become bright red. Moving the flash off to the side somewhat both eliminates the red-eye effect and introduces some shadows. Another serious problem with the flash mounted on top of the camera body for closeup photography is subject distance. Often the subject is so close to the front of the lens (especially at the higher magnifications) that the flash cannot be tilted down enough to light the subject. Instead, the light from the flash passes above the subject without illuminating it. Even if the flash can be angled correctly, in many cases the lens hood blocks the light. This often happens at magnifications from 1:2 (one-half life-size) and above because the working distance is so small.

Like most macro subjects, fill-flash or reflectors help add sparkle to this dewy cabbage white butterfly.
In closeup photography, the flash works best if it is placed near the front of the lens. This can easily be accomplished by hand-holding the flash. A simple way to reposition the flash is to use a flash bracket that attaches to the bottom of the camera body or perhaps to the tripod collar of the lens (if your lens has a collar). A variety of brackets for supporting the flash are available. Three good sources for them include Wimberley, Kirk Enterprises, and Really Right Stuff. It can be confusing to buy the perfect bracket for your system because a variety of brackets are made to work on all the different systems. The best way to get precisely what you need is to call any of these companies and tell them exactly what you have so they can select the best equipment for you.
Once the flash bracket is attached to your equipment, attach the flash to the other end of the bracket. A good flash bracket lets you adjust the angle of the flash relative to the subject. With the flash now mounted near the front of the lens shade, it is a simple matter to rotate the flash a bit, so it is pointed at the subject. A good place to start is about 30 degrees above the line connecting the subject and the lens. This will create a shadow underneath the subject. Try moving the flash a little left or right of the lens too. Now you have a small shadow under the subject and to the opposite side as well. These angles eliminate the red-eye problem and the presence of shadows suggest depth in the image.
Using Your Hand to Hold the Flash
Flash brackets aren’t always needed. If the camera is supported by the tripod, it is easy to trip the camera with one hand while holding the flash near the front of the lens. This is the technique I use most of the time. For example, I like using flash as a fill light when making closeup images of wildflowers, mushrooms, lichens, and insects. Once the subject is properly focused with the camera mounted on a tripod, it is effective to place the flash near the front of the lens, point the flash at the subject, and fire three shots, each time moving the flash to a different position. Since it doesn’t cost anything to shoot extra digital images, try holding the flash near the left side of the lens and slightly above it, directly above the lens, and to the right side of the lens. The flash illuminates the subject differently in each of the three images. One image may clearly be better than the others.
Firing the Remote Flash
Since the flash isn’t mounted on the camera’s hot shoe, how is the flash triggered? Three commonly used methods to trigger the flash include the dedicated flash cord, remote controller, and using the built-in flash to activate the remote flash. All methods work well, but each has advantages and disadvantages.
Dedicated Flash Cords
Camera manufacturers make these flash cords that connect the flash to the camera. Dedicated cords permit the camera to control the flash, preserving through-the-lens flash metering which is crucial in closeup photography. The cord should be long enough (at least 2 feet) so you can hold the flash anywhere you want it near the front of the lens. This system does work quite nicely.
The most serious drawback is the cord may get in the way at times and may even bump the subject if you try to use if for sidelighting or backlighting. If you are careful though, all of these problems are easy to avoid. The most serious problem is the length of the cord restricts where you can place the flash. If the cord is 2 feet long and you need to put the flash 3 feet away, you are out of luck.
The Flash Remote Controller
A far more convenient way to fire the flash, but more expensive, is to use a remote controller. Canons’ unit is called the speed light transmitter (ST-E2). Nikon is called the wireless flash controller. These flash controllers slide into the hot shoe on the camera and maintain through-the-lens flash metering.
I always use the wireless flash controller when using flash. It is incredibly convenient to hold the flash where it needs to be (even behind the subject for rim-lighting) without fussing with a cord that connects the flash to the camera. I demonstrate the use of wireless flash controllers in my field workshops almost reluctantly, because I know it will cost many of my students some money. While my students may have heard of the controller, few ever realized the advantages of it until I show them. Once they see how it simplifies using flash, especially for fill applications, they order one right away. As I write this, the Nikon flash controller is about $80 (street price) and the Canon ST-E2 runs about $215.
Use the Built-in Flash to Trigger the Main Flash
A third option that is terrific is some systems are designed so the pop-up flash on the camera can trigger a remote flash. This system does work nicely and eliminates the need to buy dedicated cords or remote flash controllers. Unfortunately, most cameras and flashes aren’t set up to do this. As technology evolves, I am certain this capability will become more prevalent.
Fill-Flash Techniques
While it is very effective to use flash for the main or only light source in some situations, I feel flash is far more useful as a supplementary light. Using flash as a fill light is necessary for making the best closeup images. Fill-flash solves a host of problems. Most closeup subjects have deep shadows. Even on a dark overcast day when the light is extremely low in contrast, a mushroom has dark shadows underneath the cap which acts like a hat. Fill-flash easily adds light to the darkest areas, lowering the contrast, and revealing the detail in the stalk and perhaps gills of the mushroom.
The color of light is a huge problem for film and somewhat of a problem for digital, although the colors produced by a digital camera are easy to adjust, especially if you shoot RAW images. Pink Calypso orchids grow near decaying logs in dark coniferous forests around my home. The orchids are always in the shade so the light is extremely blue. A warming filter would reduce the excess blue or the shade white balance setting could be set to solve this problem. But, neither method eliminates all the extra green light that is reflected from the foliage to the orchid. The color temperature of the light emitted from the flash is neutral in color since it is balanced for daylight around 5500 to 6000 K. Even if the flash exposure is 1.5 stops under the natural light exposure, the light from the flash greatly minimizes the color cast in the natural light.
Using Fill-Flash
Due to through-the-lens metering, effectively using flash as a fill light is quite simple to do today. Most D-SLRs have two exposure compensation controls, one for flash and one for natural light. Make sure you know where they are, which is which, and how to adjust them.
Fill-Flash Example
Lewis’s monkeyflower is a common wildflower along wet streams in the mountain drainages of the Northern Rockies. After finding an excellent blossom, mount the camera on the tripod and carefully focus and compose the image. Without using any flash at all, take a natural light exposure and check the histogram. Make sure the histogram is close to the right side without clipping any highlights. Once the best natural light exposure is set, bring in the flash and set it for a compensation of –1.5 or –1.7 stops, depending if the flash is set for 1/3 or ½ stop intervals. Using one of the three methods described earlier to trigger the flash, hold the flash close to the lens on the left side and fire a shot. Check the histogram again to make sure nothing is clipped and no pixels are flashing. There shouldn’t be anything since the flash is adding very little light to the highlights where clipping would occur first. Try another shot with the flash held close to the front of the lens hood and right above it. Now take a third shot with the flash held on the right side of the lens hood. By bracketing the flash angle slightly, one image may be better than another. Since there is no cost to shooting digital images, it is effective to bracket the strength of the fill-flash by trying another set of three images with the flash set at –1 stop and perhaps a third set with the flash set to –2 stops.
Since the camera can measure the flash and natural light exposure separately, this permits using the flash and natural light compensation button at the same time. Most modern flash units permit exposure compensation with a control on the flash and the camera. However, adjusting the flash compensation on the camera might cause a problem because it forces you to touch the camera which could change the focus slightly. It’s best to adjust the exposure compensation on the flash.