
Carrying Your Photography Gear

Michele Smith is our office manager who doubles as an expert mule packer and backcountry guide. We commonly use mules and horses to carry supplies and camera gear deep into the wilderness.
While it is possible to make excellent nature photographs near the road where you can work out of your car, you will have to hike to the vast majority of exciting nature images. Even a relatively short hike of a few hundred meters means you must move your photographic gear to the site. There are numerous ways to move camera gear around so let’s take a look at the options.
The easiest way to move camera gear is having someone carry it for you. Sometimes a nonphotographer spouse or friend is happy to go along and carry some of the weight. While gorilla trekking in Rwanda, it is customary to hire a porter to carry your camera bag up and down the slippery mountain slopes for only a few bucks-a great bargain. But, most of the time you’ll need to carry your own gear. Let’s take a look at different ways to do that, but realize there is no one best way that is perfect for everyone.
THE CAMERA STRAP
Every new camera probably comes with a camera strap to help you carry it. It does work, but I have seen the strap fail when it wasn’t properly fastened to the camera and let the camera crash to the ground. The strap is best for people who tend to drop things a lot. By using the strap, there is a better chance they have a grip on the strap when the camera is dropped. Camera straps have their downside too. When using tripods, the camera strap easily gets caught in the tripod leg or head locking mechanism. When shooting straight down during closeup photography, the dangling strap might strike the subject. Just because the camera comes with a camera strap does not mean you have to use it. Nearly every advanced nature photographer we know quit using camera straps years ago. Perhaps they aren’t for you either! Some sort of camera bag or case is needed to carry all of your gear. Let’s take a look at those.

We never use camera straps. Dangling straps often get in the way and could strike these raindrops on an autumn maple leaf ruining the image.
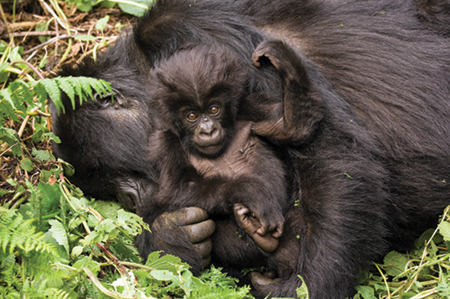
Most mountain gorilla visitors use porters to carry their camera equipment up the steep slippery slopes.
HARD-SIDED CASES
Early in my career, I used a hard-sided aluminum case that was superb for protecting camera gear. The inside of the case was made with heavy foam that had to be cut out to fit my camera gear. This system worked well until I bought new equipment that wouldn’t fit in the spaces I had cut out. The aluminum case was heavy too. Since it couldn’t be made into a backpack, I carried it in one hand until that hand became tired, then switched to the other and so forth. I finally decided a hard-sided aluminum case wasn’t the answer when I hiked 3 miles and climbed 2000 feet up a rugged snow-covered mountain in the Sierra Nevada Mountain range. I set the case in the snow and turned to set up the tripod. When I turned around to get the case, I discovered it slid down the mountain. I followed its trail for over a mile before finding it caught in the branches of a small conifer tree. The contents were fine so the case did its job perfectly of protecting the gear, but a camera case that can go on a joyride by itself leaves much to be desired. However, these cases do protect delicate gear well, so if you don’t have to carry the case far and want to protect fragile gear well such as flash equipment, these cases do work fine for this purpose.
SOFT-SIDED CASES
Shoulder Bags
These bags are offered in all different sizes. Usually, the bag has adjustable dividers inside so you can adjust the individual compartments to fit your equipment. These bags do work well if you don’t have too much equipment which is quite possible with digital and you don’t hike long distances. Shoulder bags are quick to use because a single strap fits over your shoulder as you walk along, so they are popular with street and travel photographers. It is easier to get to your equipment because you don’t have all of the straps to undo like you would with backpack camera bags.
However, most nature photographers shy away from shoulder bags because they have lots of camera gear so all of this weight is on one side which gets tiring after awhile. The uneven weight makes you unbalanced, making it more difficult to hike and negotiate difficult terrain. Plus, you lose the use of one hand because it is holding the shoulder strap unless you slip it over your neck.
Backpack Camera Bags
Soft-sided camera backpacks are the most widely used type of camera bag used by nature photographers. Backpacks distribute the weight of the contents across your body. Since the bag is strapped to your back and fastened using quick release snaps around the waist and chest, both hands are free to carry a tripod, push away brush as you walk, slap mosquitoes, or any number of other uses.
Camera backpacks have been around a long time so they come in all sizes and shapes with many features. Visit the web sites of the leading manufacturers of soft camera backpacks to find out what is available. Lowepro, Tamrac, and Tenba offer many choices for the digital nature photographers. All of these companies and others make excellent bags. A good camera backpack bag is designed to fit your body snugly to make it easier to carry. Most have moveable internal dividers that can be adjusted to precisely fit your equipment. Since wet weather and nature photography go together, look for a bag that repels rain.
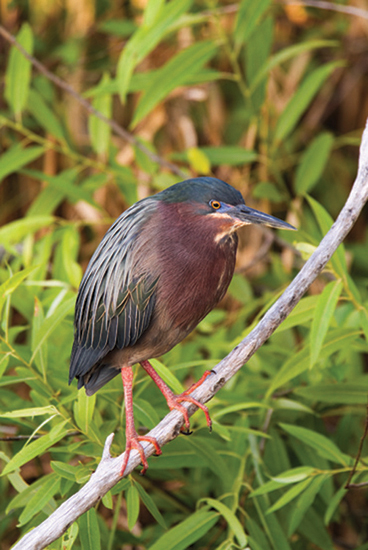
Many of the best images are made by walking a long way from the car. Be sure to have a way to protect your gear from rain. We hiked more than a mile to find this Green-backed heron in the Florida Everglades, a place well known for sudden soaking storms.
The bags we use are made by Lowepro. It is called the PhotoTrekker AW II and sells for about US $240. This bag easily holds two camera bodies, three or four small lenses, and a large 500 mm lens right in the middle of the bag, plus filters, CF cards, flash, and other small accessories. AW stands for all weather which means this type of bag has a special waterproof flap that can be pulled over the bag to keep moisture out. Except for the smallest commuter prop planes, this bag fits under most airline seats and in the overhead compartment, so it is airplane friendly.
Many backpacks are designed so the tripod can be attached to the bag. I tried this method, but found the large tripod I use bounces around too much. Instead, I carry my tripod by resting the padded legs on my right shoulder while holding it there with my right hand. This system works for me, but doesn’t mean it is the best way for everyone.
Photographer’s Vest
These are special vests that are filled with numerous pockets that use zippers, velcro, and/or snaps to seal each pocket. Some photographers love them while others have no use for them at all. It all depends on personal preference and shooting style. Photojournalists are more likely to use a photographer’s vest because they shoot hand-held a lot and need to move quickly. Nature photographers tend to stay in one place longer than photojournalists. A nature photographer hikes to a waterfall, puts their camera backpack down on the ground in a safe spot, and works out of the bag without moving it for the next 2 hours while they photograph the waterfall with an assortment of lenses. Since nature photographers tend to take their time, it isn’t necessary to have instant access to all of their equipment.

We rarely use a photographer’s vest. We hiked more than a mile up this shallow creek to find these autumn leaves swirling about in a miniature whirlpool. It is too easy for something to fall out of the vest when standing in water.

To get the lowest possible shooting angle, we laid on a boardwalk in the Everglades to catch this pied-billed grebe with it’s reflection in a small pond. If we were wearing a vest full of camera gear, we would have to take it off to comfortably lay on the boardwalk.
I find expensive pieces of camera gear are prone to falling out of the vest at critical times and I constantly “lose” stuff in one of the many pockets so I don’t use them very often. I wish to emphasize that is just me. However, if you don’t have too much equipment, always remember where you put everything, and never have anything fall out, a photographer’s vest could be perfect for you.
Long Lens Bags
Wildlife photographers frequently use super telephoto lenses to shoot the great images they get. It is important to protect long lenses, but still be able to get to them quickly. Using a long lens bag (sometimes called a case) is an excellent way to go. These are designed by the companies I mentioned earlier to fit big lenses. Be sure to ask for their literature, visit their web site, or look at the bags in a well-stocked camera store.
Speed is important in wildlife photography, so look for a long lens bag that is large enough to accommodate your lens with a camera already attached to it. To shoot the big lens, unfasten the top of the bag, take the lens cover off the lens, turn the lens hood around and attach to the lens, turn the camera on, and you are in business.
While photographing wildlife on a safari in Kenya, we teach our clients to snugly bungee cord the long lens bag to the back of their extra seat. The lens hood and camera body is already attached. Put this back into the long lens bag so the back of the camera body is facing up. Now place the lens cover over the camera body to keep it clean. When it is time to use the lens, take the lens cover off, pull the equipment out of the bag, turn on the camera, and you are ready to capture some outstanding wildlife images. It only takes seconds to do this!
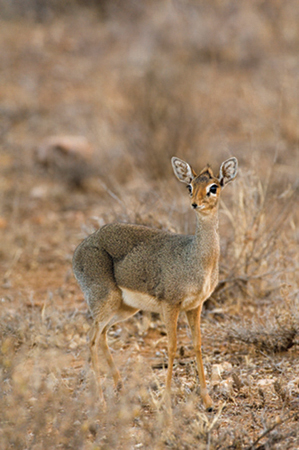
Padded long lens bags are invaluable on a Kenya safari to protect the lens from bumps and dust. This tiny dik-dik at Samburu is always alert and wary because it has many predators. A long lens is usually needed to photograph it.

This mule deer doe calmly watched us along the road. Using a car as a blind to get close to wildlife and carry equipment is often effective.
CAMERA BAG SETUP STRATEGIES
The contents of my camera bag vary with the season and what I plan to photograph. The biggest change from trip to trip is whether the 500 mm lens is in the bag or not. Here is how I load the camera bag for two entirely different shooting situations. I spend many days each winter photographing in Yellowstone National Park with the aid of snowmobiles. Yellowstone in winter offers numerous wildlife and landscape possibilities and some closeups on frosty mornings.
Here’s a list of items I have in my camera bag to photograph Yellowstone in winter.
• 17–40 mm lens
• 24–70 mm lens
• 100–400 mm lens
• 500 mm lens
• 180 mm macro lens
• 1.4x teleconverter
• three 4GB Sandisk Extreme III Flash Cards
• a rubber blower to clean the sensor
• polarizing filters to fit all of the lenses except the 500 mm
• microfiber cloth for cleaning lenses
• one electronic cable release
• two digital cameras
• a few tools to tighten quick release plates and L-brackets
• extra batteries for everything that takes batteries
Now let’s compare the camera bag contents for a totally different type of shooting experience. Northern Michigan is famous for summer wildflowers, small insects like dragonflies and damselflies, and spider webs. Since Michigan is surrounded by the Great Lakes and filled with small inland lakes, plenty of surface water is present. The abundance of lakes and ponds permits great quantities of water to evaporate into the air each summer day increasing the relative humidity. On cool, clear, and calm nights, the moisture in the air condenses on everything near the ground in the open meadows. All insects, wildflowers, blueberries, and spider webs are coated with a heavy layer of dew by dawn. These are wonderful subjects for the digital nature photographer.

We leave most closeup gear out of the bag when we know we expect to photograph primarily birds and mammals like this gray catbird.
Let’s change the bag around to be more appropriate for the shooting conditions and potential subjects. It isn’t likely the 500 mm lens will be needed so that is left in the trunk of the car. This frees up a lot of room in the bag to accommodate more closeup photo equipment and accessories.
Bag Contents
• 17–40 mm lens
• 24–70 mm
• 70–200 mm
• 180 mm macro
• 65 mm 1–5x Canon macro for the really small stuff
• 25 mm extension tube
• Macro Twin Light flash system for lighting really tiny subjects
• Canon 580 EX flash for fill-flash
• Canon ST-E2 flash controller
• three 4GB Sandisk Extreme III Flash Cards
• blower brush to clean the sensor and lenses
• polarizing filters that fit all lenses
• microfiber cloth for cleaning lenses
• one electronic cable release
• two digital camera bodies
• a few tools
• extra batteries
• reflectors and diffusers for light control
• Wimberley plamps to hold flowers still

Making closeup images may require setting up the camera bag completely different than bird and mammal photography. We use two different bags to solve this problem.
Since the 500 mm lens is waiting back in the car in its own long lens bag, the space that became available by its removal is now filled with extra closeup equipment (25 mm extension tube and 65 mm macro), plus light controls that include the reflector/diffuser combination, two kinds of flash, and a couple of plamps to help stabilize a closeup subject that might wiggle if the air is moving at all.
An excellent way to carry some extra camera gear on an airplane is to use a photographer’s vest which is the only reason I own one. It is easy to carry a couple small lenses and some other camera accessories on the plane in addition to my regulation size camera bag. Since I wear the vest, it isn’t considered a second carry-on, so it is a good way to get a bit more on the plane. I never overdo stuffing the vest!
I fly from Michigan to Kenya and back at least once a year. I have never had any problems (lucky perhaps) flying Northwest and KLM. I avoid problems by following the rules as closely as possible and go out of my way to be extra friendly and helpful. I always travel as light as possible, taking only what I really need. A few changes of clothes is all that I need since I wash my clothes in the bush camp, but you could use a laundry service. I take two checked bags that aren’t close to the weight limits. One bag is filled with clothes. Some of my less fragile gear is wrapped in the clothes. These items include a tripod, ball head, Wimberley Sidekick, extra rechargeable batteries, and cleaning materials. If this bag disappears, I can make due without it. The second checked bag is loaded with clothing that I wear once on safari and leave with the camp workers who are eager to have it.
My Lowepro carry-on camera bag is regulation size and accommodates a 500 mm, 100–400 mm, 24–70 mm, 1.4x teleconverter, and a few other small items. I wear a photo vest to carry a couple more small lenses such as a 100–300 mm and a 17–35 mm zoom plus a flash. I take two lenses that include the 100–400 mm and the 100–300 mm which cover similar focal lengths because that is an important range to cover on a Kenya safari and you never know when a lens will malfunction. Having two lenses that cover this important range of focal lengths is insurance. I do carry a computer with me too in its own bag. Generally, international flights permit one carry-on bag plus a computer bag too, but always check with your carrier before you show up at the gate.
It is wise to avoid using carry-on bags with wheels that are right at the size limit. The wheels make the bag look extra big and suggest that it is heavy too. There is usually a weight limit on carry-on baggage, so the last thing you want to do is draw attention to yourself with this setup and have them double check the size and weight of the bag. Being a friendly and courteous airline passenger who adheres to the regulations (as closely as possible) is clearly the best route to hassle free flying. Always try to board the plane earlier rather than later so some space remains for your carry-on baggage.

Carry as little as possible when you must fly. We always carry our most precious camera equipment on the plane. This bald eagle was easily photographed at Homer, Alaska which requires a lot of flying to get there.