
Composing Strong Images

This bull elk is driving another bull away from “his” cows in mid-September. The implied action in the position of his head, space in front of the elk for room to move, and the non-distracting background all work together to make this a pleasing composition.
WHAT IS COMPOSITION?
Composition is the creative side of photography, so it is a bit harder to frame within a set of rules that always lead to excellent results. Creating interesting compositions is easier for some than others, but everyone can learn to compose effectively by thinking about what the image is saying. As you gain experience photographing nature, composition becomes easier and more intuitive. Composition depends a lot on personal preference so follow your feelings too.
Good composition is recording the subject in the most effective way. That seems obvious, but doesn’t offer any ideas on how to achieve that goal. Composition is the thoughtful choice, placement, and arrangement of primary and perhaps secondary subjects, lines, shadows, shapes, and colors within the image. Composition involves a lot more too. It includes using lenses well to affect the size of the foreground and background elements with respect to each other, to use effective zones of depth of field, eliminating distractions from the image, and even choosing shooting angles to use the light to best advantage or to control the background. All of these creative controls available to photographers are part of composition.
I don’t believe in photographic compositional rules because there are valid exceptions to all of the “rules”. Instead, it is better to offer guidelines that normally work well. These guidelines offer a good place to start so learn what they mean and use them in the beginning.
Here are some guidelines that have worked well for me over my 30-year career. Try following these guidelines to help get started, but don’t be afraid to reject or modify them for your own use. Eventually, as you develop your shooting eye, you’ll acquire a compositional style that is natural to you and it will continue to evolve throughout your photographic career.

This ruffed grouse was feeding next to our home. By carefully selecting the best angle, we could keep the house out of the background. We like wildlife looking into the frame. While the breast is close to the left side, having the head looking back over it’s shoulder leads the flow back into the image.
COMPOSITIONAL GUIDELINES
Compose Hand-Held
This single tip will help you more to produce well-composed images than any other. While using a tripod is often critical for shooting sharp images, tripods are detrimental to making strong initial compositions. Tripods actually hinder selecting stunning images from the chaos of nature. Suppose you find a colorful clump of wildflowers growing only a few inches above the ground. The best angle could be photographing straight down from above. Perhaps a 45-degree angle to the ground is better or even a ground level shot may offer the best viewpoint. Perhaps the whole clump of wildflowers makes a great photograph or maybe three blossoms on the left side of the flower patch work best. Maybe a single blossom is the strongest image. If you are composing on a tripod to view each possibility through the camera, it takes too much time to keep repositioning the tripod. It is far more efficient to hand-hold the camera and look at each potential image by viewing it through the viewfinder.
Once you see an excellent image in the viewfinder, then get the tripod and move it into position. Remember where you were holding the camera so you know where the tripod has to hold the camera to make the shot. Composing landscapes hand-held is especially valuable because there are so many ways to compose them. Handholding makes it convenient to rapidly change the composition from horizontal to vertical too. Walking closer to a foreground to emphasize it in the landscape image is often effective and easy to do when you aren’t laboring with a tripod.
Recently, we photographed the sand dunes in Death Valley National Park and the famous rocks of the Alabama Hills. These landscapes were huge so we mainly used lenses from 12 to 300 mm. In each case, we hand-held the camera first as we explored the area, framing potential images in the camera’s viewfinder before mounting it on the tripod. We fine-tuned the composition on the tripod, determined the best exposure, and focused carefully to make the final image.

There are many possible images at the edge of a lake with autumn reflections. The quickest way to spot some fine images is to walk along the shoreline slowly looking through the camera. When you spot an image you must have, then attach the camera to the tripod. We call this composing hand-held.
When to Compose on a Tripod
There are times to compose on a tripod though. Heavy lenses such as a 300 mm f/2.8 or a 500 mm are too heavy to handhold while trying to compose images. In this instance, mount the big lens on the tripod and find your subject such as a squirrel. Approach the subject slowly until you think it is large enough in the viewfinder and take a look. If the subject is still too small, slowly approach a bit closer and try again. Once the subject is the size you want, fine-tune the composition and shoot the image.
Keep the Horizon Level
Be careful to keep the horizon level. Lakes that flow downhill to one side of the frame or a mountain range that is obviously tilted to one side are common errors that should be avoided. Some cameras offer optional grid screens that can be inserted into the camera. The grid lines make it easy to line up the far horizon so it is level in the image. Just line up the horizon with a horizontal line on the grid screen to keep the image level. However, the far horizon must be directly opposite to you. If you line up a level horizon with a horizontal grid line and shoot at an angle that isn’t 90 degrees to the shoreline of a lake for example, the shoreline will not be level. In this case, let the horizon line flow downhill somewhat and use the vertical trees along with the vertical lines on the grid screen to keep the vertical lines straight up and down. You could also attach a level to the hot shoe of the camera to help you level the horizon. Digital software can level the horizon after the image has been taken too. This is enormously helpful, but no substitute for sloppy technique. Try to keep the horizon level to begin with.
Viewpoint Choices
You have a choice of photographing a subject at eye level, from above, or from below. It is often effective to get above the subject and shoot down on it. This angle works well for many patterns in nature such as frosted leaves, large groups of mushrooms, or a field of flowers. Many stunning landscape images are made by shooting down on them from an elevated position. The fabulous view from Yellowstone’s Artist Point of the gorgeous canyon and Yellowstone river is an excellent place where shooting down into the canyon is a super viewpoint.
Shooting straight at the subject without shooting down or up does work well for many subjects, but it is the most used angle so it tends to lead to commonplace images. Still, go ahead and photograph the subject from eye level if it truly makes sense. But, always consider if shooting up or down at the subject works better.
Grand Prismatic spring is gorgeous from the boardwalk during the summer, especially if there is a slight North breeze so the steam blows away from you revealing the foreground. Use a wide-angle lens here.
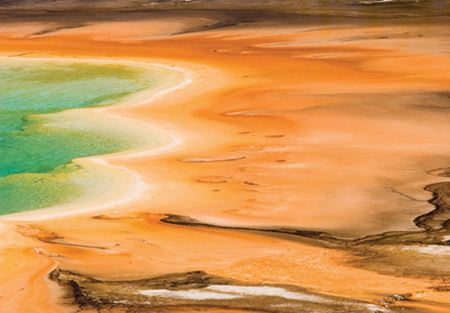
This is an entirely different view of Grand Prismatic spring from a hill on the opposite (south) side where a long telephoto lens nicely extracts a section of the colorful bacteria mats. In both cases, use a polarizing filter to get the most color saturation.
The least used angle is shooting up at the subject and this is unfortunate. This angle is seldom used among beginning photographers because it is an unusual angle. We are not accustomed to viewing most subjects this way and it may be difficult to get the camera into position to use this angle. However, this worm’s eye view is ideal for photographing many subjects. It makes animals seem larger and perhaps more threatening as in the case of an elephant or bison. This low angle shows the stalk and gills of a mushroom clearly. When photographing wildlife, shooting from eye level or slightly lower produces exciting and unusual images. When photographing small animals such as rabbits or shorebirds, I prefer to lay flat on the ground to get the lowest possible angle rather than mount my camera on a tripod with its legs extended and shoot down on the subject. Photographing an animal at eye level or slightly below is a successful guideline to follow and borders on a rule! Be careful though. Shooting up at the subject could produce distracting backgrounds that include white parts of the sky or branches.
TELEPHOTO LENS STRATEGIES
It isn’t always possible to select the exact viewing angle you want. A robin perched in a tree 10 feet up is 10-feet high. Unless a small hill is nearby, you won’t be photographing it from eye level. You’ll be lower than you want to. Conversely, you might someday photograph the polar bears near Churchill, Manitoba from a Tundra Buggy where you must shoot down at the bears. This isn’t a wonderful angle for bear photography, but necessary for your safety. One way to reduce the angle in both situations is to use a long telephoto lens to photograph the subject. By photographing animals further away with long lenses, the robin appears to be lower in the tree and the polar bear appears to be higher. Shorter focal length lenses do the reverse and make the shooting angle more extreme because you have to be closer to the subject.
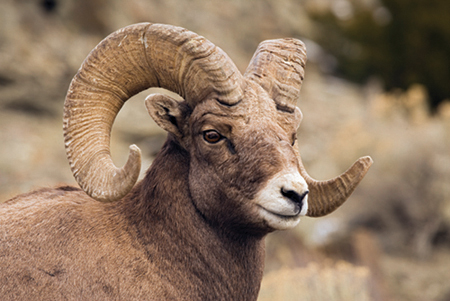
Too many photographers shoot down on animals. We find images are more intimate if the shooting angle is at the same level as the head or slightly below. The low viewpoint was used to capture this Bighorn sheep portrait.
WIDE-ANGLE LENS VIEWPOINTS
Wide-angle lenses that include focal lengths in the 17–28mm range are terrific for creating a viewpoint that emphasizes the foreground. To emphasize the wildflowers in a mountain meadow with a snow-covered peak in the background, use a very short focal length lens close to the flowers to make them fill the foreground. A 20 mm lens placed a foot away from a clump of Red Indian paintbrush emphasizes the wildflowers while reducing the size of the mountain behind them. Such images tend to command attention because it is an unusual viewpoint and perspective.
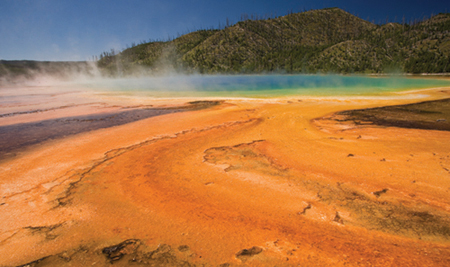
It’s also effective to use wide-angle lenses from a higher shooting position above the ground to fill the frame with a large foreground such as a field of golden poppies or beautiful rock formations. Using a wide-angle lens 4 to 5 feet above the ground to shoot down on the ground offers an aerial perspective. This is a technique that works effectively to photograph gorgeous color patterns in thermal areas such as Grand Prismatic Spring in Yellowstone National Park.
TELEPHOTO LENSES
Telephoto zoom lenses are terrific for isolating intimate landscapes when it is possible to shoot down on the subject from a hill. Many possibilities exist for shooting down on gorgeous landscapes in mountainous regions or even from tall buildings.
When photographing a subject such as a wildflower from eye level, it is often possible to select the angle carefully to include out-of-focus flowers in the foreground, background, or both. By using a shallow depth of field around f/5.6 and focusing on a single blossom, it is simple to make many poetic images of wildflowers that are surrounded by swirls of soft colors from the out-of-focus blossoms. Since telephoto lenses compress the foreground and background blossoms together and depth of field is reduced when magnification increases, it is quite easy and effective to make wonderful selective focus images.

Birds tend to perch higher than you are. Use a long telephoto lens such as a 500 mm to shoot from further away. This reduces the shooting angle so these gray-crowned rosy-finches don’t look so high in the treetops.

Although this rosy-finch was perched 8 feet high, the 500 mm lens gently brought it down to eye level.
DON’T CENTER EVERY SUBJECT
It is a worthwhile guideline to avoid placing the main subject in the middle of the frame. A series of bird, mammal, or wildflower images where the main subject is centered or bulls-eyed in the center of the frame becomes boring and static. Most subjects suggest a flow where off center placement works best. A duck looking to the right could better be placed on the left side of the image to give it room to look to the right. A tall wildflower that is hanging down to the left might best be placed so the stem occupies the right side of the frame and the blossom is hanging down from the upper left corner.
Since digital images are so easy to crop with software, it is not quite as necessary to avoid the dreaded dead center subject. I use the center focusing point in my digital camera anytime I photograph difficult-to-track subjects. The center focusing point is the cameras most accurate focusing point and there is less chance of accidently cutting off a wing tip, hoof, or tail of the subject if it is centered in the image. The image can easily be cropped later to make a stronger composition. Of course, cropping the image eliminates pixels which may be needed to make a large print.
THE RULE OF THIRDS
There is a well-known compositional idea called the “Rule of Thirds” that is helpful to reduce the tendency to put so many subjects in the middle of the image. The “Rule of Thirds” is useful to know, but like any rule, there are exceptions so we’ll refer to it as the “Guideline of Thirds” from here on. The guideline of thirds reminds you to divide the digital sensor into thirds both horizontally and vertically. Wherever these lines intersect at four different points, these points are called power points. They tend to be a good spot to place the main subject. All four power points don’t work all of the time though. It is still necessary to identify the flow in the image. A gray squirrel perched on a limb that is bent down from the upper right and a squirrel that is looking to the left composes well if the squirrel is placed at the upper right power point. Here’s another way to use the power point idea. Since the image is divided into thirds, it makes sense to put the sky in a landscape image at the upper one-third position if the foreground is more interesting. If the sky is more exciting, try placing the sky at the bottom one-third position so the gorgeous sky fills two-thirds of the image.
Don’t take this thirds idea too far. It is effective to change the ratio. If a landscape foreground is especially stunning, including only one-quarter sky might be the best way to go.
IMAGE EDGES
Check the edges of the image for distractions that should be avoided. A patch of white sky in an autumn color image, a stick or any hotspot along the edge shouldn’t appear in the image. Unfortunately, most consumer grade cameras don’t show everything in the viewfinder that ends up being recorded. Many cameras only show around 92%. Your choices are few here. You can either buy an expensive high-end camera body that reveals 100% in the viewfinder or learn to live with the shortcomings of most cameras. If your camera’s viewfinder only shows 92% of what actually will be recorded, try moving the camera a bit in all directions to see if any distractions are present along the margin of the image as seen in the viewfinder. If you see a distraction, adjust the composition slightly to avoid it. Of course, cropping the digital image later with software is an effective strategy too.

The main body of this strutting peacock fills the lower left power point. The tail feathers nicely flow to the upper left and right power points too.

Beehive geyser is unpredictable, but truly special when it erupts in late afternoon sun because a rainbow appears in the steam. Unfortunately, a couple of people managed to get into the scene, but they were covered up with steam using PhotoShop.
It is easy to remove distractions with software along the edge of the image and in the middle too. Barbara once got the special opportunity to photograph beehive geyser in Yellowstone National Park. Beehive geyser is not predictable and doesn’t erupt very often. It was a stunning late afternoon image with a gorgeous rainbow in the spray. Two bison were standing near the geyser too, providing a sense of scale.
While many distractions can be removed or covered in the digital darkroom, it is wise to shoot the finest image you can before editing it later with the computer. By making the finest possible digital image in the field, you spend less time working on it with software and you’ll become a better photographer too.
KEEP THE IMAGE SIMPLE
Avoid including too many unrelated elements in the image. The key to making strong images with impact is to isolate photogenic subjects and eliminate clutter. Making the subject large in the viewfinder often eliminates distractions. Rather than photograph a large mass of wildflowers, some of which are wilted and in poor shape, move in closer and carefully select a group of three outstanding blossoms in mint condition for your image.

This American copper butterfly perched on a flower is a clean and simple image with no distractions in the background.
You may hear that including odd numbers of objects in the image such as one, three, or five makes a better composition than even numbers like two, four, or six. The theory is that even numbers of objects such as two frogs or four flowers are easy to divide once again. Odd numbers are unbalanced so it is more difficult to divide the subjects. It is true that a fine group of five wildflower blossoms does look nice, but so does a group of six, even if they are easy to divide into two groups of three. After all, you could always divide a group of five blossoms into a group of three and a group of two. Still, there is visual appeal to groups with odd numbers so take advantage of them. But, if you find a group of photogenic subjects with even numbers, go ahead and photograph them anyway because you will love them too.

These three lions are amusing because they all have the same pose. This is a good example showing where odd numbers of subjects tend to be quite pleasing.
USE LEADING LINES
Lines are a key element of composition. Learning to use them effectively comes by learning to “see” lines and placing them where they will do the most good or the least harm.
Horizontal Lines
Let’s look at simple horizontal lines first. These lines do not have to be perfectly straight, but may curve a bit. The horizontal lines of overlapping sand dunes or mountains are perfect examples of horizontal lines. These lines tend to impart a feeling of restfulness or peace in the image. A series of overlapping horizontal lines that begin at the bottom of the image and rise to the top make wonderful patterns so be sure to use them whenever possible. Even a single horizontal line such as the far shoreline of a lake can be useful.
It is best to avoid putting a strong horizontal line dead center in the middle of the frame. A strong line bisecting the frame tends to divide the image into two smaller images. Try putting a single strong horizontal line either lower in the frame if the area above the line is the most interesting part or above the middle of the frame if the foreground is more exciting. However, this is only a guideline. Images that have strong reflections often work well when the dominant horizontal line bisects the image separating the subject and it’s reflection. However, most subjects and their refection still work best if the line is not centered in the middle of the image.
Vertical Lines
These are active lines that convey the feeling of motion and height. The vertical trunks of trees or the stems of tall flowers are common examples. Fine images can be made with a single strong vertical line on one side of the image or a series of strong vertical lines across the image which makes a wonderful pattern. Keep a single vertical line out of the middle of the image so it doesn’t divide the image into two equal parts.
Unfortunately, because vertical subjects are frequently tall such as a tree or giant saguaro cactus, most photographers tend to point the camera up to include the top. As soon as you do this, the vertical lines tend to converge or lean in toward the top because the base of the object is closer to the camera than the top. Leaning vertical lines are unnatural and distracting, so it is normally best to avoid them when possible. Vertical lines can be prevented from leaning by not pointing the camera up. Unfortunately, this often means the top of the subject is cut off. The leaning vertical line problem can be solved by finding a higher position to shoot from, so the camera doesn’t have to be pointed up. If this isn’t possible, try moving back a bit and use a shorter focal length lens. Keep the optical axis of the lens parallel to the ground. While the subject’s image is smaller than you wanted, cropping the digital image later will restore its size, but you lose pixels. An excellent (expensive) solution to this problem is to buy an 85 mm Nikon perspective lens or any of the three Canon T/S lenses which come in 24 mm, 45 mm, and 90 mm focal lengths. The shift capability of these lenses makes it easy to keep vertical lines vertical. Fortunately, leaning vertical lines can be fixed with some software programs such as PhotoShop CS3.
Leaning vertical lines aren’t always detrimental. Sometimes it is desirable to make vertical lines lean in. An effective way to do this is to use the widest lens you have such as a 24 or 17 mm. Try lying on your back in the forest when the trees are adorned with autumn color or frosted during the winter and shoot straight up. If you are surrounded by trees, all of them lean in creating a circle which is a unique viewpoint that is quite pleasing.
Diagonal Lines
These lines are common in nature and very active. They work well to suggest depth in the image because the lines recede into the background and become closer together. Since most people read the page in a book from left to right, beginning the diagonal lines in the lower left portion of the image and letting them flow to the upper right corner makes a very strong composition, especially if a dominate subject occupies the upper right corner. The diagonal lines lead the viewer to the main subject. A series of horizontal lines can be turned into diagonal lines by choosing a shooting position at an angle to the horizontal lines. The closer you are to the horizontal lines and the shorter the lens, the easier it is to turn them into diagonal lines.
Curved Lines
These lines are extremely photogenic whenever they are found. The gentle curves of a winding river are common examples of the famous “S curve”. While using the S curve is a bit of a cliché, it still works very well photographically. Gentle curves are common in nature so use them in your composition whenever possible.
FORMAT
Square Format
There are three formats that you can use to compose your image in. The shapes of these formats include square, rectangular, and panoramic. While the vast majority of sensors in digital cameras are rectangular in shape, it doesn’t mean you are limited to that shape. Using software, it is simple to crop a rectangular image into a square. Some images such as flower patterns or tight portraits of animals work well as a square. When making a print from a square image, it may be desirable to make the borders so they are even on all sides to preserve the square format. At times, it is desirable to print a square image with one side of the border wider than the other to avoid centering the square image in the frame. Since lenses throw a circle of light that is cropped by the typical rectangular digital sensor, I suspect more cameras of the future will use a bigger square sensor to avoid wasting the cropped portion of the circular image focused by the lens. This would be an excellent way to increase the size of the digital sensor, so more pixels could be added.
Your camera probably uses a rectangular sensor to record the image. Since one side is longer than the other, it makes sense to use the long side to shoot vertical or horizontal images which covers the flow of the image best. Subjects that are taller than they are wide such as giraffes, trees, flowers that bloom along the side of a tall stem, and skinny waterfalls suggest vertical compositions. A wide subject like a sideways view of an elephant, a mountain range, or autumn color reflections in a lake usually makes excellent horizontal images. But, there are no rules here. A tall giraffe that is balanced with a lot of acacia thorn bushes could be a horizontal image while many autumn color reflections in lakes work well as vertical images. Usually a vertical or horizontal composition suggests itself right away. If you are in doubt, compose the subject both ways and decide later when you edit them. Perhaps both vertical and horizontal compositions work!
The panoramic format is an exaggerated rectangle where one side is at least twice as long as the other side. Everyone shooting digital cameras can easily shoot panoramics with their cameras. This format is tremendous when you have a subject where it works well. It is an unusual format that has only recently become widely used to make nature images, so it is sure to draw attention. Long panoramic images make gorgeous prints on the wall and generate a lot of interest in viewers because they are stunning to see.

The diagonal lines in the rock and the falling water start you in the lower right corner and lead to the upper left. While AuTrain falls is small, the shallow river permits walking in the water so you can photograph it from unexpected angles.
FANTASTIC PANORAMICS
Since digital images are easy to align precisely with software, it is simple to shoot fabulous panoramic images once a few field techniques are learned. Using software, it is easy to assemble multiple images into eye-popping panoramics.
Choosing Great Panoramic Subjects
You must develop your eye for seeing panoramic possibilities. Not every scene works well as a panoramic. Since the successful panoramic image must fit in a narrow rectangular box, look for photogenic subjects that are long. Usually these are horizontal images, but vertical subjects could work as a panoramic too.
The scene should be quite interesting throughout the length of the panoramic. If the subject has some especially strong points on the left or right side of the image or both sides, so much the better because these points serve to anchor the panoramic. The autumn color of a beechmaple climax forest reflecting in the quiet waters of a small Northern Michigan lake is a beautiful candidate for the panoramic treatment. Even a strong pattern such as the sand dunes in Death Valley National Park make a super panoramic. Although learning to see and shoot panoramics is new for all of us, the act of shooting panoramic images is straightforward and easy to master.
Panoramic images work best if the subject is not especially close to you, so a 50 mm or longer focal length lens is needed. Shorter focal lengths tend to bend the horizon and cover so much sky that you may get huge differences in the brightness of the sky which can be disturbing in a print.
LEVEL THE TRIPOD
Level the tripod first. It helps if your tripod has a bubble level built-in such as my Gitzo 1325. While it is easy to level the tripod on a solid wood floor, it is not nearly as easy to level the tripod in snow, mud, water, brush, or on a hillside. These situations are the normal places where nature photographers make their images. If you take your time, it is possible to level the tripod in the most difficult of circumstances. Unfortunately, on unstable ground such as mud, the tripod easily becomes tilted with the slightest pressure from the photographer.
I once used to struggle with leveling the tripod precisely until one of my students came to the workshop with the perfect answer. Gitzo makes a video adapter that was designed for video applications, but it works perfectly to level any tripod head. Gitzo calls it a G1321 leveling base. It is easy to use. Remove the flat base that comes with the Gitzo 1325 tripod and insert the leveling base. Level the tripod as best you can. It doesn’t have to be perfect. Now twist the column underneath the leveling base and the whole thing comes loose. Hold on to the column and move it until the leveling base is perfectly level as indicated by the bubble level in the leveling base. Twist the column again to lock everything up nice and snug. With practice, it only takes a few seconds to perfectly level the base that the tripod head rests on. The leveling base only works on certain Gitzo tripods so make certain the G1321 leveling base is compatible with your tripod. Hopefully, manufacturers of other tripods will address this new need to make it simple to level the tripod.
LEVEL THE CAMERA
Even though the tripod might be perfectly level, it doesn’t mean the camera is level on the tripod. Most tripod heads can be tilted in all directions too. The camera must be level with the horizon or your series of horizontal images that make up the panoramic image will slope to one side or the other. Fortunately, it is easy to level the camera. Insert a double bubble level in the hot shoe of the camera. Tilt the camera until the bubble is perfectly centered in the circle of both bubble indicators. Now the camera is level side to side and front to back with the world and the horizon should be level across the images that make up the panoramic.
USE A SPECIFIC WHITE BALANCE
Do not use auto white balance because the camera might change the white balance as the images that make up the panoramic shift from mostly shade to full sun for example. It is best to set a specific white balance such as sun, shade, or cloudy so the same white balance is used for the entire series of images that make up the panoramic.

Panoramic images are appealing so learn to shoot and print them. This frozen scene of the trees on Two Top Mountain near our home was made with five separate images and stitched together manually.

This beautiful Michigan lake was captured with three separate images. Be sure the tripod and camera is perfectly level so the images stitch together easily.
Set the exposure manually. As the series of images change during the sequence, autoexposure cameras change the exposure from one image to the next when the meter detects differences in light or reflectance values. You want the same exposure throughout the series of images so they match up better when you put them together. Since you don’t want to blow out the highlights, manually meter the brightest part of the scene and set the best exposure for that. Use this exposure for the entire set of images, even if one end of the scene is darker than the brightest part. If you begin with the darkest part of the scene, you run the risk of overexposing the brightest areas.
FOCUS CAREFULLY
Most people focus manually on the scene to make it easier to line up the images later. I have found that slight changes in focusing distance don’t seem to be a problem and give me a higher degree of sharpness. Normally in a horizontal pan, the entire subject is fairly close to the same distance anyway. Therefore, I typically fine-tune the focus from shot to shot by using the back-focus button control on the camera.
MARK THE PANORAMIC SEQUENCE
Once you have the camera and tripod level, the scene metered and carefully focused, begin the panoramic on either the left or right side of the scene. The first image to take is your hand. Stick your hand in front of the lens and shoot an out-of-focus image of it. This shot marks the beginning of the panoramic series. Photograph your hand again at the end of the series. If you don’t do this, you are apt to delete the first frame or two before you realize the images make up a panoramic scene because individual images often don’t seem well composed. The images of your hand marking the beginning and ending of the panoramic series saves you time.
BEGIN SHOOTING THE PANORAMIC
Now shoot the first image. Then pan the camera over enough so the second frame overlaps the first frame by at least 25% and continue to repeat this process until you reach the end of the scene. Don’t be afraid to shoot more than you think you might use. If you don’t want the entire scene later, it is easy enough to delete. But, if you fail to include everything you might use in the panoramic, there is no way to get it back later.
While it seems counterintuitive, it is best to shoot a horizontal scene as a series of vertical images. This puts more pixels on the subject and give you more wiggle room. When you line up the images to assemble the final panoramic image, it is necessary to crop part of the top or bottom of the image to make it a perfect rectangle again. Starting out with extra space above and below the main subject simplifies this process.
PANORAMIC SOFTWARE
There are numerous software programs that automatically stitch your images together to make the final panoramic image. It seems that new programs are being introduced to the market on a monthly basis and established programs are constantly updated. Virtually any image processing software program has a way to make panoramic images. Since I use PhotoShop CS3, the Photomerge feature works fine. Barbara is excellent at making panoramics and she lines up each image manually, but you do need to understand PhotoShop well to do it.
A Google search will find many popular panoramic programs that automate the process and produce technically fine images. Some of these programs include PhotoVista Panorama 3.0, PanaVue Image Assembler, ArcSoft Panoramic Maker, and Realviz Stitcher EZ. Canon includes PhotoStitch software with many of it’s cameras too.
