Chapter 17
Postproduction Workflow and the Process of Digital Editing
Your shooting is done. Your digital media is “in the can.” What’s next? This is the first of a series of chapters about the postproduction phase of documentary production. In this chapter, we will look at the technical, organizational, and craft aspects of postproduction. In Chapter 18, we will consider the role that writing plays in creating a finished documentary. In Chapter 19, we will look at the conceptual and aesthetic issues involved in editing.
■ Postproduction Overview
Postproduction encompasses all of those creative and technical processes that go on after the shooting stops—but it’s never quite that neat. While the goal is to complete shooting before you start editing, on a documentary it is not uncommon to find yourself shooting more material as you refine your story during editing. In addition, for many documentaries, you will be adding a variety of other materials in postproduction that will greatly affect your final film. These include archival footage, stock footage, still photos (all covered in Chapter 20), graphics, narration (Chapter 18), and additional sound elements including effects and music (Chapter 22).
The key people involved in postproduction are the director, the producer, the editor, and the assistant editor. Many documentary filmmakers edit their own films, and if you are a student making a short documentary for class, you probably will too. In fact, when you are starting out, it’s a good idea to do as much of the postproduction as possible yourself so that you gain a hands-on understanding of how it all works, as well as a conceptual understanding of the expressive power and flexibility of editing. On a larger project, the entire process may be overseen by a postproduction supervisor who ensures that things go smoothly and that time and money aren’t wasted by making choices at the beginning of the process that have undesirable effects later on in the postproduction chain.
The Basic Phases of Postproduction
- Lay out a systematic workflow, if you haven’t done so already (p. 270).
- Create a master list of footage.
- Transfer and/or transcode footage for ingest into your edit system. Make sure you have a strategy for naming clips before you begin ingesting (p. 274).
- Organize your material by logging and transcribing, either in your editing system or on paper (p. 284).
- In your editing system, organize your clips into bins based on character, date, theme, or whatever works for your particular project. Bin columns are also versatile and useful for project organization (p. 284).
- Create paper edits or other organizing documents (p. 289).
- Edit the picture and sound into rough cuts (p. 290) using temporary graphics, low-resolution archival materials, and scratch music and narration.
- Create a fine cut (p. 292); check availability of all licenses for footage, stills, and music.
- Lock picture.
- Incorporate final graphics and cleared, high-quality archival footage and stills.
- Record final narration, if you are using it.
- Get the final version of the musical score from composer, or existing music you have licensed.
- Edit and mix sound (Chapter 21).
- Correct color (Chapter 22).
- Master the project and create submasters for distribution (Chapter 22).
There are a variety of specialists who can bring fresh conceptual perspectives, imaginative energy, and technical expertise to your film during this stage. Writers, sound designers, composers, sound editors, and rerecording mixers (Chapter 21), and colorists (Chapter 22) can add an amazing amount of creative value to your film. If you are working on a low budget, don’t assume you can’t find people who can contribute to your postproduction process. A composer who is also starting out, for example, may be willing to work on your project for little or no money in order to develop his/her own sample reel.
Postproduction Workflow
Workflow is the technical path your project will take from sound and image acquisition to exhibition. This includes choices about the shooting format, the editing format, editing software, finishing processes, your mastering format, and your final distribution formats. Filmmakers can easily lose their way in the workflow stream, with unexpected and often expensive results. A little bit of research at the very beginning into the ways various production and postproduction phases and formats interface with one another will go a long way toward minimizing nasty surprises. Doing some tests using the various types of footage you will be working with and taking them all the way through postproduction is advisable. At the very least, talk to other filmmakers and postproduction professionals, including any facilities you’ll be working with, before you begin postproduction.
The postproduction workflow is to some extent based on decisions you’ve already made in production, including what camera you used, what format you shot in (and what format other footage such as archival material comes to you in), and how your sound was recorded (double- or single-system). Your postproduction workflow is also based on an understanding of your desired distribution venues (Chapter 23).
At this point in the evolution of the medium, there are a wide variety of postproduction pathways one can take, and each option has a significant impact on the budget of the film, your work process, your documentary’s look and sound, and ultimately on your range of exhibition possibilities. We are also at a time of big transitions in terms of available digital nonlinear editing (NLE) software tools. A few years ago, Apple’s Final Cut Pro (FCP) and AVID’s Media Composer dominated the documentary editing field. Today, with Apple’s move to the more consumer-friendly Final Cut Pro X, documentary makers and editors who used FCP have been migrating, often to Adobe’s Premiere Pro or to Avid’s Media Composer. For the near future, things will continue to be in flux, but a good grasp of postproduction basics, as we are providing below, will help you make the best decisions for your project regardless of the specific system you’re using. For the purposes of this book, we will use examples and figures from both AVID’s Media Composer (Avid) and Adobe’s Premiere Pro (PP).
When devising your workflow, you should have answers to the following questions:
- What was the film shot on: SD, HD, 2K, or 4K? What codec, resolution, and frame rate? Did you shoot single- or double-system sound? (Chapter 8)
- What editing software will you use? Will you be using specialized ingest software (p. 274) or syncing software (p. 277)?
- Will you work at highest resolution throughout, or save space and RAM by using lower-resolution versions of your files (proxies) and linking back the higher-resolution footage at the end? (p. 276)
- Do you want to transcode all your footage to a single editing format at the beginning of editing, or will you work with mixed formats and standardize at the end? (Each approach has advantages and disadvantages; see p. 275.)
- Will you edit and mix sound within your editing system, use specialized software to do it yourself, or rely on a specialist to finish the soundtrack? (Chapter 21)
- Will you do the color correction (also called grading) on your own, or do you plan to use a professional colorist? Will you need specialized third-party software if you do it yourself? (Chapter 22)
- How do you want to master the project? (Chapter 22)
- Do you want your master to be mono, stereo, or surround sound? (Chapter 22)
- How do you want to distribute the project (Chapter 23) and what media types will be required for exhibition?
Finally, if you are delivering the program to a broadcaster or other type of distributor, you need to make sure you understand what their specifications are so you deliver everything correctly.
Let’s look at a typical low-budget project shot on HD that aims to finish on one of the HD digital video formats with the intention of screening at festivals and streaming on the Internet (Figure 17.1).

■ Figure 17.1 Low-budget workflow. Shoot HD video, edit and finish in your nonlinear editing system (NLE), master as a file for festivals, DVD, and web. Master audio is stereo.

■ Figure 17.2 Medium budget workflow. Shoot HD video, edit and lock picture in your nonlinear editing system (NLE), send to professional sound edit and mix, and professional colorist. Master as a file for festivals, DVD, and web. Includes surround sound for Digital Cinema Package (DCP).
For a low-budget or student project, you will likely do some of your own color correction or sound finishing in your NLE. For a higher end project, more suitable for broadcast or theatrical release, you will actually be exporting both sound and picture and taking them to a mix session and a color correcting session, respectively (Figure 17.2).
■ The Process of Digital Editing
Virtually all documentaries are edited on a digital NLE system. Editing in the digital domain means that all visual and sound components of the project, no matter what their original form (film, analog audio, or video), must be converted into digital data in the form of media files and brought into a computer running specialized editing software. Any piece of visual footage, or any piece of sound, can be instantly accessed through a computer’s random access capability and easily labeled, organized, duplicated, cut, arranged, trimmed, mixed, and manipulated.
Digital NLE is “non-destructive” editing, which means that any cutting, arranging, and effects you might perform occur only virtually. Your original media files are not altered in any way (Figure 17.3). All editing is done via media file indicators, which use time code (Chapter 8) and clip names to “point” to the original data without ever changing the underlying media files themselves. For example, let’s say you have a camera take that is 10 seconds long and you want to use 2 seconds from the middle of that file in your cut. You simply indicate the time code numbers where you want the shot to begin (the in-point) and end (the out-point). Then you edit that portion of the shot into the program sequence. As you do this, however, you are in fact not cutting any actual media. Rather, your in-point and out-point numbers tell the computer what piece of that media file to play back at a particular point in your cut. This is why it’s easy to make or trim a shot a few frames longer or shorter, or try numerous versions of a sequence using the same shots in different order. You are simply altering data indicators, not the underlying media files.

■ Figure 17.3 Media files are saved on an external drive and are not actually altered during editing. Pictured are the .mxf files for a project in Avid Media Composer, located in a file called “Avid MediaFiles” on an external hard drive.
All of the editing decisions you make—length of shots, order of shots, layering of audio, and so on—constitute your edit decision list (EDL). The EDL is one of the major components of your project file. The project file will have an extension based on the NLE program you are using, like .prproj for Premiere Pro, or .avp for AVID Media Composer. Unlike media files, which are big, project files are small because they only contain the EDLs for your various sequences, source media information, user preferences, and settings. Because they are small, project files can be sent easily from one computer to another. It is not uncommon, therefore, to have multiple people working on the same project in different locations. As long they each have a set of hard drives with the identical source media files on them, they can email the project file back and forth.
Learning an NLE program can be overwhelming. The best way to approach your software is to learn the basic functions first. Learn how to choose the shots you want, how to perform cuts, and build a simple sequence. Rearrange the shots and trim them longer or shorter as you need. Learn how to layer a few tracks of audio and adjust sound levels, keeping your footage in sync. Maybe try a dissolve or two. That’s all you really need at first. Focus on what you need to know to tell your story. As soon as you discover that you truly need to use a particular transition or effect, look it up and learn how to do it. There are tutorials online for pretty much everything you will want to learn, often created by the NLE’s manufacturers.
The Basic NLE System
There are purely consumer programs, like Apple’s iMovie and Sony’s Vegas, which are inexpensive and relatively easy to learn. These programs are not flexible enough, though, for anyone who seriously wishes to make accomplished documentary films. The more professional programs, like Avid’s Media Composer and Adobe’s Premiere Pro, are more expensive but have much greater capability in terms of editing sound and picture, handling large projects, and integrating with professional finishing workflows for color correction and sound mixing. All professional NLE programs tend to work on the same basic principles and use similar interfaces.
The Hardware Setup
While small projects can be completed in on a laptop computer (Figure 17.4), most editing setups use a desktop computer. The hardware for a typical NLE station consists of a computer and monitor(s) (Mac or PC) running NLE software, external hard drives, a media transfer device (camera or card reader), speakers and/or headphones, and a comfortable chair (Figure 17.5). Editing requires a fairly powerful personal computer. Many editing setups will use two monitors, with one (often an HD monitor) dedicated to a full-screen display of the program.

■ Figure 17.4 The convenience of today’s editing software. Two students do some last-minute cutting in the hallway before their class begins.
External hard drives store your media files, and connect to your computer using either Thunderbolt or USB 3.0. Most NLE software instructions recommend not putting media files onto the internal drive of your computer, where your software resides. This is a speed issue and also a convenience issue. Media saved on a portable hard drive can be used with any editing station running the same software. Keep in mind that media files take up a lot of space, so you must calculate storage needs before you start working with your footage. Storage space depends entirely on your editing format. Five minutes of 1080/60i HD footage in codec like Apple ProRes HQ will require 5 GB of drive space, while 5 minutes of AVCHD footage takes up much less room. Any number of free format/storage calculators can help you figure out the storage needs for your format’s codec and data rate (p. 132).

■ Figure 17.5 A typical NLE system setup (in this case, Annukka Lilja editing Deirdre Fishel’s Care): computer (A), external hard drives (B), speakers (C), and a comfortable chair (D).
In addition to holding your original media files, your NLE system will create new media called render files for a variety of reasons. It’s essential that you have plenty of extra space for these files. It’s also important that your hard drive have a spindle speed of 7200 rpm. Many less expensive drives run at the slower 5200 rpm speed, which is inadequate for playing back HD footage. Currently a new type of solid-state drive (SSD) can offer even higher data transfer speeds, but the high price and small size makes this less likely to be found in an editing context.
A media transfer device is used to download your footage into the NLE system. Again, this depends on your shooting format. If you’re shooting on HD tape, then you’ll require a deck interfacing with the computer, or you can use your camera. If you are shooting on memory cards, you’ll need your camera or a card reader. Note that some computers come with a reader installed. Often footage will be transferred or transcoded onto a drive in the field by a Digital Imaging Technician (DIT).
A good set of speakers is important to get a true sense of your audio. If you are working in a room where there are other people, you’ll be forced to edit with headphones. Headphones are fine while you’re constructing the rough cuts of your movie, but the final soundtrack mix should always be done with high-quality speakers to get an accurate sense of how the balance and presence of the audio will sound to an audience who will be listening to your documentary through speakers. In particular, problematic bass sounds that you will be unaware of listening to headphones will become obvious when your tracks are played through good studio speakers.
A comfortable chair is a must. Editing requires that you remain inside an editing room, sitting on your behind, in front of an NLE system for days on end. Under these conditions, it’s not uncommon for repetitive stress injuries to occur. For this reason, an adjustable ergonomically correct chair is important.
Setting Up Your NLE Project
When you create a new project in your NLE, you will need to set it up so that the program understands the basic parameters of your project. One of the most important settings is your format, which relates to the format of the material you will be importing and how you want it to be converted when you bring it into your NLE (Figure 17.6). Your scratch disk (PP) or capture drive (Avid) determines where your NLE will put any files it creates while importing or during editing. It’s important to set these correctly every time you edit, or you run the risk of spraying footage throughout your system and ultimately losing files. Finally, your sequence settings determine the format of any new sequence you create.


■ Figure 17.6 Settings dialog box in Premiere Pro (left) and Avid (right). Here you can see the choices available for setting up a project in a variety of formats.
Ingesting Your Video
These days, you will most likely be shooting on memory cards (SD, CF, P2, or SxS) or onto a hard drive. You will bring your material into your NLE environment via a process called ingesting. Once you’ve inserted a card into your computer or card reader, you have several options. One is to use the computer’s operating system to copy the entire contents of the card, including its file structure, onto your hard drive. You can then bring the media files right into the NLE working environment, or convert them into another format for editing using your NLE software or another application. In other situations, manufacturers will provide software that reads the file structure on the card, and copies the files onto the hard drive, wrapping them in the process. An example is the Canon XF utility. Wrapping involves putting the media into a file format that the NLE can understand and work with, without changing the original shooting format encoding. Premiere Pro prefers files wrapped in Quicktime or .WMV (the Windows container format) wrappers. Avid, on the other hand, saves all media in the Material Exchange Format (.mxf) container format.
Many cameras that shoot in the AVCHD format use a file structure based on the one developed for Blu-ray discs. Material shot in this format is actually not saved as discrete files, but as streams, which lack the structure of normal files. Some of the information, like time code, is actually stored in a separate folder (Figure 17.7). This means that the media typically has to be wrapped in a container format—in other words, turned into individual files (.mov for Premiere, .mxf for Avid). Different cameras generate media with different file structures, and they may also have to be rewrapped or transcoded for use. NLE and camera manufacturers make it their business to offer updated software addons and plug-ins that will allow the newest camera files to be ingested. Before you start trying to bring in any media, you should make sure your software is up-to-date and set up to bring in the media you are working with.

■ Figure 17.7 The file structure of an AVCHD disk. The media is on the right in the Stream folder as .mts files.
Depending on our workflow, your media may be need to transcoded. Transcoding means converting the media to a new codec that the NLE is optimized to work with (from AVCHD to Apple Prores, for example).
Once your material has been ingested, it will appear in your NLE as clips (p. 284).
Working Natively vs Transcoding
Increasingly, NLEs (including PP) can handle a variety of codecs natively. This means that they can be ingested as they are, without transcoding. When you determine your workflow, you will need to decide whether to work natively or transcode all of your footage so that it is in one consistent codec. Documentary editors often face a “codec salad,” meaning that some footage was shot on one camera, other footage on another, archival material is in another format altogether, and so on. Avid will always convert to its own proprietary codec and wrap in an .mxf container.
The advantage to working natively is that you don’t have to spend a lot of time early on transcoding to a single format. The disadvantage of mixing formats is that long sequences can bog down your computer as it tries to process the many codecs in real time. Your finishing may also be more complicated and can reveal unsuspected problems. There is no consensus among editors at this time as to which approach is better. We suspect that, as software and processing speeds improve, working natively will become more common.
Frame Rate Considerations
If you are working in NTSC, you will have shot your footage either at 24 fps (actually, 23.97 in most cases) or 30 fps (actually 29.97). Hopefully you will not have combined both in one project! You now have to decide whether to edit in 23.97 or 29.97. The important thing is to work backwards from your intended delivery formats. You cannot mix frame rates within one sequence, so you will have to either convert your 24 fps material to 30 fps, or vice versa.
When video cameras capable of shooting 24 fps first came on the market, they were incapable of actually recording at anything except the broadcast standard of 29.97 fps. This problem was solved using an approach inherited from the days of film-to-video transfers, called 3:2 pulldown. The DSP in the camera would repeat certain fields (half a frame, remember!) so that the 24 frames filled the 29.97 timespace. Today, many HD cameras have the capacity to shoot 24p native (24Pn). XDCam and AVCHD, for instance, both include Pn formats. The implications of this can be a bit complex. The most important thing to think about is your workflow, which can go a couple of different ways for productions that shoot 24Pn. One alternative is to edit in 24P and do a pulldown at the end to create a 29.97 fps master for broadcast. Alternatively, you could do the pulldown right away, and edit in 29.97 fps to make a broadcastable master. Then you can reverse the pulldown process to make 24 fps versions of your show for DCP or Blu-ray, both of which support that frame rate.
Backing up Your Media
One of the biggest problems with modern digital media, in comparison with earlier forms such as film or analog video, is that it is totally virtual. The cards and hard drives that cameras record on are erasable and reusable, so the media you’ve imported is all you’ve got. It is very easy to lose your whole show in a hard drive crash or other computer disaster. You need to develop a backup system for your media, and use it rigorously. A standard approach is to simply copy each card that you import into your NLE system onto a second backup drive, so that there is a second copy that you can access if your main drive fails. Some ingest software will automatically make backups as it imports your material.
Working with Proxies (“Off-Line” and “Online” Editing)
Not many documentaries are shot on high-resolution formats like 4K, but this is likely to change in the near future. And even in HD, many documentaries have more than 100 hours of footage, resulting in terabytes of needed hard drive space. Sometimes, your NLE will have a hard time handling your high-resolution files. In any of these cases, it may be advantageous to create proxies, which are lower resolution versions of your high-resolution media files. Proxies take up less storage space and are less demanding in terms of computing power. The idea behind proxies is that you edit with them, and then can easily go back to the high-resolution original files and cut them in after you have finished making your editorial decisions and your cut is locked (p. 292). Using proxies for editing is also called off-line editing, which refers to an earlier time period (before about 1995) when all editing was done this way. Similarly, recreating your cut using the high-resolution footage is called online editing or conforming.
■ Ingesting with Specialized Software
Many workflows involve using special software, either in the field or as a first step toward setting up postproduction. These software systems allow you to ingest clips, transcode footage, create subclip markers, add metadata, and even back up your material while importing your media into your NLE system (Figure 17.8).
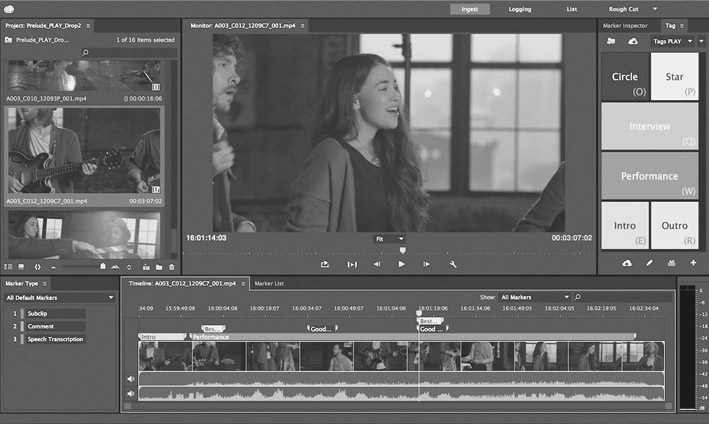
■ Figure 17.8 Adobe Prelude is a software companion to Premiere Pro that allows for ingest, transcoding, and logging in the field.
If you are working with AVID, the system will auto matically transcode your source material into the AVID DNxHD proprietary format. You can select from a variety of compression levels, expressed as bandwidths (Mbps). A high quality level would be DNxHD 220 (10-bit, full image quality, with a 220 Mbps bandwidth), while a compressed proxy could be DNxHD36 (8-bit, lower image quality, with a 36 Mbps bandwidth).
Cameras are increasingly capable of shooting high-bandwidth files (4K, for example) that are too big for edit systems to handle, so the use of proxies will likely continue for the near future.
Ingesting Audio
Ingesting audio may seem easy, but in fact there are several things you need to be aware of to avoid problems. The first is to make sure that you are ingesting at the same sample rate that you are using in your project’s main sequences. If you recorded single-system, it is likely that your audio will have a sample rate of 48 kHz. But some cameras have other options and if you are using a separate audio recorder, you may have elected to record at a higher sample rate, such as 96 kHz, and your editing software may or may not be capable of converting this on the fly. Stereo is another key issue. If you recorded in stereo, you need to make sure the import settings match this. If you didn’t record in stereo (Chapter 14), you don’t want to import your two channels of audio as a stereo clip. All nonsync audio sources, music, and sound effects must also be ingested with care. If you bring in a music track, which will often have a sample rate of 44.1 kHz, the NLE may handle it, and it may sound okay in the sequence, but cause trouble when you go to a mix. In addition, sound effects downloaded from the Internet may be in a compressed file format such as MP3, which you should also plan to convert before importing them. In fact, MP3 files are generally problematic for use in a documentary soundtrack, so try to avoid them where possible. The best formats to use are the two uncompressed digital formats, .wav and .aiff.
Syncing Picture and Sound
If you have shot single-system, then the audio will be captured in sync along with the picture. However, if you have shot double-system, then your audio was captured separately and stored as .wav or .aiff files. Now, each scene must be synced in your NLE system. There are different ways of doing this:
-
Using a Slate to Sync
Open the image clip in the viewer and find the exact frame where the clapper arm on the slate closes. Place an in-point on that frame.
Open the corresponding sound clip. You will see a sound wave representing the audio on that clip. Find the exact point where the “clap” occurs (looking at a waveform of the sound clip will help tremendously) and mark an in-point. Audio scrub, which allows you to hear frame-by-frame audio as you drag the viewer playhead, is also helpful.
Select the video and audio tracks and, using the autosync (Avid) or merge clips (PP) command, create a single synced clip. Be sure you select the dialogue box that tells the program to use the in-point as a sync-point.
-
Syncing When Your Picture Files Include a Single-System Scratch Track
Often, when you are shooting double-system, your camera will have recorded audio that is not good enough to use in your soundtrack, but which can be useful for syncing. (This is often the case with DSLR shooting, for example). If you do have a scratch track, just expand the vertical height of the track to make the waveform more visible and line up the waveform of the double-system track with the waveform of the single-system scratch track. Play the track. If it sounds “reverb-y,” it’s not quite in sync. Once the clip plays back without any echo or reverb, it’s in sync and you can merge the clips.
-
Using Time Code to Sync
If you are fortunate enough to have shot with a camera and sound recording device that had locked time code (p. 116), you will be able to use the time code on the clips to sync your audio and video.
-
Using Pluraleyes to Sync
Pluraleyes is a software program by Singular Software that synchronizes audio and video clips automatically without the need for time code or slates. It integrates with Premiere Pro and AVID Media Composer.
The NLE Software Interface
In standard editing mode, most NLE systems divide the edit environment (or desktop) into four main windows (Figure 17.9): the project window (Avid) or project panel (PP), (A); the preview monitor (Avid) or source panel (PP), (B); the timeline, (C) ; and the sequence monitor (Avid) or program panel (PP), (D). The names may differ, but their function is basically the same regardless of the particular NLE program you are using.
The Project Window (Avid) or Project Panel (Premiere Pro)
The project window or project panel is the main window for storing, organizing, and accessing all of your project’s visual and audio elements. Your media files are called clips and are organized in folders called bins. Each type of sound and picture element has a particular icon that identifies it (Figure 17.10). Remember, these are just reference information, not actual media—they simply point to the actual media files that are stored on an external hard drive. Another element you will find in this window is the sequence, which refers to your edited material as represented in the timeline (see below).
You can create as many bins as you need. Most NLE systems provide great flexibility for customizing, organizing, and identifying project elements. Clip information can include the date filmed, log notes, description, in and out time code numbers, duration, number of audio channels, frame rate, compression, codec, pixel ratio, and so on. You can customize how you see this information, and use it to sort your clips and sequences (Figure 17.11).
The Preview Monitor (Avid) or Source Panel (Premiere Pro)
This window is where you view your source clips, and then set in-points and out-points to delineate the exact piece of footage from the longer shot that you want to edit into your film (Figure 17.12).
The Timeline Window
Once you’ve decided on the specific parameters of the shot you’d like to insert into your film, you place it into the timeline. The timeline is where you truly edit your movie by inserting, deleting, arranging, rearranging, and fine-tuning your clips as you build your documentary one cut at a time.
The timeline is divided into discrete video and audio tracks for maximum creative flexibility. A typical timeline will automatically provide one video track and two audio tracks when you start a project, but you can add as many tracks as you need. You have the option to cut, rearrange, or apply effects to only the picture, or only the sound, or any combination of picture and sound tracks. Audio tracks can be layered to create complex sound design. Multiple video tracks can be used to create superimpositions and other layering effects (Figure 17.13).

■ Figure 17.9 The four main editing windows are essentially the same in Avid (top) and Premiere Pro (bottom): the project window (Avid) or project panel (PP), (A) ; the preview monitor (Avid) or source panel (PP), (B); the timeline, (C); and the sequence monitor (Avid) or program panel (PP), (D).

■ Figure 17.10 The organization of project files in Avid Media Composer. The Project Window contains folders (A) for project organization, and bins (B) which hold sequences (C), clips (D), subclips (E), audio files (F), and other elements.

■ Figure 17.11 Bins have many columns that contain useful information for organizing and finding clips. This example is from an Avid project.
As you lay down clips in the timeline, you are creating a sequence, which is a graphical representation of your edited movie. Sequences are saved in the project window or panel, along with your clips. Sequences should be clearly named and saved frequently. One of the great advantages of digital editing is that you can create multiple sequences, copy sequences, create versions of sequences, and even insert part of a sequence into another sequence.

■ Figure 17.12 The preview monitor in Avid is the left half of the composer window (shown in its entirety here). This is where you view your source clips, and set in-points and out-points.

■ Figure 17.13 The timeline consists of the picture track(s) (A), sound tracks (B), and playhead (C).
Inside the timeline is a playhead, which is a horizontally scrolling vertical line running through all edited tracks. The playhead tells you where you are in the timeline and is used to move through your sequence quickly. You can also use the playhead to determine where edit points are placed and where shots are inserted. If you hit play, the playhead moves across the sequence in real time.
In all NLE programs, the number of tools and the possibilities for working in the timeline are staggering. Some capabilities, like the ability to trim shots shorter or make them longer with frame accurate precision, are essential tools for editing. Other timeline functions you will use only rarely. It is not possible to cover the functions in detail in this book, so we refer you to the software instruction manuals. All NLE systems have a Getting Started manual, which is the best place to begin. Also, there are many online tutorials, user forums, and books readily available.

■ Figure 17.14 Avid’s Tool Palette (top) allows you to access commonly used tools for editing, and the command palette (center) allows you to map functions onto your keyboard (bottom) for faster editing.
The Sequence Monitor (Avid) or Program Panel (Premiere Pro)
This window is where you watch your sequence as you build it. Wherever the timeline playhead rests, that frame of video is viewable in the sequence monitor/program panel. You can move through the sequence in real time, slowly or quickly, or frame by frame using the transport control buttons at the bottom of the window. You can also drag the playhead to move around the sequence extremely quickly. The playhead in this window is a duplicate of the playhead in the timeline window. See the right half of Figure 17.12 for an image of Avid’s sequence monitor.
In addition to the four main windows, there are other auxiliary windows that you can include on your desktop for the sake of convenience. One in particular is the tool palette, which allows you to access timeline tools with the click of your mouse. You can also map tool functions onto your keyboard so you can perform tasks easily without needing a mouse or keypad (Figure 17.14).
■ Summary: The Four Basic NLE Windows
- 1. Project Window (Avid)/Project Panel (PP): This is where you store and organize your editing elements: video clips, audio clips, graphics files, and sequences.
- 2. Preview Monitor (Avid)/Source Panel (PP): This is where you preview clips and determine in-points and out-points for your shots.
- 3. Timeline: This is where you edit and arrange your image and sound files to create a sequence.
- 4. Sequence Monitor (Avid)/Program Panel (PP): This is where you view your edited sequence and mark in-points and out-points on the timeline.
Menu, Icon, or Keyboard: Take Your Pick
One thing you’ll discover on all NLE systems is that there are usually three ways of doing exactly the same thing. You can find any given command inside pull-down menus, or you can trigger the same command by clicking an icon on the desktop or using a keyboard shortcut. For example, in Premiere Pro, setting in- and out-points on a source clip can be accomplished three ways: by hitting the “i” or “o” button on the keyboard, by clicking on the mark in/mark out icons in the source panel, or by scrolling down the “mark” menu to the “mark in” or “mark out” command (Figure 17.15). You don’t need to memorize all three ways of doing every task. Professional editors tend to use more keyboard commands as they are the quickest, but most people use a combination. Customize your process, and find the easiest and most comfortable route for yourself.


■ Figure 17.15 Many functions can be accomplished in multiple ways. For example, you can set in- and out-points on the keyboard (left), through a menu (A), or by clicking icons (B).
There are two special keyboard functions that are extremely handy to know:
- The J, K, and L buttons are universal transport control buttons. J plays in reverse at normal speed, K is pause, and L is play forward at normal speed. Pressing J and L multiple times increases or decreases the play speed from normal speed (one press) to 2x to 4x to 8x (four presses). Holding the K and pressing J or L will give you slow motion.
- The command-Z keystroke combination instantly undoes your last action. Inevitably, as you edit, you will click a wrong icon or drag and drop something where it doesn’t belong, or even accidentally delete an entire sequence. If you’ve made a mistake, simply hit command-Z, and all is put back where it was before your blunder.
■ Making Simple Edits
The more you edit, the more tools, edit modes, and shortcuts you will incorporate into your routine. The best way to learn software is one function at a time as the need arises. The place to start is making simple cuts. Let’s go through the process of using the basic windows in Premiere Pro to make some simple but very common edits.
For this exercise we will use a footage shot of Harley “Inspector Collector” Spiller, an artist and educator in New York City whose work is based on his passion for collecting things. If you want to load the raw footage into your own Premiere Pro project and follow along, the files can be downloaded from our companion website (www.routledge.com/cw/Anderson).
Good organization is the basis of all good editing. Unfortunately, many inexperienced editors, awash in the anticipation of seeing their footage in the context of an edit, begin to capture their media without thinking through the organization of their material. This is a critical stage, especially with file-based media. If your material is not named and organized well, you can actually lose track of it quite easily. Clip naming conventions should be figured out before you begin ingesting footage, as it becomes riskier to change them after you have established a relationship between your media file indicators (clips) and the underlying media files they point to. In addition, good organization makes it easy to see what you have and find things you need. When you have only a few hours of footage, it might be possible to wade through it and find a golden moment you remember from production, but when you are dealing with dozens or hundreds of hours of material, you will never be able to keep things sorted in your mind. Developing good habits now will pay off throughout your career, and will save you time and money on any documentary, big or small.
The basic stages of organization are:
- Create a master list of footage shot and acquired.
- Develop a consistent and systematic strategy for naming and describing (logging) clips in your NLE system.
- Develop a consistent and systematic strategy for organizing your footage into bins.
- Transcribe interviews and cross-reference with clips in your NLE system.
The Master List of Footage
This might seem obvious, but many students never create a list of what they have shot! Your master list of footage is a list of all your elements, with the date created and a short description of the material. It’s like an overview of your project in a couple of pages you can review at a glance. In former times, this would have been a list of tapes. Nowadays, it is more likely to be a list of folders. Naming conventions can vary, but one strategy is to name your folders according to the date they were shot, as well as the card number for that day (1, 2, 3, etc.). Next to the name, include a short description of the material. For example:
| 01_15_14_Card_1 | Roger at work |
| 01_15_14_Card_2 | Roger at work, Roger interview Pt. 1 |
| 01_15_14_Card_3 | Roger interview Pt. 2 |
| 01_17_14_Card_1 | Visuals of Detroit, Maria at home |
| 01_17_14_Card_2 | Maria at home, Maria Interview |
The specifics of your naming convention matter less than the principle: you should be able to know what you have to work with, as well as when it was shot, and be able to go through it at a glance quickly and easily to remind yourself what material you have. It is very important that you remain consistent with what ever system you use. In the master list, you should also include archival material, stills, graphics, and audio elements.
Naming and Describing Clips
Depending on your workflow, you may name your clips before you import them or rename them once they are in your NLE. Either way, avoid having multiple clips with the same name because it will make it hard to keep track of your footage. Even if the NLE system assigns a more randomly generated series of numbers (like the name “20140305173352” assigned to a clip by Canon’s XF utility), many editors prefer to give their clips descriptive names (like “CU Roger writing,” or “WA Maria w groceries”). The advantage of giving your clips descriptive names is that the clip’s name in the browser, and in the timeline, will give you an indication of what it is. Dangers of renaming clips include not being able to re-link clips if they go off-line, which means that the relationship between the media file indicator (the clip) and the underlying media files has broken for some reason. If you are using proxies, be especially careful about renaming clips, as you will have to go back to your high-resolution media when you are finished editing. Make sure you think through your workflow carefully before you start to rename clips!
Using Bins to Organize
One very useful approach to organizing your material works like this: in the project panel or window, you should create a bin for each day of shooting, and within those bins, create bins for each card, using the same names you gave your original media folders in your master tape list. You can then duplicate the clips from each card and sort them into other bins based on character, event, theme, and so on. This is just one way of organizing your material. If you develop another system that allows you to find your material easily, then by all means use that.
Within your bins, you can use columns to organize your material as well. For My Brooklyn, for example, co author Anderson created a bin for still photographs, within that bin columns for “theme” and “source.” It was then possible to find all the clips for a particular theme, like “1930s,” or “architect renderings” simply by sorting the bin by that column. “Source” is a useful category for third-party elements that may need to be cleared, as it can remind you at a glance where a particular image came from. You can even add a column where you keep track of which images are free to use and which will require licensing (Chapter 20).
However you organize your bins, it is a good idea to export the information in them to a spreadsheet. Print these up, along with your master list of footage and transcripts, and keep everything in a postproduction binder so that you can access the documents easily as you work.
■ Transcripts—are They Really Necessary?
Every student we have ever directed to make transcripts has reacted with horror. It’s true that creating a word-for-word transcript of your interviews is time-consuming. Until voice-recognition programs get better, you are likely going to be transcribing yourself or paying someone else handsomely to do it for you. However, there is no better way to keep track of the content that is in your interviews. Once you have spent a half hour looking for a particular sound bite you remember but can’t locate, you will start to understand the value of a transcript that can be perused and searched easily.
A transcript is a word-for-word typed script of every word a speaker says. That includes “ums,” “ahs,” false starts, and asides. Transcripts should be done for all interviews. They are also very useful for observational scenes that include a lot of dialogue.
When the transcript is complete, devise a system for cross-referencing your transcript with the clips in your NLE. One way to do this is to put markers on your clips, and then name them something that you can write on your transcript as a reference. (Some editors use the initials of the character plus a number, like “RW1,” “RW2,” and so on.) Whatever system you come up with, the idea is to be able to code your transcripts so that when you want a particular piece of media from an interview, you can find it in an instant.
Some NLEs, like Premiere Pro, claim to be able to transcribe your interviews using voice recognition. Quality varies, and is much improved by uploading a text file of the transcript. AVID’s ScriptSync will allow you to upload a transcript and sync it with clips so that you can find any piece of footage easily using a transcript or using a word-based search.
For the purposes of the exercise, we will assume that you have already created a project in Premiere Pro and organized it. You have four bins in the Project Window: “Raw Footage,” “Interview Subclips,” and “Harley apt. visuals.” There is also a bin for sequences.
We are going to edit a short scene, in which Harley introduces us to his bottle cap collection and talks about collecting being important to him. We will start with a medium shot (MS) of Harley seated at a table talking, then cut to a close-up (CU) of his bottle caps, then back to a MS of Harley talking about collecting being important to him. Because he is standing in the last shot and sitting in the other two, we will finish by putting a cutaway shot of a Chinese menu over the beginning of the standing shot so that we don’t break continuity.
The bins and clips we will work are:
Bin: Interview Subclips
HS 1 intros beer cap collection
HS 3 collecting identity
Bin: Harley Apt. Visuals
CU bottle caps
kitchen cutaways
Double-click on the sequence in the “Sequences” bin to open it up in your timeline. Then open the “Interview Subclips” bin. Double click on the clip “HS 1 intros beer cap collection.” You will notice that the clip appears in the source panel window (Figure 17.16). Use the transport controls to play the clip, then set an in-point right before Harley says “This is my beer bottle cap collection” (at time code 02;43;26;25). The time code is displayed on the bottom left of the source panel window, just under the image. Set an out-point right after Harley says “. . . that are different” (at 02;43;46;11). You will notice that the area in between the in-point and the out-point is highlighted in the source panel’s scroll bar, and that the clip duration is 19 seconds and 17 frames.

■ Figure 17.16 Double-click the clip “HS 1 intros beer cap collection” (A) to load it into the source panel (B). Use the transport controls (C) to play the clip. Use the “i” key or the “set in-point” button (D) to mark an in-point at 02;43;26;25. Use the “o” key or the “set out-point” button (E) to mark an out-point at 02;43;46;11. Your time code is displayed on the left side of the panel (F), and the clip duration is on the right (G).
Now click and drag the clip from the source panel to the program panel and let go. You will see the clip appear in your timeline. Congratulations! You have made your first edit. You can play your sequence (which consists of only one shot at this point) using the transport controls on the program panel, or you can drag your playhead through the timeline to review the shot (Figure 17.17). Pushing the spacebar always starts or stops playback.
Next we want to add a second shot. Double-click the subclip labeled “CU bottle caps” and select an in-point at 02:57:18:16 and an out-point at 02;57;33;02 (the duration will be 14 seconds and 17 frames). Go to your timeline window and make sure “snapping” is turned on (the magnet icon). You can then simply drag your shot into the timeline and place it next to the first shot. Because snapping is turned on, the shot should automatically fall right into place.
Now let’s make a 3-point edit. Let’s say you play the sequence and decide that you want the next shot to come in right after Harley drops the blue and white bottle cap (TC 00;01;46;04). Find that frame and set an in-point on the program panel side this time, using the “i” key or the mark-in button (Figure 17.18). This tells Premiere Pro where to put the next shot you add to the sequence. Load “HS 3 collecting identity” into the source panel and set your in-point right before Harley says “Collecting is a big part of my identity” (00;03;34;09) and an out-point right after he says “it’s the information that you put in here that really counts” (00;04;12;10). Now drag the clip onto the program panel. The clip appears in your timeline, but instead of starting at the end of the previous clip, it starts at your in-point, covering up the end of the “CU bottlecaps” clip. This is called a 3-point edit

■ Figure 17.17 Make your first edit by dragging the image from the source panel (A) to the program panel (B). Your clip will appear in the timeline (audio and video) (C). You can review your sequence using the transport controls in the program panel (D) or by dragging the playhead through the timeline (E).

■ Figure 17.18 Make a 3-point edit by selecting an in-point in the program panel (A), and an in-point and an out-point in the source panel (B). This tells Premiere Pro to put the new image into the timeline where the playhead is (C), covering up the end of the existing shot.
because you are selecting a total of 3 in- and out-points—two in the source panel and one in the program panel. This type of edit gives you precise control over not only which section of your source footage you want to use, but where you want it to go in the sequence you are building.
You may have noticed that when you made the edit, an overlay appeared in the program panel that said “Drop to Overwrite; use Cmd to Insert.” There are two basic types of edits in all NLE programs: overwrite and insert. Overwrite edits cover up whatever was in the timeline before the source material came in. All the edits we have made thus far in this exercise have been overwrite edits. Insert edits are different in that they open up a space in the timeline for the new clip, and push any existing material further down the timeline. You might want to try the previous edit using insert instead of overwrite, to experience the difference.
There are times when, instead of adding things to the timeline, you want to delete material. Let’s look at our cut. You will realize that in the third clip, there is a long pause right after Harley says “it’s what you know about the stuff that really counts” (00;01;59;15 in the timeline). Let’s mark an in-point there on the program panel, and an out-point right before he says “I’ve been collecting Chinese menus since 1981 (00;02;02;18 in the timeline). Now under the “sequence” menu, go to “extract” (You can also use the apostrophe key: ‘). Premiere Pro will take the material you have selected out of your timeline and close the gap. This is called an extract edit. A lift edit is similar, except that instead of closing the gap, it leaves a space in the timeline where the deleted material used to be.
When you play the sequence now, you will notice two problems with continuity (Chapter 19). First, at 00;01; 46;04 the shot jumps from a bottle cap in Harley’s hand to Harley standing. There is a second, more obvious, jump cut at 00;01;59;14. One way to fix this is to find a shot or two that we can put over the image in this section, leaving the audio intact. If you are following along using the footage from the companion website, you can look through the clip called “kitchen cutaways” and find a shot that is at least 13 seconds and 11 frames long. In the source panel, I will mark a tilt down a Chinese menu with the in-point 03;16;52;23 and the out-point 03;17;06;05. Now be careful when you make the edit! You want to replace the video in the timeline, but not the audio. To do this, use the video only icon (Figure 17.19) to drag the picture directly into the timeline, and place it right where you want it. Now watch your sequence and give yourself a pat on the back for learning the basics of editing in Premiere Pro!

■ Figure 17.19 Using the “video only” icon (A) to bring video into the timeline without its accompanying audio.
■ Summary: Editing Basics
These sample edits cover most of what you will need to make a basic sequence and start editing. To review, they are:
- loading clips into the source window
- marking in- and out-points
- making insert edits
- making overlay edits
- making three-point edits
- lifting
- extracting
- making audio only and video only edits
- making split edits
There are many, many other tools, functions, and capabilities in your NLE. You will no doubt become familiar with them as you need to use them.
Split Edits
In the exercise above, we relied exclusively on straight cuts. These edits cut the picture and sound on the same frame, at the beginning (also called the head) and end (the tail) of each shot. In many instances, documentary editors combine sounds and images in more complex ways. Many of these fall into the category of split edits. In an L-cut, the picture cuts to the next shot first, and the audio cut occurs later. An example would be an interview that starts in sync, but as the person continues to talk we see images unrelated to their location. These cuts are useful when you are condensing dialogue, as you can use the incoming images to conceal cuts in the interview and avoid a visual jump cut. The J-cut is the opposite: the audio cuts out first, while the picture plays a bit longer before cutting to the next shot. The timing of these edits depends on a number of factors, some creative and some practical. A split edit can seem more “natural” than a hard cut, perhaps because it mimics the way we often perceive real events, hearing something first, and then turning our heads to look. It is a useful exercise to take a sample documentary scene and take it apart conceptually so that you can understand how split edits contribute to the whole. There is an example of a documentary scene that uses split edits on pp. 308–310.
■ Editing Stages
The documentary editing process is extremely flexible, but there are stages that all projects must go through.
Reviewing Raw Footage
Everything you shoot in production constitutes your raw footage. While you will likely review your material as you shoot it, your first task when you begin postproduction is to sit down and watch it all again. As you watch your footage, you are evaluating each and every scene as though you are seeing it for the first time. As you view your material, take detailed notes on which shots you think you might use. These are called selects (shots you won’t use are called outtakes). You need to develop your own shorthand for note-taking. There are various tools available in your NLE, including color coding and markers, or as previously explained you can use columns in the project window to make notes. Often documentary cinematographers shoot long continuous takes. Although your material comes as clips, these may or may not need to be further broken down. Some editors like to break these down into subclips, excerpted sections of the original long take that act as independent clips. Some editors create “selects” sequences by shoot day or topic. These are good to look at for a quick reminder of what you thought was good material when you first reviewed it.
As you review and evaluate your footage, you should also be keeping notes with any ideas for structure, themes, or relationships relevant to your project, or even ideas about how shots or scenes may work together. These notes are rough and spontaneous, but they help you make connections and identify the storytelling potential of your footage. Even if you have transcripts of your interviews, you should be watching that footage with the same fresh set of eyes. Sometimes sound bites seem great on paper, but the way they are delivered is less compelling.
Another thing worth mentioning in an era when many people edit their own films is that, as an editor, you are wearing a different hat than you did as a director. You need to be detached, even ruthless. Ask yourself, “What is significant about what I have here?” and “What story can this material tell?” The film that can be made at this point is very often different from the one you had in your mind while shooting. Try and see this as an opportunity instead of as a disaster! Every editor, on every project, confronts this reality.
Paper Edit
Once you have a sense of what material you have and what story it might tell, you can start to conceptualize a structure. A paper edit is one tool that allows you to organize your documentary on paper before you start actually editing. It can save you much time and effort. Here is one way to approach creating a paper edit.
Consider the bare-bones structure of your story. What is a possible beginning, middle, and end? Consult the dramatic arc in Chapter 3, and think about possible themes and takeaways from your film for the audience. Then, look through your observational material and find the scenes or events could become potential building blocks. A scene is something that unfolds in one place at one time. If you shoot at a location for half a day, there may be a dozen incidents that could be the basis of a scene, but which one you choose depends on the story you are telling. Say you’ve been shooting in a middle school classroom. You might have a few moments that stand out as being interesting: a meltdown by a student, a learning moment with some shared reading where the teacher shines, or a personal interaction at the end of class with a student who is having trouble.
If your film is about the fairness of evaluating teachers by their students’ test scores, the most significant scene might be the one where the teacher shines, because it shows that learning happens in ways that aren’t reflected on tests. Or the meltdown might be useful, as it could show the challenges teachers face in the classroom.
Whichever scene you choose to develop, it’s important to understand that a scene generally has some type of conflict, and ends when that conflict is resolved, even in a small way. So, with the hypothetical meltdown, the scene will end when the student calms down, or when the teacher decides he needs to be brought to a counselor’s office. Also important to consider is how the scene might contribute to the progression of ideas and information in your film.
The reason we start with observational scenes, if we have them, is that interviews are almost always better used when married to a concrete unfolding situation than as stand-alone elements. In addition, the vast majority of student documentaries suffer from an overabundance of talking heads and a shortage of other types of material, so it makes sense to focus on finding your best observational material first.
We suggest putting each scene you have identified on an index card. Include the content, the characters involved, and what you expect the scene to deliver in terms of an “event” or point delivered. Arrange these cards into some kind of order with an eye to the dramatic arc of your film. You should be able to identify a beginning, a climax, and a conclusion. Now add interview bites, ideas for montage sequences, text cards, animation, or voice-over on additional cards and you have a paper edit!
Your paper edit can be taped on a wall, laid out on the floor, or put into a notebook. It is a roadmap for your editing.
Rough Cuts
Now that you have a solid idea of how you want to structure your documentary, you can start to build a rough cut, following the structure you developed on paper. Start with the opening of the film and work from there. As you build the film, your main characters and events will come to life. You will get a clear idea of which interviews work really well and which don’t. It is guaranteed that some ideas that seemed great on paper will not work at all. There may be glaringly obvious ways to rearrange the material to improve your storyline and thematic threads. All this is good and part of the process. Paper edits are written on paper, not in stone. As you put the film together, take advantage of the evolving connections and chemistry that happen when you actually put your material together, and feel free to reorganize things along the way. You can expect this rough cut to be longer than your final film, but with practice it will give you a fairly clear idea of what that final length might be.
At this point, you should use the basic tools available in the edit system, like straight cuts instead of dissolves. Avoid complex split edits (p. 288). It is important not to over-polish the film at this stage. It may be irritating to view material that isn’t perfectly finessed, but you want to feel free to be able to move material around, and complex transitions between shots will only get in the way. There is another danger to overcutting: sometimes the magic of a fine-tuned cut will make you think something is working on a structural level when, in fact, it is not.
If you are planning to use narration, here is where you begin writing it. It is a good idea to start actually inserting scratch narration, whether recorded straight into the edit system or from a separate recorder. You will record final narration as part of your sound mix, so don’t worry about the quality or performance at this point. Graphic elements like titles and animated sequences should also be scratch at this early stage. You can insert title cards as placeholders to indicate any footage or scenes that remain to be filmed.
You will edit several rough cuts of your film, reorganizing things to improve the flow of the story with each version. Rough cuts are where you spend the majority of your time and do most of your creative thinking. There is a lot of cutting and recutting during this stage as you discover the final style, shape, and rhythm of your film.
When you are in rough cut stage, it is a good idea to transcribe your cut periodically. This makes it easier for you to talk through your structure with your editor or other people who give you feedback.
Rough Cut Screenings
It is hard to maintain a fresh eye when you spend months editing your documentary. For this reason, it is important to have rough cut screenings for sample audiences. These can be trusted friends, larger groups of people who are similar to your intended audience, or other filmmakers who you believe may have constructive criticism or helpful contributions to make. It can also be useful to screen rough cuts for experts on your subject matter, to make sure you aren’t misrepresenting things or framing issues in a way you ultimately won’t be comfortable with. If you expect your film to be used widely by a certain group of people like, for example, doctors, then pulling together a screening for a group of doctors is an excellent idea.
Rough cut screenings can be harrowing for directors and editors. Try to listen, take notes, and refrain from arguing with the audience. Remember, not everybody’s comments will be useful or on target. More often than not, people suggest solutions that are incorrect, but are pointing to a real problem that you may solve by other means. Take some time to digest and evaluate all of the feedback you received from the screening before running back to the cutting room and pulling everything apart. You do not need to use all of the suggestions, but you should use whatever can make your film stronger. And remember to thank people for their important contribution to your work.
Building Your Soundtracks
In the rough cut stage, working with sound is just as important as working with picture. As you develop your cut, you should plan to keep your sequence audio split out into tracks that reflect the main sound sources you’ve recorded. As an example, you could create four tracks for interviews, four tracks for ambience and audio from observational scenes, two tracks for music, two tracks for narration, and so on. Any scene will have its original sound, often on more than one track. Keep as much production audio as you have in the timeline, even if that means muting it temporarily so you can hear other sounds. If you are working with a composer, they may give you sketches of music you can lay in to figure out what they should develop further. More commonly, you will place temp music pulled from any source (regardless of whether you have the right to use it), just to get a feel for the style and tone that will work for the scene. Later, the composer will create something that works in a similar fashion, or you can acquire other music that you have rights to use (Chapter 21).
For screening rough cuts, you will have to create a scratch mix. This means getting your audio levels into a comfortable range without spending too much time developing a full mix.
The Fine Cut and Picture Lock
Once you’re happy with the structure of your film, and all of the sequences are working the way you want them to, and you’ve determined that there will be no more big changes to the film, you can start to fine-tune the rough cut. The fine cut involves finessing all of the edits one by one. This is the time to make those small adjustments to, for instance, get that cut on action just right, add the dissolve between two scenes, or trim a few frames off a shot to get the timing just perfect. The fine cut is also where you replace temporary graphics, archival footage, and stills with high-resolution versions that you have cleared the rights to. At this stage, make sure you have a complete and accurate list of lower thirds (IDs) and end credits (Chapter 22).
This stage is also where you add additional sound elements like sound effects, extra ambiences, final music, and final narration. Once the placement of all your elements is perfect, all of the editing decisions have been made, and you’ve decided you will not trim a single frame more, you have arrived at picture lock.
Finishing
Picture lock does not mean all of the creative work is over. The film still needs finishing, which means that you turn your attention to three areas: sound design, graphics, and color correction. Depending on your workflow, you may handle these within your NLE system, as in Figure 17.1. Alternatively, you may plan to export your sound and picture for mixing and color correction with outside professionals (Figure 17.2). Professional sound design is covered in Chapter 21, and color correction and graphics are covered in Chapter 22.
■ High-End Finishing Workflows
Shooting on high-resolution formats like 4K is still relatively rare in documentary, but this is a growing area of production. Godfrey Reggio’s documentary Visitors (2013) consists of 74 shots of mostly human faces staring back at the audience (Figure 17.20). It was shot on 4K in order to show the faces in extremely high detail, and exhibited using a digital 4K projector.
Considering the workflow for a project like this is a useful way to consider how to deal with the massive file sizes that 4K generates. In these cases, filmmakers often edit with proxy files instead of the original media (p. 276). Once picture is locked, they go back and conform the film using the original 4K files. The output can be anything from a Digital Cinema Package to a hi-resolution file to a Blu-ray or DVD or stream for the web (Figure 17.21).

■ Figure 17.20 Godfrey Reggio’s 4K documentary Visitors consists of 74 shots of mostly human faces staring back at the audience.

■ Figure 17.21 Picture and audio paths for a 4K workflow. Shoot uncompressed 4K video and HD video; create low-res proxies for editing; conform back to Hi-Res source; Master DCP and various formats. Audio is surround sound.
Mastering
The final step in the editing process is to master the film. This means outputting the final film to a sturdy, archivally sound digital form from which distribution copies can be made. Although most NLE systems offer a wide range of output options, you will, no doubt, want to master to a format that does not involve any further video data compression. These days some people continue to master on digital HD tape, while others retain files on a hard drive that is backed up. And, of course, many do both for safety.
■ Overview of Editing Stages
- Develop clip naming conventions
- Ingest audio and video, transcoding as necessary
- Sync sound and picture (if necessary)
- Log and transcribe media, create bin structures in NLE
- Develop paper edit
- Edit rough cuts (multiple)
- Rough cut screenings
- Edit fine cut
- Cut in final, cleared archival material and music
- Lock picture
- Color correction (grading)
- Sound edit and mix
- Create master
- Create submasters for distribution on various platforms
■ Editing Elements (In Project Window/Panel)
- Master clips. A master clip references the media file. Clips are trimmed, altered, and manipulated during the edit session, but because they are only “pointers” to the media file, all edit decisions occur only virtually, leaving the media unaltered.
- Subclips. Smaller clips made from, and referencing, the master clip. Subclips do not reference the media file; if you delete the master clip you will lose the subclip information and it will not play.
- Audio clips. A clip with no picture will have a different icon, but otherwise acts the same as other clips.
- Graphics. Graphics files with multiple layers (like Photoshop) will import with the layers separated. Alpha channels (which define transparency) will import as well.
- Sequences. The edited sequence of video, audio, and graphic clips arranged in the order you need to tell your story. Clips used in the sequence are essentially a playlist of the information from the master clips, and therefore they directly reference the underlying media files.
■ Organizational Elements
- Project. A top-level folder (located in the project window/panel) that includes all of the elements of the movie, including sequences, bins, clips, graphics, and stored effects.
- Bins. Second-level folders that are used to organize audio and video clips and graphic files. You can create as many bins as you need.
- Scratch Folder (PP) or Capture Drive (Avid). This is the folder on the external hard drive where all of your media files and all of your render files will be stored. This is referenced by the editing software, but accessed through the computer’s operating system.
- Backup File Folder. These are copies of the project file created automatically by the software.
in practice
■ Backing up Your Project and Sequences
It is important to back up your project at the end of each day of editing. If you are editing with your project file on your local computer, simply drag a copy of the project file (extension .prproj, or .avp) onto a separate drive. While dragging, the project file will make a copy onto the destination drive. You do not need to make a new project file every time you edit—this may confuse things as you will be likely to open up the wrong project at some point. Periodically you should archive a copy of your project file, with the date included in the file name, in case your project becomes corrupted. It is important to remember that copying your project file doesn’t back up your media, only the work you’ve done with it.
As you build your edited program, you will likely want to save copies of sequences before rearranging or deleting material. Many editors make a practice of creating a new sequence every day they edit. A good practice is to give your sequence a name that includes the date. When you want to save a version, simply highlight the sequence icon in the project window and duplicate it. You can then rename the new sequence with the current date, and start editing on that one. The old sequence will be preserved, and named with the date it was created. You should keep all these sequences together in a bin titled “Sequences.”
As you edit, you should save your project frequently. Your NLE system will also create automatic backups and store them in a folder. You should make sure this is on a separate drive from your main project file to protect yourself in the event of a crash. If you do have a system crash, you can find the most recent backup on the other drive and most of your work can be rescued.