Chapter 7
Organizing Cinematic Time and Space
Film is a medium. A medium is based on an agreement, a contract that has developed over a long period during which the speaker and the listener, the picture maker and the viewer, performer and audience, have established a system of meanings: a vocabulary, syntax and grammar of the language being used. For this reason, language emerges slowly, and will continue to evolve for as long as audiences and authors develop new ways of expressing themselves.
Alexander Mackendrick, On Film-Making1
■ The Visual Language of Documentary
Cinema is an art that offers a rich visual language that has developed over a 100-year history and is still growing. In documentary, this visual language references reality, but it is definitely not the same thing. Rather, it is a story about the real, and many of the conventions and expectations that make up the visual language of fiction filmmaking apply in documentary as well. In this chapter, we will look at how choices in framing, angle, movement, camera placement, and editing drawn from different strands of filmmaking offer documentary filmmakers a variety of tools to say what they want to say.
Remember that cinema is a living language with an ever-expanding vocabulary and ever-evolving syntax. The fundamentals in this chapter are just the beginning of how we speak in film. Just as in writing, the cinematic language can be bland or expressive, prosaic or poetic, utilitarian or profound. You can certainly customize cinematic language to your own expressive purposes, but it’s essential to have a firm grasp of the basic conventions first.
■ Shots, Sequences, and Scenes
Film scholars and practitioners alike have long referred to the cinema as a language, which means that it is a shared system of terms, symbols, and syntax used to communicate thoughts, feelings, and experiences. In written language, we use letters, words, sentences, and paragraphs. In the visual language of cinema, we have three basic building blocks: the shot, the sequence, and the scene.
The shot is the smallest unit of the film language. A shot is a continuous moving image, unbroken by an edit. Technically speaking, a shot is the footage generated from the moment you turn on the camera to the moment you turn it off—also called a camera take. However, these shots are often divided into smaller pieces, which are used independently in the editing stage, and each one of these pieces is also called a shot. Shots can be as short as a few frames or as long as your camera will allow before you run out of tape or data storage space.
Each shot in a film builds on the others, so that by arranging shots in a particular order you can create meaning. For example, if Shot A is an exterior shot of the United Nations (UN) building in New York City, and shot B is of a woman giving a speech, we understand that this woman is addressing an audience inside the UN building. If Shot A were cut next to a shot of the Empire State building, and then the Chrysler building, a viewer would start to understand that this might be a film about New York City, or the architecture of skyscrapers. In other words, a shot alone has meaning, but much of a single shot’s meaning depends on its context. A juxtaposition of shots often adds up to more than the sum of its parts.
■ The Raw Materials of Your Documentary: The Elements
Before you can start building your documentary, you need to decide what the filmic “ingredients” will be. You know from Chapter 2 that there are many stylistic approaches, but all of them use some combination of the following elements:
Video (sometimes with accompanying audio)
- Interviews: formal (“sit-down”) or more casual (mobile, handheld)
- Observational footage of events as they are unfolding
- Visuals that aren’t part of an observational scene: landscapes, establishing shots, visual evidence (sometimes called B-roll)
- Archival footage: generally historical material (Chapter 19)
- Stock footage: generally suggests contemporary footage shot by someone else
- Still photographs: can be historical or contemporary
- Documents: newspapers, letters, official reports, or other primary source documents
- Titles: opening titles, end credits, IDs (lower thirds), text cards
- Graphics and animation: illustrations or computer-generated elements, often used to present complex information (infographics) or to suggest personal memory or experience
- Reenactments (Chapter 2)
Audio Only
- Narration
- Music
- Wild or ambient sound
- Sound effects
From a directing point of view, you need to figure out which elements you will need in order to establish and maintain the style of your film, and express what you want to convey about your subject.
Because images and editing function in tandem, they must both be considered as you devise your visual strategy. In documentary, you usually can’t plan out your film, shot by shot, before you go into production as can be done with fiction filmmaking. You can, though, consider what you will film and how the shots you gather might fit together. This is what is referred to as “shooting for the edit.” As filmmaker S. Leo Chiang notes:
I really think if you are going to be a shooter or a director for documentaries, you really should learn how to edit. Because then you will have the experience of wishing you had a particular shot. And then, when you go back into the field to shoot you will think, “Yes, I can shoot this speaker all I want, but if I don’t have any reaction shots of people listening, this scene is not going to work.” 2
A scene is a dramatic unit in which action ostensibly happens over a continuous time and within a single location. A scene is usually composed of multiple shots, taken from different vantage points and with various shot sizes. An editor will cut these together using the conventions of continuity editing (Chapter 17) to create a sense that the scene is unfolding continuously. Scenes are clearly delineated by any break in time or place—as soon as you cut from a scene in a bedroom to the street, for example, audiences understand that you have ended one scene and begun another.
A sequence is a part of a film, usually longer than a shot or a scene, that is unified by a theme or a larger idea. It could include more than one scene, a montage (Chapter 19), and/or a series of interview bites combined with visual evidence. The idea is that a sequence has a major role to play in your story, and should have its own dramatic arc. You should be able to articulate where your sequences begin and end, and what specific ideas and meaning they bring to your documentary.
■ The Frame and Composition
Dimensions of the Frame
Aesthetic considerations concerning the graphic and compositional aspects of your shots begin with the frame. The frame has two definitions. The physical frame is each individual still image captured on film or on video, which, when projected as a series, creates the illusion of motion (Chapter 8). The compositional frame (Figure 7.1) is a two-dimensional space defined by its horizontal (x-axis) and vertical (y-axis) dimensions. Within this space, we can perceive a third dimension, depth (z-axis), which is created through graphic illusion.

■ Figure 7.1 The Compositional Frame. Although we work with only two dimensions (the x- and y-axes), we can imply depth by emphasizing the z-axis. This still is from Ilisa Barbash and Lucien Castaing-Taylor’s Sweetgrass (2009).
The frame is your canvas, the rectangular space in which you determine the parameters of the viewer’s perspective. The frame essentially crops the real-world environment and determines what the audience sees and what they don’t see. Images and action outside the boundaries of the frame are referred to as off-screen. Framing your shot, deciding what to show and what not to show, is a highly significant creative decision.

■ Figure 7.2 Aspect ratio is determined by dividing the width of the image by its height. Since this is a ratio, it can be expressed in full numbers or decimals. The HD video frame is 16 units across and 9 units high, so it can be said to have an aspect ratio of either 16 x 9 (“sixteen by nine”) or 1.78:1.
The relationship between the width and the height of the frame is called the aspect ratio and is derived by dividing the width of the frame by the height. There are several different aspect ratios used in film and video. The aspect ratio of broadcast standard-definition (SD) video (Chapter 8) is 1.33:1, generally expressed as 4 · 3 when referring to video. Nowadays, most film and video cameras have a wider aspect ratio, which elon-gates the horizontal dimension. The American theatrical release aspect ratio is 1.85:1, the European theatrical release aspect ratio is 1.66:1, and the high-definition (HD) broadcast aspect ratio is 16 · 9 (or 1.78:1). This last aspect ratio has become the most common for contemporary documentary filmmaking and the current established standard for broadcasting. Aspect ratio has significant impact on the compositional possibilities of the frame (Figures 7.2 and 7.3).

■ Figure 7.3 In this illustration, you can see the compositional possibilities of two common aspect ratios, 4:3 and 16:9. In the 16:9 frame, you can include both subjects, but with the 4:3 frame you would either have to frame the shot more widely or pan from one subject to the other to see them both.
Shot Composition and the Graphic Qualities of the Frame
Working within the parameters of a given aspect ratio, a filmmaker has a broad palette of aesthetic choices when designing the composition of a shot. There are no absolute rules concerning visual style except that the choices you make should emerge from the dramatic needs of your documentary story and should reflect your own creative ideas. Even as the reality around you is changing, you need to be thinking about how to frame your shot with authority—whether that means moving yourself or your subjects, or communicating precisely with your crew.
■ Figure 7.4 This closed frame from Patricio Guzman’s Nostalgia for the Light (2010), of a mother who searches for her murdered son’s remains in the desert, emphasizes her isolation.

■ Figure 7.5 In this open frame shot, also from Nostalgia for the Light, we are forced to decipher an image (a whale skeleton) by imagining the off-screen space of this natural history museum.

■ Figure 7.6 This deep frame from Jennifer Baichwal’s Manufactured Landscapes (2006)—which includes bicycle handlebars and ladders in the foreground, the looming ship hull on the left, and another boat passing in the background—emphasizes the complexity of economic forces in China today.
Closed and Open Frames
A closed frame means that all of the essential information in the shot is neatly contained within the parameters of the frame (Figure 7.4). An open frame leads the audience to consider the area beyond the edges of the visible shot (Figure 7.5). This is not necessarily an either/or choice. A shot can begin as a closed frame and then an unexpected intrusion from beyond the edge of the frame can suddenly disclose the larger off-screen environment. Also, sound or dialogue coming from off-screen can serve to open a frame, because it asks the audience to imagine the space beyond the edges of what is visible.
Deep Frames and Flat Frames
We refer to a frame that accentuates the compositional element of depth (z-axis) as a deep frame (Figure 7.6), and one that emphasizes the two-dimensionality of the image as a flat frame (Figure 7.7). The graphic factors that are used to create the illusion of depth are the same ones that are minimized to create a flat frame.
There are several ways of establishing depth in a frame:
1. Receding Planes, Overlapping Objects, and Diminishing Perspective
People share a perceptual understanding that smaller objects appear to be farther away, while larger objects appear to be closer. This means you can achieve a feeling of deep, receding space by placing objects along the z-axis to define foreground, midground, and back ground planes. Related to this is the idea of object over lapping, which means that when we see one object overlapping another, we understand that the object that is partially concealed is further away. Conversely, by reducing the z-axis space to two or even a single plane by putting an interviewee against a wall, we flatten the perspective and the space appears shallow (Figure 7.7). Also related to the notion of receding planes is foreshortening or diminishing perspective (Figure 7.8).
2. Horizontal and Diagonal Lines
Shot head-on, lines or objects in a horizontal arrangement will obviously look, well, horizontal. But shot from an angle, a horizontal line appears to recede into the distance on a diagonal. For example, if you shoot a tombstone head-on, the composition will appear flat. But if you move the camera 45 degrees (or more) to the side, so that the line of gravestones recedes diagonally along the z-axis, then you’ve created depth in the frame (Figure 7.9).

■ Figure 7.7 In The Thin Blue Line (1988), director Errol Morris uses a flat frame to create an “unreal” feeling. This strategy also gives us a feeling of being trapped in a tight space with the interviewee.

■ Figure 7.8 This long shot from Nostalgia for the Light uses receding planes and diminishing perspective to show the vast size of this radio telescope array in Chile’s Atacama Desert.


■ Figure 7.9 In the figure on the left, putting the camera directly facing the tombstone creates a certain formal feeling, emphasizing perhaps the way memorials have stood through time. The image on the right, taken at a 45 degree angle, creates depth in the frame and gives a more elegiac feeling, emphasizing the numbers who have found rest in this graveyard.
3. Deep and Shallow Focus
The depth of field of a shot is the range of distance along the z-axis where objects appear to be in sharp focus. Manipulating depth of field can encourage or discourage attention to background and foreground information. With a deep depth of field we can see objects along the z-axis, from foreground to background, in crisp detail (Figure 7.10). With a shallow depth of field, only a single vertical plane is sharply defined and objects in front of or behind that plane are blurry (see Chapter 9 for more about depth of field). Shallow depth of field is becoming more common in documentary because of the prevalence of large-sensor cameras. For more on the relationship between sensor size and depth of field, see p. 151. For an example of an image with a shallow depth of field, see Figure 8.12 (top).

■ Figure 7.10 This interview subject in Patricio Guzman’s Chile, Obstinate Memory (1997) is framed poignantly in a cafe where the empty seats are made clearly visible by framing and the deep depth of field. The shot emphasizes the fact that this is a man who is telling a story that is rarely heard.
4. Shadows
Shadows add depth to just about any image because they accentuate the dimensionality of your subject and their environment (Figure 7.11). Eliminating shadows, therefore, conceals depth and leads to a flatter image. Adding shadows through lighting or shooting at a time of day like morning or late afternoon, when there are more shadows, are common ways of using light and shadow to create more depth in the frame. See Chapters 11 and 12 for information about controlling light and shadow.

■ Figure 7.11 Shadows create depth (left). Eliminating shadows creates a flatter image (right).
Balanced and Unbalanced Frames
The principle of compositional balance begins with the understanding that objects in your frame carry a certain visual weight. Size, shape, brightness, and placement can all affect the relative weight of an object in the frame. How you distribute this visual weight within the frame— equally or unevenly, symmetrically or asymmetrically— gives your composition a sense of stability or instability (Figure 7.12). There is no value judgment attached to balanced and unbalanced frames; neither is better than the other. Like all of the other aesthetic principles in this section, the right choice is the one that is appropriate for the mood you are creating and the story you are telling.

■ Figure 7.12 Errol Morris’s Fog of War (2003) is built around a series of interviews with Robert McNamara, all shot on the same set. Here, the unbalanced framing gives as much space to the gray “fog” of the background as to the main character, creating a sense of unease.
Rule of Thirds, Looking Room, and Lead Room
Cinematic composition, like any other art form, has certain classic principles that have developed over time. Film and video, being two-dimensional representational art forms that developed after painting and photography, have been influenced by many earlier ideas about composition. One such idea is the rule of thirds, which is often used as a guide for framing human subjects and for composition in general.

■ Figure 7.13 This frame from Sweetgrass suggests how, according to the rule of thirds, compositional “sweet spots” occur at the intersection of the lines. Notice that the sheep herder is placed on the left vertical line, and the sheep are assembled between the two horizontal lines.

■ Figure 7.14 Looking room. A subject should be placed along the vertical third line opposite the direction they are looking (left) as opposed to in the center of the frame (right).


■ Figure 7.15 Lead room. Give a walking subject ample room in front of them (left) to avoid an awkward frame (right).
First, divide the frame into thirds with imaginary lines along the horizontal and vertical axes. Then, place significant objects, focus points, and elements of interest along these lines. The intersections of the lines are known as “sweet spots,” and placing objects at those sweet spots draws the eye to them and creates a pleasing frame (Figure 7.13). For the human face, for example, this might mean placing the eyes along the top third horizontal line. For a figure, it could mean placing the person to one side or the other, along the left or right vertical line. Bear in mind that the rule of thirds is just a guide, a convention, and not really a rule at all. While it is often employed and can be a useful starting point, it is by no means a requirement for a well-composed shot.
If your subject is looking or moving toward one side of the screen, traditional composition dictates that you should place them along the left or right vertical third line opposite the direction in which they are looking or moving. This extra vertical space, to one side or the other, is called looking room (Figure 7.14) or, for a moving figure, lead room (Figure 7.15). The extra space provides a sense of balance because the direction of the gaze, or movement, itself carries a sort of compositional weight. It also keeps the viewer from feeling like the subject is pushing, or about to go beyond, the edge of the frame.

■ Figure 7.16 This illustration gives a sense of various shot sizes as they relate to the human subject.
Shot Size
Shot size refers to the size of your subject relative to the frame. This is determined by two factors: (1) the proximity of subject to camera (the closer the subject is to the camera, the larger they will appear) and (2) the degree of lens magnification (the more your lens magnifies the subject, the larger they will appear). Dramatically speaking, you select a shot size based on the narrative emphasis, visual information, and emotional impact you need at a particular moment. As the following figures show, there are a wide variety of shot sizes to choose from (Figure 7.16).
The frame of reference for any discussion of shot size is traditionally the human form, but the following shot designations work for nonhuman subjects as well:
- An extreme long shot (ELS) or wide shot is a shot that shows a large view of the location, setting, or landscape. Even if there are people in the shot, the emphasis is on their surroundings or their relationship to their surroundings.
- A long shot (LS) is generally a shot that contains the whole human figure. It’s a good choice when you need to show larger physical movements and activity.
- A medium shot (MS) frames your subject from approximately the waist up. This shot can show smaller physical actions and facial expressions while maintaining some connection with the setting. The location is no longer the emphasis of the shot, however, as the viewer is now drawn closer to the subject.
- A medium close-up (MCU) is generally from the chest or shoulders up. The emphasis of this shot is now facial expression, but some connection to the body more generally is maintained.
- A close-up (CU) places the primary emphasis on the face or another part of the body. Small details in features, movements, and expressions are emphasized in this very intimate shot.
- An extreme close-up (ECU) is a stylistically potent shot that isolates a very small detail or feature.
- Two shots, three shots, and group shots: As these labels imply, the two shot includes two subjects, the three shot includes three subjects, and shots that include more than three people are referred to as group shots.
Often the names of shot types refer to their function in editing. An establishing shot, for example, refers to anything that will give the viewer a sense of the location where a scene will unfold. Similarly, a cutaway shot is filmed with the acknowledgment that it will likely be used to help “smooth out” discontinuity in the main action or interview (Chapter 19).
Shot Size and Character Identification
In observational films, the framing will vary within a scene. Sometimes a shot will offer information about the environment, while at other times the subject’s emotional state or focus of interest might be dominant. In general, the long shot gives us information about place, but does not give us intimacy, while the close-up shot gives us very little information about the larger situation, but tells us a lot about the individual featured. Understanding this, a filmmaker is able to precisely modulate the emotional involvement as well as the understanding the audience has at any given moment (Figure 7.17).


■ Figure 7.17 This interview with Charles Crumb, the brother of the cartoonist who is the subject of Terry Zwigoff’s Crumb (1994), was filmed by Maryse Alberti. The interview starts with a relaxed medium shot, and moves to a close-up as Charles speaks of the depression that has haunted him throughout his life.
In documentary interviews, filmmakers generally choose shot sizes in the range of medium shot, medium close-up, and close-up. This allows the audience to identify with the interview subject yet, with the wider shots, allows for the environment to provide some context. Another common strategy is to use the close-up or extreme close-up when the discussion becomes more personal or intimate.
Camera Angles
The horizontal and vertical angles you are shooting from have a dramatic effect on your image no matter what size the subject is in the frame. Simply moving the horizontal or vertical position of the camera, relative to your subject, can be a powerfully expressive technique that establishes the viewer’s relationship to your subject.
1. High and Low Angles
Using the human form for our reference, the eye-level shot is one in which the lens of the camera is positioned at eye level with your subject, regardless of whether they are sitting, standing, or lying down. Raising the camera above eye level yields a high-angle shot, and below eye level gives us a low-angle shot (Figure 7.18). An eye-level shot can encourage a connection with a subject, while extreme high or low angles tend to be more emotionally remote but very dynamic.


2. Front to Back Angles
The camera can be anywhere from directly in front of your subject to directly behind them. In a frontal shot, the camera is positioned directly in front of your subject. This is a common angle for interviews, though not the only option. Moving the camera along a horizontal arc to the side, we progressively move through three-quarter frontal, profile shot, three-quarter back, and finally to shooting from behind (Figure 7.19). As we move the camera angle from the front to the back of the subject, we drastically change the relationship of the viewer to the subject. Looking directly at a subject’s face is an intimate perspective and can elicit strong engagement, a profile shot is a somewhat neutral point of view, and hiding the face by shooting from behind or from a three-quarter back position can encourage the audience to identify with a character by aligning their visual point of view with that of the subject.

■ Figure 7.19 Front to back camera angles: frontal (A), three-quarter frontal (B), profile (C), three-quarter back (D), and shooting from behind (E).
3. The Horizon Line
In documentary, we usually put effort into keeping the frame parallel with the horizon, but sometimes there is a reason to tilt the camera to the side. Tilting the camera laterally so that the horizon of your composition is oblique is called a canted angle (or Dutch angle) (Figure 7.20). A canted shot can infuse a scene with tension, imbalance, or disorientation.


■ Figure 7.20 Two shots of the same church steeple. The standard angle on the left gives a sense of the prosaic, while the canted angle on the right adds a feeling of disorientation.
■ Framing and Camera Angles in Manufactured Landscapes
Jennifer Baichwal’s Manufactured Landscapes (2007) follows photographer Edward Burtynsky as he documents the monumental transformation of Planet Earth by modern industry. From the floor of a Chinese factory a kilometer long to the world’s largest dam, and from recycling centers the size of mountains to the graveyards of the world’s largest ships, the film asks complex and troubling questions about the irreversible impact of globalized manufacturing on life itself.
Baichwal uses all of the weight of framing, angle, and camera movement to emphasize the idea of human beings surrounded by a landscape that they have created but that threatens to overwhelm them.
Consider the various shots of a Chinese electronics factory in Figure 7.21. A long shot establishes the location and gives us a sense of its tremendous size. The medium shot provides a sense of the people in this context, and what they do. A close-up of a worker encourages us to identify with her and empathize with how it might feel to work on such a repetitive task 12 hours a day. Finally, an extreme close-up shows how small the parts they must work with are, and allows us to see that what they are assembling is a product we use every day: a steam iron. By simply changing the framing, the director allows us to view the same situation from multiple vantage points, each one giving a slightly different understanding of this reality.

■ Figure 7.21 Various shot sizes help tell the story in Manufactured Landscapes including a long shot (top left), a medium high angle shot (upper right), a close-up (bottom left) and an extreme close-up (bottom right).
■ Camera Moves
Up until now, most of the discussion has been about static camera framing, but many shots involve camera movement that changes the frame over time. Sometimes we need to move to follow a subject, while at other times we decide to change the frame to reveal new information.
Pivot Moves
Pivot camera moves involve pivoting the camera, horizontally or vertically, from a stationary spot. This can be done on a tripod or with a handheld camera as long as the location of the camera doesn’t change, just its horizontal or vertical angle.
A pan scans space horizontally by pivoting the camera left or right (pan left and pan right). A tilt shifts the camera perspective vertically, with the lens facing up or facing down (tilt up and tilt down) (Figure 7.22). A pan or a tilt that moves from one subject to another is called panning from/to and tilting from/to. For example, you pan from the man at his desk to the window across the room. A pan or a tilt that follows a subject as they move is called a pan with or tilt with (this move is also called a follow pan or follow tilt). For examples of what these moves look like, see our companion website (www.routledge.com/cw/Anderson).
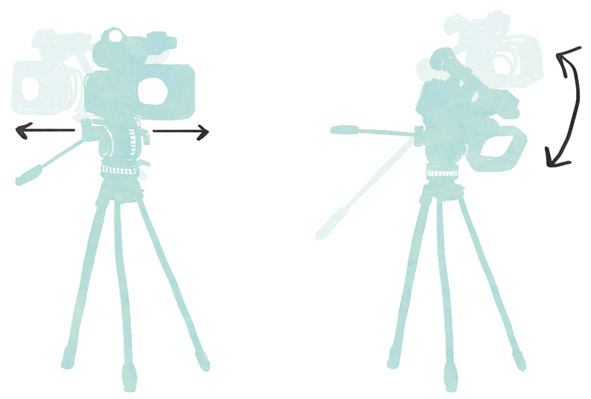
■ Figure 7.22 Pivot moves. In a pan (left), the camera moves left or right on the tripod’s axis. A tilt (right) shifts the camera’s perspective vertically on the tripod’s axis.
Zooming In and Out
Zooming in or zooming out refers to changing the image size by manipulating the focal length of the lens (Chapter 9). It is common in documentary to zoom out from a detail to reveal its context, or vice versa. During an interview, a slow zoom in can be used to emphasize an emotional high point.
Dynamic Moves
Dynamic camera moves involve a mobile camera, which means literally moving the entire camera in space, horizontally (left or right), closer or farther (forward or backward), or even vertically (up and down). These moves can be accomplished handheld, or with special camera mounting equipment.
A tracking shot is a term used when you move the camera in order to follow or track with a subject. You can track left, right, forward, or backward to follow the movement of your subject. In Robert Drew’s classic cinéma vérité documentary Primary (1960), Ricky Leacock’s handheld camera follows presidential candidate John F. Kennedy as he struggles to move from the street through a cheering crowd to the stage. The high angle and continuous tracking shot gives weight to the mass emotion raised by Kennedy (Figure 7.23).
Dolly shots are moving shots in which the camera moves closer to, or farther away from, the subject. To dolly-in or dolly-out means to move the camera closer to or farther away from the subject, respectively. In Night and Fog (1959), Alain Resnais employs slow, deliberate dolly-in shots with a 35mm camera on tracks to link postwar Auschwitz and the history of the Holocaust (Figure 7.24). The slow movement through the sunny countryside gives the film an elegiac quality, emphasizing our distance from the past while echoing the movement of the trains that brought victims to their deaths in the camps. In effect, it creates a degree of identification and empathy by putting us on the same path as the victims of the holocaust.
The term “dolly” originally referred to a wheeled platform with a mounted camera; however, in modern documentary the dolly may be a tripod in the back of a pickup truck, or even a small lateral slider mounted to a tripod (Figure 10.14).
Lifting the camera up and down is called booming (“boom up” or “boom down”). This can be done with a handheld camera or mechanically with a boom or jib arm (Figure 7.25). A crane shot is one in which the camera is raised very high in the air, certainly above a human subject’s head. This requires a special, and expensive, piece of equipment called a crane or, for smaller cameras, a jib. The specific equipment and techniques used for dynamic camera moves are discussed in more detail in Chapter 10.

■ Figure 7.23 In Primary, Ricky Leacock’s camera uses a tracking motion to follow a young John F. Kennedy through a throng.

■ Figure 7.24 In Night and Fog, cinematographer Sascha Vierney uses a dolly shot to encourage us to occupy the perspective of Holocaust victims being brought to Auschwitz.

■ Figure 7.25 A camera on a jib. Photo by Jai Mansson.
All of these moves—pans, tilts, dollies, tracking, booming, and zooming—can be combined. For example, following the trajectory of a helium balloon just as a child lets go of it would require panning and tilting simultaneously, and one might even want to zoom in.
The Moving Frame and Perspective
Although the general directions of the frame shifts are similar (i.e., left to right or up and down), there is a big difference between pivot camera moves (pans and tilts) and dynamic camera moves (dolly, track, and boom). Think of the camera as essentially the seat from which an audience member views the world of your film. With pivot camera moves, this perspective point of reference remains fixed. Panning or tilting the camera is the equivalent of having them turn their head left and right or up and down. With a dynamic camera, you are essentially moving the viewer through the space of the film.
Here’s an example of the difference. Let’s say we are filming a runner, jogging down a street. First, let’s shoot the run with a follow pan, placing the camera at the halfway mark along his path (Figure 7.26). The beginning of the shot is quite frontal, looking into the runner’s face. When he hits the midpoint mark, directly in front of the camera, he will be seen in profile and, continuing, when he reaches the end of his path, we will be looking at his back. It’s the perspective of a stationary spectator—as if we were sitting on a bench watching him run past us.

■ Figure 7.26 In a pan, a subject is viewed from one stationary point as the shot progresses. In this example, the runner is facing the camera at the beginning of the shot and is seen from behind at the end of it.

■ Figure 7.27 Here the camera tracks with the runner, maintaining a consistent profile angle.
Now, let’s go back to the beginning of the runner’s path and shoot his run with a tracking shot (Figure 7.27). We begin alongside the runner, in profile, and as he moves, our camera tracks along with him. As he reaches the midway point and then the end of the path, the runner remains in profile because we have been moving parallel to him. In this shot, the viewer, like the camera, is a runner too, a participant moving through space just like the runner. For video examples of pivot and dynamic camera moves, go to our companion website (www.routledge.com/cw/Anderson).
Motivation and the Moving Camera
A camera move, whether it’s a pan, track, or zoom, is a promise. It promises viewers that they are going to receive a new piece of information, a new perspective, or a new understanding by the end of the camera’s journey. Let’s say you are shooting a long shot of a mountain range and you pan right. The pan promises the viewer that they will see something in addition to those mountains. Maybe the move reveals a forest fire raging on the south slopes, or perhaps a cowboy comes into view in the foreground. Or maybe the pan of the mountains goes on and on, and the move reveals that our character is surrounded by mountains on all sides. One name for a shot like this, and it speaks to its storytelling function, is a reveal. A reveal uses a camera move to give new, and sometimes startling or significant, information within a single shot. What, how, and when you reveal— or conceal—details are very important factors to consider when you devise camera moves of any sort. A move that accomplishes nothing more than a static shot would break its promise of showing something else and it is considered an “unmotivated move.”
In documentary, where situations are fluid and changing all the time, you will find yourself reframing constantly to accommodate changes in the unfolding action. Deciding when to use a camera move such as a pan or a zoom requires quick thinking as well as an eye for what is happening outside the frame. Say you are shooting a scene with two people in conversation, and you are filming one person talking in a medium shot. While making sure you are in focus and have a well-composed shot, a good cinematographer will also be keeping an eye on the person who is listening. If their reaction is interesting or significant, this might mean that you should make the decision to pan to show the reaction.
It is important to know in advance where your move will begin and precisely where it will end. A common problem with inexperienced cinematographers is that they begin a camera move without knowing exactly where they are going, and wind up fishing around for a place to land, making the move look sloppy. The alternative is to know how to think on your feet, and begin and end your camera moves in places that make sense. In some situations, you will be able to practice the move before you actually execute it. At other times, you will be making decisions on the fly, as Maryse Alberti does in this scene from Crumb shown in Figure 7.28.
Adjusting Your Shot
Whether you’re executing a pan, tilt, dolly, or tracking shot, a camera move is a clear and substantial alteration of the subject or composition. A camera adjustment, on the other hand, is a slight shifting of the frame to maintain your composition on a person or object that is moving only a little. For example, if you are filming someone in a medium close-up while they speak to someone else off-screen, they may shift from one foot to the other or take a step forward or back, or even just shift their gaze from screen right to screen left. Each one of these changes requires a minor adjustment of the frame to maintain a balanced composition. The person operating the camera needs to anticipate these small movements and adjust accordingly. For this type of small adjustment, we sometimes say that the camera is “breathing with the subject.” A common error in a documentary interview, for example, is to “lock off” the tripod and presume that the subject will stay in exactly the same place. As a rule of thumb, always keep controls on the tripod loose and be ready to adjust when someone sits back, leans forward, or turns to the side. Even if your subject doesn’t move much, the looser camera will give your interview a more dynamic and responsive feel.

■ Figure 7.28 This single shot in Crumb is the last of a series that follow cartoonist Robert Crumb down the street. At the beginning of the shot, the camera is very low, following his legs as he walks (top left). The camera then booms up as Crumb pauses and looks at a bench (top right). It comes back down as Crumb sits (bottom left), and then tracks around him to get a profile (bottom right).
■ Shooting with Editing in Mind
The way events are presented to us in a documentary film may be very different from the order in which they actually occurred. In addition, documentary films often have a high shooting ratio, meaning that the amount of material recorded is much greater than what actually ends up being used in the final film. All this means that the filmic reality of the documentary is to a great extent created in the edit room, after much or all of the film has already been shot. This means that as you go into a situation to film, you should have a sense of how the event you are filming might translate into a scene that will work for your film. While you can never predict exactly what will happen while you are filming, having an idea of what might occur will allow you to think through a strategy for shooting and to be flexible if and when things change. Otherwise you risk being left without the elements you need to construct your scenes. An example would be to make sure you collect establishing shots of your location, as well as enough cutaways of significant details in the environment, before you wrap up filming for the day.
This sense of your approach and storytelling strategy will dictate how you cover everything you shoot. Coverage refers to your strategy for filming the pro-filmic reality: what you will shoot, where you will position your camera, and how you will select and arrange your frame. This can apply to both observational and more expository modes of documentary. For an observational film that depends on the creation of a continuous time and space experience, you will need to approach your coverage with the rules of continuity editing in mind (Chapter 19). If you are doing a project that is based more on an expository or rhetorical approach, your coverage might include both interviews and various types of visual evidence.
■ Collecting Visual Evidence
Whether you are shooting an observational film or a more expository one, you will need to collect imagery. Strong visuals are more than “something to look at” while you are listening to an interview or narration. They should, in and of themselves, contribute important additional information and meaning to the film. As Barry Hampe says, in his book Making Documentary Films and Videos:
Evidence shows the audience something both real and true which they can understand to be a portion of the documentary argument. A strong visual demonstration will almost always be the best evidence you can use. The minute you find yourself thinking about visuals or B-roll footage, an alarm should go off in your head to tell you that you lack the visual evidence you need and are relying on words to tell your story. Show us what happened, instead.3
Students often refer to documentary visuals as B-Roll. This term, used in broadcast journalism to refer to images that will accompany a voice-over narration, limits the possibilities for visual material because it implies that visuals are just illustrations to back up voice-over or narration. Visuals, on the contrary, are at the heart of documentary filmmaking. Sometimes they will simply illustrate what is being said, but at other times they can function independently as powerful evidence backing up a claim, or refuting one.
A great example of a documentary that offers strong visual evidence for its points is Michael Moore’s Roger and Me (1989). One line in Moore’s voice-over refers to the fact that the city of Flint, Michigan, is depopulating because General Motors is closing its operations there. To underline this idea, Moore cuts to a scene at the local post office, where there are three women who are working full-time just processing “change of address” forms (Figure 7.29). They talk about how this part of the job keeps them all busy as we watch them work, and they mention that a new computer will help them. This evidence is anecdotal (they give us no firm numbers), but the visuals create an indelible impression of the size of the exodus from Flint.

■ Figure 7.29 In Roger and Me, Michael Moore offers strong visual evidence for the depopulation of Flint, Michigan, in this scene at the Flint post office, where three women are needed to handle the growing number of change of address forms.
■ Covering Observational Scenes
Unlike live television and studio programs, which are shot using multiple cameras, documentaries are generally filmed using a single camera and then edited together in postproduction. It is increasingly common to shoot with two cameras so their angles can be intercut, but multiple camera setups remain relatively rare in documentary. Building observational scenes, which as we have mentioned rely on an illusion of continuous time and space, require much skill on the part of a director and cinematographer. In fiction filmmaking, continuity of performance and actions is achieved by having the actors run through the scene many times, and changing the camera angle or lens between takes. As long as the actors do and say the same thing each time they do the scene, and the cinematographer follows the rules of continuity (explained below), the various takes will cut together in editing. In documentary, however, the editor must comb through hours of footage, looking for shots that can be cut together seamlessly to convey the action of the scene.
Depending on your philosophy, it may be acceptable during production to ask a subject to repeat an action. It is quite common, for example, to ask someone to “go back inside and come out through the door again, without looking at the camera.” Documentary will never resemble the highly controlled world of fiction filmmaking, but seasoned camera operators and directors will be keeping track of what they have shot and what might be needed in editing to make a scene work.
In order for your scene to cut together in a way that appears seamless, you will need to shoot with the rules of continuity editing in mind. This is covered in more detail in Chapter 19, but for now we will stress that you will need a variety of shots that have different framings, shot from the same side of the room or location. What this means is careful thinking on your feet so that you give the editor a useful selection of shots to work with.
One of the main rules of continuity is the 180° principle, which ensures that the viewer understands the physical space of the scene and the relationships between characters and objects in that space. Practically speaking, this means that when you begin to shoot an observational scene, you should draw an imaginary line called the 180° line or line of action. This usually follows the direction a character is looking, called their sightline, or the direction the character travels in the frame, called their screen direction. The 180° principle tells us that, to maintain consistent spatial orientation, all shots used in a sequence must be filmed from one side of the line, giving us a 180° arc where we can place our camera. Crossing the 180° line with the camera reverses both the looking and moving directions of our subject and breaks spatial continuity.
Here is an example of a common way of approaching a two-person interaction that involves following the 180° principle: the shot/reverse shot technique. Consider a scene from Zachary Heinzerling’s Cutie and the Boxer (2013), a documentary about the chaotic 40-year marriage of the painter Ushio Shinohara and his wife Noriko. The scene shown in Figure 7.30 involves a conversation between Ushio and Noriko about money Ushio has just received for some artwork. The first shot is a wide-angle of Ushio and Noriko sitting at the table. It acts as a master shot, establishing the space and where the characters are relative to one another and their environment.

■ Figure 7.30 Shot/reverse shot coverage in Cutie and the Boxer. The left shot is a master shot with both subjects. The middle and right shots are close-ups, which alternate as the discussion unfolds (see Figure 7.31 for an overhead diagram of subject and camera placement).
As the conversation progresses, there are medium shots and close-ups of each person. Importantly, while Heinzerling moves the camera closer to Noriko to shoot the shots of Ushio alone, and closer to Ushio to shoot Noriko, he never moves the camera to the other side of the table. Positioning the camera on the other side, by the bookshelves, would have jumped the line of action and disrupted the spatial continuity of the scene (Figure 7.31).

■ Figure 7.31 Overhead blocking diagram of the scene in . Note the 180° line, which the camera cannot cross without disrupting spatial continuity.
How do we organize space for a more complex scene in which one of our characters moves around, disrupting the original line of action? What happens if a third person comes into the scene, causing our characters to shift their sightlines? The truth is, we are not stuck with only one 180° line in every single scene. It’s very common for there to be shifts within a single scene. And in documentary, audiences tend to be forgiving of small disruptions in continuity.
Shooting a scene like the one described above presents challenges for even seasoned documentary cinematographers. A variety of shots must be filmed, from many angles, if the editor is to have enough material to work with. Deciding on your angles, and when to change your position, takes experience and an ability to keep your eye on what is going on outside the frame, as well as staying attuned to the emotional tenor of the interactions between the people you are filming.
When shooting a conversation between two people like the one between Ushio and Noriko in Cutie and the Boxer, when is it best to stay in the wide, establishing shot? When should you move to capture a shot of just one person talking? When is a good time to capture reaction shots of the person listening (like the shot of Noriko in Figure 7.30, right)?
About shooting another, very similar scene between Ushio and Noriko in Cutie and the Boxer, Heinzerling says:
In shooting, what you are really paying attention to are reactions and body language. If you have a good sound recording you are going to be able to use the conversation, even if you don’t film the person on camera. So I always think it’s better to stick with one person for a long period of time, where you are getting a variety of reactions and getting into the rhythm of the scene, as opposed to worrying, “What is that person saying?” and “I need to make sure that I get that exact point where he says that great line.” Forget all of that. You’ll find those moments in body language and in their faces, I think. You have an outline of what you are supposed to get, but rarely does the scene equal what you thought it would be. It’s so much more important to make sure that you have coverage.4


■ Figure 7.32 In Mr. Cao Goes to Washington, we see more of Joseph Cao’s reactions than of Rep. Sessions’ speech.
Another key question in deciding how you will cover a scene is point of view. Since your camera becomes the eyes of the audience, camera placement is a powerful storytelling tool. S. Leo Chiang’s film Mr. Cao Goes to Washington (2012) follows Joseph Cao, the first Vietnamese-American US Congressperson, as he navigates the difficulties of being a rookie Republican congress man representing a largely African-American, Democratic district in Louisiana. Chiang explains how knowing your story helps you figure out your coverage:
I knew this was going to be a “fish out of water” story, a story about an outsider who is kind of on the margins of everything that he’s a part of. He’s a Republican in a majority Democratic district. He’s a Vietnamese American in a majority African American district. His party doesn’t really want him, and the Democrats don’t really like him. How does somebody like that survive? 5
In one very telling scene, Cao is at a Republican Congressional Campaign fundraiser and conservative Texas Congressman Pete Sessions is speaking about how Obama is destroying America by “putting us on a path to Central Europe.” Chiang keeps the camera on Cao almost the entire time, even though Cao doesn’t say a word (Figure 7.32). Chiang explains:
I always ask myself, “Whose scene is it?” I don’t really care about Pete Sessions. I can hear what he’s saying, but if I’m on him I don’t necessarily get any additional information. I’m curious what Cao’s thinking when he’s hearing all these things that he disagrees with. And that happened a lot. I think he disagreed a lot with what the Republican Party—especially the more conservative faction of the Republican Party— had to say. So it was always interesting to watch his face and see how he was reacting.6
Filming Group Interactions
Many documentary scenes involve more than two subjects. There are many different approaches to shooting groups of people, but the 180° rule applies to these as well. Choose your camera position and stay on one side of the line. Sometimes it’s simplest if you can divide your group into two smaller groups (a single speaker vs a group listening, or placing yourself so that half the people are on one side of you, and the rest on the other). Then you can conceptualize the camera placement for the scene exactly like a two-person interaction.
For example, in Mr. Cao Goes to Washington, Joseph Cao gives a talk to a group of Young Republicans. Chiang draws the imaginary line using Cao’s sightline to the audience, and keeps the camera on one side of the line while capturing a variety of shots (Figure 7.33).
There will be more complex scenes where you need to cross the line to cover the action you need. One way to do this is to move the camera, while it is running, as you cross the line. Then, include that shot in your sequence. This will reestablish the 180° degree line and your audience will not be disoriented. Another way is to use a neutral shot, like a cutaway, that doesn’t include the subjects in the previous shot.


■ Figure 7.33 Coverage of a simple group scene in Mr. Cao Goes to Washington. Director Chiang keeps the camera on one side of the 180° line.


■ Figure 7.34 A variety of still images from a “show and tell” sequence in Mr. Death: The Rise and Fall of Fred A. Leuchter, Jr.
Walking and Talking, Showing and Telling
Because formal sit-down interviews can get tedious for an audience, many filmmakers prefer to shoot their subjects in another, more dynamic, environment. The walk and talk sequence is one strategy for this. It involves walking with the subject, tracking backwards or alongside them as they talk. This is a good choice for films where the environment is part of the story. An example would be having a subject walk around their childhood neighborhood as they reminisce about the past.
Another version of this approach is the show and tell sequence, where the subject explains something to an off-screen director. The cinematographer will usually work handheld (Chapter 10), following the subject and filming a variety of camera angles and cutaways to allow the sequence to be edited together seamlessly using continuity conventions. An example is a sequence in Mr. Death: The Rise and Fall of Fred A. Leuchter, Jr. (2009), Errol Morris’ film about an execution technician who becomes an infamous Holocaust denier. In the sequence, Leuchter shows Morris an electrocution system he developed for a prison in Tennessee (Figure 7.34). Cinematographer Peter Donahue covers the scene with shots of Leuchter talking, as well as with a variety of shots that help tell the story and make editing smooth.
When filming any scene where a subject moves through space, it is important to think about one final principle of continuity: screen direction. Basically this principle dictates that the movement of a character (or a car, or animal) through the frame establishes their screen direction and the axis of action. For us to maintain a strict sense of continuity and progress toward a destination, we must maintain this screen direction from shot to shot by staying on the same side of the 180° line. This means that if a subject enters frame left and exits frame right from one shot, the following shot should also involve them traveling from left to right. Otherwise, they will appear to have switched directions and be traveling back to their original departure point.
Maintaining only one screen direction over the course of a long traveling sequence can get monotonous for a viewer, however. It is possible to change screen direction and still maintain the feel of a character’s progress toward their destination. One strategy involves showing the character changing direction within the shot. Another is to film the subject from a neutral angle, like heading right towards the camera. After this shot, you can move your camera to the other side of the subject’s path and it won’t appear that they are reversing direction.


Entering and Exiting the Frame
Allowing moving subjects to enter and exit the frame in each shot is especially useful when it’s time to edit a moving-through-space sequence. Cutting from the moment a subject exits the frame to the moment they enter the frame is a very smooth edit, although it is not necessarily the one you need make. By allowing a moving character to enter and exit the frame, you give the editor a range of possible places in which to cut into the action.
The Long Take
Some directors, instead of relying on cutting to tell their story, prefer to shoot in long takes. This approach allows the actions and relationships of an entire scene to develop within a single shot, in real time. These shots can be as long as several minutes. Consider that the average shot length in a conventional documentary runs around two to six seconds, and you’ll have a sense of what a radical aesthetic departure the long take is. Because one essentially never cuts into a master shot, there is no question during production about spatial orientation, or matching shot content or actions. By the same token, the long take makes it impossible to cut out extraneous actions, terrain, or time. This real-time unfolding of events gives the viewer a long time to ponder the image, and that is the power of this shot. Viewers are asked to look, think, and then consider again what it is they are seeing, as the film flows on in the real time of everyday life. They are also given the opportunity to choose for themselves what part of the scene to pay attention to, rather than have the editor dictate what they should see and when. In the appropriate story, this immersion into a single perspective for a long unbroken period can communicate the feeling of truly being “in the moment” instead of witnessing an abbreviated construction of it, and this can be profound.
An example of the long take can be found in Our Daily Bread (2005), Nikolaus Geyrhalter’s documentary about modern industrial food production. The film opts to depict each scene, whether it is showing us meat processing or a chicken farm, in long uninterrupted takes (Figure 7.35).
The opening shot, of a worker hosing down the floor of a slaughterhouse, lasts more than a full minute. On both sides, we see pig carcasses. The absence of cutting creates a powerful emotional effect as we are forced to experience the uniform size and shape of each animal, and the scale of this operation. In subsequent shots, the long duration forces us to be present with what is happening, and to question our complicity with this system of food production that reduces all life—plant, animal, and even the human workers—to a uniform commodity.
■ Stylized Expressive Sequences
Errol Morris is a documentary filmmaker who creates resonant, stylized visual sequences that work in many ways to complement, and sometimes contradict, what is being said in his interview footage. In Mr. Death: The Rise and Fall of Fred A. Leuchter, Jr., there is a montage (Chapter 19) that accompanies Leuchter’s account of how he met his wife (Figure 7.36).
The images feel exquisitely planned, as if they came from a big-budget commercial rather than a documentary. This is not surprising, since Morris also directs TV commercials, and cinematographer Peter Donahue had worked mostly on commercials prior to this film. The sound design (Chapter 21) also contributes to the feeling of heightened reality. Morris has recruited his subject (Leuchter) as an actor in these scenes, blurring the boundary between fiction and documentary. Finally, our curiosity about how these images relate to the subject of the film draws us further into the film’s world as we wait for their significance to be revealed. Eventually we are told that Leuchter met his wife, a waitress, in the coffee shop where he has breakfast.


■ Figure 7.36 Images from the “coffee montage” in Mr. Death: The Rise and Fall of Fred A. Leuchter, Jr.
■ Infographics and Animation
Many documentaries rely on graphics and/or animation to convey complex information. Infographics can be a powerful way to help your audience absorb critical information that is dense. These can be as simple as text cards over moving images, or a slow zoom into on a map, as S. Leo Chiang does in several of his films (Figure 7.37).


■ Figure 7.37 Text cards give us critical establishing information in Mr. Cao Goes to Washington (left). An animated map shows us where New Orleans’ Vietnamese community is located in Chiang’s A Village Called Versailles (2009).
■ Conclusion
It is essential that anyone hoping to tell stories with moving images develops a deep working knowledge of the concepts of framing, composition, and coverage. It is with these building blocks that you will build your documentary, weaving together story, information, meaning, and emotion. Being aware of the expressive power of camera angles and moves allows one to conceive of shots, sequences, and scenes that are narratively and emotionally eloquent. When it comes to the aesthetics of the still or moving frame, we have only laid the groundwork in this chapter. There are many factors that contribute to the graphic qualities of your images: choice of imaging format, lens selection, camera support, lighting design, exposure, and frame rate, just to name a few. In the next chapters, we look at the impact of camera and format choice, and lens optics, on your documentary.