Chapter 10
Camera Support
Deciding if your camera should move during a shot and how you want it to move are critical to the tone, style, and meaning of your film. Whether you’re panning, tracking, tilting, or staying absolutely still, choosing the appropriate camera support is vital. You need to understand the equipment you have available to you and the expressive potential of each piece of gear, so that you can achieve your aesthetic goals.
Let’s say during preproduction you decide that your film would best be told as a series of meticulously lit and composed static compositions where the camera barely moves, as in Our Daily Bread (2005), Nikolaus Geyrhalter’s documentary about industrial food production. Or perhaps you want your film to open with a 7-minute tracking shot of a Chinese electronics factory, like Manufactured Landscapes (2006) by Jennifer Baichwal. Or you choose to invoke hard realism and intimacy through a restlessly moving camera, as we see in a film like A Lion in the House (2006), Julia Reichart and Steven Bognar’s documentary about children with cancer and their families.
Each of these choices was perfectly suited to the content and concept of its respective film, and each one required a different kind of camera support. You need to ask yourself what camera support system will allow you to achieve the particular look and style you are after, and if you have or can afford the equipment needed to achieve it. Let’s take a look at some options.
■ The Handheld Camera
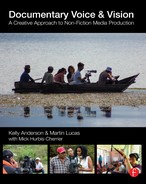
The cheapest and most readily available method of camera support is the human body. “Going handheld” means using your hands and arms for holding small and light-weight cameras, or carrying a larger camera on your shoulder and bracing it with your arm (Figure 10.1).


■ Figure 10.1 Handholding a camera can be fairly easy for short periods when using a small camcorder (left) or DSLR (center), but for extended shooting a larger shoulder-mounted camera may present an easier solution (right).
Handholding always introduces some instability into the image, because the camera reflects the human movements of the operator. No matter how steady the camera operator is, a handheld camera is never as stable as one mounted on a tripod, nor should it be. The handheld camera is a staple of much documentary filmmaking, for several reasons. First, a handheld camera can respond more effectively to unplanned events, making it a particularly appropriate choice for observational documentaries that require the cinematographer to follow unscripted action. In addition, the movement obtained with a handheld camera has an aesthetic quality that adds a feeling of immediacy and realism, and thus authenticity, to the documentary image. It may also go so far as to imply a certain ethical stance, characterized by the filmmaker’s decision to observe and document, as opposed to shaping, the reality in front of the camera.
For all of these reasons, the handheld camera has been popular with documentary filmmakers since the advent of portable 16mm film cameras during the 1960s, and the corresponding birth of the cinéma vérité and direct cinema movements (Chapter 2). In fact, these advances in portable handheld technology produced major changes in the documentary form.
Using a handheld camera is not as easy as simply slinging a camera on your shoulder and shooting. We’ve all seen plenty of home movie footage that’s so jittery it makes us nauseous. Techniques for handheld shooting require a great deal of body strength and control to keep the image from looking haphazard or sloppy, and must be practiced. In many ways, small ultralight cameras are more difficult to control than larger cameras because the weight of a camera, especially when mounted on a shoulder, provides some stability. If you decide to go handheld, your movements should be as controlled as possible while still feeling natural. Don’t worry that it will look like a tripod shot; it won’t. Controlled imperfection is the aesthetic point.
■ Tips for Shooting with a Handheld Camera
- Camera movement comes from the body, not just the hands. Use your entire body: feet, legs, torso, arms, and hands.
- Keep your knees bent and loose, like a skier, for shock absorption.
- Stay toward the wide angle end of the lens. A telephoto lens only magnifies the jitter and instability of the frame. If you need to get closer, move in closer.
- Breathing should be long and steady. Don’t hold your breath or you will find the need to gasp for air in the middle of a shot, causing an inevitable jerk of the frame.
- Don’t hold the camera rigidly. Rhythm, grace, and controlled movement are key.
- Take advantage of the pivoting LCD screen and the light weight of palm-held camcorders to go beyond eye-level shots. These cameras allow you to see your compositions even when the camera is dangling low from your arm or held aloft far over your head.
- Practice, practice, practice. Like any other creative skill, you get better at handholding a camera by doing it over and over again. Great handheld cinematographers are great because they’ve handled a camera nearly as often as a great pianist has touched the piano keys or a tennis pro has swung a racket. No great skill is acquired without effort, learning, and practice.
Once upon a time, a “handheld” camera always sat on the user’s shoulder and was supported in front by the right hand, which would also control the servo zoom control and start and stop recording. The left hand was then free to adjust focus, aperture and other camera controls. Since many cinematographers are now filming with small cameras that don’t sit on the shoulder, the term “handheld” now often refers to literally holding the camera in your hands, supporting it with a shoulder mount (more on shoulder mounts below) or working with a camera big enough to sit on your shoulder.
■ Shoulder Mounts
Larger camcorders, common before the advent of small digital and DSLR video cameras, had the advantage of being heavier and shoulder-mounted. While this would not necessarily seem to be an advantage—after all, shooting is hard work, and more muscles are required to support a heavier camera—the image from a camera mounted on an operator’s shoulder tends to be more controlled and smoother than one from a small handheld device. The lens of a shoulder-mounted camera also rests at approximately the same level as the eye of the cinematographer, creating what may feel like a more natural perspective for the viewer than a camera held at torso-level, where many small cameras are more comfortably held.
For these reasons, many cinematographers working with DSLR and other small cameras prefer to use a shoulder mount (Figure 10.2). When choosing a shoulder mount, it is important to consider what type of camera you are using. Some rigs can accommodate several types of cameras, while others are suited to one model. It is also important to ask yourself what types of additional equipment you will need to attach to your mount. Common add-ons include a monitor (Chapter 8), external drives, follow focus systems (Chapter 9), a matte box (Chapter 11), and receivers for wireless microphones (Chapter 13).

■ Figure 10.2 A simple shoulder rig for a DSLR.
With larger cameras, it is critical that your shoulder rig be properly balanced. Proper balance means that when you are not supporting the mount with your hands, it should sit on your shoulder without pitching forward or backward, or to one side. Commonly, weight will need to be added to the back of the rig to balance the weight of the camera at the front end. An improperly balanced shoulder rig will force the camera operator to use their arms to hold up the front end, which is very difficult for long filming periods and likely to produce back injuries. Adding battery packs or weights to the back of the shoulder mount allows the operator’s body to do the work of supporting the camera, and gravity helps the camera stay balanced. Importantly, a well-balanced camera and rig will allow the operator to use one hand to adjust focus or change the focal length of the lens. It is worth mentioning that the added gear that is likely necessary to make a DSLR or small mirrorless camera useful for documentary will add significantly to both the cost and the weight of your equipment package.
■ The Tripod
After handholding, tripods are the most common form of camera support in documentary. A tripod is a three-legged support designed to hold the camera steady for precise subject framing and also to allow for fluid pans, tilts, and compound moves. Professional filmmaking tripods are designed with pan heads that are different from the static heads used in still photography. These are highly adjustable, allowing a filmmaker to frame and maneuver with a precision and fluidity not possible with a handheld camera.
In documentary, tripods are commonly used for formal “sit-down” interviews. An interview can last an hour or longer, making it impractical to handhold the camera. In addition, using a tripod gives the interview visual continuity that can both help focus attention on the subject and make editing easier. Tripods are also extremely common in news gathering (Figure 10.3), where the camera must often be far away from the speaker, making handheld shooting very difficult, and where shooters must wait for long periods for the action to begin.

■ Figure 10.3 News shooters often use tripods, especially when covering press conferences or speeches. Photo courtesy of VOCAL-NY.
Tripods may also be used for shooting establishing shots and other elaborate visuals that require a controlled camera. For example, in Patricio Guzman’s Nostalgia for the Light (2010), there is a shot of a pre-Colombian carving in Chile’s Atacama Desert, high up on a cliff. Cinematographer Katell Djian does a slow zoom from a long shot to a close-up of the carving (Figure 10.4). Although it would be possible to shoot this handheld, we wouldn’t be able to absorb the detail of the carving because the final close-up would be at the telephoto end of the zoom range and would be shaking too much. The tripod also lends this shot a controlled, meditative feel that would be diminished by the observational realism associated with a handheld camera.

■ Figure 10.4 This shot from Nostalgia for the Light begins with a long shot (left) and zooms in to a close-up (right). This type of shot is best taken using a tripod because of the stability and precision needed.

■ Figure 10.5 The tripod has been used since the early history of filmmaking, as seen in Dziga Vertov’s Man with a Movie Camera (1929).
Finally, for any kind of time lapse photography, where a long time period is condensed to a short period by speeding up the footage, you will need to use a tripod.
The design of the tripod has remained essentially un-changed since the earliest years of cinema (Figure 10.5). A tripod can be broken down into two major components: the head and the legs (also called sticks). Some less expensive tripods are constructed with the head and legs in one unit, but the most flexible tripods are those that are designed as systems, so that each component is separate and interchangeable to fit a variety of production situations (Figure 10.6).

■ Figure 10.6 A tripod system will commonly have a head (A), extendable legs (B), a pan handle (C), and a removable spreader (D). A professional tripod head, like this Sachtler DV-2 fluid head shown in close-up on the right, has a tilt lock (E), a pan lock (F), tension (drag) adjustments for the tilt and pan controls (G, H), a camera mounting plate (I), and a quick release lock for the base plate (J).
Tripod Head (A)
In terms of movement precision, the most important component of any tripod is the head. The tripod head is where the camera is mounted, and is the component that swivels left and right for panning, as well as up and down for tilting. The quality of the head greatly affects the smoothness of the camera moves executed using the tripod. Tripod heads come in different sizes to accommodate various camera weights. A small head, like the Sachtler DV-2, is designed specifically for small cameras (Figure 10.6). Larger heads, like the Miller Compass 15, are built to accommodate the bulk of large video camcorders weighing up to 20 pounds. You can find out what weight your tripod head can handle by checking the manufacturer’s specifications. Since tripods themselves tend to be both bulky and a rather heavy burden on a shoot, it is very important to match your tripod’s weight capacity with the actual equipment you plan to mount on it (Figure 10.7).

■ Figure 10.7 Picking the right tripod for the job. For smooth, controlled camera moves, convenience and safety, the tripod should match the weight rating of the camera being used.
An important factor determining the quality of the tripod’s panning and tilting abilities is the resistance mechanism. Smooth moves with a tripod are accomplished by adjusting the resistance of the tripod head against the weight of the camera and the speed of the move. A very slow pan, for example, is smoothest with heavy drag on the pan mechanism. The two types of resistance mechanisms you’re likely to come across are fluid heads and friction heads. Fluid heads use pressurized hydraulic fluid to provide the adjustable drag necessary for smooth camera moves. Friction heads use the surface friction between internal plates, sometimes lined with cork, to create movement resistance. Fluid heads are more expensive, but they give you much more precise and varied adjustments to facilitate your camera moves, and they generally have a smoother and more even action throughout the panning and tilting range.
There are several features on a tripod head that are common to all professional tripods, and you should locate these right away (Figure 10.6).
Pan and Tilt Locks (E & F)
Pan and tilt locks completely lock down the head mechanism, keeping the tripod from pivoting at all. The most important lock for you to locate is the tilt lock. If your camera is slightly unbalanced on the tripod (from the addition of a heavy battery, for example) and the tilt lock isn’t tight, the camera can tilt forward or backward all the way, even sending the camera crashing to the ground. The standard procedure to avoid this catastrophe is to tighten the tilt lock between takes and never leave the tripod and camera unattended.
Pan and Tilt Dampers (G & H)
Pan and tilt dampers adjust the amount of resistance for their respective movements. Generally speaking, the more slowly you wish to execute a move, the more resistance you want, and vice versa. This assures smoother motion and greater control. The amount of resistance is usually characterized as drag, and many tripod heads will have as many as ten levels of drag.
Pan Handle (C)
The pan handle is used to control the movements of the camera. On most tripods, the angle of the pan handle can be adjusted for various tripod heights and personal comfort. Many tripods allow you to mount the pan handle on the left or right. Take the time to adjust the handle for maximum comfort and control. An important cautionary note here is that you should never carry a tripod by the pan handle. Pan handles are usually made of lightweight aluminum and the adjustment threads can easily strip or break off.
Camera Mounting Plate (I)
Finally, all tripod heads have a camera mounting plate, which attaches the camera to the tripod head. Cameras are secured to the mounting plate with a threaded mounting screw. Most professional film and video cameras use a 3/8” mounting screw, and small video cameras use a smaller 1/4” mounting screw. Make sure the mounting screw matches the threads on the underside of the camera before you leave for your location.
You might be wondering why we mention a tiny detail like the size of the camera mounting screw. In documentary production, every little detail is crucial. We have had students who have gone on location with tripod heads that had the wrong-sized mounting screw. They arrived on location with everything in place—crew, subjects, permissions—but had no way to secure the camera to the tripod. Instead of shooting on a tripod, they had to handhold an entire hour-long interview. Since this didn’t match their other footage (not to mention the difficulty of holding the camera steady that long), the look of the project was seriously compromised, all on account of one little screw.
It’s also important to note that many tripods have adjustable mounting plates. An adjustable mounting plate will slide slightly forward and backward on the head. This allows the camera operator to precisely balance the camera on the tripod. Ideally, you should be able to take your hands off the camera, without the tilt lock engaged or any drag on the mechanism, and the camera will remain level. This way, the operator doesn’t fight gravity while executing a camera move. In addition, you will typically find a quick release feature (J) on the mounting plate. The quick-release feature allows you to pop the camera on and off the head of the tripod quickly, making it easier to move from one location to another quickly. You should never carry the tripod around with a camera attached. The quick release also lets you quickly remove the camera from the tripod to go handheld and then pop it back on again for tripod shots. Don’t forget to remove the quick release plate from the camera and stick it back on the tripod at the end of the shooting day!
Head Mount
The head mount is at the base of the tripod head and is where the head mounts to the tripod legs. With modular tripod systems, the head can be used with a variety of different legs. Most quality tripods have claw ball or ball-and-socket mounts, which can be loosened to freely adjust the angle of the tripod head in any direction to achieve a level base no matter where the tripod is standing. It is much easier to level a tripod by using this adjustment than by varying the lengths of the three legs. Tripods with adjustable heads also usually have a bubble leveler to assist in leveling of the head (Figure 10.8).
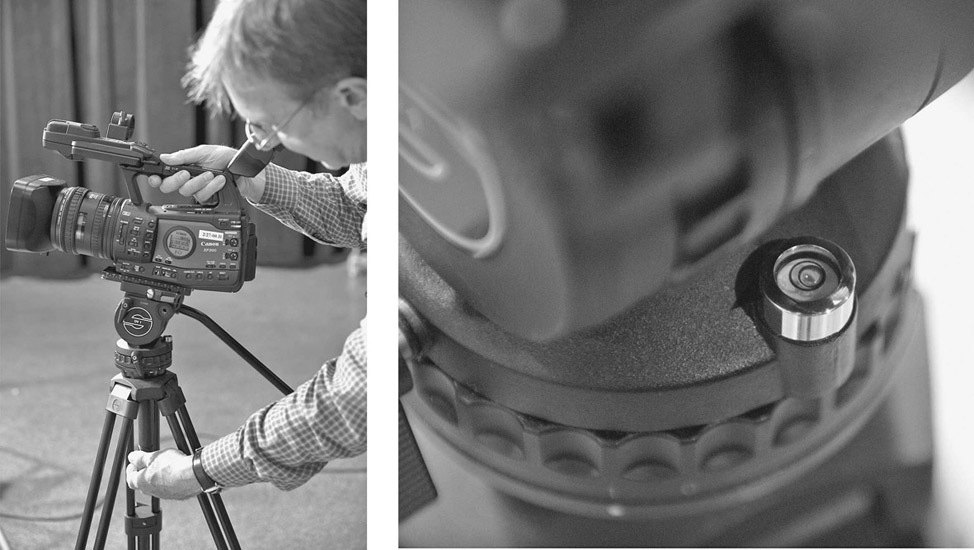
■ Figure 10.8 Here the camera operator is adjusting the level of the tripod head (left) using the bubble leveler (right).
The legs (or “sticks”) of a tripod are adjustable so that the tripod height, and therefore the camera height, can be easily changed from shot to shot. Also, because the legs are independently adjustable, they can provide a firm footing on uneven terrain, like a hillside or on stairs (Figure 10.9).

■ Figure 10.9 The individually extendable legs of a tripod make it possible to get stable support on uneven surfaces, such as a staircase.
Some tripod systems offer legs in different heights, on which the same head can be used interchangeably. Typical standard legs have three stages of extension, and can position the camera between 3 feet and 6 feet high. Another option are two-stage legs, which have additional length for extension and can offer even higher angles. On many professional tripods, the legs are allowed to open out freely to any width for a stable base of support. To keep the legs from completely sliding out from under the camera, a spreader is often used. Some tripods have a built-in spreader, while others require a separate unit. The feet of some tripod legs have spikes that can be pushed into the ground in exterior locations, but these spikes will obviously slip on hard surfaces or destroy wooden floors, so you must use a spreader in these situations.
For shots lower than 3 feet we often use baby legs, which have a height range from less than 1 foot to about 3 feet (Figure 10.10).

■ Figure 10.10 This “baby legs” tripod gives a height of up to about 10 inches.
Many documentary cinematographers forgo bringing a set of baby legs on location because of the weight and hassle of carrying a lot of extra equipment. You need to make sure you have the equipment you need, while remembering that a large equipment package is the enemy of the spontaneity so often required in documentary production. And documentarians are great at improvising! Sometimes a rope tied around the tripod legs can replace a spreader and allow the tripod to get very low to the ground. It is not uncommon to see documentary filmmakers using a pillow or a folded up jacket to support the camera in an unusually low or awkward position.
■ The Monopod
With the advent of lighter-weight digital camcorders and DSLR shooting, as well as the ubiquity of the one-man-band crew, the monopod (once a tool used only by still photographers) is becoming increasingly popular with documentary shooters. A monopod (Figure 10.11) is a single pole that can be used to reduce camera shake in the vertical plane, allowing for smoother handheld shooting. While it is not as stable as a tripod, and cannot support a camera independently, the monopod is more lightweight and portable than a tripod. In POV’s 2013 Documentary Equipment Survey, the Manfrotto 516B mono pod emerged as a popular camera support for filmmakers. One said,
[It] is a fantastically useful and versatile piece of equipment. It has a ball joint at the bottom and three little flip-out feet, so it offers stability and movement in a very light package. It’s strong enough to hold the Canon C-300 as well as any DSLR.1
Remember that a monopod is a stabilizer, not a substitute for a real tripod in situations where a pan or tilt is required.

■ Figure 10.11 A monopod can be used, in lieu of a tripod, to reduce camera shake.
■ The Dolly
A dolly is a camera support on wheels that is used when your shot requires a dynamic move (Chapter 7) and you want it to be smoother and more controlled than what you can achieve with a handheld camera. Dollies are relatively rare in documentary, with notable exceptions including the opening shot of Jennifer Baichwal’s documentary Manufactured Landscapes (2006). For that shot, the cameras moved on a dolly through a factory for more than 5 full minutes, revealing the incredible size of the plant. Many types of dollies are available, from expensive to inexpensive, and extremely heavy to relatively portable. Some dollies have soft, inflated rubber tires and require a smooth, even floor (Figure 10.12). Other dollies run on tracks that are laid out in straight or curved sections along the desired path of the camera movement.

■ Figure 10.12 A “doorway dolly” has inflatable wheels that allow for a smooth transit and do not require tracks.
Laying dolly track creates extremely smooth camera moves, but it is a time- and labor-intensive task that requires the careful placement of wooden shims to even out the dolly’s movement. For this reason, students often think twice about using dollies on tracks. Professional dollies provide a post for you to mount your fluid head so that you can execute smooth pans and tilts while the camera is being moved around, while inexpensive dollies require that you mount the entire tripod on the base (a substantially less stable arrangement). There is no doubt: dynamic moves with dollies are wonderful, but you need to be aware that using a dolly can be a time-consuming addition to your production schedule (Figure 10.13).

■ Figure 10.13 Dollies that use tracks can create extremely smooth moving shots, even over rough terrain, but their setup is a time- and labor-intensive endeavor.
As the saying goes, necessity is the mother of invention, and many people throughout the history of filmmaking have used their ingenuity to achieve their ends with minimal resources. One of the most common dolly-like devices is a wheelchair. The cinematographer simply sits in the wheelchair and is pushed.
in practice
■ Camera Support in the Immortalists
David Alvarado and Jason Sussberg used a variety of innovative camera support systems in their documentary The Immortalists (2013), about the science of life extension. One of their interviews with Bill Andrews, a marathon runner, was shot from a van while Andrews was running (Figure 10.14, above). “We used a $60 tripod and weighted it down with rocks,” says Alvarado. “It worked because we didn’t need to do any moves [that needed a fluid head].”2


■ Figure 10.14 Shots filmed from a moving car (above) and with a slider (below) in The Immortalists (2013).
Alvarado and Sussberg used a slider to introduce one of the film’s main characters, scientist Aubrey de Grey, because they wanted a dynamic moving shot (Figure 10.14, below). De Grey most often does his work in a pub with a pint of beer in hand. Alvarado says:
Aubrey has a 3-foot long red beard, he’s a mythic looking character. We had shot a lot of handheld vérité material, but we were trying to introduce him in this bar, so we used sliders because we needed to give the audience a chance to sit there and stare at him. He just drank his beer and did his computer work, and we got shots of it. It’s just a bit more kinetic than a still shot.
Much of The Immortalists is handheld, but Alvarado never used his cameras (a Canon C-100 and a Canon 5D) without a weighted shoulder mount (Figure 10.15). He says,
I never hold the camera in my hands. When you do that, the camera moves in ways that we don’t do with our heads. We don’t look at the world from that position or with that kind of shakiness. And it gives the viewer a sort of disturbed sensation, even if they’re not aware of it. For me it’s very important to put a weight, hopefully equal to the camera, on the back of a mount like the Redrock, and have a comfortable shoulder pad. Even with a DSLR, it allows the camera to move the same way we move with our normal bodies. You have to have a lot of upper body strength to do that, so I work out to have good upper body strength.

■ Figure 10.15 David Alvarado (right) using a Redrock Micro shoulder mount with a Panasonic C-100 camera on The Immortalists (2013). Co-director Jason Sussberg is on the left. Photo by Erika Kapin.
Sliders
A less expensive and time-consuming alternative to large dolly systems is the slider (Figure 10.16). A slider is a small apparatus, usually from 11⁄2 to 3 feet wide, that you can put on stands or on a tripod (or between two tripods). By mounting a small camera on a slider, and pushing it left to right (or right to left), you can create a move that feels like a dolly but requires much less effort and preparation.

■ Figure 10.16 A slider can be a less expensive alternative to larger dolly systems, especially if you are using a small camera like a DSLR.
For those on a tight budget, a quick Internet search produces many examples of homemade sliders for DSLR and other lightweight cameras, many involving roller skate wheels or skateboards.

■ Figure 10.17 A jib arm like the Glidetrack Carbon Crane can be used to get boom shots, even on location. Photo by Philip Johnston/ www.hdwarrior.co.uk.
■ Jib Arms and Crane Shots
As we learned in Chapter 7, lifting the camera up and down is called booming (you “boom up” or “boom down”). On big budget fiction films, this is done with a crane that holds both the camera operator and the camera. In documentary these shots are relatively rare, but when they are done the cinematographer generally uses a jib arm that can attach to a tripod. You sway its long arm up and down and side to side to give the camera a smooth, controlled movement (Figure 10.17).
One advantage of the smaller digital and DSLR cameras is that their light weight has opened up possibilities for camera support that weren’t possible with heavier cameras. Sometimes filmmakers will rent a small crane or jib arm for one day to get a number of shots that can be integrated throughout their documentary to give a particular aesthetic and raise the production value.
■ Stabilizing Arm Systems
Invented by cinematographer Garrett Brown in the 1970s, the Steadicam stabilizing system combines the mobility and ease of use of a handheld camera with the smooth and controlled movements of a dolly. The downside to Steadicam systems for students and low-budget filmmakers has always been the cost and complexity of the system. However, since the advent of lightweight video cameras, we’ve experienced the emergence of a whole range of far less expensive and less cumbersome stabilizing systems (Figure 10.18).
Most stabilizing systems are ultra-lightweight handheld units that use a simple system of counterweights to smooth out the movements of the operator as they move with the camera through space. With practice, you can get wonderfully smooth tracks, dollies, and arcs with these systems.
More recently, a variety of powered stabilizing systems using gyroscopes and gimbal mounts for cameras have emerged (Figure 10.18, right). These typically involve one person holding the camera, while another controls pan and zoom remotely using a computer or smartphone. The stabilizer can correct for tilt, roll, and pan movements, and can even be set to deal with issues such as engine vibration in a helicopter.


■ Figure 10.18 The emergence of small video and DSLR cameras has prompted the creation of lighter, cheaper stabilizing systems, like this Glidecam (left) being used for a moving shot. Gimbal stabilizers use computer controlled motors, like this DJI Ronin-M (right, shown here with a Sony A7S camera). Gimbal photo by Shari Sperling.
■ Drones
No discussion of camera support systems would be complete without a discussion of drones. Once upon a time, an aerial shot was a complex and very expensive option that involved renting a plane or a helicopter, and working with someone specializing in aerial photography. Today, small drones—flying devices that mount tiny cameras—allow for shooting in an amazing number of situations (Figure 10.19). Typically, these systems allow the images to be transmitted via Wi-Fi directly from the air, so you can monitor and control your shooting carefully. Many drones come equipped with stabilizing systems like gimbals (see above) so that extremely smooth aerial shots can be filmed. Note that legal issues around drones are still being worked out. Make sure you have any necessary permissions before putting anything in the sky with a camera on it. Drones are also prone to crashing, so use with care.


■ Figure 10.19 A small drone (DJI’s Phantom Series) used for aerial cinematography. Drones can be used to take images in places humans cannot go, like this shot of an erupting volcano in Iceland (right). Images courtesy of DJI.
■ Underwater Photography
A specialized area of documentary is underwater cinematography. Manufacturers offer a professional option in the form of underwater housings for a variety of cameras, which are great if you have your scuba gear and know how to dive. Now the availability of a variety of inexpensive waterproof cameras, and even the advent of new underwater drones, means that the water’s surface is no longer a great barrier to a documentary maker.
■ Conclusion
From the super-controlled fluidity of a gyroscopic gimbal stabilizer to the edgy movement of the handheld camera to the formal pivot of a tripod, different camera supports offer different “feels.” There is no system that is better or worse—there is only what is appropriate for the conception of your film, and for your schedule and budget. Often, within a single film, there will be scenes that work best with a handheld camera, and others that require the stability of a tripod, while a signature transition shot may call for a slider or a jib arm. But whether you handhold a camera, put it on a tripod, or wheel it around on a dolly, both the movement of the camera and the fashion in which it moves must be motivated by the story you’re telling and style you are using to convey it.