Chapter 11
Basic Lighting for Documentary
Everything can be transformed, deformed, and obliterated by light. Its flexibility is precisely the same as the suppleness of the brush.
Man Ray, La Photographie N’est Pas L’art1
Film is a visual medium, yet for many documentary filmmakers, lighting is a secondary concern. Unlike fiction film, where “painting with light” is part of the standard process and actors are paid to wait on the lighting crew, documentary makers depend on the cooperation of their subjects and borrowed time. In addition, modern digital cameras are highly light sensitive, able to produce an image with available light in many situations. The addition of a bulky kit of lights, difficult to carry and laboriously time-consuming to set up, can seem like an imposition that limits spontaneity and gets in the way of the creative interaction with reality that is central to the documentary process. Yet an understanding of film lighting principles, and perhaps even more centrally an awareness of light itself—what it does and how it works its magic on the human eye—is indispensable for any documentary filmmaker. The more you know, the more you can develop your own approach to lighting, one that suits your own shooting style, your own sense of production value, and the basic expressive needs of the particular film you are making.
A look at the work of great documentary filmmakers will reveal a wide variety of approaches to lighting, some boldly stylized and others assiduously naturalistic. Some makers work with cinematographers who are renowned for their work on fiction films, others are do-it-yourself shooters who rely on a couple of tried and true lighting instruments and techniques. In all cases, understanding the essential properties of light and basic lighting techniques will make you a more flexible, efficient, and expressive filmmaker.
■ Why Light?
The most rudimentary reason for lighting is to ensure exposure so the camera can register a visible image. But there can be many reasons to light a scene, or to control the available light in your shooting situation. They include:
- Getting an exposure
- Adding depth, dimension, and aesthetic interest to the image
- Developing visual emphasis
- Setting tone and mood
- Creating visual consistency, both within a scene and for the project as a whole
The best lighting approach is one that does all five of these things at the same time.
In documentary, we tend to think of a camera as “capturing” the reality in front of it, but the instrument we’re using has a serious limitation: it is representing a three-dimensional world on a two-dimensional screen. On that flat screen, light and shadow are key ways we define objects and understand depth as well as texture. In addition to the clues that help us perceive the image, there are larger questions about how the look serves the intention of the film. Even a cinéma vérité filmmaker dedicated to a strictly “fly-on-the-wall” approach defines their style by the way they treat light levels. The blown out exposures of gritty black and white film are a signature of authenticity in the great observational documentaries of the 1960s (Figure 12.8). The highly stylized reenactments in Errol Morris’s The Thin Blue Line (1988), with their carefully controlled studio lighting, offer another approach that uses lighting to emphasize the constructed nature of what we call truth.
in practice
■ Documentary Lighting to Enhance Meaning
Ellen Bruno’s short documentary Split (2013) is a deeply personal exploration of how six young people process their parents’ divorce. The lighting, by award-winning cinematographer Ellen Kuras, supports the director’s goals for the film. While the interview setup looks simple, just putting a camera in front of the subject in this situation would not give an effect at all like what we see (Figure 11.1).
The light is soft, gentle, and restrained, seeming to come from only a single source, allowing us to feel we’re in intimate contact with the young person who is revealing her feelings about the way her life has been altered. The low key (Chapter 12) quality of the light adds to the intimacy by de-emphasizing the space surrounding the subject, adding an almost somber note. The soft light, which falls away quickly, also emphasizes the physical presence of the subject. She seems to almost “pop out” of the frame. The saturated colors create a consistent look both within the scenes, and across the film as a whole. Even the details, which look “natural,” are carefully controlled. The window light in a dark room is typically much brighter than the interior and can typically only be used by applying neutral density (ND) gel over the window, as was likely done here. Another thing to note is how the subject’s eyes are unlit. This is unusual in document ary interviews, and adds to the sense of the subject as someone of unseen depths, depths that we hope to explore.

■ Figure 11.1 In Split, subtle yet expressive lighting by cinematographer Ellen Kuras develops an intimate mood in this “kid’s-eye” view of divorce.
Lighting also picks out detail, emphasizing one aspect of a situation and de-emphasizing another. Mood in documentary is also heavily affected by lighting. The inclusion or elimination of shadows, the range of colors in a scene, the hardness or softness of the light, and the direction the light comes from—all of these lighting choices have a profound impact on the emotional tone that will be communicated to the audience. Finally, consistency is a key goal of any lighting strategy. In a documentary shooting situation, it is easy to have one shot very dark and the next very bright, or one blue and the next orange, just from natural variations in the light. These differences, if not dealt with carefully, will affect a viewer’s ability to see the images as part of the same scene.
Lighting as Respect
Another almost contradictory way of understanding lighting in documentary is exactly in its role as a sign of moviemaking. Sometimes setting up lights signals to your subjects the seriousness of the enterprise, helping to create the unspoken contract that underlies their participation in your project. This can be particularly true for interviews, which are such a key part of documentary lighting that they get their own section in Chapter 12. Another way to think about this has to do with how people are treated by filmmakers. A democratic approach to making films would suggest that all of the subjects in a film be treated as “authorities” or experts in the conditions of their own lives, and given the same level of concern and respect by the camera, regardless of their place in social hierarchies outside of your film. There is no inherent reason that a senator in their office should get more production value in terms of lighting than a factory worker on the job or a housewife in her home.
■ Elements of Exposure
What does it mean to get an exposure? It’s all about light: how much of it is bouncing off your scene, into your lens, and registering on your imaging device. But how do we control exposure? In filmmaking, every exposure you make involves an intricate interrelationship between all of the variables that produce, transmit, control, transform, or record light. Here are the primary elements along the path, beginning at the light source and ending at the imaging device:
- 1. The light source. Whether you are shooting under the sun or with artificial lights or a mixture of both, the aesthetic and technical properties of your lighting source have the biggest impact on the look of your image. Of central importance for exposure control is the intensity of light, meaning how much light is falling onto your scene, but also significant are the quality and color temperature of the light.
- 2. The scene. What are the visual dynamics of your scene? Or more specifically, what are the physical properties of the space, the reflectivity of the objects, the volume of the area, the colors and shadows, and movement? All these need to be considered when lighting and creating an exposure.
- 3. Filters. Lens filters are often employed in documentary production to alter the quality, color, or intensity of the light entering the camera. We don’t always use filters, but when we do, they affect many of the other exposure elements.
- 4. The lens and aperture. As we mentioned in Chapter 9, all of the light exposing your imaging device passes through the lens. The lens aperture determines the amount of light that is allowed to pass through to hit the sensor. Aperture control is one of the most flexible variables for creating the best exposure for each image (see Chapter 9 for more on aperture, f-stops, and exposure).
- 5. Frame rate, shutter speed, and gain (ISO). The camera’s frame rate (60i vs 24p, for example) has an impact on the duration of each exposure. The amount of gain (or, in the case of DSLR cameras, the ISO setting) and shutter speed are also important factors (Chapter 8).
- 6. Imaging device. Whether you’re using CCDs or CMOS sensors, understanding and factoring in your imaging device’s particular and unique sensitivity and response to light is essential in getting the shot the way you want it.


■ Figure 11.2 Combining sunlight with shade means a broad (and difficult to work with) range of exposure values. On the left, a correct exposure for the exterior means the subject is in silhouette. On the right, ND 0.6 over the side window brings the exterior light down two stops, making it possible to open up and expose the driver properly (Figure 11.20).
In documentary production, where you almost always have less time than you want to set up lights, or gel windows, there is always going be a tension between your creative desires and the concrete reality of the situation you are in. Imagine you have 2 hours to do an interview. Do you want to spend 90 minutes setting up and 30 minutes on the actual interview, or the reverse? On the other hand, if you are going to film someone driving, it may be worth inconveniencing the subject and mounting a small light over the dashboard, or putting ND gel on the side window to balance the interior and exterior light. The difference could be between a haphazard image and a highly expressive professional looking one (Figure 11.2).


■ Figure 11.3 A histogram (created in Adobe Photoshop). In the image on the left, you can see that most of the pixels in the image are clustered towards the low end of the spectrum, telling us that the image doesn’t have very much brightness. On the right, we have adjusted the image so that light and dark values are more evenly distributed. This is reflected in a more “stretched out” histogram with more light values.
Monitoring Exposure
With many cameras and monitors, you can view exposure range directly via a histogram on the screen. Figure 11.3 shows an image with a superimposed histogram. The histogram tells us the light value of every pixel registered by the sensor. This is useful information. You can see whether you are taking advantage of the full range of dark and light values in the scene, and whether you are under- or overexposing. You can also see if your camera is “clipping,” or overexposing, parts of the image. In this image, the values are clustered in the dark part of the histogram, meaning that there isn’t a lot of brightness in the picture as it is being captured.

■ Figure 11.4 Zebras indicate parts of the image are over a certain luminance level, in this case 100 IRE units.
Another useful tool for monitoring exposure is the zebra function (Figure 11.4). The zebra can be set for various levels, but probably the most useful is to set it so that the viewer image is overlaid with the zebra pattern when the exposure is above 100 IRE units, or “full white.” This still allows you to overexpose, but reminds you to check carefully when you are approaching the exposure limits.
■ The Fundamental Sources of Light
Anything that gives off light, from the blazing midday sun to a candle, can be used as a lighting source in a scene. Natural light refers to light coming from nature, a source that is not artificial. Usually we mean the sun when we talk about natural light, but the term also applies to light that comes from nonelectric sources that aren’t naturally occurring, like campfires, candles, and fireplaces. Artificial light is any light source that generates light through electricity. Artificial lights can be as big as a 10,000-watt light or as small as a flashlight.
The term available light refers to light sources that ordinarily exist in any given location. For example, if you walk into a grocery store with your camera and simply shoot by the light of the fluorescent fixtures overhead, or if you shoot in a bedroom illuminated only by the sun streaming in from a window, you are shooting with available light. Mixed lighting refers to combining available sources and artificial lights to achieve the look you’re after. It’s very common to use the sun as one light source and artificial lights as another.
Very often, natural or available light sources are not powerful enough to create an exposure, but we nonetheless want the audience to feel like a particular source is illuminating the scene. For example, imagine a subject is curled up in her living room reading a book, and we want the audience to believe that the 25-watt reading lamp is the only light illuminating her face. The lamp’s wattage is unlikely to be strong enough to get a good exposure. In this situation, you might bring in an artificial light to duplicate the color, quality, and direction of the ostensible light source, but at a higher intensity.
This strategy of using additional lights to enhance or duplicate light, which would logically be emanating from an existing light source in the scene, is called motivated lighting. Motivated lighting is a central strategy for creating naturalistic lighting designs (Chapter 12). These are realistic lighting setups where the light source, intensity, and texture can be logically derived from what the viewer knows about the shooting situation.
The simplest lighting setup is one that uses available light, whether sun through a window, an overhead fixture, or a lamp on a table. Sometimes you can create enough control of the available light by opening or closing a curtain, or turning off the overhead lights, to create the lighting effect you feel is appropriate for the situation. More typically, however, you will find yourself using one or more lighting instruments. Controlling your tools properly requires knowing how light works.
■ Three Essential Properties of Light
Light sources don’t simply give off generic light. Every light source emits a light that has specific characteristics that contribute to the look of your scene. Three of the basic properties of light that give any light source its distinctive character are intensity, quality, and color temperature.
Intensity
Light intensity is the strength of the light emitted by a source. Direct sunlight is obviously a very intense source of light, although the actual intensity changes depending on its angle at various times of day. With artificial light, intensity depends largely on the wattage of the lamp used (500 watts, 1,000 watts, etc.). When we speak of lamp wattage, we use the symbol “K” to stand in for “thousand.” So a 1,000-watt light is called a 1K (“one kay”) and a 2,000-watt light is called a 2K. (Do not get this K mixed up with the “K” symbol used for degrees Kelvin, which relates to color temperature.)
The intensity of light hitting your scene is also greatly affected by the light-source-to-subject distance. The farther away an instrument is placed from the subject, the weaker the light is on that subject. This diminishing intensity as the unit is moved away follows the inverse square law, which says that the intensity of light falls off by the square of the distance from the subject (Figure 11.5). Obviously, the converse applies as well. When you bring a light in closer, you increase its intensity. If the inverse square law seems like a lot of calculation to do on the set, you can simply apply this rule of thumb: if you double the distance between the lighting unit and your subject, say from 10 feet to 20 feet, the strength of the light will be reduced four times and will be only one-quarter the intensity compared to the original position. If you halve the distance between the subject and the lighting unit, you will increase the light intensity four times.
You can also change the intensity of a light in a variety of other ways. Adding a scrim to the light will reduce its intensity. Some lights have dimmers, and dimmers can be added to any power cord (Figure 11.6). In addition, spotlights have different reflectors that can be inserted behind the bulb to vary the intensity of the light. Many lights will have a flood/spot control (where the flood is less intense) as well. These last two alter the quality of the light along the hard/soft spectrum as well as the intensity, as we will discuss next.

■ Figure 11.5 The inverse square law. Doubling the distance from the light source to our subject means that the illumination is spread over four times the area and is therefore only 1/4th the intensity. Likewise, tripling the distance means cutting the light to 1/9th of its original intensity.
Quality
The texture of a light—how hard or soft its beam is—is referred to as its quality. The bulbs for the most commonly used film lights involve a wire filament. That glowing filament becomes the point source of the lamp’s illumination, creating a highly directional beam. Light that travels directly from a lamp to the subject is referred to as hard light or directional light, because the light rays, which travel straight and parallel to each other, all fall on the subject from a single angle, causing sharp shadows and bright highlight areas. Lighting units that do not illuminate directly from the bulb, but instead bounce the light off a reflective surface, emit a diffused or soft light. The reflecting surface scatters the light rays in a variety of directions, disturbing their parallel paths (Figure 11.7). Diffused light rays do not hit the subject from the same angle and therefore create softer shadows and smoother highlights. Other lights that do not generate light from a point source, such as fluorescent lights, also create a soft light. It’s important to note that the larger the area of the diffused bounce surface, the softer the light.

■ Figure 11.6 This simple in-line dimmer can be plugged into any circuit (less than 1,000W in the case of this model from Mole-Richardson) to add an extra level of control.

■ Figure 11.7 Hard light creates sharp shadows (left) because the light beams maintain their parallel direction. Soft light (right) creates diffused shadows because the scattered light beams hit the subject from many directions.
Understanding this principle, you can see that it is not difficult to soften the light from a hard lighting instrument by simply bouncing it off any diffusing surface, like a white wall or a white bounce card or reflector (Figure 11.8). You can also soften light from a hard lighting unit by placing diffusion media in front of the beam (Figure 11.28). Diffusion media scatters the light rays in a way similar to that achieved by bouncing light off a diffusing surface. Be aware, however, that diffusing light always decreases its intensity. As with so many other things, the choice is based primarily on applying the appropriate aesthetic choice for the content of your film.

■ Figure 11.8 A diffused surface, like a show card or a reflector, scatters the light rays, changing the quality of the light from hard to soft.
Hard light, which travels directly, tends to travel further, giving a long throw, and is easier to control. It also creates hard shadows. Soft light by its nature tends to spread, giving it a short throw and making it more difficult to control. Soft light makes for few shadows, and gentle ones.
Color Temperature
Light comes in a variety of colors, from purple to red. In daily life, our brains compensate for these differences and we don’t notice them much. However, different sources emit light of different frequencies, and the camera registers these as different colors. The tonality of a light is called its color temperature and it is measured using the Kelvin scale (Figure 11.9). Average daylight is 5,600K (quite blue or “cool”), but the sun can change color temperature dramatically over the course of the day. The most common artificial lighting instruments for documentary production are tungsten-halogen lights (also called quartz lights), which have a color temperature of 3,200K (quite “warm” or orange). Newer LED light panels often come with a color temperature control which allows you to dial up different temperatures between daylight and tungsten standards (Figure 11.10).
As discussed in Chapter 8, with the white balance function you can set your camera to see a specific color temperature of light as “white.” Generally, your goal is to achieve a consistent and fairly neutral color temperature.

■ Figure 11.9 This chart shows the color temperatures of various common light sources measured in degrees Kelvin. (See plate section for color.)
Combining lights with various color temperatures in one scene can present challenges. Ways of compensating for differing light color values include adjusting the white balance function on your camera, and using color conversion gels on light sources (p. 179).

■ Figure 11.10 The dial on the upper left on the back of this LED light controls color temperature (from a blue 5600K to an orange 3200K) (A), while the one on the right is a dimmer to adjust light intensity (B).
■ Controlling Light
Once you have an idea of what light’s qualities are, it is time to think about how to control it to get the images you need to tell your story. Unless they encounter an obstacle, light waves travel in a straight line. Anyone who goes out on a clear night can see the light traveling from galaxies millions of light years away, simply because there is nothing blocking its path. If light hits a reflective surface, it will change direction. If it shines through a translucent material, it will soften or change color. These behaviors of light are the foundation of any lighting strategy. Let’s review them:
- 1. Blocking light. A fundamental way to control light is to block it. On a lighting instrument, this is accomplished with barn doors. On a set, this can also be achieved with flags mounted on stands (Figure 11.29). On location, this might mean closing the curtains or blinds. However you do it, blocking light is a strategy that will help make sure that the light is where you want it, illuminating significant parts of your scene, and not where you don’t want it.
- 2. Bouncing light. Reflecting or bouncing light offers an important approach to putting light where you want it. While reflectors and show cards are designed to reflect light, a light-colored wall or ceiling will often be adequate for a location shoot. Remember that bouncing alters the quality of light as well as the intensity, giving you light that is softer than the original source.
- 3. Filtering light. Filtering light by putting it through something that will alter it gives you control not just over the amount of light, but over other qualities as well. Gels or diffusion can make hard light soft, but can also change the color of the light. Filtering can work over a light source, whether a window or a lighting instrument, or over the camera lens for a variety of special lighting effects.
■ Basic Lighting Equipment, Filters, and Gels
Lighting Units
There is a dizzying array of lights available for documentary production, with new ones being developed all of the time. It would be impossible to present them all in this book, but the following sections present some lighting units that are commonly used.
Open-Faced Lights
Open-faced lights are units that consist of an open lamp (no lens) and a specular (mirror-like) reflector behind the bulb. Open-faced lights are a hard light source and act primarily as key lights and set lights. The open-faced spot is a common unit that has a movable lamp, allowing you to focus its throw from a broad to a more narrowly defined area (Figure 11.11, left). If you have a small light kit, an open-faced spotlight is a sturdy and efficient light to include. Broads, which are open-faced lights with no spotting capability, simply deliver a hard, efficient bright light (Figure 11.11, right). Both lights come in a variety of intensities, from 250 to 2,000 watts.


■ Figure 11.11 The light on the left is Lowel’s Omni, a versatile 500 W open-faced light whose small size and portability make it useful for documentary field production. The light on the right is a mini-broad (Lowel’s Tota), which offers a lot of very hard light in a small package.
Fresnels
Fresnels are one of the most versatile lighting units you will find in a location light kit. What distinguishes a Fresnel is its unique lens and its movable lamp, which allows it to spot its beam with fair precision while not having the harder edge associated with a spotlight (Figure 11.12). The lens also gives this light a very long throw, so it can be set up quite far from the subject. Though the textured lens does soften the light somewhat, Fresnels are still considered hard lights. Fresnels are named after Augustin-Jean Fresnel, the French physicist who designed the shape of the lens, originally to send the beam of an oil lamp far out to sea from coastal lighthouses.

■ Figure 11.12 Fresnels have lenses that focus the beam more effectively than open-faced lights. In the spot position (top), the bulb and the reflector are farther from the lens, creating a sharp beam. In the flood position (bottom), the bulb and reflector are brought closer to the lens, creating a wider throw.
Fresnels come in various sizes and wattages. The medium wattages (300W to 650W) (Figure 11.13, right) are commonly used to light people and are a good key light source (Chapter 12). A small Fresnel (100W to 200W) like the Pepper light (Figure 11.13, left) is commonly used on location for eye lights, backlights, and kickers. They are almost always equipped with barn doors (Figure 11.30) which allow you to block part of the beam.


■ Figure 11.13 The LTM 100/200W Pepper Light (left) is a typical small Fresnel used for back or eye light. The De Sisti 650W (right) is a typical medium wattage Fresnel offering hard light with a long throw.
Soft Lights
Soft lights are units that do not throw the light beam directly from the lamp. Rather, they are a soft, even source. In documentary, soft light is generally created by bouncing a hard light off an umbrella or enclosing a hard light in a nylon shell (Figure 11.14). Soft lights are popular in documentary because the diffused light looks less artificial than hard light. In addition, the lack of shadows means soft lights are kind to the human face, making them ideal for interviews. Soft lights come in a variety of intensities, and common wattages are 500W, 1K, and 2K. Keep in mind that a 500W soft light will be quite low intensity, compared to a 500W hard light. While a 1K hard light might be more light than you need for almost any documentary situation, a 1K soft light might give the perfect soft illumination required for an interview.


■ Figure 11.14 This Chimera softbox (left) is a typical folding soft light used for documentary location lighting. The Lowel Pro (right) uses a reflector umbrella to create a portable soft light.
While softbox units that fold up for packing are very popular, some filmmakers prefer to create their own soft light source by bouncing light from a hard light unit off a reflector umbrella, a show card, or even a white wall. Also popular in documentary are Chinese lanterns which throw a soft even glow in all directions (Figure 11.15).

■ Figure 11.15 Chinese lanterns, this one by Chimera, throw a soft even glow. Some cinematographers use the paper ones that are readily available at low cost, but be careful they don’t catch fire.
Fluorescent Lights
Fluorescent lights generate their illumination by passing an electric charge through mercury gas trapped within a hollow tube, causing it to glow. Because of this construction, fluorescent lamps give off a very soft light that can be flattering. In addition, they are lightweight and draw very little power. Fluorescent units come in a wide variety of sizes, from large banks holding ten 48-inch fluorescent tubes to tiny nook fixtures holding a single 9-inch fluorescent lamp capable of being tucked into the dashboard (Figure 11.16). Fluorescent lights burn cool, and the units are collapsible, making them a good choice for location shooting. Fluorescent lighting units can also be rebulbed with lamps of various color temperatures. The downside is that they are rather delicate. Note that fluorescents used for film production are different from the types typically found in schools and office buildings, which can create problems both from unflattering color and potential for flicker. A common fluorescent light for documentary field production is the Kino Flo Diva, which comes in small banks of 200W each.

■ Figure 11.16 Using a small fluorescent lamp to add light to a car interior.
LED Lights
Light Emitter Diode (LED) lights are relative newcomers to the world of documentary lighting, but they are becoming very popular in a variety of situations. LEDs are built from sets of tiny individual cells, which are highly efficient and run on DC power, which means they can be powered with batteries. LED lights can be found in a huge variety of configurations, from tiny units designed to be mounted on a camera to large light panels that generate a soft even light (Figure 11.17). These units are also highly controllable, typically offering both a dimmer switch and a color temperature control. Their portability, versatility, and ease of use guarantee that, as their cost comes down, LEDs will play a larger and larger role in the world of documentary lighting.

■ Figure 11.17 This 12”x12” LED light can operate on batteries or AC current, and provides a cool and controllable fill light.
HMI Lights
Hydrargyrum Medium-arc Iodide (HMI) lights are mercury vapor lights that were developed as an alternative to tungsten lighting. They are common in film and television as large (5K or 10K) lights. Because they are daylight balanced (5,600K), HMIs are often used to illuminate exteriors. They require a ballast, or transformer, to produce the high voltages they need to function. Small portable HMI kits do exist, but they are expensive. In general, HMIs are not common for documentary production.
Reflectors
Reflectors are not lighting units per se, but we discuss them here because, as an illumination tool, they are as essential to a cinematographer as any lamp. Reflectors are light weight, portable surfaces that bounce light. Reflectors usually have two sides with different reflective qualities: a diffused surface (white) that simultaneously bounces and diffuses a hard light source, and a specular side (silver or gold) that reflects and maintains the hard quality of the source. While reflectors are available as hard show cards or bounce boards, the reflectors typically used in documentary production are flexible ones with a metal band sewn into fabric with a reflective coating. These reflectors can be folded into a fraction of their full diameter and whipped out as needed, for instance to fill shadows in a daylight exterior interview (Figure 11.18).

■ Figure 11.18 This daylight exterior shot under the hot African sun (and far from any electricity) gets much needed fill from a reflector. Pictured here is cinematographer Mike Kambalame for Story Workshop’s production Okoma Atani (2010).
Camera Filters and Lighting Gels
Camera filters and gels are key tools for subtle control of your lighting. They are both used to change the quality and/or color of light in a scene. The fundamental difference between the two is that camera filters are glass or hard plastic elements mounted on the camera, in front of the lens, to change the quality of the light from all sources entering the camera. Gels (short for gelatin from which they were originally made) are sheets of material that are used in front of a lighting unit (or over a window) to alter the quality and/or color of that particular light source before it falls on the scene.
Altering Light with Filters
Camera filters are mounted in front of a lens in two ways: they either screw directly onto the front of the lens or are held in a matte box. Filters that mount directly onto the lens are usually glass in a metal mounting ring (Figure 11.19, left). These filters come in a wide variety of sizes to match the diameter and mounting threads of various lenses. Matte boxes attach to the front of the camera and extend out from the lens to prevent lens flare (Figure 11.19, right). They have filter holders and slots for holding several rectangular glass or plastic filters independent of the lens. Different matte boxes are designed to hold specific filter sizes (2 · 2, 3 · 3, or 4 · 4 inches). Make sure that you have the proper size filter for your particular matte box.


■ Figure 11.19 A filter that screws directly onto the lens (left), and a matte box that holds filters and is mounted over the lens housing (right). Matte box photo by Curt Pair.
There are literally hundreds of different filters on the market that accomplish a wide range of different effects. Camera filters break down into three broad categories: color correction, exposure control, and special effects. It’s not possible to cover every filter available, but the following sections cover a few of the most common and indispensable filters for filmmaking.
Neutral Density Filters

■ Figure 11.20 Neutral density filters cut the amount of light entering the lens without changing its color. ND 0.3 (left) reduces light by one stop and ND 0.6 (right) cuts the light by two stops.
Neutral density filters (or ND filters) are gray-tinted filters that simply cut down the amount of light entering the lens (Figure 11.20). Filter manufacturers have different systems for indicating the light blocking capabilities of a specific filter. In the system used by Lee and Tiffen, a filter capable of blocking one f-stop worth of light (cutting the light in half) is a ND 0.3 filter. Hoya and B+W use the term ND2 for the same filter. For simplicity, we will stick with the former system.
ND filters are exposure control filters and do not affect color at all. An ND 0.3 filter cuts the amount of incoming light in half, or one full stop; an ND 0.6 cuts down two stops, and an ND 0.9 cuts down three stops. ND filters are useful if you find yourself shooting on a sunny day, and in fact many cameras will give you a warning when you need to add an ND filter. This filter is also used when you want to decrease your depth of field without changing your lens focal length, as it allows you to decrease your f-stop, or open your aperture (Chapter 9). This is especially important when shooting with a smaller image sensor, as the depth of field tends to be very deep. Many cameras have ND filters that are built-in and accessible either through menus or on a filter wheel behind the lens (Figure 8.31). Also popular are variable ND filters, which can be set in increments from 1 to 8 stops, allowing for precise control.
Diffusion Filters
Diffusion filters are special effect filters used to soften an image while maintaining sharpness of focus. Exactly how and how much they soften the image depends on whether the filter uses a white or black diffusion effect, as well as on the degree of diffusion. White diffusion creates a soft haze, from the subtle refracting of white highlights, and black diffusion softens the image by delicately flaring the shadow areas of the image. The degree of diffusion is designated by a scale beginning with the fractions 1/8, 1/4, and 1/2, and then going from 1 to 5. In documentary, diffusion is mostly used to soften wrinkles on an interview subject. Some shooters feel that the unfiltered digital video image can be excessively harsh and will routinely employ a very light, black diffusion to slightly soften the image’s “electronic” edge.
Polarizing Filters
When light reflects off shiny surfaces, specifically nonmetallic surfaces like glass or water, it scatters and vibrates in many directions, causing glare. A polarizing filter reduces or eliminates the obstructing glare, as well as reflections coming off transparent surfaces like glass and water. A polarizing filter is made of either one glass element that rotates, or two elements, where one is fixed and one rotates. Each element is manufactured with tiny parallel lines. These lines block light that is off-axis, allowing only light waves that are parallel to one another to pass through the filter (Figure 11.21).
Polarizers offer a great amount of creative control because you can easily see, as you rotate the filter, exactly how much glare and reflection you are eliminating (Figure 11.22).
Polarizers are also handy for darkening blue skies to make cloud formations stand out vividly. For this use, the angle of the sun to the filter is important. Darkening blue skies works best when the sun is not directly overhead. This means the effect works better in the morning and later afternoon. A polarizer does not alter the color tonalities of your scene, but it does take a toll on exposure. Most require a compensation of 1.5 to 2 stops. Also remember that polarizers work through the precise angles between the light and filter elements, so moving the camera by panning or tracking can visibly change the polarizing effect.

■ Figure 11.21 When shooting shiny, transparent surfaces, the reflected and direct light travel together toward the lens. To stop the reflected light, the polarizer is rotated until it blocks the off-axis light rays, allowing only direct light to pass through.

■ Figure 11.22 Glare on the window makes it difficult to see through (left). Turning the polarizing filter shows the gradual reduction in light reflecting off the window’s surface (center). At its most effective angle, the polarizer can almost completely eliminate glare (right).
Graduated Filters
Graduated filters incrementally introduce a filter effect into only a portion of the frame, leaving the rest of the frame unaffected (Figure 11.23). A graduated ND filter, for example, may incorporate a noticeable ND effect at the top of the frame to darken the sky, but the ND effect will taper off and disappear by the center of the frame, leaving the bottom half of the image completely unchanged.

■ Figure 11.23 Graduated filters gradually introduce a filter effect into a portion of the frame. Shown here are (left to right) ND 0.9, ND 0.6, and ND 0.3 graduated filters.
Graduated ND filters are popular because they reduce the contrast range in an image by bringing down the brightness of the sky so that the exposure more closely matches that of a shaded area on the ground. Graduated color filters are also popular, especially those that affect the color of the sky. Examples include the sunset graduated filter, which warms up the sky with an amber tint, and the blue graduated filter, which deepens blue skies. Color graduated filters need to be used with some caution, as they are not the most subtle effects you can apply to your image.

■ Figure 11.24 Gels come in hundreds of colors and intensities. (See plate section for color.)
Altering Light with Gels
While filters are mounted on the camera, gels are positioned in front of a specific light source to change the color or quality of that particular source’s output. There are several different manufacturers of lighting gels offering literally hundreds of different colors, shades, and effects to choose from (Figure 11.24). In documentary, cinematographers use these gels extensively to change the color temperature of light in a scene, as well as to flatter a subject or “perk up” a background.
Color Conversion Gels
Color conversion gels are used to change the color temperature of a light source, and they come in two basic flavors: CTO for “color temperature orange” (Figure 11.25, right), and CTB for “color temperature blue” (Figure 11.25, left). CTO gels convert daylight (5,600K) into tungsten color temperature light (3,200K).
Full CTO converts 5,600K light directly into 3,200K, but 1/2 blue CTO converts 5,600K daylight to 3,800K (a little bluer) and 1/4 CTO converts 5,600K daylight to 4,500K (even bluer). These gels allow the cinematographer a high degree of control in shifting the color tonalities of light sources. These are commonly put over windows to bring the daylight into the range of tungsten lighting.

■ Figure 11.25 CTB filter being placed on a light to make it “daylight” (left). CTO filter being placed on a window to convert the daylight to “tungsten” (right). (See plate section for color.)
CTB gels convert a tungsten light source to daylight color temperature and are mostly used directly in front of lighting units. Full blue converts 3,200K light into 5,600K, but CTB also comes in various conversion degrees. For example, 1/2 blue CTB converts 3,200K to 4,100K (less cool) and 1/4 CTB converts tungsten to 3,500K (even warmer).
Color Conversion Gels and Mixed-Lighting Situations
CTO and CTB gels are indispensable for situations in which you have lighting sources with different color temperatures in one location. Let’s say you are lighting a subject with tungsten light (3,200K) but there is a window with daylight streaming in (5,600K) close-by. If your camera is balanced for daylight, the subject will look as orange as a carrot. If you balance for tungsten, the window light will turn an unnatural blue. What to do?
There are two ways you can balance the light in this situation. You can cover the window with orange gel and white balance the camera to tungsten light, and all lighting sources will be tungsten color temperature. However, the difficulty with this approach is that it’s not so easy to cover a window with gel, especially a large one. Lining windows requires that you carefully tape the gel to the window frame, making sure that there are no wrinkles that will refract light and reveal the gel. It can certainly be done, but it takes time and practice.
The other, more common, option would be to cover your tungsten lights with blue gel (CTB), so that they match the color temperature of the sunlight, and white balance your camera to daylight (Figure 11.26). Although putting a gel in front of a light is easier, there are drawbacks to this approach, too. Using a gel on your lights cuts the light intensity and creates greater contrast between the tungsten areas and the bright sunlight areas.
Both solutions work, though, so choosing one depends on your specific situation. The principle to remember is to use gels to change the color temperature of one source to match the other.
Also, remember that 1/2 and 1/4 color conversion allow you to subtly control the color. Let’s say the image you are shooting is a winter scene and you want it to feel like it’s cold outside but warm inside the house. You might choose only a half blue gel for the interior lights, which would convert them only partially to daylight, maintaining the warmth of your interior sources.
Neutral Density Gels
Like ND filters, neutral density gels cut down the intensity of a light source without affecting the color. ND 0.3 cuts intensity by one stop, ND 0.6 by two stops, and ND 0.9 by three stops (Figure 11.23). Because these gels are very often used on windows to moderate the intensity of light pouring into interior scenes, you will often find ND mixed with CTO in a single gel. A CTO ND 0.6, for example, will change the color temperature of the daylight to 3,200K and will reduce the intensity of the window almost three stops.
■ Figure 11.26 Shooting with a camera balanced for daylight will make the daylight from the window appear white, while the light from the tungsten light will look orange (top). Placing a CTB gel over the tungsten light changes it to daylight (middle), matching the color temperatures of all sources (bottom). (See plate section for color.)
in practice
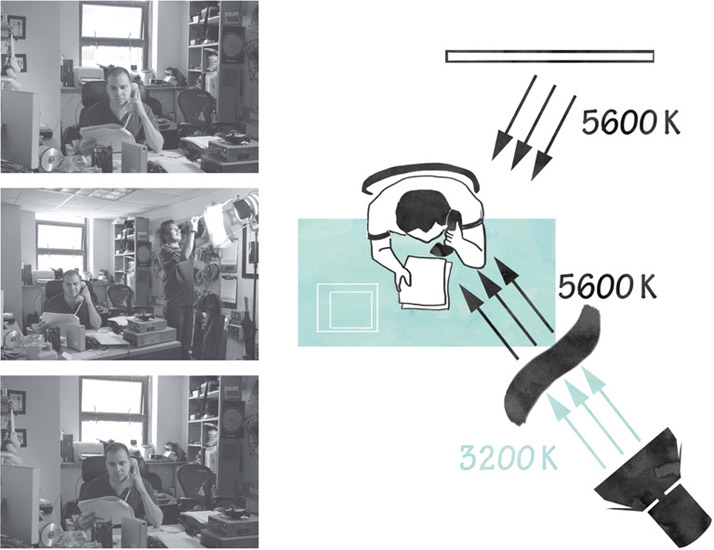
■ Mixing Light Temperatures
Sometimes, rather than putting gels on lights or over windows to even out the color temperature of the light sources in a scene, cinematographers choose to keep the color temperature of the various lights as they are. In the example below, from Christian Frei’s War Photographer (2001), the cinematographer has lit the subject (Christiane Amanpour) with artificial lights (3200K) while balancing the camera closer to the color temperature of the daylight outside (5600K). The resulting difference helps pull Amanpour out of the background and gives her a warm intimate feel (Figure 11.27).

■ Figure 11.27 Using mixed light for aesthetic effect in War Photographer. (See plate section for color.)
Diffusion Media
Diffusion media are used to soften the output of a hard light source, like an open-face spotlight. Diffusion can be used as a single layer or doubled or tripled to increasingly soften the light. Using a spotlight with diffusion creates light that is less harsh than a spot, but still more controllable than that of a soft light. The trade-off is that diffusion can cut light intensity drastically, but this can also be an advantage. Diffusion is not called a “gel” because there are many different kinds of diffusion, made from a variety of materials. Tough spun (made of spun glass), tough frost, grid cloth, and tough opal are some common diffusion materials. The designation “tough” on any gel indicates that it is heat resistant and can be placed on lights—with caution, of course (Figure 11.28). Like color conversion gels, diffusion comes in varying strengths, with full diffusion cutting your light exactly one f-stop, and half and quarter diffusion offering gentler effects.

■ Figure 11.28 A layer of tough frost diffusion attached to barn doors to create a softer light.
Basic Grip Gear
Documentary productions rarely have enough crew for a separate person to deal with lighting. Lighting falls under the responsibilities of the cinematographer, but whether you are the director, the sound recordist, or the associate producer, you may be called on to chip in. For this reason, everyone on set should have a basic understanding of the tools of the lighting trade. There is too much specialized grip equipment to cover all of it here, but these are some of the most commonly used grip tools you’ll encounter on documentary productions.
Stands
Light stands are what we usually position lighting units on, especially in field production. They are collapsible three-legged stands that have a telescoping center pole to raise and lower the light as necessary. C-stands are your all-purpose holder, used for hanging, holding, or positioning flags, scrims, or just about anything that needs hanging (Figure 11.29). They are heavy and awkward to transport, but their flexibility makes them indispensable in many situations. Combined with a gobo head and gobo arms, C-stands become infinitely adjustable and versatile.

■ Figure 11.29 C-stands are all purpose holders used on film shoots. Here a C-stand is shown supporting (from left to right) a cookie, a scrim, and a flag.
Gear for Light Control
When lighting, we want to be able to carefully control where the light falls and where it does not. Blocking light to keep it from falling where you don’t want it is called trimming the light, and it’s easy to do with hard light. Soft light, on the other hand, is difficult to trim. Because its light rays scatter in all directions, soft light will not create the sharply defined shadow edge necessary for precise trimming. Light that falls where it should not is called spill light, and soft light tends to spill.
Barn doors are a standard addition to almost every hard lighting unit and are designed to help control where the light falls, and to control spill. Barn doors fit onto the front of the lighting unit and consist of two or four foldable black metal leaves (Figure 11.30). When precise trimming is called for, we often use flags, which are free-standing frames covered with black felt, to sharply define where the light falls and where it doesn’t.
Various other tools are used to cut the amount of light without using diffusion. Scrims fit right behind the barn doors on a light to reduce the intensity of the light. Scrims are wire mesh screens that fit directly in front of the lighting unit. The denser the wire mesh, the more light it cuts. A single scrim cuts the output of the unit by half a stop and a double scrim cuts it by one full stop. You can use multiple scrims to achieve the intensity you need.
Nets are netting material stretched across a frame and, like flags, are usually supported by C-stands. Nets are used purely to cut the intensity of light, by one, two, or three stops. Obviously you can reduce the intensity of light simply by moving it, but by placing the net over part of the beam, you can cut intensity on only a part of the scene. Silks are like nets, but the material is partly opaque, which not only cuts the light intensity, but diffuses it as well. Gobo is the general name given to anything that comes between a light source and the scene and throws a shadow pattern. One specific kind of gobo is a cookie (short for cucoloris), which is metal or foam core that has had shapes cut into it to create patterns on a wall, floor, or other surface (Figure 11.29).

■ Figure 11.30 Barn doors are used to keep light off areas of your set where you don’t want light. They come on both Fresnels and open-faced spots. The hexagonal wire is for safety, not light control.
Clamps
There are all sorts of clamps used to hold things on a film set, but there are two that can be of special use when it comes to placing lights. Gator clamps are heavy-duty spring clamps with rubber teeth to ensure a very tight grip on things like doors and tables, and mafer clamps are designed to lock onto pipes. Both clamps are built with posts to which you can attach a small light. These clamps allow you to position or hide small lights by attaching them to a door, a bookcase, or any place you can find a grip.
Miscellaneous Grip Gear
A few of the other important items in a grip package would include the stinger, which is the on-set name for an extension cord, splitters for plugging multiples devices into one outlet, and 3-to-2 adapters for plugging three-pronged plugs into two-pronged outlets. Be careful when doing this; see Chapter 16 for more on electrical safety. Sandbags are placed over the legs of light stands to keep them from toppling over. One indispensable item is gaffer’s tape. Gaffer’s tape rips easily into any width and length strip you need, it holds well, and it leaves no adhesive residue behind. It is especially useful for taping down cables (called dressing cables) to prevent people from tripping (Figure 11.31). Do not substitute commonduct tape for gaffer’s tape, even though it is much less expensive. Duct tape is designed to be permanent and will leave gum all over your equipment and anything else it touches. And of course, don’t forget a pair of gloves, preferably leather that won’t burn. A typical bulb has a surface temperature measured in the thousands of degrees.

■ Figure 11.31 Securing cables with gaffer’s tape to prevent people from tripping on them.
Never set up a light, lay a cable, add a gel, or plug in a stinger without considering all the safety issues involved. In the context of documentary filmmaking, where you are often setting up equipment in locations full of nonprofessionals, careful placement of lights, cables, and stands is extremely important.
The Ditty Bag
A ditty bag is a filmmaker’s general utility tool kit and is filled with items you might find useful on the set. Ditty bags are built over time, but here are a few standard items to get you started:
- Lens cleaning fluid/tissues
- Jeweler’s screwdriver set
- Screwdrivers: various sizes, regular, and Phillips
- Pliers: regular and needle nose
- Sharpies
- Allen wrench set
- Canned air
- AC plug adaptors (three-prong-to-two-prong with ground loop)
- Tape measure
- Cable ties
- Tweezers
- Extra batteries (AA, 9-volt, and whatever your microphones use)
- Pencils and small note pad
- Small scissors
- Flashlight
- Leather grip gloves
- AC circuit tester
- Leatherman tool or Swiss Army knife
With all of these tools, there is really only one way to gain expertise. Even with the best kit in the world, documentary filmmaking is a continuous series of improvisations and unplanned lighting situations. Practice is the best guide, but in the next chapter we will explore some common approaches that can help you get started.