Perched high on rooftops and cornices, gargoyles silently watch the world below, protecting their buildings by scaring away evil spirits with their grotesque features. Because of their monstrous appearance, gargoyles are often misinterpreted as evil creatures, rather than staunch guardians. In mythology, gargoyles either turn to stone at will or by force in daylight, but come alive at night. You can draw a gargoyle in its stone or “human” form. If you want to draw a “human” gargoyle as in this project, consider adding horns, fangs, claws, heavy brow ridges, beaks, wings, tails, and hooves. Look to existing animals for ideas—the more exotic the animal, the better!

Architectural Differences In architecture, the term gargoyle refers to carved water spouts that direct excess water off rooftops (left). Non-functional statues of these beasts are called “grotesques” (right). Try your hand at drawing both!

Step 1 Using an HB pencil, I draw the line of action and roughly indicate the figure, including the tail and wings. I want this gargoyle to be crouching as if he’s lurking on the edge of a rooftop with his wings raised above him, so it’s important that I establish where his body and wings will be from the start.
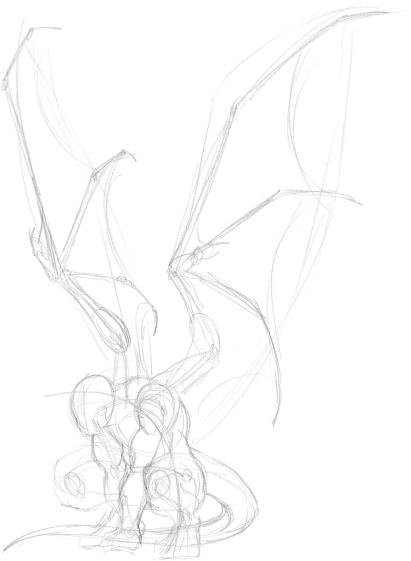
Step 2 Now I use basic shapes to develop the forms. I want to emphasize that the figure is hunched over, so I place the head low on the body and make the shoulders quite bulky. He’s shaping up to be pretty muscular, so I’m generous with the muscles in the wings for consistency. I like where I’ve placed his wing “fingers,” so I indicate the curve of the wing membrane stretched between them. Note that the gargoyle’s feet are slightly larger than a human’s would be; they’re more like the paws of a lion or tiger.
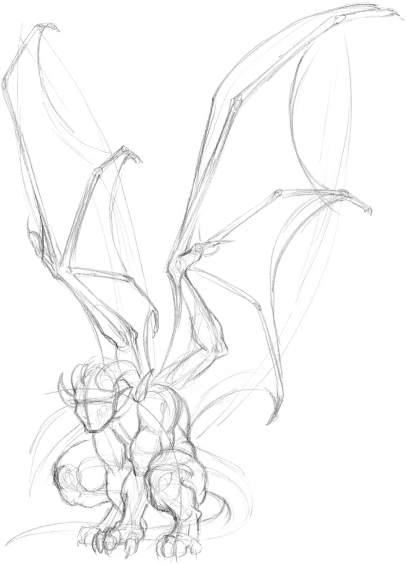
Step 3 Once I’m happy with the basic shape of my gargoyle, I further define the form by indicating specific muscles and adding details like fingers, toes, horns, and a suggestion of the hair. I also sketch guidelines on the head to determine where to place the eyes.

Step 4 After cleaning up a few of my messier sketch lines, I use an HB pencil to draw most of the facial features, including the eyes, nose, mouth, shaggy eyebrows, and a long patch of hair between a pair of spikes on the chin. I also add the pointy ears and a small earring. Next I draw the claws on the feet and wings, the ridges on the horns, and the spikes on the tail.

Step 5 Now I use a light table to help me trace the gargoyle onto a clean sheet of paper. It’s a good idea to make any compositional changes at this stage.

Step 6 Still using the HB pencil, I add shadows with light hatching, just to establish the areas of light and shadow. Later I will fill in areas I want to be darker, such as the hair and the length of tail behind the body.
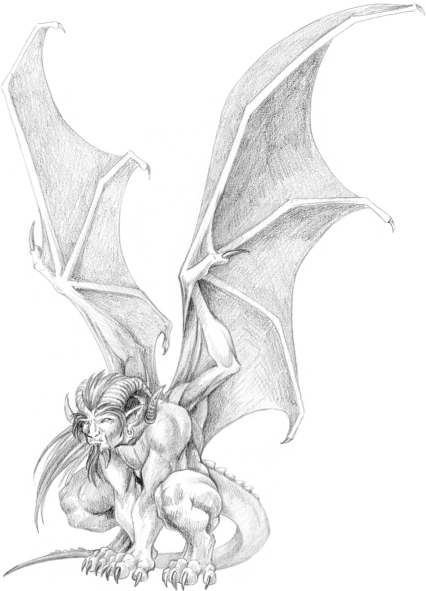
Step 7 Now I use a softer 2B pencil to go over the areas I want to be darker, such as under the folds of the wings, the backs of the thighs, the area where the leg on the left bends, and the claws. I switch back to the HB to lightly blend some of the darker shadows into the lighters areas; I also shade the rest of the wings with light crosshatching and gradating. Next I shade the hair and goatee, using long strokes that follow the growth of the hair. I keep the tail smooth and without much detail so it doesn’t detract from the rest of the figure.
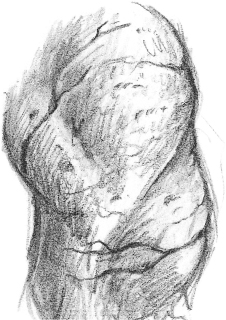
When a gargoyle comes to life, does the stone transform to flesh? Or does its skin simply look like stone? As the artist, that decision is entirely up to you. Creating the appearance of stonelike skin may seem daunting. Is it enough to shade the entire figure evenly so it appears gray? Perhaps. But by closely examining actual statues and various types of stone such as marble or granite, you’ll find many fine details and texture qualities that can lend realism to your gargoyle drawings. A gargoyle with scars might look like it has cracks in its hide, as in this example of a shoulder and bicep. Scratches, pitting, veins of different values, and even weather discoloration can spice up a gargoyle’s appearance.

Step 8 I continue using the 2B pencil to darken some shadows; then I blend them into lighter areas with the HB. Now I use a 4B pencil for the darkest areas, especially underneath the fold of the wings, the ridges of the horns, the hair, and the claws. When darkening the claws, I allow some of the lighter shades and even the white of the paper to show through in a narrow band running the length of each claw. This produces a bright highlight that contrasts with the slick black, making the claw appear shiny. Now I concentrate on the wings, creating their rippled appearance by hatching and lifting out highlights with a kneaded eraser. I also avoid blending my strokes in the wings. Finally, I use the kneaded eraser to lighten the wing on the left, pushing it back into the picture to create depth and make the gargoyle’s wingspan look truly grand.